A-122: DIY - 105k Service: Timing Belt, Water Pump, Spark Plugs, Thermostat *PICS*
#1
Thread Starter
Chapter Leader (Southern Region)
Joined: Sep 2008
Posts: 88,888
Likes: 11,843
From: Waffles, BU
A-122: DIY - 105k Service: Timing Belt, Water Pump, Spark Plugs, Thermostat *PICS*
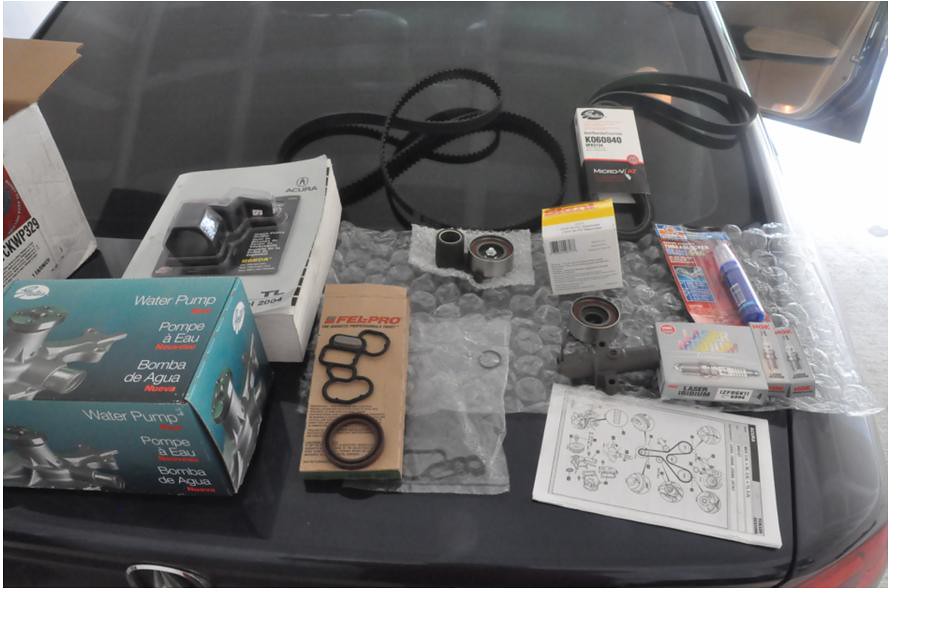
Here's a basic DIY guide for you guys considering on doing the 105k service yourself. Below will be the basic list of materials and tools you need to complete the job. Feel free to add anything that I may have omitted in the writeup.
A few notes about the task, find at least a half empty garage to do it and give yourself the weekend to complete it. Start early Saturday morning and if you're lucky and everything goes right, you're done early Saturday afternoon.. If not.. late Sunday Afternoon.
Most importantly, I take no responsibility if you attempt this DIY and fuck something up.
Parts
Timing Belt
Drivebelt
Water Pump
TB Adjuster
TB Auto Tensioner
TB Idler Pulley
170F Thermostat
NGK Laser Iridium plus #6994
Brake Cleaner
Anti Seize
Thread Locker
PB Blaster
2gals Coolant 50/50 (silicate free - Honda Type 2 / Prestone)
Shop Towels
Tools
Hydraulic Jack
Jack Stands
Wood Block
At least a 2' Breaker Bar (Can be rented at Autozone for free, or bought at AZ or HF for ~$20)
Impact Sockets & Extensions - CP 19mm
10mm, 12mm, 14mm, 17mm socket set, deep neck and normal
10mm angled / elbow wrench, standard metric wrench set
Torque Wrench at least 200 ft lb spec (Can be rented at Autozone for free)
Mirror, Magnet, Metallic tray, Gloves (optional but very useful)
Pan to hold used coolant
Gloves
Prep
Engine cool
Dry covered secure place - garage
1. Remove all covers, unplug battery, raise front end and put up on jacks, remove front pass wheel, remove lower front splash guard.
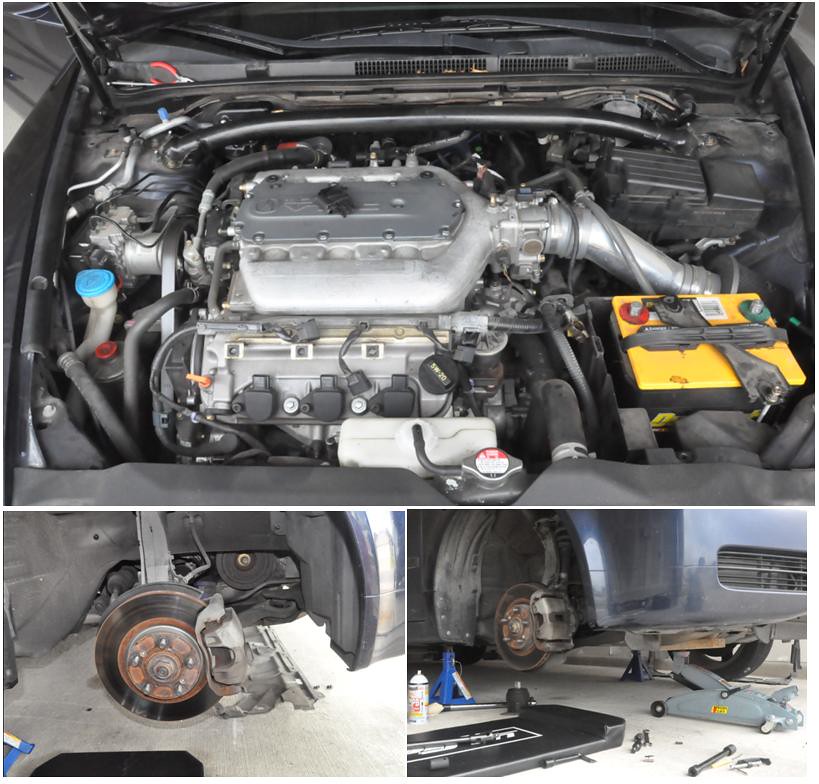
2. Remove Rad Res, Remove spark plugs, place coils in a safe location - helps when turning Crank and cams to leave them out until after TB job.
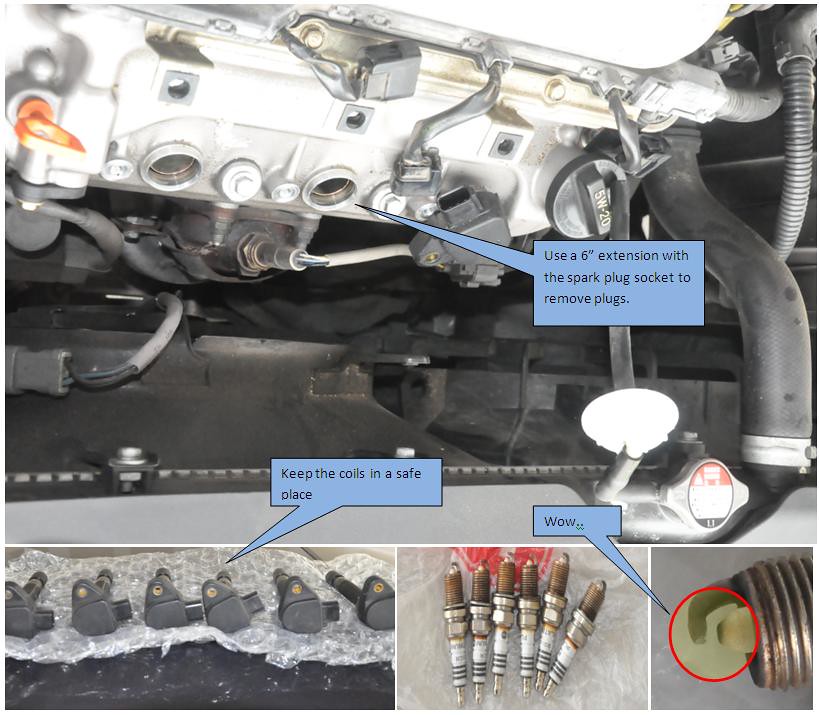
3. Unhook PS res and tuck it out of the way, Remove drive belt, remove belt tensioner (learned the hard way)

4. Place jack with wood block under oil pan to support engine, remove side engine mount bracket & side engine mount
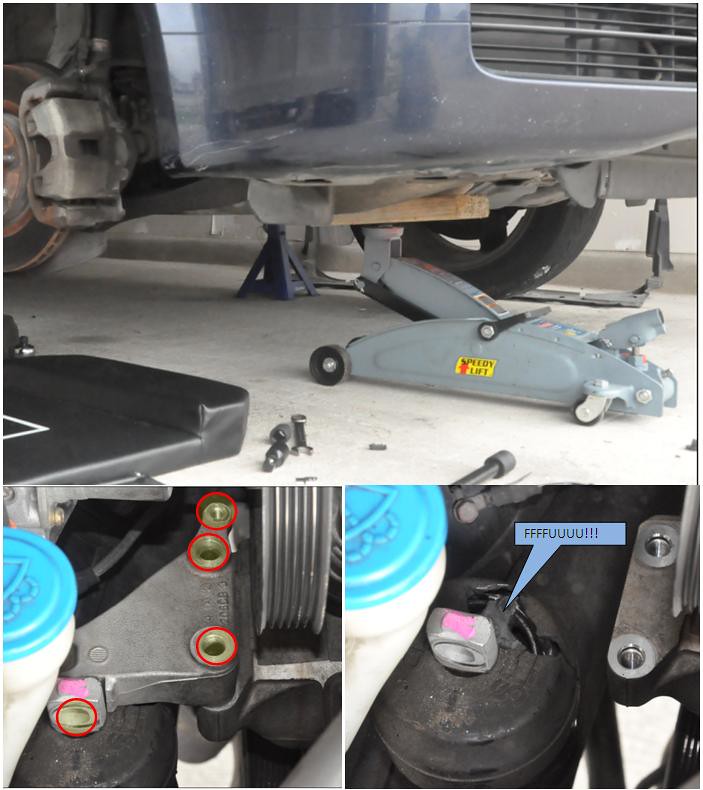
5. Turn CP to line up the CP, rear & front cam marks (1st piston TDC position) - verify front, rear might be off a little.
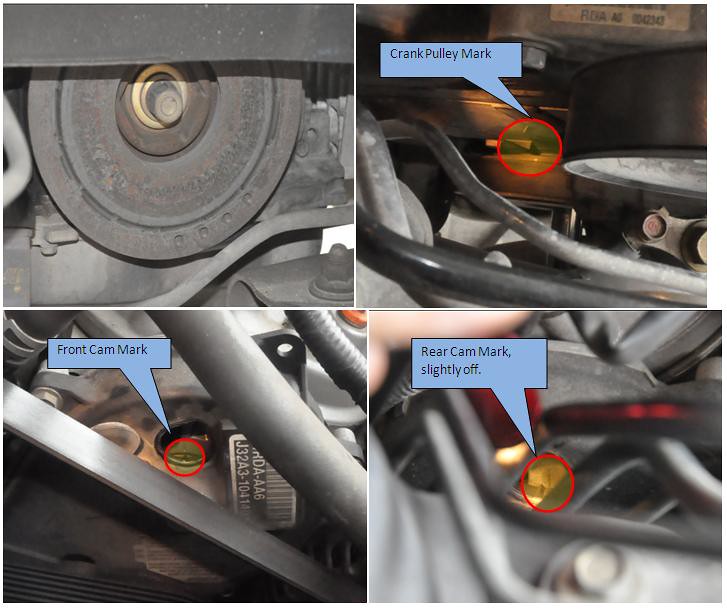
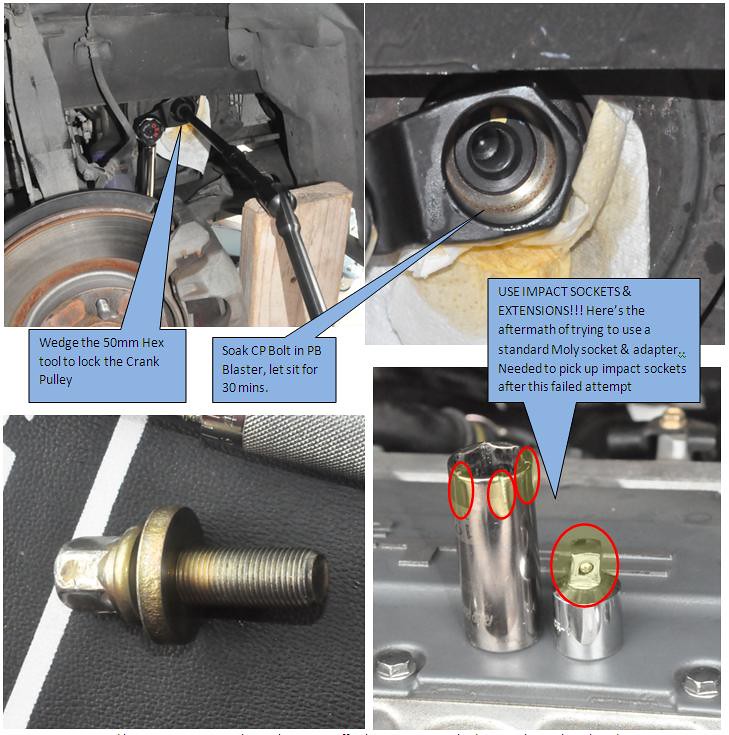
6. Remove CP bolt.. ffffuuuu!!! If you can get an impact wrench, get one. Otherwise don't be pussy, wedge the hex tool with a breaker bar & using another breaker bar, remove CP bolt. I used 2' breaker bar and impact sockets & extensions to get the job done. I soaked the bolt in some PB, not sure if helped but I got it off. It should be easy to remove after the initial pop.
7. Remove upper and lower TB covers. Don't pry the covers off otherwise you might damage the seal on the edge. Remove remaining engine mount bracket.
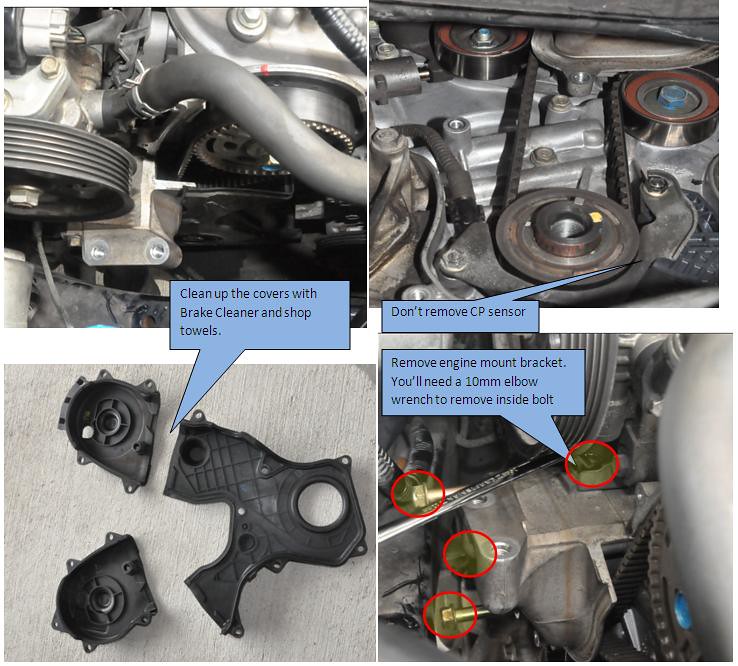
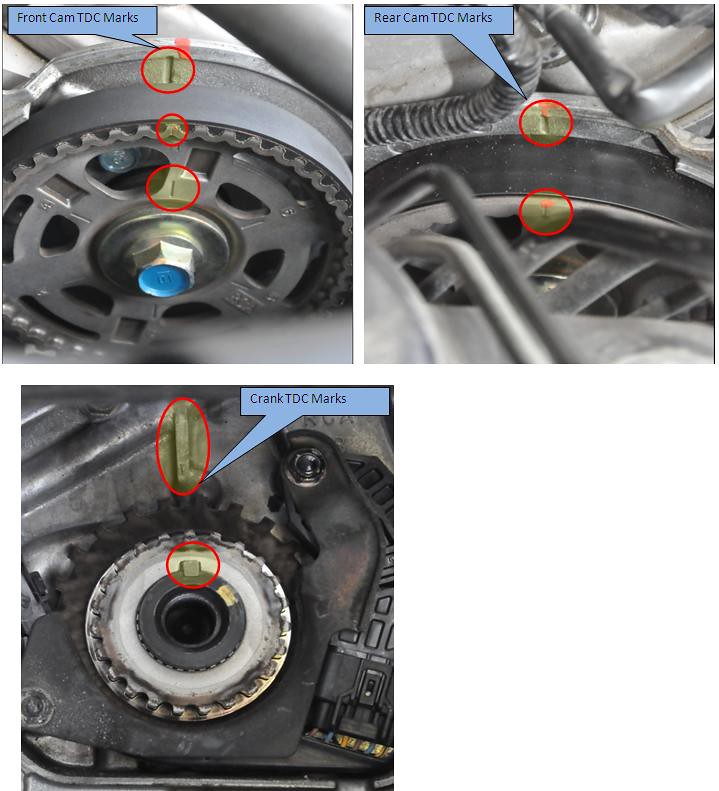
8. Get all the timing marks in spec with the body, remove idler pulley, remove CP, remove TB, remove adjuster, remove auto tensioner

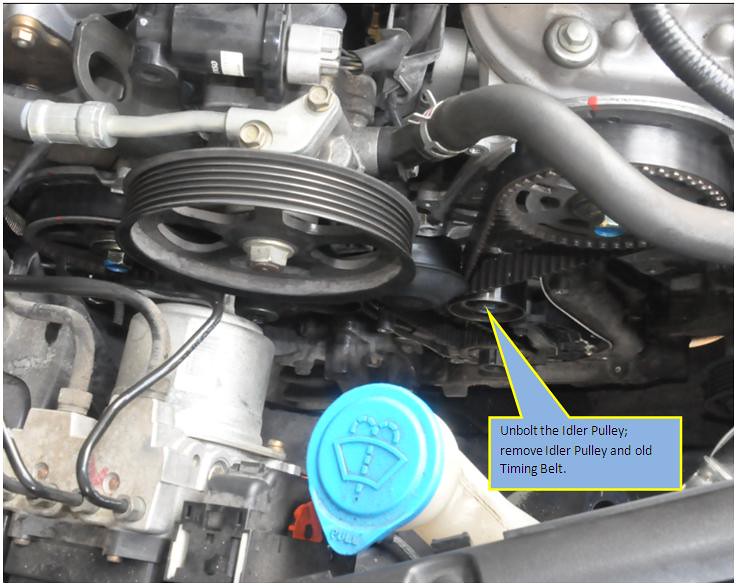
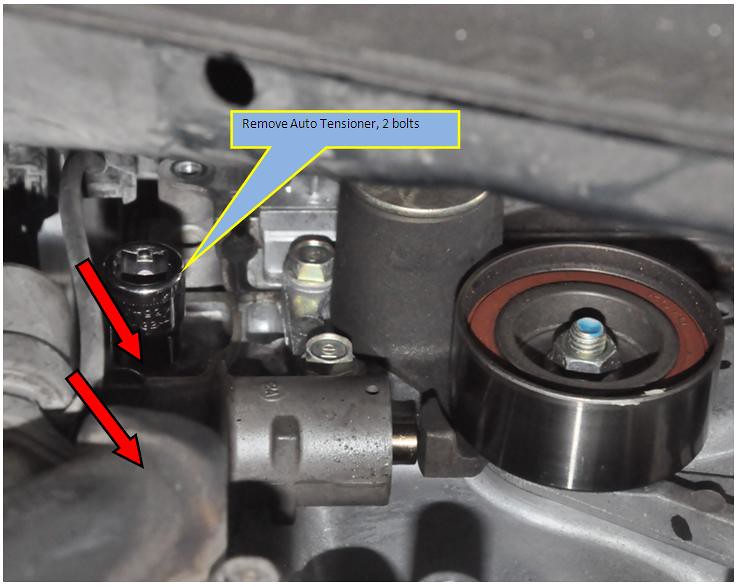
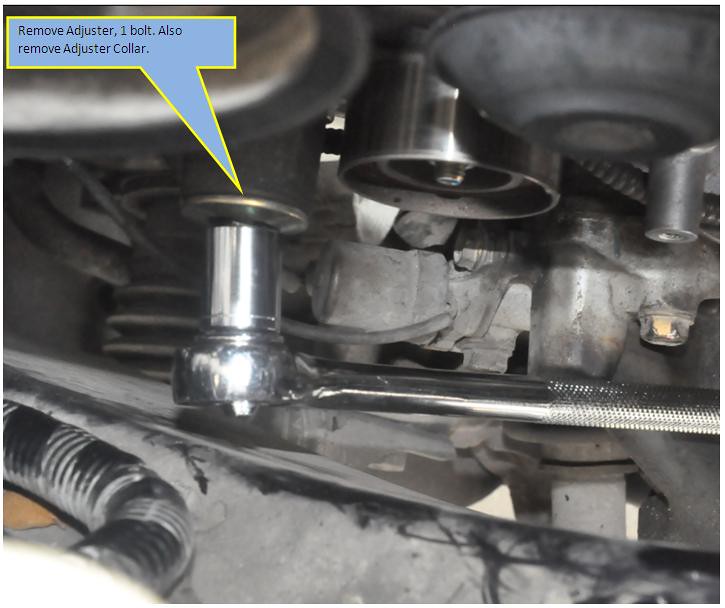
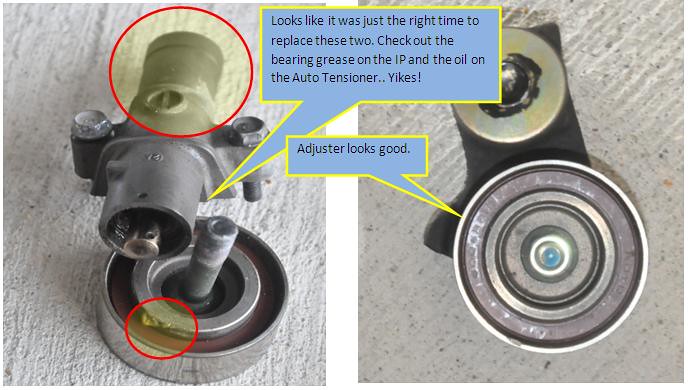
9. Open radiator cap on top and then open up bottom radiator cap to drain Coolant from rad.

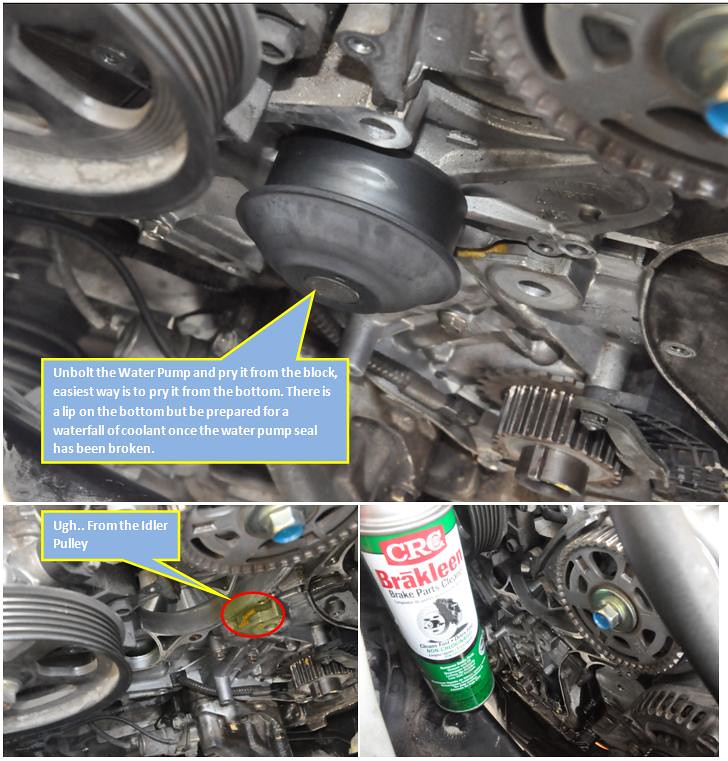
10. Don't bother with rear engine coolant drain, it's a PITA bleeder valve to get to.. I was able to open it up but not a lot of coolant came out. I consulted 240sx and he said they just pop the WP and let the coolant spill out in the shop and to spray down with Brake cleaner to evaporate everything. If you want to bleed it from the rear of the block get a 1/8” long hose leading to your fluid container and open up the valve with a wrench. If you decide to open up the WP without draining, put l long tray underneath the area collect the coolant and pack paper towels around the CP sensor assy.
Remove the Water Pump. Soak up excess coolant and spray down CP area / WP seal and Timing Belt cover areas with lots of Brake Cleaner. Wipe Clean. Make sure CP area is completely dry and WP seal areas are clean as well as timing belt cover areas.
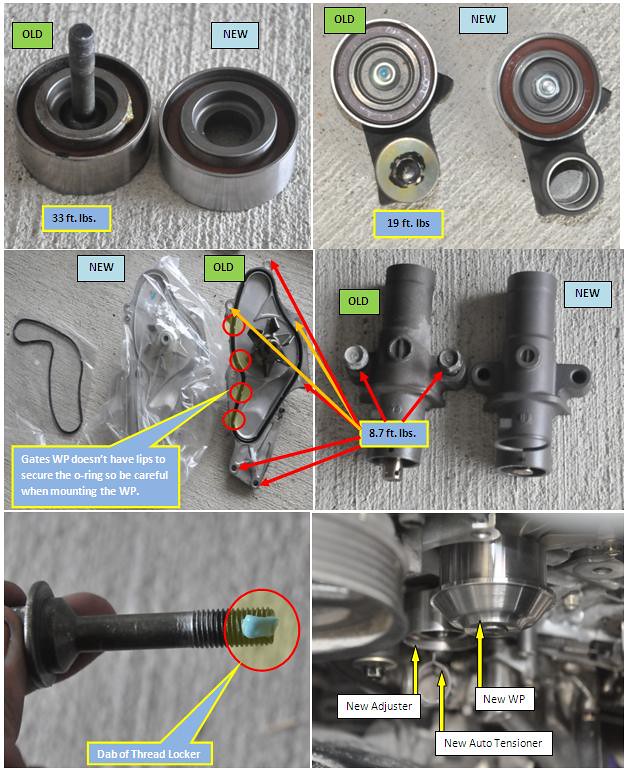
11. Install new WP, Idler Pulley, Adjuster, Auto Tensioner – tighten battery tie down against adjuster
12. Check your TDC marks and install new TB starting at the CP – counter clockwise. There should be ZERO SLACK all the way to the adjuster. All the slack should be at the adjuster / tensioner. Tighten idler pulley to spec once TB is on.

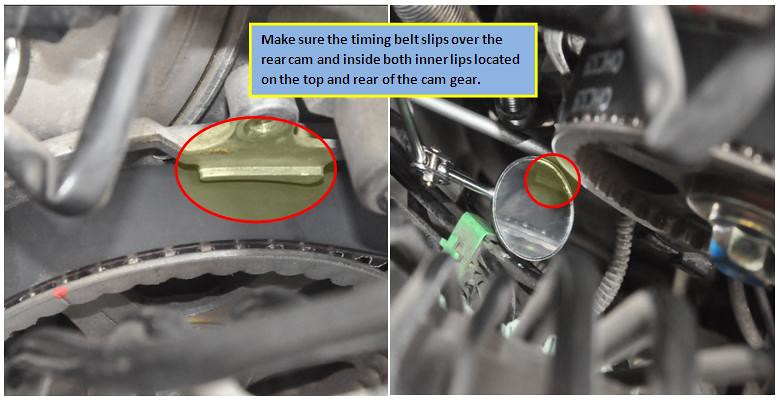
Check your TDC marks again after the belt is on
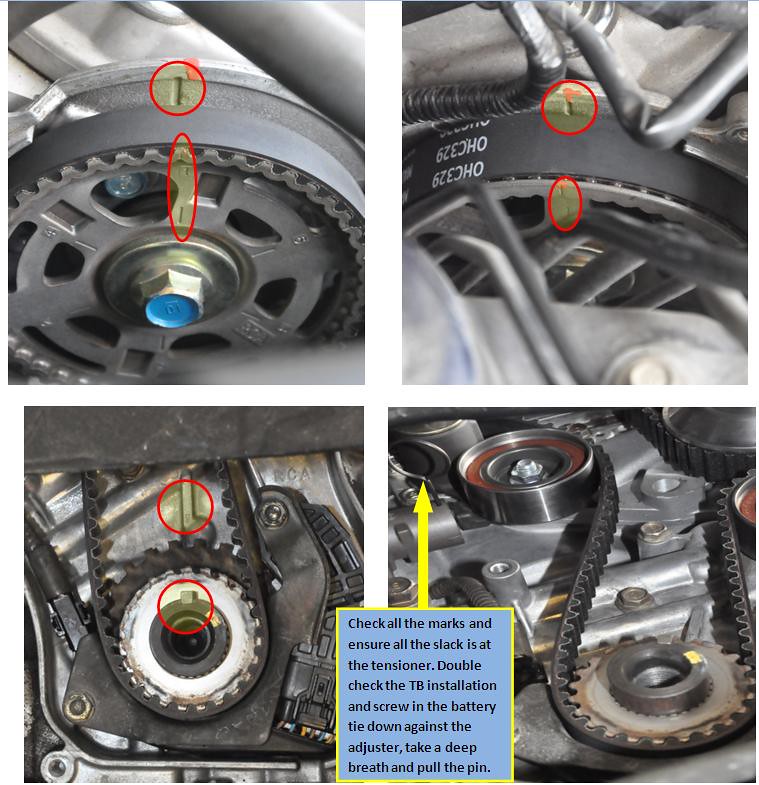
13. Clean up CP gear and shim with brake cleaner, reinstall shim (should be lip out) & CP. Clean up CP bolt and lubricate end threads and neck of CP bolt between head and washer with fresh oil. Install bolt loosely and cycle crank six times, check TDC marks (front / rear cam & CP marks). If they don't line up, redo TB installation. Wedge the hex tool again to keep the CP from moving and spec in the bolt to 181 ft.lbs.
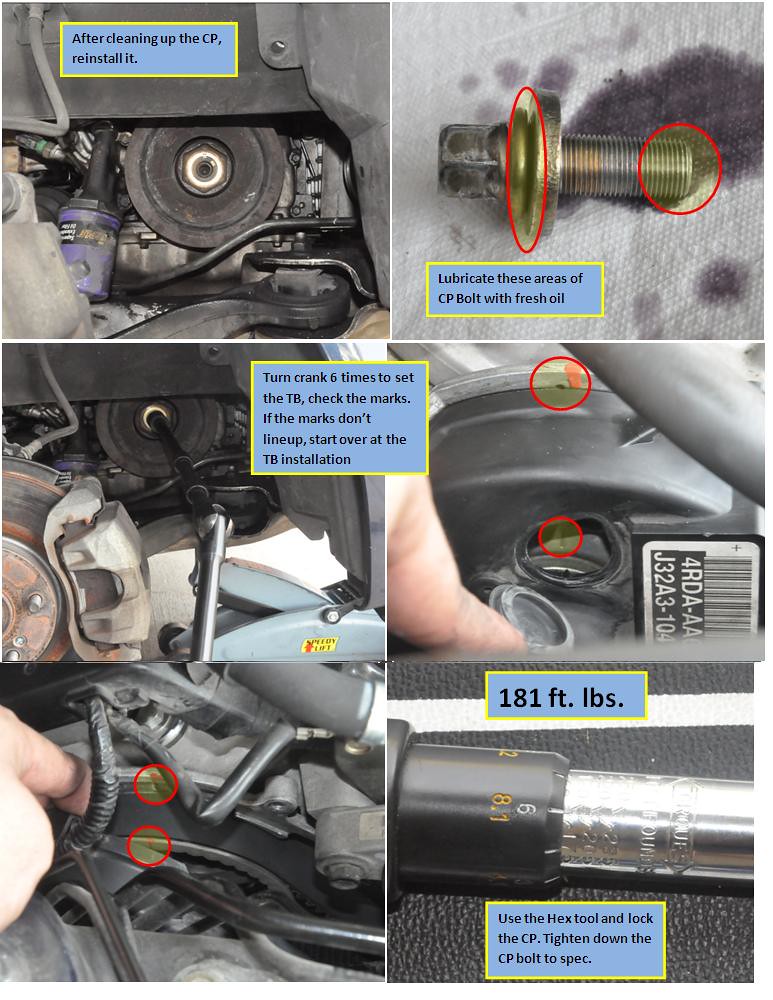
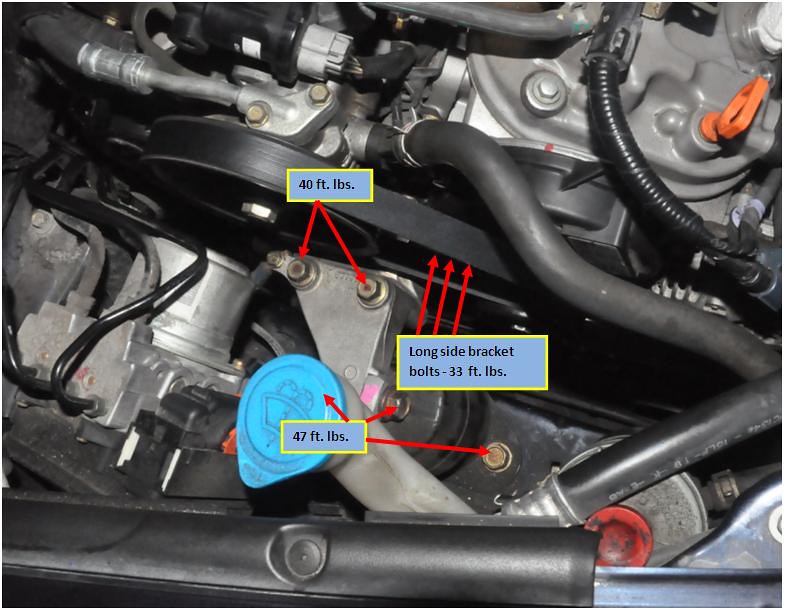
14.Replace timing covers, side mount bracket, drivebelt tensioner, check TDC marks for sanity. Remember.. check TDC marks with block not covers. Replace Drivebelt starting at CP, push tensioner back and slip top of Drivebelt over PS pump pulley. Replace Side Engine Mount, clean up securing bolts first. Torque into spec. Release jack from oil pan.
Thermostat
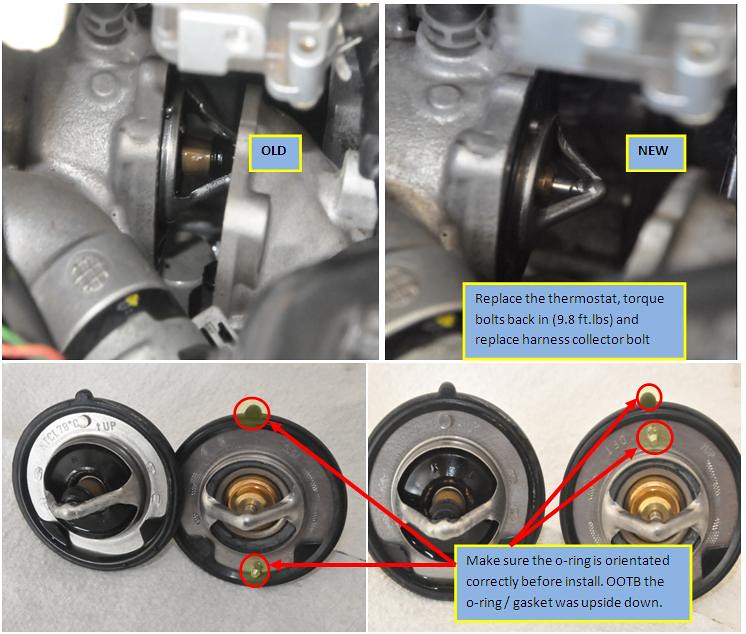
1. Remove intake, remove securing bolts on thermostat

2. Replace Thermostat with new one / new gasket.
Spark Plugs & Burping
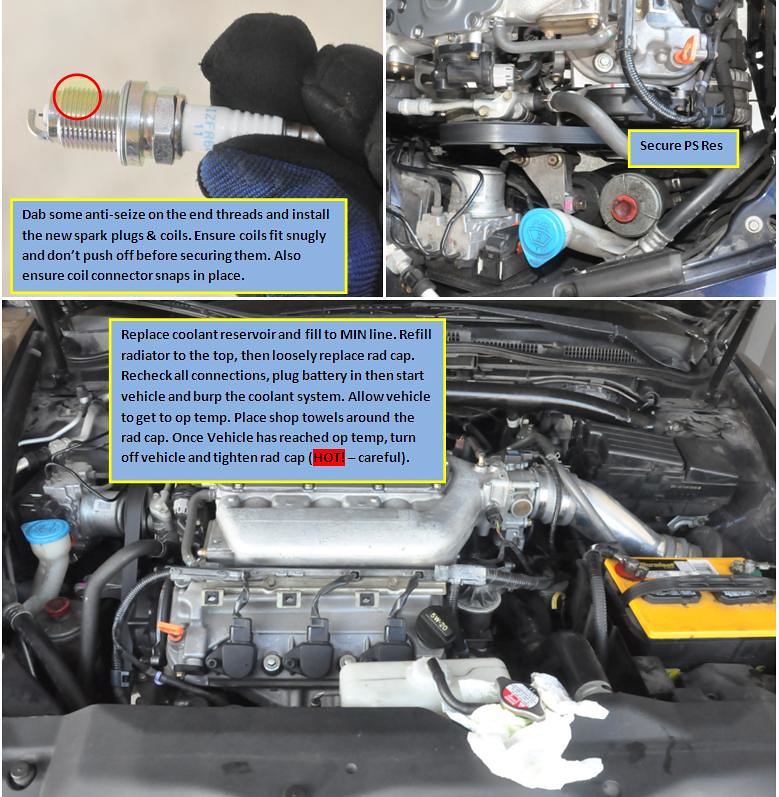
Install plugs and coils. Make sure to apply anti seize to end of the thread on the plugs. Replace Rad Res and refill rad. Do a triple check on all harness connections and look for any missing bolts, etc.. Verify everything is back together. Don’t forget to secure the PS Res. Plug in battery and tighten clamps. Start the car and let it get to op temp to burp the coolant system.
Put the car back together and on the ground then take it for a ride.. the SM says to put it on the street and keep it in 2nd then let it drop from 2.5k down as part of the relearning drive cycle but I think it's only applicable when interfacing with the HDS. Not sure..
But other than that, that's it. I'm sure I left some stuff out or neglected to mention some things but that's the basics of the 105k service. I recommend doing a valve adjustment at this time as well. It's an additional few steps after the TB removal but definitely worth it. I have new heads that have been ported with new hardware going in as well, so with my limited time I opted to skip the valve adjustment.
Special thanks to MisterFubar for selling me his Timing Kit at such a good price and 240sx acura tech for the inside tips on the job.
A few notes about the task, find at least a half empty garage to do it and give yourself the weekend to complete it. Start early Saturday morning and if you're lucky and everything goes right, you're done early Saturday afternoon.. If not.. late Sunday Afternoon.
Most importantly, I take no responsibility if you attempt this DIY and fuck something up.

Parts
Timing Belt
Drivebelt
Water Pump
TB Adjuster
TB Auto Tensioner
TB Idler Pulley
170F Thermostat
NGK Laser Iridium plus #6994
Brake Cleaner
Anti Seize
Thread Locker
PB Blaster
2gals Coolant 50/50 (silicate free - Honda Type 2 / Prestone)
Shop Towels

Tools
Hydraulic Jack
Jack Stands
Wood Block
At least a 2' Breaker Bar (Can be rented at Autozone for free, or bought at AZ or HF for ~$20)
Impact Sockets & Extensions - CP 19mm
10mm, 12mm, 14mm, 17mm socket set, deep neck and normal
10mm angled / elbow wrench, standard metric wrench set
Torque Wrench at least 200 ft lb spec (Can be rented at Autozone for free)
Mirror, Magnet, Metallic tray, Gloves (optional but very useful)
Pan to hold used coolant
Gloves
Prep
Engine cool
Dry covered secure place - garage
1. Remove all covers, unplug battery, raise front end and put up on jacks, remove front pass wheel, remove lower front splash guard.

2. Remove Rad Res, Remove spark plugs, place coils in a safe location - helps when turning Crank and cams to leave them out until after TB job.

3. Unhook PS res and tuck it out of the way, Remove drive belt, remove belt tensioner (learned the hard way)

4. Place jack with wood block under oil pan to support engine, remove side engine mount bracket & side engine mount

5. Turn CP to line up the CP, rear & front cam marks (1st piston TDC position) - verify front, rear might be off a little.

6. Remove CP bolt.. ffffuuuu!!! If you can get an impact wrench, get one. Otherwise don't be pussy, wedge the hex tool with a breaker bar & using another breaker bar, remove CP bolt. I used 2' breaker bar and impact sockets & extensions to get the job done. I soaked the bolt in some PB, not sure if helped but I got it off. It should be easy to remove after the initial pop.

7. Remove upper and lower TB covers. Don't pry the covers off otherwise you might damage the seal on the edge. Remove remaining engine mount bracket.

8. Get all the timing marks in spec with the body, remove idler pulley, remove CP, remove TB, remove adjuster, remove auto tensioner


9. Open radiator cap on top and then open up bottom radiator cap to drain Coolant from rad.

10. Don't bother with rear engine coolant drain, it's a PITA bleeder valve to get to.. I was able to open it up but not a lot of coolant came out. I consulted 240sx and he said they just pop the WP and let the coolant spill out in the shop and to spray down with Brake cleaner to evaporate everything. If you want to bleed it from the rear of the block get a 1/8” long hose leading to your fluid container and open up the valve with a wrench. If you decide to open up the WP without draining, put l long tray underneath the area collect the coolant and pack paper towels around the CP sensor assy.
Remove the Water Pump. Soak up excess coolant and spray down CP area / WP seal and Timing Belt cover areas with lots of Brake Cleaner. Wipe Clean. Make sure CP area is completely dry and WP seal areas are clean as well as timing belt cover areas.

11. Install new WP, Idler Pulley, Adjuster, Auto Tensioner – tighten battery tie down against adjuster

12. Check your TDC marks and install new TB starting at the CP – counter clockwise. There should be ZERO SLACK all the way to the adjuster. All the slack should be at the adjuster / tensioner. Tighten idler pulley to spec once TB is on.


Check your TDC marks again after the belt is on

13. Clean up CP gear and shim with brake cleaner, reinstall shim (should be lip out) & CP. Clean up CP bolt and lubricate end threads and neck of CP bolt between head and washer with fresh oil. Install bolt loosely and cycle crank six times, check TDC marks (front / rear cam & CP marks). If they don't line up, redo TB installation. Wedge the hex tool again to keep the CP from moving and spec in the bolt to 181 ft.lbs.

14.Replace timing covers, side mount bracket, drivebelt tensioner, check TDC marks for sanity. Remember.. check TDC marks with block not covers. Replace Drivebelt starting at CP, push tensioner back and slip top of Drivebelt over PS pump pulley. Replace Side Engine Mount, clean up securing bolts first. Torque into spec. Release jack from oil pan.

Thermostat
1. Remove intake, remove securing bolts on thermostat

2. Replace Thermostat with new one / new gasket.

Spark Plugs & Burping
Install plugs and coils. Make sure to apply anti seize to end of the thread on the plugs. Replace Rad Res and refill rad. Do a triple check on all harness connections and look for any missing bolts, etc.. Verify everything is back together. Don’t forget to secure the PS Res. Plug in battery and tighten clamps. Start the car and let it get to op temp to burp the coolant system.

Put the car back together and on the ground then take it for a ride.. the SM says to put it on the street and keep it in 2nd then let it drop from 2.5k down as part of the relearning drive cycle but I think it's only applicable when interfacing with the HDS. Not sure..
But other than that, that's it. I'm sure I left some stuff out or neglected to mention some things but that's the basics of the 105k service. I recommend doing a valve adjustment at this time as well. It's an additional few steps after the TB removal but definitely worth it. I have new heads that have been ported with new hardware going in as well, so with my limited time I opted to skip the valve adjustment.
Special thanks to MisterFubar for selling me his Timing Kit at such a good price and 240sx acura tech for the inside tips on the job.

The following 174 users liked this post by Majofo:
03max6spd (10-27-2016),
04ManualTL (01-19-2019),
04TLOK (07-20-2015),
05TLdcc (08-25-2013),
3.2TLc (10-10-2013),
and 169 others liked this post.
#2
takin care of Business in
iTrader: (5)
Joined: Jan 2008
Posts: 30,994
Likes: 4,732
From: Kansas City, MO
holy fuck....
great write up bro....i vouch for 3G Garage !!!
i wont even attempt to do it myself....i know am good at screwing up....and i dont wanna mess up that bad.....but none the less great write up for someone who is a little more mechanically inclined than me
great write up bro....i vouch for 3G Garage !!!
i wont even attempt to do it myself....i know am good at screwing up....and i dont wanna mess up that bad.....but none the less great write up for someone who is a little more mechanically inclined than me

The following users liked this post:
joejsn (08-29-2014)
Trending Topics
The following users liked this post:
LongLurkerTL12 (04-06-2020)
#9
Check your TDC marks again after the belt is on

This is a great write-up!
I just did this on my CLS-6 and it is exactly the procedure I followed, except on the CLS it is helpful to loosen the PS pump and position it up and out of the way.
The only thing I would note is that the long timing marks on the cam pulley spokes can ONLY be utilized initially when the TB covers are ON the car. The portals on the TB covers provide a reference line to use with the cam pulley spoke line when TDC being determined.
When the TB covers are removed, the lines on the cam pulley teeth are utilized along with the marks on the block behind the cam pullies for TDC.
The only reason I mention this is because the picture above has all of the lines circled in red with the TB covers off of the engine. Which was a little confusing.
In essence, If you line up the long line on the cam pulley spoke with the reference line on the TB cover portal for #1 cylinder TDC, remove the TB covers, the reference marks on the cam pulley teeth should be in their correct position with the lines on the block as a check.

The following users liked this post:
JD TL-S (03-04-2015)
The following users liked this post:
TACORICAN (12-04-2014)
#11
Thread Starter
Chapter Leader (Southern Region)
Joined: Sep 2008
Posts: 88,888
Likes: 11,843
From: Waffles, BU
Check your TDC marks again after the belt is on

This is a great write-up!
I just did this on my CLS-6 and it is exactly the procedure I followed, except on the CLS it is helpful to loosen the PS pump and position it up and out of the way.
The only thing I would note is that the long timing marks on the cam pulley spokes can ONLY be utilized initially when the TB covers are ON the car. The portals on the TB covers provide a reference line to use with the cam pulley spoke line when TDC being determined.
When the TB covers are removed, the lines on the cam pulley teeth are utilized along with the marks on the block behind the cam pullies for TDC.
The only reason I mention this is because the picture above has all of the lines circled in red with the TB covers off of the engine. Which was a little confusing.
In essence, If you line up the long line on the cam pulley spoke with the reference line on the TB cover portal for #1 cylinder TDC, remove the TB covers, the reference marks on the cam pulley teeth should be in their correct position with the lines on the block as a check.

This is a great write-up!
I just did this on my CLS-6 and it is exactly the procedure I followed, except on the CLS it is helpful to loosen the PS pump and position it up and out of the way.
The only thing I would note is that the long timing marks on the cam pulley spokes can ONLY be utilized initially when the TB covers are ON the car. The portals on the TB covers provide a reference line to use with the cam pulley spoke line when TDC being determined.
When the TB covers are removed, the lines on the cam pulley teeth are utilized along with the marks on the block behind the cam pullies for TDC.
The only reason I mention this is because the picture above has all of the lines circled in red with the TB covers off of the engine. Which was a little confusing.
In essence, If you line up the long line on the cam pulley spoke with the reference line on the TB cover portal for #1 cylinder TDC, remove the TB covers, the reference marks on the cam pulley teeth should be in their correct position with the lines on the block as a check.


The following users liked this post:
dawidocl (03-12-2012)
#12
Thread Starter
Chapter Leader (Southern Region)
Joined: Sep 2008
Posts: 88,888
Likes: 11,843
From: Waffles, BU

You can tell my garage floor is still bare. You know what my next project will be... well after I change the TCC solenoid on the X..


 I bathed in Goop..

 Thanks guys.. I hope it helps you out down the line. Feel free to bump the thread to ask any questions / request pics (I have a lot) when it comes time.


The following users liked this post:
JD TL-S (03-04-2015)
#17
Congrats Majofo! You win the best DIY post of the year award!
This will help those who are considering doing this on their own decide whether they really want to do it themselves. Even though I was a mechanic in my earlier years, I'll still pay the dealer for this labor as my mechanics tool set with everything needed was stolen once upon a time and my 'crawling under' days are over.
I'll still stick with all OEM parts like the water pump with the lip for the o-ring. Dealers willing to do the job with your own supplied parts will only install OEM's anyway.
.
.
The following users liked this post:
JD TL-S (03-04-2015)
#19
Thread Starter
Chapter Leader (Southern Region)
Joined: Sep 2008
Posts: 88,888
Likes: 11,843
From: Waffles, BU
It's to secure the adjuster so it doesn't spring out from the auto tensioner.. I really don't see a need for it, maybe for the install but not for the removal.
#20
Thread Starter
Chapter Leader (Southern Region)
Joined: Sep 2008
Posts: 88,888
Likes: 11,843
From: Waffles, BU
Congrats Majofo! You win the best DIY post of the year award!
This will help those who are considering doing this on their own decide whether they really want to do it themselves. Even though I was a mechanic in my earlier years, I'll still pay the dealer for this labor as my mechanics tool set with everything needed was stolen once upon a time and my 'crawling under' days are over.
I'll still stick with all OEM parts like the water pump with the lip for the o-ring. Dealers willing to do the job with your own supplied parts will only install OEM's anyway.
.
.
This will help those who are considering doing this on their own decide whether they really want to do it themselves. Even though I was a mechanic in my earlier years, I'll still pay the dealer for this labor as my mechanics tool set with everything needed was stolen once upon a time and my 'crawling under' days are over.
I'll still stick with all OEM parts like the water pump with the lip for the o-ring. Dealers willing to do the job with your own supplied parts will only install OEM's anyway.
.
.
If you find a good deal, or at least find a good reputable and honest shop, go for it. I'm super cheap. If I can save a buck I'll do it, plus it's still fun to wrench on the car. It's treated me well thus far so I'm going to do the same. Next DIY from me will be the Dash cover.

The following users liked this post:
JD TL-S (03-04-2015)
#24
takin care of Business in
iTrader: (5)
Joined: Jan 2008
Posts: 30,994
Likes: 4,732
From: Kansas City, MO
i was actually planning a trip to austin....shit....how ironic....never seen texas so me and my girl were thinking of a 4 day trip to see dallas/austin/houston/san antonio.....
and i was telling her i have heard nothing but great things about austin....lets move there....good weather all year long and yada yada....
i might just make it a 5 day trip and get this done too....what say majofo ?
and i was telling her i have heard nothing but great things about austin....lets move there....good weather all year long and yada yada....
i might just make it a 5 day trip and get this done too....what say majofo ?

#25
And if you work for the city of Newark, NJ, you soon won't have toilet paper to break your finger through.
Just today, Newark's mayor Corey Booker announced the city no longer has money to buy toilet paper.
NO KIDDING!!
Just today, Newark's mayor Corey Booker announced the city no longer has money to buy toilet paper.
NO KIDDING!!
#28
#30
Thread Starter
Chapter Leader (Southern Region)
Joined: Sep 2008
Posts: 88,888
Likes: 11,843
From: Waffles, BU

#33
lol.. it's all good. I knew I'd get those responses once I revealed my location. Luckily most of the guys in Austin that are on the board are gear heads.
To be honest it feels much better / smoother. I don't feel as much of a heat soak issue so it could be related to the thermostat but I have yet to test the old one. My mpg went up 1-2 mpg's. Those Bosch Plats were toast. I pulled NGK Iridiums out of my X after 105k and they still had a bit of a tip.. The plat's looked great otherwise and the TL did run fairly smooth before the plug change. I have also put it into vtec a couple of times since the install and all is good... and yes.. I did exclaim vtec just kicked in yo!.. my gf was not amused.
To be honest it feels much better / smoother. I don't feel as much of a heat soak issue so it could be related to the thermostat but I have yet to test the old one. My mpg went up 1-2 mpg's. Those Bosch Plats were toast. I pulled NGK Iridiums out of my X after 105k and they still had a bit of a tip.. The plat's looked great otherwise and the TL did run fairly smooth before the plug change. I have also put it into vtec a couple of times since the install and all is good... and yes.. I did exclaim vtec just kicked in yo!.. my gf was not amused.

I get all the main parts - TB, auto tensioner, idler pulley, water pump, thermostat.
What gaskets do I need ? And two identical drive belts ? Do you have a copy of your parts invoice ? How much did you spend on parts ? I did the math and it's like $400
Thanks
The following users liked this post:
JD TL-S (03-04-2015)
#35
www.curryacuraparts.com is selling the parts for the tb replacement only- drive belt,TB,WP for like $250. But if you add the idler pulley, auto tensioner...
The following users liked this post:
JD TL-S (03-04-2015)
The following users liked this post:
JD TL-S (03-04-2015)
#37
Thread Starter
Chapter Leader (Southern Region)
Joined: Sep 2008
Posts: 88,888
Likes: 11,843
From: Waffles, BU
I bought the kit from MisterFubar who sold his TL before doing the timing belt service so I don't have a full invoice. Several of the parts aren't "OE" (OE doesn't mean higher quality),which will save you some coin like the Gates Water Pump and the Stant Thermostat. The presitige acura deal is decent, I've seen better and I've seen worse. Make sure you buy the idler pulley if you go with the special because it doesn't appear to be part of the kit. I bought plugs & coolant at Autozone. I definitely recommend you guys get the NGK Laser Iridium plugs, they're around $7 / each but usually AAP or AZ will put out a 10-20% off coupon every other month.
The following users liked this post:
JD TL-S (03-04-2015)
The following users liked this post:
93LT1 (10-29-2012)
The following users liked this post:
UNIVERSE_04 (12-06-2012)


 )....only water pump and timing belt remain
  Much thanks Majo! VERY NICE!
 Austin


 ....coz i know that questions is coming up next LOL !!!