When you click on links to various merchants on this site and make a purchase, this can result in this site earning a commission. Affiliate programs and affiliations include, but are not limited to, the eBay Partner Network.
So... When you build the '19 RDX on Acura.com and select the Advance Package option and then see what comes with it by clicking on "More Details," Heated Steering Wheel is among the inclusions for the Interior.
But, when you scroll further down the Build page and click on the Interior Accessories tab and "See All 12 Accessories," Steering Wheel - Heated is shown as an available accessory and costs $500.
What gives??
That "listing or pics" are of the accessories avail....IF your model does not have it...and you want it. Not specific to any one model. You have to know what your model comes with, then go shopping! It's the same with all the Acura
models.
The "build" tool is supposed to be smart enough not to offer accessories that duplicate features of a particular model and trim level ( package ). If you had selected "Advance" and it offered heated steering wheel, that's an error. ( I just got the same result ).
My 2019 RDX Advance does have a heated steering wheel, and it wasn't added as an accessory.
Does anyone have a trailer hitch installed in an A-Spec? I'm just wondering how the hitch is being installed with the diffuser in A-Spec which is different from other trims.
A picture will be appreciated.
Thanks in advance
Can you take a few more good, clean pics of the full side view of the body side molding out in the daylight? I have been considering installing them but wanted to see them first and wasn't sure how it would look along with the chrome trim across the bottom.
I can also tell from the second pic of the rear door edge guards that you need to fully install them. You need a rubber mallet and gently hit it throughout to get it to fully seat. I can see the waviness of the guards and the reveal is not what it should be. A simple fix my friend.
Can you take a few more good, clean pics of the full side view of the body side molding out in the daylight? I have been considering installing them but wanted to see them first and wasn't sure how it would look along with the chrome trim across the bottom.
What did you pay for them?
I buy my Acura parts from Tim at oemacuraparts.com The Body Side Moldings were $181.30 and the Door Edge Guards were $81.50. Shipping and Handling to HI was $86.52.
Finally got around to installing the roof rails. Super easy to install, took me 10 min.
I installed mine too as it was a simple install but did you have a problem with the rear rubber part sticking up, not laying flat with the paint surface?
I installed mine too as it was a simple install but did you have a problem with the rear rubber part sticking up, not laying flat with the paint surface?
that's strange. Perhaps you can try heating it with a blow dryer and bending it down.
Using the blow dryer was the first thing I did after I noticed it but that didn�t work. I removed it and reinstalled as I thought I could�ve installed it improperly but it didn�t make much of a difference either.
Did you try removing the roof rail (go back to stock configuration to see if the rubber piece fits like it came from the factory) and then trying the install again? Maybe this side's roof rail is sitting too far rearward and there's not enough room to fit the piece of rubber back in.
Did you try removing the roof rail (go back to stock configuration to see if the rubber piece fits like it came from the factory) and then trying the install again? Maybe this side's roof rail is sitting too far rearward and there's not enough room to fit the piece of rubber back in.
I did take it off yesterday and reinstalled it to see if it I missed removing one of the stock clips or if I lined it up improperly but it didn�t seem that way. Debating if I could use double sided tape as it�s not behind that rubber strip.
I did take it off yesterday and reinstalled it to see if it I missed removing one of the stock clips or if I lined it up improperly but it didn�t seem that way. Debating if I could use double sided tape as it�s not behind that rubber strip.
I don't have an RDX, but I was wondering if that piece of rubber has some kind of lip that snaps or slots into some part of the roof in that area and due to some kind of interference, it is not going back into place in the original way. I find it hard to believe it to only a pure friction fit, since rubber tends to shrink as it ages and would surely come loose. Sorry I couldn't be of more help
I don't have an RDX, but I was wondering if that piece of rubber has some kind of lip that snaps or slots into some part of the roof in that area and due to some kind of interference, it is not going back into place in the original way. I find it hard to believe it to only a pure friction fit, since rubber tends to shrink as it ages and would surely come loose. Sorry I couldn't be of more help
I took it off again the other day and examined the area and found out the cause. Apparently the roof rails wasn’t the problem rather the car itself was. The point where the roof was welded was a little too thick on the driver-side causing the rubber of the rails to be pushed up. I cut a slit on the rubber strip to relieve some stress and not it looks a whole lot better and almost matches the other side.
Now I’m debating if I should install the black cross bars to match, I purchased it it the same time I got the roof rails but now am having second thoughts about it; too bad I can’t return it as it has been pass the return dateline.
Thanks for your rail info and pics, super valuable. What gives you second thoughts about the cross bars? I'm about to pull the trigger on both rails and cross bars myself.
I took it off again the other day and examined the area and found out the cause. Apparently the roof rails wasn�t the problem rather the car itself was. The point where the roof was welded was a little too thick on the driver-side causing the rubber of the rails to be pushed up. I cut a slit on the rubber strip to relieve some stress and not it looks a whole lot better and almost matches the other side.
Now I�m debating if I should install the black cross bars to match, I purchased it it the same time I got the roof rails but now am having second thoughts about it; too bad I can�t return it as it has been pass the return dateline.
Thanks for your rail info and pics, super valuable. What gives you second thoughts about the cross bars? I'm about to pull the trigger on both rails and cross bars myself.
Thanks for your rail info and pics, super valuable. What gives you second thoughts about the cross bars? I'm about to pull the trigger on both rails and cross bars myself.
I’ve seen it installed at the dealership on a white Tech model and it didn’t really appeal to me in person. Maybe because I’ve seen pics of it on a Lunar Silver ASPEC and it looked good so I got them. I think it depends on the color of the car. I actually wouldn’t use it for its intended purpose, it was more for the look.
If you plan on getting black cross bars, let me know, I can let them go at a better than dealership price.
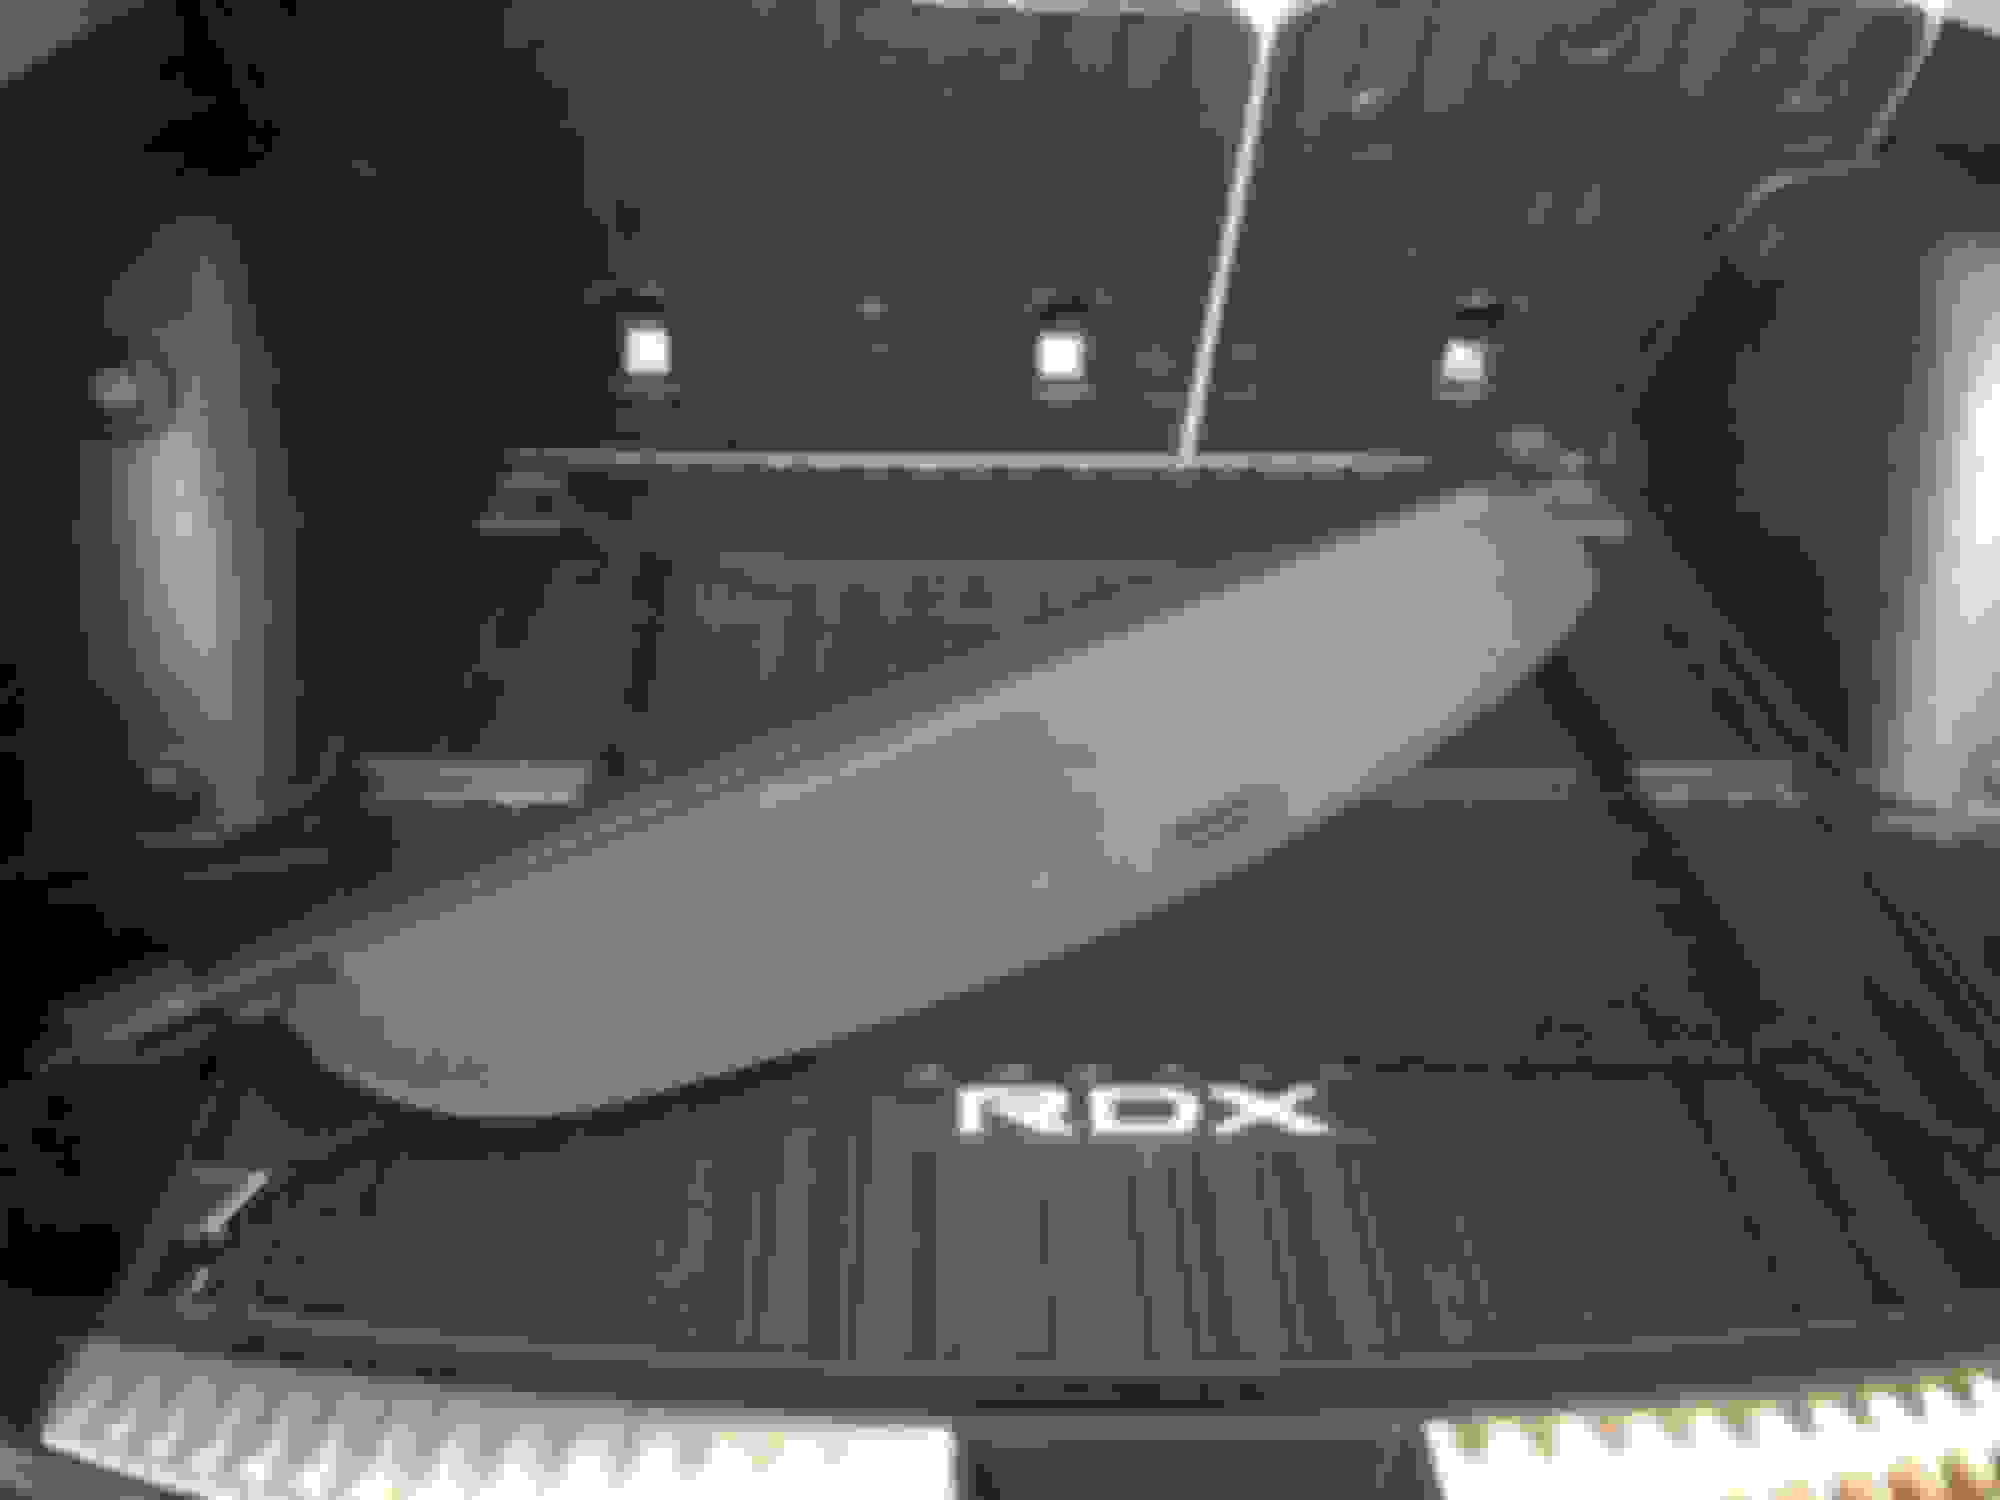
One of the accessories I didn't buy at the dealership and got instead on Curry Acura's eBay store is the cargo cover, but when I got it, I was like, "uh-oh." How do I get those black square recess covers off so that the "stem" at the both ends of the cover's base bar would connect securely into the recesses on both sides (male-to-female)? The installation guide referred to some special tools and was vague as to what they are.
I admit there was some consternation, thinking about how much I will have to pay someone to remove those things, how far away the dealership is, when I would be free to run up there (picture the D.C. metro area as a clock -- the dealership is at 12:00 and I'm south of 6:00), So, I actually decided to do DIY and it worked! I got a small knife with a very thin blade and jimmied the blade very slowly and gingerly on the edge of the recess covers, being careful not to scratch or gouge, and bam, they came out rather easily. Am very relieved I avoided a huge hassle and I have the thing to cover my stuff up now.
Has anyone been successful at installing the front lower trim? I've been struggling with it all day and have given up. The instructions appear to be missing several steps. I appears to me that to remove the front lower trim, you must remove the Left and Right Chrome trim pieces because the sit in a grove which is part of the lower trip.
Thanks,
Mario
Any luck on installing it? From what I can tell from oemacuraparts.com the front lower trim (part 08P46-TJB-200A) apparently doesnt fit the advanced trim? Maybe that's an error? I cant imagine the bumper being that much different than the other trims.
Any luck on installing it? From what I can tell from oemacuraparts.com the front lower trim (part 08P46-TJB-200A) apparently doesnt fit the advanced trim? Maybe that's an error? I cant imagine the bumper being that much different than the other trims.
The lower front trim fits on the Advanced trim (I have it installed on my Canadian Platinum Elite which is equivalent to the US Advanced), it is the rear lower trim that can't be installed on the Advanced because it will interfere with the hands-free tailgate feature.
The lower front trim fits on the Advanced trim (I have it installed on my Canadian Platinum Elite which is equivalent to the US Advanced), it is the rear lower trim that can't be installed on the Advanced because it will interfere with the hands-free tailgate feature.
I spoke to my dealership and apparently you can install the rear diffuser with the hands free tailgate, its just a hassle because it requires more drilling and cutting to relocate the sensor
I spoke to my dealership and apparently you can install the rear diffuser with the hands free tailgate, its just a hassle because it requires more drilling and cutting to relocate the sensor
I can not for the life of me figure out how to get these caps off. I tried a screw driver first. Then I'm looking online and I found the instructions which mentions tool SILTRIMTL10, a 10.00 tool here: https://www.collegehillshonda.com/mm...vc?Screen=SRCH It looks much like a bicycle tire lever so I tried several different ones I have. All that did was mar the cap. I then tried your Xacto knife approach and it did get into the crack however the cap still would not budge. I have nothing left to try. I have to go to Acura tomorrow to get the tire sealant inflator they owe me so perhaps the friendly service manager there will help without charging me 200+ dollars to remove two suborn caps.
It's horrible this car didn't come with a cargo cover, something that's standard on other cars just like this one (CR-V) but it's even worse they made installing one this difficult. This is terrible.
Originally Posted by birdonamission
One of the accessories I didn't buy at the dealership and got instead on Curry Acura's eBay store is the cargo cover, but when I got it, I was like, "uh-oh." How do I get those black square recess covers off so that the "stem" at the both ends of the cover's base bar would connect securely into the recesses on both sides (male-to-female)? The installation guide referred to some special tools and was vague as to what they are.
I admit there was some consternation, thinking about how much I will have to pay someone to remove those things, how far away the dealership is, when I would be free to run up there (picture the D.C. metro area as a clock -- the dealership is at 12:00 and I'm south of 6:00), So, I actually decided to do DIY and it worked! I got a small knife with a very thin blade and jimmied the blade very slowly and gingerly on the edge of the recess covers, being careful not to scratch or gouge, and bam, they came out rather easily. Am very relieved I avoided a huge hassle and I have the thing to cover my stuff up now.
I can not for the life of me figure out how to get these caps off. I tried a screw driver first. Then I'm looking online and I found the instructions which mentions tool SILTRIMTL10, a 10.00 tool here: https://www.collegehillshonda.com/mm...vc?Screen=SRCH It looks much like a bicycle tire lever so I tried several different ones I have. All that did was mar the cap. I then tried your Xacto knife approach and it did get into the crack however the cap still would not budge. I have nothing left to try. I have to go to Acura tomorrow to get the tire sealant inflator they owe me so perhaps the friendly service manager there will help without charging me 200+ dollars to remove two suborn caps.
It's horrible this car didn't come with a cargo cover, something that's standard on other cars just like this one (CR-V) but it's even worse they made installing one this difficult. This is terrible.
Ok just found this fantastic video on youtube and his box cutter knife trick worked like a charm.
I can not for the life of me figure out how to get these caps off. I tried a screw driver first. Then I'm looking online and I found the instructions which mentions tool SILTRIMTL10, a 10.00 tool here: https://www.collegehillshonda.com/mm...vc?Screen=SRCH It looks much like a bicycle tire lever so I tried several different ones I have. All that did was mar the cap. I then tried your Xacto knife approach and it did get into the crack however the cap still would not budge. I have nothing left to try. I have to go to Acura tomorrow to get the tire sealant inflator they owe me so perhaps the friendly service manager there will help without charging me 200+ dollars to remove two suborn caps.
It's horrible this car didn't come with a cargo cover, something that's standard on other cars just like this one (CR-V) but it's even worse they made installing one this difficult. This is terrible.
Honestly, the Xacto knife should�ave worked, so long as the blade is super thin. All I did was slowly and carefully jimmy the tip of a small knife�s thin blade in the crevice around the recess cover and it just fell out.
Just be very careful not to slip and gouge or puncture anything.
 08-28-2018, 09:04 PM