When you click on links to various merchants on this site and make a purchase, this can result in this site earning a commission. Affiliate programs and affiliations include, but are not limited to, the eBay Partner Network.
There isn't much info on bagged 3G's (I've searched). Just had a few questions, going to install my bags in the next week or so. Answers and advice are definitely appreciated.
Is there a need for a dual compressor setup? I'm going to be running a single 444c with a 4 gallon tank and wondering if that's enough; is it more reliable running dual compressors?
I've heard that the front of the TL won't rise until there's a minimum 175-200psi in the tank, can anyone confirm?
Where do you guys route your air lines and power lines? Through interior or exterior?
My setup will be as follows:
AirLift 3H (Height + Pressure) Management
AirForce Struts w/ 1/4" lines
1 or 2x Viair 444c Compressors
4 Gallon Tank
1. You can run a single compressor setup, just note recovery time for that single VIAR 444c maybe around 3-4 minutes and fill time from an empty tank about 7-9 minutes(Not 100% sure as I run AirZenith compressors). I also recommend 1 AirZenith OB2 compressor over a dual VIAR compressor setup. An Air Zenith OB2 compressor is quality made, and what that means is that it's more expensive and built tougher. Usually one cost the same as two VIAIR units, or maybe more. The good thing about an AZ unit is that it's more quiet and it has a built in fan and will continuously fill your tank up to 200psi. An AZ unit is also a heavy, so most run one and that's all you really need. The time it takes to fill a 5 gallon tank with 1 AZ is the same amount of time it takes to fill a 5 gallon tank with 2 VIAIR 400cc compressors. So your choice really. Also don't forget to get a better check valve if you go with VIAR.
2. Yes you should run at least 165psi minimum for tank pressure. 175psi would be the better and 200psi would be the best. I run 200psi on my setup.
3. This will be mostly preference, but if you got the time and patience, I would recommend running everything on the inside. As for my setup, my airlines currently run outside (exits car from trunk spare tire drain plugs). Power & Ignition are ran inside along the driver side flooring (under plastics) and I grounded the setup along with my audio stuff in the trunk. (Plenty points for good ground, make sure you shave/grind down the area to bare metal for proper ground).
Also you should run a water trap as well to keep out as much moisture as possible. Also install a drain kit for easy tank draining.
OP you can check out my progress thread linked below in my signature (which have a few pics from my air ride install) and you can also check out my IG @tliscious_typesex. Any other questions I'm happy to help. I'm sure other bagged members will chime in.
My setup btw is:
Accuair E-Level Management with iLevel module
5 Gal Tank
Dual Water Traps
Dual AirZenith OB2 Compressors
1/4" lines
Airforce Suspension Bags
Last edited by BOOSTED6IX-S; Sep 23, 2016 at 05:13 PM.
There isn't much info on bagged 3G's (I've searched). Just had a few questions, going to install my bags in the next week or so. Answers and advice are definitely appreciated.
Is there a need for a dual compressor setup? I'm going to be running a single 444c with a 4 gallon tank and wondering if that's enough; is it more reliable running dual compressors?
I've heard that the front of the TL won't rise until there's a minimum 175-200psi in the tank, can anyone confirm?
Where do you guys route your air lines and power lines? Through interior or exterior?
My setup will be as follows:
AirLift 3H (Height + Pressure) Management
AirForce Struts w/ 1/4" lines
1 or 2x Viair 444c Compressors
4 Gallon Tank
I would prefer to do dual compressors.. just in case one goes out you have a back up. I heard that one AZ is equivalent to two viair 480s. The TL is heavy in the front you won't air the front up until about... 110ish psi. If you're going have to run your power line inside of the car... so why not run the lines while you're at it? All my lines are currently inside the car which I feel more comfortable with. I believe that airlift the maximum psi they prefer is 175 which is enough to air your car up but 200psi would be best.If you have any questions feel free to pm me.
Appreciate all the feedback guys, I'm gonna go with a dual compressor setup.and try to route all the lines from the inside...power lines definitely, air lines it's flexible since I live in a dry and warm climate (SoCal).
Will PM my questions to you guys! Nice build thread btw.
Appreciate all the feedback guys, I'm gonna go with a dual compressor setup.and try to route all the lines from the inside...power lines definitely, air lines it's flexible since I live in a dry and warm climate (SoCal).
Will PM my questions to you guys! Nice build thread btw.
Hey Osk, recently watched your smoking tire vid...curious why you're going air?
He was complimenting you on how well the car handled and how it wasn't too low or rubbing etc.
Hey Osk, recently watched your smoking tire vid...curious why you're going air?
He was complimenting you on how well the car handled and how it wasn't too low or rubbing etc.
Picking your brain, that's all.
For show and stunting on the weekends lol. I'm not gonna be tracking it or anything so I figured why not. I'll probably buy a RWD/AWD car for canyon carving and track days. But I will keep the Type S <3. My first car, so it's a sentimental value type thing.
Originally Posted by turtlecivic
The question I have for you is... what are your intention with going on air? Track?
Haha not track, just for show and cruising on the weekends. I've always wanted to go air, so more form over function for me.
I'd love a RWD car for the canyons...
oh wait, I haz 2 now
I feel you though, I can appreciate keeping your first car!
Curious...did Matt ask you if you wanted to show that you have one arm and brought up the transmission? Or did that just naturally happen? I hadn't noticed it at all until he did that.
Oh yeah, wrong thread, but you're here!
I know mannnnnnnn vagon <3. I love CTS-V's man, so much straight line potential. And you still have your S?
I was caught by surprise about the arm thing lol. but i'm used to it at this point LOL
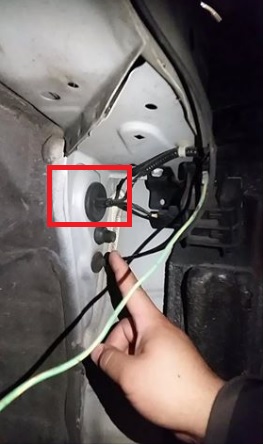
For the the routing of air lines and power, where did you guys use for interior? I'm seeing from trunk to back seat there's a rubber grommet with wires, does that go to the wheel well for my air lines?
And for power, I'm thinking of running down driver side kick panels all the way down to under steering column, is there a rubber grommet that goes to the firewall?
If you remove the back seats you should see this grommet. If you remove the rear liner you can tuck the lines behind those.
Originally Posted by mrkingstonvi
So did you route the airlines for the rear bags through the trunk liner and the ones for the front through that grommet? Just making sure where they ran to to get a complete understanding.
Originally Posted by turtlecivic
I just ran my rear lines into that grommet. If you remove the front fender liner you will see 2 grommets (used the biggest hole/first hole) which you can feed the line through that hole. If it doesn't make sense I'll try and get you pics of it.
For the frontm does turtle have pics of where routed? Thinking of routing FL + FR lines through driver side firewall and then passenger side through engine compartment to wheel well.
For the frontm does turtle have pics of where routed? Thinking of routing FL + FR lines through driver side firewall and then passenger side through engine compartment to wheel well.
No he never got back to me or posted any pics either. I have yet to re run my lines on the inside but someday I will get to it.
I recently redid my lines and ran the front this way. Also tucked the sensor harness and ran it parallel with the airline.
Drilled a hole and ran them through the tunnel that goes from the front of the car to the back. Sway bar movement is minimal so that line will not tear or bend.
Then I zipped tied them next to rear subframe and drilled holes into the trunk.
Ill try and get you pics of the rear this weekend. Im running 200psi.
I know mannnnnnnn vagon <3. I love CTS-V's man, so much straight line potential. And you still have your S?
I was caught by surprise about the arm thing lol. but i'm used to it at this point LOL
.
Damn, I never checked back in! Soory!
Wow...I can't believe he didn't ask if you felt like discussing it...fkng Matt
I actually thought it was a pretty cool story. So many find excuses to be lazy or not be passionate about stuff, always refreshing to see a guy with some hurdles grab life right by the pussy and kick ass like anyone else.
I don't have a lot of useful information to add about air ride, but I enjoy reading and seeing how other's are doing it. Maybe one day!
Funny, the height sensors remind me a LOT of the way the magneride is set up on the Caddy.
and yes sir, I still have the S2000...it's great in the winter time for top down but I sure wish we had a little more curvy roads in SoFla to enjoy it!
I went auto for my daily for wife driving and traffic abilities...but I do miss a manual, so I'm grateful to still have the arguably best feeling one ever made in the S.
I think that's what the owner did in that pic you linked above. Others have welded a bracket (I did) to the sway bar. Also if you can get a custom bracket made that attached to the sway bar then that can work as well. Similar to this:
Here's some other ideas of how to mount the sensors on different vehicles. You got to be creative:
Here's the part numbers on the collars. Hope this helps.
www.mcmaster.com
Just tap them and thread in the ball mount and they are good to go...the fronts you have to shorten the ball stud a little so its flush on the inside but the rear is perfect. These are the part numbers if you have the Porterbuilt control arms and trailing arms. These are aluminum so you can polish them too.
Drilled a hole and ran them through the tunnel that goes from the front of the car to the back. Sway bar movement is minimal so that line will not tear or bend.
Where did you get your grommets from speedy4ever? Also if not to much trouble can you also provide the Item/Part #? I couldn't find any similar to that in my local Home Depot. Thanks in advance.
My height sensors are in! Took some trial and error but they're in range and I passed calibration. It's amazing how accurate height management is. I forgot to take pictures but will soon.
My fronts I used the shortest hole since there's not much travel for the sensor on the front swaybar, the rears I used the longest hole (third), also drilled through rear swaybar.
And I agree about the sensors, I used my setup for a few months before I installed the sensors and man when I installed them I wondered how the hell did I live without them! Looking forward to your pics. I think this thread will help others who might Bag their TL in the future.
[QUOTE=OsK;15901600]Thank you speedy and kingston!
My height sensors are in! Took some trial and error but they're in range and I passed calibration. It's amazing how accurate height management is. I forgot to take pictures but will soon.
My fronts I used the shortest hole since there's not much travel for the sensor on the front swaybar, the rears I used the longest hole (third), also drilled through rear swaybar.
Thanks,
Oscar.
Hello! I'm in the process of running my lines right now and completely lost.. can you just give me the spots you ran your lines from? and also the power/remote cable? Thank you!!
Shit, I forgot all about this. I never took pics of the fronts because I haven't changed my wheels to stocks yet. if you look in the fender lining there should be a rubber grommet where you can poke a hole through to feed the lines. I'll take pics for you tomorrow. I also added those electrical plastic tubing on the line doesn't get any debris
Last edited by turtlecivic; Nov 27, 2016 at 08:58 PM.
Hello! I'm in the process of running my lines right now and completely lost.. can you just give me the spots you ran your lines from? and also the power/remote cable? Thank you!!
So, for the power lines, you can run it along the driver side (under the plastic trim) all the way up past the fuse box. You will see a grommet a little slightly up and left past fuse box, that goes to the engine bay. It's a pretty big grommet so you gotta tough it out and ziptie your lines, and get a buddy to reach and feel for the ziptie, and pull so you can get the cables through to the engine bay.
For the air lines there's a rubber grommet once you take off the rear seat plastic trim to pass through to the wheel well (see pictures above), then you can route the front inside the side skirt (pretty nifty).
Also! How are you liking the airforce struts? Ride quality good?
Airforce struts ride quality are good. A lot of my friends says it feels better than stock. They expected a "bouncy" feel but overall solid ride once you dial in your preferred dampening settings. So far I've been bagged on them for 2yrs 6months and approximately 29,000ish miles. No issues to date
Airforce struts ride quality are good. A lot of my friends says it feels better than stock. They expected a "bouncy" feel but overall solid ride once you dial in your preferred dampening settings. So far I've been bagged on them for 2yrs 6months and approximately 29,000ish miles. No issues to date
I definitely echo that as well. It feels softer than a stock Type S. It soaks up the big bumps very well, but that's expected from an air spring. It does feel "bouncy" on some imperfect roads, but nonetheless, a smooth ride.
I haven't messed with the dampening settings. Do you just use the allen key and put it in the hole at the top of the strut, and turn, just like a regular coilover? Does it come dialed in the middle from the factory? Or at the softest
I'm not sure what setting it comes with but yeah you put the allen key just like coilovers. I think I have the fronts just a tad more stiff than the rear. Been a long time since I messed with them.
Also some of that "bouncy" feel may either be from your tires or how much air in the struts. I recently changed all 4 tires and went back to factory 18" size. I was running 225/40/18 on the A-specs 18x8 and now on 235/40/18. Much better ride and I don't feel the imperfect roads. With the 225/40 it wasn't horrible but I felt the imperfect roads a little more compared to now.