
[DIY] Let's Add Some Class: Footwell LED Lighting

it all makes sense now haha thanks for clearing it all up and the fast response!


Alright,
First, this is possible with a MT, but it is the exact opposite of fun, tying into that dome light is about a nightmare.
Second, if you're running the back lights all the way to the back seat, do yourself a favor and use a clothes hanger to run your wires under the trim that separates the front and back doors.
Thanks for the awesome write up, plan on doing the puddle lights next, just didn't have time tonight.
Also did this in red, if you want pictures of red on a gray interior, just let me know.


Cruisin'
Joined: Apr 2006
Posts: 15
Likes: 2
Alright,
First, this is possible with a MT, but it is the exact opposite of fun, tying into that dome light is about a nightmare.
Second, if you're running the back lights all the way to the back seat, do yourself a favor and use a clothes hanger to run your wires under the trim that separates the front and back doors.
Thanks for the awesome write up, plan on doing the puddle lights next, just didn't have time tonight.
Also did this in red, if you want pictures of red on a gray interior, just let me know.
First, this is possible with a MT, but it is the exact opposite of fun, tying into that dome light is about a nightmare.
Second, if you're running the back lights all the way to the back seat, do yourself a favor and use a clothes hanger to run your wires under the trim that separates the front and back doors.
Thanks for the awesome write up, plan on doing the puddle lights next, just didn't have time tonight.
Also did this in red, if you want pictures of red on a gray interior, just let me know.
How were you able to get the green connector out for the MT? I was just looking at mine and I'm pretty sure I can feel that green connector back there, but I don't have mirror I can get in there to confirm. Did you have to unplug anything else or just keep at it for a long time?
Cruisin'
Joined: Apr 2006
Posts: 15
Likes: 2
Thanks! Finally got it. For anyone else who's struggling with this, here's how I was able to get it disconnected without being able to get much of a grip due to the clutch pedal assembly.
1. Remove the bottom 10 mm bolt holding in the fusebox. Don't remove the top one as it looks like it would be really hard to get back in.
2. Push down the clip on the green 5-pin connector and try to apply some pressure back from the connector. With your left hand gently pull the opposite way on the little tab on the right side of the fuse box (toward the pedal). It would really help to be double jointed, but I was able to contort myself enough to reach it.
Of course can't guarantee this will work 100% of the time, but I was very happy it worked for me! Later tonight, I'm going to try to get both the puddle lights and footwell lights installed.

Instructor
Joined: Mar 2013
Posts: 182
Likes: 18
From: Georgia
I'll be doing this mod this weekend as long as the strips come in on time. I plan on using the original DIY except I want to have a switch to also turn the lights on at any time. I plan using a 3 way switch like the one I have attached. I'm going to put it between the splice of the green/red wire and the negative wires of the LED strips. I will use the switch to switch between the:
I-green/red wire which will allow the doorstills to just come with the dome light
II-an actual ground connection, which when selected will allow the lights to come on at any time
O-in the middle which would completely turn the lights off
does this sound about right?
I-green/red wire which will allow the doorstills to just come with the dome light
II-an actual ground connection, which when selected will allow the lights to come on at any time
O-in the middle which would completely turn the lights off
does this sound about right?

2nd Gear
Joined: Dec 2014
Posts: 2
Likes: 0
For some reason, i can't get a full connection even after tapping into the green supervisor wire. I was wondering if you actually had to pull the plug out of the socket? Cause i just tapped into it while the plug was still attached. Thanks!
2nd Gear
Joined: Dec 2014
Posts: 2
Likes: 0

Thread Starter
Joined: Mar 2010
Posts: 10,766
Likes: 2,317
From: ON, Canada

Use a multimeter if you have one to check if there's anything coming out of your tap.
Can I ask why you used the power lead from the dome light? I have the super computers sills and have them wired up to a power source just in front of the front doors on each side.
With installing these new ones I'll have it so that each sill only lights up when the particular door is open even though 1 inverter will power each side. I'll use a zener diode on the ground leads to the door to ensure that the ground contact doesn't register for both doors when one is open.
With installing these new ones I'll have it so that each sill only lights up when the particular door is open even though 1 inverter will power each side. I'll use a zener diode on the ground leads to the door to ensure that the ground contact doesn't register for both doors when one is open.
Thread Starter
Joined: Mar 2010
Posts: 10,766
Likes: 2,317
From: ON, Canada
Glad you asked.
Door sills don't serve the same purpose as footwell LEDs.
When I make DIYs I seek the most efficient and OEM like way.
Tapping into one source - efficient.
OEM Like- no footwell leds only come on with one door, from what I know of.
Most cars with OEM footwells have them all come on with one door open.
Hope that explains it.
Now if I had illuminated door sills, I would wire it your way.
Different mods we're talking here, different purpose lol
Registered Bunny
Joined: Nov 2014
Posts: 8,307
Likes: 1,073
From: Montreal
Glad you asked.
Door sills don't serve the same purpose as footwell LEDs.
When I make DIYs I seek the most efficient and OEM like way.
Tapping into one source - efficient.
OEM Like- no footwell leds only come on with one door, from what I know of.
Most cars with OEM footwells have them all come on with one door open.
Hope that explains it.
Now if I had illuminated door sills, I would wire it your way.
Different mods we're talking here, different purpose lol
Door sills don't serve the same purpose as footwell LEDs.
When I make DIYs I seek the most efficient and OEM like way.
Tapping into one source - efficient.
OEM Like- no footwell leds only come on with one door, from what I know of.
Most cars with OEM footwells have them all come on with one door open.
Hope that explains it.
Now if I had illuminated door sills, I would wire it your way.
Different mods we're talking here, different purpose lol
Personally I'd want my footwell to all light up independent of the door that is open. It's just an opinion. :-)
Argh! Sorry, I have both this thread open and the DIY for the acrylic illuminated door sills open in tabs right beside each other. Got messed up as to which thread I was reading. 
Although for the foot wells something similar could be accomplished by using the same power points as the door sill install and combining the grounds from the doors together (with diodes) and could even have it switched still. All without having to go to the dome light for power. I could lay out the wiring if anyone is interested.
After looking at your wiring setup in the first post that would probably be easiest anyways. Similar setup but the way I was thinking would have a little bit of soldering required so yours is definitely more user friendly.
Last edited by Buda; Dec 29, 2014 at 03:46 PM.

Thread Starter
Joined: Mar 2010
Posts: 10,766
Likes: 2,317
From: ON, Canada
I have my pictures hosted on photobucket, should be good
Imageshack is the host I'm worried about, they delete the pictures on there if you don't pay for membership.
I'm also quite active on here if you want pictures right from the source
Imageshack is the host I'm worried about, they delete the pictures on there if you don't pay for membership.
I'm also quite active on here if you want pictures right from the source

Thread Starter
Joined: Mar 2010
Posts: 10,766
Likes: 2,317
From: ON, Canada
Here's the method I use for cars I work on:
Unbolt the two bolts holding the fuse box. One top, one bottom. Top one is harder to see.
Move the fuse box until you can fit your left hand behind it.
Then with your right hand, from the front of the fuse box, depress the clip while your left hand pulls on the harness.
Unbolt the two bolts holding the fuse box. One top, one bottom. Top one is harder to see.
Move the fuse box until you can fit your left hand behind it.
Then with your right hand, from the front of the fuse box, depress the clip while your left hand pulls on the harness.
Yes, it's very easy to locate, actually.
Remove the driver dash under cover on the driver side, then remove the driver lower dash cover as shown in the DIY.


The parking light wire is a red and black with on a connector bundled on the left of the frame.
It should be directly under the driver side air vent.
This is what the "connector bundle" looks like.
The parking light wire is shown on the picture also. It's the far corner one.
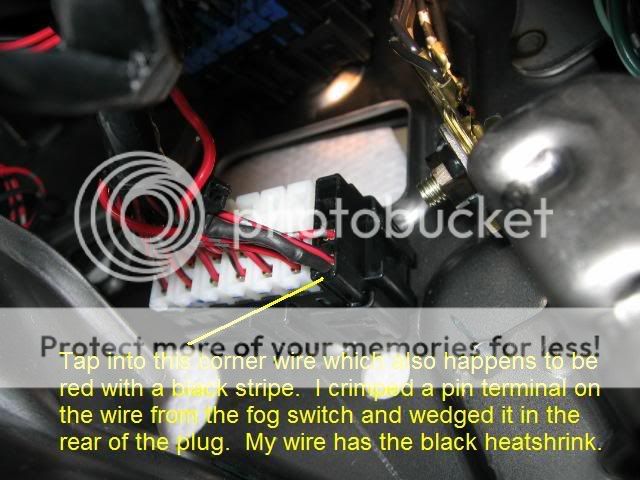
Don't wedge the footwell wire to the pin like they did in the picture - use a T-Tap splice connector as it's easier.
Cheers
Remove the driver dash under cover on the driver side, then remove the driver lower dash cover as shown in the DIY.
The parking light wire is a red and black with on a connector bundled on the left of the frame.
It should be directly under the driver side air vent.
This is what the "connector bundle" looks like.
The parking light wire is shown on the picture also. It's the far corner one.
Don't wedge the footwell wire to the pin like they did in the picture - use a T-Tap splice connector as it's easier.
Cheers
So I hooked up the positive wire to the driver power seat slide and the negative to the parking light wire. But the results are the opposite of what I wanted. LEDs stay on when the lights are off reguardless of if the key is in the ignition and the lights go off when I flip on the parking or low beams
Which wire do I need to tap for the negative wire so the leds only stay on when the lights are turned on?
![[DIY] Let's Add Some Class: Footwell LED Lighting-0zhganj.jpg](https://acurazine.com/forums/attachments/3g-tl-2004-2008-93/120397d1683211512-%5Bdiy%5D-lets-add-some-class-footwell-led-lighting-0zhganj.jpg)
![[DIY] Let's Add Some Class: Footwell LED Lighting-ofqhqw2.jpg](https://acurazine.com/forums/attachments/3g-tl-2004-2008-93/101876d1683211512-%5Bdiy%5D-lets-add-some-class-footwell-led-lighting-ofqhqw2.jpg)
Just finished this task using this guide. Thanks!
Holy hell, the plug for the dome wire is awkward af to get to with the quick splice, I almost put it too close to the plug, causing a space issue. But excellent finished product. Comes on and fades out ,easy peasy.
Holy hell, the plug for the dome wire is awkward af to get to with the quick splice, I almost put it too close to the plug, causing a space issue. But excellent finished product. Comes on and fades out ,easy peasy.

Advanced
Joined: Jan 2016
Posts: 94
Likes: 7
From: 604
I just finished this on my 2nd gen.
I tapped into the harness nearest to the dome light for me, the add a fuse method didn't work for me since the fade option did not work. Tapped to the dome it does.
No pics yet, I'll wait until tonight.
I tapped into the harness nearest to the dome light for me, the add a fuse method didn't work for me since the fade option did not work. Tapped to the dome it does.
No pics yet, I'll wait until tonight.

Blurry


Intermediate
Joined: May 2016
Posts: 34
Likes: 1
From: Atlanta
I've been searching all over, I swear there used to be a DIY for this that involved using the cigarette lighter slot in the center console. I'd feel more comfortable doing it that way. Anyone have a link to that?


The negative wire gets tapped to a source depending on how you want the lights to come on.
Do you want them to be on 24/7? You would put the negative to the ground bolt.
Do you want them on when you start your car? You would put the positive to fuse #32, and negative to a ground bolt.
Do you want them to turn on only when the doors are open? You would follow this DIY and tap the negative wire to the dome supervisor wire.
Do you want them to turn on only when you turn on your headlights? You would tap the negative wire to the parking light wire.
WIth the parking lights on the dome negative and the fuse will be isolated on the 87A, they no longer matter if the parking lights are on and the relays are energized. When parking lights go back off, the footwell lights will be off and only work if the dome light is triggered.

Last edited by DesertMistTL; Oct 9, 2016 at 10:59 PM.
GP16 - thanks for the thorough write up. I have saved this thread for years, and just bought the stuff to do it, lol *However* I'm just now reading about the struggles the 6MT owners will have in reaching the 5-pin harness. Thanks to Dracura, CrazyEigths, Splew, Viet, and Sick TLS for adding their experience on how to get the connector out while dealing with the clutch pedal blocking access though. I'm still not sure about when the best option will be for me to get at it. Are there any other 6MT tips, or a summary of options, for getting at this connector?
I want the LEDs to come on when the door is opened and turn off when the door is closed (preferably dim with the dome lights)
Thanks,
James
I want the LEDs to come on when the door is opened and turn off when the door is closed (preferably dim with the dome lights)
Thanks,
James
Last edited by tomlinsonj; Nov 7, 2016 at 01:54 PM.
Ok, so Id like to add capability to have these on a toggle, one side to come on and fade off to the dome supervisor , and an "on" .
I've installed the lights and hooked up to the DS wire. but want them on sometimes besides with the domes.
How do I use two souces?
I've installed the lights and hooked up to the DS wire. but want them on sometimes besides with the domes.
How do I use two souces?
1. Do you have a constant ground to them with switched power (such as power coming from dome light)?
2. Do you have a constant power to them with switched ground (such as ground triggered from dome light)?
If number 1 above then you could do the following
1. You need a secondary power source. The accessory fuse (#32 7.5A I think) on the interior fuse panel is an option (by using an add a fuse) or you can tap into the power leads to the cigarette lighter sockets.
2. You need two 12v diodes of proper type (fast switching renner diodes I believe). Two diodes assumes that currently a single power lead powers all the LEDs that you want to do this with (if not then this will change things). These have to be placed in line from each main line coming from both power sources. This will prevent power from one source powering the components on the other source. (i.e. if you turn it on via switch, it won't turn on dome light, without the diodes the dome light would come on)
3. After diodes are put in line from each power source, then just connect both power leads (after the diode) to your LED power input line.
That is high level explanation assuming you know what I'm talking about in how to use diodes. If that stuff doesn't jive with the install instructions or if option 2 (switched ground) is done, then others can speak up as to correct process to do that.
Last edited by Buda; Nov 8, 2016 at 03:02 PM.