DIY: JDM Honda Type S Skirt Package Install (non-drilling method)
 05-31-2011, 10:06 PM
#1
DIY: JDM Honda Type S Skirt Package Install (non-drilling method)
The JDM Type S skirt package consists of a front underspoiler, side skirts and a full bumper replacement. It didn't come with mounting hardware or any installation instructions, hence this DIY. Acura wanted a cool $120 and a 2 month wait for the mounting hardware so I ended up going through Fastenal and the local auto parts shop and ended up shelling out only $20.
Parts List
Front underspoiler
Side skirts
Rear bumper
No additional mounting hardware needed
Tools Needed
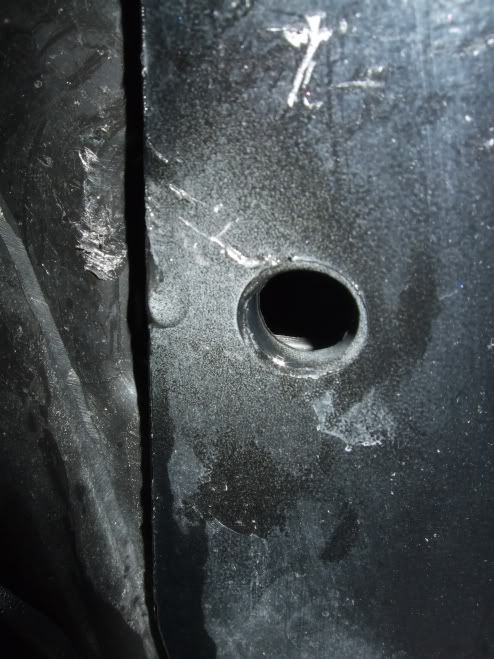
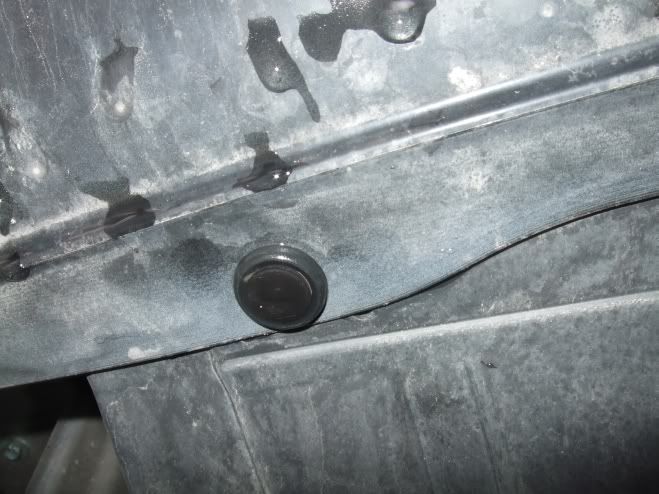
First locate the two small indents on the edge of your front bumper in the front wheel well.
Insert two 5mm clip nuts being careful to have the raised part of the nut facing forward. It helps to have the front wheel turned or removed to give yourself more room.
Move to the front of the vehicle and look underneath the bumper to find 8 of these slots.
And one of these holes on either side of the bumper
Insert ten 6mm clip nuts into these slots with the raised portion of the nut facing upwards.
Prep the surface of the front bumper with some rubbing alcohol on a clean shop rag.
On the underspoiler itself, peel back a portion of the 3M tape backing and use some masking tape to temporarily secure the backing of the tape to the front of the spoiler (makes it easier to peel later).
Get a friend to hold the spoiler against the bumper and insert two 5mm self-tapping screws on each side of the car into the clips nuts you put into the wheel well earlier.
Insert ten 6mm bumper bolts into the clip nuts under the spoiler.
Position the spoiler and then remove the rest of the backing of the 3M tape. Using firm pressure (Honda recommends a roller) press down on the spoiler till the tape holds securely.
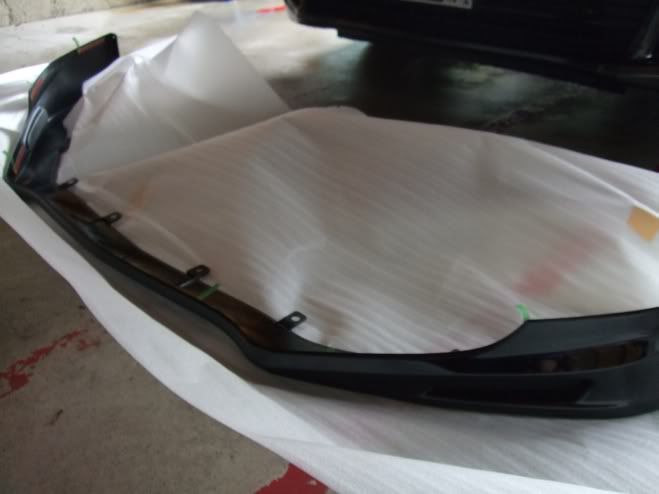
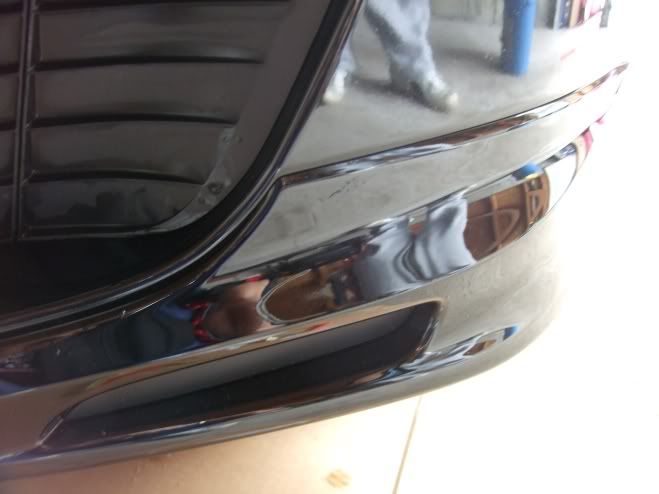
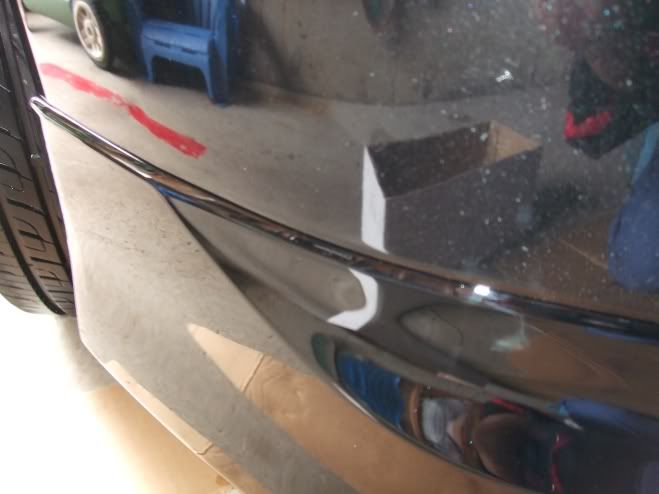
Some pics of the fitment
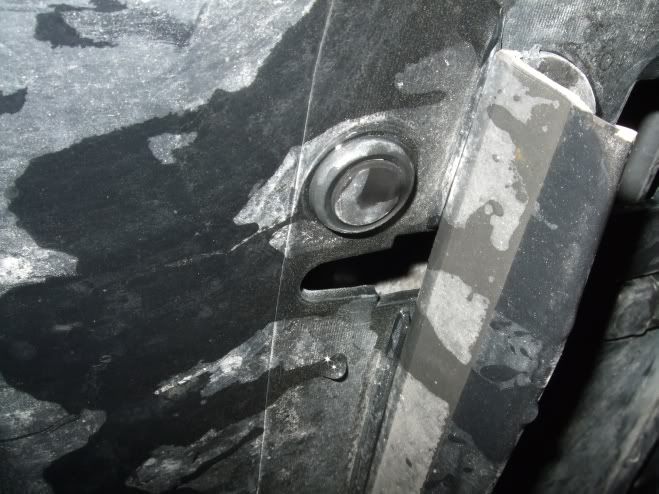
Find and remove these two screws in the rear wheel well
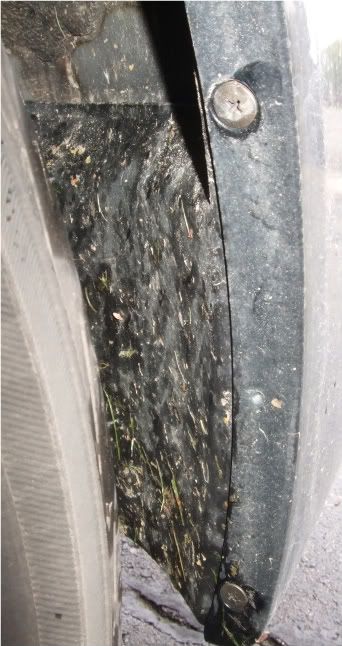
And this one up high at almost the 2 o-clock position in the wheel well

Look directly under the bumper near the license plate and find and remove two of these bumper clips
Open the trunk and use a slotted screwdriver to remove the cap for two of these bolts

Ok here's where everyone gets nervous. Gently and carefully pull back and out on the bumper starting at the wheel well to help the bumper disengage from the mounting tabs. It might help to insert something to disengage the tabs but mine came out pretty easily. Work slowly and don't rush this part or you'll end up with broken mounting tabs. Here's what the bumper looks like removed
Take the two reflectors out of the old bumper and place it into the new one.

Install of the new bumper is reverse of the above steps and you'll end up with this
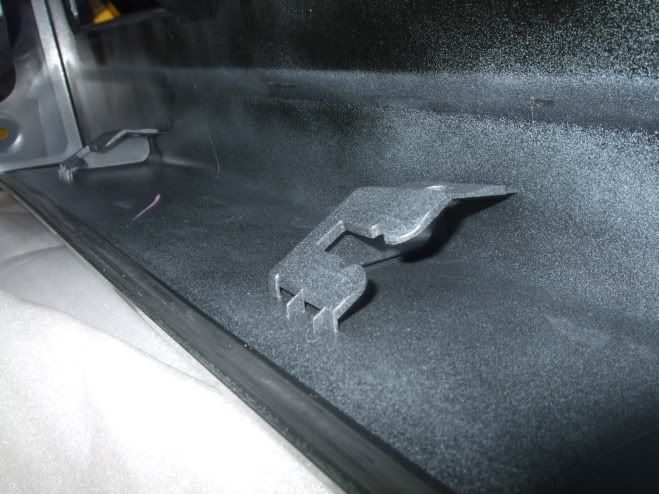
Here's what the side skirts look like from Honda. I removed the white tabs because I'm not drilling into the sides of my rocker panel to mount these.
Tabs removed
Using a phillips head screwdriver, remove the 3 self-tapping screws holding the front mudguard in place. It helps to turn the front wheel or remove it altogether.
Have a friend position the skirt in place against the rocker panel and look underneath the skirt. Locate the three holes for the bumper clips and use a marker to mark the position of these holes. Set skirt aside.
Set the parking brake, locate the jack point and jack up the front of the vehicle. Place vehicle securely on jack stands and set down wheel chocks or block the rear wheels. Get a drill and 3/8 drill bit and make a hole at the front and middle holes you've marked. It helps to make a pilot hole before you start drilling with the 3/8. Apply touch-up paint to the hole to prevent rust forming. Lower the vehicle and repeat with the rear hole.
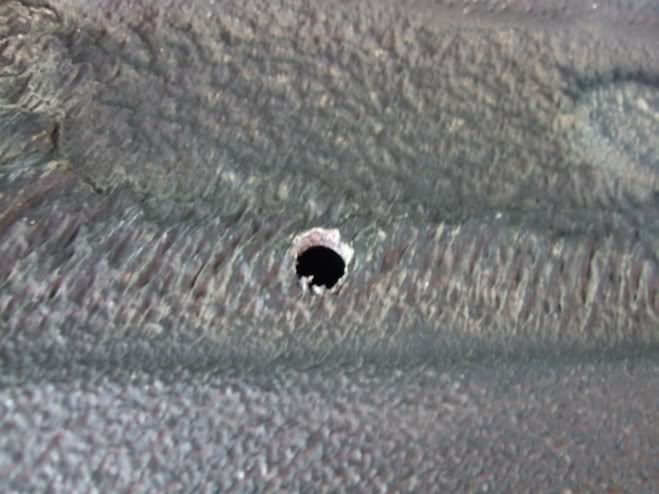
Place 3M tape along the length of the side skirt and remove a small portion of the backing as you did with the front underspoiler. Have a friend hold the skirt and insert two of the three self-tapping screws you removed from the mudguard into the holes in the front of the skirt in the front wheel well. Insert 3 bumper clips into the holes you drilled under the vehicle.
Prep the surface with rubbing alcohol. Position the skirt and carefully remove the backing of the 3M tape.
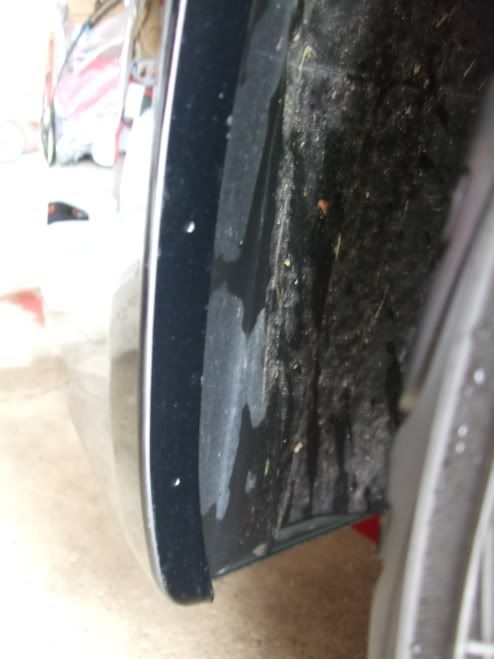
TIP! Don't position the skirt too high or you won't be able to open the rear doors!! There is a crease along the body and door that lines up with the skirt.
Use firm pressure or a roller as above with the front underspoiler and secure the side skirt. Repeat for the other side.
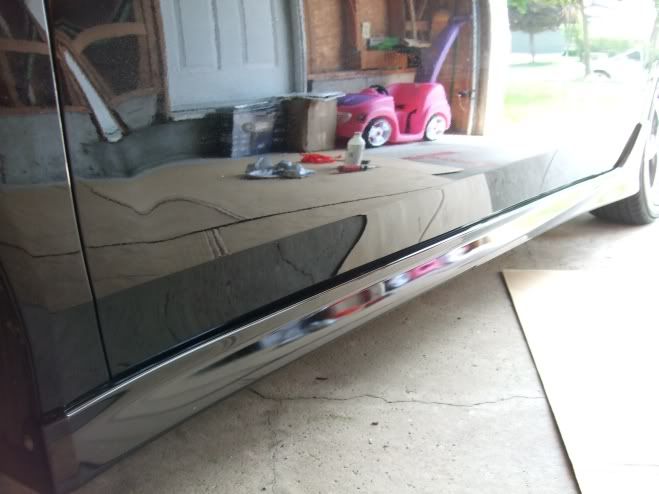
Honda recommends not washing the car for 24 hrs. There's no rain forecasted for the next few days so I'm good! I'll wash and wax her up good later this week and do a formal photoshoot!
Parts List
Front underspoiler
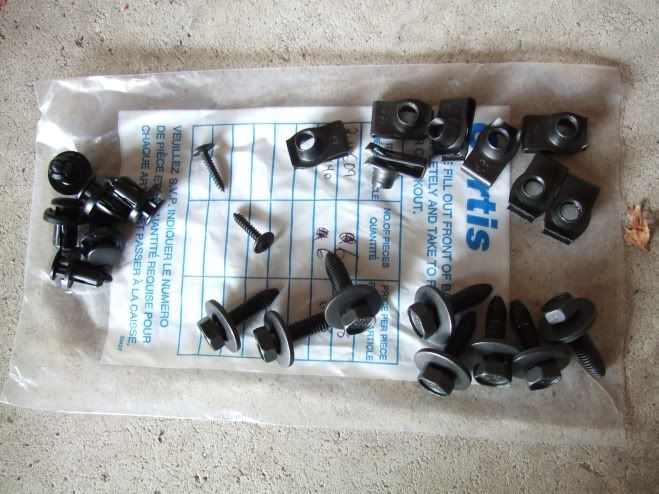
- 4x 5mm clip nuts
- 4x 5mm self-tapping screws (or 2x if you want to re-use 2 screws from your front mudguards)
- 10x 6mm clip nuts
- 10x bumper bolts
Side skirts
- 6x bumper clips
- 3M tape (non-drilling method)
Rear bumper
No additional mounting hardware needed
Tools Needed
- Screwdriver
- Ratchet
- Jack, jack stands, wheel chocks
- Rubbing alcohol
- Drill (to make holes for the bumper clips for the side skirts)
- Touch-up paint
Obligatory disclaimer: Please do not attempt this if you are not mechanically-inclined or do not understand the instructions. I assume no responsibility for any personal injury or damage you might cause by attempting this on your own. If you're not sure of how to do something, then have your dealer install it!
FRONT UNDERSPOILER INSTALLATION
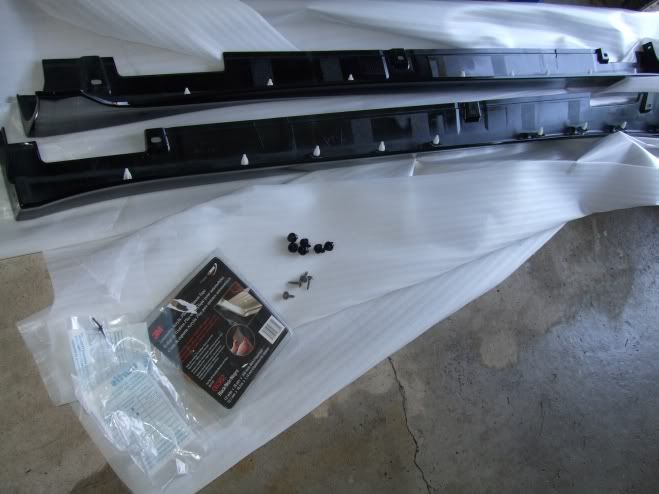
Here's what the hardware and front underspoiler look like unpackaged:FRONT UNDERSPOILER INSTALLATION
First locate the two small indents on the edge of your front bumper in the front wheel well.
Insert two 5mm clip nuts being careful to have the raised part of the nut facing forward. It helps to have the front wheel turned or removed to give yourself more room.
Move to the front of the vehicle and look underneath the bumper to find 8 of these slots.
And one of these holes on either side of the bumper
Insert ten 6mm clip nuts into these slots with the raised portion of the nut facing upwards.
Prep the surface of the front bumper with some rubbing alcohol on a clean shop rag.
On the underspoiler itself, peel back a portion of the 3M tape backing and use some masking tape to temporarily secure the backing of the tape to the front of the spoiler (makes it easier to peel later).
Get a friend to hold the spoiler against the bumper and insert two 5mm self-tapping screws on each side of the car into the clips nuts you put into the wheel well earlier.
Insert ten 6mm bumper bolts into the clip nuts under the spoiler.
Position the spoiler and then remove the rest of the backing of the 3M tape. Using firm pressure (Honda recommends a roller) press down on the spoiler till the tape holds securely.
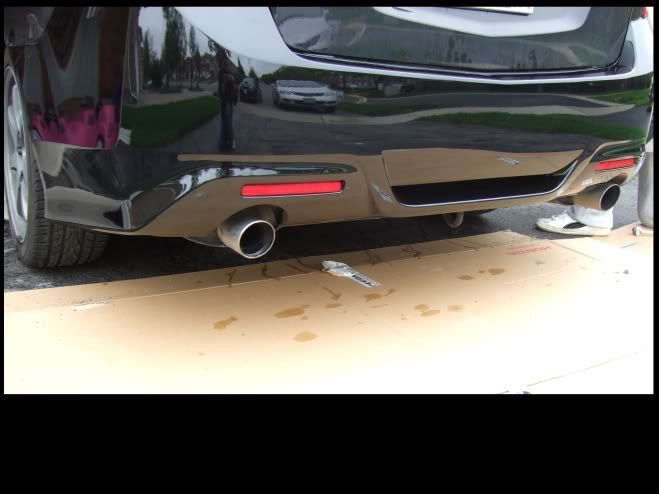
Some pics of the fitment
REAR BUMPER INSTALLATION
The rear bumper is just a replacement so it's a simple take-off, put-on affair.Find and remove these two screws in the rear wheel well
And this one up high at almost the 2 o-clock position in the wheel well
Look directly under the bumper near the license plate and find and remove two of these bumper clips
Open the trunk and use a slotted screwdriver to remove the cap for two of these bolts
Ok here's where everyone gets nervous. Gently and carefully pull back and out on the bumper starting at the wheel well to help the bumper disengage from the mounting tabs. It might help to insert something to disengage the tabs but mine came out pretty easily. Work slowly and don't rush this part or you'll end up with broken mounting tabs. Here's what the bumper looks like removed
Take the two reflectors out of the old bumper and place it into the new one.
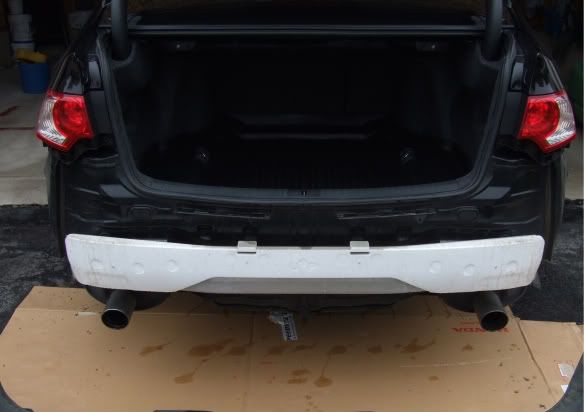
Install of the new bumper is reverse of the above steps and you'll end up with this
SIDE SKIRT INSTALLATION (NON-DRILLING METHOD)
Here's what the side skirts look like from Honda. I removed the white tabs because I'm not drilling into the sides of my rocker panel to mount these.
Tabs removed
Using a phillips head screwdriver, remove the 3 self-tapping screws holding the front mudguard in place. It helps to turn the front wheel or remove it altogether.
Have a friend position the skirt in place against the rocker panel and look underneath the skirt. Locate the three holes for the bumper clips and use a marker to mark the position of these holes. Set skirt aside.
Set the parking brake, locate the jack point and jack up the front of the vehicle. Place vehicle securely on jack stands and set down wheel chocks or block the rear wheels. Get a drill and 3/8 drill bit and make a hole at the front and middle holes you've marked. It helps to make a pilot hole before you start drilling with the 3/8. Apply touch-up paint to the hole to prevent rust forming. Lower the vehicle and repeat with the rear hole.
Place 3M tape along the length of the side skirt and remove a small portion of the backing as you did with the front underspoiler. Have a friend hold the skirt and insert two of the three self-tapping screws you removed from the mudguard into the holes in the front of the skirt in the front wheel well. Insert 3 bumper clips into the holes you drilled under the vehicle.
Prep the surface with rubbing alcohol. Position the skirt and carefully remove the backing of the 3M tape.
TIP! Don't position the skirt too high or you won't be able to open the rear doors!! There is a crease along the body and door that lines up with the skirt.
Use firm pressure or a roller as above with the front underspoiler and secure the side skirt. Repeat for the other side.
Honda recommends not washing the car for 24 hrs. There's no rain forecasted for the next few days so I'm good! I'll wash and wax her up good later this week and do a formal photoshoot!

The following users liked this post:
dave_88 (10-28-2014)
05-31-2011, 11:11 PM
#2
ahhhh!!! cant wait to see the real photos. Great write up man and I am very jealous of your sexy new ride.
 06-01-2011, 01:38 AM
#4
Three Wheelin'
Excellent writeup
I was quite surprised that the kit did not come with installation instructions or hardware. Can't wait to see the final product.
I was quite surprised that the kit did not come with installation instructions or hardware. Can't wait to see the final product.
06-01-2011, 01:16 PM
#6

Thanks Rawesome. Your ride was one of the ones that inspired this purchase. $2k and change.
06-01-2011, 05:01 PM
#7

WTF no hardware either!!!!!!!!!!!!
damn...I'm pissed. And I'm still pissed off that drilling is 'required' for the side skirts, but I understand why now.
I wonder if someone on here in Russia or Japan can get a hold of the Honda instructions for us.
Did you locate some instructions already? Where did you get the 'Honda recommends a roller' from?
Last edited by Prototype; 06-01-2011 at 05:06 PM.
Trending Topics
06-01-2011, 05:38 PM
#8
You'll be hard-pressed to find instructions since the side skirts and rear bumper are not accessories--they're actual body parts for the Type S. I believe the front underspoiler is an actual accessory. Yeah, mounting hardware would have been nice but hey $20 is not too bad. That's the whole point of this DIY. If you still want instructions, the best bet would be to find a Japanese or European equivalent of a Haynes shop manual and look up one for the Type S....yeah a long shot.
I just looked up Honda's instructions for installing bodykits from previous gens and other models and got an idea of where to start from there.
I just looked up Honda's instructions for installing bodykits from previous gens and other models and got an idea of where to start from there.
 06-05-2011, 04:31 PM
#11

Looks great my friend. I've been keeping the runways hot from VA to WA to NY and out to Cali tomorrow. :P Maybe I'll get my side skirts installed eventually. I bought all the hardware to drill, but haven't had the time to sort exactly where the holes need to go.
06-05-2011, 08:32 PM
#12
Just a heads up if you do decide to drill--definitely start with a pilot hole and go up gradually. Make sure your drill bit is sharp too--my job on the underside took 30 min longer cause I was working with a dull bit. Switched to a sharper one and it went right through easy.
06-26-2011, 10:53 AM
#13
Still coast hopping and the skirts have been sitting on my shelf for the last month+. I am leaning towards 3m install in case I ever want to remove them as well. I already bought the hardware for the install though so I'm not sure. I guess thats why I've been putting it off so long. Once I start drilling it'll be too late to turn back 
07-05-2011, 06:30 AM
#14
I ordered the double sided 3M industrial strength tape last week and celebrated the 4th with the installation of the skirts. Unfortunately it dumped rain right after the install so she is garaged for a few days. I did manage one pic from my phone. Thanks 5thTo2nd for setting up the group by and making my V6 that much more unique.
Pardon my messy garage

(The white line is just reflection of my flourescent lights)
Pardon my messy garage

(The white line is just reflection of my flourescent lights)

Thread
Thread Starter
Forum
Replies
Last Post
saberlove
2G TL Performance Parts & Modifications
12
03-11-2021 09:29 AM
nuldabz
3G TL Tires, Wheels & Suspension
3
09-03-2015 05:49 PM