DIY: Front Bumper Removal
 05-16-2012, 12:47 AM
#1
Safety Car
Thread Starter

DIY: Front Bumper Removal
OK, so you want to remove your front bumper do you? Finally manned up, and are willing to try it, but don't wanna just wing it? well, Here ya go. if you have any questions, post them up or PM me.
Some helpful links for after you remove the bumper
How to remove the intake resonator https://acurazine.com/forums/showthr...=DIY+resonator
How to install HID foglights
https://acurazine.com/forums/showthr...Y+HID+foglight
ok so to start off, pop your hood. remove the radiator cover, 8 clips as shown here
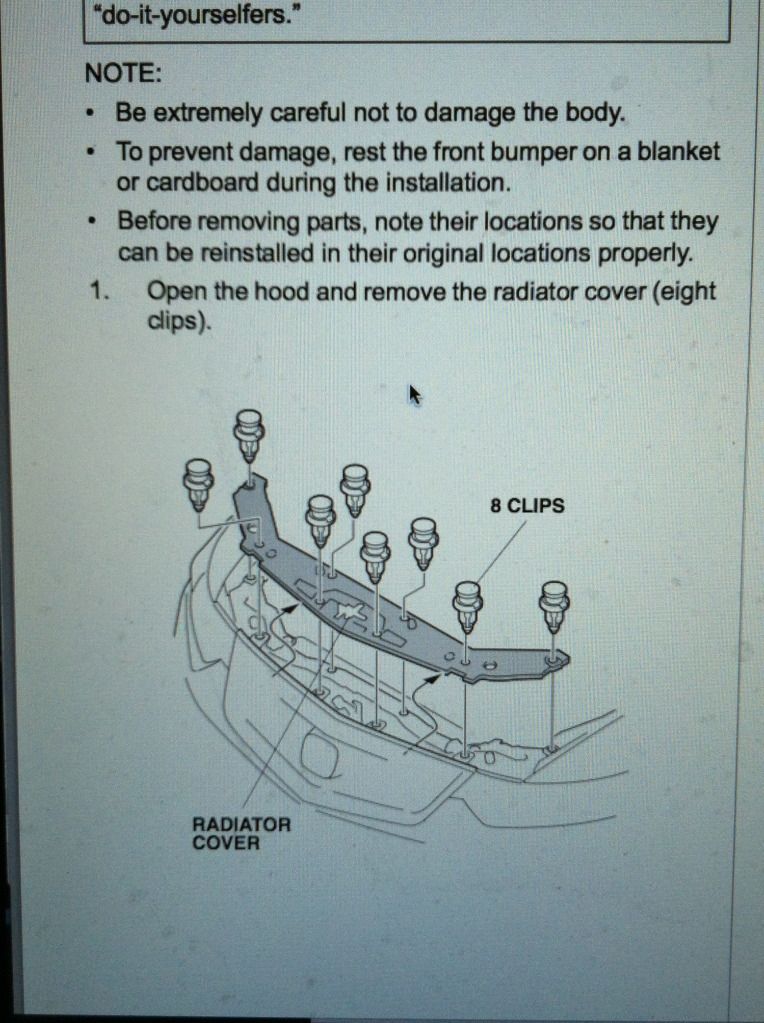
before and after


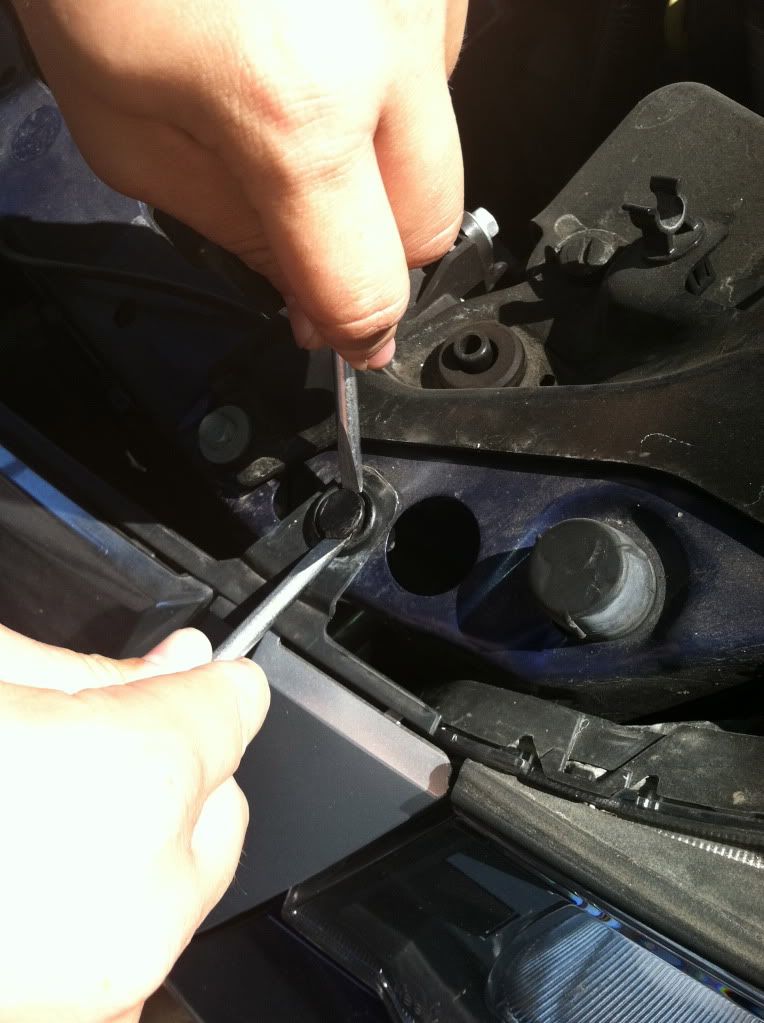
i prefer to put 2 of the clips back into the grill where it attaches to the frame, this pic also shows my method for removing the clips, two flatheads, then just use them as levers at the same time.
Then remove the phillips screw which is in each wheel well


ok now the annoying part, you gotta get underneath the car, and i didn't take pics of this, but heres the PDF part.
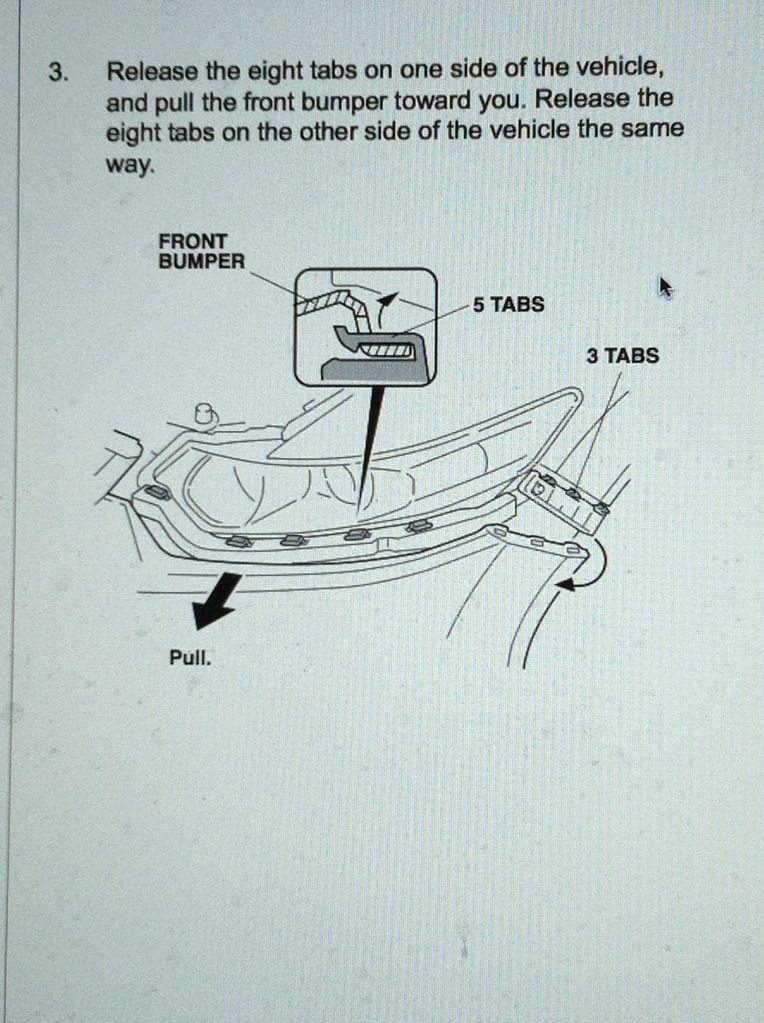
in the center, you will see a little black flap maybe a CM or 2 thick, and behind that, there are 6 clips. remove these. then on either side there are 3 more clips following the line of the bumper(remember the point is to separate the plastic bumper from the plastic black pieces of the car). the last clip of the 3 on each end is longer than the others. make note of where it goes, and keep it separate.

then remove the two clips you reattached to the top of the grill if you did that.
at this point, you have fully removed all the supports of the bumper except the built in clips for the headlight. this is the scariest and trickest part, but apply some force, and it should pop off. reach your hand through the wheel well area and push from behind the bumper. i dont know any real technique to make this easier. the bumper is hard to break and made of very tough plastic.
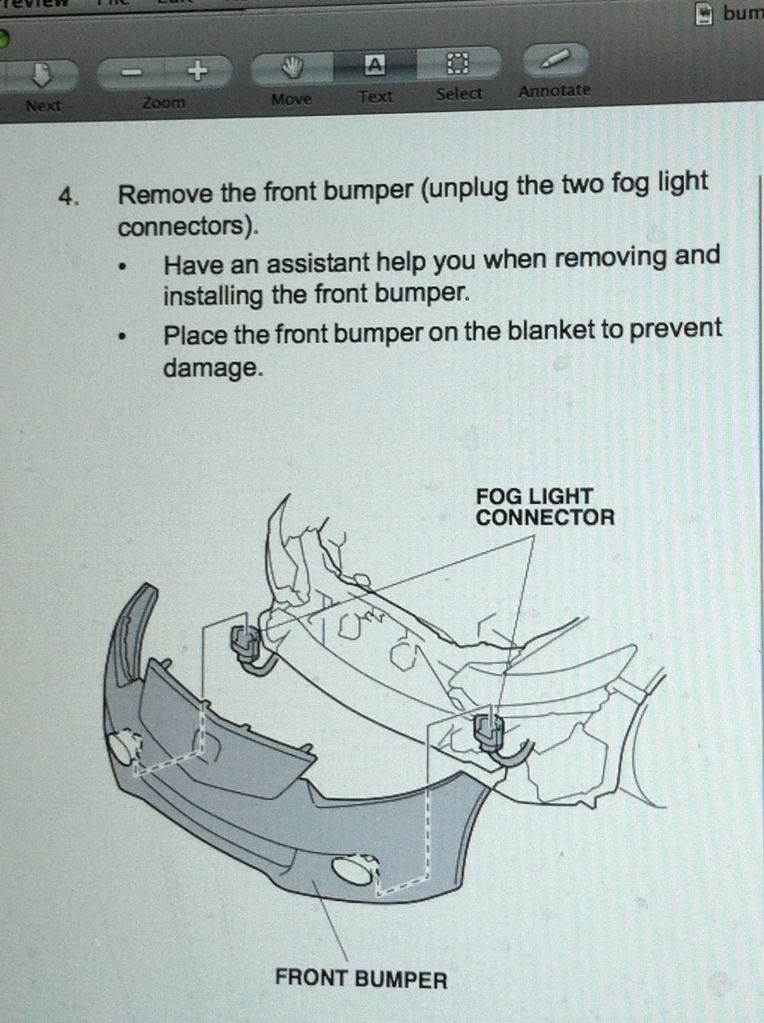
don't pull away from the car yet, the foglights are still attached. remove the foglight connectors(there is a tab on the side opposite the bulb near the bottom, just push it in, and pull the connector down and away from the bulb) or you can remove the entire bulb by twisting it counter clockwise, then place the bumper on cardboard or a beach towel.
DISCLAIMER: By attempting this guide or any DIY work, you understand the risks involved and relinquish all legal standing to sue or otherwise hold Myself, Acurazine, and its subsidiaries, or any other party or persons unless explicitly stated, responsible for any wrongdoing.
Some helpful links for after you remove the bumper
How to remove the intake resonator https://acurazine.com/forums/showthr...=DIY+resonator
How to install HID foglights
https://acurazine.com/forums/showthr...Y+HID+foglight
ok so to start off, pop your hood. remove the radiator cover, 8 clips as shown here
before and after
i prefer to put 2 of the clips back into the grill where it attaches to the frame, this pic also shows my method for removing the clips, two flatheads, then just use them as levers at the same time.
Then remove the phillips screw which is in each wheel well
ok now the annoying part, you gotta get underneath the car, and i didn't take pics of this, but heres the PDF part.
in the center, you will see a little black flap maybe a CM or 2 thick, and behind that, there are 6 clips. remove these. then on either side there are 3 more clips following the line of the bumper(remember the point is to separate the plastic bumper from the plastic black pieces of the car). the last clip of the 3 on each end is longer than the others. make note of where it goes, and keep it separate.
then remove the two clips you reattached to the top of the grill if you did that.
at this point, you have fully removed all the supports of the bumper except the built in clips for the headlight. this is the scariest and trickest part, but apply some force, and it should pop off. reach your hand through the wheel well area and push from behind the bumper. i dont know any real technique to make this easier. the bumper is hard to break and made of very tough plastic.
don't pull away from the car yet, the foglights are still attached. remove the foglight connectors(there is a tab on the side opposite the bulb near the bottom, just push it in, and pull the connector down and away from the bulb) or you can remove the entire bulb by twisting it counter clockwise, then place the bumper on cardboard or a beach towel.
DISCLAIMER: By attempting this guide or any DIY work, you understand the risks involved and relinquish all legal standing to sue or otherwise hold Myself, Acurazine, and its subsidiaries, or any other party or persons unless explicitly stated, responsible for any wrongdoing.

The following 10 users liked this post by PyroDave:
Acura_Dude (05-16-2012),
ceb (05-16-2012),
denwhat (05-16-2012),
GameOver69 (05-16-2012),
gwickes (05-19-2012),
and 5 others liked this post.
05-16-2012, 08:23 AM
#6
Everyday I'm rofling
Thanks for the writeup Dave! I know there will be a lot of people who can use this. Maybe it'll even inspire some to get modding seeing how easy it is to take it off.
05-16-2012, 09:19 AM
#7
Advanced
Yessss the thread I've been waiting for. I'll have a redone plastidipped grille and hopefully once I get the bumper off once, I'll have the confidence to maybe do an HID fog upgrade if I feel up to it vs the yellow halogen with laminx option.
Trending Topics
05-16-2012, 09:26 AM
#8
We don' need no stinkin' DIY. Just do it like a multitude of 2000-2003 Audi A6 owners (and many VW Jetta owners) and pull into a parking space with a parking block. Reverse. Bumper is removed.
With Audi/VW, it was a faulty underbody cladding design where the cladding was attached above the bottom of the bumper allowing the trailing edge of the bumper to catch on the parking block. A simple redesign fixed the problem but Audi/VW spent millions on warranty repairs for something that was really caused by the customer.

With Audi/VW, it was a faulty underbody cladding design where the cladding was attached above the bottom of the bumper allowing the trailing edge of the bumper to catch on the parking block. A simple redesign fixed the problem but Audi/VW spent millions on warranty repairs for something that was really caused by the customer.
 05-16-2012, 11:54 AM
#11
back in my day, when you wanted to remove your bumper, you just nutted up and tore that shit off hoping nothing broke
were babying the new guys for sure now

related: dont let pyro ever drive your car. Your lucky all your wheels showed up in one piece ben
 05-16-2012, 12:21 PM
#12
Safety Car
Thread Starter
glad you guys enjoyed it, i agree it is pretty simply, but you know what, never hurts to have a guide to follow along and make sure you don't mess anything up.when i went at it, i had no guide either, and i took off ALOT more clips that i needed to.(guys that have done it, you know the clips closer to the front of the bumper that hold in something on the bottom of the bumper? yup, i took all those off, and those are clips with metal inserts that are hard as fuck to remove)
related: last time i bumped into killerG in brooklyn, he didn't even get into my car and i couldn't get rid of the curry smell for a week...
05-17-2012, 04:04 AM
#16
 05-18-2012, 03:04 AM
#17

I read this writeup and few days back but didn't get a chance to post. Well done! This will definitely help all the new CU2ers who want to do some DIY Aero upgrades!
By the way, what is that thing above? A marmoset? Anteater? Sloth?
By the way, what is that thing above? A marmoset? Anteater? Sloth?

 05-18-2012, 12:18 PM
#19
ROTAREDOM
Can I add the fact that it is definitely a good idea to put the clips back on your bumper! Or at least put all of the clips that attach to the splash guard/wheel well liner. It can and will fuck it up. I know from experience. Because the plastic is loose without the clips it will eventually start to rub on your tires, especially if you are lowered. If you hit any type of rock or just do a lot of highway driving you will burn straight through the plastic exposing your intake ( if you did resonator removal) and wiring to your fog lights. A new liner and clips are close to $130. Be warned
05-18-2012, 12:34 PM
#21
Safety Car
Thread Starter
Can I add the fact that it is definitely a good idea to put the clips back on your bumper! Or at least put all of the clips that attach to the splash guard/wheel well liner. It can and will fuck it up. I know from experience. Because the plastic is loose without the clips it will eventually start to rub on your tires, especially if you are lowered. If you hit any type of rock or just do a lot of highway driving you will burn straight through the plastic exposing your intake ( if you did resonator removal) and wiring to your fog lights. A new liner and clips are close to $130. Be warned
05-18-2012, 01:18 PM
#22
Advanced
Currently have my bumper sitting on my driveway with my grille inside on the couch, trying to take apart the two chrome trim pieces from the rest to give it a nice plastidip job. Anyone have experience tearing down the actual grille piece into its individual parts? It seems like the emblem has a part in holding it all together. Can't find those damn schematic drawings everyone posts when I need them now..
05-18-2012, 01:38 PM
#23
SeeYou2Crew #2
those part gave me difficulty as well.
i ended up not taking it off cuz i was scared i was gonna break it LOL
also. didnt modesto or ecko or someone didnt put on their clips, and when they were backing out or something the whole bumper was ripped out?
i ended up not taking it off cuz i was scared i was gonna break it LOL
also. didnt modesto or ecko or someone didnt put on their clips, and when they were backing out or something the whole bumper was ripped out?
05-18-2012, 01:41 PM
#24
Advanced
With it all apart like this, I'm real tempted to go ahead and do an actual paint match instead of a plasti dip..
05-18-2012, 01:42 PM
#25
Safety Car
Thread Starter
https://acurazine.com/forums/2g-tsx-2009-2014-143/2nd-gen-tsx-tsb-information-789358/
go there, click that blue "link" open up a random file, then scroll down in the thread i linked, and look for your year car with the TSB for the chrome grill molding peeling. open that PDF. it has the full schematics
go there, click that blue "link" open up a random file, then scroll down in the thread i linked, and look for your year car with the TSB for the chrome grill molding peeling. open that PDF. it has the full schematics
The following 2 users liked this post by PyroDave:
JordanTSX (05-18-2012),
MC MiYoung3269 (05-18-2012)
05-18-2012, 02:10 PM
#26
Advanced
Pyro, you're my TSX guardian angel.
Helpful diagrams, as well as realizing that the peeling chrome I just discovered post-plastidip removal is actually a TSB. hmmmm
Helpful diagrams, as well as realizing that the peeling chrome I just discovered post-plastidip removal is actually a TSB. hmmmm
05-18-2012, 02:23 PM
#27
Safety Car
Thread Starter
yea, plastidip is not the cause of that, though i recommend removing ALL of it off your grill prior to bringing it in. if it doesn't peel off quite right, or your coats are too thin and it just tears apart, buy goo gone, spray it on, then rub everything off. it gets a bit messy but it'll work
05-18-2012, 05:45 PM
#28
ROTAREDOM
Yeah the peeling chrome paint is bullshit, Im just waiting until it gets really bad then I can rip off the plastidip and the chrome paint at once and have a nice satin black plastic finish!
05-18-2012, 11:44 PM
#29
Advanced
If I take it into the dealership, they'll just replace the peeling parts automatically since its an official TSB, won't they? If they won't, I'm about to sand it all off and paint it. I hope they don't force me to do that though.
05-19-2012, 01:29 AM
#30
Safety Car
Thread Starter
if the service guy says you have to pay for it, inform him that there is a TSB. if they keep hassling you, print it, talk to the service manager, and let him know its not ok for his service advisors to try to con you, but it should never really get to that, this is acura not toyota
05-19-2012, 11:06 AM
#31
Advanced
So annoying. I'll have to wait till Monday to deal with them. Gave them a call on Friday and said that I was taking my car into the "body shop" to have them repaint my bumper and they already had the bumper all taken apart before we realized there was a TSB about the peeling chrome molding. We asked politely that since the car was already disassembled in the "body shop" (my driveway) that if we could bring in the peeling piece if they would just replace it. They said they would have to have me bring the whole car in assembled so he could make sure that it was covered by the TSB "because how would I know that it wasnt the rock chips you're getting re done that is the cause of the peeling molding".
Damnit. Took the whole bumper off just to put it back on to take it in on Monday to have them look at it and then take it all off again and replace it and then bring it home and take it off again to dip the grille again. At least I'm getting some good experience ripping that thing on and off again.
Got a nice little gap between the grille and bumper after putting it back together this time and can't exactly figure out the reasoning for it but I guess I'll just let it be and have the dealer fix it when I take it in hopefully.
05-19-2012, 04:24 PM
#33
Advanced
Link for DIY for rear bumper
In case anyone is looking, here's the DIY video I did awhile ago for the rear bumper removal (video is post #15, about halfway down the thread)... https://acurazine.com/forums/showthread.php?t=821584
05-19-2012, 06:51 PM
#34
SeeYou2Crew #2
So annoying. I'll have to wait till Monday to deal with them. Gave them a call on Friday and said that I was taking my car into the "body shop" to have them repaint my bumper and they already had the bumper all taken apart before we realized there was a TSB about the peeling chrome molding. We asked politely that since the car was already disassembled in the "body shop" (my driveway) that if we could bring in the peeling piece if they would just replace it. They said they would have to have me bring the whole car in assembled so he could make sure that it was covered by the TSB "because how would I know that it wasnt the rock chips you're getting re done that is the cause of the peeling molding".
Damnit. Took the whole bumper off just to put it back on to take it in on Monday to have them look at it and then take it all off again and replace it and then bring it home and take it off again to dip the grille again. At least I'm getting some good experience ripping that thing on and off again.
Got a nice little gap between the grille and bumper after putting it back together this time and can't exactly figure out the reasoning for it but I guess I'll just let it be and have the dealer fix it when I take it in hopefully.
Damnit. Took the whole bumper off just to put it back on to take it in on Monday to have them look at it and then take it all off again and replace it and then bring it home and take it off again to dip the grille again. At least I'm getting some good experience ripping that thing on and off again.
Got a nice little gap between the grille and bumper after putting it back together this time and can't exactly figure out the reasoning for it but I guess I'll just let it be and have the dealer fix it when I take it in hopefully.

The following users liked this post:
JordanTSX (05-20-2012)
05-20-2012, 12:29 PM
#35
Advanced
Figured that out a little bit after I posted that comment after looking closer at some drawings. Took the bumper back off, fixed it, and had it back on in less than 15 minutes so got some good practice. Thanks for the tip though!
The following users liked this post:
ed_423 (05-20-2012)
05-22-2012, 06:11 PM
#36
Great instructions, Dave.
So there are only 2 screws, the rest are just plastic clips?
My question, was it easy to remove the clip w/o breaking it AND was it easy to install it back?
Reason is: most of the time I removed the plastic clips, they either bent or broken and worst, I could never snap them back in.
If it does turn out all easy to put back, I might replace the foglight cover-lens myself, there is no reason for me to spend $400+ at the dealer to fix this.
05-23-2012, 02:19 PM
#37
Nice post! Side note, this took is excellent for removing the black clips without risk of breaking or distorting them:
http://www.heeltoeauto.com/honda-gen...ip-popper.html
Video in the link
http://www.heeltoeauto.com/honda-gen...ip-popper.html
Video in the link
05-23-2012, 03:00 PM
#38
Drifting
Great instructions, Dave.
So there are only 2 screws, the rest are just plastic clips?
My question, was it easy to remove the clip w/o breaking it AND was it easy to install it back?
Reason is: most of the time I removed the plastic clips, they either bent or broken and worst, I could never snap them back in.
If it does turn out all easy to put back, I might replace the foglight cover-lens myself, there is no reason for me to spend $400+ at the dealer to fix this.
So there are only 2 screws, the rest are just plastic clips?
My question, was it easy to remove the clip w/o breaking it AND was it easy to install it back?
Reason is: most of the time I removed the plastic clips, they either bent or broken and worst, I could never snap them back in.
If it does turn out all easy to put back, I might replace the foglight cover-lens myself, there is no reason for me to spend $400+ at the dealer to fix this.

