When you click on links to various merchants on this site and make a purchase, this can result in this site earning a commission. Affiliate programs and affiliations include, but are not limited to, the eBay Partner Network.
I did 4/6 plugs. I didn't change the plugs at far bank passenger side. I wanted to get the feel of doing them. I did attempt to take apart the very hard to get to plug. Damn it is very hard, but once you do it, it's very easy. I will replace the last the this weekend.
Another question is how do you know when an ignition coil is going to fail? One of the plugs I took out looked way more blackened then the rest.
That one plug that is hard to get to is easy once you get the hang of it. I actually put the socket with the 6" extension in first then put the 3" socket on.
Speaking the plugs. NGK just came out with the Laser Iridium. What do you think of it?
and the right type of spark plug socket with rubber inside.
That way you can complete the job in under thirty minutes. Remove the covers. remove the coil pack, then the plug. once you've done it once or twice it will take twenty minutes.
Thanks, great diy. I had my first run'in with coil packs on my Mom's '95 Volvo.
I have done many tune-ups on my old '95 Civic(s), and have found a deep well 6" spark plug socket to be a must have. I'm j/c because I find the deep socket eases the extraction of a seized plug, and gives you more even torque when installing the new plugs.
Is this not possible with the TL, due to the clearance issue, and therefore the extension method is prefered?
...I have done many tune-ups on my old '95 Civic(s), and have found a deep well 6" spark plug socket to be a must have. I'm j/c because I find the deep socket eases the extraction of a seized plug, and gives you more even torque when installing the new plugs.
Is this not possible with the TL, due to the clearance issue, and therefore the extension method is prefered?
Thanks.
See post #97- that's what I used & it works very well.
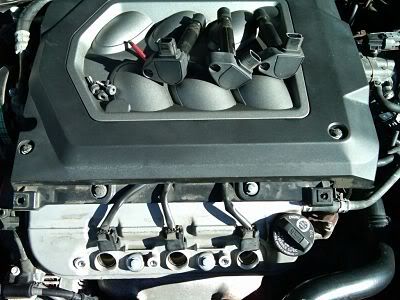
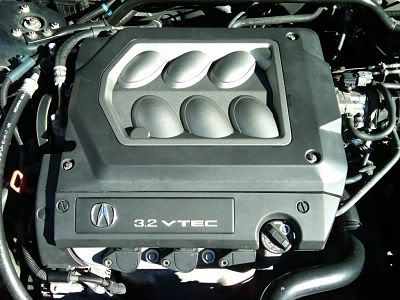
My friend has the 2003 TL Type S. I noticed there is something blocking the rear bank of plugs pictured here. What is this and how do I get to the plugs?
followed this post on my 01 tl, 148k miles. thought everything was spot on. i noticed that the engine starts a millisecond quicker. not sure if it's just in my head that things were noticeably better, but i think the plugs i pulled out were the original set so regardless it's an improvement. thanks for posting this.
I have an 03 TL-S, just turned 9 years @ 107K with original plugs. Are there any potential issues with plugs seizing in plug holes when I take them out. If so, how should I proceed with taking them out without stripping threads.
(Hey - I know 107 miles with original plugs? Car has been in gainful use first by my son for two years and next by my daughter for another two years and I am finally getting it back)
Took me about an hour+ to do mine. Had to remove that stabilizer bar to get to the rear plugs. Did this at around 75k, probably need to do it again soon, I'm at around 145k now. Definitely noticed a huge improvement after changing them, much smoother.
Just did this on my 03 TL-S. Did not have to remove anything at all, just had to play around with the orientation of the coil packs and extension/plug to feed them in and around the strut bar and the module that controls the V-tech. Took about 1 hour total, instead of a 6mm allen wrench I used a 6mm allen driver in a mini (1/8 in? I mean really tiny, this is it beside my 3/8 wrench ) . Made it super easy to position and remove the coil packs.
Just finished the plug change on my '02 TL (non type-S). Very easy. I don't know why everyone is complaining about the rear passenger plug, it's really not that hard - definitely not enough to stump anyone. The only difference is you are working in a tighter area and can only turn the ratchet 1/8 of a turn at a time, so that takes a little longer.
I did not have a spark plug socket, just used a 5/8" deep socket that worked fine. I then took some needle nose pliers and reached into the hole to grab the plug and pull it out. Smeared some anti-seize on the new plugs, dropped them in the hole, dropped the 5/8" socket connected to a 6" extension into the hole and tightened them down as much as I could by hand, then hooked up a ratchet and snugged them up a little bit more.
Ignition coil. Was wondering if you have to put coil back in same spark plug hole
Originally Posted by bruistopher
since i didn't see a DIY on how to replace or change spark plugs and had to search around the forum for numerous threads to see how to change them. i decided to make a thread on how to change spark plugs on the 2nd gen TL.
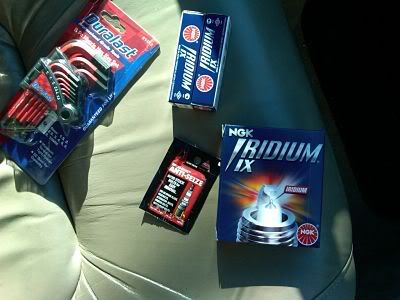
what you will need:
- 6 NGK Iridium IX spark plugs (they come pre-gapped)
- anti-seize grease
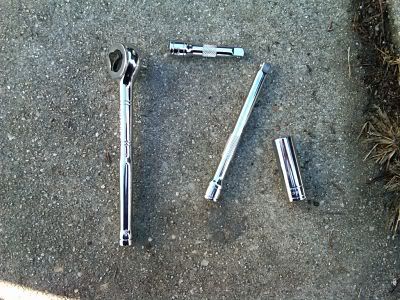
- 3/8 ratchet, 3" extension, 6" extension and spark plug socket (5/8)
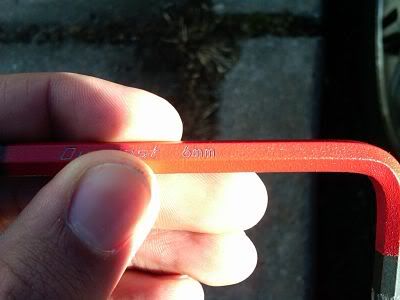
- 6mm allen wrench key (metric)
you will need time and patience, especially the rear passenger side spark plug.
difficulty: easy
time: probably 30 minutes to an 1 hour (if your a noob)
you will need as seen in the above pic:
-6mm allen wrench for the coil packs ($15, i got the whole metric set)
-6 NGK Iridium IX spark plugs ($7 each) ($42 for all 6) (autozone)
-anti-seize grease ($1.25)
-3/8 ratchet
-3" extension
-6" extension
-5/8 spark plug socket (it will help to have a magnet spark plug socket by the way)
now you can start at whichever bank (front or rear) you feel comfortable with.
i prefer to start with the rear bank, especially the passenger side spark plug, considering its the hardest out of them all and it takes more time then the others.
using your 6mm allen wrench:
Removing the bolts or screws on the coil packs:
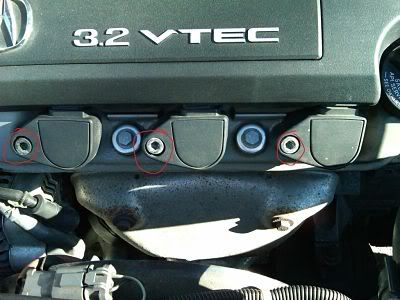
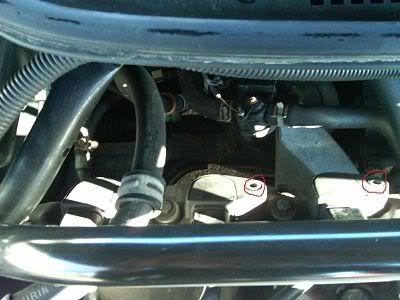
front bank: the bolts i circled red, you will be using the 6mm allen wrench to remove them.
the same can be said about the rear bank (the screws circled in red is what you will using your 6mm allen wrench for)
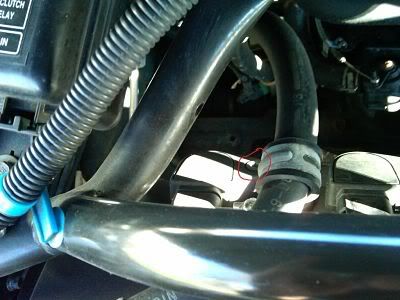
now i didn't highlight the passenger coil pack because it was difficult to take a picture of considering the power steering hose is in the way.
now thats the passenger coil pack bolt or screw that i circled red thats between the bar and the power steering hose. use your 6mm allen wrench to remove it.
this is optional but i suggest to remove the bolt that's holding the power steering hose, which is in this picture:
because it gives you some room to squeeze your hands in there to get the coil and to get the ratchet in place. the screw or bolt is 10mm deep socket and can be taken out using a 1/4 ratchet and 1/4 3" extension.
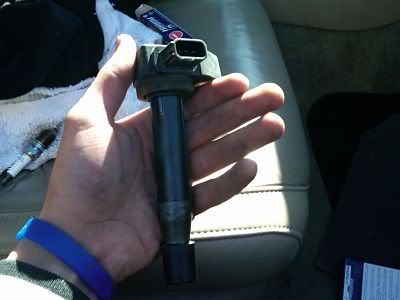
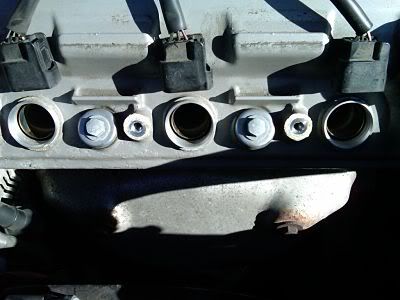
after removing the rear passenger side coil pack
make sure you place the coil pack somewhere in the car so that it doesn't drop or fall. these things are fragile according to 01tl4tl
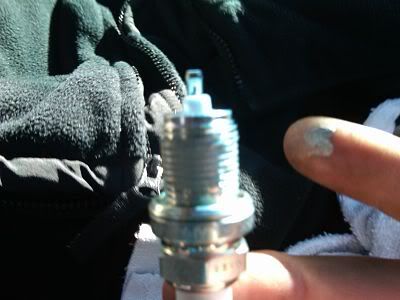
in order to remove the spark plug, i and 01tl4tl suggest to first combine the 3"extension and the spark plug socket and drop it in and then attach the 3/4 ratchet and 6" extension to undo the spark plug. it will take some time but you will get the hang of removing it. it took me 15 minutes to get that one out. but putting it back in was a breeze
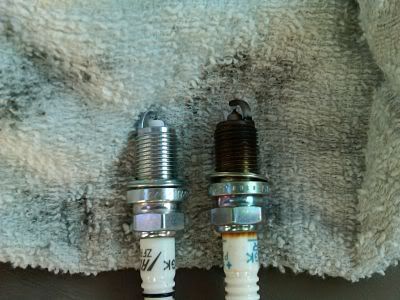
this is what most of my spark plugs looked like compared to the new ones (NGK Iridium IX):
now to add, those plugs were in the car ever since it was rolled off the dealer lot back in 1998
okay now is the best time to add anti-seize around the threads of the new spark plug:
make sure you DO NOT get anti-seize on the first 2 threads of the plug!! you do not what that stuff you in your combustion chamber!
then use the steps above in the reverse order to get the plug back in place. after you do the rear passenger spark plug doing the rest in the back is a breeze and definitely the front bank is easieR!
for torque specs for the spark plugs are 13 foot pounds. but i just hand-tighten mine first and then applied the 3/8 ratchet until they felt snug and then i put back on the coil pack.
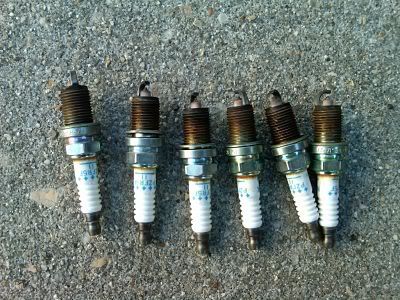
Here is all 6 old stock spark plugs
when you put all the coils back. put everything back together and start the engine up!
after the spark plug change:
-i noticed a huge amount of response on the throttle.
-its quieter, also there isn't any shaking at idle like i would feel in the morning and the car just started right up without any hesitation.
-the gas needle on the dash hasn't moved since the replacing of the spark plugs. usually my car goes through gas and i have been wondering why but it was the spark plugs that were old and worn out.
thanks to 01tl4tl and friesm2000 for the help
Hey I just changed my plugs and I was wondering if the coils have to go back in the same plug?
^^^ Yeah, as RONE said......replacing plugs with their corresponding coil is something that's normally done one cylinder position at a time.
However, in attempt to clarify the original question: if ya wanted to interchange a coil with a different cylinder's coil, to isolate a misfire .....that's not a problem.
great job!
now add 1 can seafoam to half tank of gas, do that twice and internals are now clean and can use those new spark plugs!
don't forget manual cleaning of TB air plate is still required to make it run its best
Clean and lube throttle return springs, and lube throttle and cruise cables while there
I actually did clean the TB thoroughly with TB cleaner and a rag and also the throttle springs and cables with silicone based lube. I also cleaned the air intake hose and replaced the air filter.. and removed the air intake resonator while I was there.
Is the seafoam treatment really as simple as 1 can of seafoam in half a tank of gas two times?
I thought I read in the DIY section about the seafoam treatment being a little more complicated.
YES!!!!! it is as simple as 1 can in half a tank 2 times
the diy is for the blaster method to get instant results, make smoke to annoy neighbors
Its really for mechanics who need to clean a carbon loaded engine to find a misfire or other issue, they need certain things at a known point
Ever see an old car keep running after key turned off? sounding like a diesel clattering that's severe carbon loading!!
for the rest of us: the gas tank method is WAY BETTER and safer= per seafoams head tech guy-
Because it gets to clean all the fuel tank, fuel line, pump, filter sock, from tank to injectors, that's important!
Time and heat, drives over 30 minutes are seafoams friend
It will take a few weeks for it to run thru the system
those doing the vac port ~blaster~ method should also run a can thru half tank to get those other parts clean
I haven't done either of those things. The intake manifold/egr system clean seems pretty straightforward from the post in the DIY thread, should I buy a spacer kit at the same time? https://acurazine.com/forums/second-...eaning-615644/
The PCV valve seems pretty easy to replace and it's only about $20, I assume mine is still in working condition but for the price should I just go ahead and replace it, or check to see if it's working and just clean it? Car has about 106k miles (2002 base tl).
I did my plugs today. Couldn't be easier. I had an 8" extension which simplified things. Also, removing the support bracket for the p/s hose made all the difference on that rear passenger side plug. I had the whole job done in 45 minutes.
After using the pulstar plugs for 5 months...I started having engine hesitation issues at different speeds. Changed back to stock NGKs over the weekend and the problem was resolved. The plugs worked fine for the first 5 months. No external signs of wear/tear on the plugs...must be an internal issue with the plugs. I had them in the car for about 8K miles.
Welcome Rascord !!!
Yeah, our TL's respond much better to NGK's.....nothing else comes close.
Thanks for reinforcing what most of us already know, it's good to know the results.
add another special plug to the do NOT use list, no bosch 4 prongers, no 2 buck chuck specials, ,,,,,
I believe its the TL high energy ignition of coil on plug that destroys many brands.
Pulsestars are often shown on cars with plug wires! where they work great!!
I just did my plugs and wanted to weigh in on the process.
It's super easy, even the back ones and the dreaded passenger one.
The trick with that passenger one is to detach the power steering hose mounting bracket and then tuck the hose under the box to the left. It'll stay out of the way for the job. Then, you can slip the socket and extensions into the coil pack channel, then attach the ratchet and ratchet away. I had no problems doing this - a novice can do it.
My plugs were never changed to my knowledge - and my car has 160K (bought '06 with ~50K). The coil packs look remarkably good, although one of them had a bit of rust. Here's some pics of my plugs. My only concern is the gunk that has piled up on the covers (both front and back). I'm not sure where it's coming from.
Yup NGK Irridium IX! Picked them up at O'Reilly for $7/ea. Changing these put a punch back in her step for sure. Hopefully I'll see much better gas mileage now. My guess is I'll need to change O2 sensor 1 soon as well, and inspect/clean EGR ports.
Sounds like Head cover gasket replacement is in order, is there a DIY on here for that? I also noticed that my oil cap was broken - probably by those jerks at one of the quick lube places. I'll bet the missing piece broke off and fell into my head cover and they certainly didn't bother telling me.
its a VALVE cover NOT a head cover- which would be the cylinder head
You appear to have a basic problem that may be just the bolt seals, or the entire valve cover gasket
IF its the vc gasket itself, replace them with the egr cleaning job, as the intake manifold will be off and easy access (only access) to the vc covers
Adjust the valves using a GO- NO GO feeler gauge, at 125-150kmiles its definitely due for that DIY..got the covers off and don't adjust the valves? what were you thinking!!
THEN it will run like a 200hp sewing machine
Don't forget the 2 times of seafoam in just under half tank of gas (8 gallons) so all the internal fuel flow parts and combustion area is sparkling clean like new! No danger to new spark plugs when used in gas tank
Wont hurt to replace the front O2 sensor at your miles, looking for max mpg as the goal, plus the power for fun when desired
Did this yesterday and its very easy...the trick with the rear is to remove the cruise module and brace and it make the job very easy.....approximately 30 min...tip: do it when the engine is warm....NOT HOT
never understood why everyone thinks they have to remove more than just the plastic covers and coils to change the plugs. Yea one is a little tighter than the others but with the correct extension compination it's a piece of cake.
 01-09-2012, 11:03 AM


 I had my first run'in with coil packs on my Mom's '95 Volvo.


 ) . Made it super easy to position and remove the coil packs.


 )
)