Rear Motor Mount Problem
 09-26-2013, 09:31 PM
#1
Intermediate
Thread Starter

Rear Motor Mount Problem
I just installed a new side and front motor mount. I have searched and searched and I can't find decent instructions on removing the rear motor mount. Can someone help me with videos, pictures, or a good explanation or DIY? The only thing I was able to do was remove the top nut off the bracket. I read somewhere that said to remove the strut bar, but when I removed all four nuts it wouldn't budge or go anywhere.
My car is currently on jack stands. Can someone help me with specific instructions? step by step, what tools I need, how many bolts, nuts, what needs to be removed, etc etc.. I already broke a knuckle attempting to remove a side bolt on the driver's side, but wasn't sure if that was part of the bracket. I've been going over and over on the diagram, but it wasn't helping.
Thank You.

The following users liked this post:
tsaiduk (09-26-2013)
09-26-2013, 10:10 PM
#3
Intermediate
Thread Starter
09-26-2013, 11:18 PM
#4
Moderator
^^ Try to make it a Picture DIY! it would be the first and a BIG HELP! for the forum
I will do it when I change mine but they are rock solid right now.
I will do it when I change mine but they are rock solid right now.
The following users liked this post:
3.2TLc (09-27-2013)
09-27-2013, 07:14 AM
#5

* ATTENTION MODS: Apparently this DIY thread for replacing the rear motor mount never made it to the 2nd Gen's Official "DIY" sticky.
It would be much easier to find for those needing this valuable info to have it there.
 thanks !
09-27-2013, 12:28 PM
thanks !
09-27-2013, 12:28 PM
#6
Senior Moderator
^ Done  (though i really need to go thru it and re-do it all
(though i really need to go thru it and re-do it all
The following users liked this post:
3.2TLc (09-27-2013)
09-27-2013, 04:38 PM
#7
Intermediate
Thread Starter

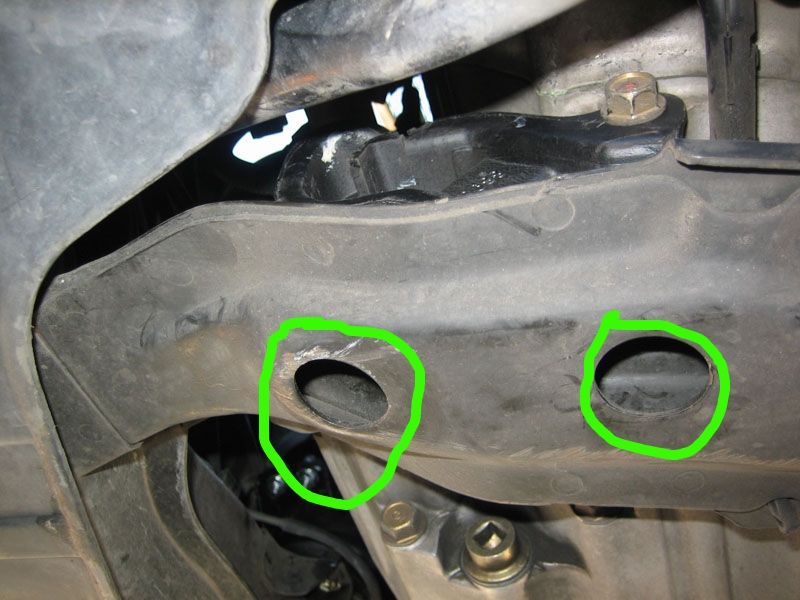
Removing the hidden bolts for the strut bar. There is two on each side in a hidden compartment below to the windshield wipers

It should be four 12mm, two on each side


Then there are the four nuts holding down the strut bar on the outside. Two on each side

There is a crap ton of wires and clamps mounted onto the strut bar

Strut bar disconnected and moved it aside onto the windshield.

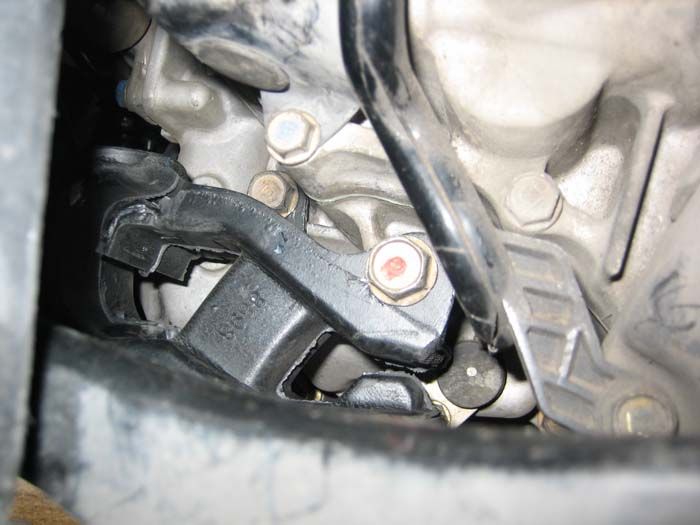
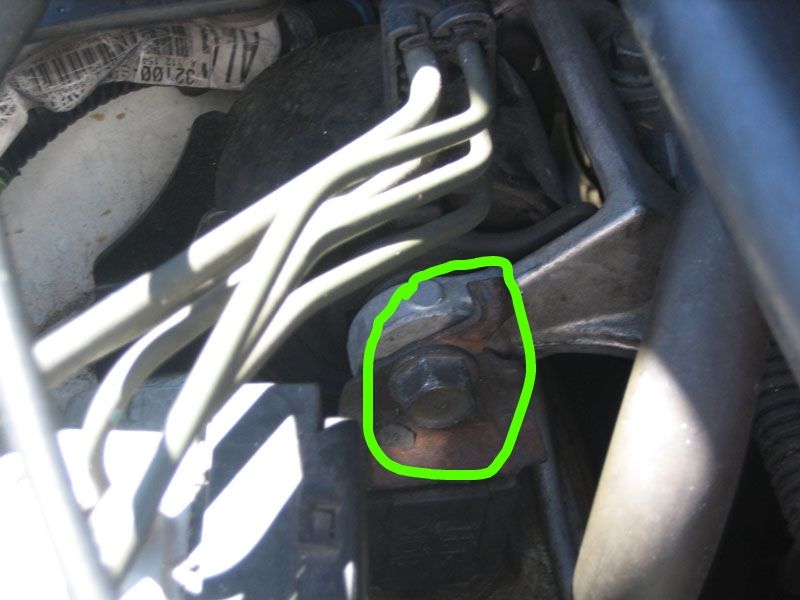
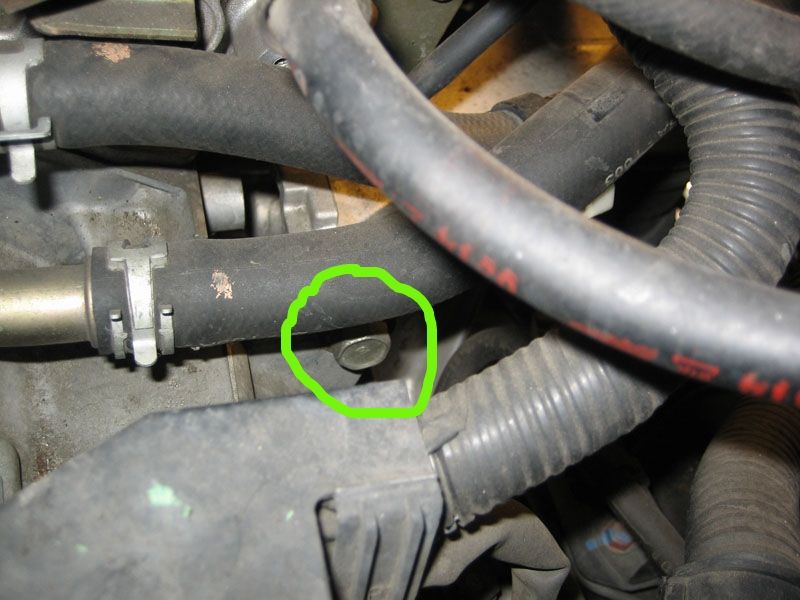
The bolt no one enjoys. The rear passenger bolt on the motor mount. Used my hand to place a 14mm and universal joint on it then attached a 21" extension bar 1/2" drive. Very difficult to get to, a lot of wires and hoses are in the way.

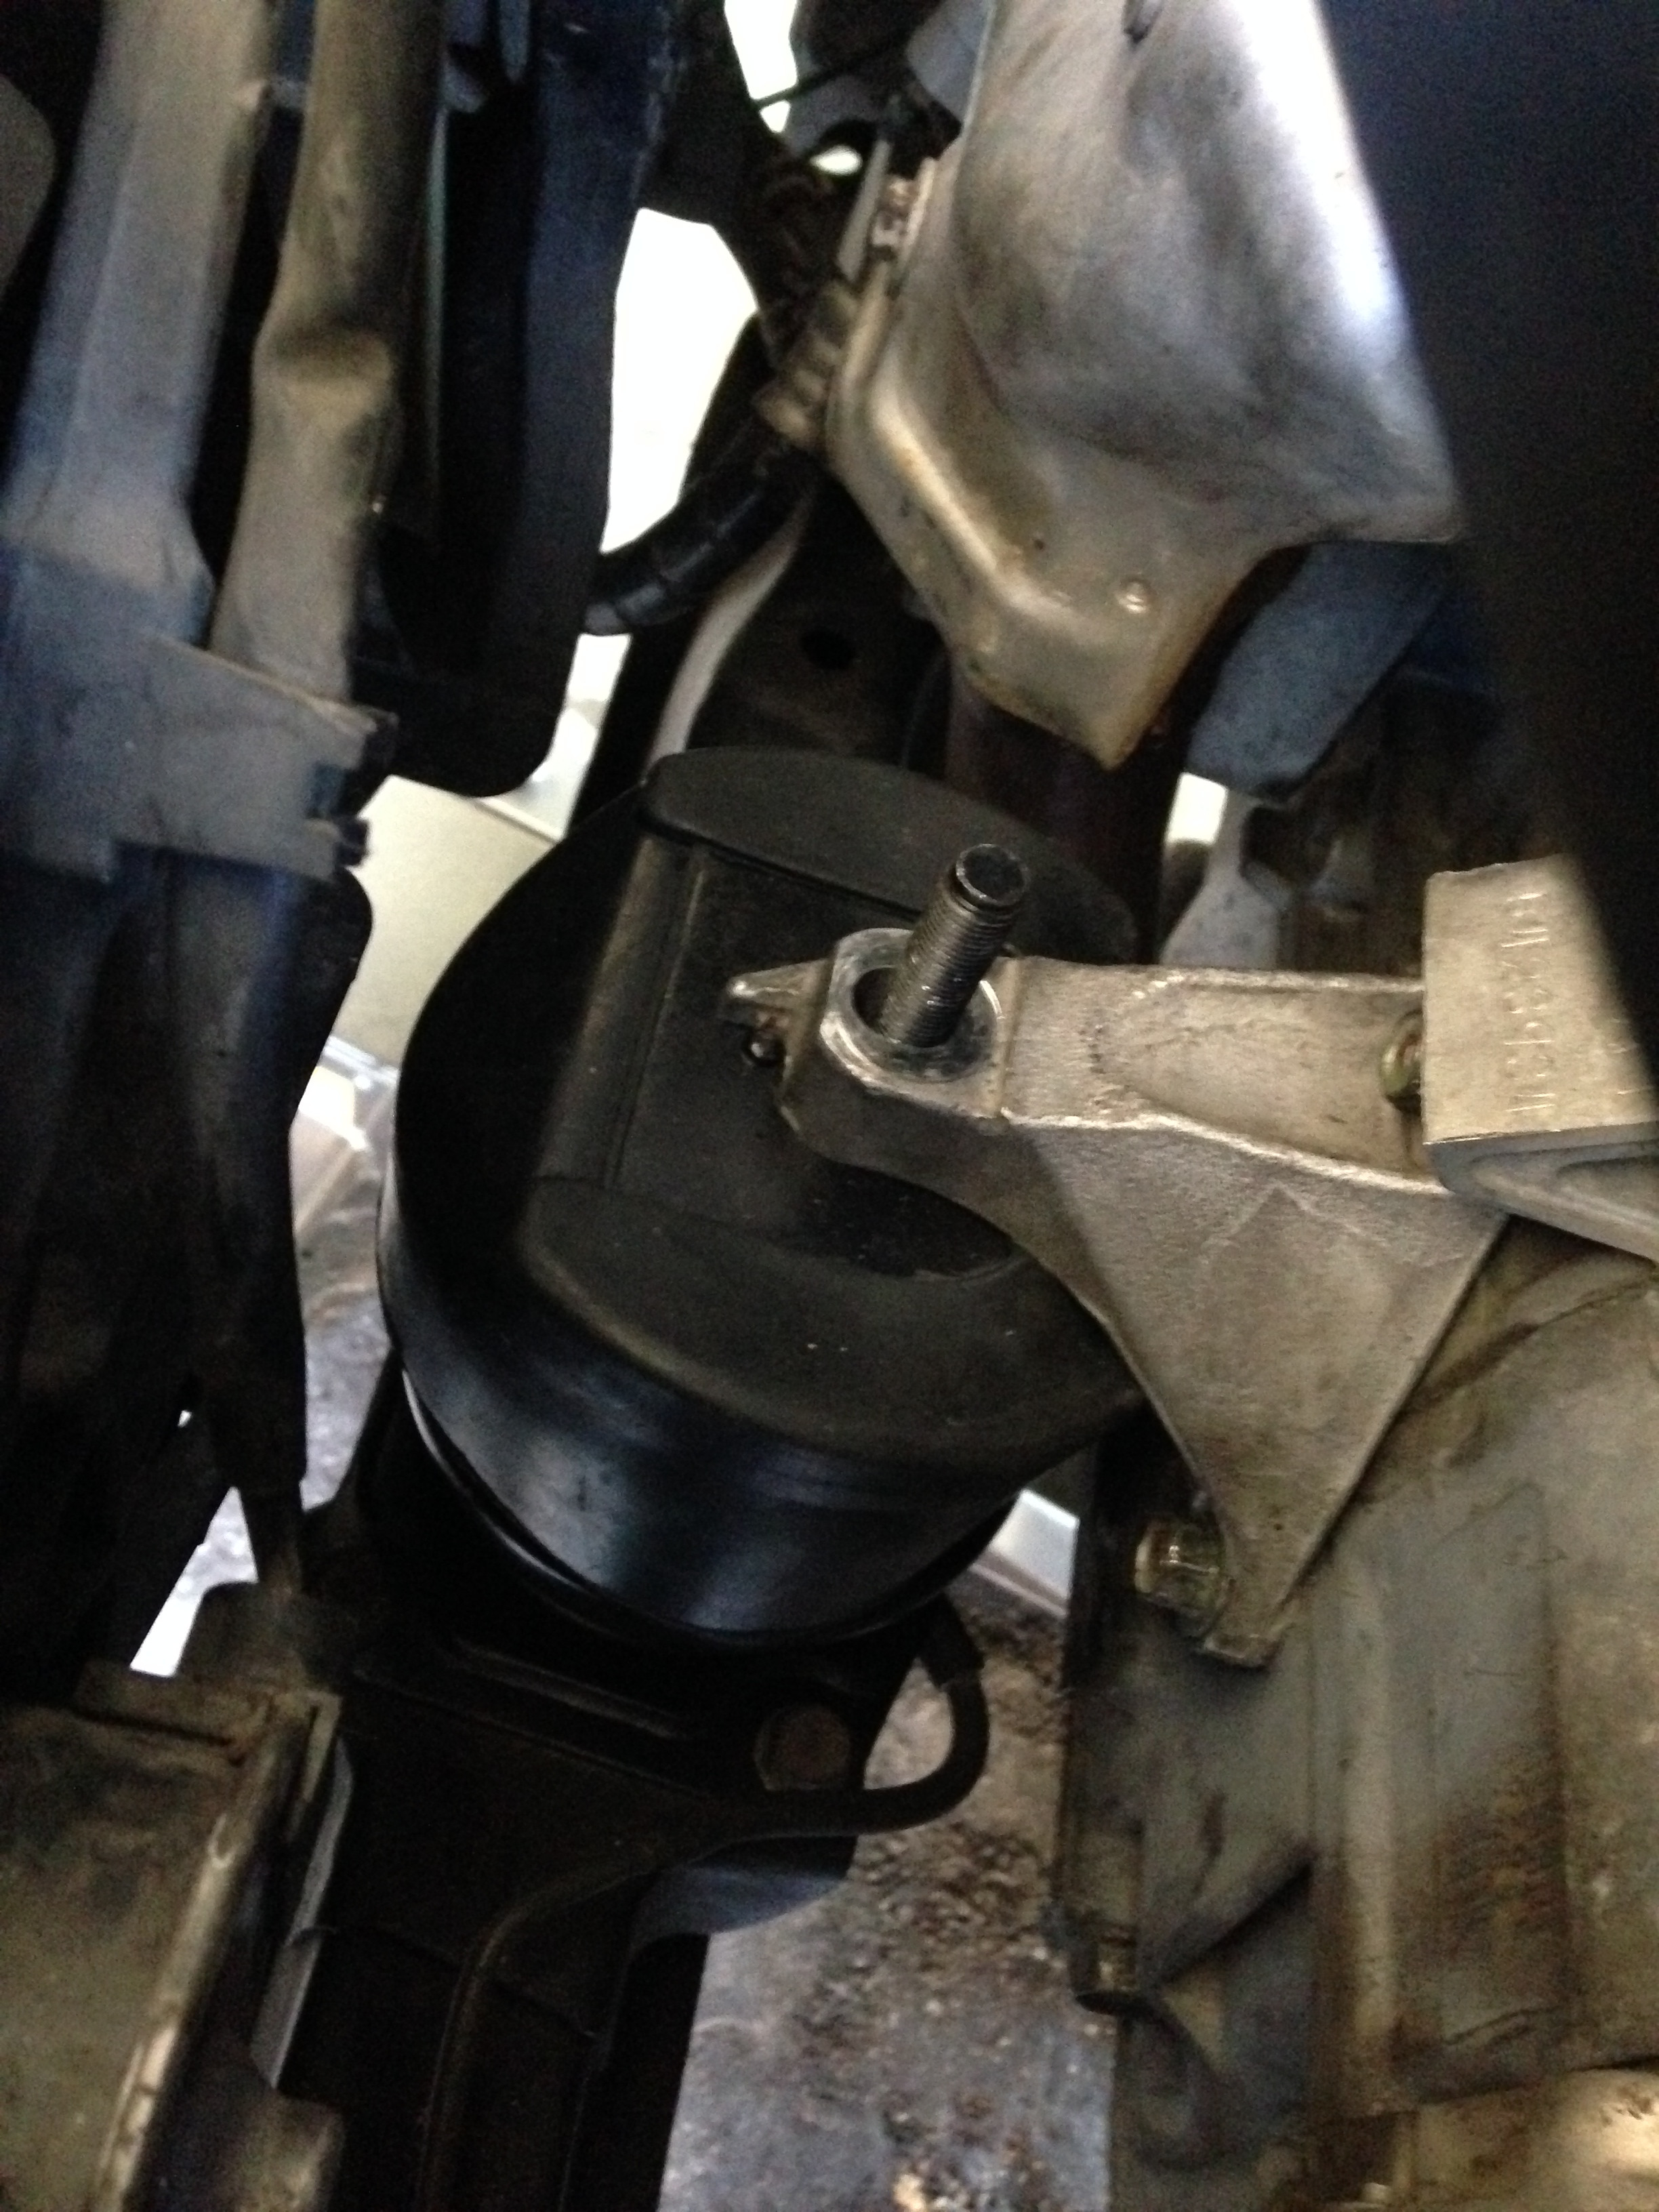
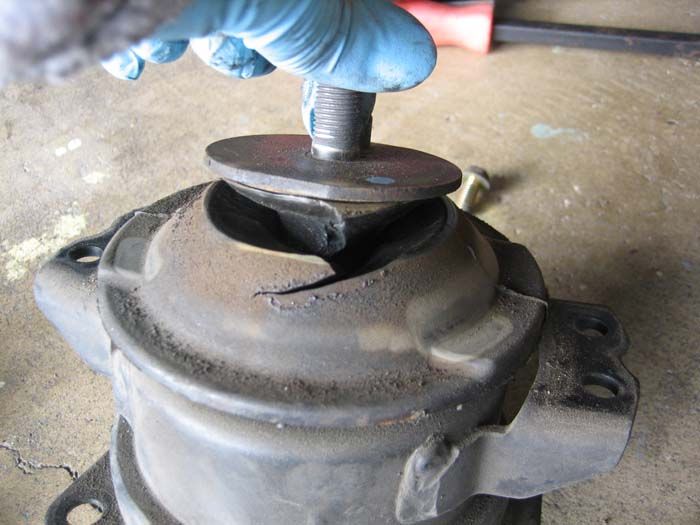
Here is a picture of the front motor mount, with the top nut off, attempting AlanW's way.
When I did my rear mount, I removed the passenger side mount completely, and removed the top nut from the front mount. Then I removed the top nut from the rear mount and then the 4 bolts holding the rear mount to the frame. I then put a board & floor jack under the oil pan and jacked up the motor/trans enough for the top stud on the rear mount to be clear of the bracket. Then you can slide the old mount out from under the car and get two of the new bolts from under and the other 2 from the top. Lower the engine back down on the mount studs, install the nuts, and replace the passenger side mount. Like said, just be sure you don't jack up the engine too high and damage the trans mount or something else.

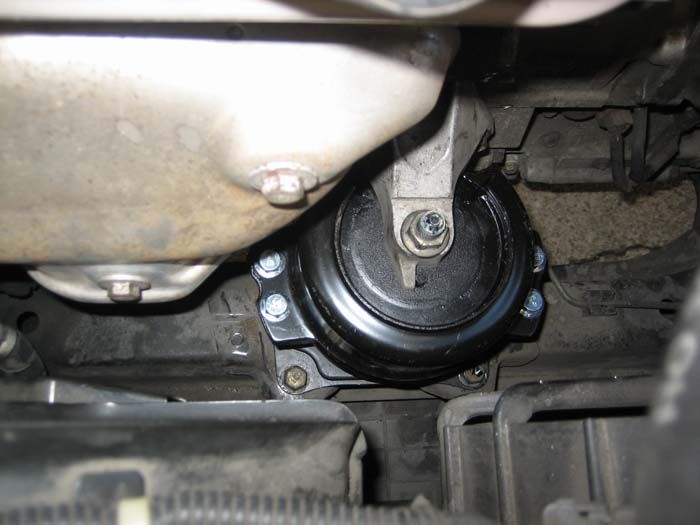
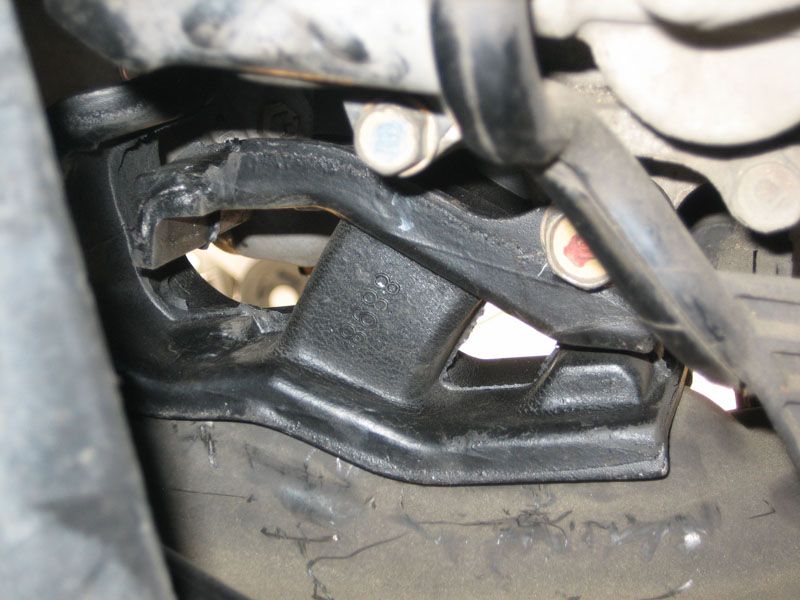
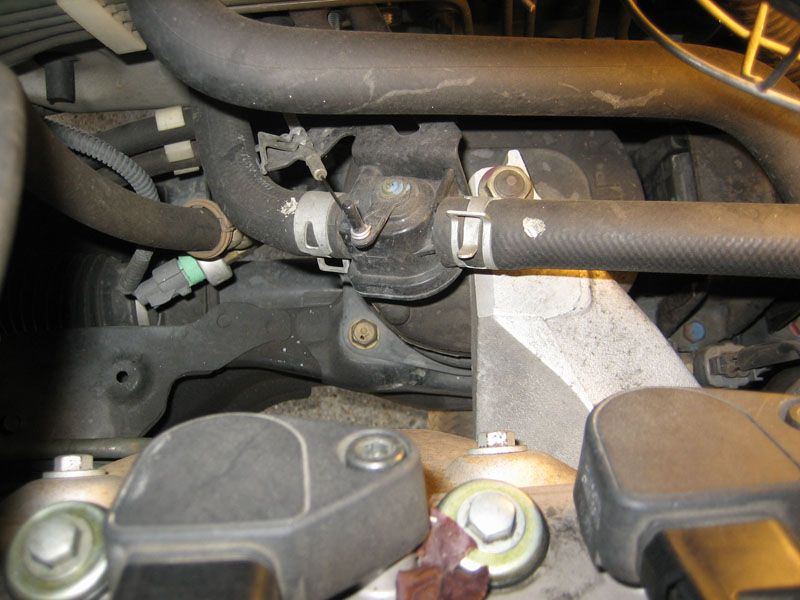
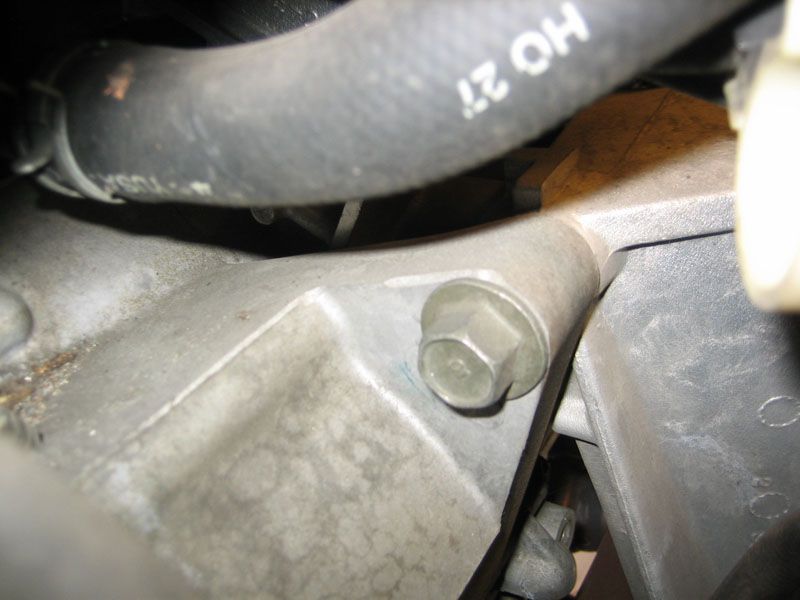
A picture of the rear mount with the top nut off.

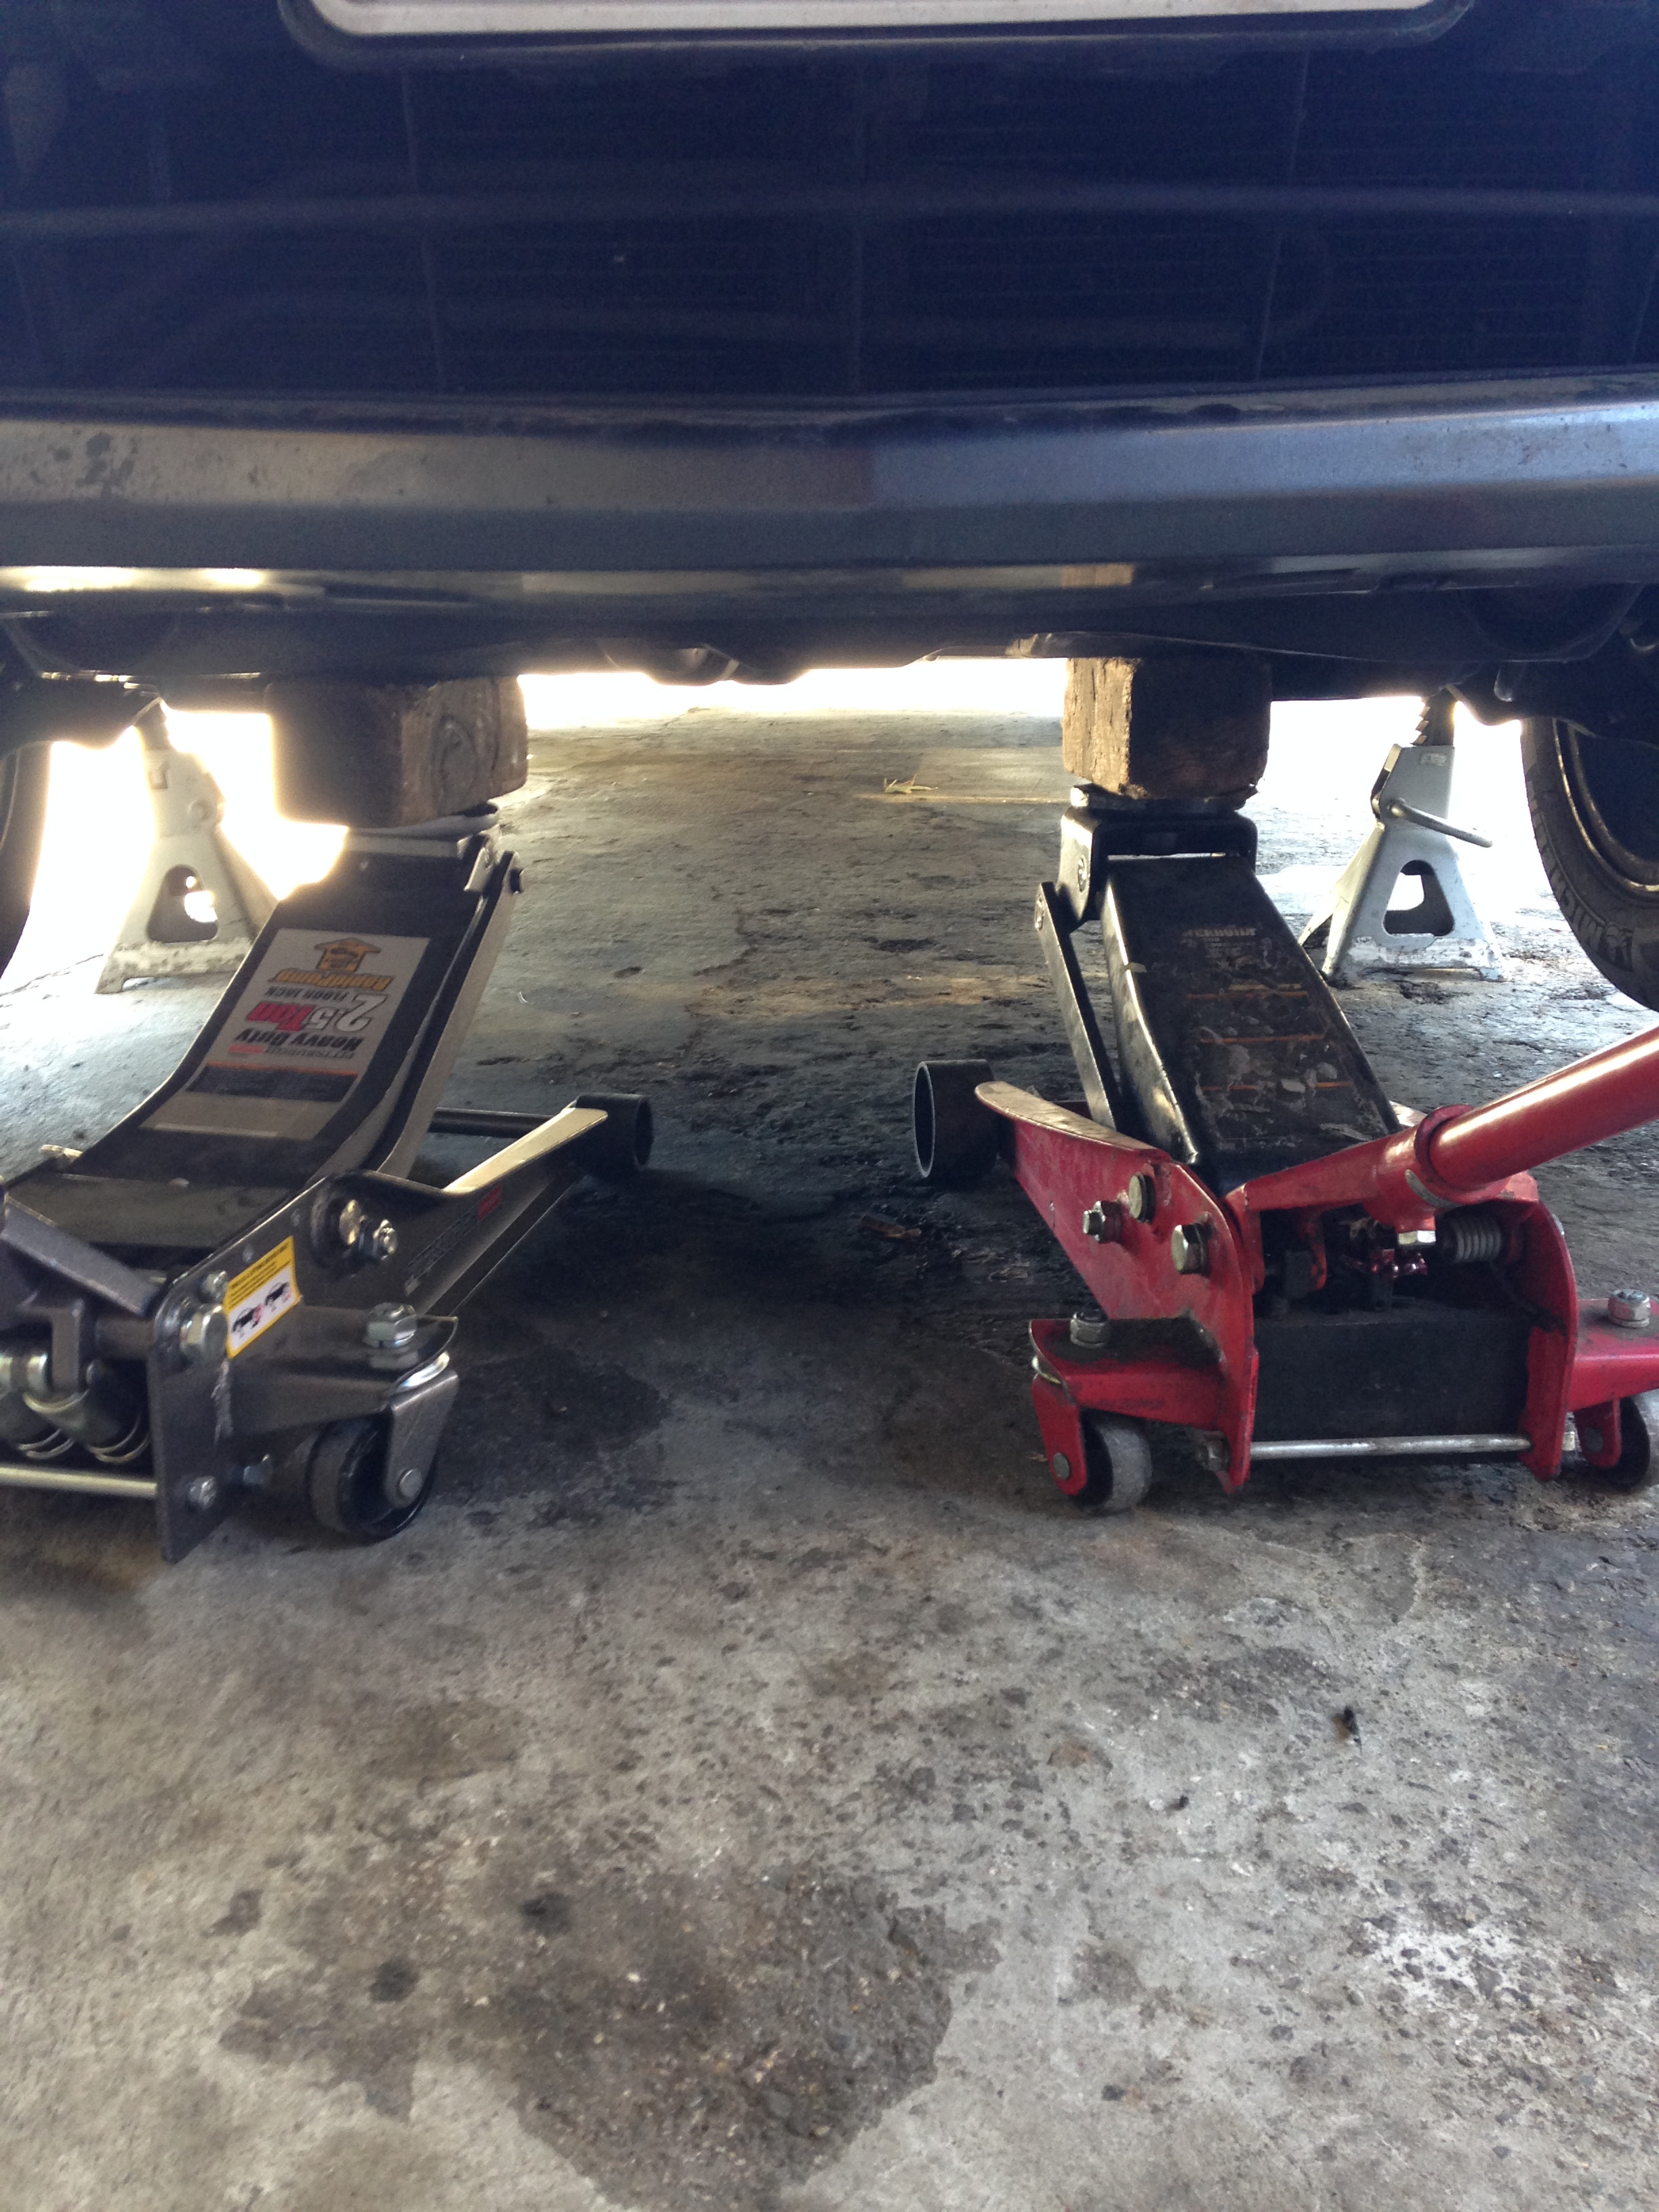
Jacked up the motor and tranny from the oil pan and the rear of the tranny, the bracket was coming off the mount, but at the same time so was the front. I was wondering why I was jacking it up so high and the bracket was not coming off the mount stud, I looked at the front mount and the bracket was completely off. Heard one of the tranny mounts crack. lol. (Luckily, I was planning on replacing them after I installed the motor mounts) This plan did not succeed for me.
Placed it all back down and decided to tackle victus1's one method. So far I removed the 10mm on the bracket holding the electrical connector on the driver side. The 17mm and 14mm from under the bottom of the bracket. Got tired, going to finish tomorrow hopefully.
NOTE: PB Blaster really does wonders, $4 at your local Walmart.
Hope someone can use my pictures and create/improvise a DIY.
Trending Topics
09-27-2013, 05:52 PM
#8
2000 Acura TL
I just change out my front and trans mounts last week and the thud seem better but still a little noticeable shift. I figure the rear is also damage and I ordered the rear mount already and should arrive tomorrow. I will also take pics of the process.
For the front I also remove the side mount bolt and trans mounts (since need to replace it anyway.. I didn't need to jack up to clear the mount.
Once four bolts on front mount is remove just jack up enough where is loose from the frame, then loosen the bracket and as you're removing the bolt on the bracket, move the mount toward the front as it come out as a whole unit.
addition to the floor jack, this is what I also use.
Remove side mount bolt
For the front I also remove the side mount bolt and trans mounts (since need to replace it anyway.. I didn't need to jack up to clear the mount.
Once four bolts on front mount is remove just jack up enough where is loose from the frame, then loosen the bracket and as you're removing the bolt on the bracket, move the mount toward the front as it come out as a whole unit.
addition to the floor jack, this is what I also use.

Remove side mount bolt


Last edited by closetprisoner; 09-27-2013 at 06:00 PM.
The following users liked this post:
3.2TLc (09-27-2013)
09-27-2013, 07:04 PM
#12
Intermediate
Thread Starter
I removed a 10mm from the top holding a electrical connector from the top of the car, removed the bottom 17mm and the 14mm from underneath the car. There is another 14mm left on there because I had things to do, I presume you take it from the top? But from what I recall, I can probably do it from underneath as well, probably because I'm a small guy. Spraying PB blaster before hand and having the right(or a lot of) tools will help so much.
09-27-2013, 07:33 PM
#13
Nothing quite like hands on teamwork !!!  .....Bravo !
Way to go guys, looks like with all the above input.....people will have more resources when undertaking this challenging DIY task of replacing the rear motor mount. Thanks to all who have given their input.
.....Bravo !Way to go guys, looks like with all the above input.....people will have more resources when undertaking this challenging DIY task of replacing the rear motor mount. Thanks to all who have given their input.
09-27-2013, 07:39 PM
#14
09-28-2013, 12:11 PM
#18
Senior Moderator
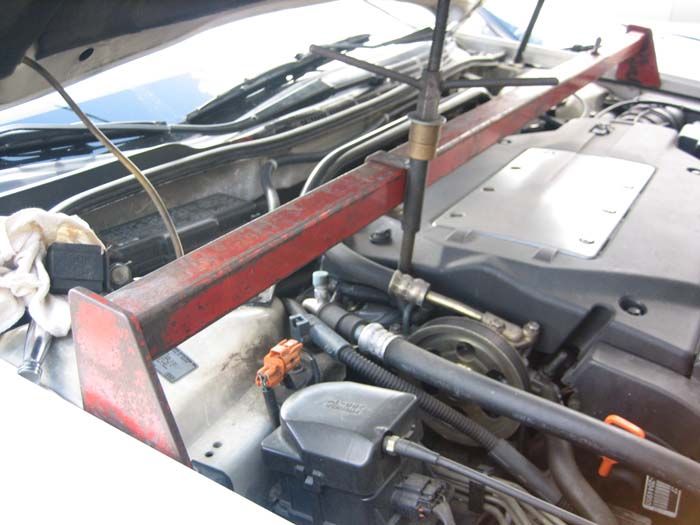
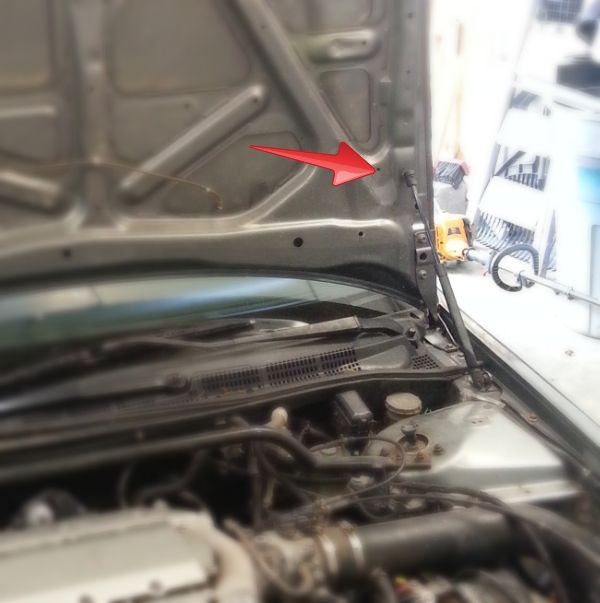
A little tip for you guys, The hood will stand straight up and give you much more light and room to work. Just pop the hood struts off the mounts on the hood. Take the drivers side hood strut mount and unscrew it and look on the hood about 6" down and over a little, there is a threaded spot for it, thread it in a little bit and hook the hood strut back to it to hold the hood open.
 09-28-2013, 12:31 PM
#19
Safety Car
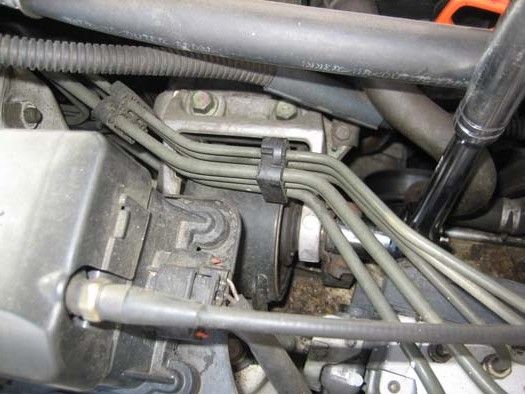
Looking at the mount from the front of the car you have to twist it first to the left and twist through the hoses behind the throttle body.
It takes a few minutes to bring it through.
It takes a few minutes to bring it through.
09-28-2013, 04:58 PM
#20
Intermediate
Thread Starter
Got it replaced, had trouble aligning the mount with the subframe, then when it was time to go down under the car to put in the 17mm, it wasn't aligned... ughhhhh. hopefully I can finish this tomorrow.
09-28-2013, 10:02 PM
#24
2000 Acura TL
Finish my rear replacement earlier today, took about 3 hours (including taking photos), whole experience is not the most difficult, just gota be patience. I've read Victus1 notes on his DIY, it helpful, cuz he given you a head up of what to expect.
My DIY description below is not the most detail, but it went pretty smooth for me, I use the engine bar and one jack on the tranny side to lift the motor, I lift it up about 1/2 inch just enough when you can move the rear mount after remove the fours bolts.
You notice my front and front tranny mount is new, which i changed it last week, that is much easier.
My process begin with the removal of the strut bar, just get it out of the way.
Remove nut/bolts from front, transmission (both), and passenger side mounts, so when lifting up the motor it doesn't put stress on other mounts, as you might tear it.
Loosen nut on front mount
remove bolt of front tranny mount
remove bolt of rear tranny mount
remove bolt on side passenger mount.
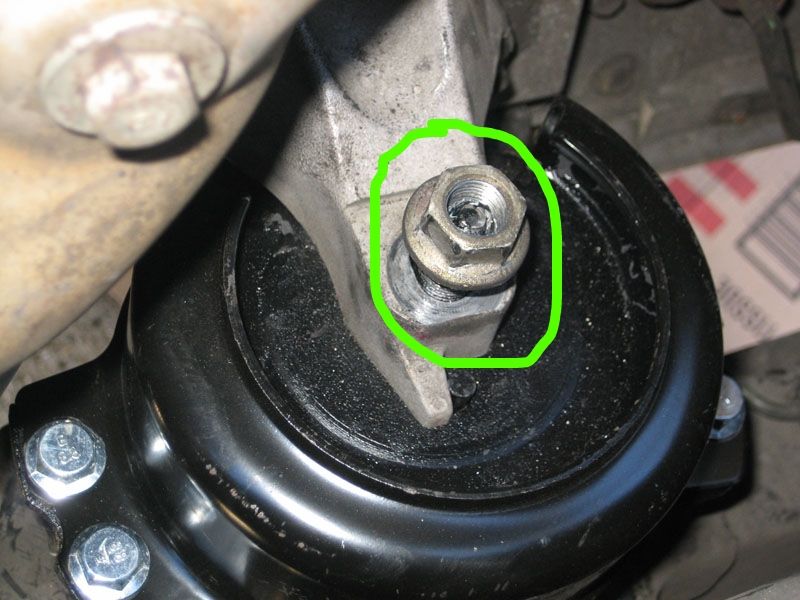
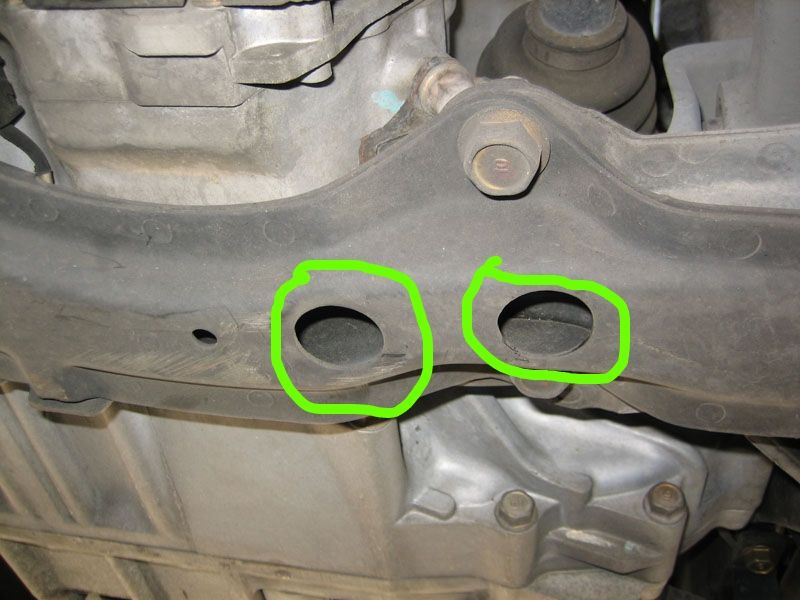
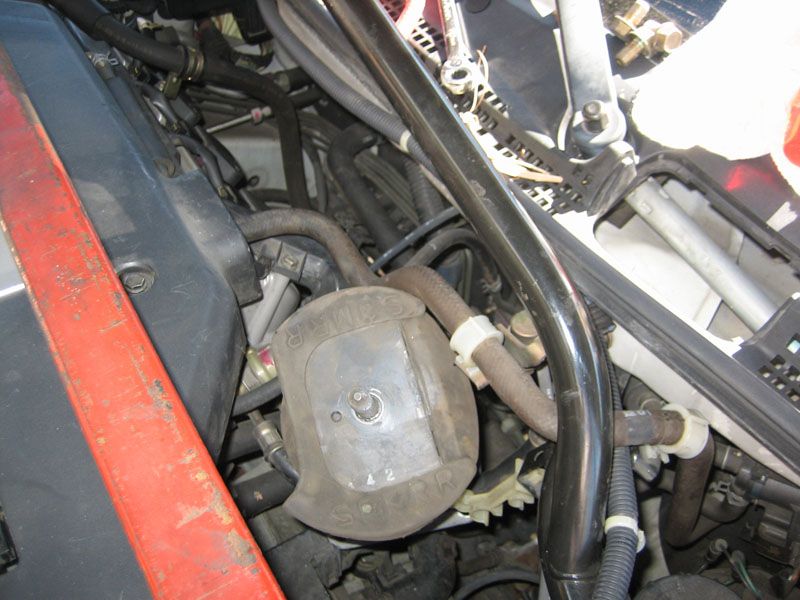
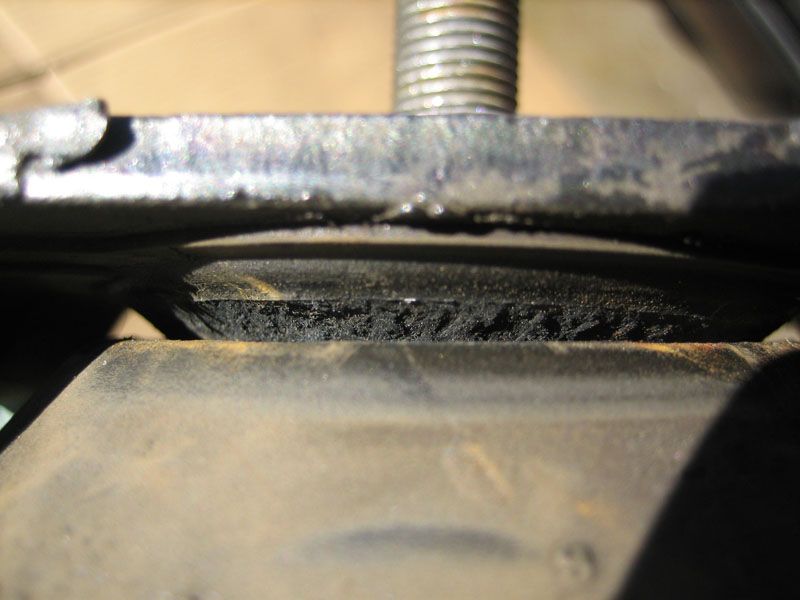
Top view of rear motor mount.. remove that bolt
Remove four bolts on the mount
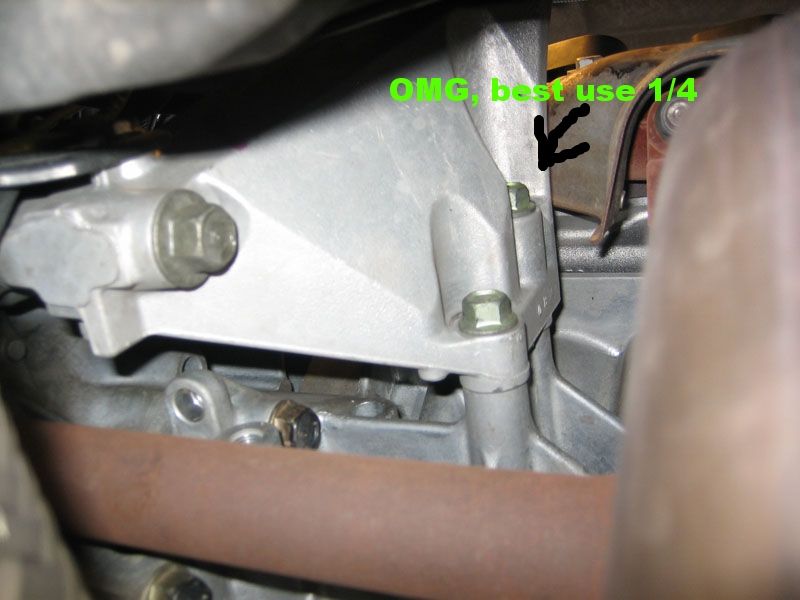
Bottom view of bracket, see note, best to use 1/4" rachet once the bolt is loose.
Top driver side bolt on bracket
After all bolts removed, move it till you can get the vacuum tube out or remove the tubing from the other end that attached to the car...then wiggle, twist n turn and squirm it ways out to the top

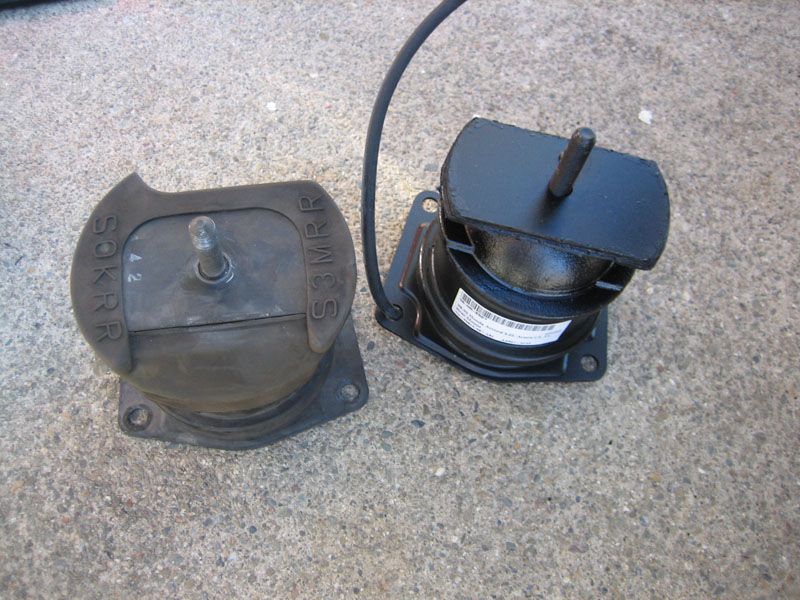
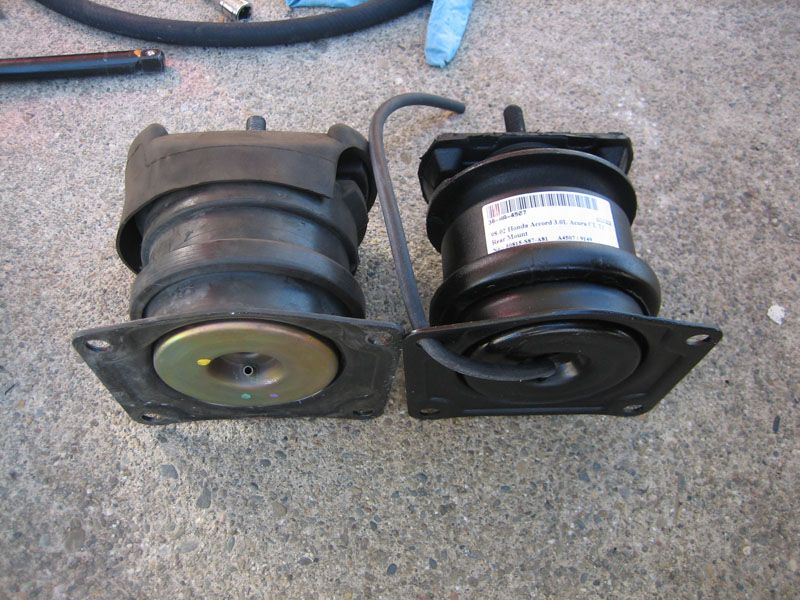
Comparison.. I also notice mine is not leaking and when shake i don't hear any liquid sound vs. the new one. I didn't use the top cover on the new one, didn't see any use of it. Before wiggle in the new mount, remove the vacuum tube from the other end that attached to the car and take the tube and install it on the new mount while is outside of the car, it much easier this way rather than try to fit it when it down there (how I know.!!??).
Have PATIENCE, and reinstall..
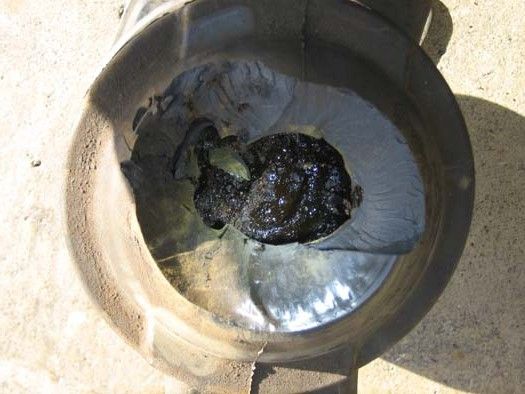
Pix of rear mount damage..
Front mount damage
No more liquid here, it all dried up..
My DIY description below is not the most detail, but it went pretty smooth for me, I use the engine bar and one jack on the tranny side to lift the motor, I lift it up about 1/2 inch just enough when you can move the rear mount after remove the fours bolts.
You notice my front and front tranny mount is new, which i changed it last week, that is much easier.
My process begin with the removal of the strut bar, just get it out of the way.
Remove nut/bolts from front, transmission (both), and passenger side mounts, so when lifting up the motor it doesn't put stress on other mounts, as you might tear it.
Loosen nut on front mount

remove bolt of front tranny mount


remove bolt of rear tranny mount


remove bolt on side passenger mount.

Top view of rear motor mount.. remove that bolt

Remove four bolts on the mount

Bottom view of bracket, see note, best to use 1/4" rachet once the bolt is loose.

Top driver side bolt on bracket


After all bolts removed, move it till you can get the vacuum tube out or remove the tubing from the other end that attached to the car...then wiggle, twist n turn and squirm it ways out to the top


Comparison.. I also notice mine is not leaking and when shake i don't hear any liquid sound vs. the new one. I didn't use the top cover on the new one, didn't see any use of it. Before wiggle in the new mount, remove the vacuum tube from the other end that attached to the car and take the tube and install it on the new mount while is outside of the car, it much easier this way rather than try to fit it when it down there (how I know.!!??).


Have PATIENCE, and reinstall..
Pix of rear mount damage..

Front mount damage

No more liquid here, it all dried up..
 09-28-2013, 11:10 PM
#26
Yeah, you're very brave and also dedicated to helping others to tackle the rear motor mount !!!
Thank you.
Thank you.
09-29-2013, 08:23 PM
#28
Burning Brakes

OK... So day 1... Got passenger side mount and front mount complete. Took about 4 hours including a trip to the autostore for a better breaker bar and 1/2 to 3/8 reducer and more pb blaster.
Having the right tools is essential!!! I couldn't finish due to having to run some errands, but will tackle the rear and trans mounts next weekend.
Universal u joint, solid breaker bar, and about 36” of extensions (used all my extension to get the length I needed). Hardest part is the bracket
Having the right tools is essential!!! I couldn't finish due to having to run some errands, but will tackle the rear and trans mounts next weekend.
Universal u joint, solid breaker bar, and about 36” of extensions (used all my extension to get the length I needed). Hardest part is the bracket
09-29-2013, 09:54 PM
#29
2000 Acura TL
Congratulations to all.. Regardless how long it takes, we got it done.. 
If need to be done again, it'll be walk in the park.
Now have a cold one.. and reminiscing about my NA1
If need to be done again, it'll be walk in the park.
Now have a cold one.. and reminiscing about my NA1

The following users liked this post:
Bricktop (11-09-2013)
09-29-2013, 10:40 PM
#30
I'd like to preface this with I have a 3G and here are some of my thoughts.
here is my aftermarket mount vs oem front mount.

dub me "justonjacks" cuz I still havent completed the install since saturday.
the rear is a pain to switch out. i have a concern about its placement, but i'm thinking i can push the engine over so that it'll mount. I hope that's the answer and that I dont have to take off the aftermarket mount to see if i have it in the right position.
the side aftermarket mount is shorter so, i'll have to go pick up a shorter bolt or grab some washers.
here is my aftermarket mount vs oem front mount.
dub me "justonjacks" cuz I still havent completed the install since saturday.
the rear is a pain to switch out. i have a concern about its placement, but i'm thinking i can push the engine over so that it'll mount. I hope that's the answer and that I dont have to take off the aftermarket mount to see if i have it in the right position.
the side aftermarket mount is shorter so, i'll have to go pick up a shorter bolt or grab some washers.
 09-30-2013, 07:03 AM
#32
Hey Justnspace* , your mounts appear different then our 2nd Gen mounts.
That aftermarket part doesn't look right when compared to the "OEM" mount. Ya may end doing more than just squattin' in your bay, ha...hah !!! May want to put on some "Depends" before going back into the bay before your next attempt.
That aftermarket part doesn't look right when compared to the "OEM" mount. Ya may end doing more than just squattin' in your bay, ha...hah !!! May want to put on some "Depends" before going back into the bay before your next attempt.
09-30-2013, 07:04 AM
#33
Safety Car
It takes patience to spin the mount around in order to bring it out, but in the end the time you put in to replace the mount saved you a few bucks, take that money and buy yourself a pepsi.
Have A Nice Day!
Have A Nice Day!
09-30-2013, 07:26 AM
#34
Hey Justnspace* , your mounts appear different then our 2nd Gen mounts.
That aftermarket part doesn't look right when compared to the "OEM" mount. Ya may end doing more than just squattin' in your bay, ha...hah !!! May want to put on some "Depends" before going back into the bay before your next attempt.
That aftermarket part doesn't look right when compared to the "OEM" mount. Ya may end doing more than just squattin' in your bay, ha...hah !!! May want to put on some "Depends" before going back into the bay before your next attempt.
i believe the issue is a slight misalignment of the engine, which can be remedied by pushing, pulling, and lifting the engine a little to get it to drop in place.
will try tonight.
09-30-2013, 08:31 AM
#35
2006 NBP TL MT6/ 02TL-S
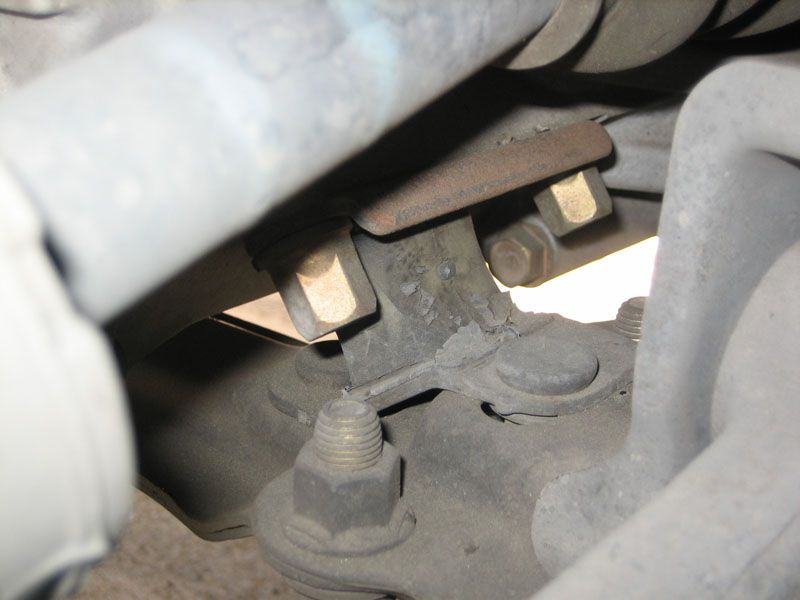
An easy way to make room to get the rear mount out after you get it loose:
to the driver's side of the rear mount there are 2 rather large square dampener blocks held in place by 2 bolts each. The bolts are pretty easy to get out and the blocks lift right and give you a space to slide the mount over & then work it up through the remaining hoses.
to the driver's side of the rear mount there are 2 rather large square dampener blocks held in place by 2 bolts each. The bolts are pretty easy to get out and the blocks lift right and give you a space to slide the mount over & then work it up through the remaining hoses.
09-30-2013, 08:32 AM
#36
Just loosen the nuts on the other mounts to allow the engine to move a little. Then use a crowbar and some 2x4's to move the engine laterally and your mount should drop in place.
11-09-2013, 05:03 PM
#38
Hey Bricktop, have ya done your rear mount yet ???
~ Gotta say that anyone who has the balls to take on the rear one.....deserve their well earned cold brew in a "Bad Ass" cup at the completion of that DIY. It's guys like him that make this site so awesome !
Thanks again to Closetprisoner for taking the extra effort to help assist his fellow 'Ziner's to work up the courage to undertake this daunting project for the first time. Here's to ya, bro....
 11-09-2013, 07:23 PM
#39
Mr.Helpful Diagram
Wow I went half way and got stuck just took it to my friends shop got it done for $50 they must of had a hell of a time figuring it out, This was when I didn't know about Acurazine Good job guys.
11-09-2013, 09:47 PM
#40
Advanced