How To Replace 01 Motor Mounts
 12-29-2008, 11:37 AM
#1
9th Gear
Thread Starter

Join Date: Apr 2005
Age: 68
Posts: 9
Likes: 0
Received 0 Likes
on
0 Posts
How To Replace 01 Motor Mounts
I searched the forum and can't find the actual steps for repalcing the mounts (front and side). Can anyone point me in the right direction?
thanks
thanks
 12-29-2008, 12:01 PM
#2
I don't think there is a DIY. It's just bolts and the vac lines. Jack up the motor for the front and back but you don't really need to for the side. If you look around, you will find my DIY for just the side mount but I don't think there is one made for the front and rear. Also look around in the Innovative mounts thread for written directions.
12-29-2008, 01:30 PM
#3
Jack the front of the car up and place it on jack stands.
Pull all the little clips out of the plastic guard under the motor.
put the jack under the motor just to take the weight off the mount.
Undo the bolts for the bracket connected to the motor, (2 underneith, 1 up top.)
Loosen the four bolts connecting the mount to the sub-frame. (they all need long extensions.)
Undo the bolt on top of the mount.
Take the four bolts out.
Twist the mount inplace and lay it on its side.
Pull it out from the drivers side by holding the upper radiator hose to the left.
It will barely squeeze out!
Voila!!
Repeat the steps to replace with new mount. I suggest to attach the mounting bracket to the engine loosly to be able to slide the top of the mount through the hole. That is a bitch, but VERY doable!
You will need:
two floor jacks
two jack stands
a block of wood or two to distribute the weight of the engine on the jack
2 6-10 inch 3/8 extensions
a strong 3/8 ratchet
17mm deep socket
14mm socket (possibly 14mm wrench too)
a blanket to lie on when doing the rear mount
and lastly lots of patience (especially the rear mount.)
one reminder, dont forget to remove your battery and the battery tray when doing this or your transmission housing will bend the tray when you're lifting the engine up. Good luck if you decide on doing this yourself. For the Side Engine mount, slightly raise the engine so you can remove the side mount.
The following 2 users liked this post by acutee:
AMart83 (09-10-2014),
stickwithjoe (03-04-2013)
04-26-2009, 07:07 PM
#4
Racer
Join Date: Mar 2009
Location: Toronto, Ontario
Posts: 250
Likes: 0
Received 0 Likes
on
0 Posts
How to tell if I have bad mounts ?
I notice that when I hit a speed bump like bumps going fast on the highway, the car does a loud boom sounds like the engine jumping up.
I notice that when I hit a speed bump like bumps going fast on the highway, the car does a loud boom sounds like the engine jumping up.
04-26-2009, 09:16 PM
#5

the front and rear mounts are oil fluid filled-- you get under the car and look straight up for signs of leakage,,,or watch the floor where you park
the front is a common failure often found at trans failure time, so anything over 50k miles expect it
The side one fails IMO because the front is broken and the driver doesnt know it, so it carries more load then fails too
the normal 2 person `stand on the brakes as apply gas while in gear and watch the engine for movement` method works for checking the mounts integrity
Noise over bumps -have the suspension checked, ball joints, sway bar end links etc
04-26-2009, 09:26 PM
#6
Racer
Join Date: Mar 2009
Location: Toronto, Ontario
Posts: 250
Likes: 0
Received 0 Likes
on
0 Posts
The engine does move back and forth? alittle when you give it gas. I always thought that was normal because the engine just cant be in a position and not move when gased.
04-27-2009, 05:19 PM
#7
Senior Moderator
Read the other mount threads on it and there is plenty of description on what to look for and how to test (proper way is with a vacuum gauge).
Trending Topics
05-24-2009, 10:07 PM
#8

Hi All :
Just did my side and front mounts today and would like to add some more tips to the instructions above which I hope will be helpful.
1) When removing the side upper mount, you need to move the cruise control module out for the way by removing the three mounting screws.
2) There is a plastic clip retaining a hydraulic line hidden underneath the mount. You need to unclip that line or the mount will not come free. The plastic clip needs to be removed and re-installed on the new mount.
3) For the front mount, you WILL need a universal joint and very long extensions (36") for a socket set or you will not be able to remove the left rear frame bolt as the exhaust manifold gets in the way. These bolts are VERY hard to loosen and I recommend putting some kind of rust solvent on the bolt heads before starting the removal. Also, remove the front exhaust manifold cover to buy a little more room. Three bolts on the front and off it comes.
4) When putting it back together, lining up all the bolt holes is a bitch. First, "hand start" ALL three bolts going into the block, making sure you have the single mounting bolt through the engine bracket. It will be difficult to line up the holes because you can't see the holes and you have to do it by feel. Once you have all three started, tighten them up. Don't worry that the frame holes don't line up as you can use a hammer or a pry bar to move the base around until they do. Once all seven bolts are in, then put on and tighten the single large nut on the top of the mount.
It took me about 4 hours to do both plus having to go to the store to by a U-joint.
Hope this makes someone's job a little less painful.
smartypants.
The following users liked this post:
stickwithjoe (03-04-2013)
06-04-2009, 10:21 PM
#9
5th Gear
Join Date: Feb 2008
Location: Chicago Suburbs
Age: 59
Posts: 5
Likes: 0
Received 0 Likes
on
0 Posts
Hey, did this replacement a little over a month ago. I noticed some lagging and roughness during acceleration and a friend of mine helped check this out. So I replaced the front vacuum assisted mount and side mount. Smartypants has some good recommendations. With the exception of a 36" extension. I was able to piece a few shorter ones together. But he's dead on concerning the left rear bolt. I did remove the exhaust cover plate to get a socket on it. This was a little scary because of corrosion on the bolts, but they came off. I found that installing the new mount was helped by dropping it down to the right of top rad/hose as described But aligning was much easier with thecar on Jack stands. I got under the car and removed the underbody plastic engine protector(??? not sure what it's called) I went to Acura to get some extra fasteners for it so I wasn't too concerned when taking this off. But I was able to both align the mount and get all four bolts started. It took less than two hours.
Cant say I noticed a huge difference. But here is what I did notice and they are subtle, but worthwhile. There tended to be a drone when driving around 40 to 50mph. I thought this was just from the tranny dropping it into 5th and saving gas. Well, it still does that, but I don't notice the drone. What I also don't notice is after morning start up less jerking when shifting from Park.
So all in all, for about $120 and 2 hours of getting acquanted with the TL, it was a good investment. There are some excellent write ups and posts here. I'm just getting into using this forum. But you're some excellent resources and I hope to contribute.


The following 2 users liked this post by Sperry:
RONE (11-11-2015),
stickwithjoe (03-04-2013)
04-21-2010, 05:19 AM
#17
Originally Posted by Sperry
The front mount, 34, is 50800-S0K-A82, and the left upper mount, 7, is 50820-S0K-A81.

I might have said "upper passenger side" mount. Is that what you learned fellows can the upper right mount?
When one takes weight off the mount by slightly jacking the engine, the oil pan is the jack point? And it can take it?
Any benefit with stands over ramps*? Where does one place stands?
* aside from the obvious, as when a wheel requires removal

The following users liked this post:
stickwithjoe (03-04-2013)
04-21-2010, 10:49 AM
#18
the mounts are relative to driver sitting view- mounts are relative to car not engine postition
front mount is the one with vac line to it,
number 34 is front mount- most common to fail
the PASSENGER/Right side mount is 7
that one usually fails after the front failure has gone unnoticed for several months
front mount is the one with vac line to it,
number 34 is front mount- most common to fail
the PASSENGER/Right side mount is 7
that one usually fails after the front failure has gone unnoticed for several months
04-21-2010, 10:51 AM
#19
jackstands go under the frame rail - it will be obvious when you look
Or look at any thread with wheels off for pics
place a piece of 2x4 or similar wood on the jack head,,, that will span the width of the pan- to distribute the load
or you will poke a giant hole in the oil pan!!!
Or look at any thread with wheels off for pics
place a piece of 2x4 or similar wood on the jack head,,, that will span the width of the pan- to distribute the load
or you will poke a giant hole in the oil pan!!!
04-21-2010, 12:19 PM
#20
Senior Moderator
iTrader: (2)
Join Date: May 2000
Location: where the weather suits my clothes
Age: 55
Posts: 27,921
Received 1,080 Likes
on
661 Posts
I'm going to give the Anchor mounts a shot. Hell for $100 shipped I get the front and right mount vs. $150+ for the crappy OEM ones.
http://www.rockauto.com/catalog/rafr...1379033k316352
Use MM3410 for an additional 5% off (put in how did you hear about us field)
http://www.rockauto.com/catalog/rafr...1379033k316352
Use MM3410 for an additional 5% off (put in how did you hear about us field)
Last edited by NSXNEXT; 04-21-2010 at 12:28 PM.
04-29-2010, 03:26 PM
#21
My mounts came today! They look like a pretty fun swap.
A universal and some extensions, and I'm in business, maybe even this weekend.
Do the nuts that hold the front mount to the frame get anything on the threads?
Or just put them back in, and torque them down?
A universal and some extensions, and I'm in business, maybe even this weekend.
Do the nuts that hold the front mount to the frame get anything on the threads?
Or just put them back in, and torque them down?
12-11-2010, 02:04 PM
#23

I'm going to give the Anchor mounts a shot. Hell for $100 shipped I get the front and right mount vs. $150+ for the crappy OEM ones.
http://www.rockauto.com/catalog/rafr...1379033k316352
Use MM3410 for an additional 5% off (put in how did you hear about us field)
http://www.rockauto.com/catalog/rafr...1379033k316352
Use MM3410 for an additional 5% off (put in how did you hear about us field)
12-11-2010, 03:36 PM
#24
2003 TL-p
i have an anchor rear motor mount, and i am pretty sure that the rubber tabs that stop mount from compressing itself completely are too large and bottom out at idle in gear causing some vibrations. i should take a picture and post it to explain better, id stick with oem mounts for now.
12-11-2010, 04:16 PM
#25
2003 TL-p
Anchor rear mount
ok i found an old pic i chopped that compares a new anchor rear mount to my old oem rear mount below
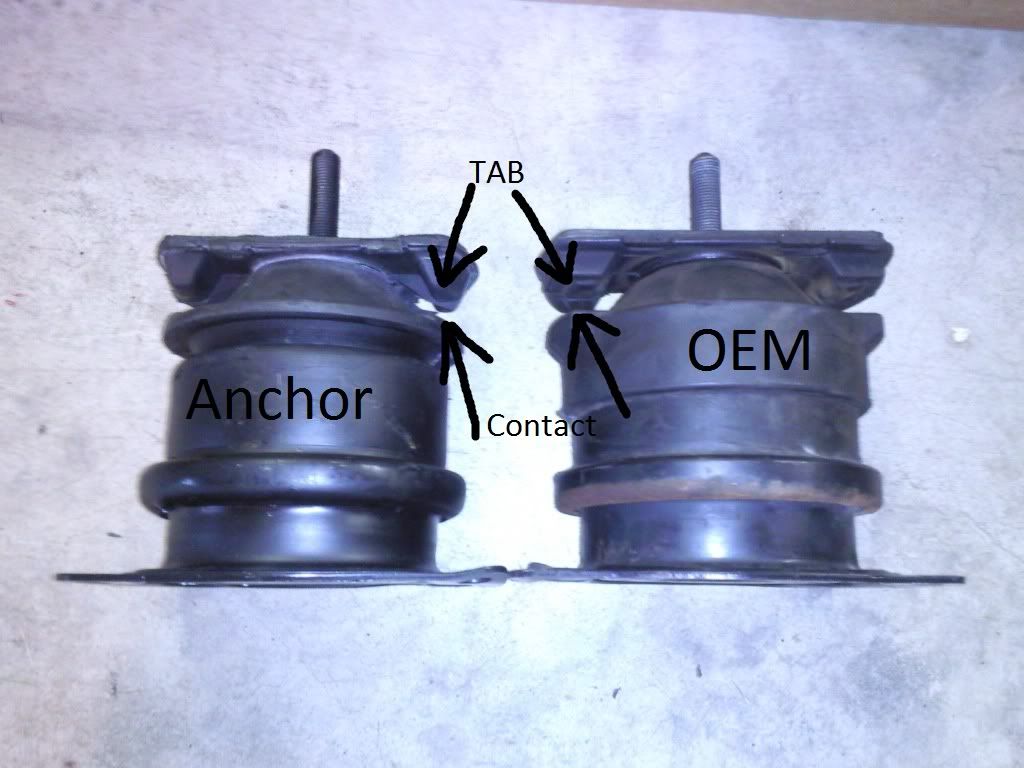
the arrows point to "TAB" is what i am talking about. The gap between the "TAB" and the "CONTACT" is much smaller on the anchor mount than the oem. The tabs on the OEM mount are nice soft rubber and the contact area is padded with rubber on the OEM mount. The anchor mount has harder rubber tabs, and much less rubber, so when the tab contacts the base it causes vibrations in that can be felt in steering wheel and throughout the car. Over time the mount compresses and gets a little shorter, lately for me my anchor rear mount has now compressed to the point where i can barley slide a piece of paper under the tab. i only have about 3k miles or so on the mount, light driving. I also do have Ingalls stiffy ETD so i am not sure if that has put more stress on the motor mount and caused it to compress. Either way, i only get vibrations when the car is idling, in gear, stopped, with my foot holding the brakes. normal and hard driving, or idling in park/neutral, has no vibrations at all. Also, my ETD could be making vibrations, but i have only been getting vibrations lately. Iv had the ETD installed for while and never had vibrations before, so i am thinking its the mount.
the arrows point to "TAB" is what i am talking about. The gap between the "TAB" and the "CONTACT" is much smaller on the anchor mount than the oem. The tabs on the OEM mount are nice soft rubber and the contact area is padded with rubber on the OEM mount. The anchor mount has harder rubber tabs, and much less rubber, so when the tab contacts the base it causes vibrations in that can be felt in steering wheel and throughout the car. Over time the mount compresses and gets a little shorter, lately for me my anchor rear mount has now compressed to the point where i can barley slide a piece of paper under the tab. i only have about 3k miles or so on the mount, light driving. I also do have Ingalls stiffy ETD so i am not sure if that has put more stress on the motor mount and caused it to compress. Either way, i only get vibrations when the car is idling, in gear, stopped, with my foot holding the brakes. normal and hard driving, or idling in park/neutral, has no vibrations at all. Also, my ETD could be making vibrations, but i have only been getting vibrations lately. Iv had the ETD installed for while and never had vibrations before, so i am thinking its the mount.
12-11-2010, 04:29 PM
#27
2003 TL-p
^ yes the front and front right are completely different mounts, i just hope they don't use the same inferior rubber compound thats on the rear. Do a search for a motor mount deal with the search button, where you can get all OEM genuine mounts shipped from a dealer cheap, i remember a thread a while back.
12-12-2010, 07:40 AM
#28
Here's the DIY I wrote for the side:
https://acurazine.com/forums/2g-tl-1999-2003-98/diy-replace-side-engine-mount-%95-acura-tl-775581/
And another one for wipers, which might be handy, as we are getting into winter:
https://acurazine.com/forums/2g-tl-problems-fixes-117/diy-fix-banging-clattering-wipers-acura-tl-776382/
https://acurazine.com/forums/2g-tl-1999-2003-98/diy-replace-side-engine-mount-%95-acura-tl-775581/
And another one for wipers, which might be handy, as we are getting into winter:
https://acurazine.com/forums/2g-tl-problems-fixes-117/diy-fix-banging-clattering-wipers-acura-tl-776382/
02-01-2011, 05:11 PM
#29
Instructor

Okay, a stupid question - How many mounts we have? I have seen only two of them. One - in the front and other on the passenger side.
On my 2000 TL, both are gone bad and are shouting to be replaced. Planning to replace them on coming or the next weekend.
On my 2000 TL, both are gone bad and are shouting to be replaced. Planning to replace them on coming or the next weekend.
Last edited by cheekoo; 02-01-2011 at 05:20 PM.
02-01-2011, 05:13 PM
#30
Instructor
Also, do we need any tools other than what mentioned in the opening post. i.e:
You will need:
two floor jacks
two jack stands
a block of wood or two to distribute the weight of the engine on the jack
2 6-10 inch 3/8 extensions
a strong 3/8 ratchet
17mm deep socket
14mm socket (possibly 14mm wrench too)
a blanket to lie on when doing the rear mount
and lastly lots of patience (especially the rear mount.) - Can someone lend me this?
05-23-2011, 11:42 AM
#31
Instructor
What tool did you guys use to remove the two bottom bolts on the bracket to the engine. That space is so tight. I used a combination wrench and that was painful. Ratcheting wrench I bought does not fit into the space between motor mount and bolt.
05-23-2011, 03:11 PM
#32
I just did this yesterday & I just used a basic(non-ratcheting) 14mm wrench. To remove the bottom left bolt, you almost have to do it from the bottom (putting it back on can be done from the top if you finagle your arm in just right. so your hand will be behind the exhaust when tightening). There's really not much room to work with. You'll spend most of the time on those 2 bolts(imo)...mainly bottom passenger side tho). I went & bought a longer 14mm wrench since the one I had was a bit on the short side. It made it much easier to get those bolts loosened. Good luck man...
check out bottom of this thread, https://acurazine.com/forums/2g-tl-1999-2003-98/diy-99-03-front-engine-mount-replacement-734247/ -- RC99TL said he did it easily with a swivel box wrench
check out bottom of this thread, https://acurazine.com/forums/2g-tl-1999-2003-98/diy-99-03-front-engine-mount-replacement-734247/ -- RC99TL said he did it easily with a swivel box wrench
The following users liked this post:
stickwithjoe (03-04-2013)
05-23-2011, 05:29 PM
#33
Instructor
I just did this yesterday & I just used a basic(non-ratcheting) 14mm wrench. To remove the bottom left bolt, you almost have to do it from the bottom (putting it back on can be done from the top if you finagle your arm in just right. so your hand will be behind the exhaust when tightening). There's really not much room to work with. You'll spend most of the time on those 2 bolts(imo)...mainly bottom passenger side tho). I went & bought a longer 14mm wrench since the one I had was a bit on the short side. It made it much easier to get those bolts loosened. Good luck man...
check out bottom of this thread, https://acurazine.com/forums/showthread.php?t=734247 -- RC99TL said he did it easily with a swivel box wrench
check out bottom of this thread, https://acurazine.com/forums/showthread.php?t=734247 -- RC99TL said he did it easily with a swivel box wrench
When I looked in the manual on how to take out the motor mounts, all I found was how to take the whole engine out. With the engine out the mounts would be easy to get to.
05-23-2011, 06:12 PM
#34
Are you talking about the bolts for the Mount or the bolts for the bracket on the engine? I am talking about the two bottom bolts for the bracket to the engine. I don't think the swivel box wrench would fit in that space. I will look for a longer combination wrench as that should give me some more surface to work with. For the left rear bolt for the mount to the frame I used a deep socket, U joint, and a extension bar as stated earlier in this thread. I had that bolt out in no time.
 05-26-2011, 01:09 PM
#36

$500 if you bring it to the stealership i imagine (can't remember what they quote for this job on average)
buy em new (well, front + side anyway) for about $200
then install em yourself...depending on how much of a car DIYer you are & how well you can follow directions. there's a little common sense involved, but it can easily be figured out with some time + trial & error (at least it was in my case)
01-28-2012, 10:09 PM
#37
kill you till you die
Did this today. dont have much to contribute. No need to get a block of wood, just jack up the motor where the transmission meets the motor. You can get the 2 bracket bolts with a ratchet from the top.
Remove header heat shield. Undo all the bolts on the actual mount itself, cut the rubber cover off, then spin the mount until you can just barely get the socket on the bolts using a small wobble extension. the socket will be 90% on the bolt head, enough to remove it without stripping it.
You wont be able to get it back on this way, but it works good for removal if you have stubborn bolts that wont budge with a wrench like mine!
01-28-2012, 10:12 PM
#38
kill you till you die
Also, I purchased the Motorking mounts from Ebay. Quality looked decent. They came with a lifetime warranty, $150 shipped for all 3 mounts plus the 2 tranny mounts.
10-03-2012, 05:17 AM
#39

2003 TL, 93k miles. Anyone know if I'll notice a big change (more vib?) if I use the less expensive "non-Vac" front mount such as DEA A4519 instead of the OEM which has a Vacuum port?? I'd like to hear actual results, not guesses.... Thanks!
10-03-2012, 06:12 AM
#40
If you're willing to give up the comfort of the vac assistance than I'd suggest going to our sponsor XLR8 and buy their mounts. They have a lifetime warranty and are made much better than other mounts. The vibrations you get afterwards are mostly in your steering wheel and are not that bad. It's only at idle you notice it, once you start driving it's smooth again.
The following users liked this post:
3.2TLc (10-03-2012)