Engine Cover DIY!
 03-06-2009, 08:10 AM
#1
Engine Cover DIY!
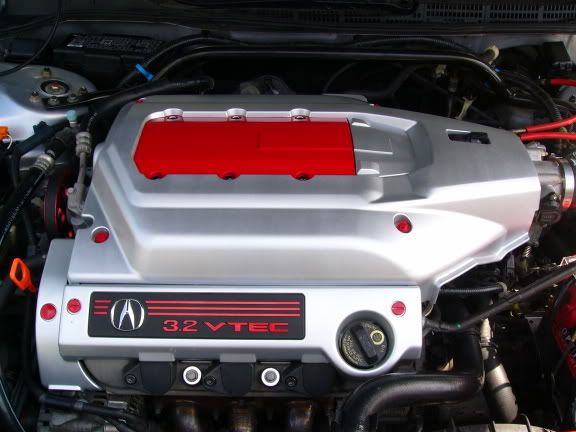
Okay these are the steps i took to paint my valve cover hopefully it will help anyone that wants to paint theirs as well...
The Supplies:
Sandpaper (IF NEEDED) If your valve cover is got uneven surfaces
Degreaser or (hand Soap)
Primer (White or Gray prefered)
Base Color of Choice
Clear Coat
*Patience*
NOTE* Keep all supply brands the same for best results. I used Dupli-Color found at any AutoZone, Walmart, Etc. When painting always have a good, and even flow of paint, primer, clear. Make sure that you are painting in a clean environment.
First Step: Take the Valve Cover off and everything you are plaining on painting, Battery Cover etc.
Second Step: Use the degreaser of your choice (You can also use hand soap) and wash off all of the grease, dirt and particles off of the valve cover.
Third Step: Let all of the parts dry.
Fourth Step: Tape off all parts that you do not want to paint, also remove all bolts and plastic screws from valve cover.

Fifth Step: Start with the primer spray the first coat really thin and let dry for about 1-2 hrs. Then apply the the second coat of primer, let dry 1-2 hrs.


Sixth Step: Paint the parts with the base coat of your choice, the paint I used is called Frescha Mocha Metalic (something like that) DO NOT APPLY TOO MUCH PAINT IT WILL RUN! You need to spray the paint like the primer in 2-3 coats to get a good coverage and bind. Follow Step 5.
*NOTE: Apply as many coats of paint as you preffer more is NOT always better!


Seventh Step: Time for the clear coat, when spraying clears do not try to cover a lot at one time IT WILL RUN its very watery... So take your time when doing this step *Patience* Follow Step 5 and/or 6. Let your clear dry a little more if needed Also apply as many coats of clear as you prefer...
Eight Step: Let all the parts dry dont rush and place back on engine.

ALL DONE! Any questions or if I forgot anything let me know.
The Supplies:
Sandpaper (IF NEEDED) If your valve cover is got uneven surfaces
Degreaser or (hand Soap)
Primer (White or Gray prefered)
Base Color of Choice
Clear Coat
*Patience*
NOTE* Keep all supply brands the same for best results. I used Dupli-Color found at any AutoZone, Walmart, Etc. When painting always have a good, and even flow of paint, primer, clear. Make sure that you are painting in a clean environment.
First Step: Take the Valve Cover off and everything you are plaining on painting, Battery Cover etc.
Second Step: Use the degreaser of your choice (You can also use hand soap) and wash off all of the grease, dirt and particles off of the valve cover.
Third Step: Let all of the parts dry.
Fourth Step: Tape off all parts that you do not want to paint, also remove all bolts and plastic screws from valve cover.
Fifth Step: Start with the primer spray the first coat really thin and let dry for about 1-2 hrs. Then apply the the second coat of primer, let dry 1-2 hrs.
Sixth Step: Paint the parts with the base coat of your choice, the paint I used is called Frescha Mocha Metalic (something like that) DO NOT APPLY TOO MUCH PAINT IT WILL RUN! You need to spray the paint like the primer in 2-3 coats to get a good coverage and bind. Follow Step 5.
*NOTE: Apply as many coats of paint as you preffer more is NOT always better!
Seventh Step: Time for the clear coat, when spraying clears do not try to cover a lot at one time IT WILL RUN its very watery... So take your time when doing this step *Patience* Follow Step 5 and/or 6. Let your clear dry a little more if needed Also apply as many coats of clear as you prefer...
Eight Step: Let all the parts dry dont rush and place back on engine.
ALL DONE! Any questions or if I forgot anything let me know.
 03-06-2009, 09:16 AM
#3

Very cool. I'd actually match the cover to the cars paint... Get a spray can of your color -- available from online retailers that sell various methods of automotive touch up paint (Pens, aerosol cans, etc.)
03-06-2009, 10:15 AM
#5
Not knocking you at all... just since this is a DIY thread I figure I'd mention that an aerosol can of automotive paint in any color (You usually just need to provide them w/ your paint code) is about $15 -- just search online.
I think it makes a big difference (personally) as well as if you like to show off your car, whether if it's at a meet or a car show. Having mismatched pieces is, meh.
I think it makes a big difference (personally) as well as if you like to show off your car, whether if it's at a meet or a car show. Having mismatched pieces is, meh.
03-06-2009, 10:22 AM
#6
cool i thought you were talking about the actual paint you buy in pints LOL that you have to spray out of a spray gun but i didnt know that, well that would probably be a whole lot better to have matching paint but mine aint to badly off of the exterior paint GOOD TIP man!
03-06-2009, 10:53 AM
#7
Senior Moderator
cool i thought you were talking about the actual paint you buy in pints LOL that you have to spray out of a spray gun but i didnt know that, well that would probably be a whole lot better to have matching paint but mine aint to badly off of the exterior paint GOOD TIP man!

Trending Topics
03-06-2009, 11:15 AM
#9
The Dumb One
iTrader: (1)
i used paint that matched to the eye because i found some with metal flake in it.. much more appealing and original then just regular color matching... dupont down the street from me sells the small spray cans of OEM paint.. but it didnt look near as good as dupli-colors finish...


 03-06-2009, 02:12 PM
#16


 03-07-2009, 03:05 AM
#27
Instructor
Join Date: Jun 2008
Location: Antioch, CA
Age: 40
Posts: 200
Likes: 0
Received 0 Likes
on
0 Posts

 03-07-2009, 01:40 PM
#31
Instructor
Join Date: Jun 2008
Location: Antioch, CA
Age: 40
Posts: 200
Likes: 0
Received 0 Likes
on
0 Posts
 04-25-2009, 05:22 PM
#39
Sippy Cup (x2)
Join Date: Jun 2005
Location: Virginia Beach, VA
Age: 42
Posts: 1,961
Likes: 0
Received 9 Likes
on
3 Posts
Looks good. Almost exactly like mine, except I did the valve cover red.
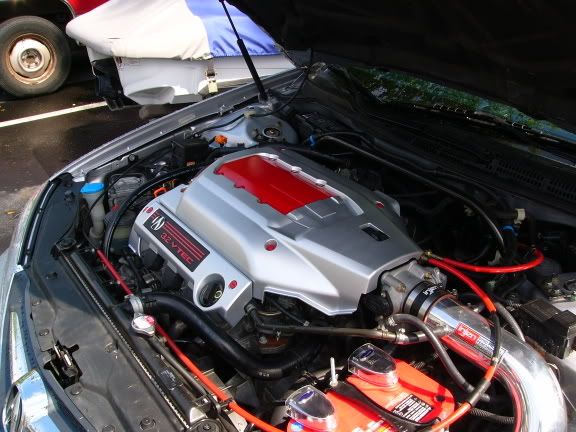
I actually also used the radiant silver. I'm in the process of re-doing it, but this time I am trying to get the smoothest finish possible. Hopefully, it will look almost like it's metal instead of plastic. I'll post pics when it's done.
I actually also used the radiant silver. I'm in the process of re-doing it, but this time I am trying to get the smoothest finish possible. Hopefully, it will look almost like it's metal instead of plastic. I'll post pics when it's done.
The following users liked this post:
shamal (11-01-2014)
04-25-2009, 06:04 PM
#40
Senior Moderator