DIY: Replace side engine mount • Acura TL
 05-10-2010, 06:41 AM
#1
DIY: Replace side engine mount • Acura TL
My front and side engine mounts were original, 10 years old with 105,000 miles on them and had failed. The side rubber was cracked right through, and the front had lost it's hydraulic fluid. Besides knowing they were bad because the dealership put it in writing, the gas pedal would transmit a fluttering, as the engine bounced about under certain conditions of acceleration and de-acceleration. Rather than spend $675 at the stealership, I'd thought I'd have a whack at them myself. Not knowing a box wrench from a box hedge, the easier mount of the two sounded a reasonable effort. So I acquired the mounts, and a few more tools, including: 1/2" breaker bar; extensions; 3/8" universal; 14mm x 3/8" universal. I refer to the following schematic by reference number throughout my narrative:
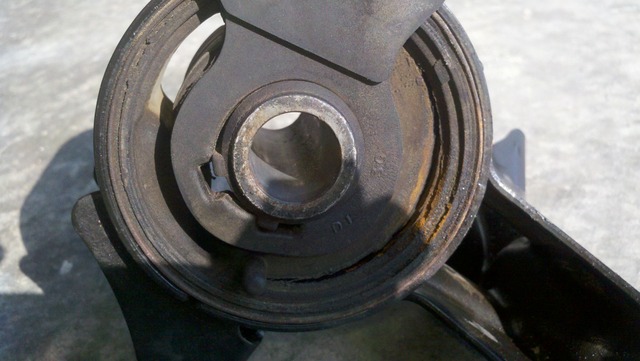
Compare new part with existing part [before removal].
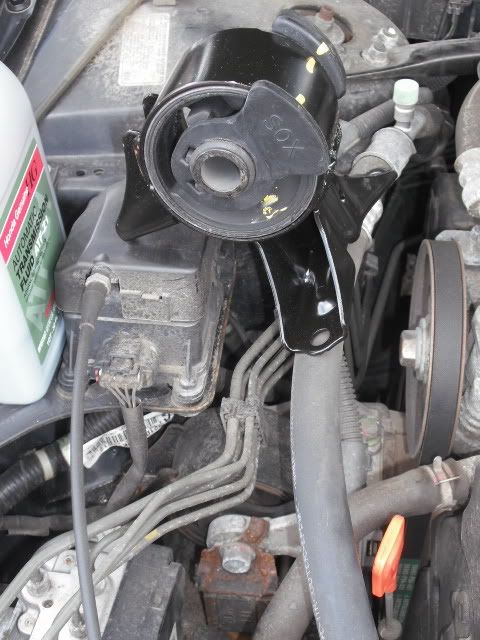
Image 1
Get a feel for how your tools will fit within the work area.
Loosen #33 FLANGE BOLT (12X110) before removing #8 ENGINE SIDE STOPPER BRACKET.
Although #33 bolt is shown with my brother's 1/2" ratchet on the socket, I swapped in the breaker bar.
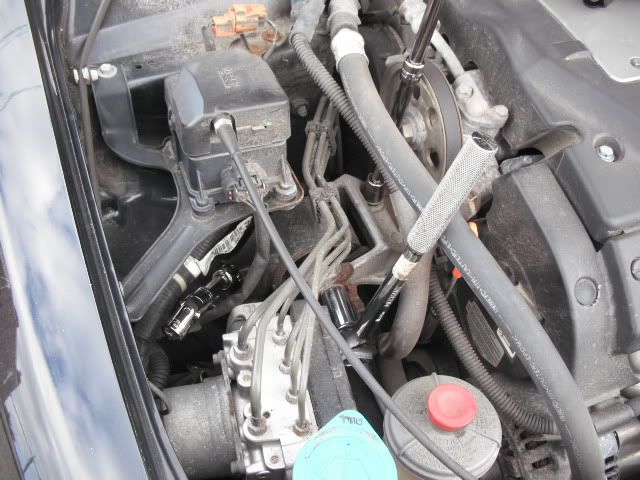
Image 2
Think ahead to the next move.
With #33 bolt loose or removed, #4 SIDE ENGINE MOUNT DYNAMIC DAMPER will
swing out of the way, allowing access to front #31 flange bolt (10 x 16).
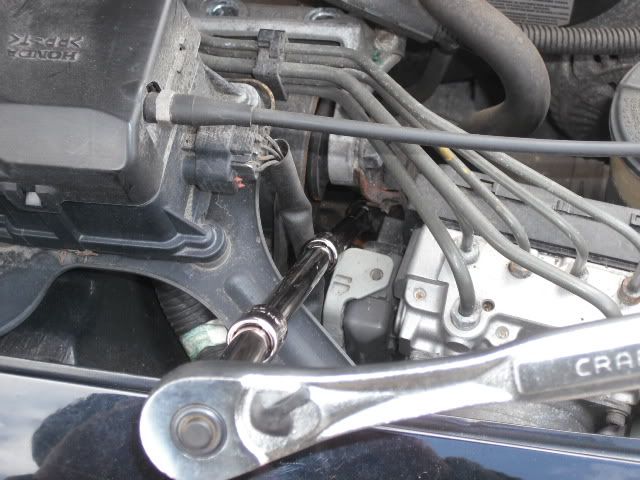
Image 3
Don't forget to remove the brake line attached to the mount.

Image 4
Fully disconnected.
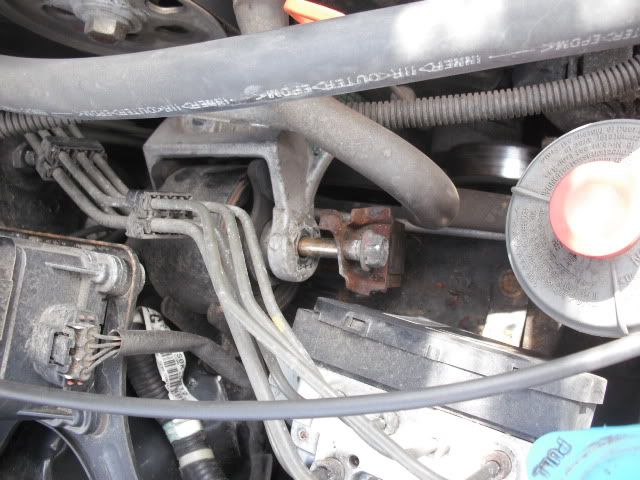
Image 5
The engine might not run properly with metal debris among the pulleys and belts.
Remove bolts, sockets, etc., that might have fallen within.
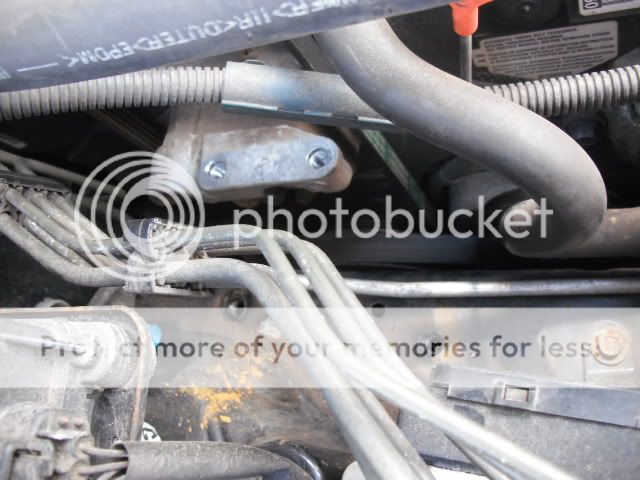
Image 6
One last look before installation.
I removed the rubber "ears" before plunging the mount back into it's space, figuring they'd fall off.
The rear-facing ear was troublesome getting back on, and I'd probably leave them on, if doing it again.
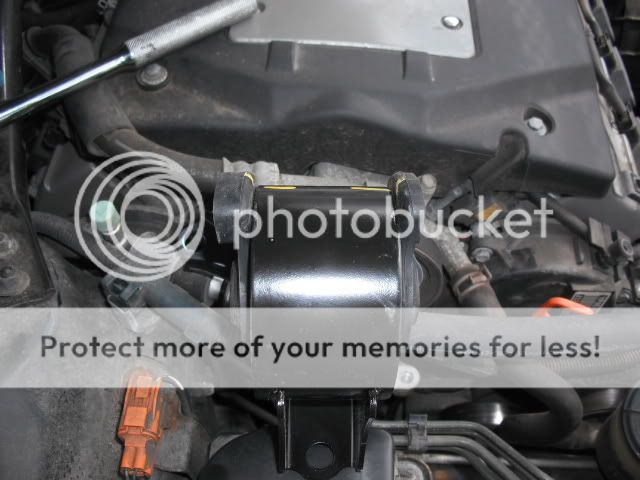
Image 7
She likes going in on her back.
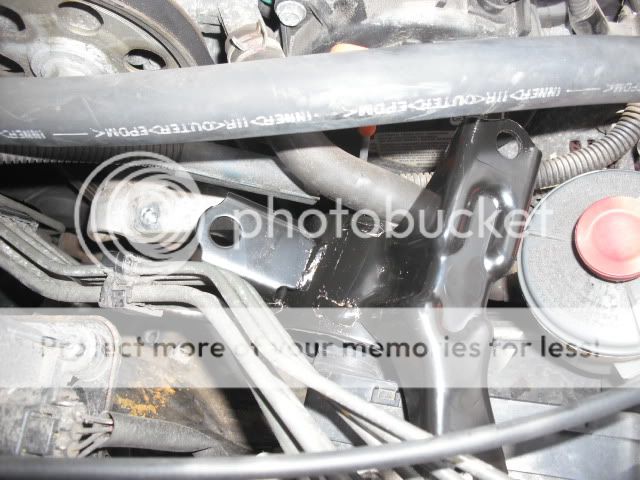
Image 8
Hey, did I forget to remove and reinstall the brake line clip?
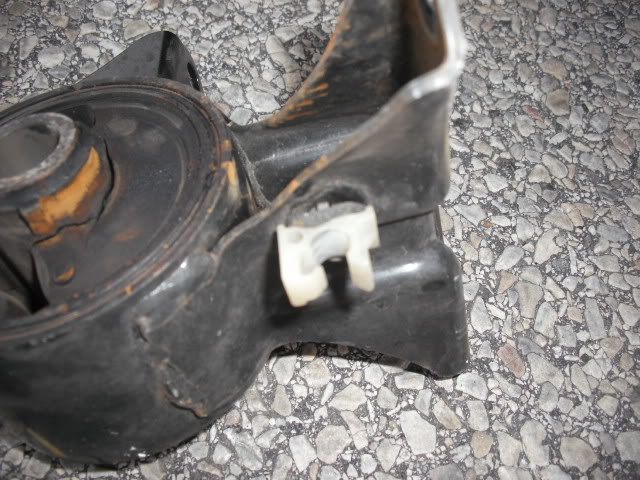
Image 9
All done! Wow, the engine seems to idle more smoothly and quietly!
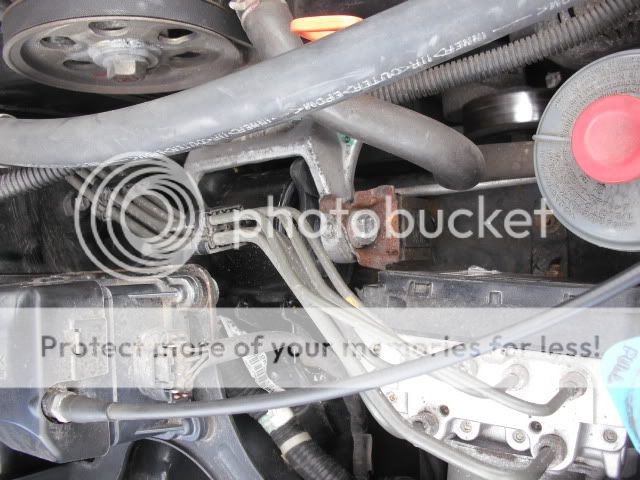
Image 10
These were the only tools I used.
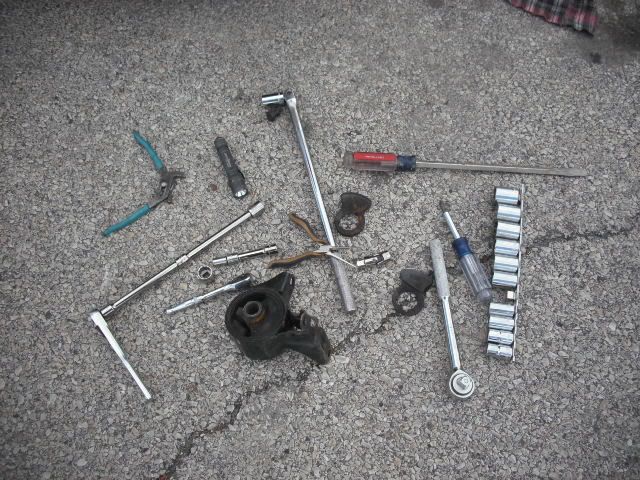
Image 11
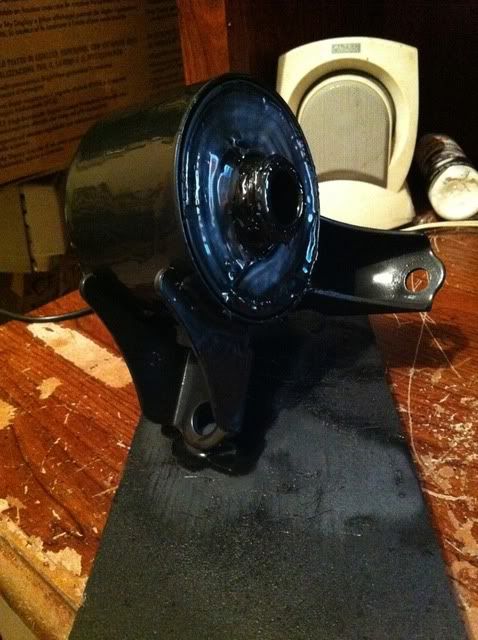
Now, is the day long enough for the front mount . . . ?
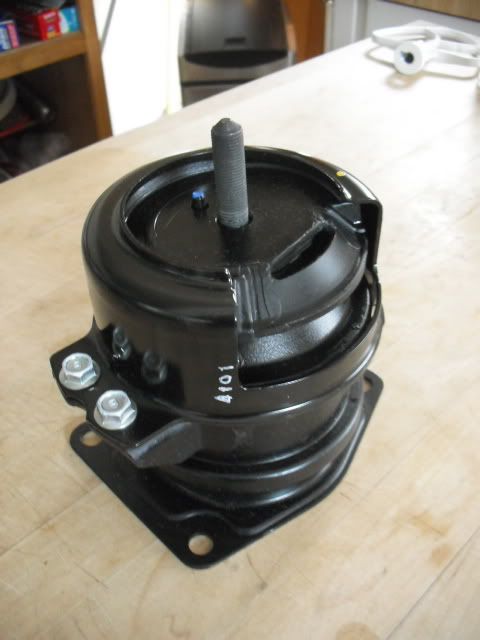
Image 12
If your previous wrenching, like me, was confined to tightening up your bicycle wheels,
you might want to replace the side mount before attempting the [pictured above] front mount.
To conserve bandwidth, please refer to image number rather than copying and pasting the image within your post. Thank you.
Compare new part with existing part [before removal].
Image 1
Get a feel for how your tools will fit within the work area.
Loosen #33 FLANGE BOLT (12X110) before removing #8 ENGINE SIDE STOPPER BRACKET.
Although #33 bolt is shown with my brother's 1/2" ratchet on the socket, I swapped in the breaker bar.
Image 2
Think ahead to the next move.
With #33 bolt loose or removed, #4 SIDE ENGINE MOUNT DYNAMIC DAMPER will
swing out of the way, allowing access to front #31 flange bolt (10 x 16).
Image 3
Don't forget to remove the brake line attached to the mount.
Image 4
Fully disconnected.
Image 5
The engine might not run properly with metal debris among the pulleys and belts.
Remove bolts, sockets, etc., that might have fallen within.
Image 6
One last look before installation.
I removed the rubber "ears" before plunging the mount back into it's space, figuring they'd fall off.
The rear-facing ear was troublesome getting back on, and I'd probably leave them on, if doing it again.
Image 7
She likes going in on her back.
Image 8
Hey, did I forget to remove and reinstall the brake line clip?
Image 9
All done! Wow, the engine seems to idle more smoothly and quietly!
Image 10
These were the only tools I used.
Image 11
Now, is the day long enough for the front mount . . . ?
Image 12
If your previous wrenching, like me, was confined to tightening up your bicycle wheels,
you might want to replace the side mount before attempting the [pictured above] front mount.
To conserve bandwidth, please refer to image number rather than copying and pasting the image within your post. Thank you.
 05-10-2010, 08:02 AM
#2
as basic of a job as this seems to be, it's still nice to see a DIY on this. good job  & thx.
i know i can look this up, but what'd you pay for your side mount? so it's not necessary to jack the engine up at all when doing just this side mount?
& thx.i know i can look this up, but what'd you pay for your side mount? so it's not necessary to jack the engine up at all when doing just this side mount?
05-10-2010, 09:26 AM
#3
Yes, there is no need to raise engine, as the side mount does not support vertical weight.
50820-S0K-A81 RUBBER ASSY., ENGINE SIDE MOUNTING $58.86
95701-10016-08 BOLT, FLANGE (10X16) 2x$0.79 $1.58
50800-S0K-A82 MTG RUB ASSY ENG FR $128.36
DYI w/pictures on front mount coming soon.
50820-S0K-A81 RUBBER ASSY., ENGINE SIDE MOUNTING $58.86
95701-10016-08 BOLT, FLANGE (10X16) 2x$0.79 $1.58
50800-S0K-A82 MTG RUB ASSY ENG FR $128.36
DYI w/pictures on front mount coming soon.
05-10-2010, 09:44 AM
#4

ck the diy's there may be one already as its very common failure,
usually found at trans failure time when someone actually looks at the fluid filled front mount and sees the oil trail
Sometime after the front goes the side has been taking extra load and it fails
Note Some years have a vac line to front and rear mounts to boost their stiffness on full throttle (gen3 is opposite and softens engine vibration at idle)
if thats present be sure it gets hooked back up
If you have that- the engine will run much better now- its had a vac leak for a year!
ck the plugs and run seafoam thru gas,,vac leaks cause lean run issues
note: if you are in the dealer for warranty trans and they say it needs front mount- do it- saves hours of labor- 15 minute job when trans is already out
05-10-2010, 01:51 PM
#6
Man...didnt know the motor didn't need to be supported for this...i might just do this in the next couple weeks...the front mount I am really worried about...thanks for the DIY..
05-10-2010, 02:29 PM
#7
Racer
Join Date: Apr 2009
Location: Wilmington, DE
Age: 36
Posts: 359
Likes: 0
Received 20 Likes
on
2 Posts
Nice write up. I decided to allow the dealership to replace them when I did my 105k service back in March of this year.
The only other three mounts I do want to replace are the two transmission mounts and the rear mount.
Someone should make a DYI for those!
Sent via Apple iTouch
The only other three mounts I do want to replace are the two transmission mounts and the rear mount.
Someone should make a DYI for those!
Sent via Apple iTouch
Last edited by bruistopher; 05-10-2010 at 02:30 PM. Reason: Spelling
Trending Topics
05-10-2010, 05:35 PM
#8
support engine or trans as needed- remove bolts- install new part- tighten bolts
There is your DIY
There is your DIY
05-10-2010, 06:02 PM
#9
Thank you. It's good to give a bit back to the community. I'll have a DYI with pictures for the front mount coming soon, and will be taking a good look at the other mounts shortly.
Great directions. It must be gratifying to post these offhand tidbits from your level of expertise.
What others might find from my posts are safety reminders, mistakes I made that they can avoid, sometimes the folly of my harder way of wrenching, so that their way might be easier. The biggest gain is reviewing the procedure, and developing the confidence from within to do their own wrenching.
support engine or trans as needed- remove bolts- install new part- tighten bolts
There is your DIY
There is your DIY
What others might find from my posts are safety reminders, mistakes I made that they can avoid, sometimes the folly of my harder way of wrenching, so that their way might be easier. The biggest gain is reviewing the procedure, and developing the confidence from within to do their own wrenching.

 05-12-2010, 04:02 AM
#13
Comments upon front mount replacement . . .

I posted the question, "Can it be done from the top", and with no responses, went ahead.
Reaching the three bolts on bracket #9 is easy, two from the top, and the one next to the exhaust manifold, from beneath.
From beneath, that is, if the car is up on stands.
It's the bolt to the right, found in this thread --> https://acurazine.com/forums/2g-tl-1999-2003-98/diy-99-03-front-engine-mount-replacement-734247/
Linked photo --> http://i70.photobucket.com/albums/i8...tunderview.jpg [photo credit - myTaLizaS3.2]
I didn't remove the battery, and am not sure if the trans came up enough to tough the battery tray.
The lower exhaust manifold bolt did, however, rip off upon removal. I'm not sure it required removal,
if the car would have been up on jack stands. Hindsight is a wonderful thing . . .
12-19-2010, 10:56 AM
#14
Instructor

The motor mounts are gone for my 2000 TL with 112k miles on it. Found it yesterday when i went for oil change to a mechanic (did my last two by myself.)
I am in Los angeles.. Anyone want to help me replacing these?
I am in Los angeles.. Anyone want to help me replacing these?
12-19-2010, 12:09 PM
#15
 12-19-2010, 04:40 PM
#17
Well, its at the shop tomorrow for its TBelt.
See about getting it done then.
Damn !@@#!@
I do get some weird vibrations in reverse and the classic delay from Drive to Reverse but no Park to Reverse delay.
GREAT!
See about getting it done then.
Damn !@@#!@
I do get some weird vibrations in reverse and the classic delay from Drive to Reverse but no Park to Reverse delay.
GREAT!
12-19-2010, 08:53 PM
#18
2003 TL-p
set ingalls stiffy ETD to 12mm and bring the length out to 5 threads for preload. really makes a huge difference, engine barley moves now. of course if your mounts are shot ETD wont compensate for that, but it should make them last longer. ETD really makes drive train feel much more solid, and major increase in throttle response. no need to wait for the engine to rotate 2 inches before its starts putting power down. Also ingalls ETD on factory settings does basically nothing, need to at least adjust the length out a few threads (max is 5 or 6 i think, 10mm i believe is max also for shock.).
12-19-2010, 09:08 PM
#19
set ingalls stiffy ETD to 12mm and bring the length out to 5 threads for preload. really makes a huge difference, engine barley moves now. of course if your mounts are shot ETD wont compensate for that, but it should make them last longer. ETD really makes drive train feel much more solid, and major increase in throttle response. no need to wait for the engine to rotate 2 inches before its starts putting power down. Also ingalls ETD on factory settings does basically nothing, need to at least adjust the length out a few threads (max is 5 or 6 i think, 10mm i believe is max also for shock.).
I think by chance i may actually have one of those big wrenches at my grandparents.
Last edited by thelastaspec; 12-19-2010 at 09:18 PM.
05-06-2011, 11:57 AM
#20
does torque necessary matter THAT much on these few bolts(if so, anyone have the specs?)? or just pretty darn snug like they were before?
Last edited by webmastir; 05-06-2011 at 12:01 PM.
05-07-2011, 10:38 AM
#24
awesome. thanks hANDYcaptd
05-09-2011, 02:21 PM
#25
Well, I'd say my side mount was quite useless given it's state:
Can you tell which is new & old?
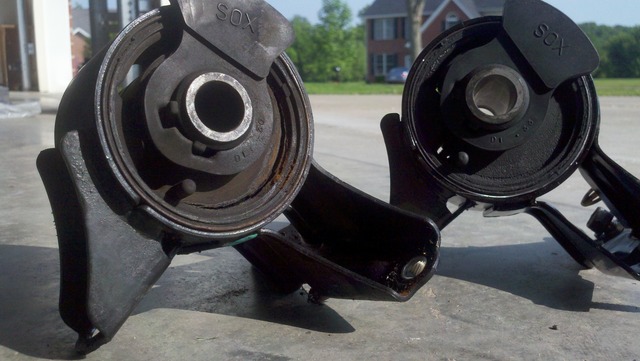
Some of my personal notes for people who do this in the future (despite how easy it seems): Breaker bar is a must! You definitely have to put down your purse for a few of those bolts, and your basic ratchet most likely won't be able to loosen a few of those bolts either. I didn't use a universal on this side mount at all & was fine. You are better off unbolting/unplugged the Cruise control module thing & swing it out of the way before starting this. It'll make things a lot easier.
Now I get attempt the much more difficult front mount this week
Thanks again for the write up Sperry (if you even read these forums anymore)
Can you tell which is new & old?
Some of my personal notes for people who do this in the future (despite how easy it seems): Breaker bar is a must! You definitely have to put down your purse for a few of those bolts, and your basic ratchet most likely won't be able to loosen a few of those bolts either. I didn't use a universal on this side mount at all & was fine. You are better off unbolting/unplugged the Cruise control module thing & swing it out of the way before starting this. It'll make things a lot easier.
Now I get attempt the much more difficult front mount this week
Thanks again for the write up Sperry (if you even read these forums anymore)
Last edited by webmastir; 05-09-2011 at 02:25 PM.
The following users liked this post:
Skeet33 (02-06-2018)
05-10-2011, 07:19 AM
#27
4' cheater? what's that
(forgive my dumbass question)
(forgive my dumbass question)
05-10-2011, 07:30 PM
#28
A 4' cheater, or a six foot cheater, etc, would be when you take a pipe,
and slip it over the handle of your pipe wrench or breaker bar.
So, I can put a 2" x 48" pipe over the handle of my 18" Rigid Pipe Wrench and get some incredible torc.
Same thing for my breaker bar. I think it is 18", but by slipping a pipe, in my case, the handle of my 40+ year old Ajax floor jack over the breaker bar, the bar effectively becomes a longer bar, so an easy tug from 4' of center puts a lot more force on the socket than the same effort applied to an 18" handle.
Like Archimedes once said, “Give me a lever long enough and a fulcrum on which to place it, and I shall move the world.”
08-29-2011, 08:19 AM
#29
1st Gear

Join Date: Aug 2011
Age: 38
Posts: 1
Likes: 0
Received 0 Likes
on
0 Posts
Good DIY write up. This was an easy project, took about 20 minutes start to finish to replace the side mount. Removing the cruise control module (?) on the passenger far left side, above the mount, makes it much easier to replace the mount.
08-29-2011, 09:22 AM
#30
Moderator
Yup I do remove the Cruise Control motor for Room makes it far easier...
Also my Poly Mount (Fully Cured 1 week) is waiting until my first try (Ugly Poly Mount cured only 2 days) Fails if it does, 2 Months and the bastard is still running strong....
Also my Poly Mount (Fully Cured 1 week) is waiting until my first try (Ugly Poly Mount cured only 2 days) Fails if it does, 2 Months and the bastard is still running strong....
11-14-2011, 11:21 PM
#31
Can someone comment on the 'fluttering' via the gas is creating with broken side mounts?
I have a constant fluttering (like the corner of a piece of paper hitting a fan) every time I hit the gas, lightly or hard. I just bought brand new XLR8 62A motor mounts and was wondering if these will correct the fluttering.
I thought it had to do with my exhaust all the way up from the pre-cat but his phrase "fluttering upon acceleration" hit it right on the head.
11-25-2011, 01:07 AM
#32
Great DIY, it was useful for when I changed my side and front.
One question: Are you sure that the clip in the side mount holds the brake line? My mount didn't have that clip, and I didn't see a line in that area. I looked at the brake line diagram here:
http://www.acuraoemparts.com/delray/...All&vinsrch=no
And it seems that the 6 brake lines are clipped together, as in your pictures.
I'm not sure what that line is for, but is it possible to be year dependent?
11-25-2011, 01:18 AM
#33
After a little more research, I'm now thinking that it is an A/C hose. In the following diagram, the hose itself is #5 and the clip is #11:
http://www.acuraoemparts.com/delray/...All&vinsrch=no
Posted it for anyone that didn't have a clip. I guess my garage mechanic threw it away when he changed my side mount.
http://www.acuraoemparts.com/delray/...All&vinsrch=no
Posted it for anyone that didn't have a clip. I guess my garage mechanic threw it away when he changed my side mount.
06-20-2012, 10:43 PM
#34
Advanced

Join Date: May 2012
Posts: 56
Likes: 0
Received 0 Likes
on
0 Posts
i just replaced my front engine mount in my 2000 tl. my engine still sounds like it wants to explode when driving over 15mph, so bad i wont even drive it. i think i have to replace the rear mount and side mount i guess. just want to know for sure since they aren't cheap. my front mount was surely bad so im guessing the others may be too. i have 236k on it and they never been changed. i guess my question to most is can the engine get super super super loud when these mounts are bad or is it just a little loud. if its just a little loud i may give in and take to mechanic but i still hopeful its the other two mounts. i know im rambling a bit but any help would be great. thanks
 08-07-2012, 03:53 PM
#36

Agreed...This is an excellent DIY. Have a question though. Since both my side and the front mount is bad, if I change the side mount now and do the front later on, will the side mount that I replaced go bad again since the front one hasn't been replaced? I've read thru both the side and the front mount DIY's and the front mount seems pretty difficult so I might take it to a mechanic for it.
08-07-2012, 04:07 PM
#37
I did the front mount from above, without jacking the car up. Now that was hard.
You can get both mounts delivered for about $200 from http://www.acuraoemparts.com.
Ramps and a floor jack, some tools, and you're in business.
If I had the car on ramps, I don't think the front mount would have been any harder than the side mount.
I don't remember if I loosened the side mount, but you don't need to raise the engine all that much.
08-07-2012, 04:51 PM
#38
For the side mount, you only need to support the engine with the jack and a block of wood.
For the front & rear mounts, you only need to raise the engine 1 inch (no more)...and only after you loosen all the nuts and bolts connecting the mounts.
And yes, you need to do all 3 mounts or expect to repeat the job soon.
For the front & rear mounts, you only need to raise the engine 1 inch (no more)...and only after you loosen all the nuts and bolts connecting the mounts.
And yes, you need to do all 3 mounts or expect to repeat the job soon.
08-08-2012, 04:12 AM
#39
Moderator
My Home-Made poly side Mount is still kicking! even with almost 20K on it! And it cost me only 5$ Bucks to make:
FYI: 20K with Front Mount Broken Got to Love Polyurethane.... I will do Front/Rear this weekend XD
FYI: 20K with Front Mount Broken
Got to Love Polyurethane.... I will do Front/Rear this weekend XD
Last edited by Skirmich; 08-08-2012 at 04:15 AM.
08-08-2012, 06:17 AM
#40
Front and rear mounts have a lot of parts to them to fail. Even the poly filling can't save them! If you don't mind the vibes at idle I say get the XLr8 mounts. A few weeks and the vibration gets a bit better but so far still there. As long as you don't have shit loose all over it's fine. Mostly present in the steering wheel. Less wheel hop on WOT and knowing it was a one time job makes the vibration a non factor.