DIY: Replace Parking Brake Shoes (E-Brake)
 11-02-2014, 11:34 PM
#1
Moderator
Thread Starter
DIY: Replace Parking Brake Shoes (E-Brake)
Hello Aziners!
Well after 13yrs with my Stock Parking brakes I've decided to replace my Brake Shoes for the First Time.
Background: I always use my parking brake, In fact I first stop the car with the parking brake and when the car settles on them I engage Park. Thus my parking brake shoes sees a lot of action for an automatic.
Some months Ago I started to notice how my parking brake would start to slip away and my brake pedal gave lots of clicks (Stock are 3 to 4 Clicks for Engagement) I had close to 13 clicks and my brake will still slip away.
Now the DIY!
What You Need:
1x Set of New Parking Brake Shoes (Comes in Pairs)
1x New Brake Hardware (Optional, also Comes in Pairs)
14mm Socket (Caliper Bracket) and Ratchet.
Flat Screwdriver.
1x Can of Brake Cleaner Spray (Optional)
Pliers.
Lots of Patience.
1.- First remove your brake caliper bracket, Don't bother removing the caliper off the bracket just remove the whole set completely and put it aside (The brake pads will not fall)
2.- Remove the 2 Philips screws securing the Rotor into the hub.
2*- If you adjusted your E-Brake Pedal before you should undo the adjustment all the way! we will adjust this later on this DIY, This is the adjustment nut:
3.- Now that you removed the rotor you will see both brake shoes, They are hold on in the HUB by 2 Main Springs and 2 Securing Tabs. The third spring holds the Separator Plate and the fourth ties up the Adjustment Wheel in the bottom. Spray everything with brake cleaner! This will be a good time to clean the Rear ABS Sensor and Sensor HUB.
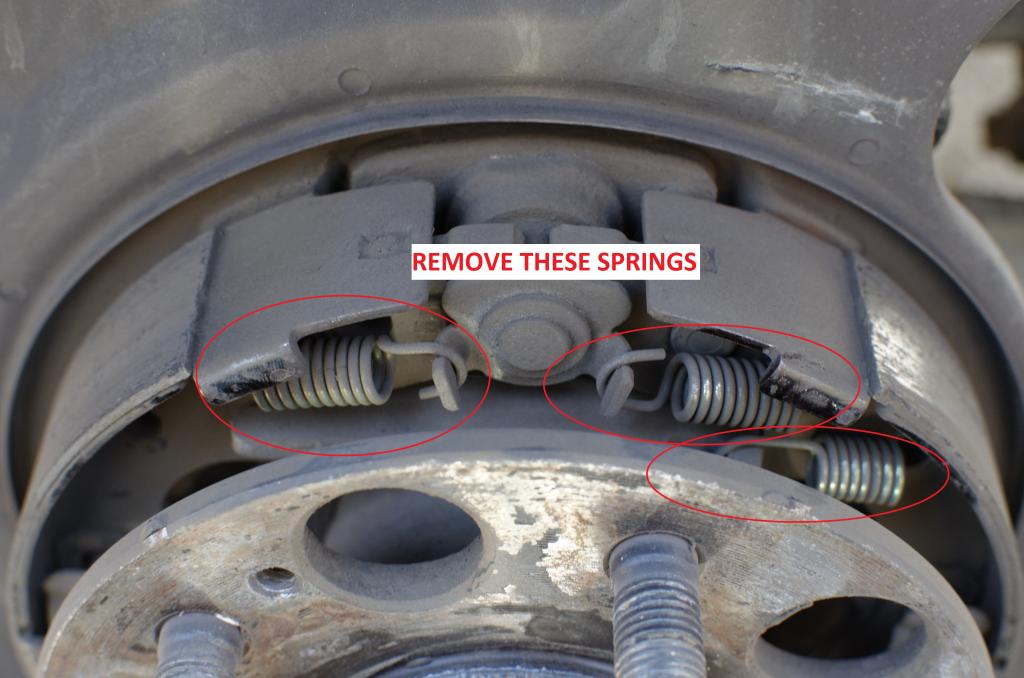
You will completely tighten up the Adjustment Wheel before re-installing.
You can remove both shoes by removing the top 2 springs and the 2 securing tabs, after you removed that the whole assembly will fall apart if you giggle it.
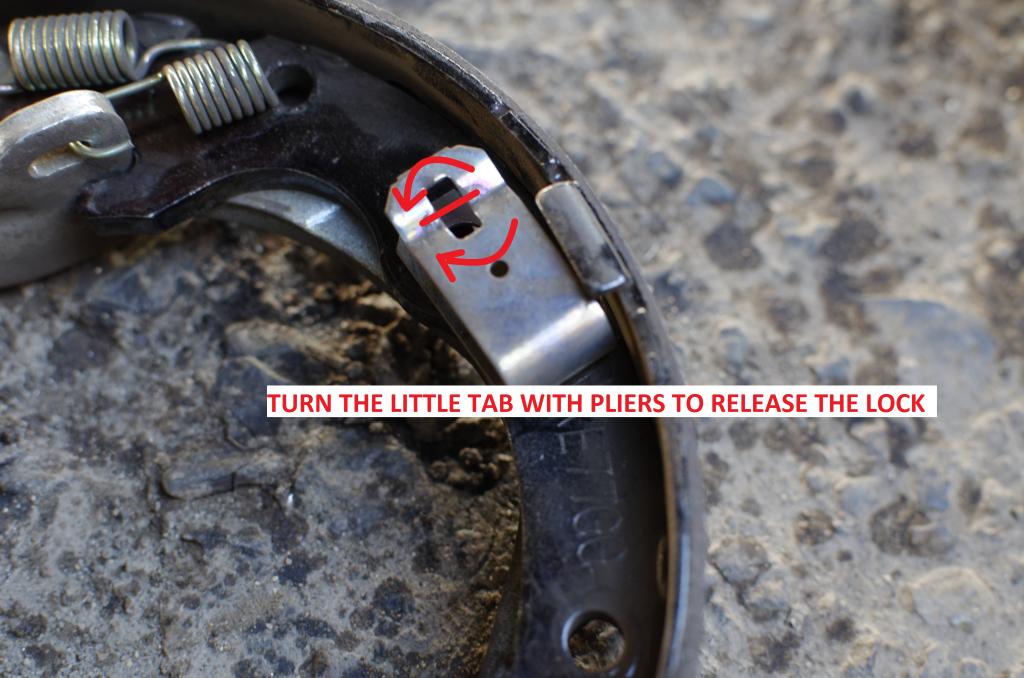
The Parking brake line bracket is held into the Shoe by 1 C-Clip you will use your flat screw driver to open the C clip and your pliers to remove it! This can be very difficult so work your way out of it:
Now re-install everything in reverse procedure a quick metod is to install the brake line first, Then install the adjustment wheel and spring and hold the 2 pieces together and sit it in the hub. Align the brake line shoe first and install its secure tab first making sure the other shoe doesn't fall apart. Once you installed the brake line shoe securing tab then install its spring, Everything should be easy after that.
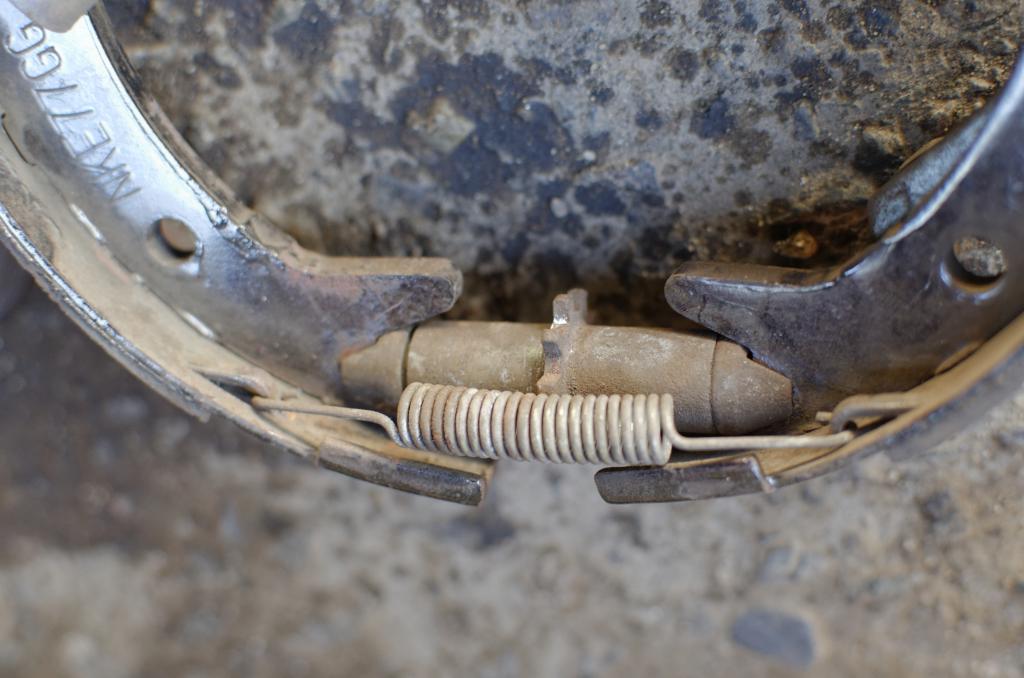
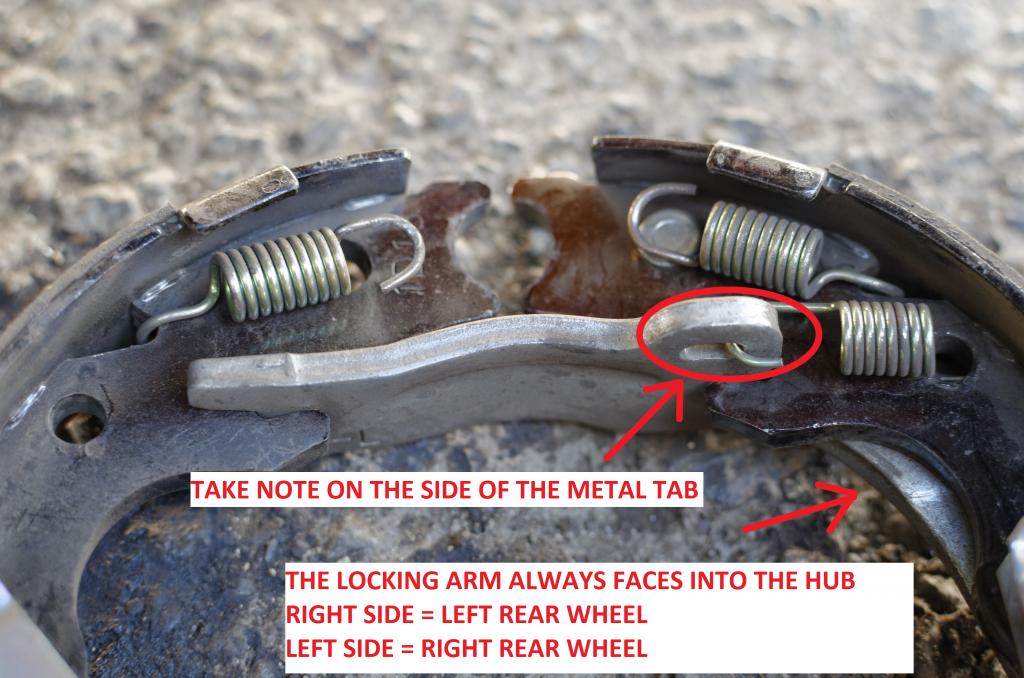
Here is a quick note on parts orientation:
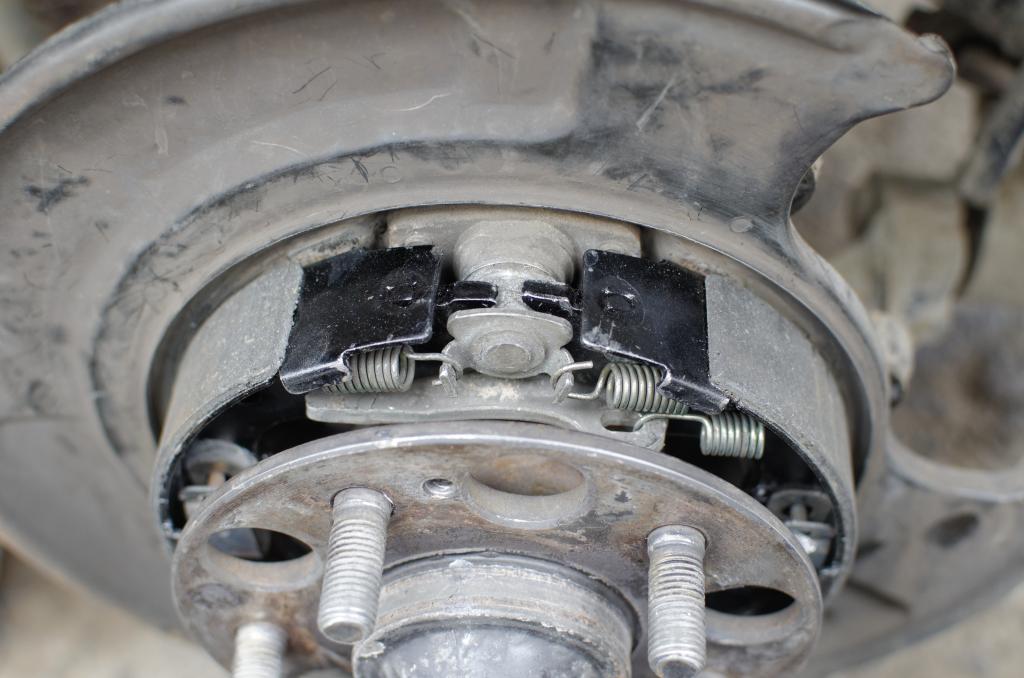
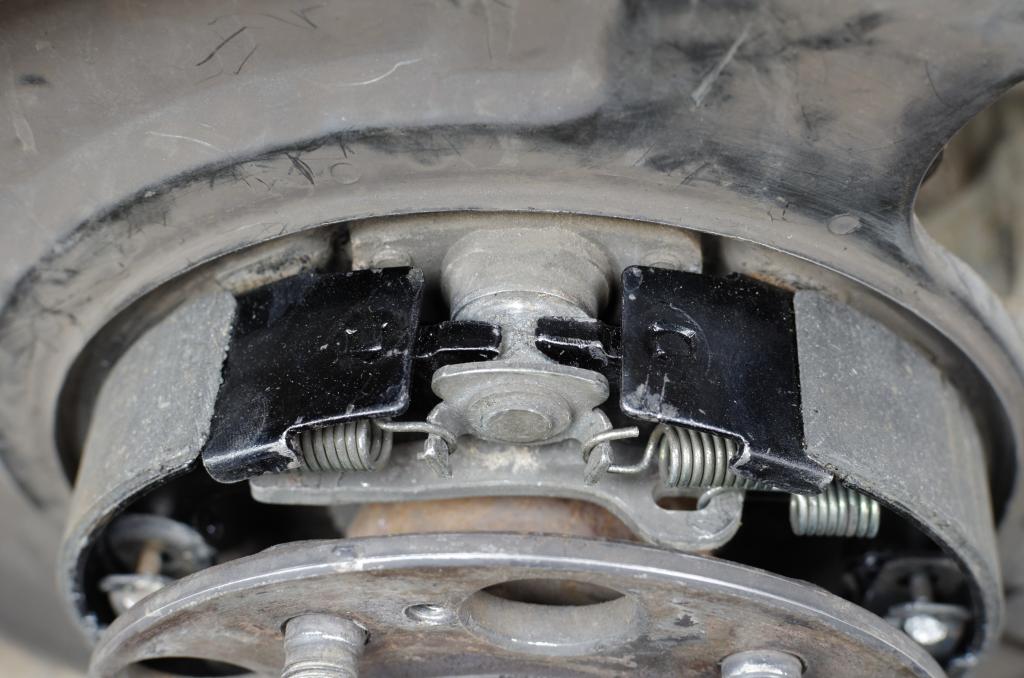
When your done it should look like this:
Now remove the Rotor Adjustment rubber thingy:
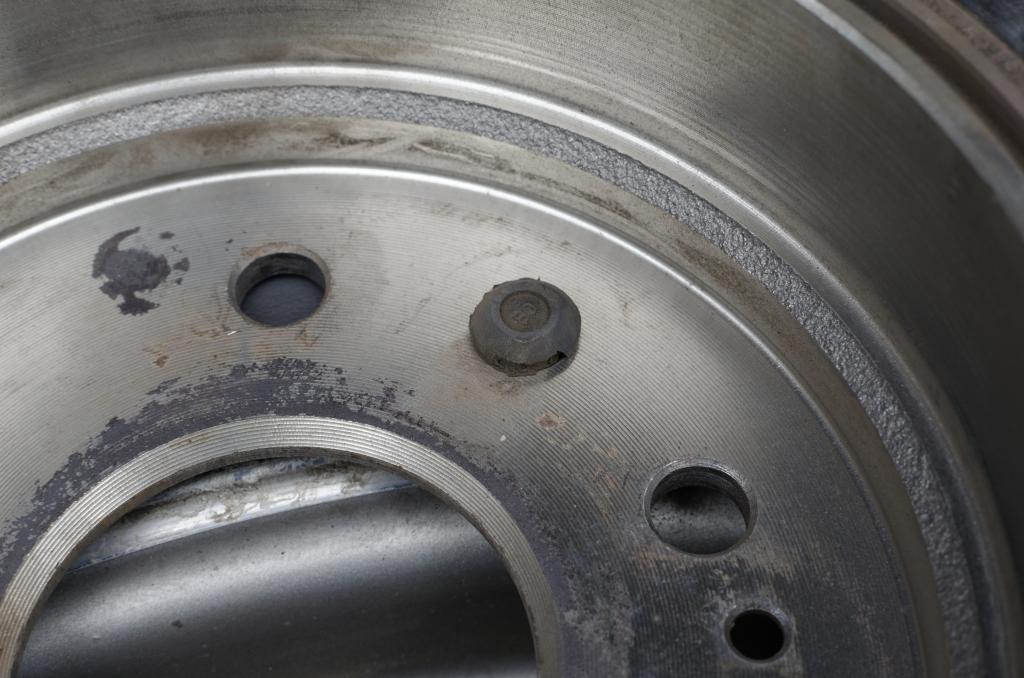
Now when you install the Rotor (If you cant install the rotor re-check your work! if your work is OK and your using Aftermarket Brake Shoes skip to Step X) You should be able to see the adjustment wheel through the hole:
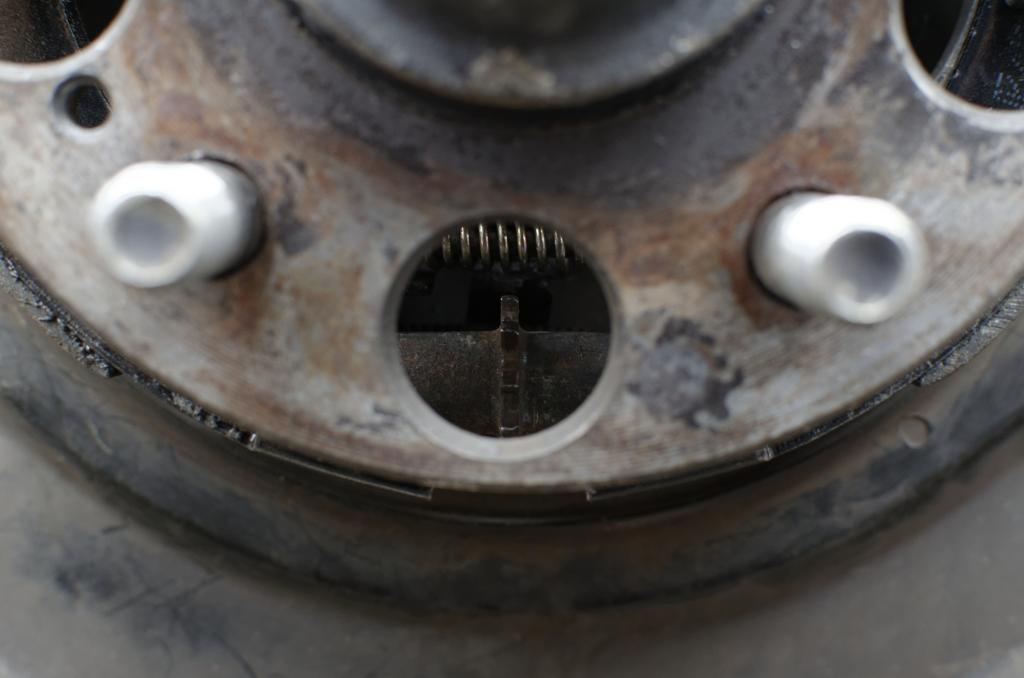
What you want to do is to turn the adjustment wheel with a Flat Screwdriver JUST ENOUGH so the brake shoe start to touch the rotor, You will feel this by the drag it creates. It should be enough to feel it but not enough to create excessive drag! When you find the sweet spot re-install the rubber thingy into the rotor Don't force it because it can fall inside and you will have to remove the rotor again. Then re-install the Caliper Bracket and The Wheel.
5.- Now its time to adjust the E-Brake Pedal, When you complete the shoe installation you will want to leave one wheel in the air (So you can spin it freely). Locate your Brake Pedal adjustment nut:
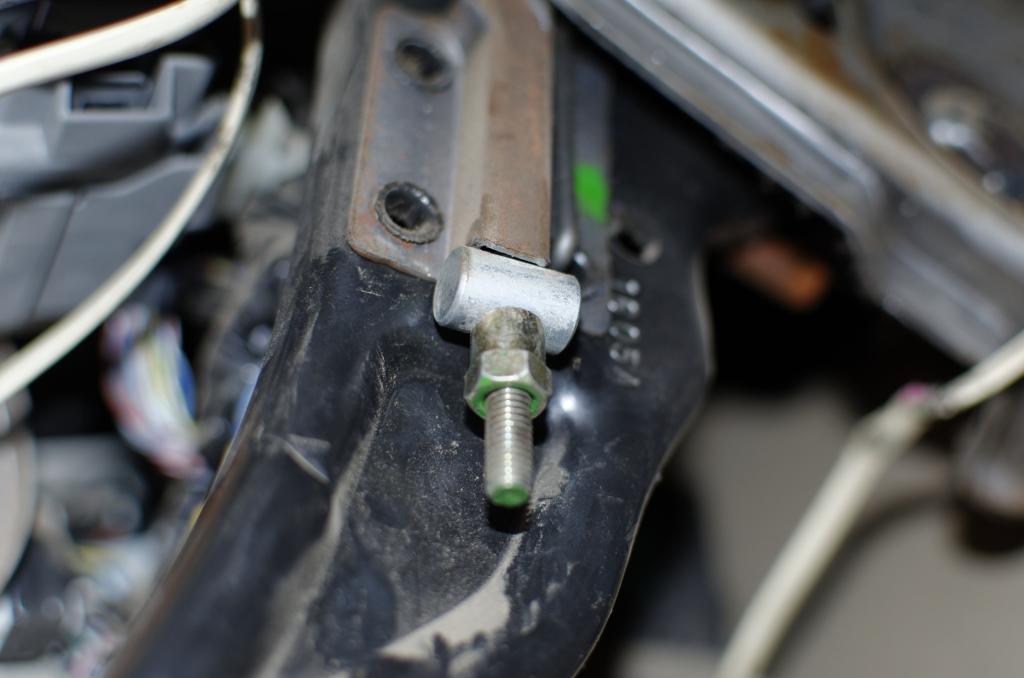
Now take a 10mm long neck socket and start to tighten it up just enough so when you spin the wheel you notice the drag (Like it was engaging it) when you notice the drag back down one turn and leave it like that! (You will want to hear 3-4 clicks and the wheel should lock up) if you hear 5 clicks then turn the nut one more time it should be enough to hear 4 clicks at least.
When your done, Your done! Congrats you just Replaced your Parking brake shoes!
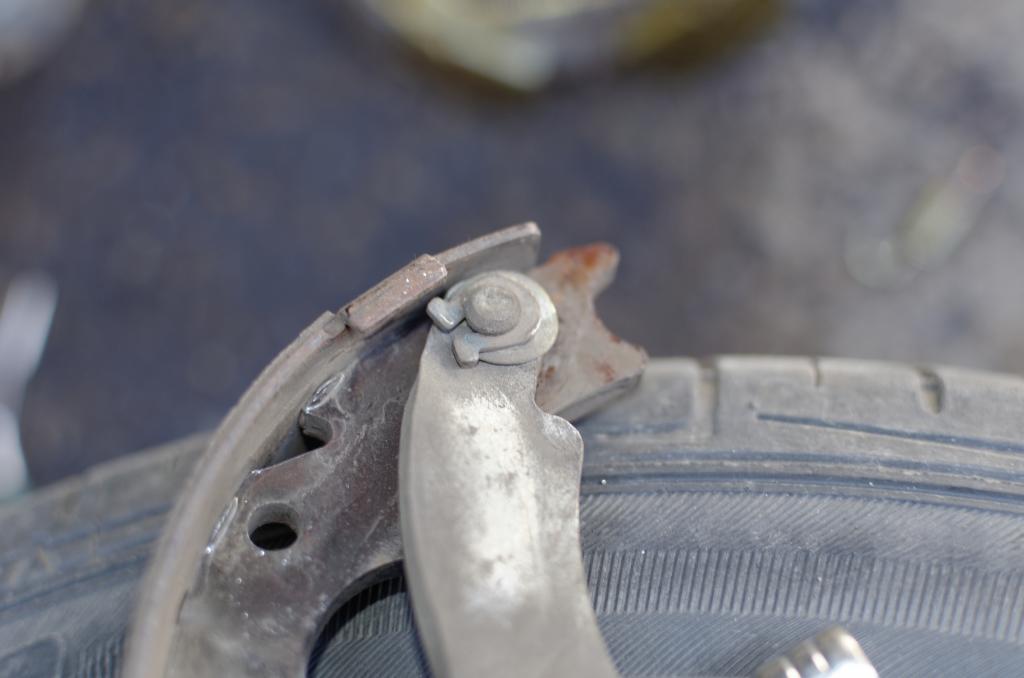
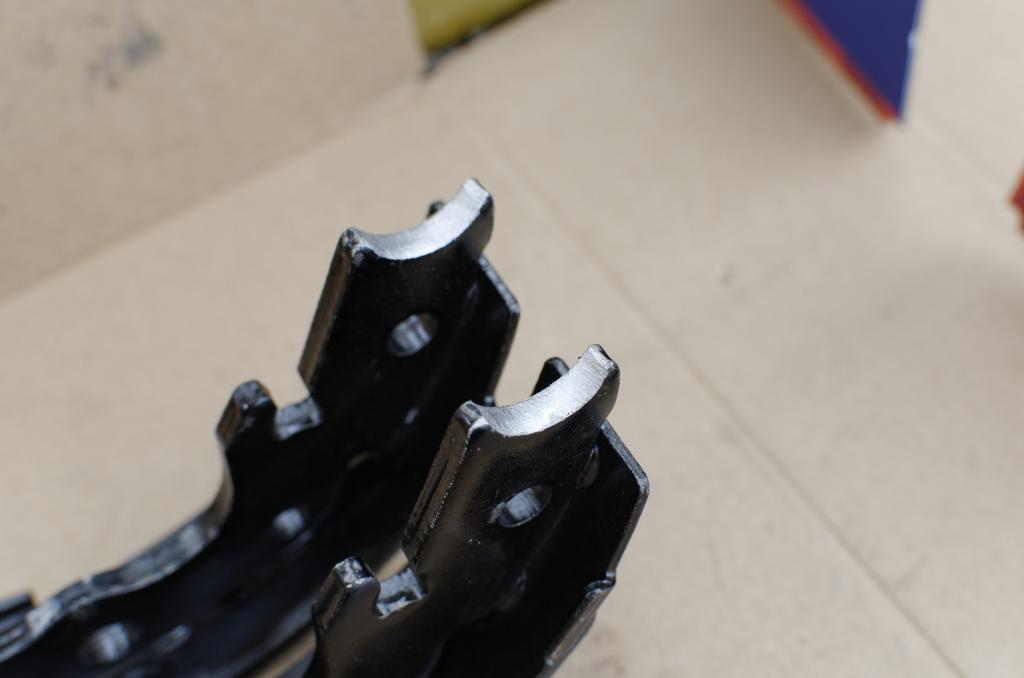
X.- Now if you use the OEM Brake Shoes the rotor should seat with ease BUT if you are using Aftermarket Shoes and by some reason when you try to install the rotor stuck before falling into the hub like if the parking brake is engaged and it wont seat down the hub then we had the same problem:
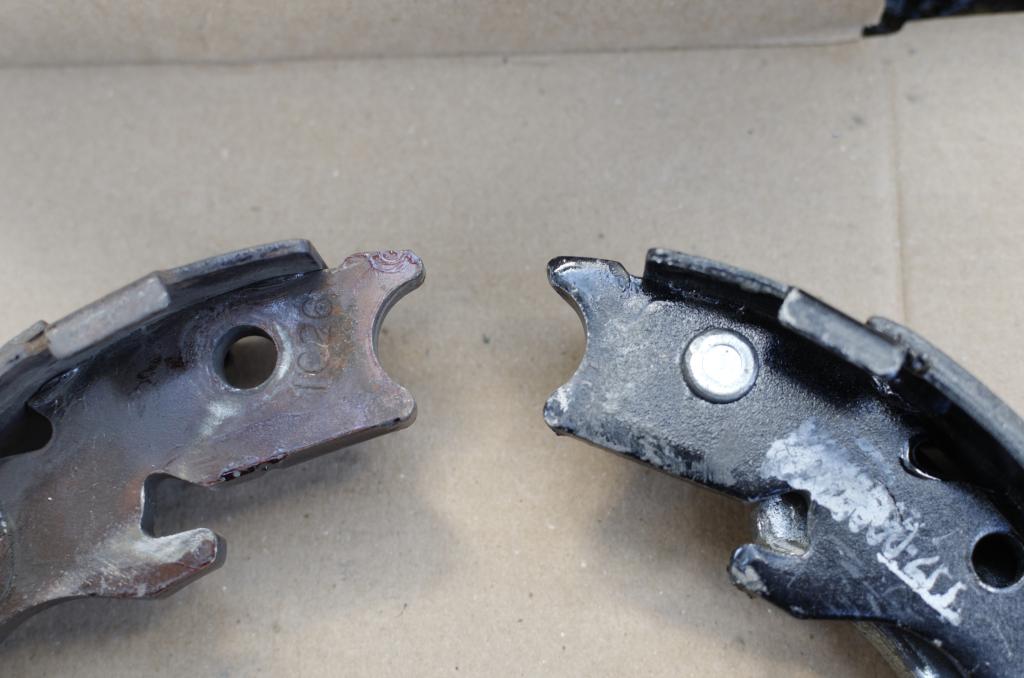
Left is OEM, Right is Aftermarket Duralast Pads (Centric ones had the same issue)
Seems that the dove the Aftermarket use was miss-casted or miss-cut but for what-ever reason the dove is too small and doesn't sit properly into the HUB Pivot point. What you have to do is get a File (Tool) and file down the Dove in the brake shoe until is evenly round:
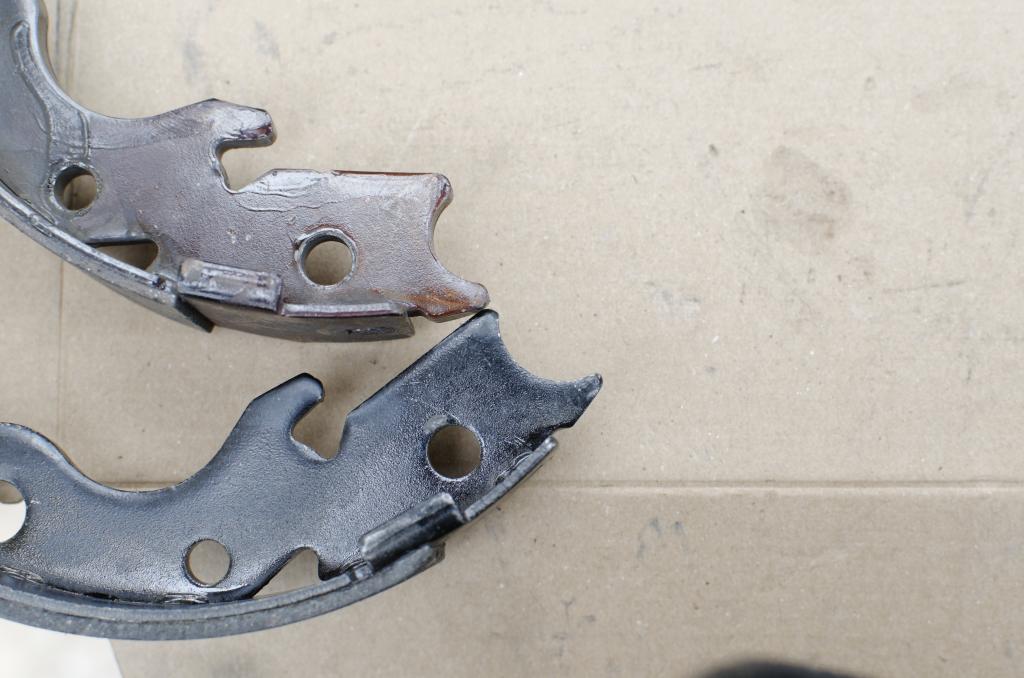
When you filed down enough material to your likeness you will have to completely install the brake shoes then the rotor should slip back into the hub like it should! if it doesn't you will have to remove the brake shoes completely and re-do this procedure until the rotor falls back in (NOTE: You aren't damaging anything else expect the brake shoes itself, You wont damage anything in your car by doing this). When the rotor falls back in go back to step 4 and proceed to complete the adjustment.
Now old vs new!!
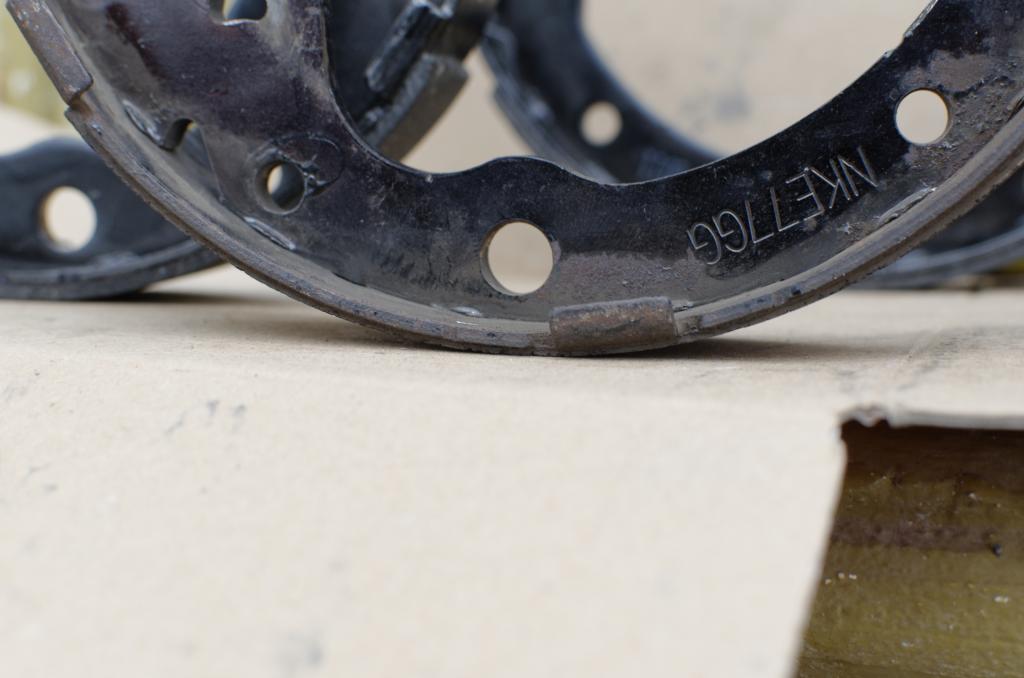
13yrd old OEM:
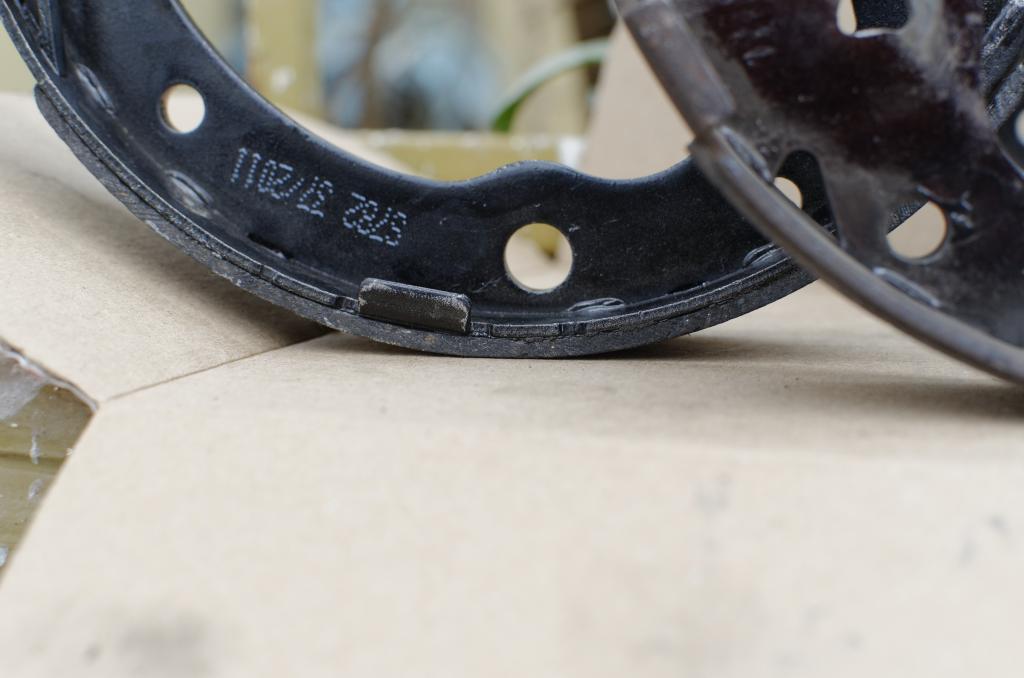
New Duralast Pads:
Hope this Helps! by Skirmich.
Well after 13yrs with my Stock Parking brakes I've decided to replace my Brake Shoes for the First Time.
Background: I always use my parking brake, In fact I first stop the car with the parking brake and when the car settles on them I engage Park. Thus my parking brake shoes sees a lot of action for an automatic.
Some months Ago I started to notice how my parking brake would start to slip away and my brake pedal gave lots of clicks (Stock are 3 to 4 Clicks for Engagement) I had close to 13 clicks and my brake will still slip away.
Now the DIY!
What You Need:
1x Set of New Parking Brake Shoes (Comes in Pairs)
1x New Brake Hardware (Optional, also Comes in Pairs)
14mm Socket (Caliper Bracket) and Ratchet.
Flat Screwdriver.
1x Can of Brake Cleaner Spray (Optional)
Pliers.
Lots of Patience.
1.- First remove your brake caliper bracket, Don't bother removing the caliper off the bracket just remove the whole set completely and put it aside (The brake pads will not fall)
2.- Remove the 2 Philips screws securing the Rotor into the hub.
2*- If you adjusted your E-Brake Pedal before you should undo the adjustment all the way! we will adjust this later on this DIY, This is the adjustment nut:

3.- Now that you removed the rotor you will see both brake shoes, They are hold on in the HUB by 2 Main Springs and 2 Securing Tabs. The third spring holds the Separator Plate and the fourth ties up the Adjustment Wheel in the bottom. Spray everything with brake cleaner! This will be a good time to clean the Rear ABS Sensor and Sensor HUB.


You will completely tighten up the Adjustment Wheel before re-installing.

You can remove both shoes by removing the top 2 springs and the 2 securing tabs, after you removed that the whole assembly will fall apart if you giggle it.
The Parking brake line bracket is held into the Shoe by 1 C-Clip you will use your flat screw driver to open the C clip and your pliers to remove it! This can be very difficult so work your way out of it:

Now re-install everything in reverse procedure a quick metod is to install the brake line first, Then install the adjustment wheel and spring and hold the 2 pieces together and sit it in the hub. Align the brake line shoe first and install its secure tab first making sure the other shoe doesn't fall apart. Once you installed the brake line shoe securing tab then install its spring, Everything should be easy after that.
Here is a quick note on parts orientation:

When your done it should look like this:


Now remove the Rotor Adjustment rubber thingy:

Now when you install the Rotor (If you cant install the rotor re-check your work! if your work is OK and your using Aftermarket Brake Shoes skip to Step X) You should be able to see the adjustment wheel through the hole:

What you want to do is to turn the adjustment wheel with a Flat Screwdriver JUST ENOUGH so the brake shoe start to touch the rotor, You will feel this by the drag it creates. It should be enough to feel it but not enough to create excessive drag! When you find the sweet spot re-install the rubber thingy into the rotor Don't force it because it can fall inside and you will have to remove the rotor again. Then re-install the Caliper Bracket and The Wheel.
5.- Now its time to adjust the E-Brake Pedal, When you complete the shoe installation you will want to leave one wheel in the air (So you can spin it freely). Locate your Brake Pedal adjustment nut:

Now take a 10mm long neck socket and start to tighten it up just enough so when you spin the wheel you notice the drag (Like it was engaging it) when you notice the drag back down one turn and leave it like that! (You will want to hear 3-4 clicks and the wheel should lock up) if you hear 5 clicks then turn the nut one more time it should be enough to hear 4 clicks at least.
When your done, Your done! Congrats you just Replaced your Parking brake shoes!
X.- Now if you use the OEM Brake Shoes the rotor should seat with ease BUT if you are using Aftermarket Shoes and by some reason when you try to install the rotor stuck before falling into the hub like if the parking brake is engaged and it wont seat down the hub then we had the same problem:

Left is OEM, Right is Aftermarket Duralast Pads (Centric ones had the same issue)
Seems that the dove the Aftermarket use was miss-casted or miss-cut but for what-ever reason the dove is too small and doesn't sit properly into the HUB Pivot point. What you have to do is get a File (Tool) and file down the Dove in the brake shoe until is evenly round:


When you filed down enough material to your likeness you will have to completely install the brake shoes then the rotor should slip back into the hub like it should! if it doesn't you will have to remove the brake shoes completely and re-do this procedure until the rotor falls back in (NOTE: You aren't damaging anything else expect the brake shoes itself, You wont damage anything in your car by doing this). When the rotor falls back in go back to step 4 and proceed to complete the adjustment.
Now old vs new!!
13yrd old OEM:

New Duralast Pads:

Hope this Helps! by Skirmich.
Last edited by Skirmich; 11-02-2014 at 11:43 PM.

The following 5 users liked this post by Skirmich:
3.2TLc (11-03-2014),
Arkady (12-04-2017),
brianmystery (11-22-2021),
RONE (11-05-2014),
Tidy Whitey (12-02-2017)
11-03-2014, 07:41 AM
#2

Well detailed info !!! Especially explaining the aftermarket fit problems.
Thanks to Skirmich for taking the time and effort to write up this helpful "DIY" for the rear PB inner shoes.
Thanks to Skirmich for taking the time and effort to write up this helpful "DIY" for the rear PB inner shoes.
11-03-2014, 08:31 AM
#3
Moderator
Thread Starter
Heheh yeah I wasn't expecting the fitment issues at all! When I tried my Centrics and didn't fit I just asked for a refund and went to Duralast pads but when they didn't fit either I was seriously thinking my HUB was defective or something.
Then I noticed that the separator plate still had enough gap between the pads so in theory the pivot point was the only thing opening the shoes for engagement when the shoes where resting. That's when I decided to go medieval with the file, It worked out great. 3-4 clicks and the wheel now locks!! Pretty easy DIY but in this case very time consuming since I had to file down the pads > install > re-do if they didn't fit. All in all took me 4 hours to finish which is just too damn long! Next time I'm going OEM for the E-Brake Shoes
Then I noticed that the separator plate still had enough gap between the pads so in theory the pivot point was the only thing opening the shoes for engagement when the shoes where resting. That's when I decided to go medieval with the file, It worked out great. 3-4 clicks and the wheel now locks!! Pretty easy DIY but in this case very time consuming since I had to file down the pads > install > re-do if they didn't fit. All in all took me 4 hours to finish which is just too damn long! Next time I'm going OEM for the E-Brake Shoes
11-04-2014, 10:37 AM
#4

Adding to make a better job:
whats missing is some caliper grease applied to all the moving parts where they interact, and the threads on the adjuster need some grease too
remove caliper from bracket and grease the slider pins and rest of the rear caliper/pads contact,,supposed to replace that grease once a year! according to maker of well known product-
If you run the car thru a car wash or pressure wash it yourself- chances are there is little or no grease left on your brake parts!
A few minutes now is good maintenance
Also a good time to do a full brake fluid flush, do the fronts, then the rear is up and wheels off making it simple
remember its LF RF RR LR on brake bleeding
otherwise,, great DIY! many thanks to Skirm
11-04-2014, 10:42 AM
#5
the under 10 dollar tool at any parts store- drum brake tool- is invaluable!
Among the things it has built in- a part that removes and installs the springs and keepers first try~
work smarter not harder- get the oe shoes and right tool for the job
Among the things it has built in- a part that removes and installs the springs and keepers first try~
work smarter not harder- get the oe shoes and right tool for the job
11-04-2014, 11:00 AM
#6
Moderator
Thread Starter
^ Yeah I completely forgot adding a note about greasing the moving joints, Sadly I cannot edit it now  But hope people will take note on that if they read the comments.
But hope people will take note on that if they read the comments.
11-04-2014, 03:36 PM
#7
did you grease, and its just not visible in pics?
Im old and not wearing my reading glasses~
Reminder: when you replace pads on either end of the car- or park brake shoes
Its time for a full brake fluid flush
EVERY YEAR is suggested by acura and performance drivers (who do it even more often) with a MAX 3 years between
If the color of fluid in the brake res is dark= its ready to do right now
winter is fast upon us- condensation in the fluid causes weaker braking power to the caliper and pads
And everyone is subject to the severe hygroscopic action of brake fluid (wiki it)
An opened can/bottle of brake fluid- recapped with a piece of plastic wrap over opening before cap installed = still only good for 6 months!!! on the shelf and toos it- has absorbed moisture sitting in the garage
Trending Topics
11-06-2014, 11:19 AM
#9
cool figured you would do it right~
just wanted those using this as a diy to know = there is a little more required than is visible
just wanted those using this as a diy to know = there is a little more required than is visible
 05-23-2018, 10:20 PM
#12
1st Gear

Join Date: May 2018
Age: 24
Posts: 1
Likes: 0
Received 0 Likes
on
0 Posts
Hey, what is the Dove, I am trying to install new brake shoes and my Rotors are not fitting on properly. Is that what I need to file down? If so, what part is it, and if not, does anyone have any suggestions?
Thanks!
Thanks!

Thread
Thread Starter
Forum
Replies
Last Post
mada51589
3G TL Problems & Fixes
79
05-03-2022 08:54 PM
asahrts
Member Cars for Sale
0
09-04-2015 05:55 PM