Diy - rear engine mount replacement
 07-10-2012, 09:41 PM
#1
Pro
Thread Starter
Diy - rear engine mount replacement
I just did my rear mount today and I must say that I was really scared from all the horror stories I read here. This was my first time doing this, and I didn't find it as bad as most people were saying. It was actually quite easy.
The best advice I can give is to get the right tools. It's all about the tools.
I didn't find it necessary to use any 1/2" ratchets or sockets, since it has the same bolts as the the front mount.
You will need a breaker bar with a 20� extension to initially break loose the bolts on the rear mount. You will need a set of 1/2" to 3/8� converters for the breaker bar. A regular 3/8� socket set will do fine with 3� and 1.5� extensions. You will need a U-joint. A 14 mm ratcheting wrench will make your life easier when removing or installing the bottom bolts on the mount bracket.
Every single bolt can be ratcheted out. My advice is to get a high quality (lifetime guarantee) low-profile ratchet with a thinner head to fit easily in tight spaces. This is what I used and it made this job sooooooo much easier.
I bought the 5-set Motor King mounts from eBay for $150 (side, front, rear, and 2 transmission mounts).
Here is a step-by-step process of what I did. This job is so easy, so straight-forward, that anyone can do it. You don't need anybody to help you. In fact, it would take longer with another person. Replacing the front mount is excellent practise before tackling the rear mount.
Procedure:
-----------
1. Remove the strut tower brace. Don�t forget the sets of bolts hidden at the base of the windshield in those little compartments. All bolts are 16 ft-lbs when installing back. Find a comfortable pad or old blanket to put on top of the engine, as you will be lying on it for a while.
2. Jack up the front end of your car so you are able to crawl under it.
3. Next you'll want to loosen the tranny mount nuts. Loosening the bottom two nuts of each of the 2 mounts will prevent them from getting torn when jacking up the engine later.
4. You'll now need to brace the engine with a sturdy piece of wood on top of your jack and place it under the rear of the tranny bell housing. Just hold it in place with your jack for now as you don't need to jack it up yet.
5. Remove the bolt on the top of the engine mount with a 17mm deep socket and breaker bar.
6. Remove the 4 bottom bolts of the mount using a 14mm socket, swivel joint and breaker bar.
7. Now you will need to disconnect the engine mounting bracket from the engine. There are 4 bolts. 2 bolts you will remove from the top and the other 2 from under the car. There are also two 10mm bolts holding electrical connectors, one on the top of the bracket and the other on the bottom. Remove both of these now.
8. From the top, first remove the bolt on the right of the mounting bracket with a ratchet, 3� extension and 17mm socket. Leave the other one (on the left and under the bracket) for last as it will take the longest time, maybe 20 min or less.
9. Now crawl under the car to remove the 2 bottom bolts of the bracket. Remove the bottom-most bolt with a ratchet, 3� extension and 17mm socket. It will help to put a 12� pipe on your ratchet for extra leverage. Then remove the second bolt from the bottom with a ratchet, 3� extension and 14mm socket. Using a low-profile ratchet (thin head) will really help to loosen the second bolt faster. You will need to remove the socket from the bolt and turn it a few clicks by hand to line up the socket again to loosen up the bolt further. Repeat this a few times until loose. Then remove the socket, and use a 14mm ratcheting wrench to remove the bolt quicker. These bolts have lots of threads on them so be patient.
10. Now you are ready to get the 4 th bolt out. This one should be out in about 20 min or less. It's not hard, but it has lots of threads to ratchet. You will see this bolt from under the car. It is directly above the second bolt you just removed in the previous step. You will make your life easier if you break loose this bolt from the bottom, then go on top of the engine bay and ratchet it out. Use your low profile ratchet with a 14mm deep socket. Position your socket so you have enough room to undo the bolt a few clicks of your socket. Then reposition your socket again and repeat a few times until the bolt is loose. Use a pipe over your ratchet for leverage. There is little room between the exhaust but VERY doable!
11. Once you�ve loosened this last bolt, go on top of the engine bay. Now use your ratchet with a 3� extension, a swivel joint connected to the extension and to a 14mm socket. Put the extension, swivel joint and socket connection in your left hand and put the socket under the bracket and onto the bolt. Now push the ratchet into the extension and start undoing the bolt. Your socket may slip out every now and then, but if you keep pressure on it, it should stay seated.
12. Once you've taken this last bolt out the most tedious part is over. The bracket will be loose.
13. Now it's time to jack up the engine. You'll need to jack it up about 1 to 2 inches (not more) to be able to remove the bracket from the engine mount stud and move it out of the way towards the passenger side. Pay attention to the tranny mounts to make sure the bushings aren't getting pulled apart.
14. Getting the engine mount out may seem a little tight, but just rotate it and move it around the hoses and it will easily come out. Also be careful of the brake lines right behind the rear mount. Don't pull on those or bang them up with the mount.
15. Don�t forget to remove the vacuum line going to the bottom of the old mount.
16. Once you've got the rear mount out wiggle the new mount in. Don�t forget to install the rubber piece on top of your new mount and the vacuum line. Position the mount bracket on the top bolt of the mount and ensure the bracket is positioned properly on the engine BEFORE installing the 4 bolts on the mount. First install the top right bolt on the bracket and leave it loose.
17. Now finger tighten the 4 bolts on the new engine mount. Leaving the bolt loose on the bracket in the previous step helps you install these 4 bolts easily.
18. Now go under the car and put that bottom 17mm bolt on the bracket. Put that second bolt on the bracket too. Tighten these 2 bolts. Now thread with your hand the third bolt under the bracket. You will go on top the car and ratchet it in later.
19. Get on the engine bay and tighten that top 17mm bolt on the right of the bracket.
20. Now seat in the last bolt on the bracket using the same technique you used to remove it. This is now easy. It should take you a few minutes. Once it�s snug tight from above, go under the car and use your ratchet with a 14mm deep socket to slowly tighten this bolt a few times (same technique you used to break it loose). Attempting to tighten it from above, with the large angle on the swivel joint, just increases the chance that it will slip and strip the bolt. Best to tighten from under the car.
21. Now go up and tighten the 4 bolts on your new mount, and lastly tighten the top bolt. Reinstall the strut bar and you are done.
NOTE: Whatever you do, don't strip any bolt. Make sure your socket is fully engaged before turning. Be extra careful when using the swivel joint. Spray the bolts with PB Blaster the day before and let them soak.
I hope this detailed DIY gives you the confidence to do this job.

The following 9 users liked this post by victus1:
3.2TLc (10-27-2012),
AMart83 (09-07-2014),
closetprisoner (09-28-2013),
JDTL-S2002 (07-13-2012),
mrcombs (10-26-2012),
and 4 others liked this post.
The following users liked this post:
dunndada27 (07-11-2012)
07-13-2012, 10:45 AM
#4
Pro
Thread Starter
It's a piece of cake. If I had to do it again, I can do it in an hour. Half an hour to remove old, and half an hour to install new.
07-13-2012, 03:09 PM
#5
Damn. I wish you got pictures. It makes things easier for some of us. Either way, thanks for posting this as my rear has been shot fo ra while. Not to mention...my tranny mounts are broken too 
07-13-2012, 04:14 PM
#6
Pro
Thread Starter
Sorry webmastir....I was really SCARED to tackle this rear mount because of everybody's negative comments about it. Pictures were the last of my worries. But the detailed steps that I have provided here are way better than any picture.....trust me. It is basically the same mount as the front one, except the mount bracket holding it to the engine is different.
The 4 bolts holding the engine mount to the frame are a piece of cake to remove....2 minutes tops. As long as you spray some PB blaster on them the night before, your breaker bar will loosen them instantly.
Where people have HUGE problems is when removing the last bolt on the mounting bracket. The KEY here is to loosen this bolt from under the car....not from the top. This will give the right purchase on it with your socket so it won't slip and strip it. And it is easy to loosen if you have a high quality ratchet....the ones with a thinner head lower profile head.....not the bulky ones. This ratchet will fit in that tight space. Put a small pipe over it for leverage too. You will be able to loosen it a couple of clicks of your ratchet at a time. Once loosened, you need the right extension and swivel joint combo to ratchet it out easily from the top of the engine bay.
That is the only problem which gave people heartaches. With the right tools, this bolt comes out in less than 15 minutes for a first-timer.
Do your tranny mounts after removing your old rear mount while your engine is slightly jacked up a couple of inches. Then bolt your tranny mounts in place after bolting in the new rear mount. Do this step last.
Just follow my instructions and it will be a piece of cake.
07-13-2012, 04:35 PM
#7
Pro
Thread Starter
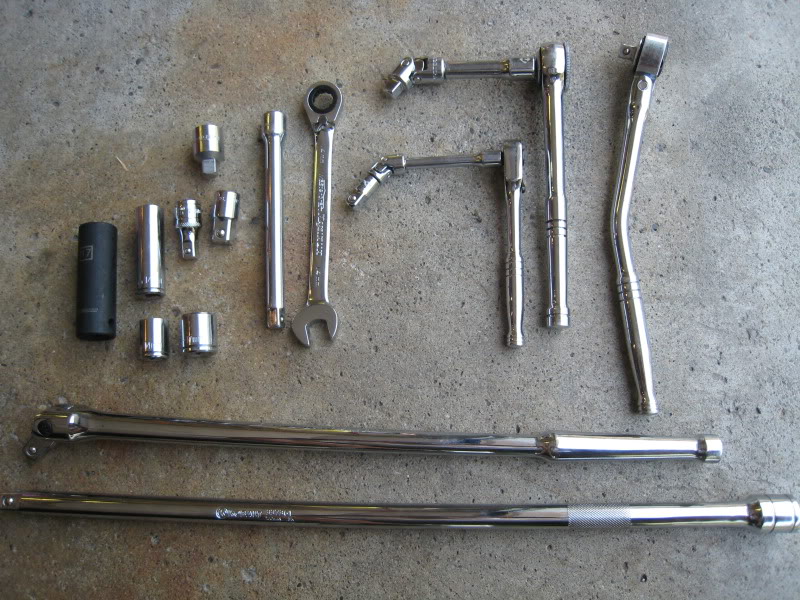
Here is a pic of the tools I used. The ratchet on the far right was used to break loose all the bolts on the mounting bracket from under the car (notice the small head on it). The 2nd ratchet combo from the right (or even the smaller one) was used to ratchet out the last bolt from the top of the engine bay. You will need a 14 mm deep socket to get the right position and purchase on the bolts of the bracket from under the car. Note the ratcheting 14mm wrench which comes in handy to quickly remove those long threaded bolts.
Trending Topics
07-13-2012, 05:27 PM
#9
Pro
Thread Starter
And if you have an air ratchet, this job will be easier than changing spark plugs.
10-23-2012, 03:32 PM
#11
2006 NBP TL MT6/ 02TL-S
When I did my rear mount, I removed the passenger side mount completely, and removed the top nut from the front mount. Then I removed the top nut from the rear mount and then the 4 bolts holding the rear mount to the frame. I then put a board & floor jack under the oil pan and jacked up the motor/trans enough for the top stud on the rear mount to be clear of the bracket. Then you can slide the old mount out from under the car and get two of the new bolts from under and the other 2 from the top. Lower the engine back down on the mount studs, install the nuts, and replace the passenger side mount. Like said, just be sure you don't jack up the engine too high and damage the trans mount or something else.
10-23-2012, 04:48 PM
#12
Pro
Thread Starter
When I did my rear mount, I removed the passenger side mount completely, and removed the top nut from the front mount. Then I removed the top nut from the rear mount and then the 4 bolts holding the rear mount to the frame. I then put a board & floor jack under the oil pan and jacked up the motor/trans enough for the top stud on the rear mount to be clear of the bracket. Then you can slide the old mount out from under the car and get two of the new bolts from under and the other 2 from the top. Lower the engine back down on the mount studs, install the nuts, and replace the passenger side mount. Like said, just be sure you don't jack up the engine too high and damage the trans mount or something else.
Nice! And makes sense.....just lift the engine to get the proper clearance over the top bolt of the rear mount. Thus you can avoid removing the mounting bracket that causes people so much heartache. Thanks!
10-26-2012, 07:11 PM
#13
Intermediate

Victus - That's a pretty inexpensive set of engine mounts! I looked on eBay for Motor King mounts -- no luck. Are your mounts manufactured by DEA? Probably too early to say, but how are they performing so far?
AlanW - That is a brilliant tip! Thanks.
AlanW - That is a brilliant tip! Thanks.
10-26-2012, 07:20 PM
#14

Do a "google" search, they're out there !
10-26-2012, 08:25 PM
#15
Pro
Thread Starter
The 5 piece kit you see in ebay actually has the exact same parts that I got, even though they don't say motor king. They look like copies of DEA. But they are probably labelled differently for various distributors. Welcome to the world of automotive parts!
Anyway, others have used them here without problems. It's a 10+ year old car, so I figured I'd save money and use these oem knock offs that are vacuum assisted. They are awesome thus far....car feels like new. Engine feels more stable when you get on the gas, and the car rides a lot smoother now. I have no problem reinstalling them 5 years from now (typical life for oem mounts), if I still have the car.
Last edited by victus1; 10-26-2012 at 08:27 PM.
10-26-2012, 09:26 PM
#16
Most knock-off replacement parts are generically branded. If you don't mind doing the labor over next time "if there even is a next time", they can indeed provide a significant cost savings for temporary relief of the immediate problem. The true savings is in the labor, and sometimes it makes more sense to install a better part if you're thinking long term.
10-26-2012, 10:16 PM
#17
Advanced
When I did my rear mount, I removed the passenger side mount completely, and removed the top nut from the front mount. Then I removed the top nut from the rear mount and then the 4 bolts holding the rear mount to the frame. I then put a board & floor jack under the oil pan and jacked up the motor/trans enough for the top stud on the rear mount to be clear of the bracket. Then you can slide the old mount out from under the car and get two of the new bolts from under and the other 2 from the top. Lower the engine back down on the mount studs, install the nuts, and replace the passenger side mount. Like said, just be sure you don't jack up the engine too high and damage the trans mount or something else.
10-27-2012, 07:49 AM
#18
DIY: rear motor mount replacement
I'm not sure if this DIY is listed under the "Official" diy sticky for 2nd Gen TL's, but it should be if not already located there. I know that there are already write ups for the front and side mounts, so it'd only be fitting to have the more difficult DIY for the rear mount to be alongside the others for future reference.
MODs: please evaluate and check this out,
 Thanks !!!
10-06-2013, 06:41 PM
Thanks !!!
10-06-2013, 06:41 PM
#19
Registered Nonmember

okay, dumb question:
Where do you put the loose bracket so I can fit the new rear mount? I can't seem to find a spot to place it where it doesn't block placement of the rear mount.
Ideas?
Where do you put the loose bracket so I can fit the new rear mount? I can't seem to find a spot to place it where it doesn't block placement of the rear mount.
Ideas?
10-07-2013, 09:02 AM
#21
2006 NBP TL MT6/ 02TL-S
If you are going to try to change the rear mount without removing the rear bracket by lifting the engine......if you put the jack under the center area of the motor/trans package, and lift the package up pretty much evenly & level, you can't get enough clearance, or at least I wasn't willing to jack it up that high.
You need to lift the motor by jacking up as close to the rear mount as possible. Use a piece of 2"X4" on the jack and try to catch something right at the rear mount. That way you are lifting mostly under the rear mount and also kind of rotates the engine forward slightly to give you the clearance without having to jack the engine sky high and risk breaking something. I left the transmission mounts in place to make sure the motor package didn't get too far out of place, and if the trans mounts were damaged, they are the cheapest & easiest replace.
You need to lift the motor by jacking up as close to the rear mount as possible. Use a piece of 2"X4" on the jack and try to catch something right at the rear mount. That way you are lifting mostly under the rear mount and also kind of rotates the engine forward slightly to give you the clearance without having to jack the engine sky high and risk breaking something. I left the transmission mounts in place to make sure the motor package didn't get too far out of place, and if the trans mounts were damaged, they are the cheapest & easiest replace.
10-07-2013, 11:34 AM
#22
Registered Nonmember
does anyone remember what side of the rear bracket does the O2 sensor connector attach to? I'm trying to remember what side of the bracket i need to keep the O2 wires.
10-07-2013, 11:39 AM
#23
Pro
Thread Starter
10-07-2013, 03:50 PM
#26
Registered Nonmember
Okay, I'm sick of this rear motor mount.
I can either install the bracket or the motor mount, but not both--the bolt holes just won't align. I think it's caused by my motor being too far back. Right now I have the side mount removed and the nut on the front mount loosened with the jack lifting under the oil pan.
Any suggestions on how to align both the bracket and mount?
10-07-2013, 04:53 PM
#27
Pro
Thread Starter
There is no need to remove the side mount or any other mount for this job. Doing so will allow the engine to move and misalign the holes as is your case. I would suggest lowering the engine some and reinstalling the side mount. You only need to loosen the 2 tranny mounts and possibly the top nut on the front mount so you can jack up the engine.
Then you can try using some 2x4's and a crow bar to push on them to move the engine in place to align the holes (without damaging the engine or the bay).
Then you can try using some 2x4's and a crow bar to push on them to move the engine in place to align the holes (without damaging the engine or the bay).
10-07-2013, 05:32 PM
#28
Registered Nonmember
I removed the side mount because when i tried to change it (before i decided to do the rear mount), the threads stripped on the big mount bolt and the bolts to the motor (but not as bad). I couldn't get the bolts to align properly, so i figured it was due to the 12 year old rear mount sagging. So I stupidly decided to tackle that thinking it would align the motor and allow the side mount in.
So I guess I have to figure out how to get that side mount aligned and back in before attempting the rear mount.
So I guess I have to figure out how to get that side mount aligned and back in before attempting the rear mount.
10-07-2013, 08:49 PM
#29
Registered Nonmember
10-08-2013, 10:02 AM
#31
Burning Brakes

1) Install the new mount to the appropriate mounting locations (3) and tighten the bolts to the appropriate torque specs
2) While the engine mount bracket was loose (i.e., the 2 bolts that secure the engine mount bracket to the engine were out), I aligned the bracket with the mount and secured the long screw through the bracket and mount
3) Now, tackle lining up the engine mount bracket by raising/lowering the engine accordingly to get a screwdriver into ONE of the holes on the engine mount bracket and through the hole where the bolt secures it. Once that was done, I was able to use the screwdriver to assist keeping the aligment and try to maneuver the engine to line up the holes
4) Secure the open hole with one of the bolts and tighten (ensure you do not cross thread the bolt)
5) Once that is in, pull out the screwdriver and get the second bolt attached (you may need to do some minor adjustment to the engine position for it to fall in and seat before it catches.
6) Tighten everything up to the appropriate torques specs.
11-01-2013, 04:58 AM
#33
~The spec torque for all of the motor mount's main bolts connecting them to the motor is 40 lbf-ft.
~The mount's brackets are 28 lbf-ft. for the front and rear.
~The side mount's bracket is 33 lbf-ft.
~ The tranny mounts are 28 lbf-ft.
~The mount's brackets are 28 lbf-ft. for the front and rear.
~The side mount's bracket is 33 lbf-ft.
~ The tranny mounts are 28 lbf-ft.
The following users liked this post:
victus1 (11-01-2013)
11-01-2013, 10:34 AM
#34
Instructor

Thanks for the reply!
Sorry but I googled for this thread and I didn't realize it was for the 2G TL, any idea on the numbers for the 3G? Please PM me if you want to avoid posting and causing confusion for future readers. Thanks!
Sorry but I googled for this thread and I didn't realize it was for the 2G TL, any idea on the numbers for the 3G? Please PM me if you want to avoid posting and causing confusion for future readers. Thanks!
10-07-2015, 07:55 PM
#35
Hi all. I just replaced my rear mount, I have to tell you, less than 48 hours before that, I replaced my oil pan and compared to that, the rear mount is a breeze.
The biggest problem I had were the 2 bolts holding the bracket and the 1 bolt on engine bracket. Also after reading the OP, I cut out quite a few steps which were useless and could be done without. Here are my observations.
1- 6 hours before you attempt this, spray all the mount bolts with penetrating oil. 3 hours after initial spray, take a crowbar and rubber mallet or something that would allow you to tap those bolts but not damage them, and bang every bolt from the top and the sides. Then apply more oil.
2- Remove sway bar and there are a few lines and electrical connector that will be in your way, try to move them out of the way, the more you move them, the easier it will be to work in that tight space.
3- Take a ratchet, long extension and U-Joint + socket and place it on the 2 top bracket bolts, then use an extension bar, I used the handle of my floor jack which detaches from the jack and add 3 feet to the ratchet handle. Also, VERY IMPORTANT, use 6 point sockets, not 12 point, you WILL strip those bolts as they are strongly in place. Start trying to get those nuts loose, they will not come out right away, so take a rubber mallet and tap the ratchet head, then spray with oil, then try again, and keep doing until you get the bracket bolts loose. BTW, i broke 2 U-Joints because of the force used, the u-joints had no chance. If like me you had to do the job without u-joints, place multiple 3 inch extentions in combination of the other extensions, the more you use, the more you will be able to get to those bolts without u-joints. Also, make sure you tap the head of ratchet to make sure the socket is fully in pleace on nut. I finally got those 2 bolts out, with patience, oil and force.
4- The 4 bolts at the base of the mount are much easier to get out. Using extension, and in my case, i had a small u-joint left, get them out.
5- Go under the car and disconnect vacuum line, then jack the engine up about 1/2 inch from the oil pan.
6- That top bolt now had a lot of pressure off its back, use spray with oil, then using crowbar, place sharp end between bolt and engine bracket, and tap with mallet, then tap bolt head, then spray, then try to take it out. Because of the 5 or 6 lines that run about 2 inches in front of the bolt, you dont have space to put a u-joint or pretty much anything else, i found that using a small 1/4 ratchet with the appropriate socket, place it on the bolt, handle pointing towards driver, then use a 1/2 ratchet with a deep socket small enough to fit in small ratchet handle but not so big as to have a lot of play, and place you extension bar and you will have some room to get that bolt loose. Be firm, but gentle, when that bolts goes loose, you dont want to hit any pipes or other engine components that are close by so watch out and be very careful.
7- I found that I was able to wiggle the mount by passing it out through the driver side, just to play safe, i wrapped the mount with cloth. Be patient, you don't want to knock out a fluid line and find yourself with a much bigger problem.
Then its smooth sailing, install in reverse. Just FYI, the 7 steps above took me 9 hours (not including 6 hours oil soak) from 8pm to 5am...including time to think about what to do without u-joints, smoking cigarettes, take a few breaks because my mental effort was off the charts, plus mental fatigue and desperation that I thought i'd be done by 11pm. I also don't have a 3000$ tool set, i simply have a 300 piece Stanley Fatmax ratchet set that cost me 500$. Until now, that set made my life easier and nothing ever bloke or stripped until the u-joint failed miserably, but so did my other one that was supposed to be impact certified.

The following 4 users liked this post by johnson-rod:
ProfessorFunk (09-11-2016),
Seabright (10-19-2015),
SuperGreg (12-01-2015),
thelastaspec (10-19-2015)
11-30-2015, 12:25 PM
#37
Racer
I replaced the rear mount on my 102K mile '03 TL-S over the weekend.
It took me just under 5 hours from start to finish working at a pretty relaxed pace and I had no major surprises. All nuts and bolts broke loose without any difficulty. The two that were the most time consuming were the top rear bolt on the engine bracket (as stated by others) and the passenger side rear bolt on the mount because of just having to figure out the right combination of extensions and swivels to get to it through the heater core hoses and valve mounting bracket. I did use my air ratchet here and there, but the bulk of the work was done with hand tools.
It's not the most difficult of projects, but it definitely requires a good amount of patience.
12-01-2015, 04:03 PM
#38
I just rolled over 200K on my '02 TL-S. While I was doing timing belt & spark plugs I decided to put in all these motor mounts I bought a while ago. I had only put in the front mount, and put in the other four last weekend while I had things apart and they were easier to get to.
The rear mount is a real PITA. The two bolts on the bracket facing the rear of the engine are just the worst. There is hardly any room to work with and the shape of the bracket makes it hard to fit tools onto the bolt heads. I ended up using a small ratchet.
Then I stripped the threads on the rear tranny mount. There was something wrong with them, I could not get the nuts to thread on at all. Finally decided to just muscle them on and hope they stay, but they just spun freely once I had them tightened all the way down. Ended up buying a new OEM mount to replace it (about $30).
 12-21-2015, 01:27 PM
#40
I replaced my Right (passenger) motor mount because it was making a racket whenever I revved in gear. Now I get a clunk after letting off the gas in similar circumstances, and sometimes when putting on the gas.
I'm pretty sure it is the rear mount. I've had the front replaced before and it looks fine. Superficially, it isn't obvious that the rear mount is bad, but because of when the noises occur, and their nature, I'm pretty sure that's the problem.
This thread has been extremely helpful. After reading it, It sounds like the easiest approach is to take off the bracket between the Right Mount and the Motor (can leave the actual mount in place since it will be decoupled). I'll loosen the nut on the front mount, remove the two transmission mounts and then try to remove the rear mount while leaving the bracket in place as suggested (after removing the 4 bolts) by lifting the motor/transmission high enough to clear.
Because of this thread I went ahead and ordered replacement transmission mounts. I figure if I'm going to be lifting things anyway, and taking off half of those bolts, I might as well put those $20 of parts in at the same time. Besides, the could be causing, or contributing to the noise and they are the last ones that haven't yet been replaced.
If anybody else is reading this in the future, contemplating replacing the rear mount, some aftermarket parts don't include the vacuum nipple that our cars use. That makes it interchangeable for some cars that don't use it. make sure you are getting one with the hydraulics. It isn't always clear on the listings. I like to use Amazon for the Prime shipping, but their descriptions can be garbage and reviews like "it fit great" are worthless if yoou don't know what vehicle they put it in.