DIY HID Projector Retro Fit 02-03 Headlights
 05-09-2007, 01:52 PM
#1
Burning Brakes
Thread Starter
DIY HID Projector Retro Fit 02-03 Headlights
So I put together this DIY Retro Fit on the 03 TL. I’m not sure if it’ll be the same as the older TL headlights, but they look very similar to each other, so I guess you guys have to improvise a bit.
Disclaimer: This is just a write up on my opinions and how I did my retro. I will not be responsible for any mistakes you guys make. My advice is to do some research and know what you are getting into before you take on this Retro. For first timers, you need to set aside two days for this project. Good luck!
I don’t know about you guys, but I like to see where I’m driving. I’ve had a civic before the TL and I have to say, their headlights are a bunch of crap. You can only see 5 feet in front of you. So then I wanted something brighter and something that would make it better for me to see the road. Of course, there’s after market HID kits. To me, they are a big no no.
1) Gets too much attention from the Police
2) They are soooo annoying to be driving in front of
3) Output is not so great.
Then, on the other side, there’s the OEM Retro Fit. Pretty much taking the OEM HID Projector setup from any car that comes stock, and pretty much making it fit on your car. It’s very expensive, but very worth it. He’s hella bright!
A retro fit consists of a few parts..
1) OEM HID Projectors
2) Ballast/ Ignitors
3) D2S bulbs
Oem HID projectors are found is cars like, Bmw, Audi, Lexus, Nissan and so on.. You have to remember that it has to be OEM HID projectors. Not halogen projectors because it’s pretty much not meant for HID.
Our TL’s are already equipped with an OEM HID kit. Unfortunately, the bulbs we are currently using is the D2R bulb. D2R bulbs are used on cars that don’t use projectors, such as the Lexus IS300, and Toyota Prius. I’m not too sure what it stands for but I know that on the bulb, there’s a reflective shield. That’s to block light from shooting up and blinding others. In the Projectors, there’s something called a cut off shield. That cut off shield does the same function as the reflective shield on the D2R bulb. Since the projectors have this cutoff shield, there is no need for the reflective shield on the bulb. So this is why we need the D2S bulb.
To the left, D2R, to the right D2S

The only thing we are missing is the projectors. Therefore, a retro fit on our cars would save us more money than someone who is working from scratch.
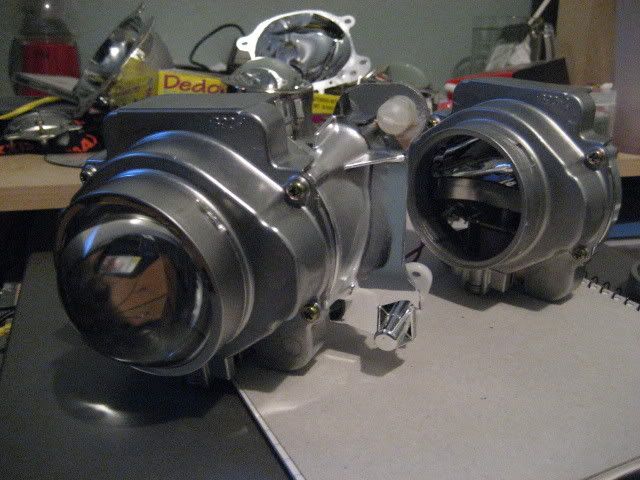
So I did my retro using the S2000 projectors for it’s sheer output and width. The best single Xenon Projector out there in its stock form.
What the S2k's look like without it's clear lens...

These are FX Bi-Xenon Projectors...
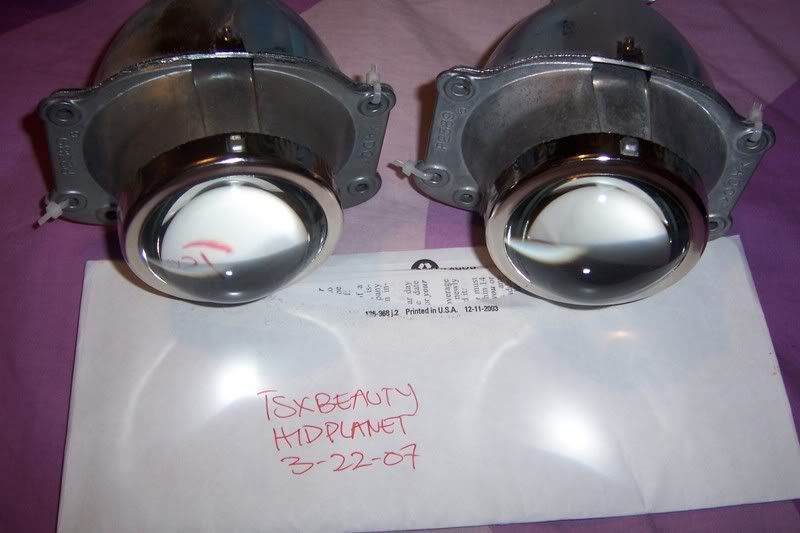
These are TSX Projectors...

Parts list…
1) Projectors – your choice
2) D2S bulbs – I went with stock 4300k Phillips
3) 6 nuts, washers and bolts- Used to mount the projectors onto headlight housing
4) Dremel – used for cutting and a bunch other things needed to make room for the projectors
5) High temp black paint- optional only if you wanna black house your lights
6) Clear silicone – used to seal up your headlight
7) Projector Shroud/bezel- used to cover up the mechanics of the projector
8) A LOT OF TIME!!!
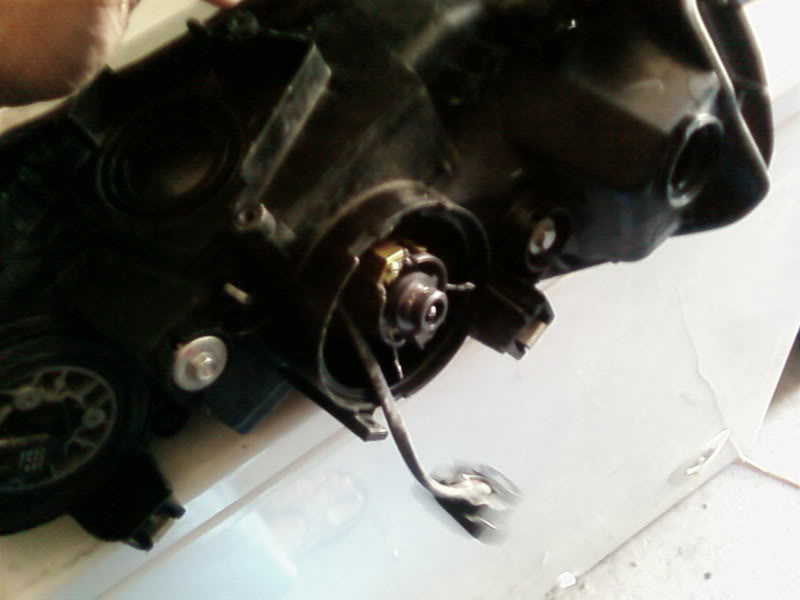
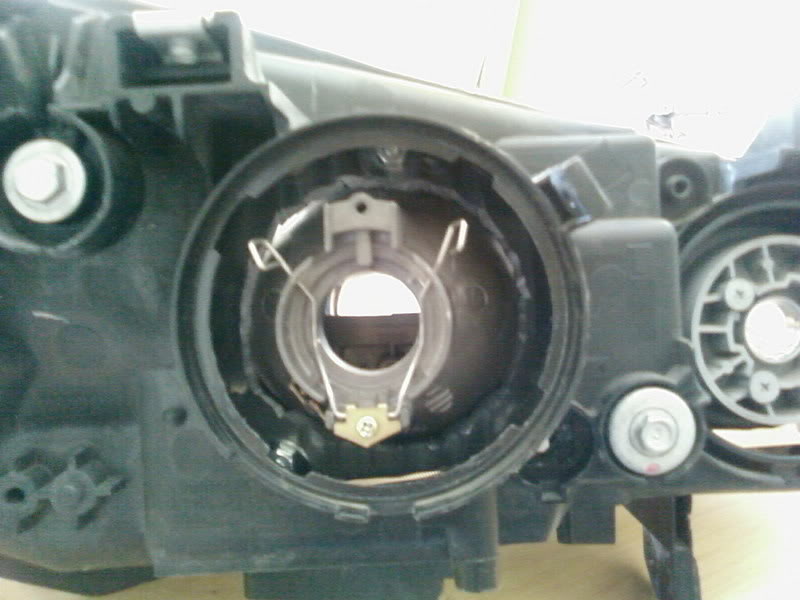
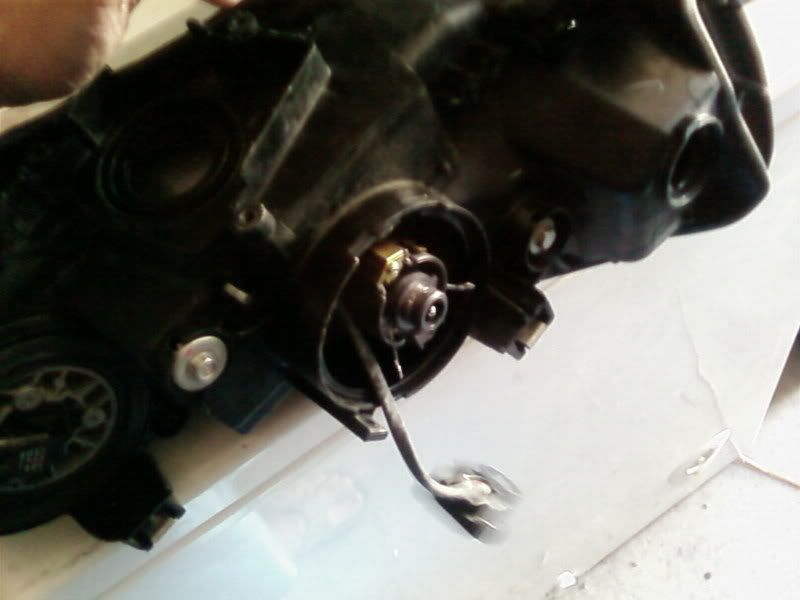
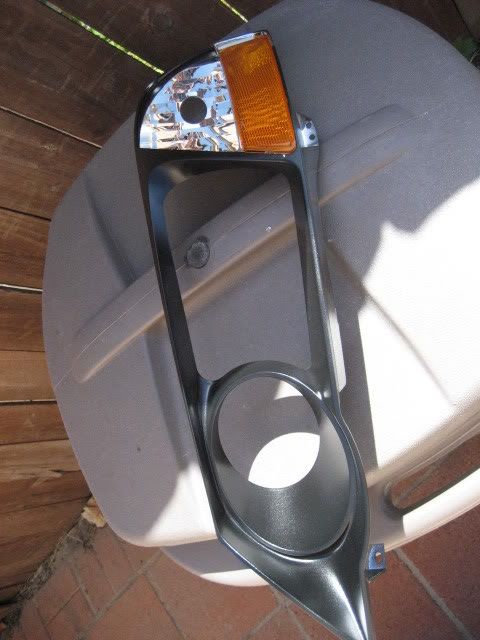
So first off, you need to take off your front bumper to access the headlights. There’s already a post going around here to show you how to take off your bumper, so I will skip that step. There are five bolts that are holding the headlights down. Two on the top, one on the bottom side next to the fender, and two under the headlight. Once that’s all taken off, slowly pull away the headlight. This is where you unplug all wires connected to the headlight. Unplug, the high beam wire, ballast wire, and two turning lights also. So once the headlight is disconnected, take out the high beam bulbs. Then open the compartment that’s holding the low beam lights. Twist off the plug counter-clockwise to disconnect it from the bulb. Then take out the bulb by moving those two pins holding it in place. Next, I flipped the headlight upside down and rested it on a table where I laid a towel down. Take a Phillips screwdriver and unscrew the three screws to remove the ballast from the headlight. Once you take the ballast off, the wire for the bulb is still attached. Unplug that and take the plug out the way were it’ll fit through the hole. Like so..
Yeah, make sure you take off all rubber couplings so that they won’t melt when you put it in the oven.
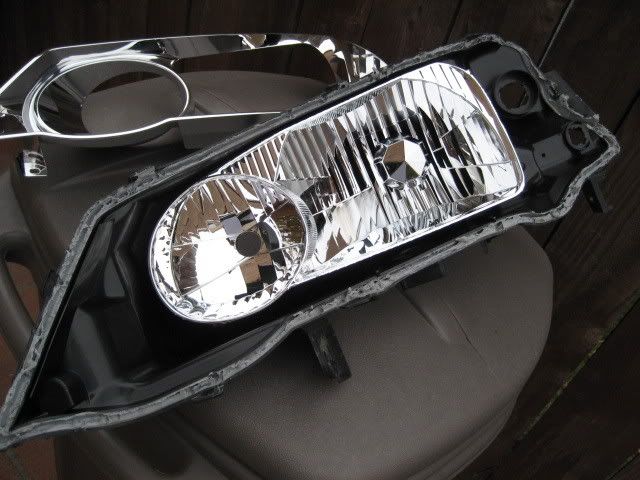
I believe there’s a post already about how to take your headlights apart, so I’ll be real quick with this process. What I did was preheat my oven to 350 and then turned it off and put in the headlights for about 8 minutes. I get real paranoid about my headlights melting, so I take it out at 8 minutes and check on the rubber thing that holds the headlights together. It should be really soft. I had help from my little brother so unless you’re a pro, you might need some help pulling the headlight apart. Using a flat screwdriver, put it in between the headlight lens and the back part of the headlight housing. Just pry open the headlight and using your hands, just pull it apart. Make sure you don’t get that grey rubber thing on the headlight lens.
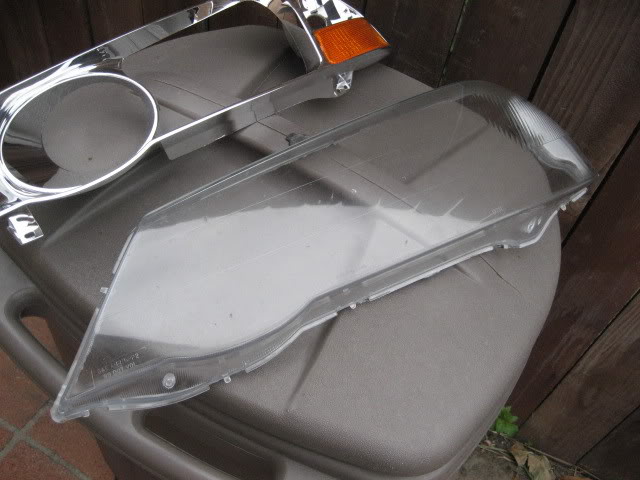

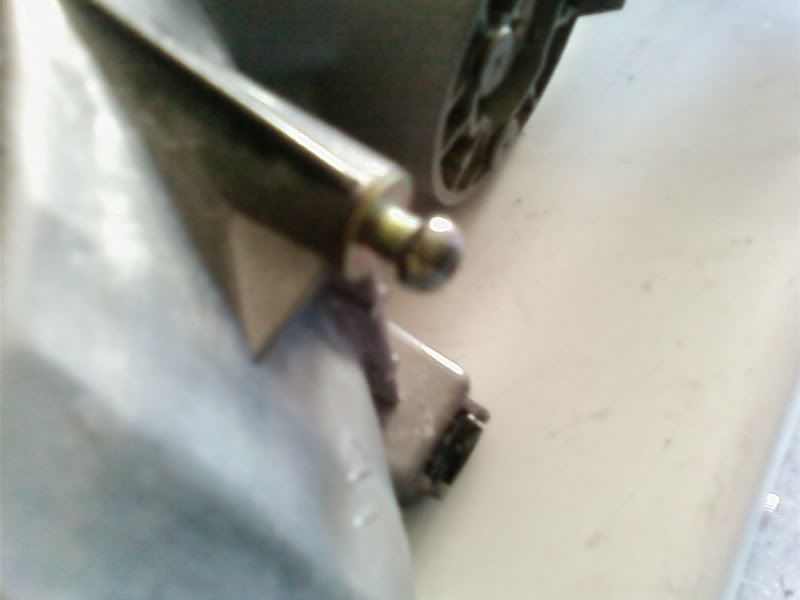
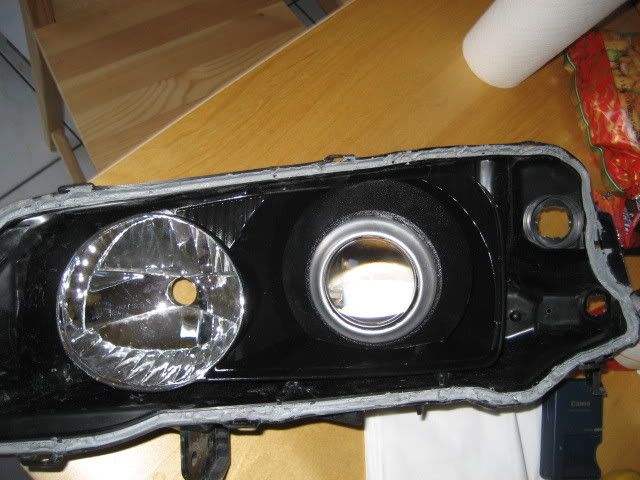
So now, you have your headlight taken apart. You now need to take the reflector housing apart from the black housing. There’s two aiming screws on the back of the headlight that holds it together. See below..
You need to loosen them by going clockwise. Remember, Righty-tighty, lefty-loosey. Hahaha. Other than the two aiming screws, there’s this ball thing that fits into a socket on the back housing. Looks like this...

That just needs to be popped out by pulling it out. No biggy.
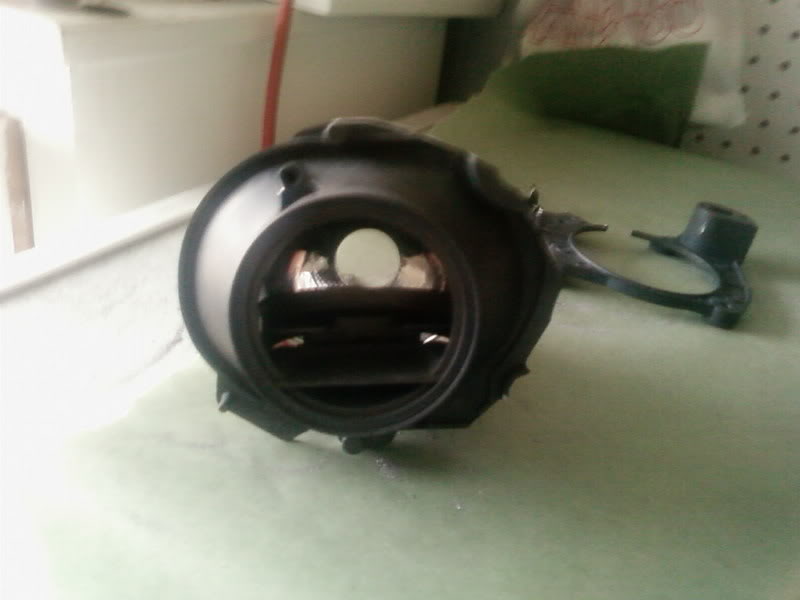
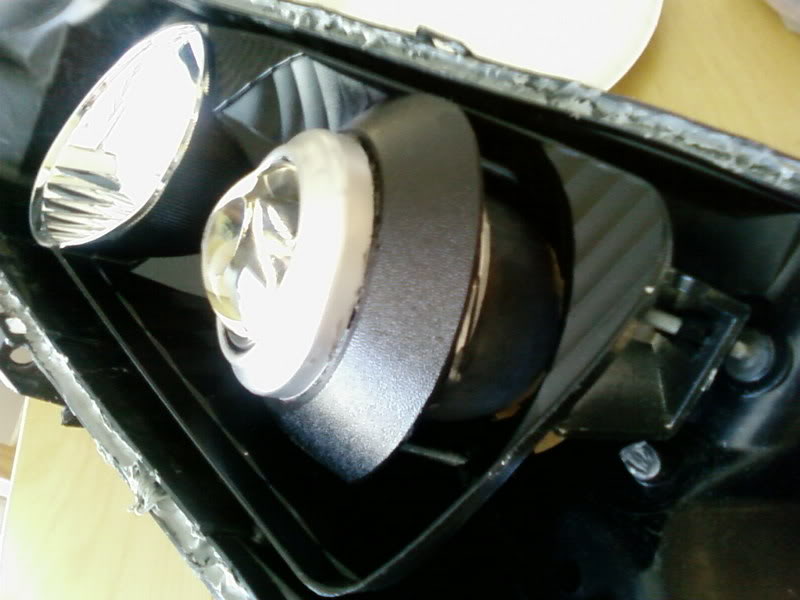
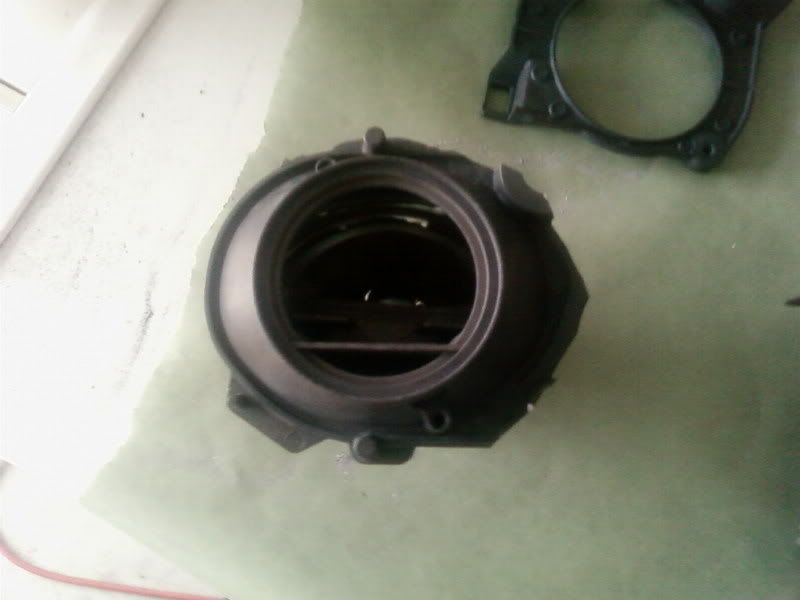
By now, you are ready to get dirty. If you take a look at the reflective housing, there’s a shield inside. Turn the housing around and take a look at the back. There’s a distinctive circle. Sorry, but I didn't take a pic of that so just look at this and imagine...
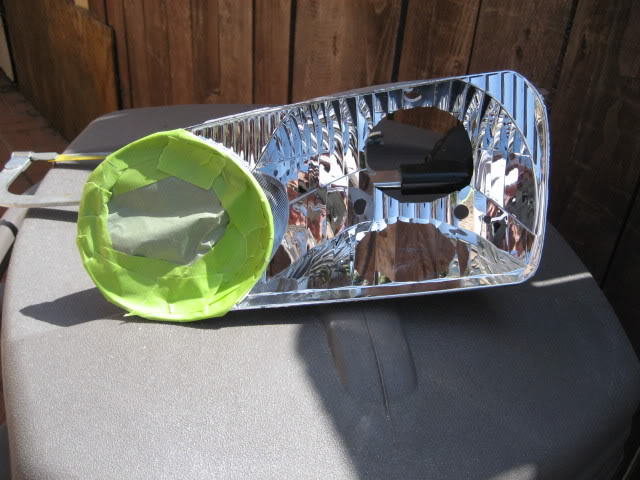
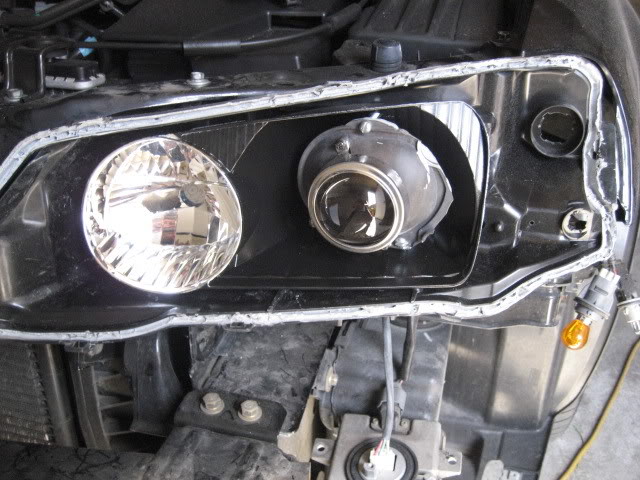
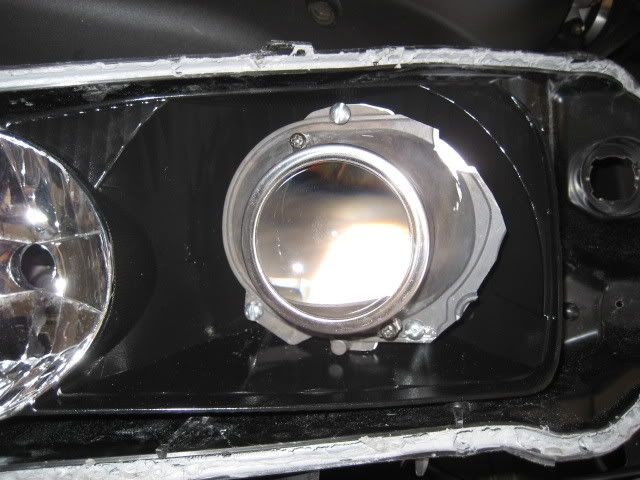
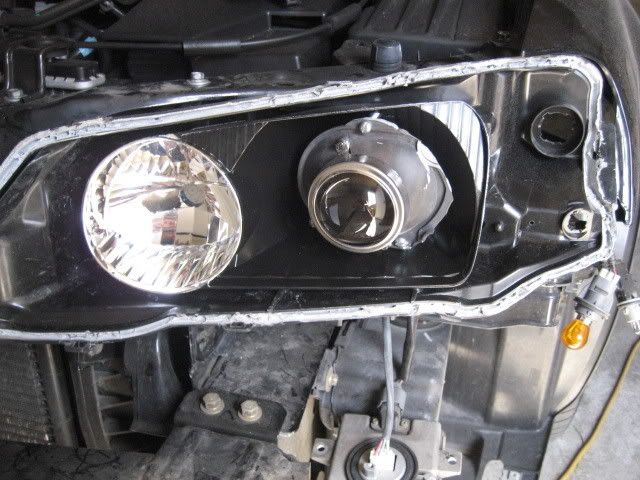
What I did was just used my dremel and cut around that circle. You might need a dust mask for that, it gets real dirty. Be real careful, if you mess up, you’re screwed. So once you cut that circle, throw your projector in to see how it fits. You must keep in mind that your projectors shouldn’t be too far back because of clearance behind the headlight in the engine bay. Another reason is that if it’s too far inside the housing, the width may be blocked by the housing. So it’s always important to check to see the positioning of the projectors before you make the holes to bolt projectors down. Another thing you must be careful of is that the projector to not stick too far out or else it’ll hit the headlight lens.
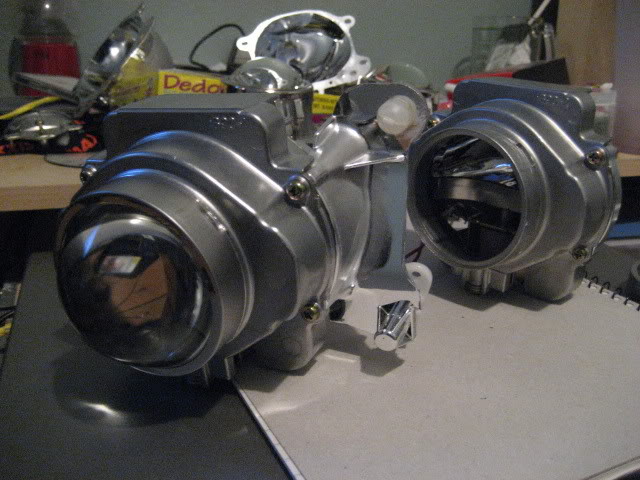
As for the projectors, I made three holes to where I want to use as holes for mounting. After cutting unnecessary parts from the projectors, there’s not much room to use. So I just found three spots and drilled a hole through it. You can see the three holes I made on the projectors here...
After positioning the projectors to where you feel is good, mark a spot on the reflective housing and drill holes for it. Once that is done, mount the projector and tighten everything up. The bolts I used was too long so when I went back and installed the reflective housing onto the black housing, the screws would hit it. What I did was just chopped that screw.
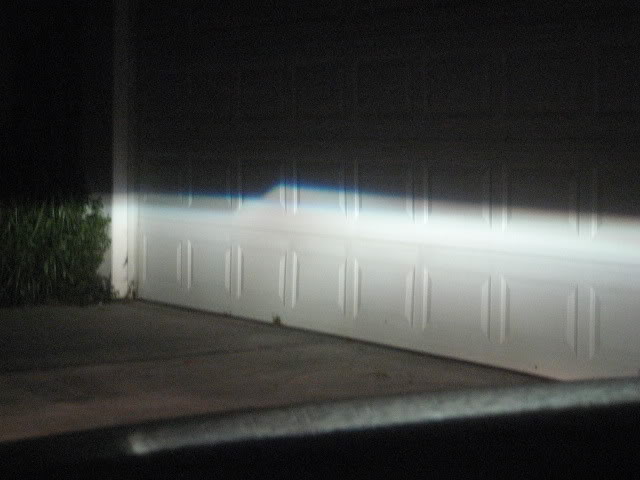
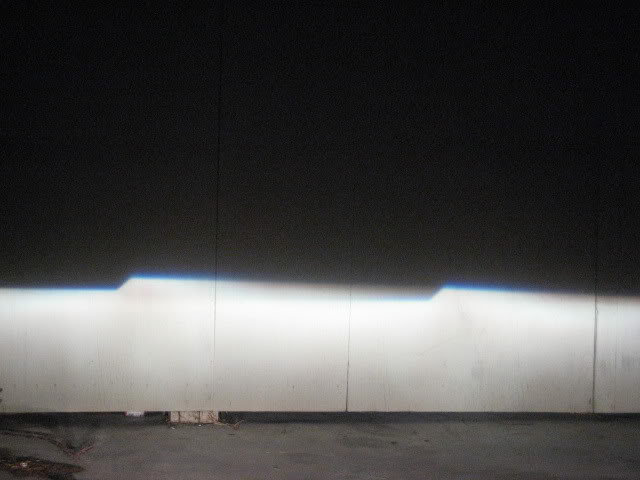
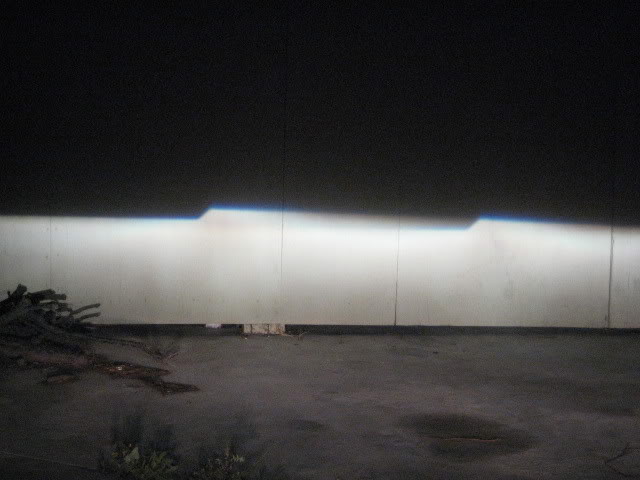
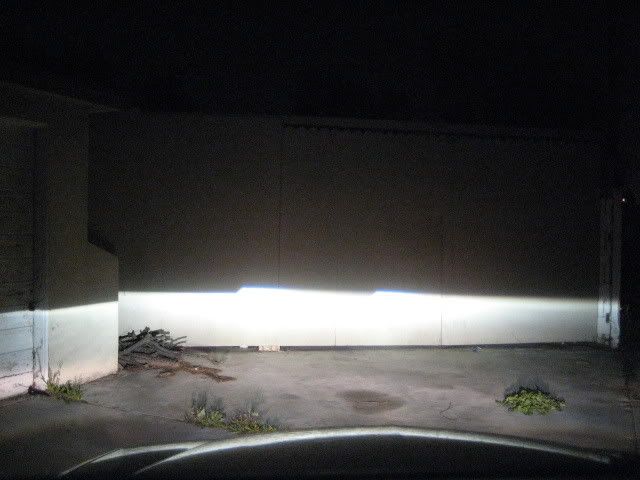
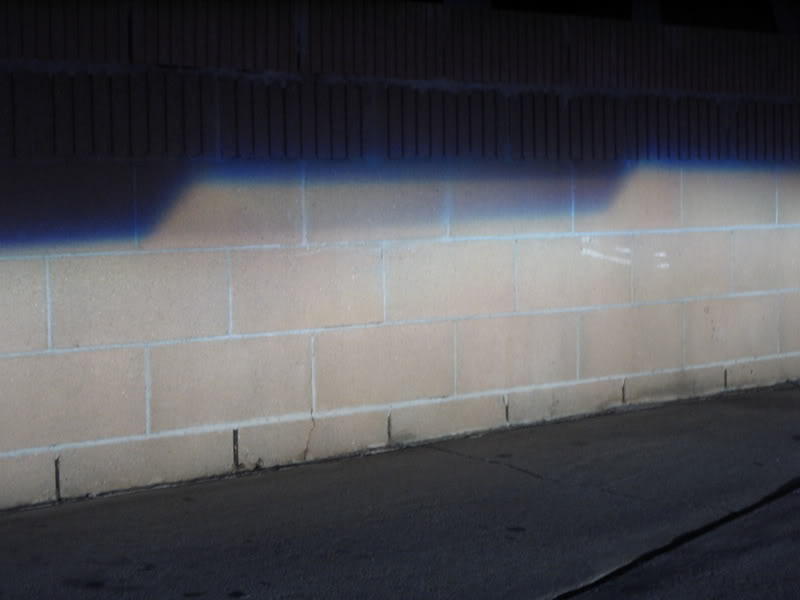
Now is time for aiming. Put back together the ballast and the ballast plug and hook it back to the wire harness on the car. Take the D2S bulb and put it in the projector. Hook the bulb back with the ballast and mount the headlights into it’s correct position. Here comes the good part, fire those bad boys up and if you did a good job, the bottom line of your cut off should be leveled. If you didn’t do a good job, it’s not the end of the world. This retro project has a lot of Trial and Error.
The bottom cutoff should be around a foot and a half off the floor when you’re about five feet away from the wall. Check out this link of how your aiming should be like.
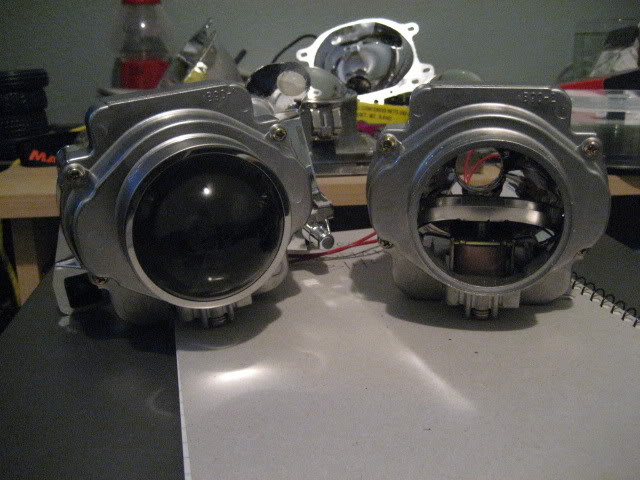
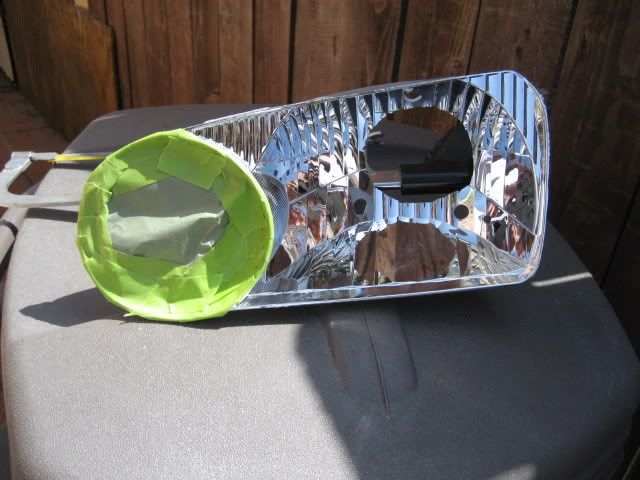
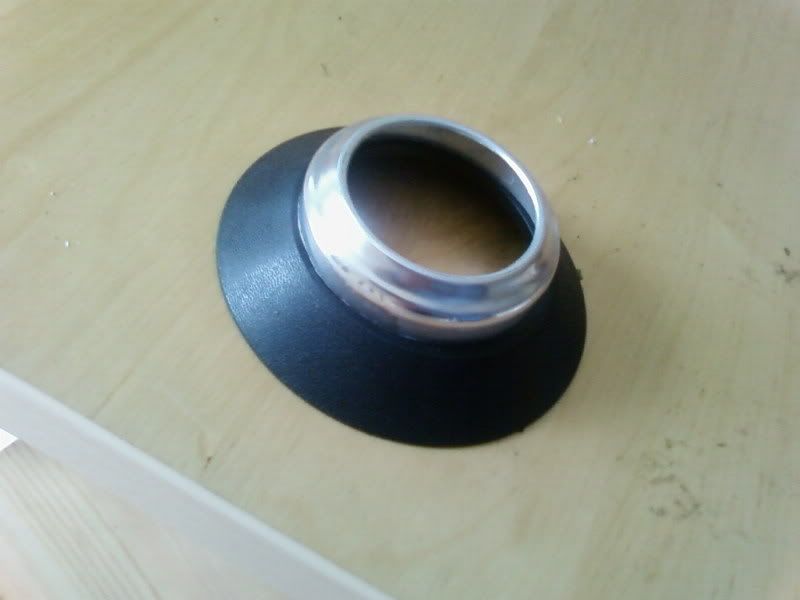
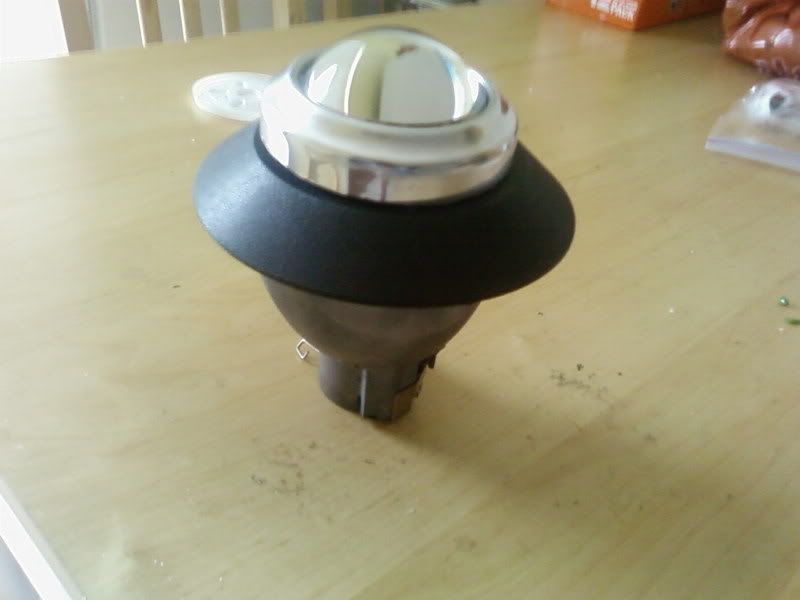
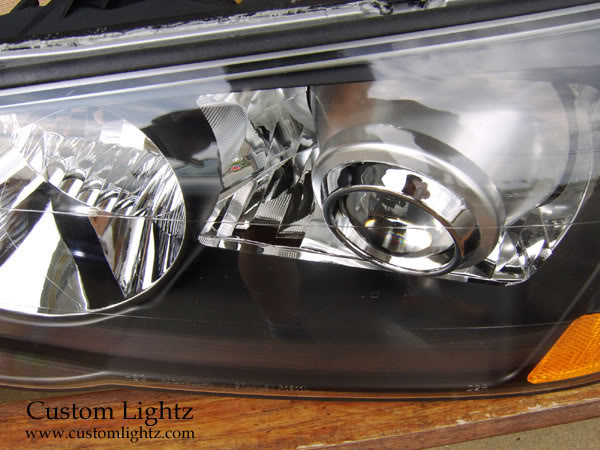
Once you get all your aiming correctly, it’s time to put on your shroud. A shroud is used to cover up all the machanics of the projectors as in how the projector is bolted and things like that. It’s pretty ugly, so you don’t want people to see ugly, you want them to see pretty. This is what they see with no shroud...
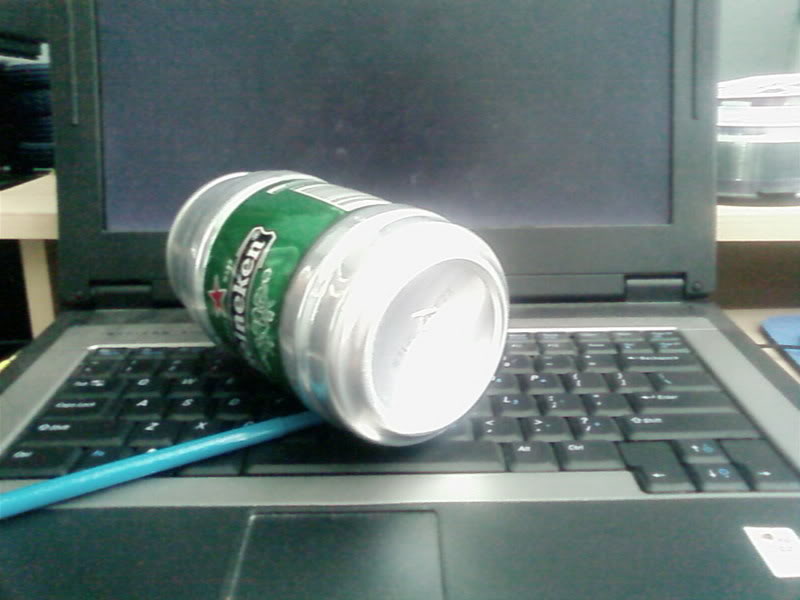
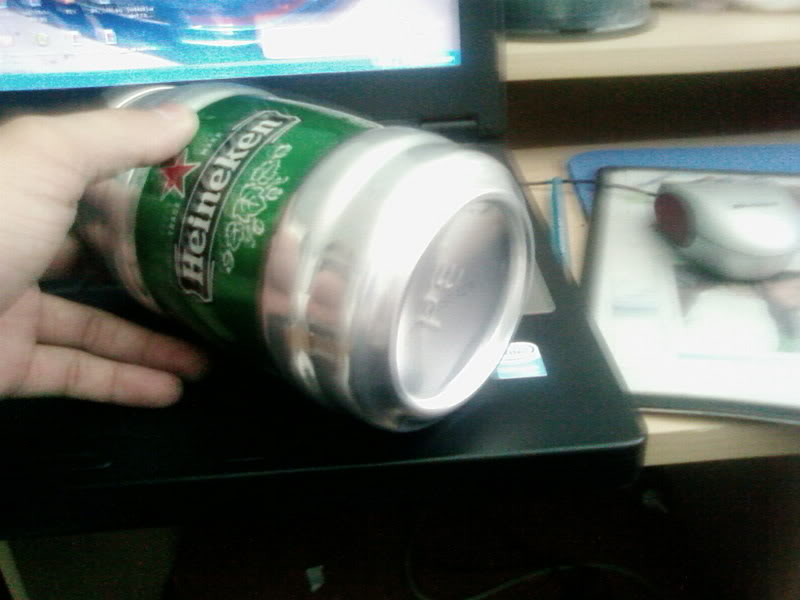
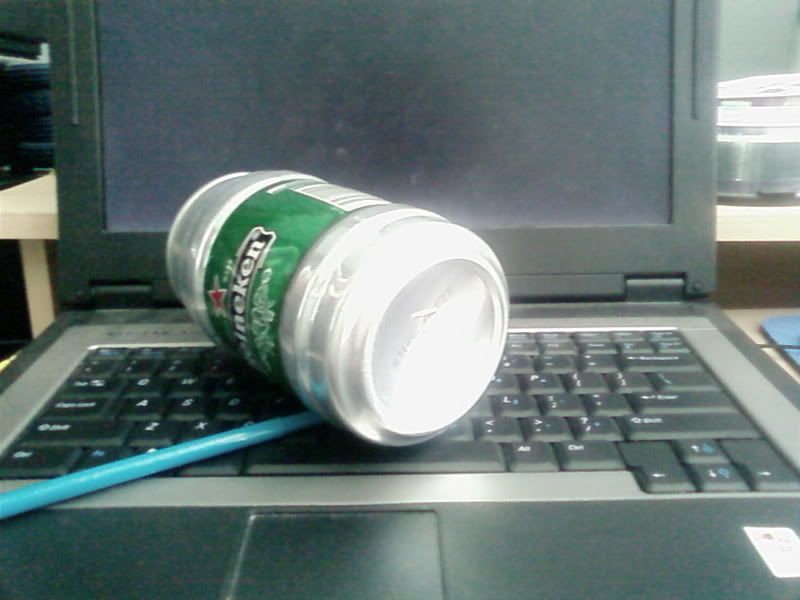
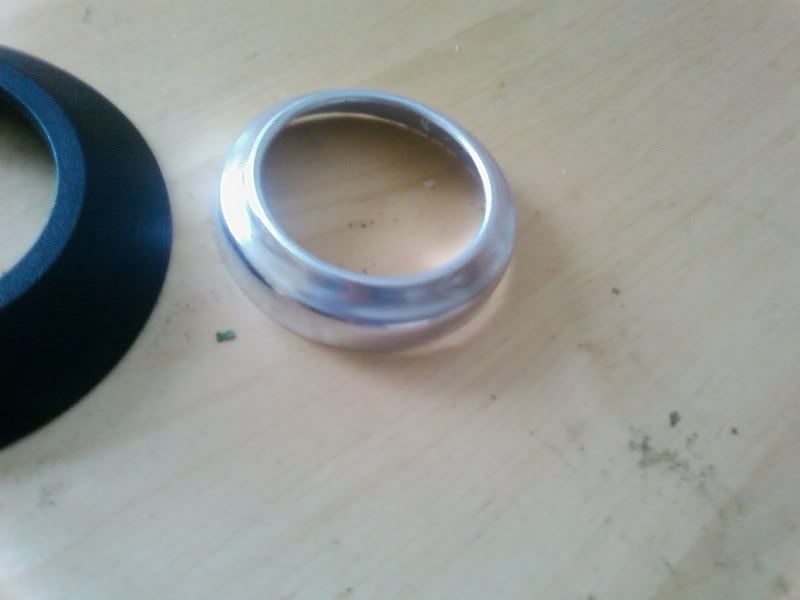
You can always purchase a shroud that came off a bmw or whatever, but I didn’t feel like spending so much. What I used was this plastic lamp thing I found from home depot and the bottom of a Heineken can.


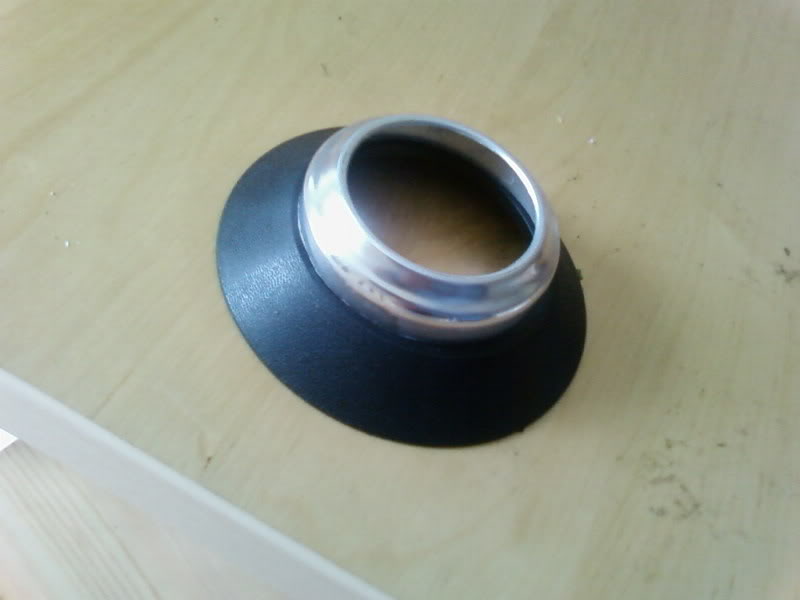

 It was placed together by JB Weld but I later came to find out that the JB weld didn’t hold onto the plastic well so it got messed up. Another thing was that I had to cut the shroud for clearance inside of the housing. Once that was done, I set it aside.
For those who wants to paint their reflective housing black, this is where you do so. Take out the projectors again and cover up the high beam portion.
Use the high temp black paint and paint the housing. The reason why I pained the housing is because there’s really no need for it. While I was at it, I painted the other housing black too. I opted not to paint the turning light area because of past experiences of not being able to see the turning light when it’s on. So I taped it all off and sprayed the remainder.
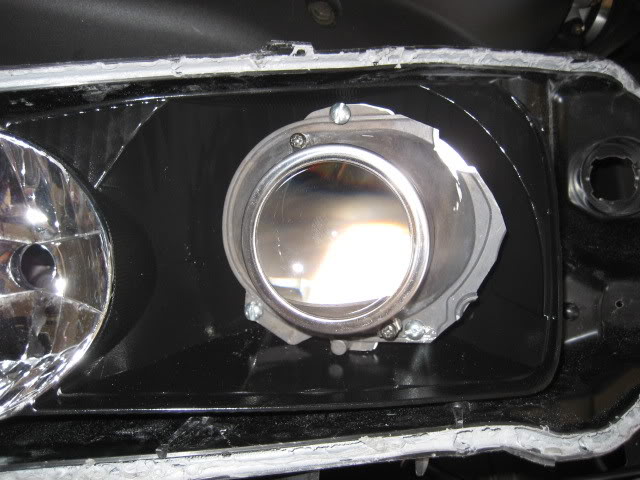
Put everything back in and aim the projectors to the perfect position. This is where I used JB weld to hold the shroud onto the projectors.

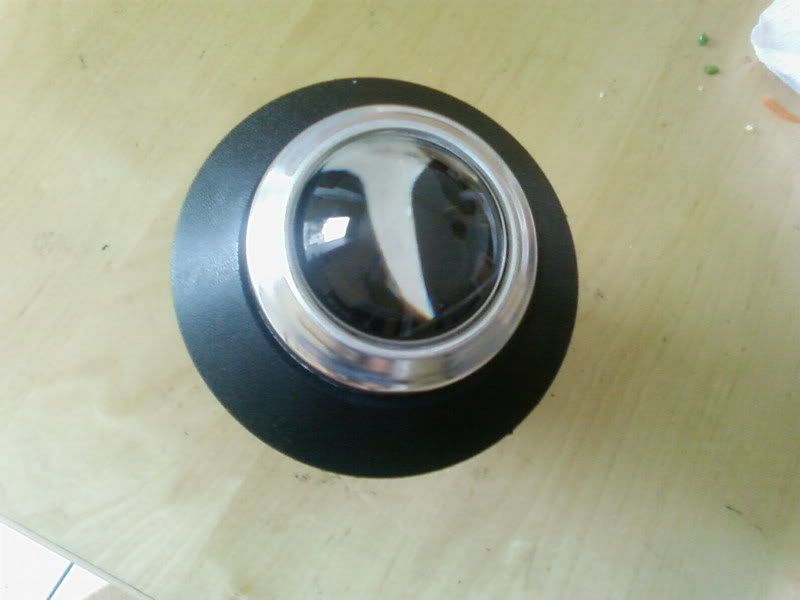
Clean the lense as good as you can. Then put back the housing in. Then put everything back together and see your outcome.
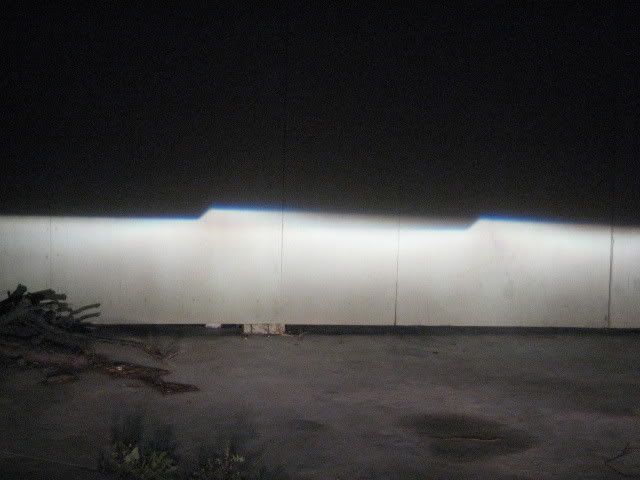
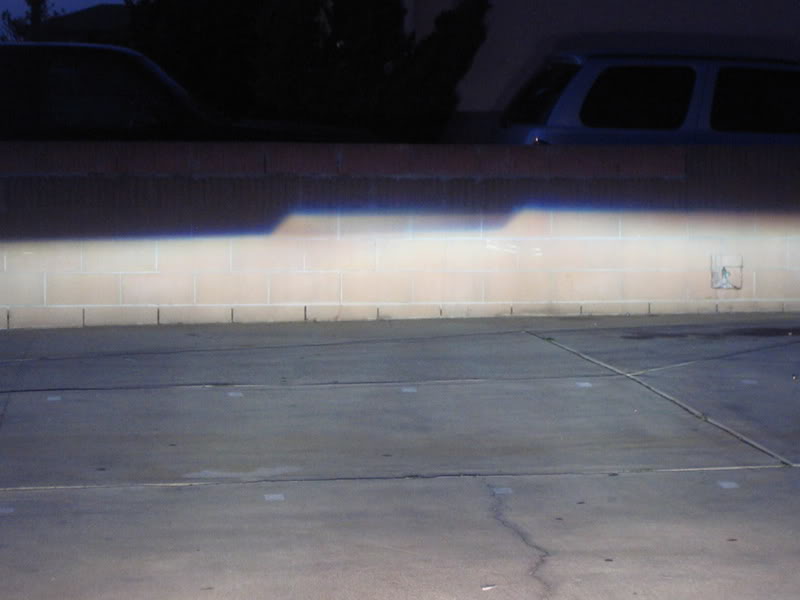
Ok, first time. Driver side is wayyy to the right..had to open them up again and readjust them..

A lot better.
Sorry, but there are a lot of pics that are out of place because I had to take pics after the Retro was done. I wasn't planning on doing the full DIY until later.
Disclaimer: This is just a write up on my opinions and how I did my retro. I will not be responsible for any mistakes you guys make. My advice is to do some research and know what you are getting into before you take on this Retro. For first timers, you need to set aside two days for this project. Good luck!
I don’t know about you guys, but I like to see where I’m driving. I’ve had a civic before the TL and I have to say, their headlights are a bunch of crap. You can only see 5 feet in front of you. So then I wanted something brighter and something that would make it better for me to see the road. Of course, there’s after market HID kits. To me, they are a big no no.
1) Gets too much attention from the Police
2) They are soooo annoying to be driving in front of
3) Output is not so great.
Then, on the other side, there’s the OEM Retro Fit. Pretty much taking the OEM HID Projector setup from any car that comes stock, and pretty much making it fit on your car. It’s very expensive, but very worth it. He’s hella bright!
A retro fit consists of a few parts..
1) OEM HID Projectors
2) Ballast/ Ignitors
3) D2S bulbs
Oem HID projectors are found is cars like, Bmw, Audi, Lexus, Nissan and so on.. You have to remember that it has to be OEM HID projectors. Not halogen projectors because it’s pretty much not meant for HID.
Our TL’s are already equipped with an OEM HID kit. Unfortunately, the bulbs we are currently using is the D2R bulb. D2R bulbs are used on cars that don’t use projectors, such as the Lexus IS300, and Toyota Prius. I’m not too sure what it stands for but I know that on the bulb, there’s a reflective shield. That’s to block light from shooting up and blinding others. In the Projectors, there’s something called a cut off shield. That cut off shield does the same function as the reflective shield on the D2R bulb. Since the projectors have this cutoff shield, there is no need for the reflective shield on the bulb. So this is why we need the D2S bulb.
To the left, D2R, to the right D2S
The only thing we are missing is the projectors. Therefore, a retro fit on our cars would save us more money than someone who is working from scratch.
So I did my retro using the S2000 projectors for it’s sheer output and width. The best single Xenon Projector out there in its stock form.
What the S2k's look like without it's clear lens...
These are FX Bi-Xenon Projectors...
These are TSX Projectors...
Parts list…
1) Projectors – your choice
2) D2S bulbs – I went with stock 4300k Phillips
3) 6 nuts, washers and bolts- Used to mount the projectors onto headlight housing
4) Dremel – used for cutting and a bunch other things needed to make room for the projectors
5) High temp black paint- optional only if you wanna black house your lights
6) Clear silicone – used to seal up your headlight
7) Projector Shroud/bezel- used to cover up the mechanics of the projector
8) A LOT OF TIME!!!
So first off, you need to take off your front bumper to access the headlights. There’s already a post going around here to show you how to take off your bumper, so I will skip that step. There are five bolts that are holding the headlights down. Two on the top, one on the bottom side next to the fender, and two under the headlight. Once that’s all taken off, slowly pull away the headlight. This is where you unplug all wires connected to the headlight. Unplug, the high beam wire, ballast wire, and two turning lights also. So once the headlight is disconnected, take out the high beam bulbs. Then open the compartment that’s holding the low beam lights. Twist off the plug counter-clockwise to disconnect it from the bulb. Then take out the bulb by moving those two pins holding it in place. Next, I flipped the headlight upside down and rested it on a table where I laid a towel down. Take a Phillips screwdriver and unscrew the three screws to remove the ballast from the headlight. Once you take the ballast off, the wire for the bulb is still attached. Unplug that and take the plug out the way were it’ll fit through the hole. Like so..
Yeah, make sure you take off all rubber couplings so that they won’t melt when you put it in the oven.
I believe there’s a post already about how to take your headlights apart, so I’ll be real quick with this process. What I did was preheat my oven to 350 and then turned it off and put in the headlights for about 8 minutes. I get real paranoid about my headlights melting, so I take it out at 8 minutes and check on the rubber thing that holds the headlights together. It should be really soft. I had help from my little brother so unless you’re a pro, you might need some help pulling the headlight apart. Using a flat screwdriver, put it in between the headlight lens and the back part of the headlight housing. Just pry open the headlight and using your hands, just pull it apart. Make sure you don’t get that grey rubber thing on the headlight lens.
So now, you have your headlight taken apart. You now need to take the reflector housing apart from the black housing. There’s two aiming screws on the back of the headlight that holds it together. See below..
You need to loosen them by going clockwise. Remember, Righty-tighty, lefty-loosey. Hahaha. Other than the two aiming screws, there’s this ball thing that fits into a socket on the back housing. Looks like this...
That just needs to be popped out by pulling it out. No biggy.
By now, you are ready to get dirty. If you take a look at the reflective housing, there’s a shield inside. Turn the housing around and take a look at the back. There’s a distinctive circle. Sorry, but I didn't take a pic of that so just look at this and imagine...
What I did was just used my dremel and cut around that circle. You might need a dust mask for that, it gets real dirty. Be real careful, if you mess up, you’re screwed. So once you cut that circle, throw your projector in to see how it fits. You must keep in mind that your projectors shouldn’t be too far back because of clearance behind the headlight in the engine bay. Another reason is that if it’s too far inside the housing, the width may be blocked by the housing. So it’s always important to check to see the positioning of the projectors before you make the holes to bolt projectors down. Another thing you must be careful of is that the projector to not stick too far out or else it’ll hit the headlight lens.
As for the projectors, I made three holes to where I want to use as holes for mounting. After cutting unnecessary parts from the projectors, there’s not much room to use. So I just found three spots and drilled a hole through it. You can see the three holes I made on the projectors here...
After positioning the projectors to where you feel is good, mark a spot on the reflective housing and drill holes for it. Once that is done, mount the projector and tighten everything up. The bolts I used was too long so when I went back and installed the reflective housing onto the black housing, the screws would hit it. What I did was just chopped that screw.
Now is time for aiming. Put back together the ballast and the ballast plug and hook it back to the wire harness on the car. Take the D2S bulb and put it in the projector. Hook the bulb back with the ballast and mount the headlights into it’s correct position. Here comes the good part, fire those bad boys up and if you did a good job, the bottom line of your cut off should be leveled. If you didn’t do a good job, it’s not the end of the world. This retro project has a lot of Trial and Error.
The bottom cutoff should be around a foot and a half off the floor when you’re about five feet away from the wall. Check out this link of how your aiming should be like.
Once you get all your aiming correctly, it’s time to put on your shroud. A shroud is used to cover up all the machanics of the projectors as in how the projector is bolted and things like that. It’s pretty ugly, so you don’t want people to see ugly, you want them to see pretty. This is what they see with no shroud...
You can always purchase a shroud that came off a bmw or whatever, but I didn’t feel like spending so much. What I used was this plastic lamp thing I found from home depot and the bottom of a Heineken can.
It was placed together by JB Weld but I later came to find out that the JB weld didn’t hold onto the plastic well so it got messed up. Another thing was that I had to cut the shroud for clearance inside of the housing. Once that was done, I set it aside. For those who wants to paint their reflective housing black, this is where you do so. Take out the projectors again and cover up the high beam portion.
Use the high temp black paint and paint the housing. The reason why I pained the housing is because there’s really no need for it. While I was at it, I painted the other housing black too. I opted not to paint the turning light area because of past experiences of not being able to see the turning light when it’s on. So I taped it all off and sprayed the remainder.
Put everything back in and aim the projectors to the perfect position. This is where I used JB weld to hold the shroud onto the projectors.
Clean the lense as good as you can. Then put back the housing in. Then put everything back together and see your outcome.
Ok, first time. Driver side is wayyy to the right..had to open them up again and readjust them..
A lot better.
Sorry, but there are a lot of pics that are out of place because I had to take pics after the Retro was done. I wasn't planning on doing the full DIY until later.

The following 2 users liked this post by myTaLizaS3.2:
justaparadox (12-11-2013),
mcottrell95 (12-11-2013)
05-09-2007, 04:08 PM
#4
Senior Moderator
Nice but who makes a DIY without pics 
05-09-2007, 04:15 PM
#6
Burning Brakes
Thread Starter
Originally Posted by fsttyms1
Nice but who makes a DIY without pics

Trending Topics
05-09-2007, 09:12 PM
#9
Senior Moderator
Yes i am a "Moderator" I cant let you go back and edit it, but if you go and quote your original post and fit in the pic links where they need and repost it ill go in and change it to the original post
05-10-2007, 11:15 AM
#11
Money is funny.
Join Date: Jan 2004
Location: King of Prussia, PA
Age: 42
Posts: 4,166
Likes: 0
Received 0 Likes
on
0 Posts
has ayone here attempted contacting the manufacturer of the actual projectors themselves instead of taking them out of other cars? I wonder how much cheaper (if at all) that could be...I'm sure a group by would help...lol
05-10-2007, 11:19 AM
#12
Burning Brakes
Thread Starter
Originally Posted by poohlikeshunny
has ayone here attempted contacting the manufacturer of the actual projectors themselves instead of taking them out of other cars? I wonder how much cheaper (if at all) that could be...I'm sure a group by would help...lol
05-10-2007, 11:34 AM
#13
Money is funny.
Join Date: Jan 2004
Location: King of Prussia, PA
Age: 42
Posts: 4,166
Likes: 0
Received 0 Likes
on
0 Posts
yeah, i was thinking it really could go one of two ways...they would either rape us up the ass, or it would be surprisingly cheap...only one way to find out!!! So does anyone know who manufactures TSX or S2k projectors?
05-11-2007, 01:37 AM
#15
Burning Brakes
Thread Starter
Originally Posted by myTaLizaS3.2
So I put together this DIY Retro Fit on the 03 TL. I’m not sure if it’ll be the same as the older TL headlights, but they look very similar to each other, so I guess you guys have to improvise a bit.
Disclaimer: This is just a write up on my opinions and how I did my retro. I will not be responsible for any mistakes you guys make. My advice is to do some research and know what you are getting into before you take on this Retro. For first timers, you need to set aside two days for this project. Good luck!
I don’t know about you guys, but I like to see where I’m driving. I’ve had a civic before the TL and I have to say, their headlights are a bunch of crap. You can only see 5 feet in front of you. So then I wanted something brighter and something that would make it better for me to see the road. Of course, there’s after market HID kits. To me, they are a big no no.
1) Gets too much attention from the Police
2) They are soooo annoying to be driving in front of
3) Output is not so great.
Then, on the other side, there’s the OEM Retro Fit. Pretty much taking the OEM HID Projector setup from any car that comes stock, and pretty much making it fit on your car. It’s very expensive, but very worth it. He’s hella bright!
A retro fit consists of a few parts..
1) OEM HID Projectors
2) Ballast/ Ignitors
3) D2S bulbs
Oem HID projectors are found is cars like, Bmw, Audi, Lexus, Nissan and so on.. You have to remember that it has to be OEM HID projectors. Not halogen projectors because it’s pretty much not meant for HID.
Our TL’s are already equipped with an OEM HID kit. Unfortunately, the bulbs we are currently using is the D2R bulb. D2R bulbs are used on cars that don’t use projectors, such as the Lexus IS300, and Toyota Prius. I’m not too sure what it stands for but I know that on the bulb, there’s a reflective shield. That’s to block light from shooting up and blinding others. In the Projectors, there’s something called a cut off shield. That cut off shield does the same function as the reflective shield on the D2R bulb. Since the projectors have this cutoff shield, there is no need for the reflective shield on the bulb. So this is why we need the D2S bulb.
To the left, D2R, to the right D2S

The only thing we are missing is the projectors. Therefore, a retro fit on our cars would save us more money than someone who is working from scratch.
So I did my retro using the S2000 projectors for it’s sheer output and width. The best single Xenon Projector out there in its stock form.
What the S2k's look like without it's clear lens...

These are FX Bi-Xenon Projectors...

These are TSX Projectors...
Parts list…
1) Projectors – your choice
2) D2S bulbs – I went with stock 4300k Phillips
3) 6 nuts, washers and bolts- Used to mount the projectors onto headlight housing
4) Dremel – used for cutting and a bunch other things needed to make room for the projectors
5) High temp black paint- optional only if you wanna black house your lights
6) Clear silicone – used to seal up your headlight
7) Projector Shroud/bezel- used to cover up the mechanics of the projector
8) A LOT OF TIME!!!
So first off, you need to take off your front bumper to access the headlights. There’s already a post going around here to show you how to take off your bumper, so I will skip that step. There are five bolts that are holding the headlights down. Two on the top, one on the bottom side next to the fender, and two under the headlight. Once that’s all taken off, slowly pull away the headlight. This is where you unplug all wires connected to the headlight. Unplug, the high beam wire, ballast wire, and two turning lights also. So once the headlight is disconnected, take out the high beam bulbs. Then open the compartment that’s holding the low beam lights. Twist off the plug counter-clockwise to disconnect it from the bulb. Then take out the bulb by moving those two pins holding it in place. Next, I flipped the headlight upside down and rested it on a table where I laid a towel down. Take a Phillips screwdriver and unscrew the three screws to remove the ballast from the headlight. Once you take the ballast off, the wire for the bulb is still attached. Unplug that and take the plug out the way were it’ll fit through the hole. Like so..
Yeah, make sure you take off all rubber couplings so that they won’t melt when you put it in the oven.
I believe there’s a post already about how to take your headlights apart, so I’ll be real quick with this process. What I did was preheat my oven to 350 and then turned it off and put in the headlights for about 8 minutes. I get real paranoid about my headlights melting, so I take it out at 8 minutes and check on the rubber thing that holds the headlights together. It should be really soft. I had help from my little brother so unless you’re a pro, you might need some help pulling the headlight apart. Using a flat screwdriver, put it in between the headlight lens and the back part of the headlight housing. Just pry open the headlight and using your hands, just pull it apart. Make sure you don’t get that grey rubber thing on the headlight lens.

So now, you have your headlight taken apart. You now need to take the reflector housing apart from the black housing. There’s two aiming screws on the back of the headlight that holds it together. See below..

You need to loosen them by going clockwise. Remember, Righty-tighty, lefty-loosey. Hahaha. Other than the two aiming screws, there’s this ball thing that fits into a socket on the back housing. Looks like this...
That just needs to be popped out by pulling it out. No biggy.
By now, you are ready to get dirty. If you take a look at the reflective housing, there’s a shield inside. Turn the housing around and take a look at the back. There’s a distinctive circle. Sorry, but I didn't take a pic of that so just look at this and imagine...
What I did was just used my dremel and cut around that circle. You might need a dust mask for that, it gets real dirty. Be real careful, if you mess up, you’re screwed. So once you cut that circle, throw your projector in to see how it fits. You must keep in mind that your projectors shouldn’t be too far back because of clearance behind the headlight in the engine bay. Another reason is that if it’s too far inside the housing, the width may be blocked by the housing. So it’s always important to check to see the positioning of the projectors before you make the holes to bolt projectors down. Another thing you must be careful of is that the projector to not stick too far out or else it’ll hit the headlight lens.
As for the projectors, I made three holes to where I want to use as holes for mounting. After cutting unnecessary parts from the projectors, there’s not much room to use. So I just found three spots and drilled a hole through it. You can see the three holes I made on the projectors here...
After positioning the projectors to where you feel is good, mark a spot on the reflective housing and drill holes for it. Once that is done, mount the projector and tighten everything up. The bolts I used was too long so when I went back and installed the reflective housing onto the black housing, the screws would hit it. What I did was just chopped that screw.
Now is time for aiming. Put back together the ballast and the ballast plug and hook it back to the wire harness on the car. Take the D2S bulb and put it in the projector. Hook the bulb back with the ballast and mount the headlights into it’s correct position. Here comes the good part, fire those bad boys up and if you did a good job, the bottom line of your cut off should be leveled. If you didn’t do a good job, it’s not the end of the world. This retro project has a lot of Trial and Error.
The bottom cutoff should be around a foot and a half off the floor when you’re about five feet away from the wall. Check out this link of how your aiming should be like.
Once you get all your aiming correctly, it’s time to put on your shroud. A shroud is used to cover up all the machanics of the projectors as in how the projector is bolted and things like that. It’s pretty ugly, so you don’t want people to see ugly, you want them to see pretty. This is what they see with no shroud...
You can always purchase a shroud that came off a bmw or whatever, but I didn’t feel like spending so much. What I used was this plastic lamp thing I found from home depot and the bottom of a Heineken can.

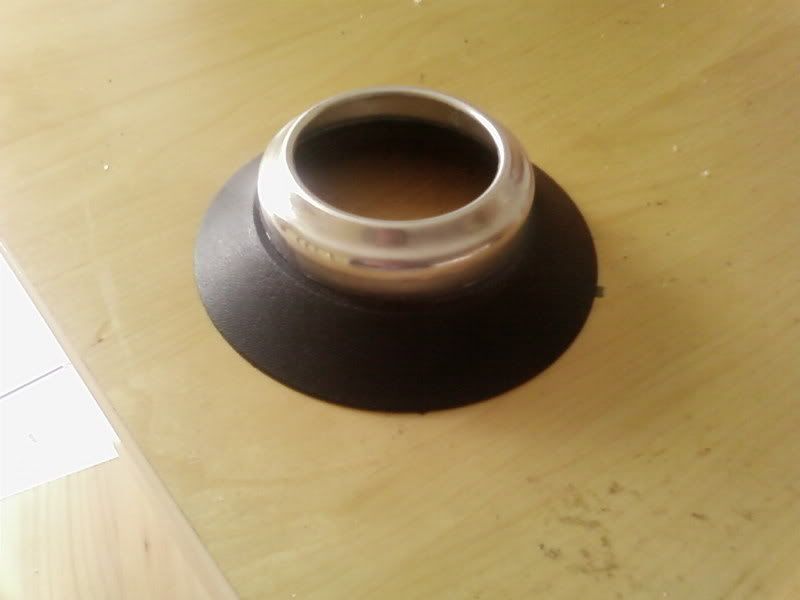
 It was placed together by JB Weld but I later came to find out that the JB weld didn’t hold onto the plastic well so it got messed up. Another thing was that I had to cut the shroud for clearance inside of the housing. Once that was done, I set it aside.
For those who wants to paint their reflective housing black, this is where you do so. Take out the projectors again and cover up the high beam portion.

Use the high temp black paint and paint the housing. The reason why I pained the housing is because there’s really no need for it. While I was at it, I painted the other housing black too. I opted not to paint the turning light area because of past experiences of not being able to see the turning light when it’s on. So I taped it all off and sprayed the remainder.
Put everything back in and aim the projectors to the perfect position. This is where I used JB weld to hold the shroud onto the projectors.

Clean the lense as good as you can. Then put back the housing in. Then put everything back together and see your outcome.

Ok, first time. Driver side is wayyy to the right..had to open them up again and readjust them..


A lot better.
Sorry, but there are a lot of pics that are out of place because I had to take pics after the Retro was done. I wasn't planning on doing the full DIY until later.
05-11-2007, 07:57 AM
#17
Money is funny.
Join Date: Jan 2004
Location: King of Prussia, PA
Age: 42
Posts: 4,166
Likes: 0
Received 0 Likes
on
0 Posts
beautiful taliza...just beautiful...that heineken shroud is hot! I didn't think it would look so...custom....lol....mad props to your for the ingenuity!!!
05-11-2007, 10:49 AM
#19
Burning Brakes
Thread Starter
Originally Posted by LIPPSTUH
nice nice, i would love to see a day and night shot of it on the car.. (pix of the car), i bet it looks hawt as fawk!
Pooh.. that heineken was nice, but it didn't hold up for me. I decided to go with another shroud. I'll post pics up later..
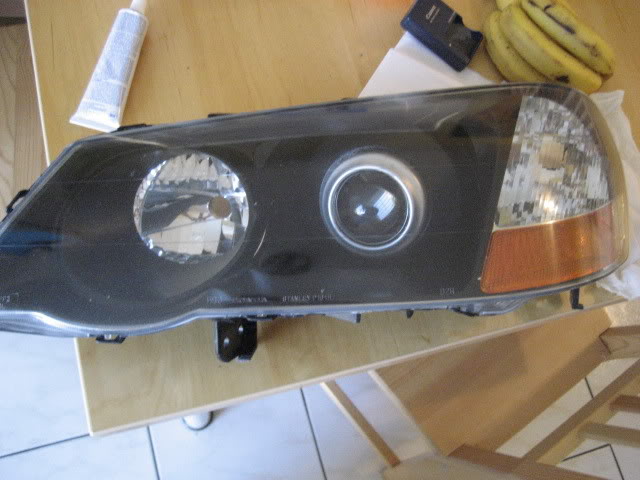
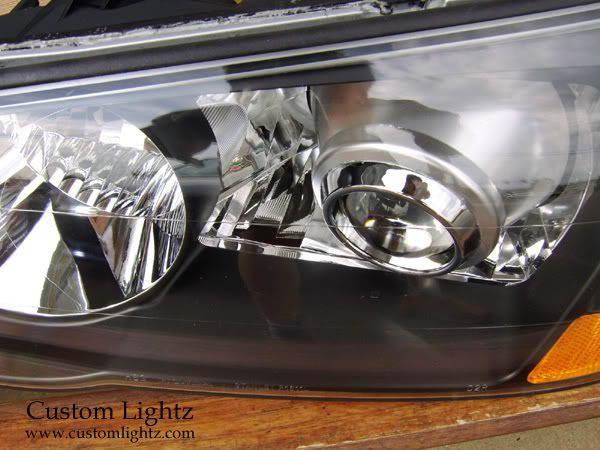
King...here you go, reflector not painted...

I wanted to do mine like this, but it was soooooo hard to find something like that shroud.
05-11-2007, 10:50 AM
#20
Senior Moderator
Nice
05-11-2007, 11:00 AM
#22
Senior Moderator
 Thanks for the great writeup
 05-11-2007, 05:05 PM
#27
Burning Brakes
Thread Starter
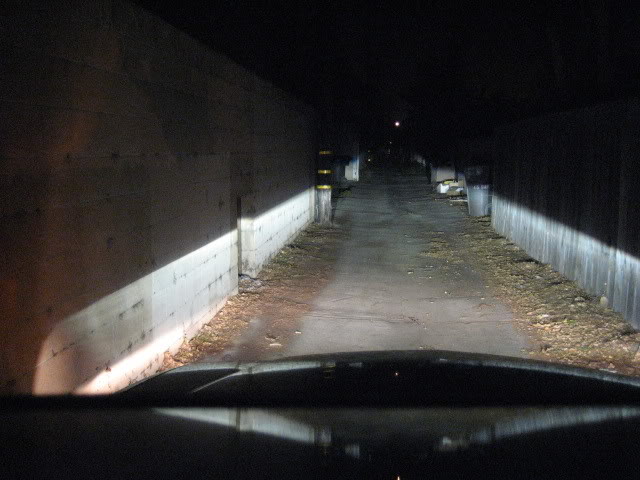
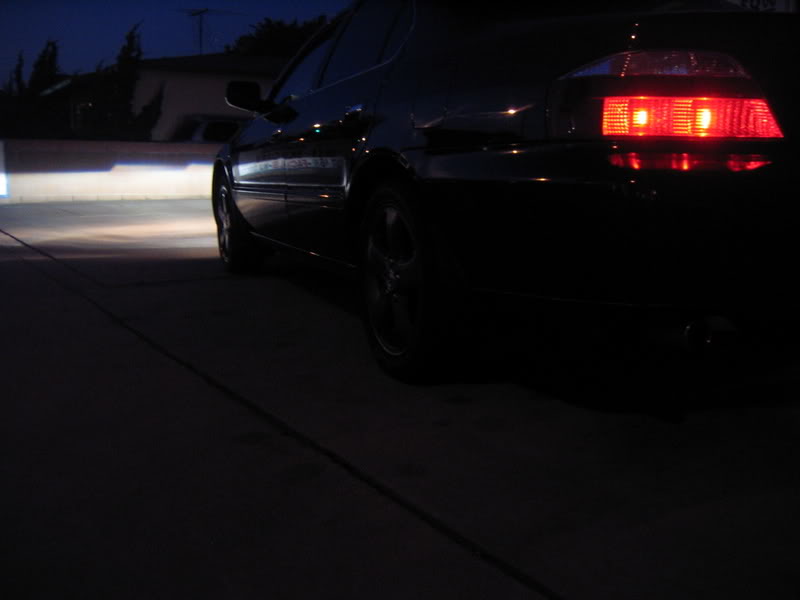
thanks guys. I've said this many times and I will say it again, very great mod IMO. I will try to find a dark spot so I can take a far away pick of the coverage the lights give. Gotta find myself an industrial area for that.
 05-13-2007, 11:43 AM
#30
Recently turned 18
Originally Posted by Malayalee King
does anyone have a retrofit picture where the housing is kept reflective? great writeup!
05-13-2007, 07:23 PM
#33
Originally Posted by Malayalee King
neveerrrr!!! the reflective is stunner! so clean...everyone has blacked out lights
05-13-2007, 08:25 PM
#34
Burning Brakes
Thread Starter
Originally Posted by dreem1er
then color match because when the lights are left alone there is too much going on in there......painting em makes only projector stand out and not all the shit next to it or behind it......
05-14-2007, 04:30 PM
#35
Originally Posted by myTaLizaS3.2
well, the car is nice, but it's not dropped. So it looks like it's flying. Didn't wanna drop it because i'm afraid it might void my warrenty.
Pooh.. that heineken was nice, but it didn't hold up for me. I decided to go with another shroud. I'll post pics up later..
King...here you go, reflector not painted...
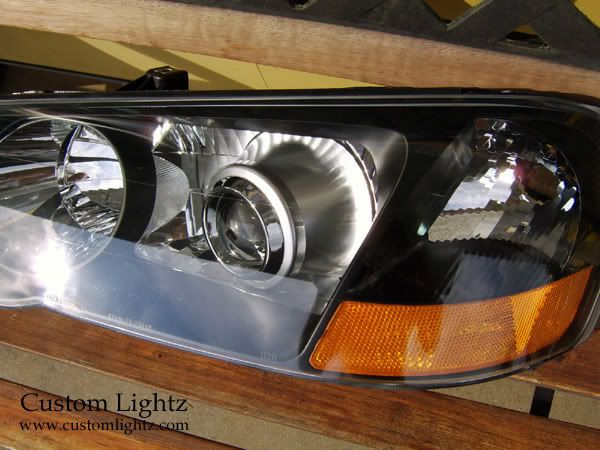
I wanted to do mine like this, but it was soooooo hard to find something like that shroud.
Pooh.. that heineken was nice, but it didn't hold up for me. I decided to go with another shroud. I'll post pics up later..
King...here you go, reflector not painted...
I wanted to do mine like this, but it was soooooo hard to find something like that shroud.
new pic
 05-14-2007, 06:50 PM
#37
Originally Posted by myTaLizaS3.2
so you went and painted yours black too huh? Would you happen to have a pic of that shroud that you were using in the before pic?
sorry man... customlightz did all of the hard stuff and he remove the old shroud and put the new ones on .I don't know what he did with them or what they came from.I guess you didn't notice last time we posted pics but I had the mdx shroud and the reflector black for some time now.good write up...I couldn't have done it.
05-14-2007, 09:54 PM
#40
Burning Brakes
Thread Starter
They are good. They have great width. Not much color though. If you like the blue look like the picture at the top, then you can go with those FX bi xenons and then change out the lens for TSX clear lense.
Here's what it looks like...(keep in mind that it's HELLA blue and that it's not behind the headlight lens so there's major color. Of course behind the lens will kill most of that color)

Here's what it looks like...(keep in mind that it's HELLA blue and that it's not behind the headlight lens so there's major color. Of course behind the lens will kill most of that color)