DIY 99-03 Front Engine Mount Replacement
 07-04-2009, 04:22 PM
#1
Burning Brakes
Thread Starter
DIY 99-03 Front Engine Mount Replacement
Here's how I replaced my front engine mount...
Tools ( From Acutee's List, hope you dont mind)
You will need:
two floor jacks ( I only used 1)
two jack stands
a block of wood or two to distribute the weight of the engine on the jack
2 6-10 inch 3/8 extensions
a strong 3/8 ratchet
17mm deep socket
1 Universal 3/8 joint
14mm socket
14mm wrench
10 mm socket
12 mm socket
a blanket to lie on when doing the rear mount
and lastly lots of patience (especially the rear mount.)
Removing:
1) Lift car, and put on jack stands
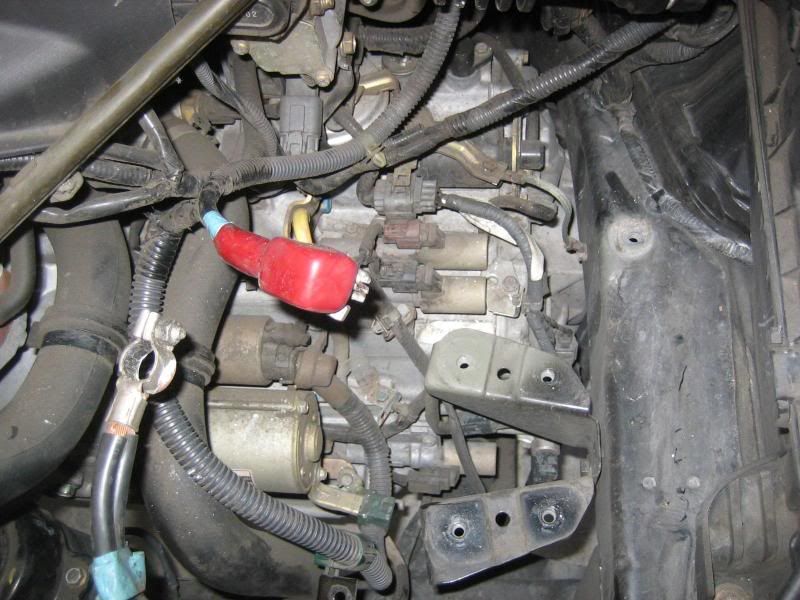
2) Remove battery and entire battery tray so that the tranny don't crush the tray when you raise the motor. Unscrew two bolts to the battery tie down with 10 mm socket. Take out battery. Then remove the plastic battery box. There are 6 12 mm bolts that hold the tray to the bracket, unscrew that. Then there's a 10 mm bolt that holds some clips, take that out.
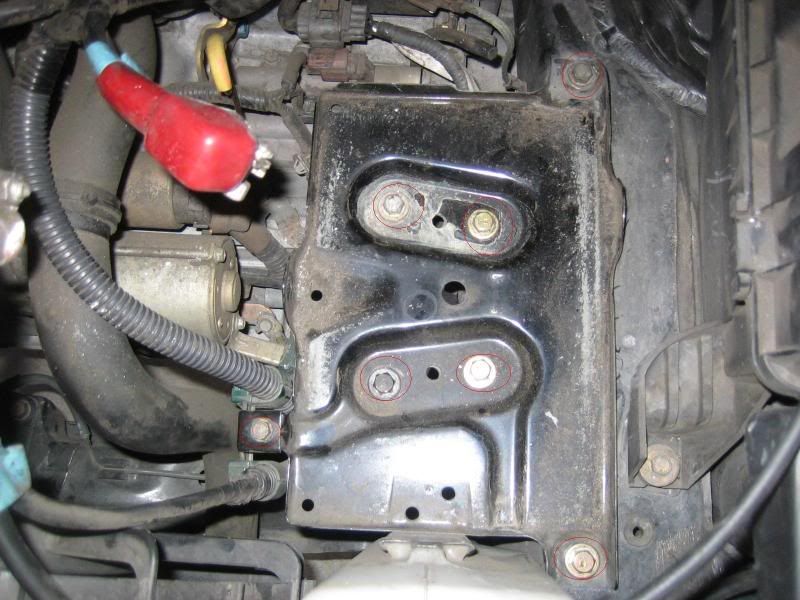
Remove battery tray and put aside. Voila, looks like this.
3) First thing i did was put the jack under the engine and raised it a tad, so that it's supporting the engine.
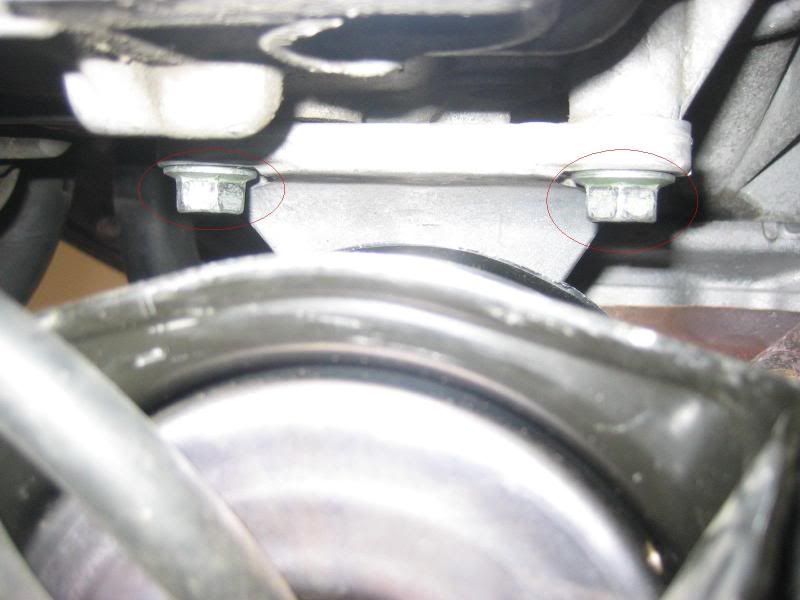
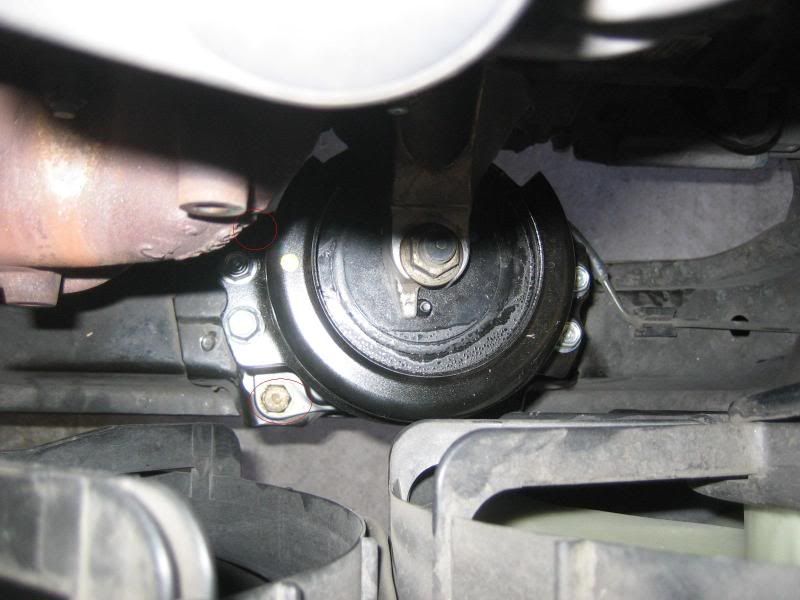
4) Then, start unscrewing three 14mm bolts that holds the engine mount bracket to the engine. There's one on top, and two on the bottom, each on one side of the mount. The top bolt and right bolt were pretty easy to get to, but the one on the left is a pain in the ass. I had to go under the car to access this. I used the 14mm wrench and it took forever! But soon enough, it was out.
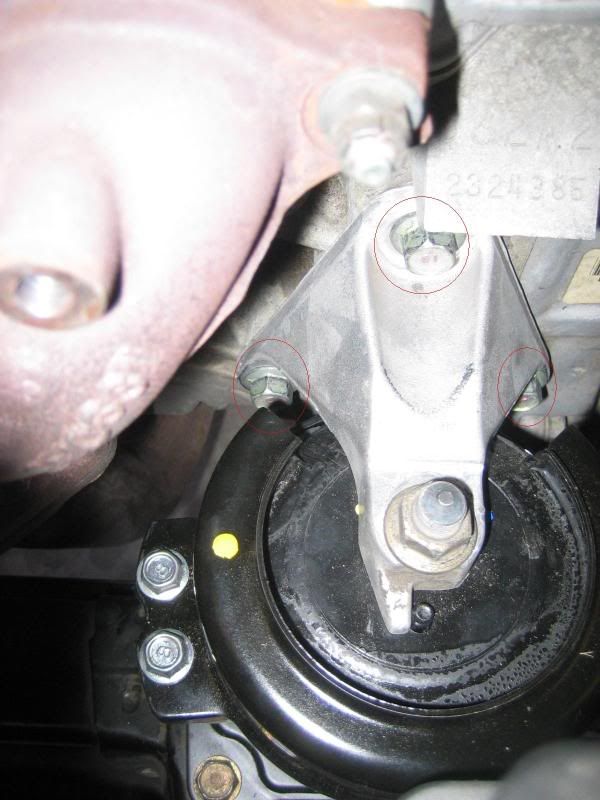
Bottom View
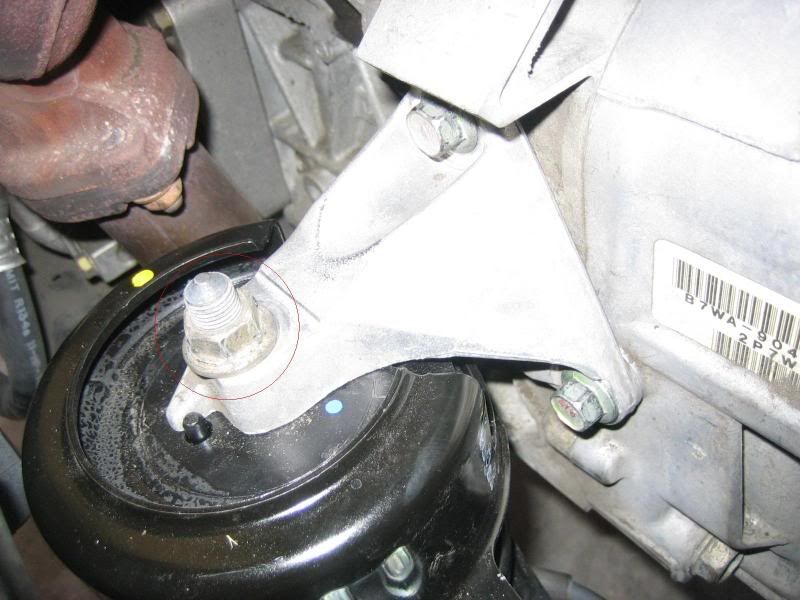
5) Now goes the 17mm bolt that connects the bracket to the engine mount.
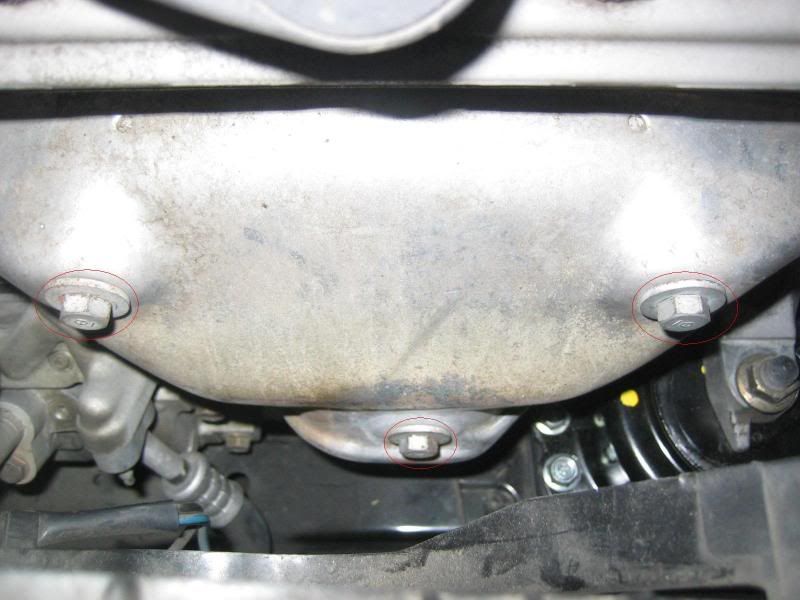
6) Next was removing the exhaust shield because it allows more room to work with to remove the rear left bolt that holds the engine mount down.
This is done by using a 12mm ratchet to remove three bolts. Remove shield and put aside.
7) Using your extensions, and 14mm socket, start removing the 4 bolts holding down the actual engine mount. I left the hard to reach for last. Without the Universal joint, i dont see how you can get this out. I found out the hard way, had to put everything back in, and do it the next day after i bought the Universal Joint.

8) Now that all 4 engine mount bolts are off, you can now wiggle out the engine mount. There's a tube that's connected to the bottom of the engine mount, pull it out and take out the mount.
Installing:
1) What I first did was put in the new mount and connect the tube you pulled out earlier and sit it where it should be sitting.
2) Put the engine mount bracket in place and line it up while placing in the three 14mm bolts. I learned the hard way because the first time I tried to install it, I tightened down the engine mount before tightening the bracket. This cause a lot of clearance problems with the left bracket bolt because the actuall bolt didn't clear the mount, thus not allowing the bolt to go in straight.
The correct way to do it is to not bolt down the engine mount yet. This allows you the rotate the mount so that you can tighten the bracket bolts.
3) Tighten all three bracket bolts.
4) Align the engine mount so that all four holes are straight. Tighten.
5) Screw on the 17mm bolt that connects the bracket to the top of the engine mount.
6) Make sure all is tight
7) Put back exhaust shield
7) Install battery tray and you are done.
Pretty simple and straight forward. Hope that helps
Tools ( From Acutee's List, hope you dont mind)
You will need:
two floor jacks ( I only used 1)
two jack stands
a block of wood or two to distribute the weight of the engine on the jack
2 6-10 inch 3/8 extensions
a strong 3/8 ratchet
17mm deep socket
1 Universal 3/8 joint
14mm socket
14mm wrench
10 mm socket
12 mm socket
a blanket to lie on when doing the rear mount
and lastly lots of patience (especially the rear mount.)
Removing:
1) Lift car, and put on jack stands
2) Remove battery and entire battery tray so that the tranny don't crush the tray when you raise the motor. Unscrew two bolts to the battery tie down with 10 mm socket. Take out battery. Then remove the plastic battery box. There are 6 12 mm bolts that hold the tray to the bracket, unscrew that. Then there's a 10 mm bolt that holds some clips, take that out.
Remove battery tray and put aside. Voila, looks like this.
3) First thing i did was put the jack under the engine and raised it a tad, so that it's supporting the engine.
4) Then, start unscrewing three 14mm bolts that holds the engine mount bracket to the engine. There's one on top, and two on the bottom, each on one side of the mount. The top bolt and right bolt were pretty easy to get to, but the one on the left is a pain in the ass. I had to go under the car to access this. I used the 14mm wrench and it took forever! But soon enough, it was out.
Bottom View
5) Now goes the 17mm bolt that connects the bracket to the engine mount.
6) Next was removing the exhaust shield because it allows more room to work with to remove the rear left bolt that holds the engine mount down.
This is done by using a 12mm ratchet to remove three bolts. Remove shield and put aside.
7) Using your extensions, and 14mm socket, start removing the 4 bolts holding down the actual engine mount. I left the hard to reach for last. Without the Universal joint, i dont see how you can get this out. I found out the hard way, had to put everything back in, and do it the next day after i bought the Universal Joint.
8) Now that all 4 engine mount bolts are off, you can now wiggle out the engine mount. There's a tube that's connected to the bottom of the engine mount, pull it out and take out the mount.
Installing:
1) What I first did was put in the new mount and connect the tube you pulled out earlier and sit it where it should be sitting.
2) Put the engine mount bracket in place and line it up while placing in the three 14mm bolts. I learned the hard way because the first time I tried to install it, I tightened down the engine mount before tightening the bracket. This cause a lot of clearance problems with the left bracket bolt because the actuall bolt didn't clear the mount, thus not allowing the bolt to go in straight.
The correct way to do it is to not bolt down the engine mount yet. This allows you the rotate the mount so that you can tighten the bracket bolts.
3) Tighten all three bracket bolts.
4) Align the engine mount so that all four holes are straight. Tighten.
5) Screw on the 17mm bolt that connects the bracket to the top of the engine mount.
6) Make sure all is tight
7) Put back exhaust shield
7) Install battery tray and you are done.
Pretty simple and straight forward. Hope that helps

The following 6 users liked this post by myTaLizaS3.2:
3.2TLc (09-06-2012),
blackhorse21 (06-12-2017),
epiles (09-06-2012),
Jamus22 (09-06-2012),
Skeet33 (02-06-2018),
and 1 others liked this post.
08-31-2009, 09:19 PM
#3
Yes, very good DIY, imo too.
is there an easy way to check & see if you need to replace your engine mounts before starting this task ? what signs would I look for etc?
is there an easy way to check & see if you need to replace your engine mounts before starting this task ? what signs would I look for etc?
08-31-2009, 11:30 PM
#4
bah... once again, i asked too soon before searching (sorry)
https://acurazine.com/forums/2g-tl-problems-fixes-117/what-does-broken-engine-mount-look-like-705129/
https://acurazine.com/forums/2g-tl-problems-fixes-117/what-does-broken-engine-mount-look-like-705129/
09-01-2009, 09:33 PM
#6
Advanced

Join Date: Dec 2006
Age: 54
Posts: 63
Likes: 0
Received 0 Likes
on
0 Posts
There is absolutely no need to remove the battery. The rest is fine. If you have socket extensions that wiggle, one short and one long, that is all you need to get from above to that harder to reach rear left bolt that holds in place mount itself. This assumes that you removed exhaust shield. I think this is a must since it is almost impossible to undo this bolt from under the car since the clearance is tight and the bolt is probably baked on (mine was).Also, after removing the mount, lube the bolts with general purpose grease and screw them in and out a few times before you start putting the new mount in. That will make it easy once you start assembling the things back. One jack and two stands + piece of wood is all you need. Raise the car and support with the stands, after that support the engine with the jack and piece of wood to prevent damage.
09-01-2009, 09:38 PM
#7
Advanced
Join Date: Dec 2006
Age: 54
Posts: 63
Likes: 0
Received 0 Likes
on
0 Posts
Also it is very important to put the hose to the new mount first, then the new mount and the bracket in place WITHOUT putting any bolts. Only then, start putting the bolts one by one slowly without tightening until all of them are partially in, the order does not matter. Then start tightening them. Also, do no forget decent length breaker bar, but this is a must for whatever you want to do on the car pretty much.
All these things without knowing them cause typical scratches on your hands, frustration and much, much more time then you can think it would take you (like anything else when it comes to never before done things).Good luck.
All these things without knowing them cause typical scratches on your hands, frustration and much, much more time then you can think it would take you (like anything else when it comes to never before done things).Good luck.
Last edited by jjar03; 09-01-2009 at 09:40 PM.
Trending Topics
09-02-2009, 02:11 PM
#8
Can anyone point me to a URL to buy a replacement front mount? I did a quick google search, and damn was I surprised at how expensive they were 
Anyway, I'm just not sure which one I need to get...
Anyway, I'm just not sure which one I need to get...
09-13-2009, 02:20 PM
#10

Hey, I just took off the front mount off my 1999 Acura TL and the replacement Anchor 9185 doesn't have a hydraulic tube opening on it. Got it from Rock auto and several other sites have the same part number. Does this one not need a tube? Any thoughts?
09-13-2009, 03:10 PM
#11
the part number on the anchor is 50810-S87-A82. Looks like in the acuraoemparts diagram, there are 2 versions- the A81 has the ECM module but the A82 doesn't. Rock Auto was only a little less but they don't seem to distinguish the parts.
11-22-2009, 02:06 PM
#12
10th Gear

Join Date: Nov 2009
Posts: 11
Likes: 0
Received 0 Likes
on
0 Posts
Well done for DIY front engine mounts. I did mine last week. I followed your instruction everything work fine. Did anybody have done rear mount and have DIY write-up? I want to do mine next week but I'm not sure I can do without DIY.
01-29-2010, 06:19 PM
#13
Instructor

Join Date: Jan 2010
Location: AZ
Age: 32
Posts: 118
Likes: 0
Received 0 Likes
on
0 Posts
03-07-2010, 01:45 PM
#14
Cruisin'
Join Date: Feb 2010
Location: Northern VA
Posts: 19
Likes: 0
Received 0 Likes
on
0 Posts
I am also interested in rear mount diy and possibly transmission mount as well.
05-19-2011, 05:54 PM
#17
Here's how I replaced my front engine mount...
Tools ( From Acutee's List, hope you dont mind)
You will need:
two floor jacks ( I only used 1)
two jack stands
a block of wood or two to distribute the weight of the engine on the jack
2 6-10 inch 3/8 extensions
a strong 3/8 ratchet
17mm deep socket
1 Universal 3/8 joint
14mm socket
14mm wrench
10 mm socket
12 mm socket
a blanket to lie on when doing the rear mount
and lastly lots of patience (especially the rear mount.)
Removing:
1) Lift car, and put on jack stands
2) Remove battery and entire battery tray so that the tranny don't crush the tray when you raise the motor. Unscrew two bolts to the battery tie down with 10 mm socket. Take out battery. Then remove the plastic battery box. There are 6 12 mm bolts that hold the tray to the bracket, unscrew that. Then there's a 10 mm bolt that holds some clips, take that out.
Remove battery tray and put aside. Voila, looks like this.
3) First thing i did was put the jack under the engine and raised it a tad, so that it's supporting the engine.
4) Then, start unscrewing three 14mm bolts that holds the engine mount bracket to the engine. There's one on top, and two on the bottom, each on one side of the mount. The top bolt and right bolt were pretty easy to get to, but the one on the left is a pain in the ass. I had to go under the car to access this. I used the 14mm wrench and it took forever! But soon enough, it was out.
Bottom View
5) Now goes the 17mm bolt that connects the bracket to the engine mount.
6) Next was removing the exhaust shield because it allows more room to work with to remove the rear left bolt that holds the engine mount down.
This is done by using a 12mm ratchet to remove three bolts. Remove shield and put aside.
7) Using your extensions, and 14mm socket, start removing the 4 bolts holding down the actual engine mount. I left the hard to reach for last. Without the Universal joint, i dont see how you can get this out. I found out the hard way, had to put everything back in, and do it the next day after i bought the Universal Joint.
8) Now that all 4 engine mount bolts are off, you can now wiggle out the engine mount. There's a tube that's connected to the bottom of the engine mount, pull it out and take out the mount.
Installing:
1) What I first did was put in the new mount and connect the tube you pulled out earlier and sit it where it should be sitting.
2) Put the engine mount bracket in place and line it up while placing in the three 14mm bolts. I learned the hard way because the first time I tried to install it, I tightened down the engine mount before tightening the bracket. This cause a lot of clearance problems with the left bracket bolt because the actuall bolt didn't clear the mount, thus not allowing the bolt to go in straight.
The correct way to do it is to not bolt down the engine mount yet. This allows you the rotate the mount so that you can tighten the bracket bolts.
3) Tighten all three bracket bolts.
4) Align the engine mount so that all four holes are straight. Tighten.
5) Screw on the 17mm bolt that connects the bracket to the top of the engine mount.
6) Make sure all is tight
7) Put back exhaust shield
7) Install battery tray and you are done.
Pretty simple and straight forward. Hope that helps
Anyone know of a place to get one of these things cheap??
The following users liked this post:
Gee'sTL (01-16-2015)
05-20-2011, 10:38 AM
#18
i'm attempting this today 
does torque matter on the exhaust shield bolts or just make sure they're snug close to what they were before?
Best place these days is http://www.acuraautomotiveparts.org
(i paid like 220 or somin for front + side w/ shipping(which was a lil below 200 before shipping)
does torque matter on the exhaust shield bolts or just make sure they're snug close to what they were before?
Best place these days is http://www.acuraautomotiveparts.org
(i paid like 220 or somin for front + side w/ shipping(which was a lil below 200 before shipping)
Last edited by webmastir; 05-20-2011 at 10:41 AM.
05-20-2011, 11:37 AM
#19
i'm attempting this today
does torque matter on the exhaust shield bolts or just make sure they're snug close to what they were before?
Best place these days is http://www.acuraautomotiveparts.org
(i paid like 220 or somin for front + side w/ shipping(which was a lil below 200 before shipping)
does torque matter on the exhaust shield bolts or just make sure they're snug close to what they were before?
Best place these days is http://www.acuraautomotiveparts.org
(i paid like 220 or somin for front + side w/ shipping(which was a lil below 200 before shipping)
05-20-2011, 02:17 PM
#20
thx swllen_cu, thought so just had to be sure.
one last question, how do u get the effin mount out after you get bolts off etc. i noticed even if i DID remove the battery+tray & exhaust shield, there still isn't much room to get the old mount out & new one back in. i'm sure i don't disconnect the radiator hose, right? that would leak like a mofo i imagine. i don't see any other way that huge mount could get out

edit: i just noticed the post in another front mount swap:
one last question, how do u get the effin mount out after you get bolts off etc. i noticed even if i DID remove the battery+tray & exhaust shield, there still isn't much room to get the old mount out & new one back in. i'm sure i don't disconnect the radiator hose, right? that would leak like a mofo i imagine. i don't see any other way that huge mount could get out
edit: i just noticed the post in another front mount swap:
Jack the front of the car up and place it on jack stands.
Pull all the little clips out of the plastic guard under the motor.
put the jack under the motor just to take the weight off the mount.
Undo the bolts for the bracket connected to the motor, (2 underneith, 1 up top.)
Loosen the four bolts connecting the mount to the sub-frame. (they all need long extensions.)
Undo the bolt on top of the mount.
Take the four bolts out.
Twist the mount inplace and lay it on its side.
Pull it out from the drivers side by holding the upper radiator hose to the left.
It will barely squeeze out!
Voila!!
Repeat the steps to replace with new mount. I suggest to attach the mounting bracket to the engine loosly to be able to slide the top of the mount through the hole. That is a bitch, but VERY doable!
You will need:
two floor jacks
two jack stands
a block of wood or two to distribute the weight of the engine on the jack
2 6-10 inch 3/8 extensions
a strong 3/8 ratchet
17mm deep socket
14mm socket (possibly 14mm wrench too)
a blanket to lie on when doing the rear mount
and lastly lots of patience (especially the rear mount.)
one reminder, dont forget to remove your battery and the battery tray when doing this or your transmission housing will bend the tray when you're lifting the engine up. Good luck if you decide on doing this yourself. For the Side Engine mount, slightly raise the engine so you can remove the side mount.
Last edited by webmastir; 05-20-2011 at 02:21 PM.
05-22-2011, 05:25 PM
#21
Ok... here are my thoughts after doing this. I'm not big car guy by any means but I can follow DIYs pretty easily.
This was actually quite tough, for someone who has never done this before. You don't have to take out the battery, it's not necessary, imo. I never did & didn't have any issue ...like jjar03 stated several posts above.
First off, be sure to loosen the 17mm bolt holding the mount to the bracket before removing all the bracket bolts. I spent hours of fucking ridiculous frustration getting off & on that lower passenger side bracket bolt (wow what a horribly designed spot for that one). For those having issues getting the bottom left bolt back in, once installing the new mount, be sure your engine is jacked up enough. I was a lil scared to jack mine up that much & had issues threading it properly. It just wouldn't line up properly & i got mad and smashed my hands down throwing bolts n shit all over my engine....ya that was a fun one to clean up(after 2 hrs of using the magnificently handy magnetic pickup tool i learned my lesson not to do that again). Anyway, I jacked it up just a tad more & it finally threaded like it should(have to use 14mm wrench on that spot..there's no maybe about it). I spent countless hours through 2 separate days completing this. What did I learn from this frustrating task? Patience.
Anyways, thx for the DIY. I learned quite a bit going through trial & error on this front mount change.
05-22-2011, 06:38 PM
#22
Why do you have to lift the motor? If you remove the front bracket to the engine you just have to keep the engine front sagging forward. The only lifting I had to do was to remove the two side trans mounts - and that was just about an inch. Nowhere near hitting the battery tray. No need to remove the battery or the front exhaust heat shield (good luck getting those bolts out with out breaking them off). Great write up that is for sure! -just a bit of extra non-needed steps. All you need are a couple of swivel sockets and some extensions. $30 bucks at Sears saves all the frustrations mentioned above.
05-22-2011, 09:45 PM
#23
removing the front exhaust shield was necessary to get to the bottom left bracket bolt from above. yes, you could go at it from the bottom...depending on how big/long your arm is. it's located in the most fucking ridiculous spot either way, imo. removing the shield just makes it that much easier & takes like 49seconds to remove. have never removed mine & didn't take much torque at all
05-23-2011, 11:59 AM
#24
I did go in from the bottom of the car using a swivel box wrench. I would be afraid the bolts on the heat shield are rusted and would just snap off.
Hey whatever works - and now the clunk in the front end is gone!
Hey whatever works - and now the clunk in the front end is gone!
05-23-2011, 03:24 PM
#25
Suzuka Master
iTrader: (1)
I resorted to loosening the two flange bolts (#23 on the link below) on either side of the front beam (#11), because I was not comfortable jacking the engine up any further. When I backed them out just a little, the front beam dropped down just a bit, along with it, the front mount. That gave me the needed space to get the proper angle on the mount bracket to thread the bolt correctly. It was a pain in the ass; however, I felt great when I figured it out and saved all that green.

http://www.acuraoemparts.com/delray/...All&vinsrch=no
09-06-2012, 03:35 PM
#26

Did my front mount over the weekend and it took forever to wrench that stupid passenger side bracket bolt off from underneath.
Before starting this job, make sure that the engine is WELL supported. I didn't have to raise the engine up at all from the original supporting position with the jack and block of wood. I didn't remove the battery and the tray either.
As others have noted, removing the exhaust shield was a must. I still don't see how anyone could have loosened the bottom right bolt from the mount without removing the exhaust shield. I was also hesitant about taking the shield off because I thought the bolts would snap off but luckily it didn't. The bolts were covered in rust but the screw portion of the bolts were fine. I replaced all three bolts instead of using the old ones.
Also, I am not sure if anyone else had this problem but I couldn't completely remove two side bracket bolts off until I loosened the engine mount bolts. The damn mount was getting in the way of the two side bracket bolts so it wouldn't completely come out until the engine mount was loose.
All in all, it was a good learning experience for me. Thanks for this DIY and to everyone contributing to this forum.
09-22-2013, 05:40 PM
#27
2000 Acura TL
Giving it an annual bump..
Replace my front and trans mount today, it simple and straight forward.
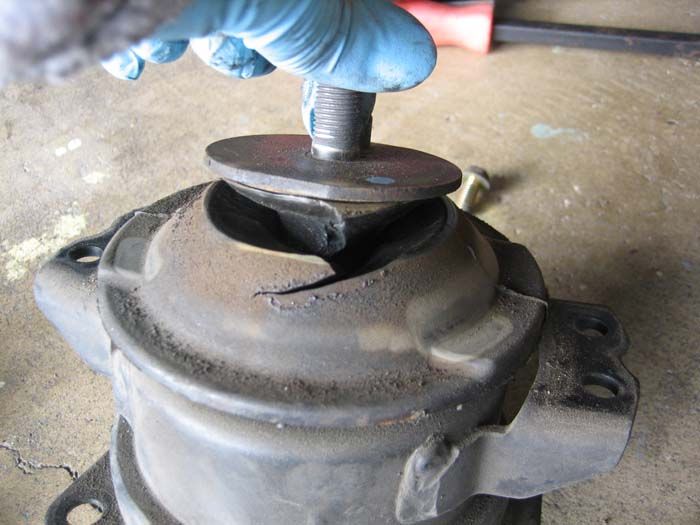
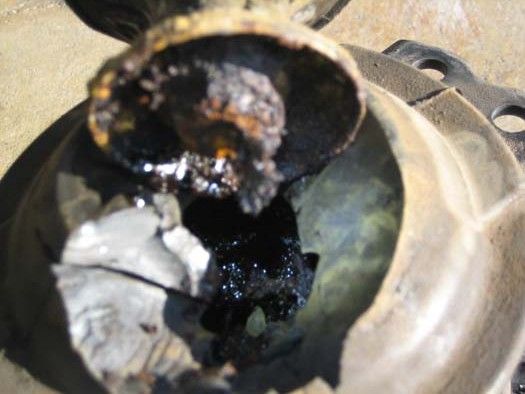
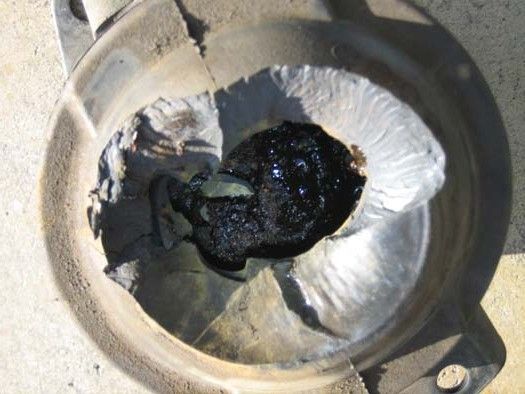
Ever wonder what it look like inside of the busted front mount ?? It was liquid, but over years of neglect it sort of dry up..
Replace my front and trans mount today, it simple and straight forward.
Ever wonder what it look like inside of the busted front mount ?? It was liquid, but over years of neglect it sort of dry up..


Last edited by closetprisoner; 09-22-2013 at 05:44 PM.
The following users liked this post:
3.2TLc (12-05-2013)
12-05-2013, 01:52 PM
#28

just finished
Thanks for the DIY post..It took me 3 hours to finish. Not that bad except for all the abrasions and cuts on my arms from working in tight quarters.I jacked my car up to access some bolts underneath.Also,I probably spend 20 minutes of that time retrieving dropped bolts on that plastic splash pan.Didnt remove the battery though.I did remove the exhaust shield and it came off easily,no problem with the bolts on the shield.
12-05-2013, 02:06 PM
#29

Hey Oreo615, did ya change all the mounts ?
What brand did ya buy ? So, no problems other than getting beat up and dropping bolts....huh ?
Ya saved yourself a bundle over what it would've cost ya to have a shop replace them. Worth a few scrapes, IMO !!!
What brand did ya buy ? So, no problems other than getting beat up and dropping bolts....huh ?
Ya saved yourself a bundle over what it would've cost ya to have a shop replace them. Worth a few scrapes, IMO !!!
12-06-2013, 04:17 AM
#30
3.2TL, oh yea,It was worth the few abrasions..not sure what the shops are getting but I'm sure its a few hundred dollars.I changed the side mount also,that on took 1 1/2 hrs by itself.I bought them both on ebay and they worked just fine.
11-26-2015, 09:00 AM
#31
WNC Real Estate Sales99TL
After almost 2 hours trying to get the left rear bolt loose, I removed the radiator fan on the right front of the radiator which enabled me to have more room to get leverage on that bolt. 2 nuts on the top of the fan and then disconnect the electrical wire harness and it comes right out. Put a thick piece of cardboard on the radiator coils to protect them so to not hit them with any wrenches and create a leak.
11-27-2015, 07:48 AM
#33
WNC Real Estate Sales99TL
Was working from above on all 4 bolts. The left rear one came loose easily after I removed the radiator fan to get leverage on it. You just have to have the right extensions and for sure a 6 sided socket.
09-30-2016, 12:07 PM
#34

I am changing the front mounts on a 2nd Gen CL, got the side mounts changed after a battle with loosening hard to reach bolts but when we got the front mount in I noticed the top mean screw head where you attach the large visible top bolt(in the above picture being grabbed by the blue glove) was crooked and not straight, it was angled toward the headlights I believe. I tried looking at pictures online to see if this was normal but could not get a very good picture to show if it not being straight was correct, a few pictures seemed to show maybe a slight angle but not like what I had. I tried bending it back by hand but it would not budge and I did not want to risk braking it by using other measures to straightening and did not want to go through trying to replace it before seeing it won't work out so I decided to take it back. With the angle the main top bolt would not seat correctly when fully tightened and would be at a angle. We ordered it from Autozone and took it back and of course they did not know if it was normal for that screw head to be bent. We ordered another one and should be getting it today but I just wanted to ask if it is normal for that screw head at the top to be bent and angled to the front(or maybe back, I forgot) and things somehow work out when you put it in and tighten the bolt or was it defective and the screw head should be perfectly straight.
The following users liked this post:
kushito (07-05-2021)
10-01-2016, 11:33 AM
#36
Thank you
The new part had a straight or mostly straight bolt head so the last one was defective, glad I noticed that before I started and tried putting it in after getting the old one out. Some bolts are a major PIA to get to and off, a flexible socket head and plenty of attachments to worm them through to get to some of bolts is highly recommended. A breaker bar or something to get more leverage also got a few of the stubborn side and front mount bolts off along with spraying bolts with PB blaster. We had to raise the engine pretty significantly for the front mount after we took the original off because we could not get the new one to align evenly for the bolts.
The new part had a straight or mostly straight bolt head so the last one was defective, glad I noticed that before I started and tried putting it in after getting the old one out. Some bolts are a major PIA to get to and off, a flexible socket head and plenty of attachments to worm them through to get to some of bolts is highly recommended. A breaker bar or something to get more leverage also got a few of the stubborn side and front mount bolts off along with spraying bolts with PB blaster. We had to raise the engine pretty significantly for the front mount after we took the original off because we could not get the new one to align evenly for the bolts.
10-02-2016, 09:31 AM
#37
WNC Real Estate Sales99TL
I struggled with the one bolt on the bottom of the mount, trying to get leverage on it. Finally took the radiator fan out (which comes out in about 2 mins. Electrical connection and 2 bolt) and could get the leverage on the bolt. Good idea to put a piece of cardboard on the engine side of the radiator so that you DON"T hit it with the breaker bar when trying to loosen the bolt. Spent quite a bit of time under the car hand tightening the bolts that go to the engine block. It's a long one with many threads. But $65 later it was fixed. I'm sure the dealer would want $500 for the same job. Not sure I would have gotten the bolt loose without the breaker bar. My car is a southern car from NC and has NO rust what so ever on it. And yes you have to raise the engine quite a bit to take the pressure off the mount. It's one of those jobs I could do in 1/2 the time if I ever need to do it again.

Thread
Thread Starter
Forum
Replies
Last Post