seat heater switch back light - how to replace?
 10-17-2011, 09:37 PM
#1
Intermediate
Thread Starter

seat heater switch back light - how to replace?
Can anybody coach me on how to access the back light of the seat heater switch on the center console? It looks like the plate around the switches and gear shift pops out, but I'm not certain. Thanks for any suggestions.
 10-17-2011, 10:02 PM
#2
Intermediate
Join Date: Oct 2005
Posts: 47
Likes: 0
Received 0 Likes
on
0 Posts
Funny, I just asked my service manager about this today. He claimed it's 30 min of labor to access the bulb. The bulb itself is only $10. He made it sound like the center console area needed to come out around the gear shift lever. It did not sound as easy as just popping the button out. I guess you can escape the dealer for around $60. Seems a little steep for a tiny little bulb.
Sorry if that isn't too helpful. I guess it depends on how much your time is worth to you. I honestly don't know how to get that part of the console apart.
Sorry if that isn't too helpful. I guess it depends on how much your time is worth to you. I honestly don't know how to get that part of the console apart.
10-17-2011, 10:06 PM
#3
Safety Car
I had to replace these. The entire surface area except the shift gate is one big piece. The easiest way to remove it is to move the shifter to neutral. Then grab the piece right around where the coin tray is. With reasonably hard force, the two front tabs should just pop out. The the two rear tabs will pop out too. Disconnect the wires running to the switches before you pull too far.
I can post a picture tomorrow.
I can post a picture tomorrow.
10-18-2011, 09:13 PM
#5
Safety Car
I had to replace these. The entire surface area except the shift gate is one big piece. The easiest way to remove it is to move the shifter to neutral. Then grab the piece right around where the coin tray is. With reasonably hard force, the two front tabs should just pop out. The the two rear tabs will pop out too. Disconnect the wires running to the switches before you pull too far.
I can post a picture tomorrow.
I can post a picture tomorrow.
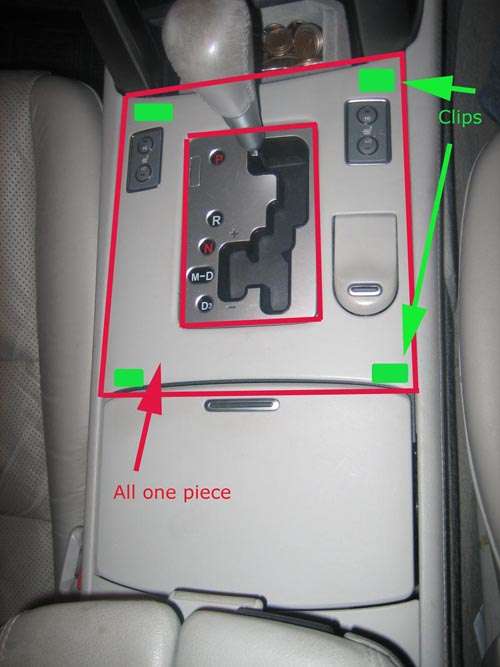
One more thing, once you pull the bulbs out, they will have a little rubber (plastic?) cap. This is because the same bulbs are used throughout, but in the seat heaters they'd be too bright. Pull the cap off to reuse on your replacement bulbs.
10-18-2011, 09:59 PM
#6
Intermediate
Thread Starter
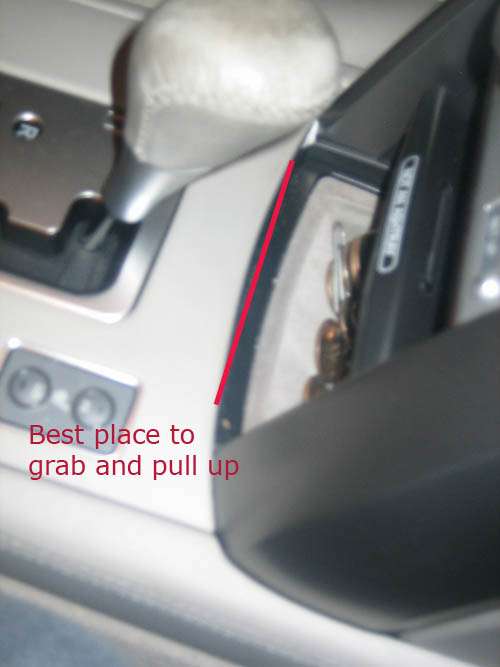
That is good to know, thanks. I'm having trouble pulling the surface panel out. Is it designed to pop out and be pushed back in - without damaging the clips or anything else? If you can post a picture that would be great. Thanks again.
10-18-2011, 10:12 PM
#7
Drifting
It just pops out. You'll have to pull it decently hard. Put the gear shift into neutral or drive to give yourself more room to work. The shift knob should just twist off I think.
Trending Topics
10-18-2011, 10:45 PM
#8
Safety Car
Yes that panel can be popped in and out multiple times. I've had to remove it at least 4 times to replace the latch for the cig lighter, replace the seat heater bulbs, and for deep cleaning.
The following users liked this post:
RLStuck (10-19-2011)
10-27-2011, 03:45 PM
#9
Racer
All this talk, and I was thinking, "I've never had a bulb go out in my RL". That was until I started looking! One of my heated seat switch bulbs was out and I didn't notice until I looked for it. This forum made it easy to find a source for a replacement bulb and how to replace it. I thought I would share my video creation too.
http://www.youtube.com/watch?v=4H0NM...ature=youtu.be
Less than five minutes to replace the bulb.
http://www.youtube.com/watch?v=4H0NM...ature=youtu.be
Less than five minutes to replace the bulb.
The following 7 users liked this post by white05rl:
253RL (05-08-2012),
HEAVY_RL (10-31-2011),
Logic717 (10-28-2011),
mg7726 (10-31-2011),
mitchkramez (10-31-2011),
and 2 others liked this post.
10-31-2011, 12:07 PM
#11
Senior Moderator
white05rl, thanks for the video and nice console. Where did you get the wood parts? How much did you pay overall for the piece you pulled and the cup holder?
10-31-2011, 03:18 PM
#12

I have the same question.. where did you get the wood piece on the center console? is that something you just stuck on top of the plastic part??
any better pics of it? to show how it matches the OEM parts? cost?
thanks!
I know I saw a thread on here a while back of someone that retrofitted a console from an 09+ into their 05-08, but I recall that it did not fit perfectly, was not cheap, and was a bit of a chore... it surely wasn't "plug n play"... a piece that matches right and is thin enough to adhere to the OEM part and look flush would be ideal.
appreciate any info!!
and thanks for the video.. that was great.
10-31-2011, 03:47 PM
#13
Senior Moderator
I know the '09+ has been retrofitted numerous times, either through junk yards or factory originals, but the AUX power moves to the driver's side. I saw that it is on the passenger side in this video, but did not piece it together. Is it Acura made?
10-31-2011, 04:42 PM
#14
wheels - opinions
what do you all think of these...
http://www.tirerack.com/wheels/Wheel...All&sort=Brand
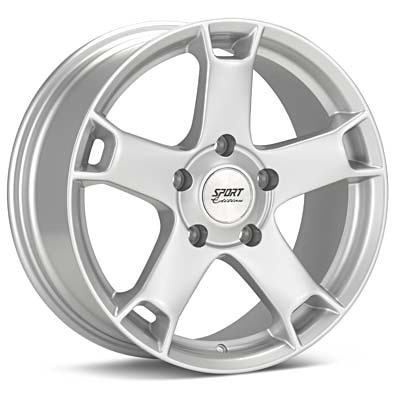
they are smilar to the OEM 17" wheel... in that they have large wide spokes..but with a split thing at the end.. and they are larger at 18"... weight is good. price is good.
just wondered what the consensus was on these..
i'm leaning toward sourcing a nice used set of OEM aspecs.. 18"
trying to see what kind of a deal I could get on ron jon revs in 18".
or something from tire rack...
i really like the look of 19" wheels... but don't want to spend the extra mnoey for bigger wheels and bigget tires.. the prices on 19" tires alone are quite a bit more than 18....
i tried to copy the picture that tirerack made of my car with these wheels...but it won't work.... they honestly dont' look bad on the pic that tire rack does... much better than the OEM wheels..despite the wheels being "similar"....
if you have the time, pull up the wheels on tire rack and then configure them onto an RL and see what you think.
http://www.tirerack.com/wheels/Wheel...All&sort=Brand
they are smilar to the OEM 17" wheel... in that they have large wide spokes..but with a split thing at the end.. and they are larger at 18"... weight is good. price is good.
just wondered what the consensus was on these..
i'm leaning toward sourcing a nice used set of OEM aspecs.. 18"
trying to see what kind of a deal I could get on ron jon revs in 18".
or something from tire rack...
i really like the look of 19" wheels... but don't want to spend the extra mnoey for bigger wheels and bigget tires.. the prices on 19" tires alone are quite a bit more than 18....
i tried to copy the picture that tirerack made of my car with these wheels...but it won't work.... they honestly dont' look bad on the pic that tire rack does... much better than the OEM wheels..despite the wheels being "similar"....
if you have the time, pull up the wheels on tire rack and then configure them onto an RL and see what you think.
Last edited by 23109VC; 10-31-2011 at 04:45 PM.
 10-31-2011, 07:20 PM
#16
Racer
nope, mine is a wood grain kit (not a retrofit from a newer model). It was on it when I purchased the car and installed by the dealer. It looks like something from here:
http://www.carid.com/2005-acura-rl-w...ain-dash-kits/
http://www.carid.com/2005-acura-rl-w...ain-dash-kits/
10-31-2011, 07:25 PM
#17
Racer
BTW, it doesn't match the dash perfectly but neither does my steering wheel or shifter. It just sticks on, but looks really good. When I purchased the car it covered the whole console (even where the climate control, stereo, etc controls are), but I removed that peice.
 10-31-2011, 08:28 PM
#19
Senior Moderator
Bob, help us!
 05-08-2012, 12:48 PM
#20
Racer

Getting ready to replace both seat switch bulbs (one is out). Thanks to this thread I now know what part number. The parts list showed 2 different part numbers for bulb #6. I already have my bulbs for the HVAC controls and my USA SPEC iPod adaptor arrives tomorrow. I also have the replacement latch for the power port which won't stay down. I am trying to do everything I need in the dash while I take it apart once. Is there anything else I should replace in there while I am at it?
05-08-2012, 04:34 PM
#21
Instructor

Getting ready to replace both seat switch bulbs (one is out). Thanks to this thread I now know what part number. The parts list showed 2 different part numbers for bulb #6. I already have my bulbs for the HVAC controls and my USA SPEC iPod adaptor arrives tomorrow. I also have the replacement latch for the power port which won't stay down. I am trying to do everything I need in the dash while I take it apart once. Is there anything else I should replace in there while I am at it?
I just did both the seat heater bulb and the power port latch, both of which were super easy. Took a while to figure out how to get to the bulb in the switch though. There's a metallic sticker on one side that you need to peel back/off. I started trying to pry the switch apart and luckily didn't break anything. The bulb I got from delrey had a blue cover on it, so I left it on. It was a little lighter than the old bulb, so sure enough it looks a little brighter than the other switch now but it's not very noticeable. I wouldn't recommend trying to swap the blue cover, they rip easily.
I also had some of the HVAC lights and hazard bulb out, so I ended up ripping out the radio to get to them. That was a more involved job, but at least I have new bulbs now. I replaced all 5 HVAC bulbs because I don't want to have to go through that process again in a month when another would have burned out.
05-08-2012, 05:25 PM
#22
Racer
I am planning on replacing both bulbs, always in sets, always in pairs. There's no sense replacing the one bulb and having the other go out months later and have to do it again. Also, you really don't want to take apart the car too many times. Parts and clips become broken and loose and can rattle. They are really only designed to go together once. That's why I am here asking about all the other things that I might want to do while I take the center stack apart so I only do it once. I am going to do the switch bulbs, power port latch, HVAC bulbs, and iPod adaptor at the same time.
02-17-2014, 09:52 AM
#23
Intermediate
Does anybody know if this is the same process I would need to follow to replace bulbs for the transmission gear selector? Anybody completed this before and have advice to offer?
03-23-2014, 05:56 PM
#24
1st Gear

Join Date: Feb 2011
Location: Fairfax, VA
Age: 68
Posts: 1
Likes: 0
Received 0 Likes
on
0 Posts
Just wanted to contribute. I though $6 a bulb was a little expensive. One of the other threads I referenced for replacing the bulbs for the A/C controls suggested using Radio Shack micro lamps. I had a couple left over and if you don't mind installing them in the existing plastic fixture, they work/fit fine for the Heated Seat lights. The schematic specs a 14V bulb, 40ma for the high/lo indicator and 60ma for the seat icon. The Radio Shack bulbs are 12v 60ma, but for $1.99 for two, I thought I could risk it. Radio Shack PN:272-1092, #7219 Micro Lamp.
06-04-2017, 06:00 PM
#25
wackjum, your instructions worked perfectly. Notes:
•The shifter knob comes off simply by turning it 11 turns counter-clockwise.
•My parts were numbered 35850-SED-J01 from Delray Acura. I replaced both while I was in there, and it cost me under $14 including shipping. Mine arrived with the color caps already over the glass, so I didn't have to futz with that at all.
•I took off all three wiring harnesses (the two seat heaters and the 12v socket). Don't force them. They don't require any tools, just find the right place to push in a clip and then gently pull the wiring harness out of the socket. Then I took the whole trim piece, with seat heater switches still attached, into the house and worked easy-peasy on a tabletop.
Thanks. Without your instructions and photos, I wouldn't have had the confidence to try the job.
The following users liked this post:
projektvertx (06-04-2017)

Thread
Thread Starter
Forum
Replies
Last Post
prox
5G TLX Problems & Fixes
6
09-01-2015 02:03 AM