F-001: 2G RL Cabin Air Filter DIY
 11-18-2007, 05:09 PM
#1
Safety Car
Thread Starter

F-001: 2G RL Cabin Air Filter DIY
Here is a 2G RL Cabin Air Filter DIY. Being not very mechanical, it took me awhile to figure this out. Previous threads talked about the three tabs, but not how to it related to the air filter, which they do not! There are probably way more pictures than necessary.
Anyway, the gist is that to get at the cabin air filter, you must remove the drop down tray that holds the Owners Manual. Once that tray is removed, the rest is easy.
1. Open the glove box
2. Fold down the piece of felt like material behind the glove box. It is held in place by velcro, and will reveal three tabs which hold the Owners Manual tray in place. The velcro is on the bottom rear of the Owners Manual tray.

3. Open the Owners Manual tray

4. Remove the Owners Manual

5. Grasp the Owners Manual tray and pull it straight out. I used two hands, but the photo was taken showing one hand since I did not have a third hand to hold the camera.

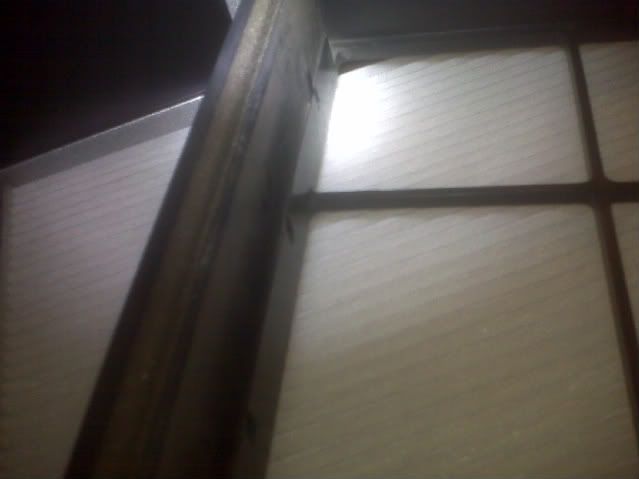
6. The cabin air filter holder is revealed. There are two tabs, one on either end of the cabin air filter holder. This picture is of the filter pulled out about an inch. You can see one of the tabs on the right side. Note the arrows on the cabin air filter holder indicating air flow direction.

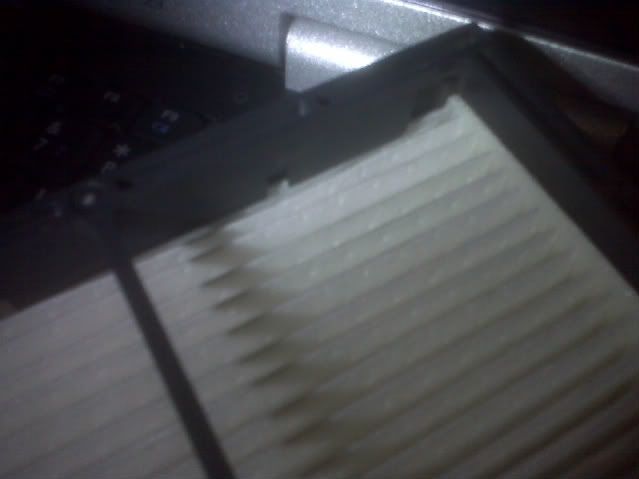
7. Grasp the holder on either end, push the tabs in the direction of the arrows to release, and pull out the filter. Again, I used two hands, but I needed to take the picture. Once the filter is removed, check the cabin air filter compartment for leaves and other debris which you may have to pick out.

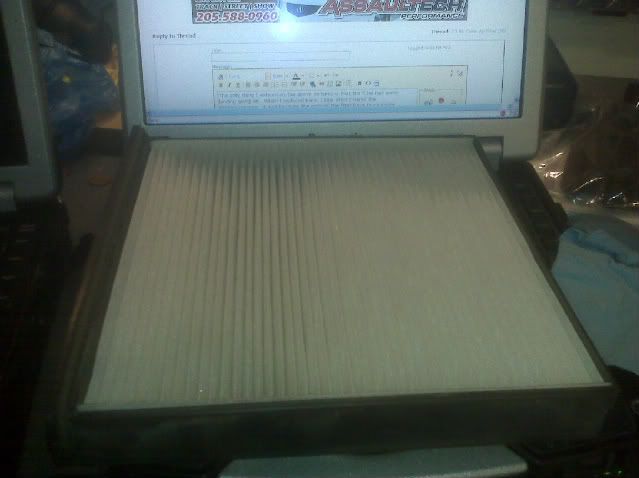
8. Push out the old filter by applying pressure to the bottom of the filter, it will lift out. Note the printed directions on the filter for air flow, arrows pointing down. The air filter holder also has arrows on it indicating the direction of air flow (See image for step 6).

9. Put in a new filter, Honda Part No. 80292-SDA-A01.

10. Now reverse the steps, 7, 6, 5, 4, and re attach the felt fabric to the velcro and you are done. Oh, and don't forget to put the owners manual back.
Anyway, the gist is that to get at the cabin air filter, you must remove the drop down tray that holds the Owners Manual. Once that tray is removed, the rest is easy.
1. Open the glove box
2. Fold down the piece of felt like material behind the glove box. It is held in place by velcro, and will reveal three tabs which hold the Owners Manual tray in place. The velcro is on the bottom rear of the Owners Manual tray.
3. Open the Owners Manual tray
4. Remove the Owners Manual
5. Grasp the Owners Manual tray and pull it straight out. I used two hands, but the photo was taken showing one hand since I did not have a third hand to hold the camera.
6. The cabin air filter holder is revealed. There are two tabs, one on either end of the cabin air filter holder. This picture is of the filter pulled out about an inch. You can see one of the tabs on the right side. Note the arrows on the cabin air filter holder indicating air flow direction.
7. Grasp the holder on either end, push the tabs in the direction of the arrows to release, and pull out the filter. Again, I used two hands, but I needed to take the picture. Once the filter is removed, check the cabin air filter compartment for leaves and other debris which you may have to pick out.
8. Push out the old filter by applying pressure to the bottom of the filter, it will lift out. Note the printed directions on the filter for air flow, arrows pointing down. The air filter holder also has arrows on it indicating the direction of air flow (See image for step 6).
9. Put in a new filter, Honda Part No. 80292-SDA-A01.
10. Now reverse the steps, 7, 6, 5, 4, and re attach the felt fabric to the velcro and you are done. Oh, and don't forget to put the owners manual back.
 11-18-2007, 07:25 PM
#3
Senior Moderator
Nice DIY. Moving to the main forum. I can do this myself, doesn't look hard at all.
11-18-2007, 07:39 PM
#5
Burning Brakes
Originally Posted by neuronbob
Nice DIY. Moving to the main forum. I can do this myself, doesn't look hard at all.
11-18-2007, 08:36 PM
#6
AcurAdmirer
It's worth mentioning that the cabin filter is available at Walmart (and probably many auto supply stores) in Fram brand. I think it's about $19 if I recall correctly.
.
.
.
.
11-18-2007, 10:13 PM
#7
Torch & Pitchfork Posse
Champion CAF 1781 @ Autozone is $17.91
I found searching on that part number brought up various vendors <$20. The $40+ price motivated me to do some shopping myself!
Chas, thanks for the pictorial. Not ONLY did I find even I could do it (with one arm still in a sling!) but I also discovered my Owners Manual kit would fit in the upper tray!
Now I can keep the lower tray filled with cheezy poofs!
I found searching on that part number brought up various vendors <$20. The $40+ price
motivated me to do some shopping myself!Chas, thanks for the pictorial. Not ONLY did I find even I could do it (with one arm still in a sling!) but I also discovered my Owners Manual kit would fit in the upper tray!
Now I can keep the lower tray filled with cheezy poofs!
Trending Topics
 11-19-2007, 10:31 AM
#9
2012 Cadillac CTS-V Coupe

Have any of you ever used the ones that have charcoal in them? I don't know if there's a version for the RL, but I do remember them when I replaced the filters in my 2nd gen TL.
Isn't the charcoal supposed to neutralize odors?
Isn't the charcoal supposed to neutralize odors?
 11-19-2007, 12:01 PM
#13
Intermediate
Join Date: Apr 2006
Posts: 43
Likes: 0
Received 0 Likes
on
0 Posts
And can someone do DIY on air filter w/ pics?
I've just changed canbin filter, but have no idea on changing air filter.
Bty, I was due on A2 maintenance (oil change, cabin filter and air filter) and dealer was going to charge $350. So I just had oil change for $35 and bought air filter and cabin filter for less than $40 from an auto shop.
Changing cabin filter took me just 2 min and now I need to change air filter.
I understand the dealer has to make money thru maintenance, but it's too much.
11-19-2007, 07:11 PM
#14
Senior Moderator
Originally Posted by GoHawks
Trust me, it's not just the Mexican food.
[Is that too much information?]
[Is that too much information?]
 11-19-2007, 09:52 PM
#15
2012 Cadillac CTS-V Coupe
Originally Posted by kkimjames
And can someone do DIY on air filter w/ pics?
I've just changed canbin filter, but have no idea on changing air filter.
Bty, I was due on A2 maintenance (oil change, cabin filter and air filter) and dealer was going to charge $350. So I just had oil change for $35 and bought air filter and cabin filter for less than $40 from an auto shop.
Changing cabin filter took me just 2 min and now I need to change air filter.
I understand the dealer has to make money thru maintenance, but it's too much.
I've just changed canbin filter, but have no idea on changing air filter.
Bty, I was due on A2 maintenance (oil change, cabin filter and air filter) and dealer was going to charge $350. So I just had oil change for $35 and bought air filter and cabin filter for less than $40 from an auto shop.
Changing cabin filter took me just 2 min and now I need to change air filter.
I understand the dealer has to make money thru maintenance, but it's too much.
I took the Land Cruiser in for an oil change today. Their inspection noted that the air filter was dirty and one of the marker lamps was burnt out.
They asked me if I wanted those two items replaced
Air Filter: $35
Bulb replacement: $28!!!!!!!! This one was the biggest shocker as it's one of those bayonet bulbs that is easily accessible. Just open the hood, reach, twist and remove. I balked.
I want to my local auto parts.
Bulb: $1.50
Filter: $10
I guess I could understand the markup on the filter to some extent. After all, I purchased a "lowly" Fram filter, not a "Genuine Toyota" air filter [sarcasm light brightly lit], but what they were going to charge me to replace the bulb was downright insulting. It was a 30 second job.... LITERALLY!
This is Toyota mind you, not even Lexus.
The following users liked this post:
Trickster (03-27-2013)
09-27-2008, 12:55 AM
#16
I only recently got into my RL. Though I changed the oil religiously I noticed decreased air volume coming from the vents. I was waiting to perhaps get a nice Blitz filter as I run those my other cars but decided I could wait no further.
Here is what my cabin filter looked like.
Now that I have a new one installed setting 4 is blowing as hard as setting 7 before, just without the noise. Anyhow I picked up a few of these @ only $12 each. Odd as I change our 4 home filters every 2 months.


Here is what my cabin filter looked like.
Now that I have a new one installed setting 4 is blowing as hard as setting 7 before, just without the noise.
Anyhow I picked up a few of these @ only $12 each. Odd as I change our 4 home filters every 2 months.
Last edited by 470hpGS400; 09-27-2008 at 12:58 AM.
09-27-2008, 02:01 PM
#21
Instructor

The fram filter seems to be a bit fancier with the addition of baking soda. I just put in a purolator, and it seems to be about the same quality as the factory one I just removed. Advance Auto had it for 13.78
09-27-2008, 02:07 PM
#22
Some of the more expensive units have coatings that claim to filter more more bacteria,etc. The Blitz units I have cost around $70.00 or so and to be honest, I breath about the same. But one of the Lexus's is a convertible so the clean air filter is mute half the time. Any filter is better than my old one pictured above.
Any filter is better than my old one pictured above.
01-31-2009, 09:07 PM
#23
2013 RL or bust
Join Date: Nov 2007
Location: Titletown, MA
Age: 39
Posts: 830
Likes: 0
Received 0 Likes
on
0 Posts
This is effin awesome! Thanks Chas!! RL filter is so unbelievably easy I can't believe it! I'm surprised it IS so easy, considering service wants the service haha! No more wasting money for me..
Acurazine FTW!
Acurazine FTW!
 07-04-2009, 07:57 PM
#25
Torch & Pitchfork Posse
I just changed mine again and was surpised how much yuck it had. 
My RL is just about 3 years old and just shy of 27K mikes. For my climate, once a year seems to be the changeout cycle. After spring / early summer pollen season is right on target for me.
My RL is just about 3 years old and just shy of 27K mikes. For my climate, once a year seems to be the changeout cycle. After spring / early summer pollen season is right on target for me.
07-13-2009, 11:36 AM
#30
2005 Acura RL ASpec

Join Date: Jan 2007
Location: Ajax, Ontario, Canada
Age: 43
Posts: 177
Likes: 0
Received 1 Like
on
1 Post
Great write up! Thanks. I also have one request, how do you change the air filter under the hood? I found the 4 screws that hold down the box, after that I can't get the box to lift up high enough to get the filter.
07-14-2009, 05:19 PM
#31
Evil Mazda Driver
Just did this on the RL...really easy to do but the pictures provide nice reassurance. I'm 99.99% sure the dealer never even touched the air filter in ours (is it even on the maintenance schedule?) so it had a bunch of debris and leaves in it. Start to finish, the swap took all of 90 seconds. 
Just FYI, the part number provided at the top of this page is incorrect. The new part number 80292-SHJ-A41. Just thought I'd let you all know.
Just FYI, the part number provided at the top of this page is incorrect. The new part number 80292-SHJ-A41. Just thought I'd let you all know.
07-14-2009, 10:10 PM
#32
Instructor
Join Date: Jun 2009
Location: Columbia/Spartanburg, SC
Posts: 185
Likes: 0
Received 6 Likes
on
5 Posts
I'm jacked!
I will change soon as will also do air filter, oil, trans, diff, rear brakes, rotate tires, coolant, and 2 headlight inverters. Just warming up for my 100K service (still have a little more research to do on it). Luckily I have 20,000 more miles to go before I tackle these items. Should be ready by then.
Anybody ever changed the timing belt, water pump, or motor mounts?

 09-19-2009, 06:03 PM
#36
'05 RL 300K Miles
The only thing I noticed on the above pictures is that the filter had some binding going on. When I replaced mine, I saw what caused the binding/creasing, it was because the ends of the filter have to go inside the filter holder LIP.
Bottom of filter holder:
Properly fit filter:
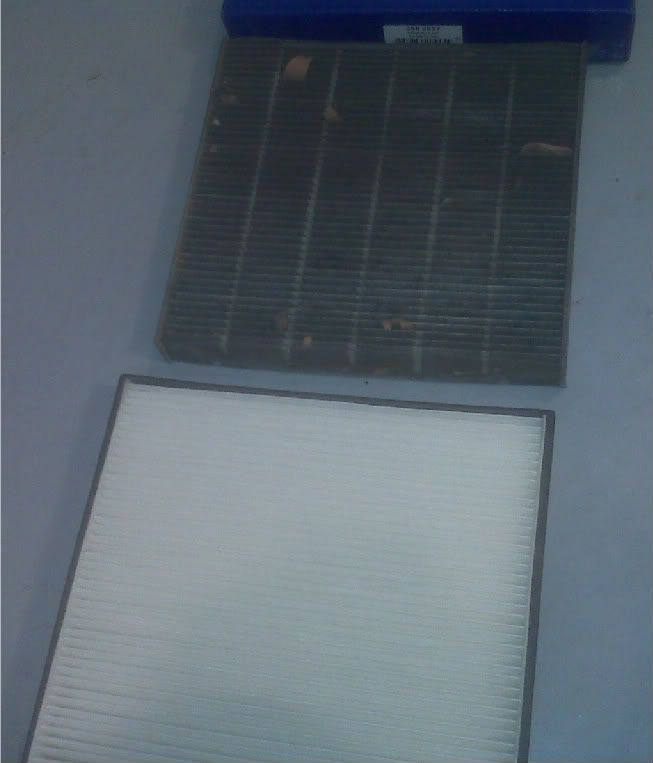
Before & after...260,000 miles worth of crap. I know, I should have changed it a long time ago...
Bottom of filter holder:
Properly fit filter:
Before & after...260,000 miles worth of crap. I know, I should have changed it a long time ago...
09-27-2009, 03:13 PM
#37
Thank you for this DIY tip.. I just changed mine with a Purolator filter from Advance Auto ($13) and I'm glad that I did. My (likely OEM) filter looked as bad as the one in the last picture.
-Mojo
-Mojo
11-16-2009, 07:58 PM
#38

Let me add my thanks to the list.
Stealership quoted ~$320 for B12 Service (I get free regularly scheduled oil and filter changes).
The service writer mentioned that the engine and cabin air filter change was the expensive part of the deal at ~$170.
Fortunately I remembered seeing this threat and googled it.
Thanks Chas2!!
Stealership quoted ~$320 for B12 Service (I get free regularly scheduled oil and filter changes).
The service writer mentioned that the engine and cabin air filter change was the expensive part of the deal at ~$170.
Fortunately I remembered seeing this threat and googled it.
Thanks Chas2!!
 11-17-2009, 09:28 PM
#40
Safety Car
Thread Starter
Glad to be of service! I documented this, but others on the board before me gave me hints on how to do it, so it is just one of those joint efforts by many.