Goda%&#&*muthafrakin#$%&& Rotor Screws!!!!
 07-27-2006, 08:49 PM
#1
Instructor
Thread Starter

Join Date: May 2006
Posts: 173
Likes: 0
Received 0 Likes
on
0 Posts
Ok, I've been meaning to buy an impact screwdriver anyway. Guess now is the time. Sorry. Just wanted to vent. Those damn screws REALLY pissed me off tonight! Used PB Blaster and everything!! Anyway, I just wanted to vent. I've done MANY brake jobs on other cars and have NEVER had to deal with bullsh!t screws like this! SO FRAKIN STUPID!!!! I HATE YOU HONDA!!!!! whew...ok... I'm done venting. Sorry. 
 07-27-2006, 09:06 PM
#2
Blown is Best

Originally Posted by TRILIGHT
Ok, I've been meaning to buy an impact screwdriver anyway. Guess now is the time. Sorry. Just wanted to vent. Those damn screws REALLY pissed me off tonight! Used PB Blaster and everything!! Anyway, I just wanted to vent. I've done MANY brake jobs on other cars and have NEVER had to deal with bullsh!t screws like this! SO FRAKIN STUPID!!!! I HATE YOU HONDA!!!!! whew...ok... I'm done venting. Sorry.
Even with an impact screwdriver, on some, I had to drill out the center and then use a cold chisel and hammer to spin them out.
Good luck with them.
BTW - on the new ones, I coated them with anti-seize.
07-27-2006, 09:17 PM
#3
Instructor
Thread Starter
Join Date: May 2006
Posts: 173
Likes: 0
Received 0 Likes
on
0 Posts
Thanks for the tip! I don't plan to put ANY back in!  I am unfamiliar with the term "cold chisel". How does this differ from a regular one and define "spin them out". Thanks for the info!! Anything will definitely help since I am going to attack this again tomorrow evening.
I am unfamiliar with the term "cold chisel". How does this differ from a regular one and define "spin them out". Thanks for the info!! Anything will definitely help since I am going to attack this again tomorrow evening.
07-27-2006, 09:26 PM
#4
Blown is Best
Basically a metal chisel:
http://www.sears.com/sr/javasr/produ...seBVCookie=Yes
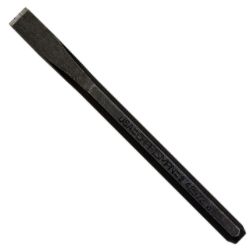
After I've tried to get some screws out and the head has stripped, I've used either a chisel or center punch and placed it on the edge of the screw and tried to drive the screw counter-clockwise. The hammering on the head of the screw using a hammer and chisel is enough to loosen up the threads and corrosion enough to allow the screw to rotate.
Worked for me
http://www.sears.com/sr/javasr/produ...seBVCookie=Yes
After I've tried to get some screws out and the head has stripped, I've used either a chisel or center punch and placed it on the edge of the screw and tried to drive the screw counter-clockwise. The hammering on the head of the screw using a hammer and chisel is enough to loosen up the threads and corrosion enough to allow the screw to rotate.
Worked for me
07-27-2006, 09:33 PM
#5
Instructor
Thread Starter
Join Date: May 2006
Posts: 173
Likes: 0
Received 0 Likes
on
0 Posts
Ah!! A picture is worth a thousand words. hehe Yeah, actually I have a whole Craftsman set of those. Just didn't know they were called "cold chisels". Thanks again for the tips!
Yeah, actually I have a whole Craftsman set of those. Just didn't know they were called "cold chisels". Thanks again for the tips!
07-27-2006, 10:33 PM
#6
Racer

trick is to hit the screws : place a hammer with a rounded head on the screw, then with another hammer hit the other hammer like twice.
2nd step : use an impact driver
that's how we do it at the dealership and it succeeds about 99.5% of the time
average is like we break 1 screw in 2 years.
2nd step : use an impact driver
that's how we do it at the dealership and it succeeds about 99.5% of the time
average is like we break 1 screw in 2 years.
07-27-2006, 10:46 PM
#7
Instructor
Thread Starter
Join Date: May 2006
Posts: 173
Likes: 0
Received 0 Likes
on
0 Posts
Originally Posted by Type S Zero
trick is to hit the screws : place a hammer with a rounded head on the screw, then with another hammer hit the other hammer like twice.
2nd step : use an impact driver
that's how we do it at the dealership and it succeeds about 99.5% of the time
average is like we break 1 screw in 2 years.
2nd step : use an impact driver
that's how we do it at the dealership and it succeeds about 99.5% of the time
average is like we break 1 screw in 2 years.
Trending Topics
07-27-2006, 11:34 PM
#8
2001 Acura CL-S

Join Date: Apr 2005
Location: Boston, MA
Posts: 68
Likes: 0
Received 0 Likes
on
0 Posts
Yep, those things are a bitch!!
I got all but one out with an impact screwdriver and a 10 pound sledgehammer (no joke). The last one I had to chisel out... ended up taking me over 8 HOURS to change the front rotors (included 2 trips to Home Depot and an AutoZone).
I got all but one out with an impact screwdriver and a 10 pound sledgehammer (no joke). The last one I had to chisel out... ended up taking me over 8 HOURS to change the front rotors (included 2 trips to Home Depot and an AutoZone).
 07-28-2006, 07:04 AM
#12
Senior Moderator
Originally Posted by Type S Zero
trick is to hit the screws : place a hammer with a rounded head on the screw, then with another hammer hit the other hammer like twice.
07-28-2006, 07:22 AM
#13
'08 TL-S

Join Date: Jun 2004
Location: Delco, PA
Age: 55
Posts: 157
Likes: 0
Received 0 Likes
on
0 Posts
Originally Posted by rockd
Yep, those things are a bitch!!
I got all but one out with an impact screwdriver and a 10 pound sledgehammer (no joke). The last one I had to chisel out... ended up taking me over 8 HOURS to change the front rotors (included 2 trips to Home Depot and an AutoZone).
I got all but one out with an impact screwdriver and a 10 pound sledgehammer (no joke). The last one I had to chisel out... ended up taking me over 8 HOURS to change the front rotors (included 2 trips to Home Depot and an AutoZone).
sounds like any of my DIY projects...
07-28-2006, 09:13 AM
#14
DON'T TREAD ON ME
Originally Posted by o2cls
you dont even need those screws.....
they are there to keep the rotor on the hub during production. your wheels hold the rotor onto the hub just fine once the car is assembled.
07-28-2006, 09:15 AM
#15
Instructor
Thread Starter
Join Date: May 2006
Posts: 173
Likes: 0
Received 0 Likes
on
0 Posts
Originally Posted by RUPNOK
sounds like any of my DIY projects...
No sh!t dude!!! For real! I am so used to the "takes an hour for the project and takes 2 for trips back and forth to the store!" I thought I was all set for this one because I have tons of tools. Nope! I really didn't even notice there were screws there at first! I didn't expect it because there shouldn't be any and there is so much rust on everything, I didn't notice them.@m733l: Seriously dude, do not bother with putting screws back in. Absolutely 100% unnecessary for them to be there in the first place! That being said, the dealer might sell them. However, I would imagine they come in a bag with replacement rotors from Honda if at all.
 Don't even bother getting new ones... I haven't had them since I changed the rotors.
07-28-2006, 09:13 PM
Don't even bother getting new ones... I haven't had them since I changed the rotors.
07-28-2006, 09:13 PM
#18
Instructor
Thread Starter
Join Date: May 2006
Posts: 173
Likes: 0
Received 0 Likes
on
0 Posts
Yeah, I don't plan on replacing the screws. Totally useless! As for cutting new lines in them, I've had to do that before, Rondog. Haven't stripped anything here though. Just couldn't get them off with PB Blaster and muscle. I was going to do it tonight but got off of work too late. I'll be picking up an impact screwdriver tomorrow and trying out some of the tips here. I will post back with pics letting everyone know how things went.
07-29-2006, 03:46 PM
#19
Instructor
Thread Starter
Join Date: May 2006
Posts: 173
Likes: 0
Received 0 Likes
on
0 Posts
Ok, welcome to "how to OWN those damn screws" brought to you by your friendly neighborhood Craftsman Impact Screwdriver...

Here is the old rotor next to the new cryo treated Powerslots...

Before...

After...

I felt compelled to post this picture since it freakin rained like 15 minutes after I got finished washing it! Damnit!! Not a cloud in the sky before! Oh well. I guess it could be worse. It could have started raining on me in the middle of the brake job.

Thanks again for the tips everyone! Turns out the Impact Screwdriver was all I needed. Banged on that a few times and it made short work of the whole thing. You might notice I put them back in when I said I wouldn't. I didn't want to but I purchased an extended warranty. I'll have a hard enough time with the aftermarket rotors. I didn't want to push my luck by leaving the screws out and giving the monkees something to complain about.
Here is the old rotor next to the new cryo treated Powerslots...
Before...
After...
I felt compelled to post this picture since it freakin rained like 15 minutes after I got finished washing it! Damnit!! Not a cloud in the sky before! Oh well. I guess it could be worse. It could have started raining on me in the middle of the brake job.
Thanks again for the tips everyone! Turns out the Impact Screwdriver was all I needed. Banged on that a few times and it made short work of the whole thing. You might notice I put them back in when I said I wouldn't. I didn't want to but I purchased an extended warranty. I'll have a hard enough time with the aftermarket rotors. I didn't want to push my luck by leaving the screws out and giving the monkees something to complain about.
07-29-2006, 05:22 PM
#22
Instructor
Thread Starter
Join Date: May 2006
Posts: 173
Likes: 0
Received 0 Likes
on
0 Posts
Originally Posted by Allout
Way to go 
BTW - Cryo Powerslots is a very good choice. I'd be very surprised if those warp on you.
BTW - Cryo Powerslots is a very good choice. I'd be very surprised if those warp on you.
These should keep my dumb ass out of trouble. The calipers are ugly as hell. I think I might pull them and paint them black.
07-29-2006, 06:01 PM
#23
When u C the L type S
Join Date: Jul 2006
Location: Springfield, MO
Age: 40
Posts: 100
Likes: 0
Received 0 Likes
on
0 Posts
I had painted my calipers black @ first & was just wanting a lil more so I decided to try red & i'll say I don't think you'll be disappointed in how they turn out.
07-29-2006, 06:23 PM
#24
Instructor
Thread Starter
Join Date: May 2006
Posts: 173
Likes: 0
Received 0 Likes
on
0 Posts
Originally Posted by Axxie01TypeS
I had painted my calipers black @ first & was just wanting a lil more so I decided to try red & i'll say I don't think you'll be disappointed in how they turn out.

I'm keeping things a little more "low key" on the CL though. I just don't like the ugly rust. I think the black on silver Powerslots would look nice.
07-29-2006, 07:12 PM
#25
Blown is Best
Did you do a bedding process? Here's a link to Stoptech's site on Bedding in Brakes. It includes both theory and procedure.
http://www.stoptech.com/tech_info/wp...contents.shtml
http://www.stoptech.com/tech_info/wp...contents.shtml
07-30-2006, 01:09 AM
#26
Instructor
Thread Starter
Join Date: May 2006
Posts: 173
Likes: 0
Received 0 Likes
on
0 Posts
Originally Posted by Allout
Did you do a bedding process? Here's a link to Stoptech's site on Bedding in Brakes. It includes both theory and procedure.
http://www.stoptech.com/tech_info/wp...contents.shtml
http://www.stoptech.com/tech_info/wp...contents.shtml
While most processes are roughly the same, I followed and am continuing to follow the recommended procedure that accompanied the Powerslot rotors. In addition to the initial "bedding" procedure, they suggested doing only moderate braking for the first 500 miles of use. I'll try to keep my road rage in check until then.

Thread
Thread Starter
Forum
Replies
Last Post
MrHeeltoe
1G TSX Tires, Wheels, & Suspension
20
02-23-2023 01:54 PM
rp_guy
Member Cars for Sale
9
07-16-2017 07:33 AM
MrHeeltoe
2G TSX Tires, Wheels & Suspension
3
09-29-2015 10:43 PM
MrHeeltoe
3G TL Tires, Wheels & Suspension
0
09-28-2015 05:43 PM