03CLS6 Autocross/Track/Street Build Thread
 03-10-2017, 03:29 PM
#1321
Suzuka Master
iTrader: (1)
I mean if the EMS fix, in regards to the sensors, is just a 'flick of the switch', as discussed, than you would not have to redo the auto sensor 'swap' work, yet still get the engine tuned and running and have the ability to covert back on emission day, get what I'm saying?
Unfortunately, the extra $1900 retail for the dezod unit would be tough to swallow, at this point; however, you would ultimately get what you need without incurring that labor to switch back to 6-speed factory sensors. What do you think? Not trying to spend your money here, just throwing out thoughts to see if they are practical for your situation.

Last edited by zeta; 03-10-2017 at 03:36 PM.
 03-10-2017, 03:45 PM
#1322
Suzuka Master
iTrader: (1)

My logic is flawed. The auto pinned harness would not connect with the manual ECU; which in turn, would not be compatable to read signals sent by the auto sensors.
FAIL. shot down in flames, hehe. Oh well. 
That's why it's best to let the pro's handle this mind numbing electronics BS. I'll stick to fn Finance and just pay to play.
Last edited by zeta; 03-10-2017 at 03:57 PM.
03-10-2017, 08:27 PM
#1323
Suzuka Master
iTrader: (1)
brian, FYI, found this box and it looks like it is talking the same language as dezod; however, it's $560 cheaper, not sure about the harness though.
http://www.phearable.net/engine-comp...2a2-j35a4.html
AEM's Series 2 EMS is a complete engine control system that plugs into the factory harness and uses the factory sensors. This means you do not need to replace any parts of the harness or sensors, just plug the EMS into the harness and begin tuning! This Series 2 EMS was designed specifically for J-motor swaps, and allows you to control every aspect of your J-series motor.
2002-2003 Acura CL 3.2 Type S J32A2
6-Speed Manual
Last edited by zeta; 03-10-2017 at 08:32 PM.
03-10-2017, 10:02 PM
#1324
brian, FYI, found this box and it looks like it is talking the same language as dezod; however, it's $560 cheaper, not sure about the harness though.
Engine Computers :: AEM Engine Management :: AEM Series2 :: Honda/Acura :: AEM Series 2 P&P EMS Honda J30A J30A1 J32A J32A1 J32A2 J35A4 - Engine Parts & Tuning Solutions - Products - Phearable.net
AEM's Series 2 EMS is a complete engine control system that plugs into the factory harness and uses the factory sensors. This means you do not need to replace any parts of the harness or sensors, just plug the EMS into the harness and begin tuning! This Series 2 EMS was designed specifically for J-motor swaps, and allows you to control every aspect of your J-series motor.
2002-2003 Acura CL 3.2 Type S J32A2
6-Speed Manual
03-10-2017, 10:24 PM
#1325
Suzuka Master
iTrader: (1)
03-11-2017, 07:10 AM
#1326
He is saying Dezod used a different ems2 than the 30-6051.
Here is a pic of auto ecu someone modified to run rx8 before swapping to megasquirt. Assuming this probably wouldn't pass inspection, but not sure.
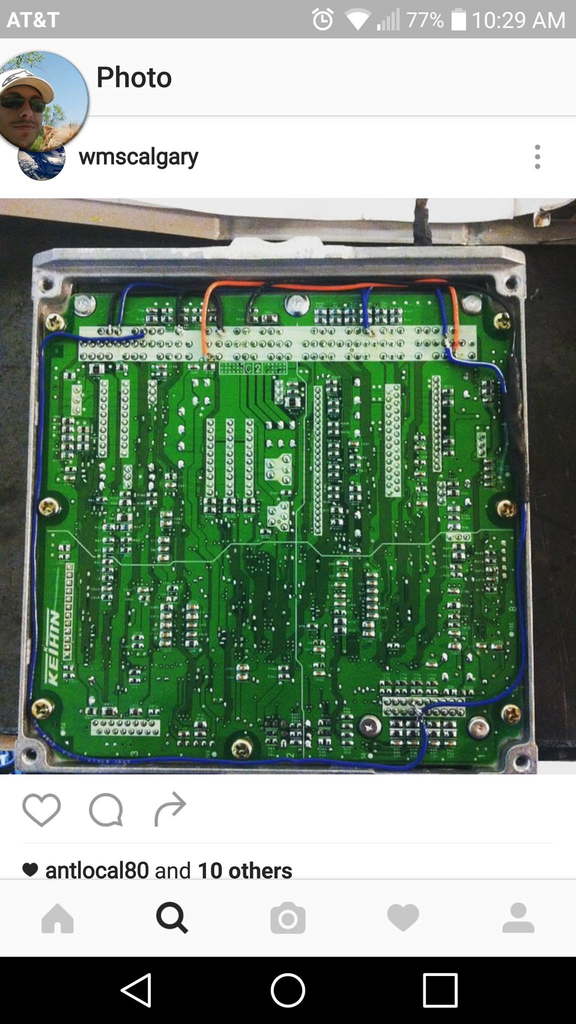
Option 1: Leave car as is and wait till 2018 to deal with emissions.
Option 2: Leave car as is then decide to make it track car in 2018.
Option 3: Dezod Route.
Option 4: Convert back to stock.
That is where I am at now.
Here is a pic of auto ecu someone modified to run rx8 before swapping to megasquirt. Assuming this probably wouldn't pass inspection, but not sure.
Option 1: Leave car as is and wait till 2018 to deal with emissions.
Option 2: Leave car as is then decide to make it track car in 2018.
Option 3: Dezod Route.
Option 4: Convert back to stock.
That is where I am at now.
03-12-2017, 08:39 AM
#1327
Noticed new Hankook Ventus RS-4 are now listed in stock at tirerack. Tempted to try them out. Might be best new thing for a street/auto-x/track combo. The problem now is you need like RE-71R to be competitive at autocross, but it wears too fast at the track. Not really wanting to buy another set of wheels, so need to make decision soon. Miss days when best auto-x tires also lasted on track as well.
Can't find any reviews for the RS-4 yet, and it looks like direzza Z3 won't be available till next season really.
Can't find any reviews for the RS-4 yet, and it looks like direzza Z3 won't be available till next season really.
Last edited by brian6speed; 03-12-2017 at 08:48 AM.
03-14-2017, 09:58 AM
#1328

same ems he has now
option 1
He is saying Dezod used a different ems2 than the 30-6051.
Here is a pic of auto ecu someone modified to run rx8 before swapping to megasquirt. Assuming this probably wouldn't pass inspection, but not sure.
Option 1: Leave car as is and wait till 2018 to deal with emissions.
Option 2: Leave car as is then decide to make it track car in 2018.
Option 3: Dezod Route.
Option 4: Convert back to stock.
That is where I am at now.
03-15-2017, 01:04 PM
#1329
Wanted to say that I gave up on the tsx rear knuckle idea. There would just be too much to deal with, then worrying about suspension geometry etc. Custom would cost too much, plus gains would be so minimal. Probably not even 0.1 second per lap.
04-18-2017, 07:05 AM
#1330
Excited to finally be picking up my car this Friday after being in shop since November.
Registered for first autocross event April 29th.
They just left ecu as is(out of time), gonna have to do changes next winter.
My car is a little over 100 lbs lighter than the last time I corner balanced it. Not sure where my weights got confused, but car isn't as light as I've been saying. My car is 2715 with full tank of fuel. It doesn't look like I'll ever be below 2600 lbs with all this steel and cast iron, oh well.
Sticking with the RE71R tires for now, just got new rear set. Just need to buy/change rear brake pads and wash/wax car and should be good to go.
Last edited by brian6speed; 04-18-2017 at 07:10 AM.
04-19-2017, 08:40 AM
#1332
Yea, it is what it is. Car should be faster than last year, which is what matters.
When got car corner balanced 2 years ago it weighed 2823 lbs without driver and 1/2 tank of fuel.
Corner Weights: 969 left front, 942 right front, 531 left rear, 523 right rear.
New weight is 2718 lbs with more gas in tank.
New Corner Weights: 934 left front, 915 right front, 519 left rear, 492 right rear.
Ideal Corner Weights: 937, 909, 513, 498. Got close to these numbers, but not exact because of ride height clearance etc.
New alignment : -2 camber front
-3 camber rear
1/8" front toe out.
05-24-2017, 07:17 AM
#1335
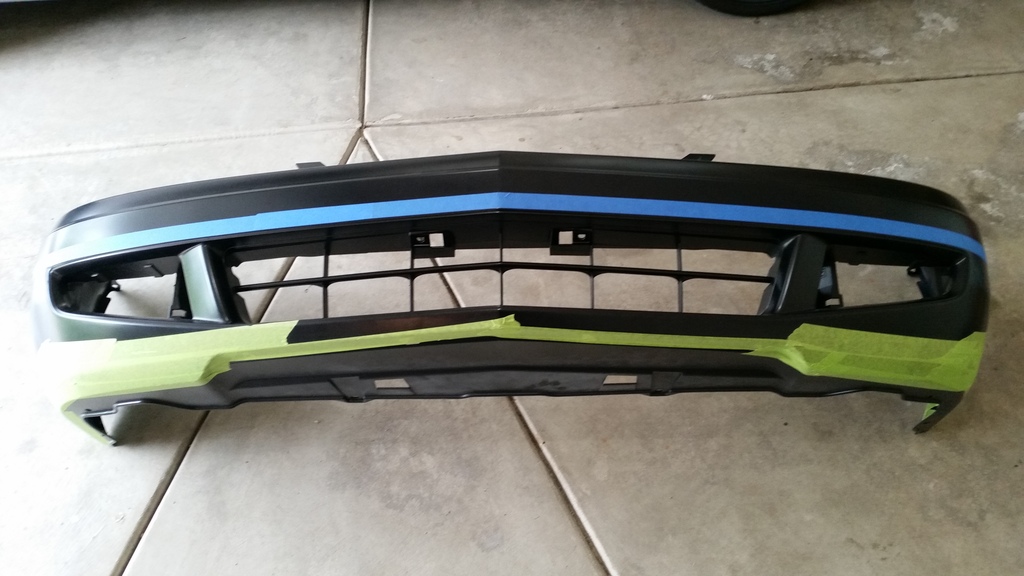
Gonna be working on making front splitter. Gonna need to hack up a bumper, but not sure I want to cut up my new bumper. If anyone has a used bumper for sale in Chicagoland area let me know.
Will be similar to how Villo did it by cutting bottom half of bumper off and riveting a 1/8" sheet of abs plastic. Considering shape of our bumper, this should be easiest and most effective method.
Plan is to keep my current bumper with Ron Jon lip attached, and use another bumper for splitter setup. Ron Jon lip isn't best for aero, weighs a lot, and bottom isn't flat so would have to rivet a strip of plastic to it and put holes in it.

The following users liked this post:
teh CL (06-13-2017)
06-13-2017, 06:05 PM
#1338
Suzuka Master
iTrader: (1)
^^That front end is looking good! Congrats on the concept and implementation.
In regards to the post above, not sure if you have been to his profile, but, he has a facebook link that displays his unique gear work/understanding of all manual Honda transmissions. My guess is he may have been trying to bring this to your attention should you be interested in 'gearing modification(s)' to improve your autocross performance.

In regards to the post above, not sure if you have been to his profile, but, he has a facebook link that displays his unique gear work/understanding of all manual Honda transmissions. My guess is he may have been trying to bring this to your attention should you be interested in 'gearing modification(s)' to improve your autocross performance.
06-14-2017, 07:11 AM
#1339
^^That front end is looking good! Congrats on the concept and implementation.
In regards to the post above, not sure if you have been to his profile, but, he has a facebook link that displays his unique gear work/understanding of all manual Honda transmissions. My guess is he may have been trying to bring this to your attention should you be interested in 'gearing modification(s)' to improve your autocross performance.
In regards to the post above, not sure if you have been to his profile, but, he has a facebook link that displays his unique gear work/understanding of all manual Honda transmissions. My guess is he may have been trying to bring this to your attention should you be interested in 'gearing modification(s)' to improve your autocross performance.
The following users liked this post:
zeta (06-14-2017)
07-03-2017, 04:40 PM
#1342
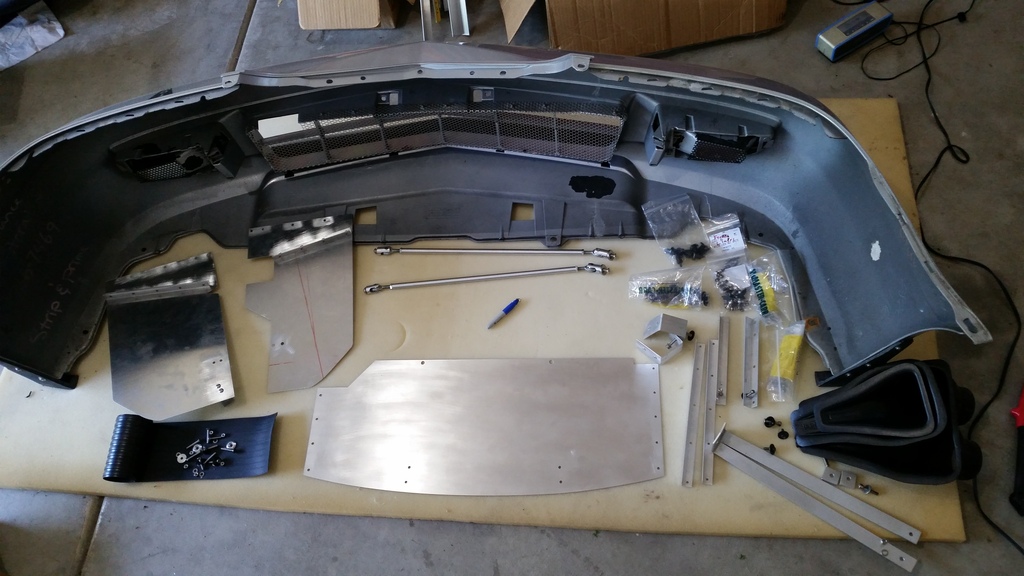
Splitter DIY Part 1: Gathering Materials
1. OEM Front Bumper. Bought from dealer to skip shipping charge.
2. 1/2" Birch Plywood from Home Depot.
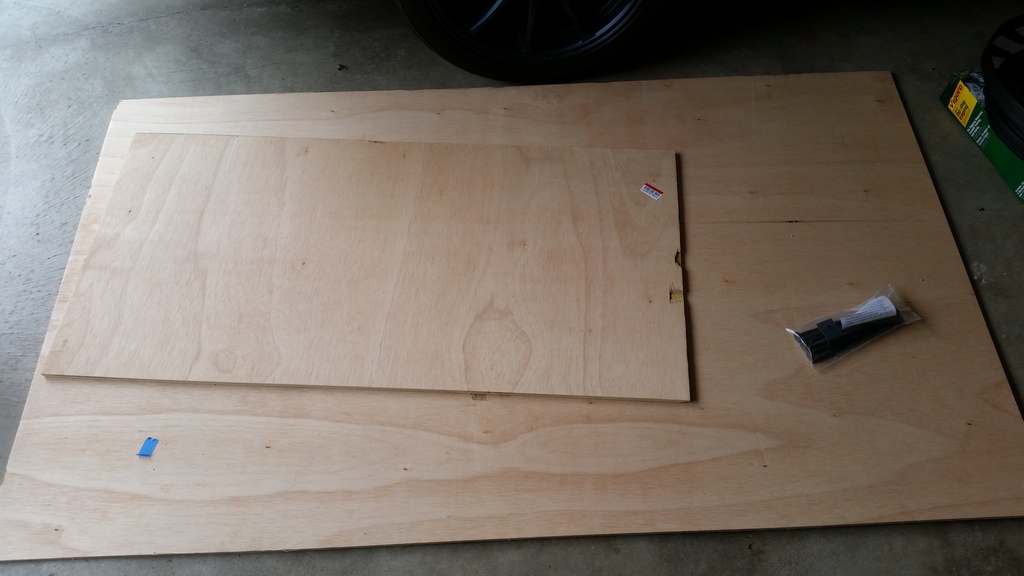
3. 1/8" ABS Sheet Plastic from Free Shipping @ Speedway Motors, The Racing and Rodding Specialists.
4. Edge Trim from Home Depot.
5. Naca Ducts from www.pegasusautoracing.com.
6. Aluminum tube and Angled Aluminum from Home Depot.
7. Aluminum sheet, CF sheet, and Hardware from www.Mcmaster.com.
8. Countersunk Aluminum Washers from Titanium, Stainless Steel, Aluminium Fasteners & Motorcycle Bolts | ProBolt.
9. Splitter Rods from www.fullytorquedracing.com.
10. Rivets from Ace Hardware and Rivet Nuts from Amazon.
1. OEM Front Bumper. Bought from dealer to skip shipping charge.
2. 1/2" Birch Plywood from Home Depot.
3. 1/8" ABS Sheet Plastic from Free Shipping @ Speedway Motors, The Racing and Rodding Specialists.
4. Edge Trim from Home Depot.
5. Naca Ducts from www.pegasusautoracing.com.
6. Aluminum tube and Angled Aluminum from Home Depot.
7. Aluminum sheet, CF sheet, and Hardware from www.Mcmaster.com.
8. Countersunk Aluminum Washers from Titanium, Stainless Steel, Aluminium Fasteners & Motorcycle Bolts | ProBolt.
9. Splitter Rods from www.fullytorquedracing.com.
10. Rivets from Ace Hardware and Rivet Nuts from Amazon.
07-09-2017, 04:09 PM
#1345
Will do update this week of last ax and splitter DIY, just been super busy. The splitter helps, even at ax speeds. Had some issues with splitter scraping at event in a few spots where the parking lot dips down. Most of cars were scraping and GTO had his bumper ripped off. Not sure if I should raise it because of this or not. It is only 1 lot that is an issue and would not scrape at track.
07-12-2017, 11:09 PM
#1346
Splitter DIY Part 2 : Tools
This will be rather short since I use most basic tools.
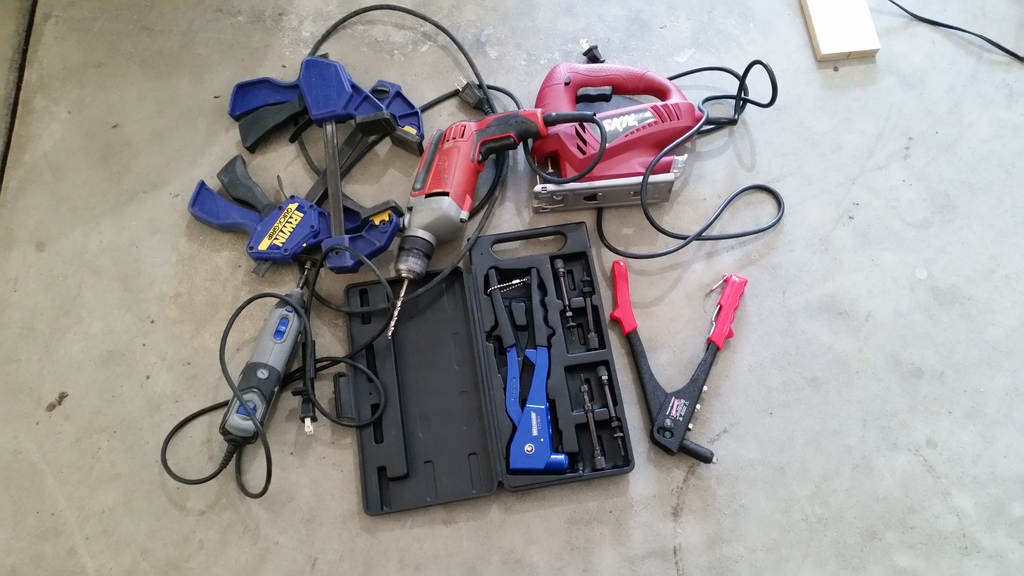
1. Jigsaw for cutting plywood.
2. Drill
3. Dremel for cutting sheet aluminum, abs plastic sheet, angled aluminum, aluminum tube, and edge guard. Use thick metal disc and plastic disc. Use grind stone to clean up drill holes also.
4. Clamps(2)
5. Tabletop Sheet Metal Bender for bending brackets. Use torch to heat aluminum before bending to prevent cracks.
6. Rivet Tool used to attach abs plastic sheet to bumper.
7. Rivet Nut Tool used to add rivet nuts to frame under radiator and also to add to the aluminum tube.
8. Sand Paper used by hand.
9. Various Hand Tools to install splitter.
10. 2x4's or Magazines to prop splitter in position to bolt up 2 main aluminum tube frames.
11. Painters Tape, Pencil, and Small Tape Measure for measuring and marking.
This will be rather short since I use most basic tools.
1. Jigsaw for cutting plywood.
2. Drill
3. Dremel for cutting sheet aluminum, abs plastic sheet, angled aluminum, aluminum tube, and edge guard. Use thick metal disc and plastic disc. Use grind stone to clean up drill holes also.
4. Clamps(2)
5. Tabletop Sheet Metal Bender for bending brackets. Use torch to heat aluminum before bending to prevent cracks.
6. Rivet Tool used to attach abs plastic sheet to bumper.
7. Rivet Nut Tool used to add rivet nuts to frame under radiator and also to add to the aluminum tube.
8. Sand Paper used by hand.
9. Various Hand Tools to install splitter.
10. 2x4's or Magazines to prop splitter in position to bolt up 2 main aluminum tube frames.
11. Painters Tape, Pencil, and Small Tape Measure for measuring and marking.
Last edited by brian6speed; 07-12-2017 at 11:17 PM.
07-13-2017, 10:43 AM
#1349
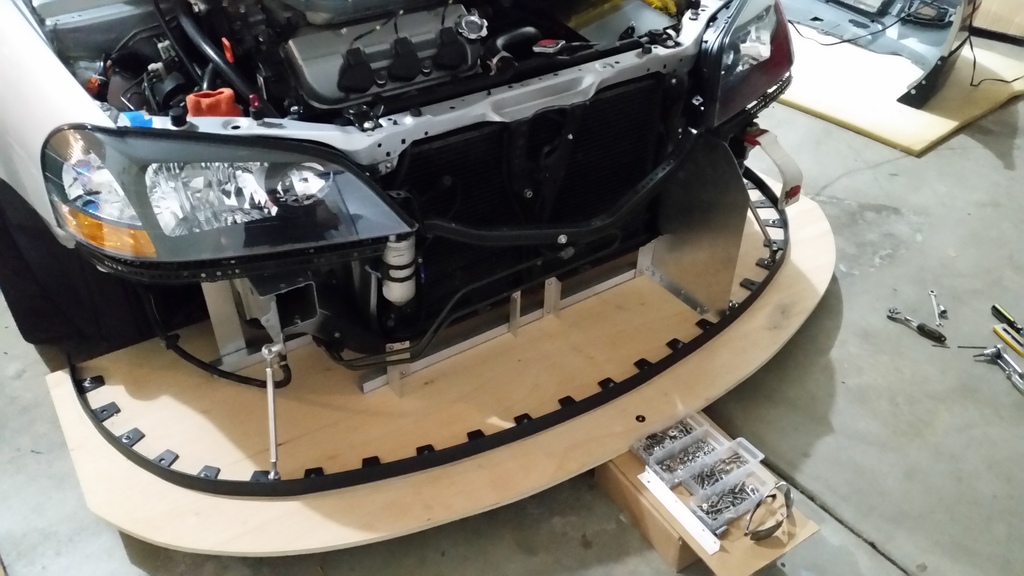
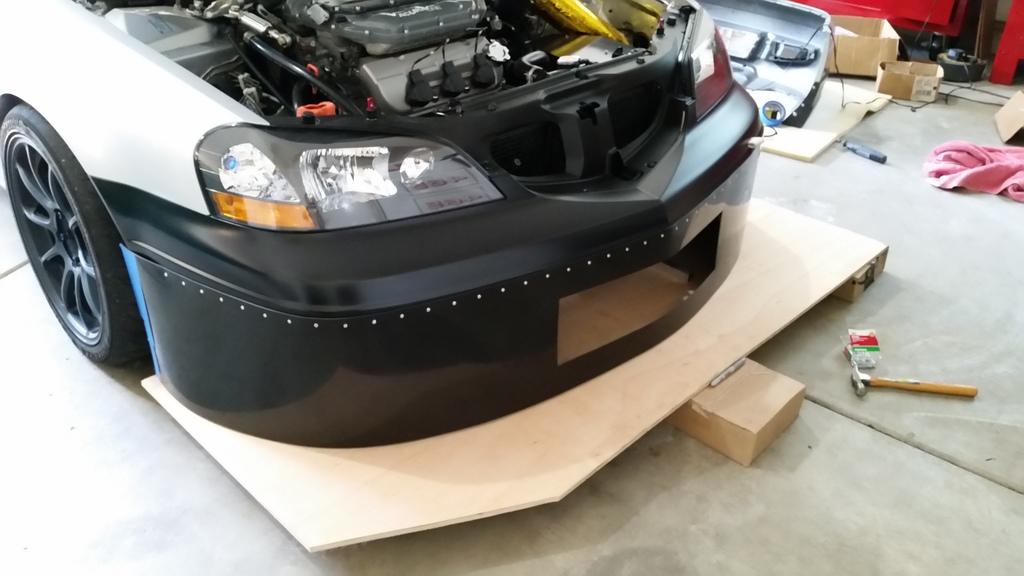
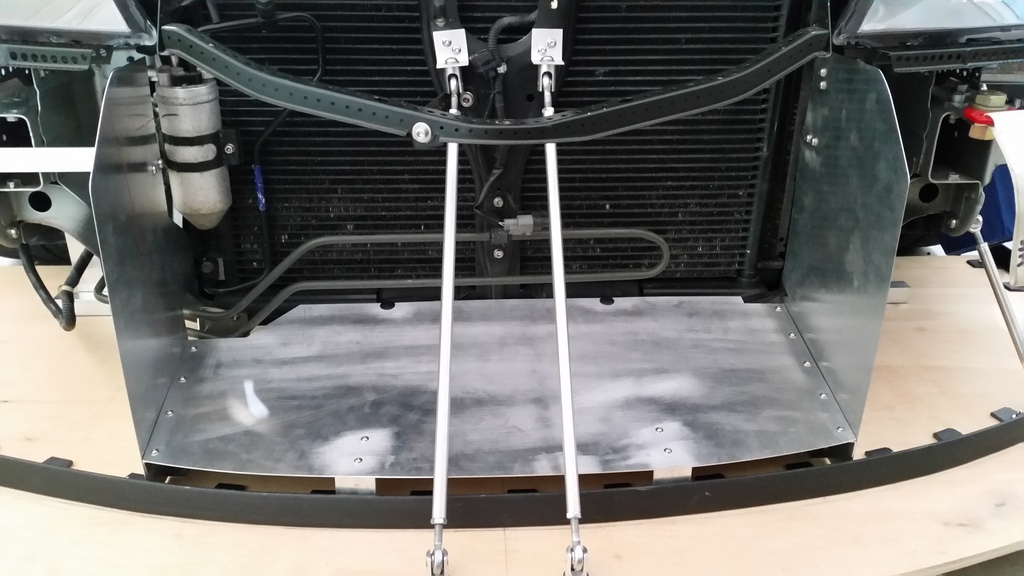
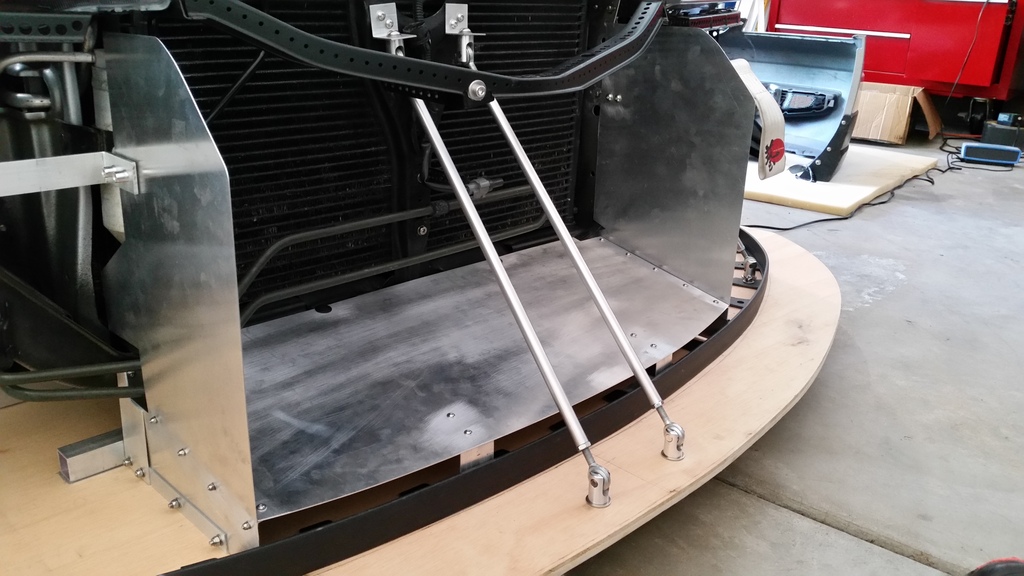
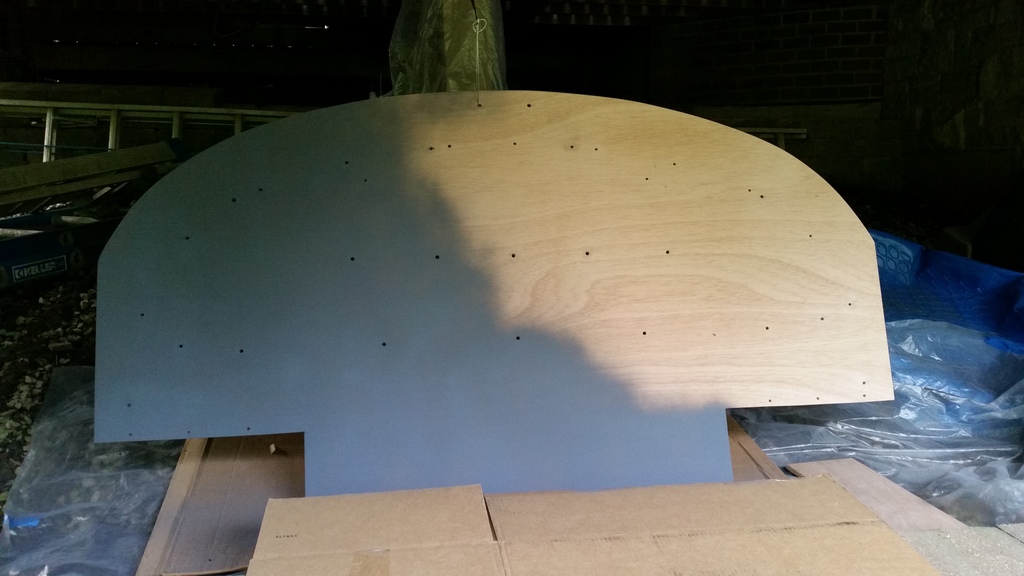
Splitter DIY Part 3 : Building Frame
1. First thing to do is look under car for locations to mount brackets that will attach to splitter frame. I like to use pre-existing bolt holes or other holes already present if available. My thinking was to attach to main frame of the car and avoid making attachments to subframe which could flex independent of cars frame.
2. Mocked up plywood with 2x4's and took measurements to know where to cut for wheel openings.
3. For attachment of rear aluminum tube, decided to use the bolt holes where the OEM tow hooks were located. Used 2x2" angled aluminum for (2)brackets. Marked where to drill holes for oem tow bolts. Used tape measure to measure from ground up to brackets to see how long to make them. On driver side, the filter was kind of in the way, so just cut part of the bracket off to clear.
4. Cut a section of 1" aluminum tubing(longer than needed for mock-up purposes). Mocked it up using magazines(as far up as I really could with only 2-3mm of subframe clearance), then measured and marked where to drill holes. Drilled holes to add 4 rivet nuts(2 per side) to tubing. After inserting rivet nuts, I spread some anti-seize lubricant on them. Then mock tube back up with magazines and push rivet nuts against brackets. The anti-seize will mark where to drill mounting holes on the 2x2" brackets. Remove brackets, drill holes, re-install brackets. Then bolt up tubing and measure from bottom of tubing to ground on both sides to get them even.
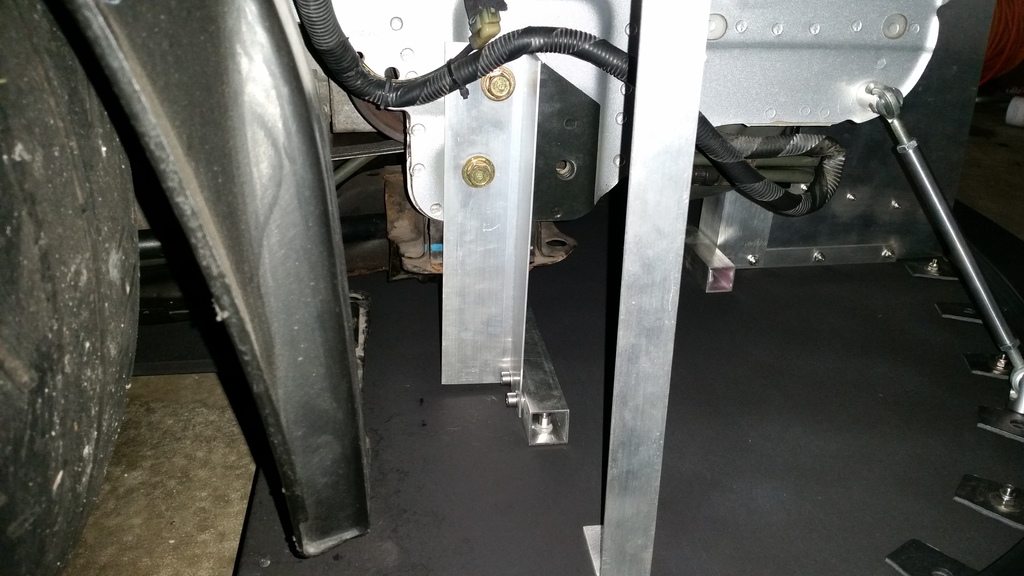
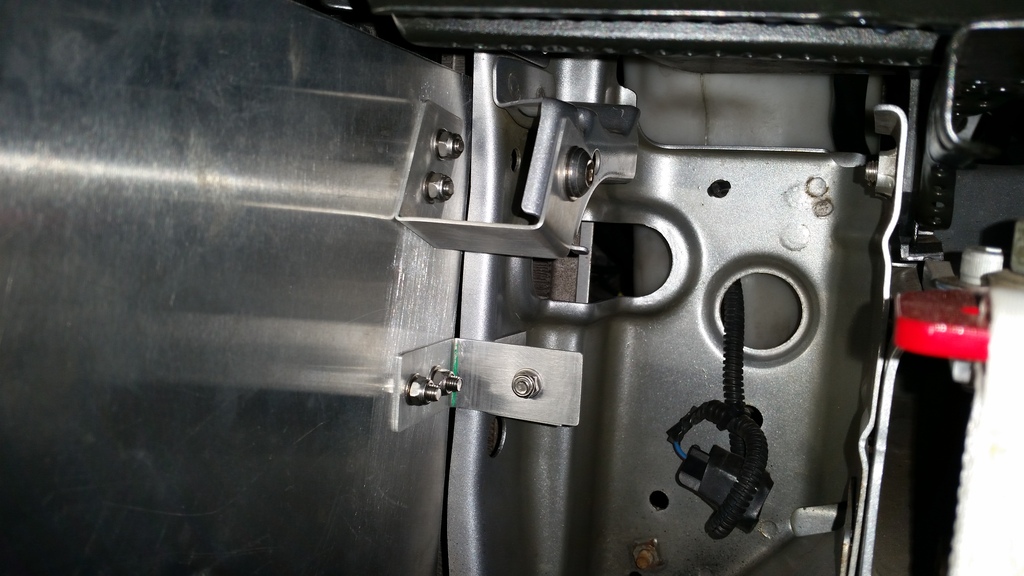
5. Figuring out where to mount front aluminum tube was little more tricky, especially without a bumper beam to use. Decided to use the frame underneath radiator. There were already some holes on front of the frame, so inserted some rivet nuts in the holes. Made 2 outer brackets out of 2" angled aluminum and 2 inner brackets out of 1.5" angled aluminum.
6. Cut another section of 1" tubing to desired length, mocked it up, then drilled holes to insert rivet nuts. Same procedure as above.
7. Added rivet nuts to bottom of both tubes. Bolted tubes on car and measured ground clearance to get them even. Spread anti-seize lubricant on the rivet nuts, then mocked up plywood. Used anti-seize markings to know where to drill holes in wood. After drilling holes, remove tubes and bolt them to plywood. That is basic structure. Using rivet nuts gives me the option to bolt the splitter up with tubes already attached or you can bolt splitter up from below also, 2 options. Made sure I designed it so 1 person can install and remove it.
1. First thing to do is look under car for locations to mount brackets that will attach to splitter frame. I like to use pre-existing bolt holes or other holes already present if available. My thinking was to attach to main frame of the car and avoid making attachments to subframe which could flex independent of cars frame.
2. Mocked up plywood with 2x4's and took measurements to know where to cut for wheel openings.
3. For attachment of rear aluminum tube, decided to use the bolt holes where the OEM tow hooks were located. Used 2x2" angled aluminum for (2)brackets. Marked where to drill holes for oem tow bolts. Used tape measure to measure from ground up to brackets to see how long to make them. On driver side, the filter was kind of in the way, so just cut part of the bracket off to clear.
4. Cut a section of 1" aluminum tubing(longer than needed for mock-up purposes). Mocked it up using magazines(as far up as I really could with only 2-3mm of subframe clearance), then measured and marked where to drill holes. Drilled holes to add 4 rivet nuts(2 per side) to tubing. After inserting rivet nuts, I spread some anti-seize lubricant on them. Then mock tube back up with magazines and push rivet nuts against brackets. The anti-seize will mark where to drill mounting holes on the 2x2" brackets. Remove brackets, drill holes, re-install brackets. Then bolt up tubing and measure from bottom of tubing to ground on both sides to get them even.
5. Figuring out where to mount front aluminum tube was little more tricky, especially without a bumper beam to use. Decided to use the frame underneath radiator. There were already some holes on front of the frame, so inserted some rivet nuts in the holes. Made 2 outer brackets out of 2" angled aluminum and 2 inner brackets out of 1.5" angled aluminum.
6. Cut another section of 1" tubing to desired length, mocked it up, then drilled holes to insert rivet nuts. Same procedure as above.
7. Added rivet nuts to bottom of both tubes. Bolted tubes on car and measured ground clearance to get them even. Spread anti-seize lubricant on the rivet nuts, then mocked up plywood. Used anti-seize markings to know where to drill holes in wood. After drilling holes, remove tubes and bolt them to plywood. That is basic structure. Using rivet nuts gives me the option to bolt the splitter up with tubes already attached or you can bolt splitter up from below also, 2 options. Made sure I designed it so 1 person can install and remove it.
Last edited by brian6speed; 07-13-2017 at 10:50 AM.
07-13-2017, 11:35 AM
#1350
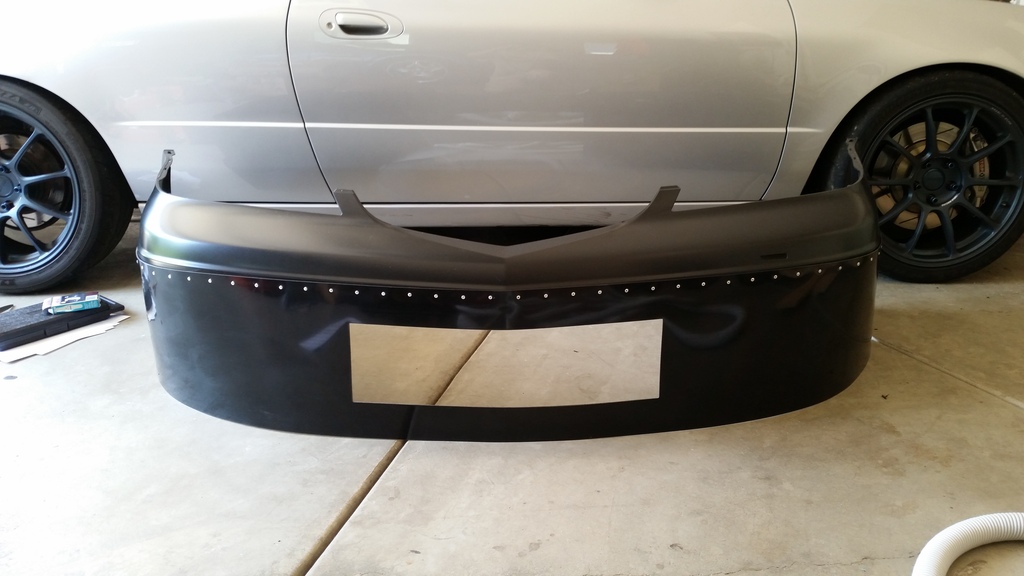
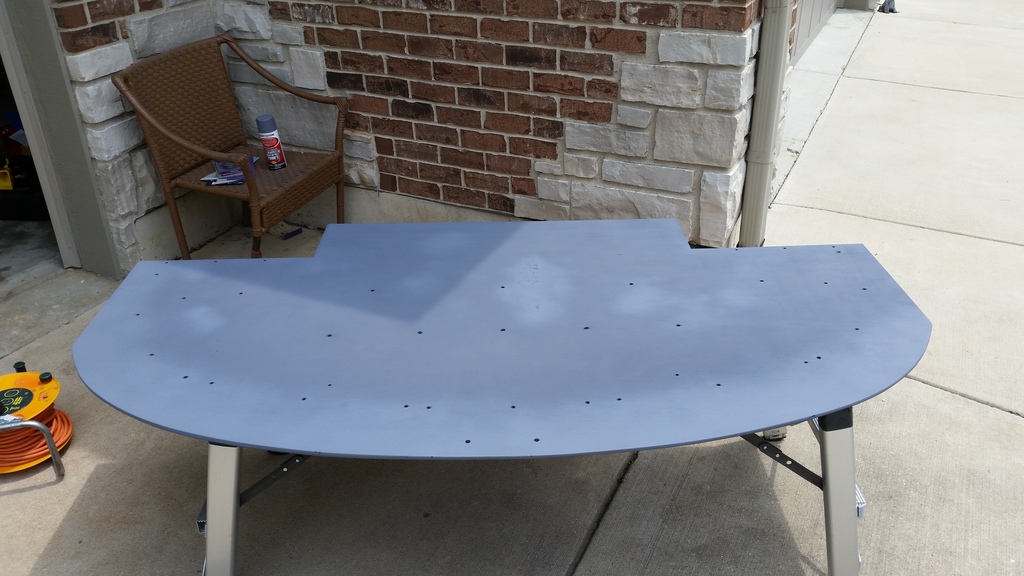
Splitter DIY Part 4 : Custom Bumper
1. First thing to do is mark where you want to cut bumper in half using painters tape.

2. Cut the bumper in half, sand edge smooth if want, then mount bumper on car.
3. With splitter in place(I used boxes under front of splitter to simulate splitter rods pulling front up), measure from the splitter up to where you want abs sheet to end on bumper. My measurement was a little under 12". Mark the abs plastic sheet with painters tape where you want to cut it. Use dremel with plastic cutting wheel at around 15k rpm. The painters tape will work as a guide for the cutting wheel. Sand the edge of plastic smooth.
4. Place abs sheet plastic on splitter and shape around bumper(tape helps hold it in place). Cut excess off sides, but don't go too far.
5. Next step is drilling holes and riveting abs sheet to bumper. Start at middle of bumper. Use a pencil and tape measure to mark where to drill. I use a small grindstone attachment on dremel to make a dimple in the plastic first. This prevents the drill bit from moving when drilling horizontally. I drill the holes using dremel. Make sure to add pressure with one hand while drilling with the other. I tend to use my other forearm to stabilize dremel. Do one hole at a time starting in middle, then rivet it in place(make sure to add pressure when riveting also). Make sure you use longer rivets. I used standard rivets, but I see other cars use rivets with bigger heads which would probably be better.
6. Measure and cut radiator opening, then sand edges smooth. Still need to add intake and brake ducts.
7. With bumper riveted on, use fender and splitter to determine the shape and location to cut the sides of abs sheet. Remove bumper, mark where to cut with tape, and cut away. It can change slightly when you bolt everything down, so better to leave little extra to remove later.
1. First thing to do is mark where you want to cut bumper in half using painters tape.
2. Cut the bumper in half, sand edge smooth if want, then mount bumper on car.
3. With splitter in place(I used boxes under front of splitter to simulate splitter rods pulling front up), measure from the splitter up to where you want abs sheet to end on bumper. My measurement was a little under 12". Mark the abs plastic sheet with painters tape where you want to cut it. Use dremel with plastic cutting wheel at around 15k rpm. The painters tape will work as a guide for the cutting wheel. Sand the edge of plastic smooth.
4. Place abs sheet plastic on splitter and shape around bumper(tape helps hold it in place). Cut excess off sides, but don't go too far.
5. Next step is drilling holes and riveting abs sheet to bumper. Start at middle of bumper. Use a pencil and tape measure to mark where to drill. I use a small grindstone attachment on dremel to make a dimple in the plastic first. This prevents the drill bit from moving when drilling horizontally. I drill the holes using dremel. Make sure to add pressure with one hand while drilling with the other. I tend to use my other forearm to stabilize dremel. Do one hole at a time starting in middle, then rivet it in place(make sure to add pressure when riveting also). Make sure you use longer rivets. I used standard rivets, but I see other cars use rivets with bigger heads which would probably be better.
6. Measure and cut radiator opening, then sand edges smooth. Still need to add intake and brake ducts.
7. With bumper riveted on, use fender and splitter to determine the shape and location to cut the sides of abs sheet. Remove bumper, mark where to cut with tape, and cut away. It can change slightly when you bolt everything down, so better to leave little extra to remove later.
Last edited by brian6speed; 07-13-2017 at 11:42 AM.
07-13-2017, 12:31 PM
#1351
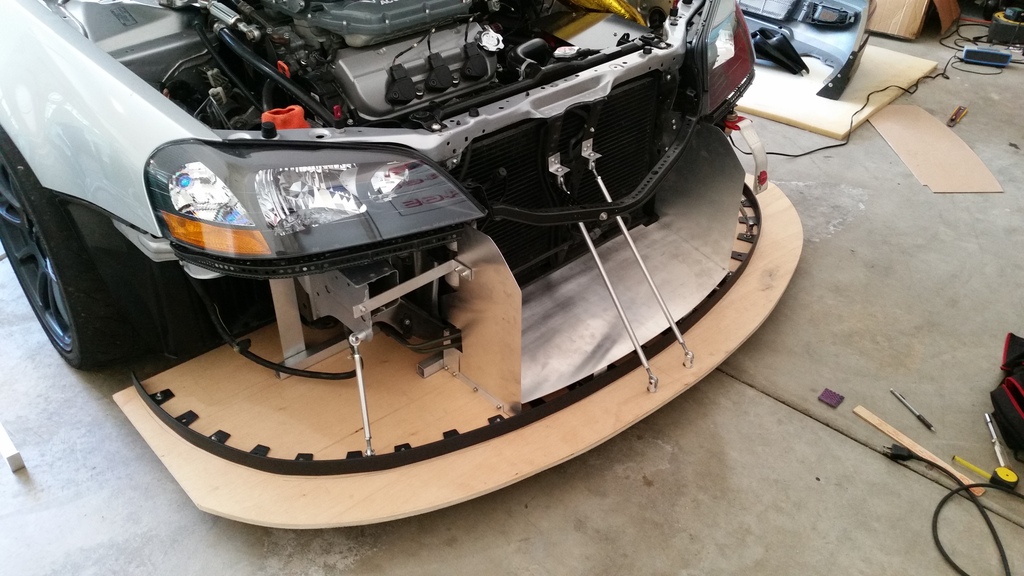
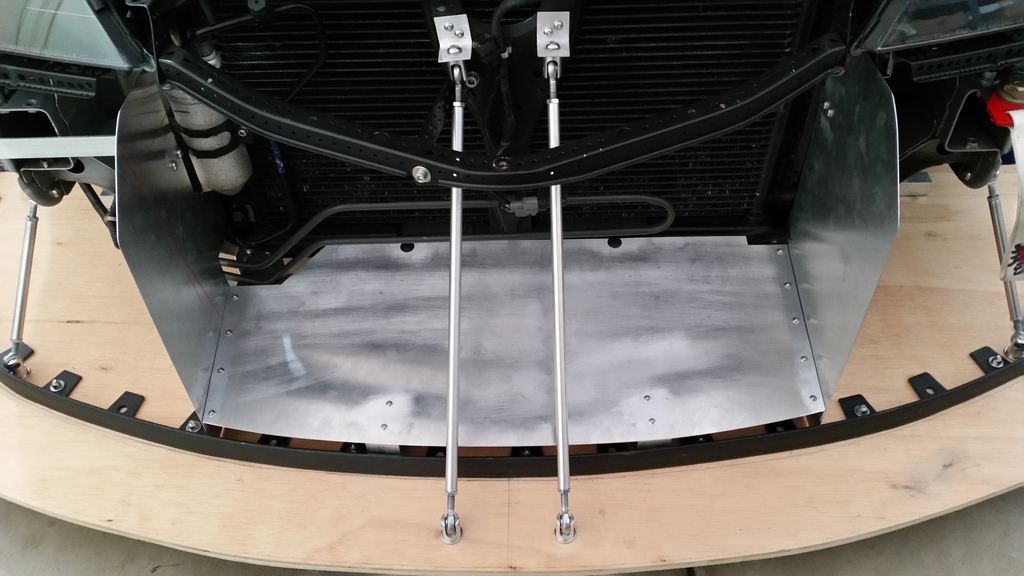
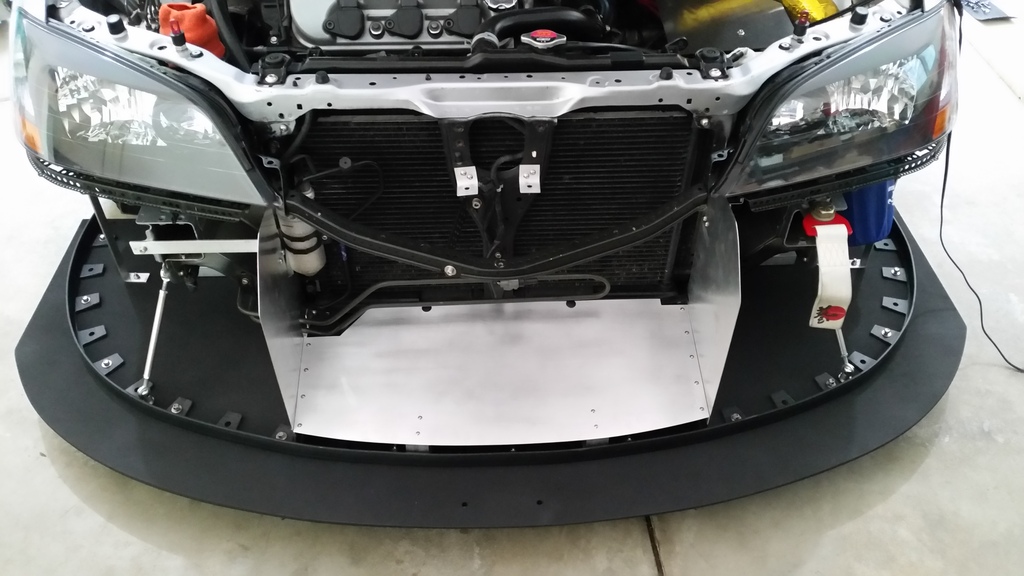
Splitter DIY Part 5 : Edge Trim, Splitter Rods, Brackets, and Radiator Ducting
1. First step is looking for locations to mount splitter rods. Found 2 holes on frame rails that would work perfect, but had to drill them slightly larger to fit the 5/16" bolt. Had a set of splitter rods used previously for diffuser build that would work perfect. Wanted to leave these 2 rods behind bumper, so needed to install edge trim first.
2. Re-installed bumper and marked splitter where the bumper contacted it. Removed the bumper and splitter, then drilled holes in splitter to mount edge trim. Mount edge trim on splitter, then mount splitter to car.
3. Marked where to drill holes for 2 side splitter rods.
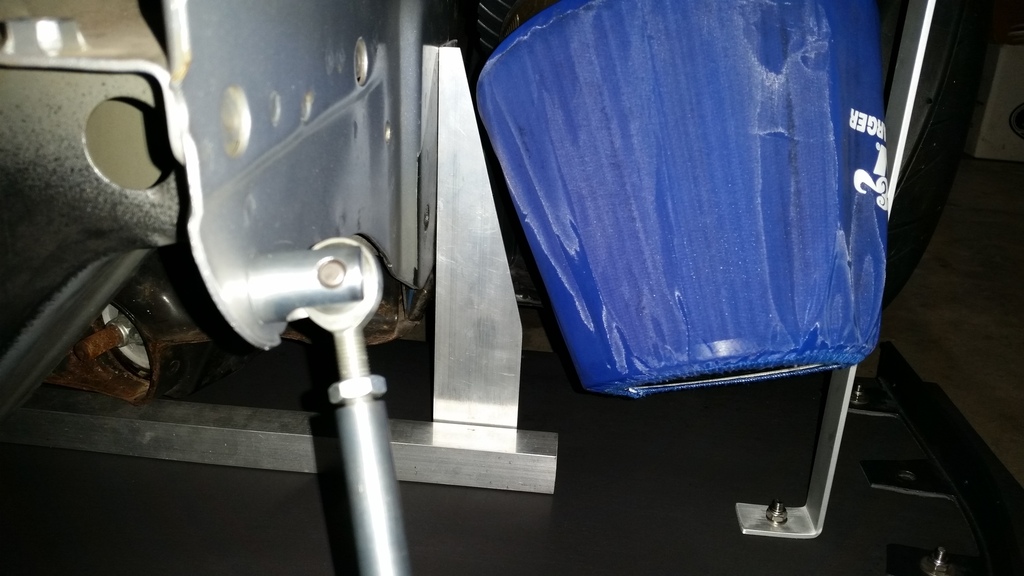
4. Decided to mount 2 inner rods to radiator support since there is no bumper beam. Measured how long the rods needed to be, then had fullytorqued make me a custom length set. Used 2 existing holes in radiator support, and drilled 2 more. Inserted rivet nuts. Cut some brackets from angled aluminum, and bolted then down. Bolted up rods and marked where to drill holes on splitter. Was able to drill holes without removing splitter.
5. For radiator ducting, first mock it up in cardboard. Then trace cardboard templates over to sheet aluminum and cut them out. Test fit and cut/sand where needed.
6. Added angled aluminum and other brackets to hold sheet metal in place.
1. First step is looking for locations to mount splitter rods. Found 2 holes on frame rails that would work perfect, but had to drill them slightly larger to fit the 5/16" bolt. Had a set of splitter rods used previously for diffuser build that would work perfect. Wanted to leave these 2 rods behind bumper, so needed to install edge trim first.
2. Re-installed bumper and marked splitter where the bumper contacted it. Removed the bumper and splitter, then drilled holes in splitter to mount edge trim. Mount edge trim on splitter, then mount splitter to car.
3. Marked where to drill holes for 2 side splitter rods.
4. Decided to mount 2 inner rods to radiator support since there is no bumper beam. Measured how long the rods needed to be, then had fullytorqued make me a custom length set. Used 2 existing holes in radiator support, and drilled 2 more. Inserted rivet nuts. Cut some brackets from angled aluminum, and bolted then down. Bolted up rods and marked where to drill holes on splitter. Was able to drill holes without removing splitter.
5. For radiator ducting, first mock it up in cardboard. Then trace cardboard templates over to sheet aluminum and cut them out. Test fit and cut/sand where needed.
6. Added angled aluminum and other brackets to hold sheet metal in place.
Last edited by brian6speed; 07-13-2017 at 12:38 PM.
07-13-2017, 12:54 PM
#1352
Splitter DIY Part 6 : Finishing Splitter
1. Remove all the splitter parts. Organize and label to make re-install easier.
2. Mark on splitter 4" out from edge trim or however long you want splitter to be. Sand splitter. I angled bottom edge of splitter by sanding to aid airflow.
3. Sprayed splitter with primer.
4. Sand Primer, wipe it down, then paint.
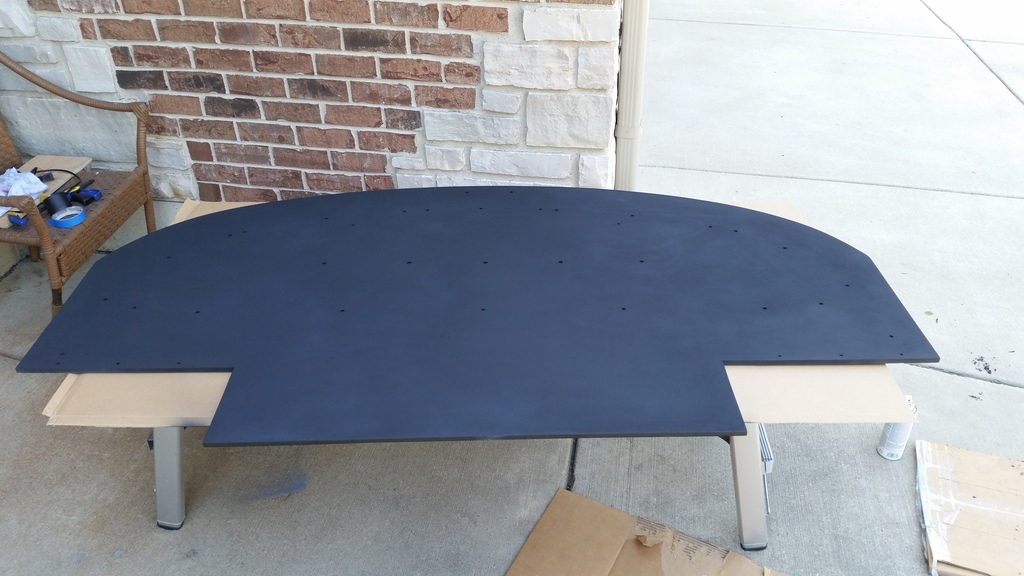
5. Remount splitter and other parts. Noticed before painting that the sides in front of tires had more flex than I wanted, so added 2 more brackets that attach underneath headlights.
6. Install bumper. Mark and drill holes near bottom edge of bumper and through edge trim. Mount bottom of the bumper using sheet metal screws.
7. Sit back and look at meanest looking CL EVA!!!!!
1. Remove all the splitter parts. Organize and label to make re-install easier.
2. Mark on splitter 4" out from edge trim or however long you want splitter to be. Sand splitter. I angled bottom edge of splitter by sanding to aid airflow.
3. Sprayed splitter with primer.
4. Sand Primer, wipe it down, then paint.
5. Remount splitter and other parts. Noticed before painting that the sides in front of tires had more flex than I wanted, so added 2 more brackets that attach underneath headlights.
6. Install bumper. Mark and drill holes near bottom edge of bumper and through edge trim. Mount bottom of the bumper using sheet metal screws.
7. Sit back and look at meanest looking CL EVA!!!!!
The following users liked this post:
Marcelechka (07-13-2017)

 07-13-2017, 07:06 PM
#1357
Glad you guys like it, it was a really fun project that went really smoothly. I should thank vill0169 for his build, it gave me some ideas.
Next projects will be rear wing, installing PCI sideskirts, and a bigger and lower rear diffuser. Hard part will be deciding what wing to use since obviously nothing is made for CL.
07-13-2017, 08:29 PM
#1359
WCMC AX 7/8/17
Had no issues driving to event with splitter. At the event, there were 2 dips in parking lot where it scraped some on front corner splitter rod bolts. Splitter didn't really scrape, just the bolts underneath acting as skid plates. Replaced 2 bolts for this weekend and raised front little bit by adjusting splitter rods. I am running on over a season old tires that are very worn down, so new tires will raise car up a bit.
Wasn't really expecting to finish that well considering I wasn't sure if splitter would help at these speeds, plus it makes car wider, longer, and little bit heavier. Then on top of that the tires are old and not much tread left.
Honestly feel like car had more front grip because of the splitter, especially in slalom sections. On 2nd to last run, was able to get my only sub 49 sec time of 48.84 which was good enough for 1st place by roughly 0.2 sec. Can't wait to see what it does with new tires.
