


New House - Need to Remove Floor to Ceiling Mirrors



Joined: Jan 2005
Posts: 92,780
Likes: 4,690
From: ShitsBurgh


Thread Starter

Joined: Aug 2006
Posts: 10,870
Likes: 2,298
From: Music City
UPDATE
In December we found out we're having another child . We knew going into purchasing our house that we might end up losing our guest bedroom if we had another child (3 bedroom house, already with 1 kid) but we loved the house and its location so much we were willing to budge on the 4 bedroom must-have.
Fast forward to a month or so ago. We started talking about possibly splitting our son's bedroom into two smaller rooms, especially after we found out we're going to having a girl, another . It seemed simple enough. His room - by 2 y/o standards - is huge at 20'x10', it has two closets one at each end and two windows, so if we put a wall up in between it would work perfect for two 10'x10' rooms. The only thing we'd be sacrificing is a small hallway closet that was in between his room and the guest bedroom.
After getting multiple quotes we choose our contractor and in less than a week the work was done. And the coolest part is our house has increased in value by $6,000 in the past month on Zillow.com . I'm not sure if it's due to me changing the specs of it from a 3BR to a 4BR or not, but hey, we'll take it. Included with the upstairs construction was them putting a door on my office so I can completely shut it off so I can work with a newborn at home.
Onto the photos (I wish I had taken before photos of the hallway closet but oh well).
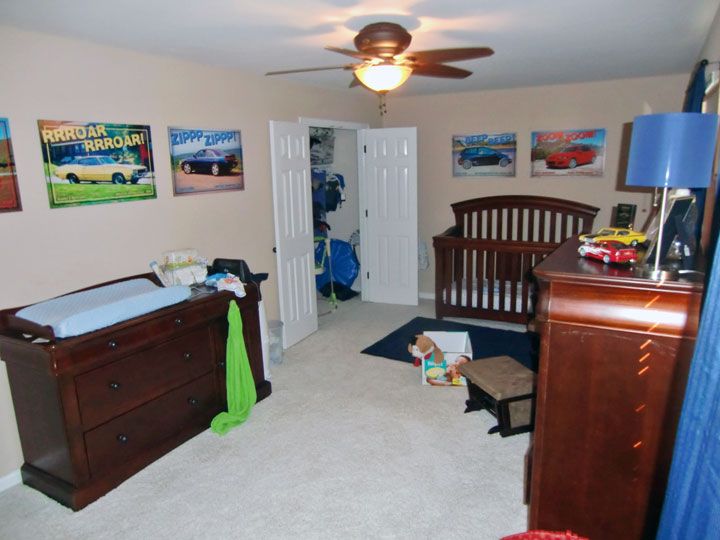
My son's room before the split looking toward the doorway
ks-bedroom-before-work-1_zps73c927d7.jpg
My son's room looking toward the closet on the other end
The sacrificed hallway closet, door frame and door out
hallway-closet-frame-and-door-out_zps48306a87.jpg
New doorway at other end created
hallway-closet-out-new-doorway-in_zps88297c3e.jpg
New doorway for my son's new smaller room
new-doorway-in_zpsf83ef8f0.jpg
Dividing wall up before sheetrock
new-dividing-wall-in_zps85a053c0.jpg
My soon-to-be new daughter's room sheetrocked
new-dividing-wall-in-with-sheetrock_zps572fafc4.jpg
Hallway completed, just needs paint
hallway-with-new-doorway-no-closet_zps6f5a815a.jpg
My son's new wall, painted this past weekend with Shelby inspired racing stripes
ks-new-room-new-wall-w-stripes_zpsba856d6f.jpg
ks-new-room-w-stripes_zps3a58f242.jpg
New door put in my office
new-door-in-office_zpsabebd783.jpg
In December we found out we're having another child
. We knew going into purchasing our house that we might end up losing our guest bedroom if we had another child (3 bedroom house, already with 1 kid) but we loved the house and its location so much we were willing to budge on the 4 bedroom must-have. Fast forward to a month or so ago. We started talking about possibly splitting our son's bedroom into two smaller rooms, especially after we found out we're going to having a girl, another
. It seemed simple enough. His room - by 2 y/o standards - is huge at 20'x10', it has two closets one at each end and two windows, so if we put a wall up in between it would work perfect for two 10'x10' rooms. The only thing we'd be sacrificing is a small hallway closet that was in between his room and the guest bedroom. After getting multiple quotes we choose our contractor and in less than a week the work was done. And the coolest part is our house has increased in value by $6,000 in the past month on Zillow.com
. I'm not sure if it's due to me changing the specs of it from a 3BR to a 4BR or not, but hey, we'll take it. Included with the upstairs construction was them putting a door on my office so I can completely shut it off so I can work with a newborn at home. Onto the photos (I wish I had taken before photos of the hallway closet but oh well).
My son's room before the split looking toward the doorway
ks-bedroom-before-work-1_zps73c927d7.jpg
My son's room looking toward the closet on the other end

The sacrificed hallway closet, door frame and door out
hallway-closet-frame-and-door-out_zps48306a87.jpg
New doorway at other end created
hallway-closet-out-new-doorway-in_zps88297c3e.jpg
New doorway for my son's new smaller room
new-doorway-in_zpsf83ef8f0.jpg
Dividing wall up before sheetrock
new-dividing-wall-in_zps85a053c0.jpg
My soon-to-be new daughter's room sheetrocked
new-dividing-wall-in-with-sheetrock_zps572fafc4.jpg
Hallway completed, just needs paint
hallway-with-new-doorway-no-closet_zps6f5a815a.jpg
My son's new wall, painted this past weekend with Shelby inspired racing stripes
ks-new-room-new-wall-w-stripes_zpsba856d6f.jpg
ks-new-room-w-stripes_zps3a58f242.jpg
New door put in my office
new-door-in-office_zpsabebd783.jpg




Thread Starter
Joined: Aug 2006
Posts: 10,870
Likes: 2,298
From: Music City
Thanks man! I don't know how you did it with two  right off the bat!
Nice spot! I've had that print since high school. I've always been intrigued with his art.
Thank you!
Hey those racing stripes were a major PITA to paint lol. And thanks!
right off the bat!Nice spot! I've had that print since high school. I've always been intrigued with his art.
Thank you!
Hey those racing stripes were a major PITA to paint lol. And thanks!
Last edited by SuperTrooper169; Apr 26, 2013 at 11:47 AM.


Thread Starter
Joined: Aug 2006
Posts: 10,870
Likes: 2,298
From: Music City



Thread Starter
Joined: Aug 2006
Posts: 10,870
Likes: 2,298
From: Music City
Thread Starter
Joined: Aug 2006
Posts: 10,870
Likes: 2,298
From: Music City
Just a little update to our guest bathroom. It had the 90's style smoked glass sliding doors with gold trim, tracks and hardware. My wife asked me if it's possible to take the doors off and put up a shower curtain, so this was my morning project.
I was happy to see the tub under the rails wasn't too discolored, so with a little elbow grease I got the old silicone calk and rust/water spots off and it's barely noticeable tracks where there. I just need to fill the screw holes in with some white silicone calk and it'll be all set until we update the gold faucet and knob surround.
I wish I had better before photos, but this is a snapshot from a video I took when first looking at the house. You get the idea.
gold-smoke-glass-doors-guest-bathroom_zps4b0f466b.jpg
Doors and rails off waiting to be taken to the dump
gold-smoke-glass-doors-guest-bathroom-off_zpsc96dfc02.jpg
Nice clean bathtub
shower-curtain-guest-bathroom-1_zps4775b9f4.jpg
A fresh new look to our guest bathroom
shower-curtain-guest-bathroom-2_zpse31981d3.jpg
I was happy to see the tub under the rails wasn't too discolored, so with a little elbow grease I got the old silicone calk and rust/water spots off and it's barely noticeable tracks where there. I just need to fill the screw holes in with some white silicone calk and it'll be all set until we update the gold faucet and knob surround.
I wish I had better before photos, but this is a snapshot from a video I took when first looking at the house. You get the idea.
gold-smoke-glass-doors-guest-bathroom_zps4b0f466b.jpg
Doors and rails off waiting to be taken to the dump
gold-smoke-glass-doors-guest-bathroom-off_zpsc96dfc02.jpg
Nice clean bathtub
shower-curtain-guest-bathroom-1_zps4775b9f4.jpg
A fresh new look to our guest bathroom
shower-curtain-guest-bathroom-2_zpse31981d3.jpg

Thread Starter
Joined: Aug 2006
Posts: 10,870
Likes: 2,298
From: Music City
Thanks man. A little tip. I used an automotive trim removal tool to pry the tracks up after scoring the silicone calk with a razor. Also used Goo Off for getting the remaining calk off. Good luck!

David_Dude
Joined: May 2011
Posts: 13,283
Likes: 581
From: Florida
 I was like wth... I missed this thread?! Trooper, congrats on child #2! I like the updates that were done to the home also.
Thread Starter
Joined: Aug 2006
Posts: 10,870
Likes: 2,298
From: Music City
Thank you, sir! Maybe I should update the thread I started when my son came along.

Moderator


Joined: Aug 2006
Posts: 15,549
Likes: 6,209
From: Phoenix, AZ


Thread Starter
Joined: Aug 2006
Posts: 10,870
Likes: 2,298
From: Music City
Thanks! My wife got the Rav4 in January due to knowing we were going to need the extra room, but I'll be keeping the MS6 for now. We'll see how it goes once she comes along and if its too tight with two car seats in the back. I might have to start looking for something bigger once that time comes.
Thread Starter
Joined: Aug 2006
Posts: 10,870
Likes: 2,298
From: Music City
A shot of the finished hallway. It's really hard to tell it was any different now that it's painted and photos are hanging
.
hallway-finished_zps87177aeb.jpg
My son's room finally finished with all the wall decorations up.
ks-room-finished-1_zps727e2e0c.jpg
ks-room-finished-2_zpsca9886ba.jpg
.
hallway-finished_zps87177aeb.jpg
My son's room finally finished with all the wall decorations up.
ks-room-finished-1_zps727e2e0c.jpg
ks-room-finished-2_zpsca9886ba.jpg
Thread Starter
Joined: Aug 2006
Posts: 10,870
Likes: 2,298
From: Music City
UPDATE 02/26/2014
I decided to tackle putting up a backsplash in our kitchen. We've never really loved our kitchen to start off with, so we figured any little thing to add something interesting to it would be worthwhile. I've never done any tile work before so this was completely new to me. After watching a few DIY videos on YouTube I figured out it wouldn't be too difficult, just time consuming. Here's some before and after photos. The results look a lot more impactful in person than in the photos but you get the idea. Next I want to figure out something to do with the scroll design in that accent piece above the sink/window. Hate it.
I just realized I never updated this thread with photos of my daughter's room after I painted it and the former pool table room aka formal living room, so I'll add those later today, too.
BEFORE
kitchen-backsplash-before-1-sm_zpsd54ae932.jpg
AFTER
kitchen-backsplash-after-1-sm_zpsd2afa932.jpg
BEFORE
kitchen-backsplash-before-2-sm_zpsa6fe037a.jpg
AFTER
kitchen-backsplash-after-2-sm_zps895e99c3.jpg
DURING
kitchen-backsplash-during-1-sm_zpsc5f988fd.jpg
AFTER
kitchen-backsplash-after-3-sm_zps7673069f.jpg
I decided to tackle putting up a backsplash in our kitchen. We've never really loved our kitchen to start off with, so we figured any little thing to add something interesting to it would be worthwhile. I've never done any tile work before so this was completely new to me. After watching a few DIY videos on YouTube I figured out it wouldn't be too difficult, just time consuming. Here's some before and after photos. The results look a lot more impactful in person than in the photos but you get the idea. Next I want to figure out something to do with the scroll design in that accent piece above the sink/window. Hate it.
I just realized I never updated this thread with photos of my daughter's room after I painted it and the former pool table room aka formal living room, so I'll add those later today, too.
BEFORE
kitchen-backsplash-before-1-sm_zpsd54ae932.jpg
AFTER
kitchen-backsplash-after-1-sm_zpsd2afa932.jpg
BEFORE
kitchen-backsplash-before-2-sm_zpsa6fe037a.jpg
AFTER
kitchen-backsplash-after-2-sm_zps895e99c3.jpg
DURING
kitchen-backsplash-during-1-sm_zpsc5f988fd.jpg
AFTER
kitchen-backsplash-after-3-sm_zps7673069f.jpg
Last edited by SuperTrooper169; Feb 26, 2014 at 12:23 PM.

Thread Starter
Joined: Aug 2006
Posts: 10,870
Likes: 2,298
From: Music City
Thank you both!
Here's my daughter's room finished up from the bedroom split in April of '13. I've gotten really good at painting stripes lol.
ns-room-1-sm_zpse675a091.jpg
ns-room-2-sm_zpse3bb81b8.jpg
And here's what was formerly the junk collecting room, then my pool table room and now currently the kids play room, so in other words their junk collecting room now haha.
play-room-1-sm_zpsd9b6b743.jpg
Here's my daughter's room finished up from the bedroom split in April of '13. I've gotten really good at painting stripes lol.
ns-room-1-sm_zpse675a091.jpg
ns-room-2-sm_zpse3bb81b8.jpg
And here's what was formerly the junk collecting room, then my pool table room and now currently the kids play room, so in other words their junk collecting room now haha.
play-room-1-sm_zpsd9b6b743.jpg

Needs more Lemon Pledge
Joined: Mar 2005
Posts: 52,768
Likes: 2,000
From: Phoenix, AZ
Damn, looks awesome all around!
Digging the backsplash. How tough is it to cut the sheets of tiles to fit around the outlets, etc? Do you end up having to cut a few of the tiny tiles on the sheet to make the opening?
<--- tiling noob
Digging the backsplash. How tough is it to cut the sheets of tiles to fit around the outlets, etc? Do you end up having to cut a few of the tiny tiles on the sheet to make the opening?
<--- tiling noob
Thread Starter
Joined: Aug 2006
Posts: 10,870
Likes: 2,298
From: Music City
So basically I'd hold the 12"x12" sheet up, determine which tiles to cut off the backing then trim them off and put the sheet up filling in the missing tiles with cut pieces. I also made life a lot easier by using a product called "Simple Mat" and "Simple Grout" from Home Depot. Simple Mat replaces the traditional tile morter and Simple Grout is already mixed grout, so it made the process a little less intimidating for a 1st timer.
I found out about those two products and got most of my DIY tips from this specific video on YouTube...
Thread Starter
Joined: Aug 2006
Posts: 10,870
Likes: 2,298
From: Music City
Yes kids do, but I knew the pool table wouldn't last forever. I love to play pool but I found having a table in my own house didn't equate to wanting to play pool all the time. Luckily I ended getting exactly what I paid for it back, minus the moving/set up cost of course.

Oderint dum metuant.
Joined: Mar 2005
Posts: 12,496
Likes: 534
From: Lake Wylie
Backsplash looks great! The other rooms came out nicely, as well...although I'm not too sure about losing the pool table. My old neighbor lost his (which was also in their formal living room) for similar reasons LOL. He offered it to me, but I was moving, so I passed. In the end, they're really only useful when people come over.
Thread Starter
Joined: Aug 2006
Posts: 10,870
Likes: 2,298
From: Music City
Backsplash looks great! The other rooms came out nicely, as well...although I'm not too sure about losing the pool table. My old neighbor lost his (which was also in their formal living room) for similar reasons LOL. He offered it to me, but I was moving, so I passed. In the end, they're really only useful when people come over.


