Instruction to replace license plate lights and courtesy step light to LED
#1
Instruction to replace license plate lights and courtesy step light to LED
I never modified anything before on my car by myself so I searched AZ hoping to find some guides. There were couple threads about it but I didn't find any step by step guide so I decided to make one.
as it turned out the mod was pretty easy and I didn't encounter any electrical issues. Hopefully this will help anyone else looking to mod their lights to LED
COURTESY STEP LIGHT:
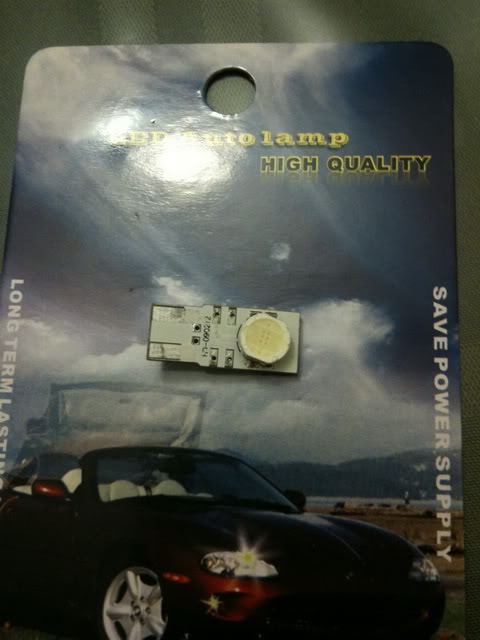
STEP 1: This is the light I bought off eBay. This particular one I bought off vendor "superb_lights" came in 2 in a pack. Just do a search in eBay motor for "flank LED" it should come up. The actual LED is small, about 24cm in length and 10cm width.
STEP 2:
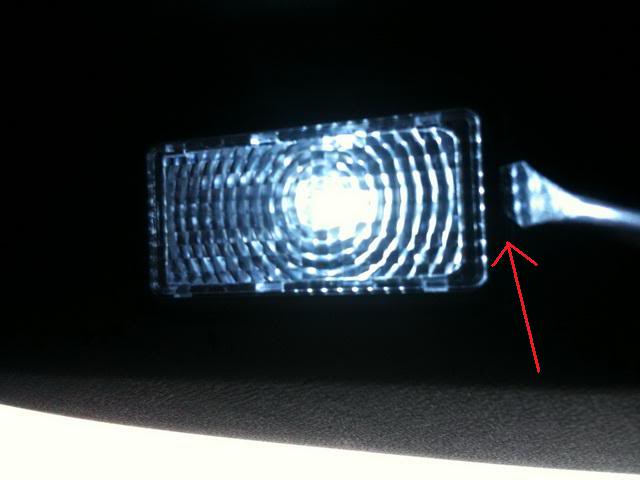
Sorry about the crappy cell phone photo. Anyway, under the front doors, you'll see the light housing. Take a flat head screw driver and pry open the gap between the housing on the ends (RED ARROW) and it should pop out relatively easy. Note: I took this shot after I put the LED in already.
STEP 3:
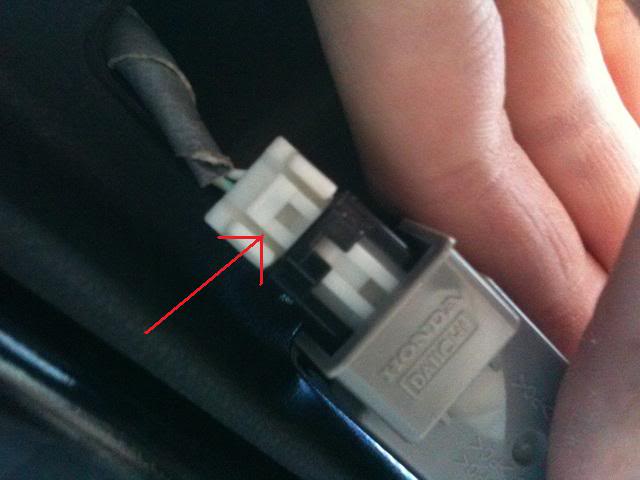
Once you take the housing out, just press on the small white clip (RED ARROW) and the connector to the wire should slide right out. Think ether net cable.
STEP 4:
After you disconnect the light housing from the wire, just pull up from the gray part (RED ARROW) of the housing away from the black part. Its pretty easy to separate it.

STEP 5:
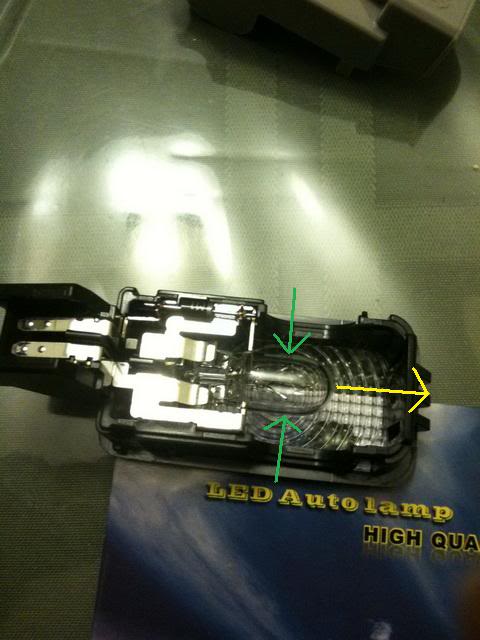
Remove the bulb by holding it with your fingers (GREEN ARROW) and pulling it away from the base (WHITE ARROW). Nudging it slowing and it should pull right out.
STEP 6:
I forgot to take a pic after I put in the LED. What happens here is my particular LED was just a little to wide to fit in between the 2 metal "ring" holding the old bulb. So what I did was I use the screw driver to open one side of the metal plate outward to the (RED LINE). This allowed the opening to be wider so I can fit in the LED.
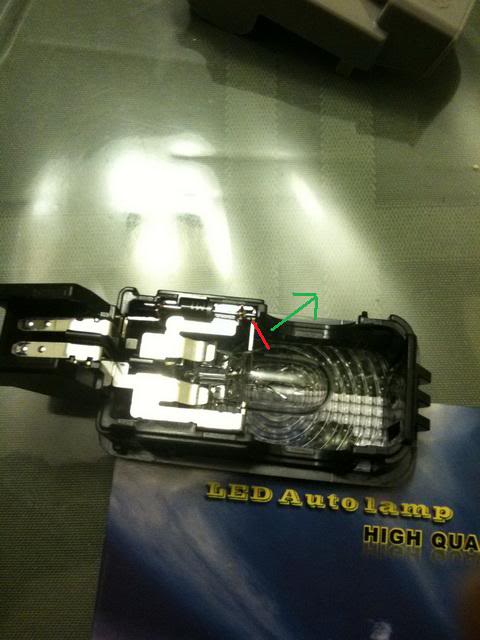
STEP 7:
Reverse the instructions above and voila, your step light is now emitting a cool white light that should be brighter than before. It was day time when I took the pics. I'll try to take one next time when it is dark outside.
LICENSE PLATE LIGHT:
These are the ones I got off eBay. Just do a search for license plate LED from eBay motor. Bunch should come up.
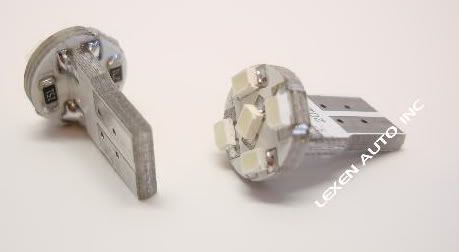
STEP 1:
This one is easy. There is a small opening (RED ARROW) on one end of the clear plastic. Insert the flat head screw driver and it it pop right out.
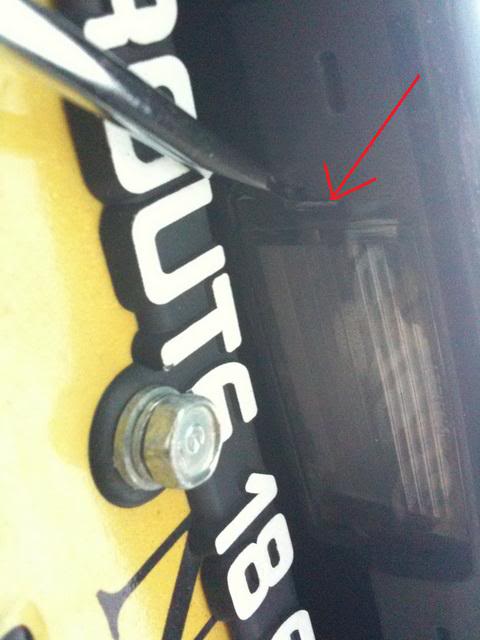
STEP 2:
Once the clear plastic lens is removed, you should see the bulb and pull it down away from the housing. It should slide right out like it did from the courtesy step light. In this pic, I put in the LED already
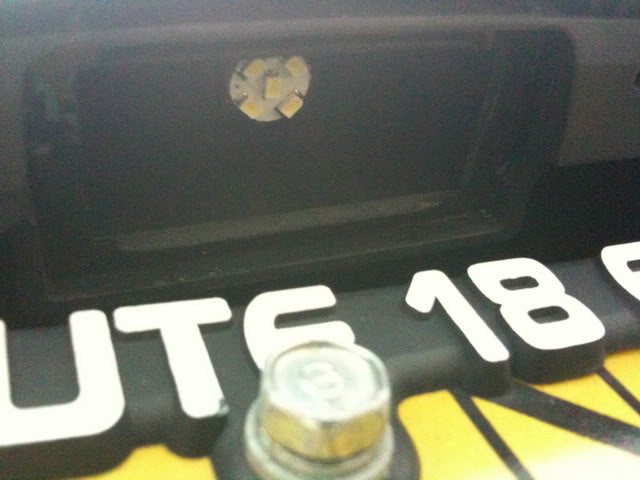
STEP 3:
Slide the LED bulb in and test to see if it lights up. If it doesn't then pull the LED out again and flip it around and slide back in. Once it lights up then replace the clear plastic and you're all set. ENJOY!
Next light I will change is the trunk light. There are couple options for this light and I have not decided which one to go with yet. Will post guide after I decide
as it turned out the mod was pretty easy and I didn't encounter any electrical issues. Hopefully this will help anyone else looking to mod their lights to LED

COURTESY STEP LIGHT:
STEP 1: This is the light I bought off eBay. This particular one I bought off vendor "superb_lights" came in 2 in a pack. Just do a search in eBay motor for "flank LED" it should come up. The actual LED is small, about 24cm in length and 10cm width.

STEP 2:
Sorry about the crappy cell phone photo. Anyway, under the front doors, you'll see the light housing. Take a flat head screw driver and pry open the gap between the housing on the ends (RED ARROW) and it should pop out relatively easy. Note: I took this shot after I put the LED in already.

STEP 3:
Once you take the housing out, just press on the small white clip (RED ARROW) and the connector to the wire should slide right out. Think ether net cable.

STEP 4:
After you disconnect the light housing from the wire, just pull up from the gray part (RED ARROW) of the housing away from the black part. Its pretty easy to separate it.

STEP 5:
Remove the bulb by holding it with your fingers (GREEN ARROW) and pulling it away from the base (WHITE ARROW). Nudging it slowing and it should pull right out.

STEP 6:
I forgot to take a pic after I put in the LED. What happens here is my particular LED was just a little to wide to fit in between the 2 metal "ring" holding the old bulb. So what I did was I use the screw driver to open one side of the metal plate outward to the (RED LINE). This allowed the opening to be wider so I can fit in the LED.

STEP 7:
Reverse the instructions above and voila, your step light is now emitting a cool white light that should be brighter than before. It was day time when I took the pics. I'll try to take one next time when it is dark outside.
LICENSE PLATE LIGHT:
These are the ones I got off eBay. Just do a search for license plate LED from eBay motor. Bunch should come up.

STEP 1:
This one is easy. There is a small opening (RED ARROW) on one end of the clear plastic. Insert the flat head screw driver and it it pop right out.

STEP 2:
Once the clear plastic lens is removed, you should see the bulb and pull it down away from the housing. It should slide right out like it did from the courtesy step light. In this pic, I put in the LED already

STEP 3:
Slide the LED bulb in and test to see if it lights up. If it doesn't then pull the LED out again and flip it around and slide back in. Once it lights up then replace the clear plastic and you're all set. ENJOY!
Next light I will change is the trunk light. There are couple options for this light and I have not decided which one to go with yet. Will post guide after I decide

The following 4 users liked this post by dtc5:
#2
Thanks for posting. I'm looking forward to your trunk light replacement. My 11 TL and the 2006 Solara Convertible I just traded in, might as well not have trunk lights. They are/were so dim. A question regarding the door lamp upgrade, did you a notice considerable difference in light output with the change?
#6
LED Upgrades on 2009 SH-AWD TL: License Plate, Vanity lights and Front Door Courtesy (puddle) lights were just done.
I started on the rear at the license plate. Straight forward as noted above....small screwdriver inserted in the notch to the left side of the cover and pry the over straight down. Pull the old bulbs straight down. Put the new LED bulbs straight up/in. I used the V-Leds 194_HP_W_5K (package comes with 2 LED bulbs so only order one) and here are the before and after photos:


Vanity Light next.....that was also easy as noted above. Small screw driver in the bottom of the clear cover to pop off the cover. Remove the old bulb and insert the new one with the LED's facing out. I used V-Leds VANITY_W_5k bulbs (you need to order 4 since there's one bulb per package). Put the covers back on by inserting the top first and snap in the bottom. Here are before and after shots:


On to the trunk light and that was straight forward using the V-Leds 3175_4HP_W_5K straight forward just point the LED Bulb down and snap the cover back on.
Finally, the Courtesy lights in the belly of the front doors (aka puddle lights). This one is straight forward if you use a small screw driver and pry the front of the fixture out of the door completely and then push the wiring connector to free the housing up from the harness. This should prevent problems with the Multiplex problems some have had. Small screw driver in the side of the clear lense pops that off. Old bulb pushed out from behind with the screw driver worked for me. Getting the V-Leds 194_4_HPF_W_5K Flank bulbs (order 1 pkg. since it comes with 2 bulbs) in was the hardest part. You need to "widen" the front metal parts by bending the metal to the side body of the fixture to get the width of the LED bulbs body. Slide the bulb into the socket and I snugged the metal on the sides against the LED bulb. Plastic cover back on then plug the connector in and the plug end of the connector goes in facing the back of the door and the back goes in 1st and then the front snaps in flush with the bottom of the door. Here are before and after shots:


Note: On the courtesy light, I did the driver's side door without removing the fixture from the door and the circuit was hot and I had no problem. When I did my passenger door, I had issues getting bulb in and I screwed up power feed to that fixture. Switch works and I don't see and fuse issues so I may have fried my Multiplex....that's why I say now that I've done the job, take the fixture out of the door and unplug it BEFORE making the bulb swap.
I started on the rear at the license plate. Straight forward as noted above....small screwdriver inserted in the notch to the left side of the cover and pry the over straight down. Pull the old bulbs straight down. Put the new LED bulbs straight up/in. I used the V-Leds 194_HP_W_5K (package comes with 2 LED bulbs so only order one) and here are the before and after photos:


Vanity Light next.....that was also easy as noted above. Small screw driver in the bottom of the clear cover to pop off the cover. Remove the old bulb and insert the new one with the LED's facing out. I used V-Leds VANITY_W_5k bulbs (you need to order 4 since there's one bulb per package). Put the covers back on by inserting the top first and snap in the bottom. Here are before and after shots:


On to the trunk light and that was straight forward using the V-Leds 3175_4HP_W_5K straight forward just point the LED Bulb down and snap the cover back on.
Finally, the Courtesy lights in the belly of the front doors (aka puddle lights). This one is straight forward if you use a small screw driver and pry the front of the fixture out of the door completely and then push the wiring connector to free the housing up from the harness. This should prevent problems with the Multiplex problems some have had. Small screw driver in the side of the clear lense pops that off. Old bulb pushed out from behind with the screw driver worked for me. Getting the V-Leds 194_4_HPF_W_5K Flank bulbs (order 1 pkg. since it comes with 2 bulbs) in was the hardest part. You need to "widen" the front metal parts by bending the metal to the side body of the fixture to get the width of the LED bulbs body. Slide the bulb into the socket and I snugged the metal on the sides against the LED bulb. Plastic cover back on then plug the connector in and the plug end of the connector goes in facing the back of the door and the back goes in 1st and then the front snaps in flush with the bottom of the door. Here are before and after shots:


Note: On the courtesy light, I did the driver's side door without removing the fixture from the door and the circuit was hot and I had no problem. When I did my passenger door, I had issues getting bulb in and I screwed up power feed to that fixture. Switch works and I don't see and fuse issues so I may have fried my Multiplex....that's why I say now that I've done the job, take the fixture out of the door and unplug it BEFORE making the bulb swap.
The following 2 users liked this post by ghanner:
AAPL3TLS (12-14-2011),
Pseudomaniac (02-10-2012)
#7
Forgot to note (I can't figure out how to edit my own post) that during the trunk LED change, I learned that the LED bulb was polarity sensitive meaning if it doesn't work when you go to push it in, simply flip it 180 degrees and it should work  , mine did.
 , mine did.
Trending Topics
#12
Hi everyone. I've been reading the threads regarding replacing the 2 license plate bulbs with LEDs - I purchased 2 from eBay that said they would fit a 2012 Acura TL but guess what! They did NOT. Can someone please give me the exact size bulbs I need so I can put LEDs back there? I've gone to various websites and they list different sizes for this application. HELP! Thanks all!
#13
Note: On the courtesy light, I did the driver's side door without removing the fixture from the door and the circuit was hot and I had no problem. When I did my passenger door, I had issues getting bulb in and I screwed up power feed to that fixture. Switch works and I don't see and fuse issues so I may have fried my Multiplex....that's why I say now that I've done the job, take the fixture out of the door and unplug it BEFORE making the bulb swap.
#14
How many receivers do the bulbs have?
I'm looking on Amazon for the bulbs for my doors, plate and trunk and I don't know exactly which ones to buy. Some have one receivers others two, the large number of variations confuses me lol. Thanks in advance.
#15
Use the following to get the bulb part numbers you need:
Lamp Replacement Guide Home
Then use VLEDs, iJDMToy, or another vendor and buy the appropriate direct replacement bulb.
This was my thread in the Audio, Bluetooth, Electronics & Navigation section where I linked to several of the bulbs I purchased and even posted a comparison picture of 6000K vs 5000K white.
https://acurazine.com/forums/audio-b...t-leds-924469/
#16
I tried to put in LED's in the door (puddle lights) the pass. door went fine the Drivers door another story...Now I have no power going to the fixture and the reg. bulb dosent work at all and NO fuses are out...can someone HELP please 

The following users liked this post:
fryrice (07-05-2015)
#20
So I want to buy courtesy lights for our cars. Do you guys think I should get the right angle bulbs like this?
6K WHITE 4 LED HIGH POWER FLANK BULBS 194 168 158 160LM | 1 EACH - 194 - Interior - Shop Bulb Type
Or regular ones?
6K WHITE 4 LED HIGH POWER BULBS 194 168 158 160LM | 1 EACH - 194 - Interior - Shop Bulb Type
6K WHITE 4 LED HIGH POWER FLANK BULBS 194 168 158 160LM | 1 EACH - 194 - Interior - Shop Bulb Type
Or regular ones?
6K WHITE 4 LED HIGH POWER BULBS 194 168 158 160LM | 1 EACH - 194 - Interior - Shop Bulb Type
#21
I never modified anything before on my car by myself so I searched AZ hoping to find some guides. There were couple threads about it but I didn't find any step by step guide so I decided to make one.
as it turned out the mod was pretty easy and I didn't encounter any electrical issues. Hopefully this will help anyone else looking to mod their lights to LED
COURTESY STEP LIGHT:
STEP 1: This is the light I bought off eBay. This particular one I bought off vendor "superb_lights" came in 2 in a pack. Just do a search in eBay motor for "flank LED" it should come up. The actual LED is small, about 24cm in length and 10cm width.
Attachment 53173
STEP 2:
Sorry about the crappy cell phone photo. Anyway, under the front doors, you'll see the light housing. Take a flat head screw driver and pry open the gap between the housing on the ends (RED ARROW) and it should pop out relatively easy. Note: I took this shot after I put the LED in already.
Attachment 53174
STEP 3:
Once you take the housing out, just press on the small white clip (RED ARROW) and the connector to the wire should slide right out. Think ether net cable.
Attachment 53175
STEP 4:
After you disconnect the light housing from the wire, just pull up from the gray part (RED ARROW) of the housing away from the black part. Its pretty easy to separate it.

STEP 5:
Remove the bulb by holding it with your fingers (GREEN ARROW) and pulling it away from the base (WHITE ARROW). Nudging it slowing and it should pull right out.
Attachment 53176
STEP 6:
I forgot to take a pic after I put in the LED. What happens here is my particular LED was just a little to wide to fit in between the 2 metal "ring" holding the old bulb. So what I did was I use the screw driver to open one side of the metal plate outward to the (RED LINE). This allowed the opening to be wider so I can fit in the LED.
Attachment 53177
STEP 7:
Reverse the instructions above and voila, your step light is now emitting a cool white light that should be brighter than before. It was day time when I took the pics. I'll try to take one next time when it is dark outside.
LICENSE PLATE LIGHT:
These are the ones I got off eBay. Just do a search for license plate LED from eBay motor. Bunch should come up.

STEP 1:
This one is easy. There is a small opening (RED ARROW) on one end of the clear plastic. Insert the flat head screw driver and it it pop right out.
Attachment 53178
STEP 2:
Once the clear plastic lens is removed, you should see the bulb and pull it down away from the housing. It should slide right out like it did from the courtesy step light. In this pic, I put in the LED already
Attachment 53179
STEP 3:
Slide the LED bulb in and test to see if it lights up. If it doesn't then pull the LED out again and flip it around and slide back in. Once it lights up then replace the clear plastic and you're all set. ENJOY!
Next light I will change is the trunk light. There are couple options for this light and I have not decided which one to go with yet. Will post guide after I decide
as it turned out the mod was pretty easy and I didn't encounter any electrical issues. Hopefully this will help anyone else looking to mod their lights to LED

COURTESY STEP LIGHT:
STEP 1: This is the light I bought off eBay. This particular one I bought off vendor "superb_lights" came in 2 in a pack. Just do a search in eBay motor for "flank LED" it should come up. The actual LED is small, about 24cm in length and 10cm width.
Attachment 53173
STEP 2:
Sorry about the crappy cell phone photo. Anyway, under the front doors, you'll see the light housing. Take a flat head screw driver and pry open the gap between the housing on the ends (RED ARROW) and it should pop out relatively easy. Note: I took this shot after I put the LED in already.
Attachment 53174
STEP 3:
Once you take the housing out, just press on the small white clip (RED ARROW) and the connector to the wire should slide right out. Think ether net cable.
Attachment 53175
STEP 4:
After you disconnect the light housing from the wire, just pull up from the gray part (RED ARROW) of the housing away from the black part. Its pretty easy to separate it.

STEP 5:
Remove the bulb by holding it with your fingers (GREEN ARROW) and pulling it away from the base (WHITE ARROW). Nudging it slowing and it should pull right out.
Attachment 53176
STEP 6:
I forgot to take a pic after I put in the LED. What happens here is my particular LED was just a little to wide to fit in between the 2 metal "ring" holding the old bulb. So what I did was I use the screw driver to open one side of the metal plate outward to the (RED LINE). This allowed the opening to be wider so I can fit in the LED.
Attachment 53177
STEP 7:
Reverse the instructions above and voila, your step light is now emitting a cool white light that should be brighter than before. It was day time when I took the pics. I'll try to take one next time when it is dark outside.
LICENSE PLATE LIGHT:
These are the ones I got off eBay. Just do a search for license plate LED from eBay motor. Bunch should come up.

STEP 1:
This one is easy. There is a small opening (RED ARROW) on one end of the clear plastic. Insert the flat head screw driver and it it pop right out.
Attachment 53178
STEP 2:
Once the clear plastic lens is removed, you should see the bulb and pull it down away from the housing. It should slide right out like it did from the courtesy step light. In this pic, I put in the LED already
Attachment 53179
STEP 3:
Slide the LED bulb in and test to see if it lights up. If it doesn't then pull the LED out again and flip it around and slide back in. Once it lights up then replace the clear plastic and you're all set. ENJOY!
Next light I will change is the trunk light. There are couple options for this light and I have not decided which one to go with yet. Will post guide after I decide

Thread
Thread Starter
Forum
Replies
Last Post
mada51589
3G TL Problems & Fixes
79
05-03-2022 09:54 PM
darksky
3G TL Problems & Fixes
2
09-05-2015 04:11 AM
Mugen TSX
Eastern Canada
0
09-02-2015 12:05 AM
prox
5G TLX Problems & Fixes
6
09-01-2015 03:03 AM


