Horn Location
#1
Horn Location
Hey Everyone,
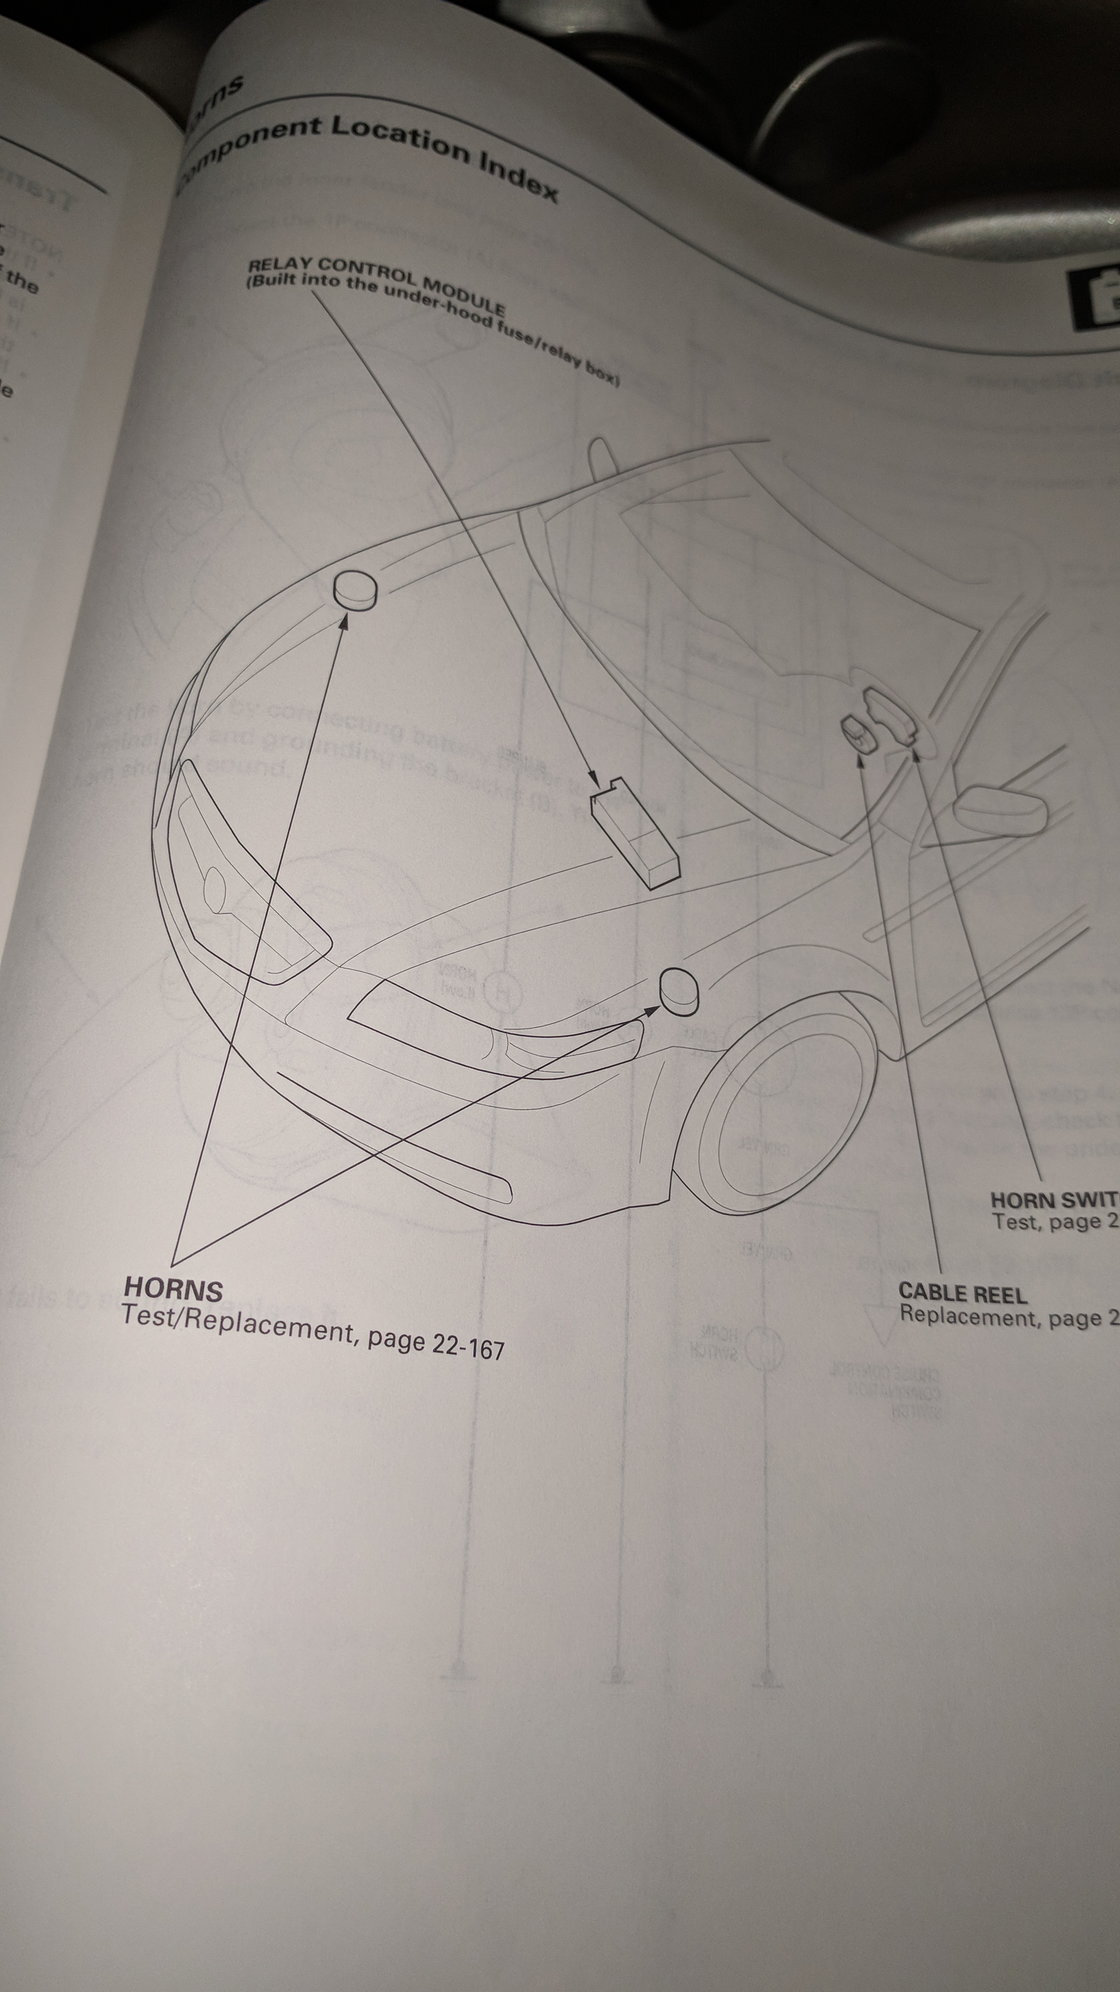
Car is a 2013 TL Sh-AWD Advance. Hoping to find a manual or a diagram that shows where the horn is located under the hood or if anyone knows where/how to disable it. Recently my horn has decided to stay stuck on (sometimes after being pressed or sometimes for no reason) with no way to turn off other than to disconnect the battery. This is a very lovely thing to occur at a busy gas station when you have not much experience and don't even know to disconnect the battery (thank you person who did to save whats left of my ears after the first 2 minutes). Fuse is not blown and unfortunately on my car it will not start with the horn fuse pulled (it must be linked with something else because it is labelled "Horn and Stop" in the manual and with the fuse out the brake pedal wont push right). I]m out of town away from my dealer and just want to disable to horn until a later time I can get it in to the shop.
Would appreciate any advice!
Cheers,
Jordan
#4
Burning Brakes
Has anybody changed these themselves? I have one that's out (not sure if it's the high or the low). I've changed them in other cars, but the TL's parts are often trickier to access than other cars (particularly North American)
Trending Topics
#9
Forum Contributor
Join Date: Sep 2013
Location: Chicago NW Burbs
Age: 47
Posts: 1,607
Likes: 0
Received 1,391 Likes
on
643 Posts
2013 TL - Horns Component Location Index
https://techinfo.honda.com/rjanisis/...untry=1&lang=0
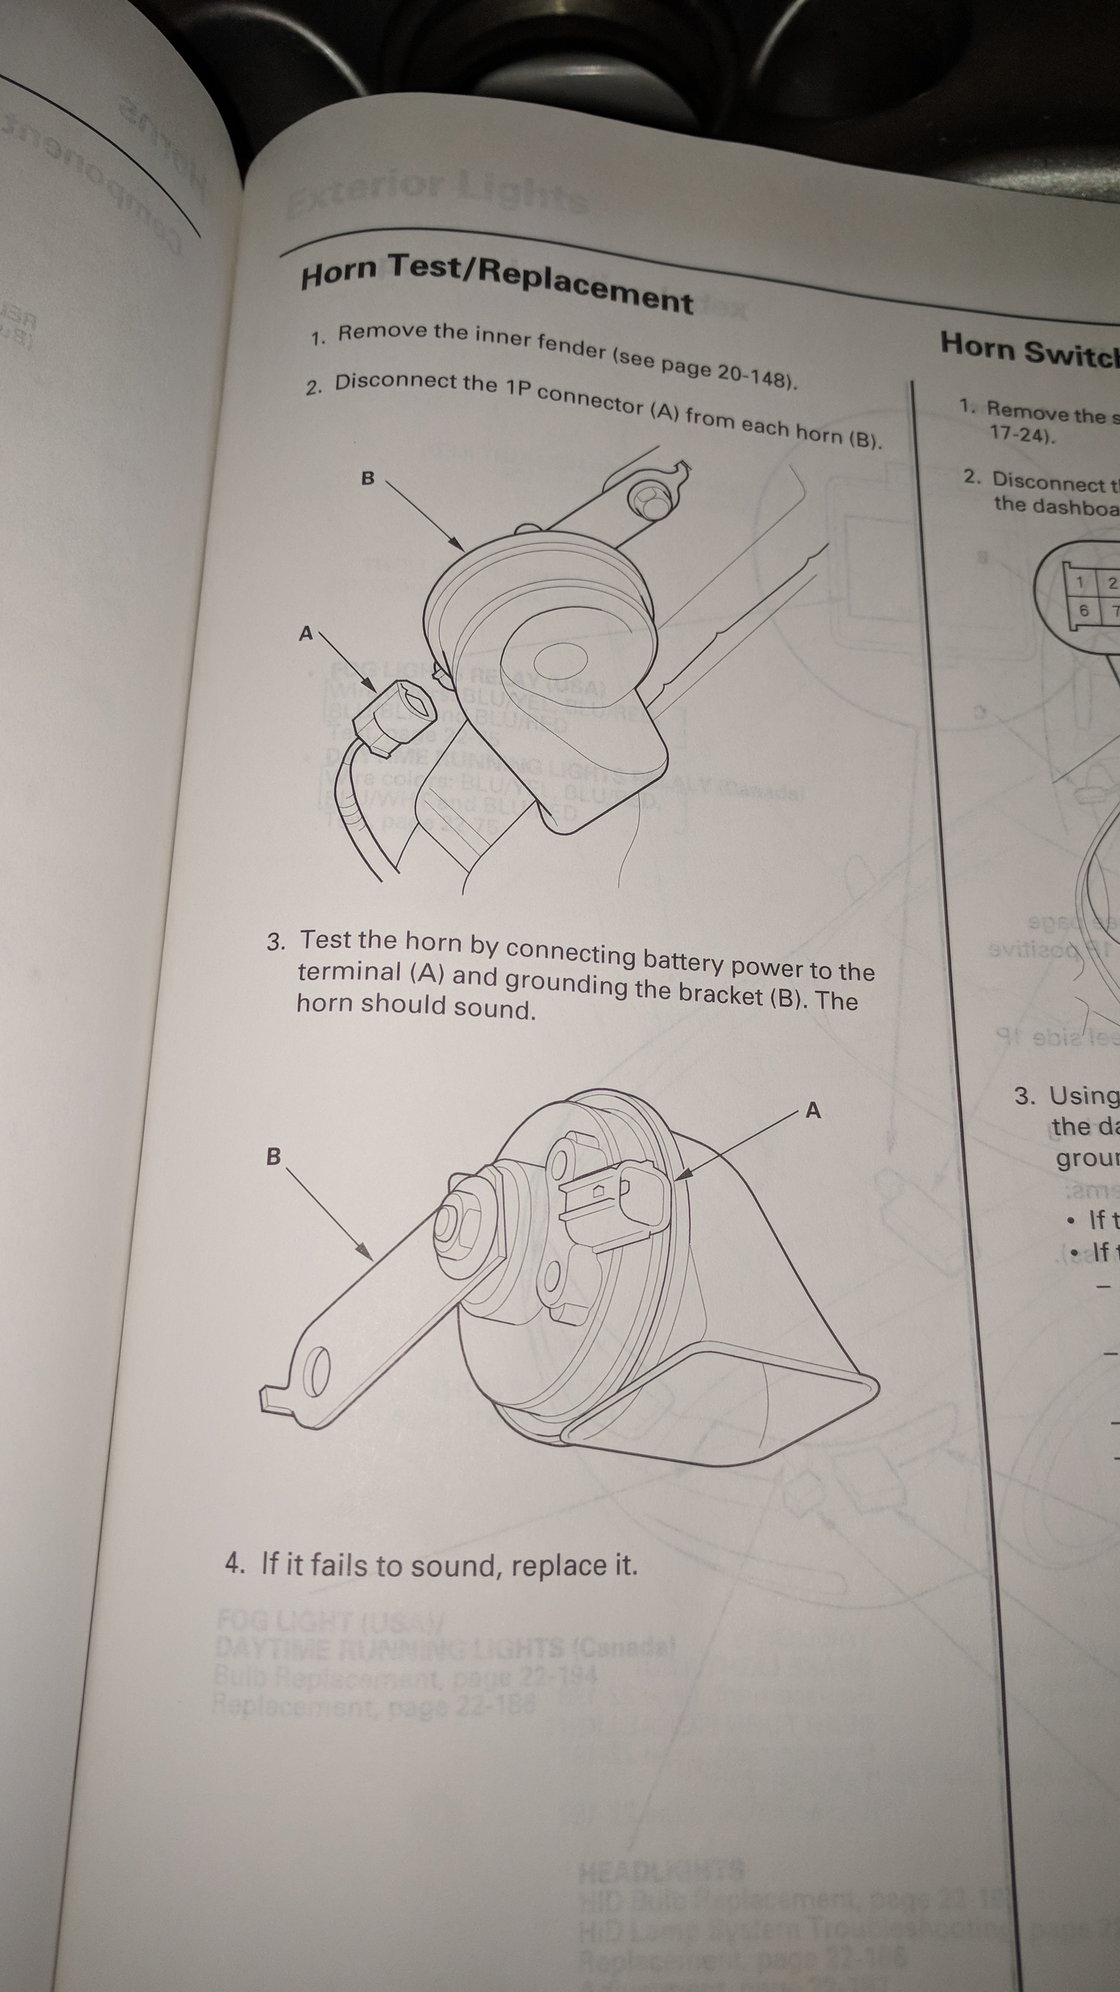
2013 TL - Horn Test/Replacement
https://techinfo.honda.com/rjanisis/...untry=1&lang=0
https://techinfo.honda.com/rjanisis/...untry=1&lang=0
2013 TL - Horn Test/Replacement
https://techinfo.honda.com/rjanisis/...untry=1&lang=0
#11
2013 TL - Horns Component Location Index
https://techinfo.honda.com/rjanisis/...untry=1&lang=0
2013 TL - Horn Test/Replacement
https://techinfo.honda.com/rjanisis/...untry=1&lang=0
https://techinfo.honda.com/rjanisis/...untry=1&lang=0
2013 TL - Horn Test/Replacement
https://techinfo.honda.com/rjanisis/...untry=1&lang=0
#12
Forum Contributor
Join Date: Sep 2013
Location: Chicago NW Burbs
Age: 47
Posts: 1,607
Likes: 0
Received 1,391 Likes
on
643 Posts
2013 TL - Horns Circuit Diagram
https://techinfo.honda.com/rjanisis/...untry=1&lang=0
https://techinfo.honda.com/rjanisis/...untry=1&lang=0
#13
For purposes of this description, left and right refer to the view as if you standing in front of the car facing the engine head on. Car is a 2013 TL SH-AWD Advance.
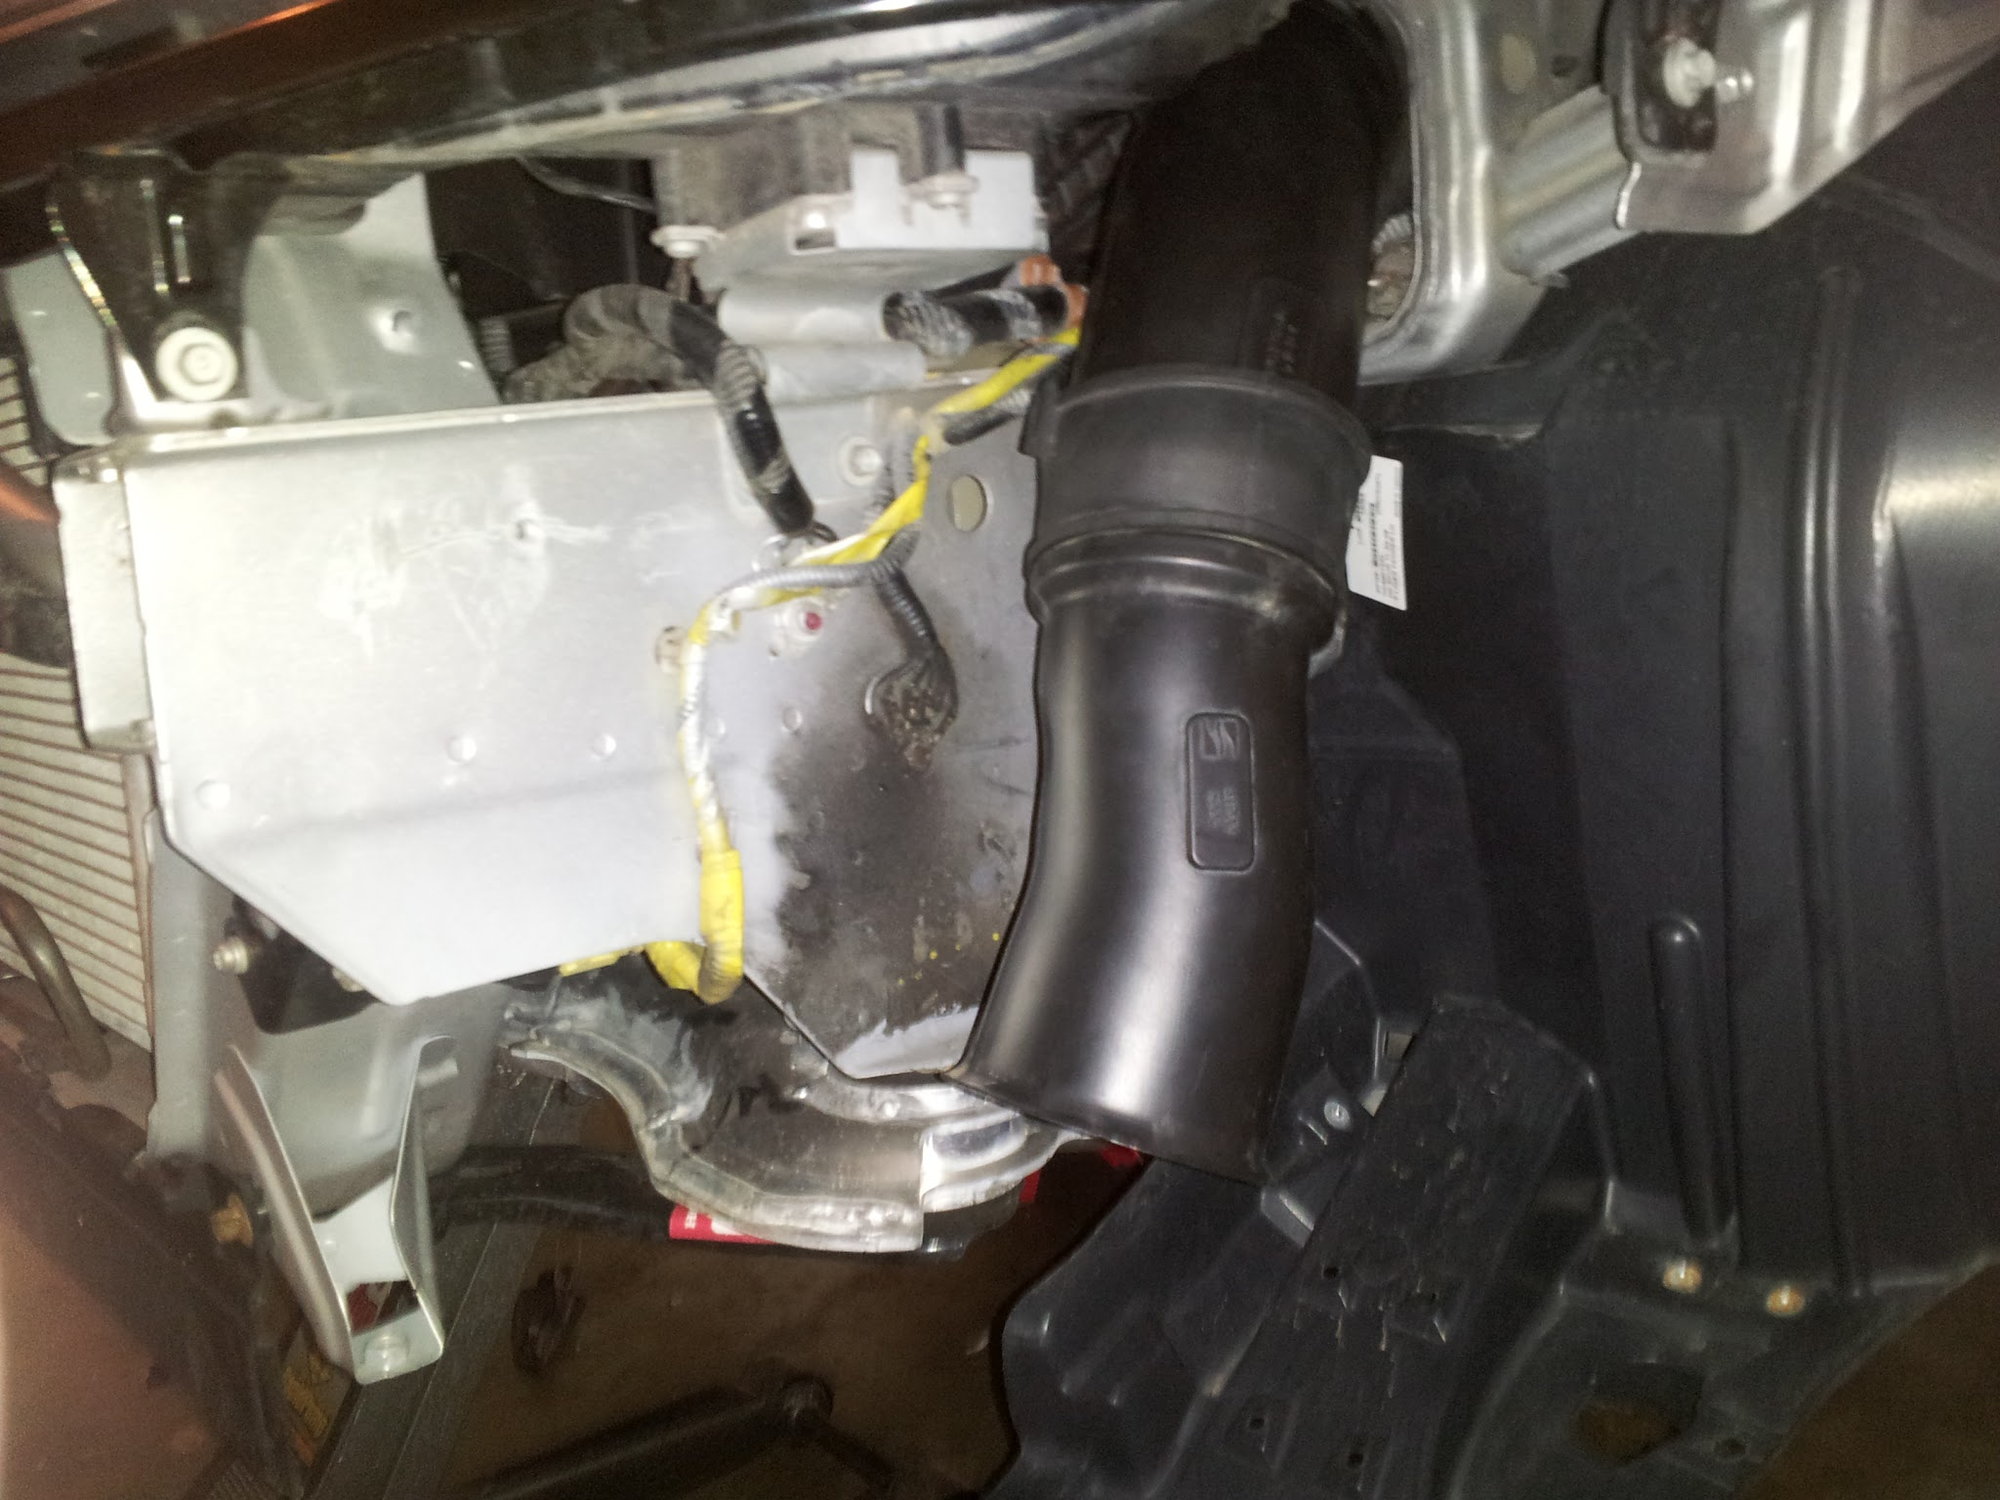
Removed all the plastic panels on top of the engine (you could leave the solo one at the top of the engine below the windshield on but I took it off for no reason). Disconnect the battery, both terminals (the negative wire needs to be disconnected and pushed out of the way to allow arm to get in). Take off the plastic piece over the battery that funnels the air down into the airbox, it is connected by 4 clips. Next take off the 2 brackets located on the top 2 corners of the radiator, they are connected by 2 bolts each (10mm I believe). Lastly, there is one single bolt directly below the left side radiator bracket attached to the relay device that needs to come out as well. The horns are both located pretty much directly below the inside of headlights and are connected by one connector each (thanks EELIFE for the diagrams!). On the right side the space for your arm is directly beside the radiator it is pretty much the only opening, on the left you need to go behind the white radiator reservoir tub. On the right side the power connector for the horn is easy to distinguish because it is the only one that splits off from the big harness for the lights and it is a smaller wire as well. It does not have a release on the end so you need to push down on the middle of the connector fairly hard to get it to release. The left side is tighter especially if you have big hands, you will basically need to push on the radiator reservoir tub a bit to get in there and then once again it is just one connector. With the connectors unplugged we taped the ends and zip-tied them to the nearest wire. Put back on brackets, then the plastic air box piece, then battery, then plastic panels and good to go!
Suspected culprit is the clock spring in the steering wheel, and since I have probably used the horn two times in the 11 months I've had the car (one of which was curiosity and the other was the accidental push that lead to this problem) I'm fine running without them temporarily. I wanted to write this out thoroughly because I can not find a single specific 4G TL article on this and I'm pretty good at google searches haha so hopefully this can help someone else out in the future. Especially someone mechanically useless like me but willing to learn. This temporary fix is definitely DIY and although I had help now that I've seen it I could definitely do it alone. Didn't think to take a video at the time but might again in the future, if anyone needs to do this or needs further info just ask!
Tools Required:
10mm (maybe 12mm as well just because I'm useless and cant know for sure if it was 10mm) socket wrench
Clip removal device and if you don't have one of those like my friend did then a Flathead screwdriver
Not huge hands and forearms (Still possible with but probably going to hurt a bit)
5-30 minutes depending on how mechanically inclined you are
In my case I needed 2 people because of my knowledge and also my hood struts are shot and no longer hold the hood up.
Thanks all for the diagrams and suggestions!
Jordan
Thread
Thread Starter
Forum
Replies
Last Post
dave2live35
2G CL Problems & Fixes
2
03-12-2019 10:01 AM


