
Easy Oil Change, 1 Wheel Off
 03-23-2011, 11:07 PM
#1
Racer
Thread Starter
I looked around and could not find a DIY guide on the oil change of a 4th Gen TL. I know most of us gear heads already know how to do a oil change, it is easy enough. But I thought I would compile my method and info I found in doing mine. I like doing my own oil change, as I know it is done right. I save enough money for a little bit of Beer to drink while doing the job.
I looked at the car and decided it was simplest and easiest just to do a one wheel off method, as it would make access easier, and I would not have to jack the car up as much and use multiple jack stands as I did when doing a 3rd Gen.
I found overall the 4th gen oil change is a bit easier.
This is my particular methodology, I am sure there are quite a few ways to get the job done, so if you have a better way, by all means do it, and share with us!
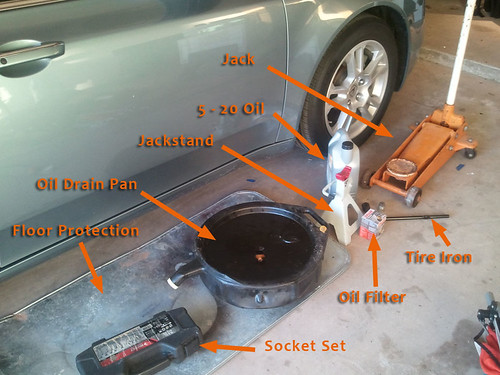
STEP 1 (Get all of your equipment ready)
1. Pre-warmed car, Let it cool for about 15 minutes or so, to minimize any burns. Warm oil drains cleaner and quicker.
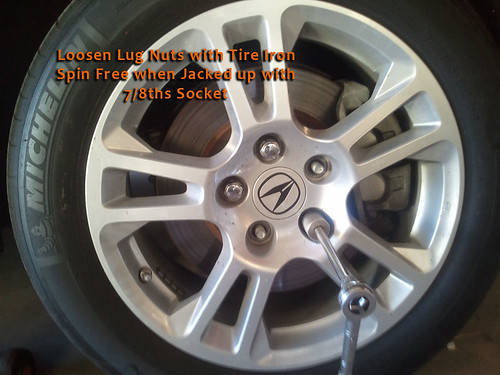
2. Tire Iron
3. 7/8ths Socket - This is optional but I like to use this to quickly remove lugs, without having to do it by hand or with the tire iron swinging around.
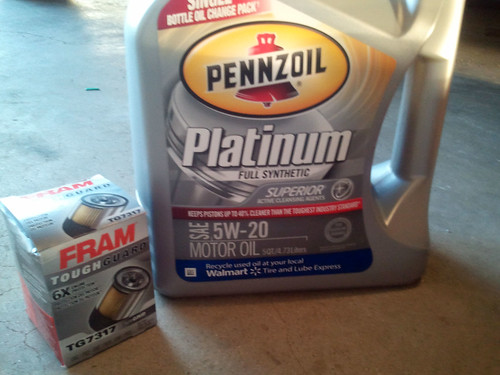
4. 5 / 20 weight Oil or 0 / 20 weight oil of your choice - Both are authorized by Acura. I prefer Mobil One , but used Penzoil Full Synthetic this time around. You will need a total of 4.5 quarts.
5. Oil Filter - I used a Fram TG7317 Extra Life, I recommend spending a few extra dollars to get a decent filter. There is a difference.
6. Metric 17mm Socket with Extension and ratchet - Will be used to remove the oil pan bolt
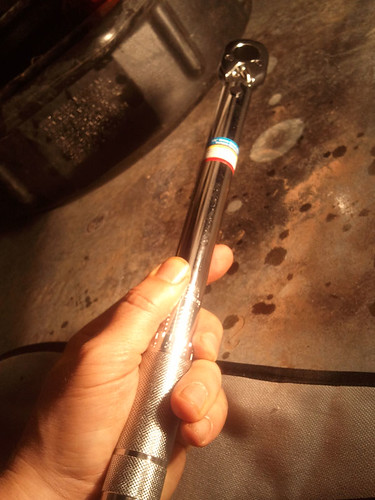
7. Torque Wrench - You can get by without it, but better to have one
8. Shop Towels - What ever cleanup items you like
9. Oil Drain Pan - Something to collect the oil in. I like the all in one units that allow you to seal it up and take it to your drop off facility
10. Jack - You can use the one with the car, or an aftermarket one
11. Jack Stand - For Safety, You never want to depend on your jack only
12. Funnel for adding oil
13. Locking Lug Nut Key - If Needed
14. About 30 minutes of your time
15. Beverage of your choice
Some of the items you need
To Run Synthetic or Not? It's a personal decision. I feel if you are DIY, the money your saving, you might as well use the good stuff! I usually prefer Mobil 1, but this is a good substitute. IMHO. Use a quality filter. The more miles you plan on between oil changes and the dustier it is, use a better filter.
STEP 2
Turn the car off, doh! Put the parking brake on. Loosen all of the lugs while the car is on the ground. I like to use a socket wrench with a 7/8ths once the tire is off the ground to quickly spin the sockets off. Unless you are lucky enough to have a impact wrench.
STEP 3
Jack your car up on the passenger side near the front. You will see a metal tab of about four inches wide under here. If you are unsure, refer to the owners manual in regards to changing a tire. Go slowly, don't make a costly mistake. Once you have it jacked up, you can finish removing the tire.
STEP 4
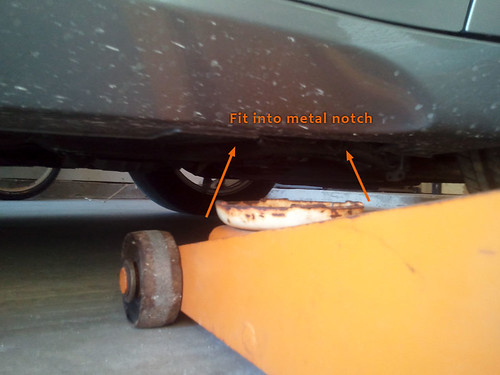
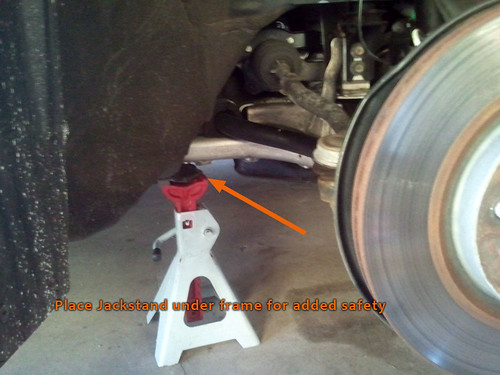
Place the Jackstand under a support part of the frame. Do not put it under any suspension arms, as those will not hold up if the lift jack fails. Also place it somewhere sturdy, you don't want this going through your floor board. I found a strong point on the subframe not attached to any suspension parts. You may have to jack the car up a little bit more, and then rest it back on the jack stand. Your safety is at stake here, So know what your doing, use your own common sense. Be careful, if you are not confident then get some help. Don't come looking to me if you screw your car up or hurt yourself.
STEP 5
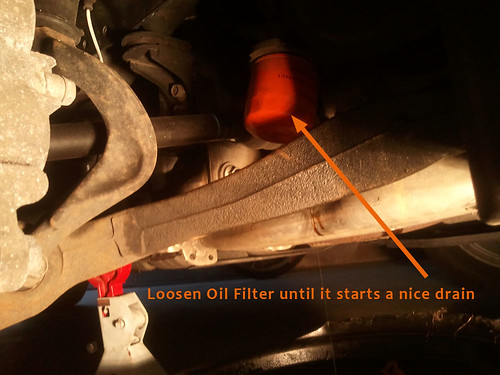
Now that the wheel is off you can easily access the oil filter, go ahead and loosen it. If you can't loosen it, the tool that did it before probably over tightened it or you are a wimp. Just loosen it enough to get it started. We don't want to drip it out yet.

STEP 6
Put a floor covering down under the oil pan area and oil filter area, and locate the oil drain plug, it is clearly marked. Be careful not to burn yourself on the exhaust system!
STEP 7
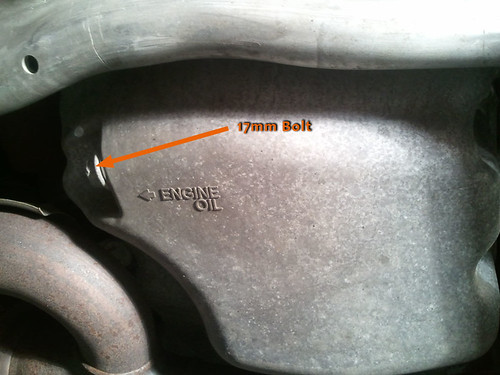
Go ahead and loosen the bolt with a 17mm wrench. It usually takes a little bit of initial force to pop it (Counter clock wise) You shouldn't have to hammer or you are going the wrong way. The metal down here strips easily, so double check that you are loosening the correct direction. Just loosen it for now.

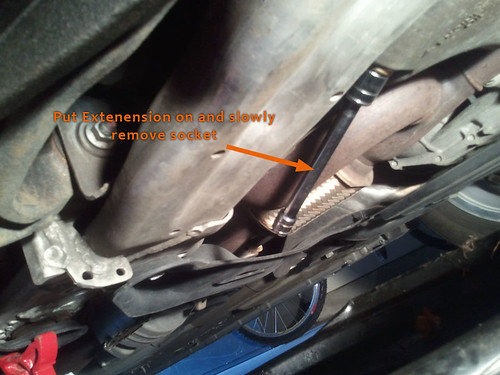
Now that you have it loosened, I like to add an extension to the socket, and and a slight downward angle, remove the socket. This just saves it splashing in the oil and making a mess.
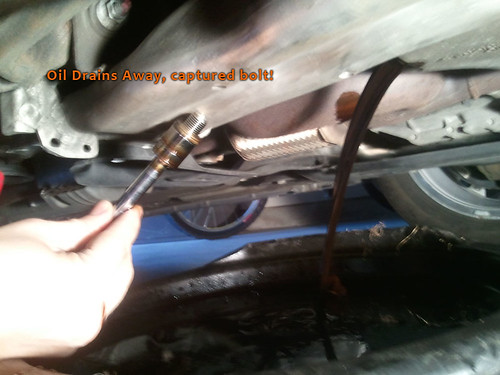
If your lucky you will catch the bolt as shown here, and the oil will flow freely. It will take a bit of time for the oil to completely drain, Mine took about 15 minutes. You can remove the dip stick or oil cap to improve airflow.
STEP 8
While this is draining, I like to take this time to prep the oil filter, remove the rubber gasket, and coat it in the new oil, you can dip it or use your finger, whatever works, then replace the gasket back on the filter. Not everyone does this, but I find it helps keep the Filter from getting locked onto the car making future removal difficult.

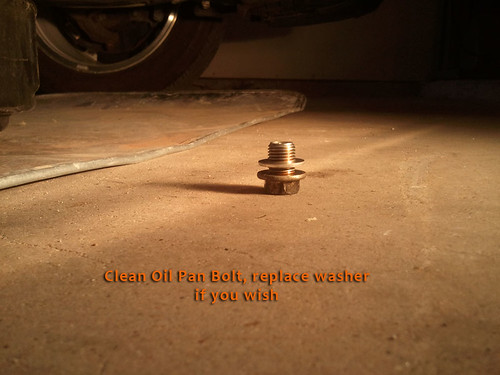
Clean up your oil plug and optionally replace the metal gasket. I forgot to get a replacement this time around, but it seems to be fairly thick, I would think you can get a few uses out of it in a pinch.
STEP 9
Now let's go ahead and loosen up the filter some more, this time rotate it until you get a steady stream of oil draining. I find it better to let it drain while still attached, rather than pulling it all at once, which can be very messy. I have always wanted to pop a hole in the bottom of the filter and let it drain that way, but have not given that a try yet. Once the drip slows, you can go ahead and finish removing it. It will still be full of oil and it will not fit straight down, you will have to carefully carry it up and over the suspension arm. Dump it in your drain bucket.
STEP 10
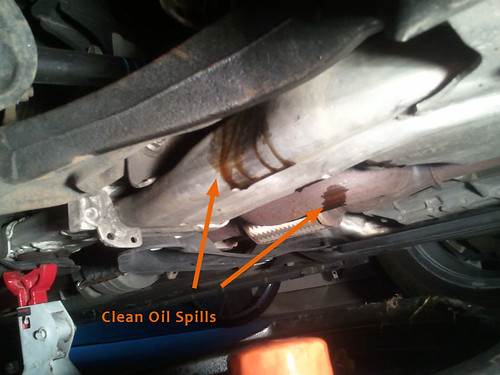
Go ahead and reattach the new Oil Filter, I like to hand tighten it until it is nice and firm and then go about a 1/4 turn past that. Then clean up all the oil spills on the motor parts. You want to do this to prevent any fires or smoking.
STEP 11
Put the cleaned Oil Pan Bolt back on, I recommend using a Torque Wrench, I got mine from Harbor Freight for about $25, it is the kind that clicks. I tightened the bolt to 25 ft lbs. I could not find any reference as to what is supposed to be officially, I think the 3rd gen was 28lbs. This is definitely a place you do not want to over do it. Of course you don't want your bolt falling out and draining all of your oil either. Which is why I recommend using the torque wrench. If you do it manually make it snug but don't crank down on it like a crazy person. I have done enough oil changes in my life to have a pretty good feel for it without a torque wrench. But most men, if you put all your might into it your going to strip it out.
STEP 12
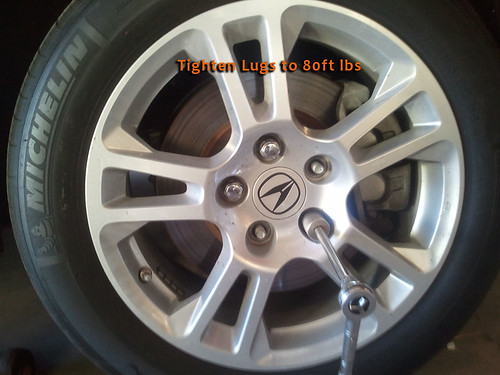
Move out all of your tools from under the car, remount the wheel, put the bolts back on, again I like to use a socket 7/8 here, it is faster than doing it by hand, and less clumsy than using the tire iron. Lower the car, then tighten the lugs with a torque wrench to 80 ft lbs.
STEP 13
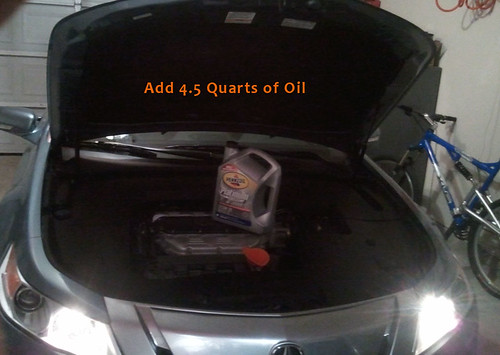
Put your new oil in, use a funnel, I would put in four quarts, and then check the dip stick, it should go to 4.5 quarts when you are done.
Once you have done this. You may want to check for any leaks drips.
STEP 14
Now Reset the MID.
Easiest way I know is just to start the engine.
Using the arrows on the steering wheel go to the oil life screen. Then hold down the center Reset button for about 10 seconds or so, until a reset screen comes up.
Select Yes.
Take a test drive around the block. Recheck for any oil leaks. Be sure to check your oil levels a few times to make sure you are not loosing oil.
Again you may find it easier to not do the one tire off method, and just jack the car up and get underneath it. Much less claustrophobic. I just found it much more accessible in my opinion to take the wheel off. If I had a service pit, I wouldn't bother!
I looked at the car and decided it was simplest and easiest just to do a one wheel off method, as it would make access easier, and I would not have to jack the car up as much and use multiple jack stands as I did when doing a 3rd Gen.
I found overall the 4th gen oil change is a bit easier.
This is my particular methodology, I am sure there are quite a few ways to get the job done, so if you have a better way, by all means do it, and share with us!
STEP 1 (Get all of your equipment ready)
1. Pre-warmed car, Let it cool for about 15 minutes or so, to minimize any burns. Warm oil drains cleaner and quicker.
2. Tire Iron
3. 7/8ths Socket - This is optional but I like to use this to quickly remove lugs, without having to do it by hand or with the tire iron swinging around.
4. 5 / 20 weight Oil or 0 / 20 weight oil of your choice - Both are authorized by Acura. I prefer Mobil One
, but used Penzoil Full Synthetic this time around. You will need a total of 4.5 quarts.5. Oil Filter - I used a Fram TG7317 Extra Life, I recommend spending a few extra dollars to get a decent filter. There is a difference.
6. Metric 17mm Socket with Extension and ratchet - Will be used to remove the oil pan bolt
7. Torque Wrench - You can get by without it, but better to have one
8. Shop Towels - What ever cleanup items you like
9. Oil Drain Pan - Something to collect the oil in. I like the all in one units that allow you to seal it up and take it to your drop off facility
10. Jack - You can use the one with the car, or an aftermarket one
11. Jack Stand - For Safety, You never want to depend on your jack only
12. Funnel for adding oil
13. Locking Lug Nut Key - If Needed
14. About 30 minutes of your time
15. Beverage of your choice
Some of the items you need
To Run Synthetic or Not? It's a personal decision. I feel if you are DIY, the money your saving, you might as well use the good stuff! I usually prefer Mobil 1, but this is a good substitute. IMHO. Use a quality filter. The more miles you plan on between oil changes and the dustier it is, use a better filter.
STEP 2
Turn the car off, doh! Put the parking brake on. Loosen all of the lugs while the car is on the ground. I like to use a socket wrench with a 7/8ths once the tire is off the ground to quickly spin the sockets off. Unless you are lucky enough to have a impact wrench.
STEP 3
Jack your car up on the passenger side near the front. You will see a metal tab of about four inches wide under here. If you are unsure, refer to the owners manual in regards to changing a tire. Go slowly, don't make a costly mistake. Once you have it jacked up, you can finish removing the tire.
STEP 4
Place the Jackstand under a support part of the frame. Do not put it under any suspension arms, as those will not hold up if the lift jack fails. Also place it somewhere sturdy, you don't want this going through your floor board. I found a strong point on the subframe not attached to any suspension parts. You may have to jack the car up a little bit more, and then rest it back on the jack stand. Your safety is at stake here, So know what your doing, use your own common sense. Be careful, if you are not confident then get some help. Don't come looking to me if you screw your car up or hurt yourself.
STEP 5
Now that the wheel is off you can easily access the oil filter, go ahead and loosen it. If you can't loosen it, the tool that did it before probably over tightened it or you are a wimp. Just loosen it enough to get it started. We don't want to drip it out yet.
STEP 6
Put a floor covering down under the oil pan area and oil filter area, and locate the oil drain plug, it is clearly marked. Be careful not to burn yourself on the exhaust system!
STEP 7
Go ahead and loosen the bolt with a 17mm wrench. It usually takes a little bit of initial force to pop it (Counter clock wise) You shouldn't have to hammer or you are going the wrong way. The metal down here strips easily, so double check that you are loosening the correct direction. Just loosen it for now.
Now that you have it loosened, I like to add an extension to the socket, and and a slight downward angle, remove the socket. This just saves it splashing in the oil and making a mess.
If your lucky you will catch the bolt as shown here, and the oil will flow freely. It will take a bit of time for the oil to completely drain, Mine took about 15 minutes. You can remove the dip stick or oil cap to improve airflow.
STEP 8
While this is draining, I like to take this time to prep the oil filter, remove the rubber gasket, and coat it in the new oil, you can dip it or use your finger, whatever works, then replace the gasket back on the filter. Not everyone does this, but I find it helps keep the Filter from getting locked onto the car making future removal difficult.
Clean up your oil plug and optionally replace the metal gasket. I forgot to get a replacement this time around, but it seems to be fairly thick, I would think you can get a few uses out of it in a pinch.
STEP 9
Now let's go ahead and loosen up the filter some more, this time rotate it until you get a steady stream of oil draining. I find it better to let it drain while still attached, rather than pulling it all at once, which can be very messy. I have always wanted to pop a hole in the bottom of the filter and let it drain that way, but have not given that a try yet. Once the drip slows, you can go ahead and finish removing it. It will still be full of oil and it will not fit straight down, you will have to carefully carry it up and over the suspension arm. Dump it in your drain bucket.
STEP 10
Go ahead and reattach the new Oil Filter, I like to hand tighten it until it is nice and firm and then go about a 1/4 turn past that. Then clean up all the oil spills on the motor parts. You want to do this to prevent any fires or smoking.
STEP 11
Put the cleaned Oil Pan Bolt back on, I recommend using a Torque Wrench, I got mine from Harbor Freight for about $25, it is the kind that clicks. I tightened the bolt to 25 ft lbs. I could not find any reference as to what is supposed to be officially, I think the 3rd gen was 28lbs. This is definitely a place you do not want to over do it. Of course you don't want your bolt falling out and draining all of your oil either. Which is why I recommend using the torque wrench. If you do it manually make it snug but don't crank down on it like a crazy person. I have done enough oil changes in my life to have a pretty good feel for it without a torque wrench. But most men, if you put all your might into it your going to strip it out.
STEP 12
Move out all of your tools from under the car, remount the wheel, put the bolts back on, again I like to use a socket 7/8 here, it is faster than doing it by hand, and less clumsy than using the tire iron. Lower the car, then tighten the lugs with a torque wrench to 80 ft lbs.
STEP 13
Put your new oil in, use a funnel, I would put in four quarts, and then check the dip stick, it should go to 4.5 quarts when you are done.
Once you have done this. You may want to check for any leaks drips.
STEP 14
Now Reset the MID.
Easiest way I know is just to start the engine.
Using the arrows on the steering wheel go to the oil life screen. Then hold down the center Reset button for about 10 seconds or so, until a reset screen comes up.
Select Yes.
Take a test drive around the block. Recheck for any oil leaks. Be sure to check your oil levels a few times to make sure you are not loosing oil.
Again you may find it easier to not do the one tire off method, and just jack the car up and get underneath it. Much less claustrophobic. I just found it much more accessible in my opinion to take the wheel off. If I had a service pit, I wouldn't bother!
Last edited by wakattack; 03-23-2011 at 11:12 PM.

The following 9 users liked this post by wakattack:
Acc-Rite (04-03-2012),
FireAtWill (12-15-2013),
itsinferno (10-06-2011),
lji (03-19-2012),
Mr.Skytech (10-03-2011),
and 4 others liked this post.
03-23-2011, 11:51 PM
#4
Racer
Thread Starter
Addendum:
1. Don't use 0 /20 weight oil on the SH-AWD as per:
https://acurazine.com/forums/4g-tl-2009-2014-123/q-can-you-use-0w-20-oil-your-acura-honda-801832/
2. Take your time, listen to some tunes, this isn't a race, enjoy the process.
3. You could use rubber/latex gloves, I didn't and was able to change the oil without dripping any oil, and my hands barely got dirty.
4. Keep a journal of your oil changes, it may help at resell time. It did for me when I sold my 3Gen, I used a simple excel spreadsheet, with mileage, date and put other service in there as well.
 03-24-2011, 09:34 AM
#6
Three Wheelin'
Nice DIY post however I prefer to drive the car up on a pair of low ramps instead of removing a wheel. Access is just as easy from underneath. But to each his own.
03-24-2011, 01:21 PM
#7

7/8th must be exactly 22mm, because i use the 22mm socket for my wheel removal...
you can do the job without removing the wheel, but since i rotate my tires everytime i change my oil, its what i do too...
i use a large ziploc bag around my oil filter while i take it off to catch all the oil from the filter, then dump that into my catch pan....
gloves are great too, i love the mechanics brand shop gloves...great for this stuff...
also, budlight is my required beer during this operation
nice write up bro
Trending Topics

The following users liked this post:
musty hustla (03-20-2012)
03-24-2011, 08:24 PM
#11
The drain plug area has a ridge around one side of it. This would require at the least an extension for the Fumoto valve to clear it.
I used Fumoto valves on previous cars & like how they work a lot. My Subarus used much bigger diameter plugs than Acura. My thoughts are that putting in a valve as small as the Acura plug will create a very slow drain.
I used Fumoto valves on previous cars & like how they work a lot. My Subarus used much bigger diameter plugs than Acura. My thoughts are that putting in a valve as small as the Acura plug will create a very slow drain.
 03-28-2011, 06:40 AM
#13
Burning Brakes

The drain plug area has a ridge around one side of it. This would require at the least an extension for the Fumoto valve to clear it.
I used Fumoto valves on previous cars & like how they work a lot. My Subarus used much bigger diameter plugs than Acura. My thoughts are that putting in a valve as small as the Acura plug will create a very slow drain.
I used Fumoto valves on previous cars & like how they work a lot. My Subarus used much bigger diameter plugs than Acura. My thoughts are that putting in a valve as small as the Acura plug will create a very slow drain.
03-29-2011, 10:42 PM
#15
6th Gear

Join Date: Mar 2011
Age: 42
Posts: 6
Likes: 0
Received 0 Likes
on
0 Posts
I was pretty annoyed when I found out almost every other acura had an alternate or lighter weight oil that is approved... except for the TL-AWD. GRRRR
The brand i'm going to use after the first drain doesn't have 5w20 in their best stuff.
Oh well.
btw... there is a jack/lift point in the front center of the car you can use the jack on, then use the jack/lift point behind the front tires to put the jack stand under.
The brand i'm going to use after the first drain doesn't have 5w20 in their best stuff.
Oh well.
btw... there is a jack/lift point in the front center of the car you can use the jack on, then use the jack/lift point behind the front tires to put the jack stand under.
03-30-2011, 12:30 AM
#16
Racer
Thread Starter
04-05-2011, 11:14 AM
#17
I use to be able to get them from the "factory" website, but it now looks like they have changed it up so now we have to go to area distributors. I too only have one source for the entire state.
 04-21-2011, 12:22 PM
#22
Racer
Thread Starter
I'm thinking of picking up, this, to me it is a big deal to not make a mess while changing the oil. Has anyone tried one of these.

http://www.aircraftspruce.com/catalo...ldraintool.php
http://www.aircraftspruce.com/catalo...ldraintool.php
04-26-2011, 07:12 PM
#23
05-05-2011, 12:50 PM
#24
10th Gear

Join Date: Aug 2009
Location: Orland Park, IL.
Age: 69
Posts: 13
Likes: 0
Received 0 Likes
on
0 Posts
Has anyone installed the Fumato valve and did you need an extension to get it to work? Was thinking about trying this product, but I need to know if there are any problems. Thanks
05-05-2011, 12:54 PM
#25
Burning Brakes
The following users liked this post:
Shoot2Thrill (06-01-2012)
10-03-2011, 08:10 PM
#27
Love Guru
Thanks mate for such a detailed instruction. I was wondering where the oil-filter might be in the 2012 TL. Thanks to you now I know exactly where to go for it. 
Yes, Mobil 1 Advanced Fuel Economy comes on 0w 20. You can pick up the 5 Qt gallon from Walmart for around 25 dollars.
http://www.mobiloil.com/USA-English/...l_Economy.aspx
Yes, Mobil 1 Advanced Fuel Economy comes on 0w 20. You can pick up the 5 Qt gallon from Walmart for around 25 dollars.
http://www.mobiloil.com/USA-English/...l_Economy.aspx
Last edited by Steven Bell; 10-03-2011 at 11:56 PM. Reason: Merged Posts.
The following users liked this post:
eazy (10-05-2011)
10-09-2011, 11:18 AM
#30
Advanced

i just turned the wheels all the way to the right when i changed mine. Had plenty of room to the the filter out/in.
I see you used a Fram toughguard filter. I too have this same filter on my tl for the past 1500 miles. After reading all sorts of reviews and watching filters being disassembled i was dissapointed in Fram. Seems very cheaply made and frankly like a child put it together. I will be switching back to wix. Just my opinion based on my research. Great thread by the way.
I see you used a Fram toughguard filter. I too have this same filter on my tl for the past 1500 miles. After reading all sorts of reviews and watching filters being disassembled i was dissapointed in Fram. Seems very cheaply made and frankly like a child put it together. I will be switching back to wix. Just my opinion based on my research. Great thread by the way.
11-01-2011, 06:35 PM
#31
great write-up!
Regarding the torque specs, Honda/Acura ServiceExpress manual says to apply 29lbf ft for the oil drain bolt and 94lbf ft for the wheel nug nuts (This is for 4G 2009-2012 Acura TL)
Regarding the torque specs, Honda/Acura ServiceExpress manual says to apply 29lbf ft for the oil drain bolt and 94lbf ft for the wheel nug nuts (This is for 4G 2009-2012 Acura TL)
03-18-2012, 06:56 AM
#32
Drifting
iTrader: (1)
Well, thanks to this thread I was able to do my very first oil change. In the past I've done some maintenance on my cars but felt that there wasn't enough savings to do the oil changes. However, with the TL I wanted to go with full synthetic.
For about $5 less than I would've spent at the local Valvoline, I rotated my tires and changed my oil to Mobil 1 full synthetic. I also went with the most expensive Fram oil filter. The greatest part is that I now have two more jack stands, a 17mm sprocket and adaptors, an oil catch pan and a floor covering...not to mention the knowledge to do this again in the future. What a great feeling! Thanks OP!
For about $5 less than I would've spent at the local Valvoline, I rotated my tires and changed my oil to Mobil 1 full synthetic. I also went with the most expensive Fram oil filter. The greatest part is that I now have two more jack stands, a 17mm sprocket and adaptors, an oil catch pan and a floor covering...not to mention the knowledge to do this again in the future. What a great feeling! Thanks OP!


Thread
Thread Starter
Forum
Replies
Last Post
mada51589
3G TL Problems & Fixes
79
05-03-2022 08:54 PM
Zonian22
Member Cars for Sale
3
11-14-2015 01:20 PM
Zonian22
Member Cars for Sale
1
09-02-2015 08:19 AM