When you click on links to various merchants on this site and make a purchase, this can result in this site earning a commission. Affiliate programs and affiliations include, but are not limited to, the eBay Partner Network.
This DIY is for independent fog lights (fog light control W/O headlights on)
First off, I'd like to thank everyone who laid the groundwork for this to happen. there are a lot of great people on this site who have sprinkled very useful information all over this forum. I made reference to the following threads while performing this DIY:
So I converted my halogen fog lights to HIDs, and while i was very happy with the output, I was always disappointed that they only work with the headlights on. I was able to run fog lights with parking lights on my RSX. In my Altima, I was able to control fog lights with the factory switch and parking lights by cutting a wire in the switch stalk and running it to the fog light relay under the hood. It is not this easy in the 4G TL, as the electrical system contains digital signals and MCUs.
SOLUTION:
An easy fix that does not compromise the car's electrical system is to install a new, isolated circuit. This is done by adding a switch, a relay and using new connectors for the fog lights.
THEORY:
The relay consists of a switch and an electromagnetic coil. The idea is that you can use a low current coil circuit to control a high power circuit. When current travels through the coil, it becomes energized and acts like a magnet. in doing so, the magnet closes a normally open contact in a switch. When the coil is de-energized, the magnet opens the switch contact. This switch inside the relay will close the circuit between your battery and your fog lights, and you will be energizing the relay coil via a switch in the cabin.
Here is an image of a single-pole, double-throw relay:
Pins 85 and 86 are the ends of the coil. Energizing the coil will close the contacts between pin 30 and 87 and open the contacts between pins 30 and 87a
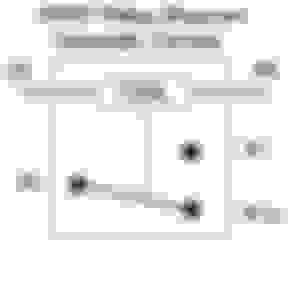
Here is a generic wiring diagram using an SPDT relay to control fog lights:
ITEMS REQUIRED:
- 35W Morimoto HID kit H11 (optional)
- Accord fog switch part# 08V31-SDN-1M035
- Accord fog harness part# 08V31-SDA-10030 (optional)
- 18 gauge Power wire (at least 25ft roll to be safe)
- 18 gauge Ground wire (25ft)
- Crimp connector for 18 ga wire
- Wire ties
- Electrical Tape
- Digital Multimeter
If you want high-quality HIDs, the Morimoto ones from The Retrofit Source are the way to go. I bought everything else on Amazon.
PROCEDURE:
1.
If you want to save yourself $20 and not buy the Honda switch harness, start by creating a wiring harness for the accord switch. There are 5 pins on this switch, 2 of which we are not going to use because it just for illumination of fog light symbol. The green light on top will still light up when the switch is on, so don�t worry.
Here is an image of the switch:
Pins 1, 2 and 5 will be used, so cut (3) 8�-12� lengths of wire with connectors and attach them to these pins.
If you are uncomfortable with this step, then I suggest buying the Honda switch harness.
2.
Pop the blank cover out near the VSA switch with a flat-head. I suggest fishing in the wires for your fog switch first and finding them under the steering wheel before popping the new switch in. Leave the wires hanging there for now.
3.
Create new harness for fogs: You will be wiring the new H11 pigtail connectors in parallel (connect positive to positive and negative to negative). Give yourself about 7-8� between the two connectors and leave one end of the crimp connector open on the driver�s side.
4.
Run wire through firewall. This is explained in one of the links above. Looking in the engine bay, there is an unused grommet in the firewall located slightly off-center towards the driver�s side and about 6� down. Get a long screwdriver and pry the grommet out. Stick the screwdriver in to poke a hole through the insulation. Now use a coat hanger (or similar) to fish a line through the firewall. You should find it inside the car near behind the accelerator pedal.
5.
Connect this wire inside the car to pin #1 or #2 of the accord switch.
6.
In the driver�s side fuse box, there is a 7.5A fuse in slot #17. Pull this fuse and install the Tap-a-fuse with another 7.5A fuse. Connect this wire to the other wire on the accord switch (pin #1 or #2 depending on step 5)
Note: Fuse #17 is a switched ACC slot, meaning that it is only powered if the car is in ACC mode or if the car is running.
7.
Connect the wire on pin #5 to chassis. You can verify ground by taking your multimeter and set it to check constant (DC) power. With the car in ACC or on, check the voltage between the fuse #17 and any nut/bolt which you see connected to chassis. You should be reading >12 VDC. Connect the ground wire to this nut/bolt.
8.
Everything in the cabin is now complete. I suggest testing the switch. With the car on or in ACC mode, check the voltage of the wire hanging through the firewall. When you hit the switch, this wire should be reading >12 VDC and the switch should light up green. If the switch works, turn the switch and car off.
9.
Install the relay. I screwed the relay into the bracket holding the lower half of the factory air intake box. Connect the wire going through the fire wall to pin 85 on the relay harness. Do not yet connect the relay harness to the relay.
10.
Now you want to connect the new fog light harness to your fog lights or HID transformer. There is a DIY in a link above that shows how to access the fog lights and how to install HID fogs.
You want to remove the factory connectors and tape them up. Connect the new harness to your fog lights / HID transformer. Run 2 wires down near the battery to the fog light harness and connect one to positive and one to negative of the harness. The other end of the positive wire will connect to pin 87 of the relay harness (normally open contact). The other end of the negative wire will connect to pin 86 of the relay harness.
11.
Connect relay harness to ground. I used a common ground for the fog lights and the relay. Take a wire from pin 86 of the relay harness and connect it to chassis. Use the same method of finding a valid ground point as in step 7. I used the bolt holding the bracket for the intake box neat the hood strut. Sand down the black paint and connect the wire to this bolt.
12.
Connect the inline fuse to pin 30 of the relay harness. You want to make sure you have a 20 amp fuse as well. Connect the other end of the inline fuse directly to the positive terminal of the battery.
13.
Finally, connect the relay harness to the relay. You are done! If you did everything correctly, you should now have control of your fog lights with the new switch. Turn your car on and try it out!
This whole procedure took me about 3 hours. Took almost as long to write this DIY! Goodluck
Slightly off color but not too noticeable in low lighting
And I doubt there is a switch stalk that will work.. I think base models come with foglights too?
Yep, I believe base had foglights as well. I'm actually in the process of doing the opposite - trying to find a blanking plate for my S2000.
Do you mind sending some pictures of your TL's blanking plate you removed? Or any chance I could buy it from you on the cheap?
Already have 2 new OEM ones (from a Pilot and Accord) coming on the way to see if they'll work. If you can save me the time of ripping apart my TL I'd love you.
Let me know if the accord ones fit and I'll send you my blank plate. I'll just charge you for shipping
Thanks so much for the in depth write up on this. Much appreciated and will be doing this soon! Real quick though, for the OEM fog light switch you've got two different part numbers listed...08V31-SDA-1M035 and 08V31-SDN-1M035. I've checked availability through American Honda and they are in fact, 2 different parts, not superceding to one or the other. Any info on that?
-greg
Thanks! The 08V31-SDN-1M035 and 08V31-SDA-1M035 are part numbers for the swich. I think they glow up different colors.. The 08V31-SDA-10030 part number above is for the switch harness that plugs into the switch. Not sure if there is an 'sdn' part number for that harness.
As for the foglight switch part numbers, they are determined by year/model/body style. Here's some good information on Honda part numbers...
Parts System Guide
Part numbers:
Are assigned to an item based on the item's functional use.
Enable Dealers to identify and arrange their parts inventories more efficiently.
The numbers and letters that make up the Part Number are arranged according to a specific set of guidelines. The format of a Part Number can vary depending on the general category of the item.
Basic Part Number
Shown below is a typical layout of the Basic Part Number.
Positions:
... Function Code = 1 & 2
... Component Number = 3, 4 & 5
... Type code = 6, 7 & 8
... Classification Number = 9, 10 & 11
... Supplemental Number = 12 & 13
1 2 / 3 4 5 / 6 7 8 / 9 10 11 / 12 13
Taken altogether, a Basic Part Number can look like this: 83500-S00-A00ZB
This part "translates" as: "LINING, R. FR. DOOR *NH264L* (Off Black)"
83 = Rigging, inner
500 = Front door lining, complete
S00 = 1996 Civic 3D
A00 = USA, first revision'
ZB = Part has color
General Notes
Part Numbers are assigned by Honda R & D (HG) initially as drawing numbers, and become part numbers as they are introduced as production items or when used for replacement.
Once the item is a "production" part, it is then passed to Honda Service Japan (HS) for inclusion in to the catalog system. As revisions are made, HS will supersede the item as necessary. At the same time, the drawing is also passed to Honda Parts (HB) for procurement and eventual sales. Parts can also be superseded by HB as required when vendors change or when applications are updated by HS.
And as for the harness, research tells me (08V31-SDA-10030) is for an Accord coupe '03-'05. An updated number (08V31-SDA-10130) fits coupes for '06-'07, as you can tell by the USA revision area (100/101) in their respective part numbers.
Thanks for the great write up I believe I was the first to do this mod with honda dash switch. I use the parking light wire for my hot to relay. This way the fogs cut of automatically if I leave them on.
Thanks for the great write up I believe I was the first to do this mod with honda dash switch. I use the parking light wire for my hot to relay. This way the fogs cut of automatically if I leave them on.
Yes I think you were the first, going by the threads above.
And if you use the #17 fuse under the steering wheel for the power to the relay, it only gets power when the car is on or in acc mode. It cuts power when the car is off. Parking light wire works too, but this involves spicing into the factory harness, plus the fogs won't be completely "independent."
The great thing about this is now my fogs don't flicker when turning the car on and leaving the switch on! I hate how even the headlights flicker when turning the car on (if on AUTO)... what a dumb design by Acura.
I'm about to begin this mod tonight, after almost a year of procrastinating. I'll be using the procedure above and utilizing the links provided by arpypat to hopefully knock this out in my shop within the next few hours, give or take. Pics to follow...
One suggestion, though...don't run fogs at night in place of regular headlights. It's unsafe, and reeks of douchebaggery. I see it from time to time, and I always laugh inside at the driver, who clearly thinks he's somehow impressing others.
There's a use for this mod, but it's not to replace headlights at night.
As promised, here are a couple pics after the install. I used Nokya H11 Hyper Yellow bulbs in place of the stockies and I'm really pleased with the color/output. First one shows fogs illuminated by themselves and the second is with just the parking lights. I've pulled the fuse for the DRL's awhile back as I disliked the ugly halogen of those and I think here shortly I may disable the turn signal amber to only illuminate when activated to try and achieve a cleaner look. Enjoy...
 07-23-2015, 08:44 AM