4G DIY: Removing Door Panels
#1
4G DIY: Removing Door Panels
I thought I'd right up a simple how too on removing the door panels on the 4G. They're a little more trickier than the 3G but with the right tools come off with a snap. (literally) 
First off you're going to need a very small flat head screw driver, and a #2 phillips (magnetic if you have it)
Second, make sure you have a good set of panel tools. I do not recommend working on these without the KTC or similar tools.

Up first is the small cover behind the door handle. There's a notch that needs depressed with the screwdriver. Press down, and it'll click. You'll then have to move the door lock to the locked position, open the handle and remove the plastic cover.

This will expose two screws that you can then remove.

Next up in the middle of the door under the door grip there's a screw cover. Use the small flat head to pop the cover down, then a phillips to remove the screw.

Remove the rubber with a KTC tool and expose the screw in the door. Then remove the screw.

The next part you'll need two of the panel poppers. I'm showing the part partially removed so the panel gap is exaggerated a bit


[IMG]http://jczech.smugmug.com/Cars/2010TL/SH-AWD-Install
/283/1215155516_jUuZq-L.jpg[/IMG]
After this piece is removed remove the last remaining screw.

Starting at the bottom of the door put the wedge tool in and gradually pop off each panel clip. Do this for both sides up the sides of the door. When you get to the top pull the door up and toward you at a 45* angle. This will release the metal clips holding the door panel onto the sheet metal. The 4G door panel does not clip onto the window ledge. You'll have to use a bit of force to remove the panel from those metal retainer clips.
That's it... The panels will come off in a little less then 5 minutes with some practice.
The front driver-side door is a tad different though.
First, when you remove the cover from the door grip you'll notice the connector. This is for the power mirrors. Remove this before removing the door panel.


Second, on the driver side door has a cluster of connectors that makes it easier to connect and disconnect when you pull away the panel. Be sure to disconnect the door panel from here.

You're finished product will look something like this (but with the factory sound deadener on) -- Mine is removed because I've deadened all my doors.


First off you're going to need a very small flat head screw driver, and a #2 phillips (magnetic if you have it)
Second, make sure you have a good set of panel tools. I do not recommend working on these without the KTC or similar tools.

Up first is the small cover behind the door handle. There's a notch that needs depressed with the screwdriver. Press down, and it'll click. You'll then have to move the door lock to the locked position, open the handle and remove the plastic cover.

This will expose two screws that you can then remove.

Next up in the middle of the door under the door grip there's a screw cover. Use the small flat head to pop the cover down, then a phillips to remove the screw.

Remove the rubber with a KTC tool and expose the screw in the door. Then remove the screw.

The next part you'll need two of the panel poppers. I'm showing the part partially removed so the panel gap is exaggerated a bit


[IMG]http://jczech.smugmug.com/Cars/2010TL/SH-AWD-Install
/283/1215155516_jUuZq-L.jpg[/IMG]
After this piece is removed remove the last remaining screw.

Starting at the bottom of the door put the wedge tool in and gradually pop off each panel clip. Do this for both sides up the sides of the door. When you get to the top pull the door up and toward you at a 45* angle. This will release the metal clips holding the door panel onto the sheet metal. The 4G door panel does not clip onto the window ledge. You'll have to use a bit of force to remove the panel from those metal retainer clips.
That's it... The panels will come off in a little less then 5 minutes with some practice.
The front driver-side door is a tad different though.
First, when you remove the cover from the door grip you'll notice the connector. This is for the power mirrors. Remove this before removing the door panel.


Second, on the driver side door has a cluster of connectors that makes it easier to connect and disconnect when you pull away the panel. Be sure to disconnect the door panel from here.

You're finished product will look something like this (but with the factory sound deadener on) -- Mine is removed because I've deadened all my doors.

The following 8 users liked this post by jnc2000:
arek1200 (10-26-2013),
ATLBuckeye (11-04-2013),
binarythrottle (04-20-2012),
just1nsama (03-27-2015),
liquidneon (09-23-2014),
and 3 others liked this post.
#3
You're welcome. Taking them off is really not that bad. But after 4 visits to the dealer about door rattles I knew the only solution was (after years of experience) was to fix it myself and deaden the doors. I can now safely play the volume at ANY level and have no vibrations or rattles to worry about. Not to mention the annoying rattles when the music is off and you want the car to be whisper quiet. 

#5
You can see the factory deadener material in my one picture showing the driver side door harness. It's an evolved vapor barrier (the white plastic) with a foam like material in the middle of the door. It's quite thin. On the rear door panel itself there are strategically placed pieces of cotton for sound absorption. The rear doors also employ a hard foam block which is prone to rattling and working itself loose. This creates a tinny and unpleaent sound when closing the door.
Here are some pictures:

Rear door interior door foam.

Note the cotton on the door panel faded in the background of this picture.

I replaced it because I was tiered of dealing with the rattles, and I wanted superior sound quality that I knew was possible, along with a quieter ambient noise level when traveling the highway.
Here are some pictures:

Rear door interior door foam.

Note the cotton on the door panel faded in the background of this picture.

I replaced it because I was tiered of dealing with the rattles, and I wanted superior sound quality that I knew was possible, along with a quieter ambient noise level when traveling the highway.
#6
ll_22,
Here's my deadening thread.
https://acurazine.com/forums/4g-tl-audio-bluetooth-electronics-navigation-294/jnc2000-tls-deadening-811530/
Here's my deadening thread.
https://acurazine.com/forums/4g-tl-audio-bluetooth-electronics-navigation-294/jnc2000-tls-deadening-811530/
The following users liked this post:
Megatron_79 (05-24-2013)
#7
I wanted to add, a few images, as I was puzzled by a few of OP images. I removed the panel of the rear right passenger door, as the window would not roll all the way down. Turned out a foam block had come loose in the door and the window was smashing into it. I was able to re-seat the foam block, and the window would roll down normally.
I used some tools similar to OP, I got from Harbor Freight for $8, they worked great. I went very slowly and cautiously, it took me about 20 minutes. If I did it again, it could easily be done in 5 minutes as jnc2000 mentioned. On a scale of 1 (installing wipers) to 10 (replacing your car engine), this is about a 3.
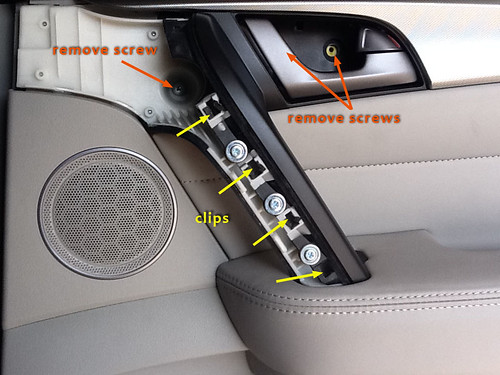
This image just shows some more detail on this area. you leave those four screws in place on the door handle.
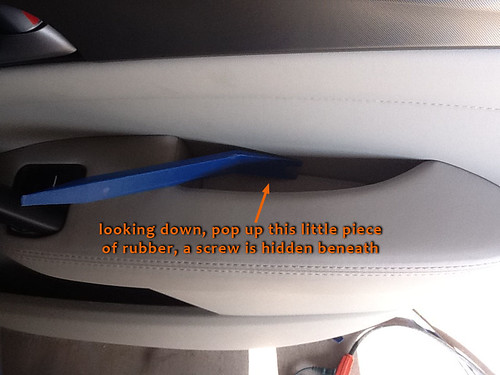
This image shows where you remove the small rubber trim from. The original OP image took me awhile to figure it out. You can use a small screwdriver to pry this up, it comes out very very easily, it is essentially just resting down there.
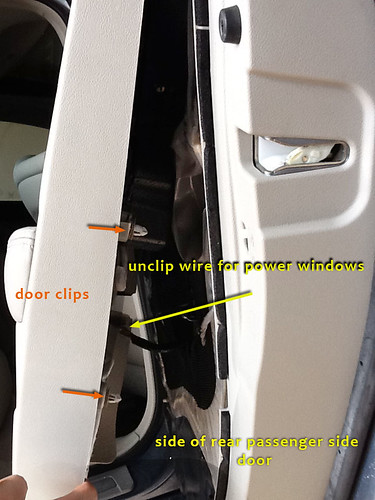
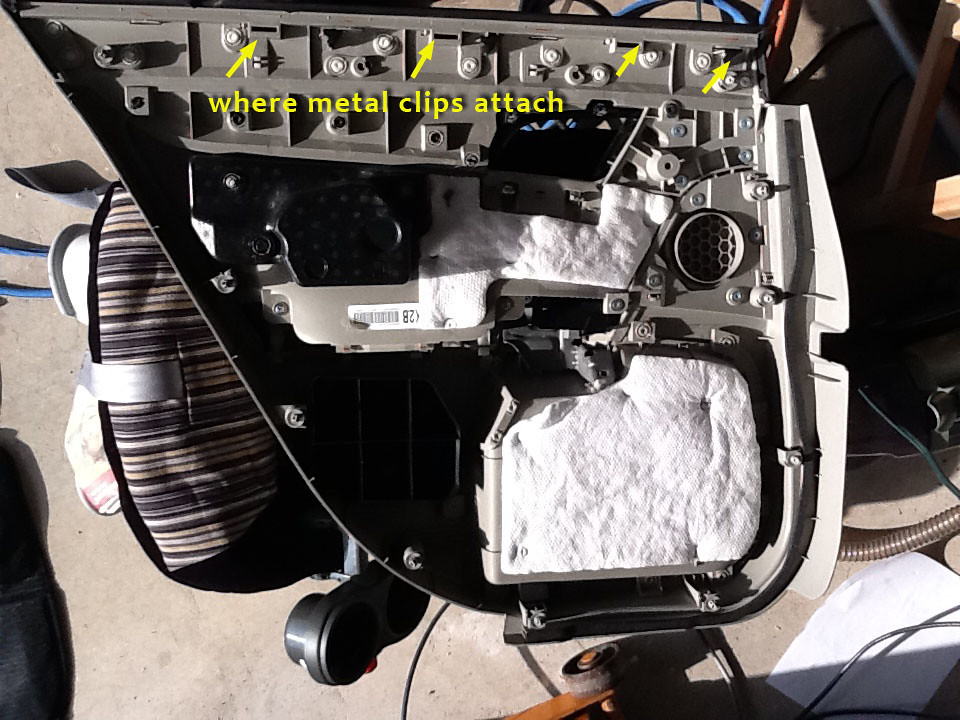
When you get to the part, where you have removed all of the screws, you start popping the plastic rivets, it is very easy, I was able to just use my hands starting from the bottom. Once you get them removed from both sides, you can move the bottom panel out to a 20 maybe 30 degree angle. From here, I reached in and un-clipped the power window control, and was able to see the four silver metal tabs up on the window, I used a flat head screw driver to compress them, thus releasing them very easily from the door without having to use a lot of force.
Here is a picture of the door panel with all of the plastic in place as it should look, just for reference.
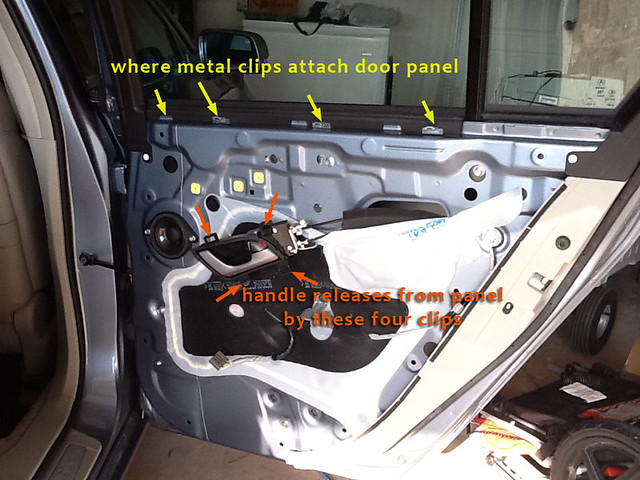
Lastly here is a picture of the back of the interior door panel for reference.
To reassemble is easy and quick.
1. Just clip in the door handle again.
2. Punch down the top of the door onto the four clips at the top.
3. Reconnect power window clips
4. push door onto the plastic rivet clips all around starting from top going
down.
5. Reattach 2 screws in door handle area, 1 in the arm rest crevice,
the one up and underneath the front arm rest. And the one in the top part of the door.
6. Pop on the plastic trim on the handle grip
7. Pop on the plastic cover for the door handle area.
8. Test
Replug
I used some tools similar to OP, I got from Harbor Freight for $8, they worked great. I went very slowly and cautiously, it took me about 20 minutes. If I did it again, it could easily be done in 5 minutes as jnc2000 mentioned. On a scale of 1 (installing wipers) to 10 (replacing your car engine), this is about a 3.
This image just shows some more detail on this area. you leave those four screws in place on the door handle.

This image shows where you remove the small rubber trim from. The original OP image took me awhile to figure it out. You can use a small screwdriver to pry this up, it comes out very very easily, it is essentially just resting down there.

When you get to the part, where you have removed all of the screws, you start popping the plastic rivets, it is very easy, I was able to just use my hands starting from the bottom. Once you get them removed from both sides, you can move the bottom panel out to a 20 maybe 30 degree angle. From here, I reached in and un-clipped the power window control, and was able to see the four silver metal tabs up on the window, I used a flat head screw driver to compress them, thus releasing them very easily from the door without having to use a lot of force.

Here is a picture of the door panel with all of the plastic in place as it should look, just for reference.

Lastly here is a picture of the back of the interior door panel for reference.

To reassemble is easy and quick.
1. Just clip in the door handle again.
2. Punch down the top of the door onto the four clips at the top.
3. Reconnect power window clips
4. push door onto the plastic rivet clips all around starting from top going
down.
5. Reattach 2 screws in door handle area, 1 in the arm rest crevice,
the one up and underneath the front arm rest. And the one in the top part of the door.
6. Pop on the plastic trim on the handle grip
7. Pop on the plastic cover for the door handle area.
8. Test
Replug
Last edited by wakattack; 03-23-2011 at 03:27 PM. Reason: fixing links
The following 5 users liked this post by wakattack:
ChunkyDA (12-15-2016),
liquidneon (09-23-2014),
Megatron_79 (05-24-2013),
queens207tl (03-03-2013),
Worm (04-27-2013)
Trending Topics
#8
How difficult would it be to replace the plastic door handles of the 4G with the new metal variety from the 4.5G? Does anyone know if this is something that can be ordered separately from the dealership?
#9
I would think the 2011 handles should just snap right in. I am sure the dealership will carry them, they probably already can be ordered.
The tools I used to open my door, are at this link. HF is not the best, but these tools worked fine for this job.
http://www.harborfreight.com/5-piece...set-67021.html
The tools I used to open my door, are at this link. HF is not the best, but these tools worked fine for this job.
http://www.harborfreight.com/5-piece...set-67021.html
#11
Did you ever get a solid answer to your question? It's something I'd be interested in changing as well.
#12
I spoke with my dear about a month ago and couldn't order them... I'll circle back here this weekend but for intents they look plug and play.
Honestly though they don't feel that much better...
Honestly though they don't feel that much better...
#13
Are they coated plastic? That's how they are on the Accords - I know from experience (someone peeled off the "chrome" or whatever it was)
The following users liked this post:
Megatron_79 (05-24-2013)
The following users liked this post:
Megatron_79 (05-24-2013)
#17
Hey Wakkaman - excellent pix man, Thx. T
his is timely stuff as I just purchased a 2009 TL and am attempting to replace a blown passenger side speaker. I got ALL the way in the disassembly to being able to pull the bottom of the door panel back (as you have here). I unclipped the plugs etc but then realized the "door handle" was still in the door panel. Silly question but how in the heck do you pop that sucker out? No one shows that being done in any videos so I was afraid of breaking it. I see it has (4) clips; two top, two bottom as shown in your picture but again, how do you pop that out? Once that's out, I'm golden.
Excellent vids and pix...gotta love the advent of digital, technology and Acura ninjas showcasing their skillz.
Thx Mongoman.
#18
Worm - hey I just reached out to WakAttack but also saw your excellent video so I'll ask you as well...How do you release the "door handle" from the panel...I wasn't able to pick that up from your video and got as far as being able to pull the bottom of the panel off...was next attempting to lift the door panel UP off the top metal clips was noticing the door handle was STILL in the door panel. yes, the (2) screws were removed from behind ther access panel (step #1). So do you just push them through the back of the panel or do you have to use pry tool and pop those? Not sure what the process is. Any help would be most appreciated. Oh and NICE Infinity's, those sounded Rich. Thx MM
#19
Hey Wakkaman - excellent pix man, Thx. T
his is timely stuff as I just purchased a 2009 TL and am attempting to replace a blown passenger side speaker. I got ALL the way in the disassembly to being able to pull the bottom of the door panel back (as you have here). I unclipped the plugs etc but then realized the "door handle" was still in the door panel. Silly question but how in the heck do you pop that sucker out? No one shows that being done in any videos so I was afraid of breaking it. I see it has (4) clips; two top, two bottom as shown in your picture but again, how do you pop that out? Once that's out, I'm golden.
Excellent vids and pix...gotta love the advent of digital, technology and Acura ninjas showcasing their skillz.
Thx Mongoman.
his is timely stuff as I just purchased a 2009 TL and am attempting to replace a blown passenger side speaker. I got ALL the way in the disassembly to being able to pull the bottom of the door panel back (as you have here). I unclipped the plugs etc but then realized the "door handle" was still in the door panel. Silly question but how in the heck do you pop that sucker out? No one shows that being done in any videos so I was afraid of breaking it. I see it has (4) clips; two top, two bottom as shown in your picture but again, how do you pop that out? Once that's out, I'm golden.
Excellent vids and pix...gotta love the advent of digital, technology and Acura ninjas showcasing their skillz.
Thx Mongoman.
The following users liked this post:
mongoman (05-13-2013)
#20
Si1Point6 - thx man, was worried my Shrek tendencies would break something. Thats probably why I was having such a hard time "lifting" the door panel up/off the clips. What a maroon. First time door panel remover so thx for the response - good to know.
#21
You're welcome. Let me know if you run into any other issues with the speaker replacement. I've replaced my own speakers on the 4G, so I know what you are going through.
#22
S1Point6 - Hey quick Q...I see Worm put in some Infinity Reference 6030's, what did you drop into your rig? I may opt to upgrade to new speakers once I shred these. Guy I bought this car from actually picked up a replacement from Acura Dealership for me so NOT sure what kind of speakers they are, but might as well use the free ones. Also, heard of that sound deadening stuff (DynaMat)...is that recommended or overkill?
#23
I have Infinity Kappa 63.9i 3-ways in the rear deck, and Kappa 60.9cs components in the front door and the a-pillars (required me to Dremel some of the plastic holding the stock tweeter in place). I use to have Kappa 63.9i's in the front too, but the sound stage was not what I was looking for. Even after aiming the tweeter at different angles into the cabin, the music sounded like it was biased to the sides of the car. After I installed the components, it evened out the sound stage a lot, and now the music sounds like it's coming from in front of me.
DymaMat is not overkill. It really does help dampen vibrations. But, in small quantities, it will not convert the TL into a tomb. If you do not plan to add an amp and/or a larger subwoofer, Dynamat in the immediate areas of the speakers will help a little. If you put in an aftermarket amp, the front door speakers and the rear deck speakers will cause the surrounding panels to vibrate some from the extra power going into them. Adding more Dynamat to the rear shelf as well as the underside of the plastic rear shelf cover helped rid the vibration for me. Adding it the inside of the door (side of the door closest to the outside) made my front speakers sound better. It also gave my doors a nice deep *thump* sound when I swing the doors shut. When I added the 10" sub, I added Dynamat to the underside of the trunk lid as well as to the rear quarter panels of the car to get rid of some of rattles I was getting when the bass was going. If you are a DIY kind of guy, you can get 36 sq. ft. of Dynamat Xtreme (model number 10455) for about $145 on Amazon. That will be enough to cover all 4 doors and the rear deck.
DymaMat is not overkill. It really does help dampen vibrations. But, in small quantities, it will not convert the TL into a tomb. If you do not plan to add an amp and/or a larger subwoofer, Dynamat in the immediate areas of the speakers will help a little. If you put in an aftermarket amp, the front door speakers and the rear deck speakers will cause the surrounding panels to vibrate some from the extra power going into them. Adding more Dynamat to the rear shelf as well as the underside of the plastic rear shelf cover helped rid the vibration for me. Adding it the inside of the door (side of the door closest to the outside) made my front speakers sound better. It also gave my doors a nice deep *thump* sound when I swing the doors shut. When I added the 10" sub, I added Dynamat to the underside of the trunk lid as well as to the rear quarter panels of the car to get rid of some of rattles I was getting when the bass was going. If you are a DIY kind of guy, you can get 36 sq. ft. of Dynamat Xtreme (model number 10455) for about $145 on Amazon. That will be enough to cover all 4 doors and the rear deck.
Last edited by si1point6; 05-13-2013 at 09:31 PM. Reason: typo
#26
Hey Mongoman sorry I just got your PM and didn't see it before. I see you got your question answered if you need anything else let me know. Also I tried to reply to your PM and AcuraZine said you have exceeded your message count so you need to erase some in order to get more messages, just FYI. Good luck 

#27
Dang man, thanks for the pictorial.
The videos that are linked are not working, not for me at least. Here is a link to another youtube video.
All in all, good video. I am not replacing my speakers, not yet at least, but I need to remove the panel to see what the dang clicking sound is that is driving me nuts....
The videos that are linked are not working, not for me at least. Here is a link to another youtube video.
All in all, good video. I am not replacing my speakers, not yet at least, but I need to remove the panel to see what the dang clicking sound is that is driving me nuts....

#28
#29
Nah dude... Driver side.
Turns out, it was not the door. I removed the door panel, drove the car around, still making this dogone clicking noise, kinda similar to the iPhone key clicking sound. I hear it coming from the dash. Nothing seems to be lose there. Feels like it is from the left side Fan Duct. Not sure, will be taking to the dealer, but I know when I will take it to them, it will not make ANY noise whatsoever....
Turns out, it was not the door. I removed the door panel, drove the car around, still making this dogone clicking noise, kinda similar to the iPhone key clicking sound. I hear it coming from the dash. Nothing seems to be lose there. Feels like it is from the left side Fan Duct. Not sure, will be taking to the dealer, but I know when I will take it to them, it will not make ANY noise whatsoever....
#30
yeah,,, removing the panel isn't that bad ,,, it does just pop off at the top,,, I just recently had to remove mine the driver window button messed up on me and had to replace the whole part of the window panel buttons.
#31
Thread
Thread Starter
Forum
Replies
Last Post
BoricuaTL
Car Parts for Sale
138
04-08-2016 02:08 PM


