DIY: Convert your Trunk CD changer into an aux port (NAV models)
 12-02-2013, 03:13 PM
#1
Racer
Thread Starter
DIY: Convert your Trunk CD changer into an aux port (NAV models)
Ok so for those of us with the nav screens there is no direct plug and play aux port available. This is an alternative method of creating one using your CD changer. I've done this on my 99 and this is for my friends 00.
The only reason I did this to my CD changer initially was because it didn't work anymore due to water damage. Please note I take no responsibility for damage to your changer so please proceed at your own risk.
Tools Needed:
Phillips Screw Driver
Small Flat Head
Soldering Iron
Pliers
Hot Glue Gun
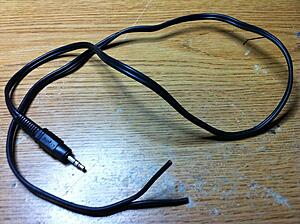
Short Aux cord for cutting
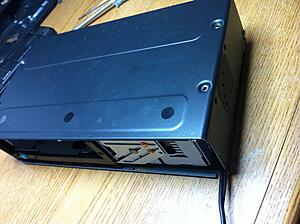
I don't have photos of the removal from the trunk but it's very simple. All you need to do is pull straight up on the cover (its on there very tight) to remove it. From there remove 3 bolts to undo the changer and bracket from the mount. Then remove the silver bracket around the changer. Now we can begin!
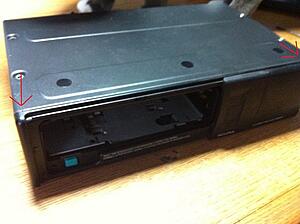
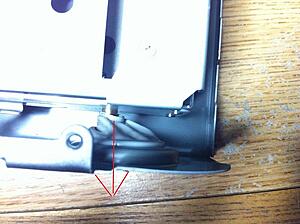
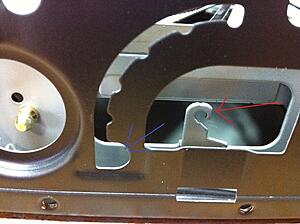
1. Remove the screws in the red circles.

2. Use a thin screw driver to create a gap on these corners. Work the gap towards the center and it should pop the face plate off.
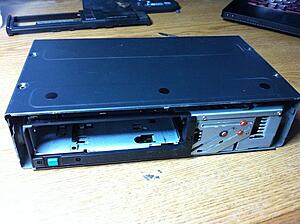
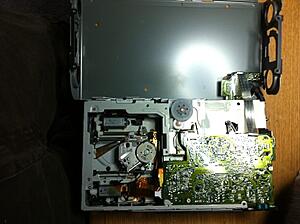
3.NOTE: If you have not removed the cd caddy do so now. With the faceplate off this is how it should look:
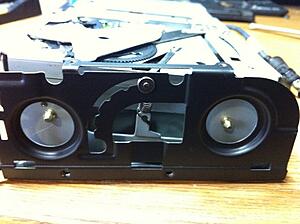
4. On the side where the cord comes out pull up on the top half of the case. The other side is slightly hooked so it should open like a door on a hinge.
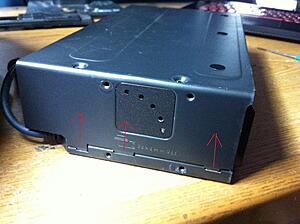
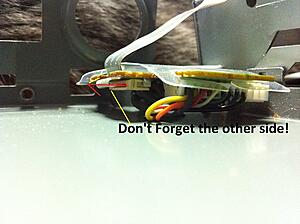
5. Follow the red arrow by pulling the circle down. It should relieve the tension on the spring allowing you to unhook from the hook (yellow arrow). Repeat for other side.
6. Use your fingers to pull the squishy things off the tips. Be careful not to pop them!
7. Flip the internals like so. Make sure to go the proper direction to prevent the cord ripping.
8. On the underside of the small board is where we will undo the cable. Carefully pull the two sides of the plug forward with a small flat head. Don't pull to hard.
9.Remove the ribbon so it looks like this:
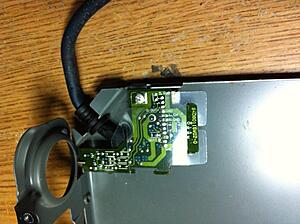
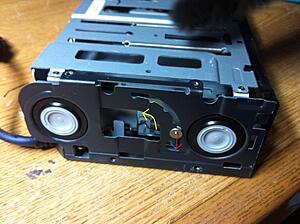
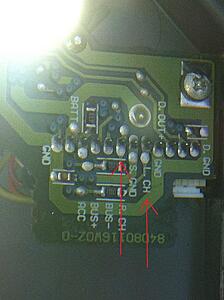
10. These are the two audio pins we are working with.
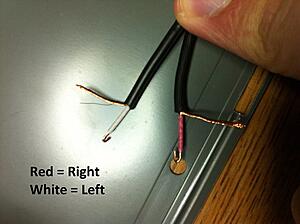
11. Prepare your wire. Separate the L and R wires.
12. Strip back the wire but be careful not to cut the ground shielding. Make little hooks on the White and Red for soldering. (Tip Use the thin corner of a small flat head for this)
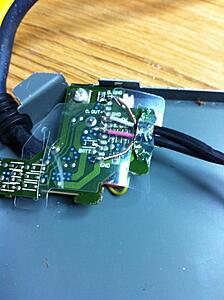
13. Solder the wires like so. Be careful not to connect pins.
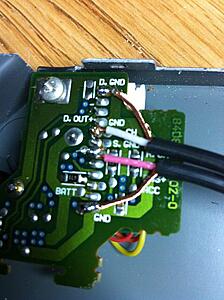
14. Use hot glue to hold down the wire so the solder points are never under strain. Also cover them using the plastic guard.
15. This step has two different choices. You can either run the wire out the top or create a small exit in the corner by bending the metal.
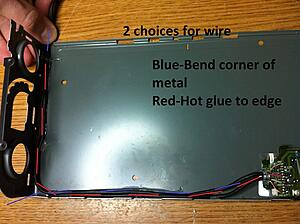
Option 2:
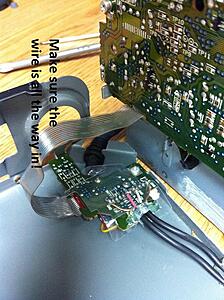
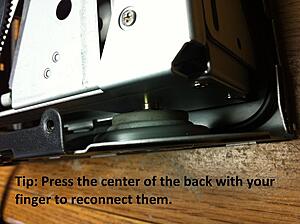
16. Reattach the ribbon cable. Don't forget to push the two tabs we pulled out back in. These lock the ribbon in place.
17. Carefully put the guts back in place. Take the two springs you had and reconnect them first at the hook then slide the circle into the slot.
18. This is how it should look like on both sides.
19. Reattach all four squishies to the pins. You probably won't be able to get them back on as tight as before but thats ok.
20. Both sides should look like this before you re attach the side cover.
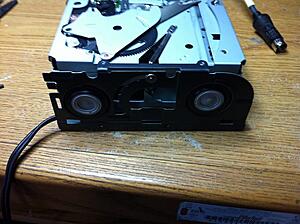
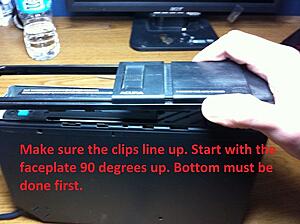
21. Re attach the other half of the casing. Don't forget to put the four screws back in place. If you picked option 1 it should look like:
Option 2:
22. Final Step is to simply reconnect the faceplate.
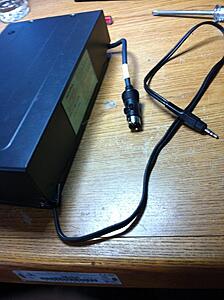
Now you just need to re-install the changer back in the trunk then run an aux cord to where ever desired. (I've actually never done this part). In my 99 I gutted the disc drive and hid it behind the nav unit like so:
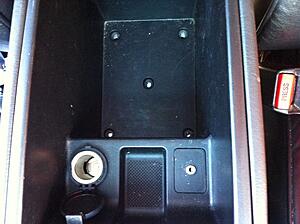
You can go to radioshack and buy an aux port that has a screw tip to attach to a plate like so:
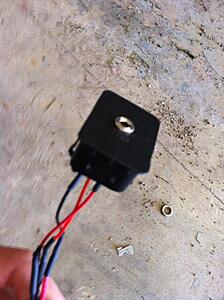
I hid mine under my center console.
To use the aux function you must have no cds in it or the cd tray removed. As soon as it switches to CD mode the audio will play regardless of what the CD drive is doing. The cd player will transfer audio regardless if it's on an error or not.
This is mainly the basis of how to begin the aux port. Depending on how/where you want the aux port to be is totally up to you. It actually sounds great and has no static to it. There is a very faint engine wine only when the music isn't playing and volume is up.
Thoughts and critiques are welcome!
The only reason I did this to my CD changer initially was because it didn't work anymore due to water damage. Please note I take no responsibility for damage to your changer so please proceed at your own risk.
Tools Needed:
Phillips Screw Driver
Small Flat Head
Soldering Iron
Pliers
Hot Glue Gun
Short Aux cord for cutting
I don't have photos of the removal from the trunk but it's very simple. All you need to do is pull straight up on the cover (its on there very tight) to remove it. From there remove 3 bolts to undo the changer and bracket from the mount. Then remove the silver bracket around the changer. Now we can begin!
1. Remove the screws in the red circles.

2. Use a thin screw driver to create a gap on these corners. Work the gap towards the center and it should pop the face plate off.

3.NOTE: If you have not removed the cd caddy do so now. With the faceplate off this is how it should look:

4. On the side where the cord comes out pull up on the top half of the case. The other side is slightly hooked so it should open like a door on a hinge.

5. Follow the red arrow by pulling the circle down. It should relieve the tension on the spring allowing you to unhook from the hook (yellow arrow). Repeat for other side.

6. Use your fingers to pull the squishy things off the tips. Be careful not to pop them!

7. Flip the internals like so. Make sure to go the proper direction to prevent the cord ripping.

8. On the underside of the small board is where we will undo the cable. Carefully pull the two sides of the plug forward with a small flat head. Don't pull to hard.

9.Remove the ribbon so it looks like this:

10. These are the two audio pins we are working with.

11. Prepare your wire. Separate the L and R wires.

12. Strip back the wire but be careful not to cut the ground shielding. Make little hooks on the White and Red for soldering. (Tip Use the thin corner of a small flat head for this)

13. Solder the wires like so. Be careful not to connect pins.

14. Use hot glue to hold down the wire so the solder points are never under strain. Also cover them using the plastic guard.

15. This step has two different choices. You can either run the wire out the top or create a small exit in the corner by bending the metal.

Option 2:

16. Reattach the ribbon cable. Don't forget to push the two tabs we pulled out back in. These lock the ribbon in place.

17. Carefully put the guts back in place. Take the two springs you had and reconnect them first at the hook then slide the circle into the slot.

18. This is how it should look like on both sides.

19. Reattach all four squishies to the pins. You probably won't be able to get them back on as tight as before but thats ok.

20. Both sides should look like this before you re attach the side cover.

21. Re attach the other half of the casing. Don't forget to put the four screws back in place. If you picked option 1 it should look like:

Option 2:

22. Final Step is to simply reconnect the faceplate.

Now you just need to re-install the changer back in the trunk then run an aux cord to where ever desired. (I've actually never done this part). In my 99 I gutted the disc drive and hid it behind the nav unit like so:

You can go to radioshack and buy an aux port that has a screw tip to attach to a plate like so:

I hid mine under my center console.

To use the aux function you must have no cds in it or the cd tray removed. As soon as it switches to CD mode the audio will play regardless of what the CD drive is doing. The cd player will transfer audio regardless if it's on an error or not.
This is mainly the basis of how to begin the aux port. Depending on how/where you want the aux port to be is totally up to you. It actually sounds great and has no static to it. There is a very faint engine wine only when the music isn't playing and volume is up.
Thoughts and critiques are welcome!

The following 2 users liked this post by Not_So_Fast_Eddie:
MyNameIsEarl (12-02-2013),
OLD_HATCH (12-09-2013)
12-02-2013, 03:51 PM
#3
Racer
Thread Starter
I only wrote this because there is no aux port for the navigation models. They have a different pin layout. I wouldn't recommend this on a regular model haha.
12-02-2013, 03:57 PM
#4
Is there one of those devices that was used on the first write-up that will fit premium model connectors? If not then really great write-up.
I'd just love to find some way to make an auxiliary input that allows the CD changer and iPod to work.
P.S. they should totally sticky this.
I'd just love to find some way to make an auxiliary input that allows the CD changer and iPod to work.
P.S. they should totally sticky this.
12-02-2013, 04:13 PM
#5
Racer
Thread Starter
As far as I know there wasn't I ordered a grom aux port awhile back when they said it would fit the nav models although it didn't fit mine. It took a 2 week return process that wasn't fun to deal with. I came up with this idea when I was aggravated over the summer that my FM transmitter sucked. The method I discuss above should work with both CD and Ipod.
For Ipod just have the 6 cd tray removed. And for cd just have the Ipod disconnected.
For Ipod just have the 6 cd tray removed. And for cd just have the Ipod disconnected.
12-09-2013, 08:43 AM
#7
Nice write up notsofasteddie.
Ive actually been slacking on this as I talked about doing this years ago but have yet to finish my system install. (even though I have all the parts, lol)
The reason I haven't done it yet is because my cd changer works and I still use it. I was planning on making a plug in module that would switch back an forth between ipod and cd changer by the flick of a switch.
Needless to say the parts are still there and I haven't started lol.
Trending Topics
12-09-2013, 10:33 AM
#8
Racer
Thread Starter
Thanks Hatch! That's a sweet mod idea you have. Your comment in the DIY for none nav models is what gave me the idea to do this. Do you know the pin out for non nav models?
I want to remove my nav and install a custom Raspberry Pi media center but my cut up CD player is taking up too much space.
I want to remove my nav and install a custom Raspberry Pi media center but my cut up CD player is taking up too much space.
12-09-2013, 12:10 PM
#9
I have to look around to see if I still have the diagram somewhere , but the pinout is basically the alpine 8 pin din pinout with 2 wires reversed. I forget which ones, but I believe it was the left and right channel positive was reversed as they used a common ground I believe.
Try googling that if not I'll have to see if I can find the diagrams I have.
Try googling that if not I'll have to see if I can find the diagrams I have.
12-09-2013, 12:53 PM
#10
Racer
Thread Starter
I think I may have found the connector pin out. The site even mentions which 2 wires are switched.
http://pinouts.ru/CarAudio/alpine_cd...r_pinout.shtml
Damn! I wish I had known it was this easy before the aux port adapters doubled in price. If I can find one cheap enough I'll have to make a bridge for it. Do you happen to know if the 00+ nav has the same size hole in the center console as the 99?
12-09-2013, 04:18 PM
#11
Thanks Hatch! That's a sweet mod idea you have. Your comment in the DIY for none nav models is what gave me the idea to do this. Do you know the pin out for non nav models?
I want to remove my nav and install a custom Raspberry Pi media center but my cut up CD player is taking up too much space.
I want to remove my nav and install a custom Raspberry Pi media center but my cut up CD player is taking up too much space.
Also, I was talking with my dad on this project and he said, "Why not do it on the tape player? It will be the same."
So I'm going to be investigating that route. Because, I for one, NEVER use the tape player.
01-09-2014, 12:51 PM
#12
1st Gear

Join Date: Jan 2014
Posts: 1
Likes: 0
Received 0 Likes
on
0 Posts
Im new to this, but I tried doing this to a non nav model and so red to right channel and black to left channel. but i only had one ground wire on my aux so i only grounded it to 1 ground pin, dont know if this is why whenever i try to play music without the cd changer in nothing happens, only when i put the changer cartridge the song plays for 2 seconds, then cycles through the 6 slots looking for a cd, and playing my music only when it pauses in between pauses. Please help tried doing this as a christmas present for my brother. Plan to hook up the airplay i bought him, from an episode of mighty car mods.
 01-09-2014, 06:22 PM
#15
Racer
Thread Starter
Hey Knowski did you have any luck? The non nav models could be different but I don't think they are too different as they are made by the same manufacturer. I'd try checking your ground / changing it perhaps the board uses it in an odd way.
If that doesn't help let me know.
If that doesn't help let me know.
02-10-2017, 09:57 PM
#19

Only One Ground
I used this trick and it seems to be working. Instead of using a 1/8" to RCA, I just went straight from the 1/8" cable and used the lower ground in your picture. Didn't make sense to have an RCA splitter just to have an extra ground. The R and L leads in the 1/8 cable are smaller and easier to solder onto the board anyway. The pics don't really show how small that board is, and I have fat fingers.
At first, it sounded like there was no low end at all, but after a little troubleshooting, I found out it was a bluetooth adapter I had connected to the soldered-in aux jack. My plan was to just have a bluetooth dongle connected next to the disc changer and not have to mess with hiding any wires. That's when I realized the dongle itself needs a 5V power supply or I'd be going into the trunk every day or so to charge it, not to mention having to go into the trunk to turn it off and on every time I use it. My revised plan was to run an aux lead to the center console and just hook the bluetooth transmitter up there since it conveniently has a 12V supply right there. Since it would always be plugged into the jack, I wouldn't have to worry about turning it off, but I think I'd still have to turn it on again. And for whatever reason the bluetooth unit I got sounds like booty anyway, so I'm just going to take it back. Looks like I'll just be plugging in like this is the dark ages or something. At least until I get new media gear installed.
I have navigation and honestly if I try to do the custom fab it will look like garbage, so I'm just gonna have to bite the bullet and pay for an install job. I'm thinking a single DIN DVD player (So I don't have to figure out what to do with the climate controls) pushing video to a tablet where that awful Win98 looking Nav used to be GOD I can't wait to get rid of that thing. You know, for the 50% of the time it actually loads, it's not that bad as long as you're somewhere that existed ten years ago. I can't have it. It must go.
Really liking the forum, there's not a whole lot out there for custom work to the RL, at least that I can find. I just got mine a week ago for 2500 cash and it looks and runs great. Interior is super clean and you can tell it was garaged. There's a little hail damage that needs to be dealt with and it feels like some of the bushings are warn, the rear end has a touch of shimmy on the highway when you hit a bump, but I think I got a steal! My last car was a 96 Taurus. From rags to bishes for real.
Cheers.

Thread
Thread Starter
Forum
Replies
Last Post
orkoTL
4G TL Problems & Fixes
107
09-28-2017 09:12 AM
BoricuaTL
Car Parts for Sale
138
04-08-2016 01:08 PM