DIY: 1st Gen Acura RL Instrument Cluster LED Bulbs
 01-30-2008, 02:03 AM
#1
Ultimate DIYer
Thread Starter
DIY: 1st Gen Acura RL Instrument Cluster LED Bulbs
DIY: 1st Gen Acura RL Instrument Cluster LED Bulbs
I would share the instrument cluster LED bulb conversion on 1st Gen RL. I bought the following T6.5 3-LED bulbs from an eBayer ID, warden_jp2002. The seller is an eBay power seller and lives in Hong Kong. The seller is an expert on LED bulbs and ships the bulbs so fast. The most of buyers can expect to receive bulbs in 2-5 business days.
Disclosure: I'm not related with the seller anyhow.
Anyway, I bought the 4 pairs of Spark blue and 2 pairs of Xenon white LED bulbs from him at $18 ($3 x 6 pairs) plus $6.80 (shipping). What a big deal?
The seller is no longer listing these bulbs on eBay, but you may ask him to list them or search on google to find the same LED bulbs. These are wide angle LED bulbs (Cross reference: #24 or T6.5) and 3-power LED wedge bulbs for using in instrument panel and gauges working at
12V. (FYI: #74 blubs (5 mm) are not right size on our RL, and single LED bulbs are not bright at all. They are not wide resulting a dim area. I learned it from a trial and error)
I'm not writing how to disassemble the instrument cluster in this thread. You can find a decent how to remove the instrument cluster if you search on this thread. (Caution: You must be very gentle to unscrew and tighten screws on the back panel of the instrument cluster. Otherwise you will mess up the whole cluster. And also there are two types of screws so you must memorize which one goes where.)
Here's some photo of the 3-LED dimension and installed photo on my RL.
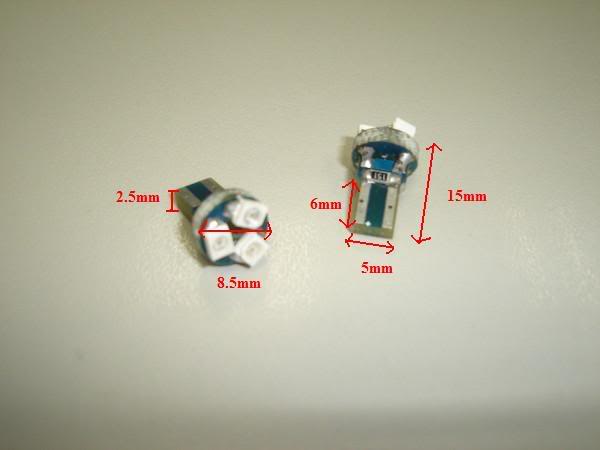
<T6.5 3 LED Bulb Dimension>
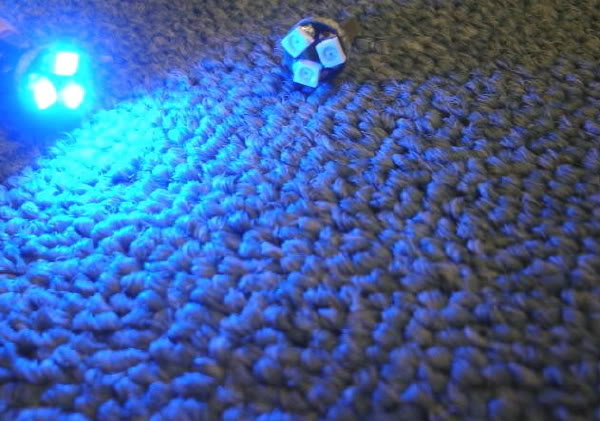
<Spark Blue>
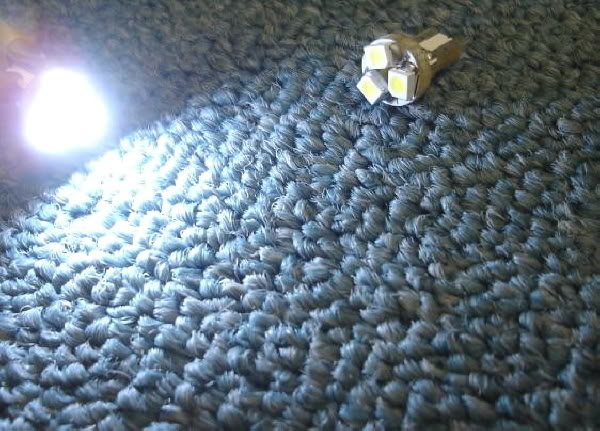
<Xenon White>
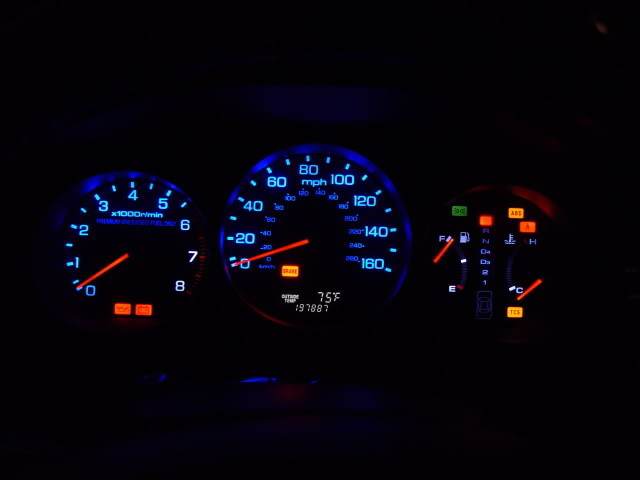
<Night shot photo of my 97 RL Instrument cluster>
97_RLer
I would share the instrument cluster LED bulb conversion on 1st Gen RL. I bought the following T6.5 3-LED bulbs from an eBayer ID, warden_jp2002. The seller is an eBay power seller and lives in Hong Kong. The seller is an expert on LED bulbs and ships the bulbs so fast. The most of buyers can expect to receive bulbs in 2-5 business days.
Disclosure: I'm not related with the seller anyhow.
Anyway, I bought the 4 pairs of Spark blue and 2 pairs of Xenon white LED bulbs from him at $18 ($3 x 6 pairs) plus $6.80 (shipping). What a big deal?
The seller is no longer listing these bulbs on eBay, but you may ask him to list them or search on google to find the same LED bulbs. These are wide angle LED bulbs (Cross reference: #24 or T6.5) and 3-power LED wedge bulbs for using in instrument panel and gauges working at
12V. (FYI: #74 blubs (5 mm) are not right size on our RL, and single LED bulbs are not bright at all. They are not wide resulting a dim area. I learned it from a trial and error)
I'm not writing how to disassemble the instrument cluster in this thread. You can find a decent how to remove the instrument cluster if you search on this thread. (Caution: You must be very gentle to unscrew and tighten screws on the back panel of the instrument cluster. Otherwise you will mess up the whole cluster. And also there are two types of screws so you must memorize which one goes where.)
Here's some photo of the 3-LED dimension and installed photo on my RL.
<T6.5 3 LED Bulb Dimension>
<Spark Blue>
<Xenon White>
<Night shot photo of my 97 RL Instrument cluster>
97_RLer

The following 5 users liked this post by 97_RLer:
01RL1stimer (10-21-2017),
BlkDrgn28 (04-04-2015),
kc2k5champ (08-16-2014),
Ken1997TL (06-06-2011),
Patro (07-24-2023)
01-30-2008, 03:36 PM
#2
Senior Moderator
Join Date: May 2003
Location: Better Neighborhood, Arizona
Posts: 45,634
Received 2,328 Likes
on
1,308 Posts
Wow, very nice! I'll be sure to do this immediately!
The following users liked this post:
Patro (07-24-2023)

The following users liked this post:
Patro (07-24-2023)
02-01-2008, 08:42 AM
#5
Racer
Originally Posted by Big Green Acura
Anybody know how to get the speedo cluster out in the first place? I am wanting to try this, but I don't want to break anything trying to get it out.
Yes i too would like to know how to do this. Two of my bulbs have gone out and it is extremely annoying.
The following users liked this post:
Patro (07-24-2023)
02-01-2008, 09:56 AM
#6

Originally Posted by 97_RLer
DIY: 1st Gen Acura RL Instrument Cluster LED Bulbs
I would share the instrument cluster LED bulb conversion on 1st Gen RL. I bought the following T6.5 3-LED bulbs from an eBayer ID, warden_jp2002. The seller is an eBay power seller and lives in Hong Kong. The seller is an expert on LED bulbs and ships the bulbs so fast. The most of buyers can expect to receive bulbs in 2-5 business days.
Disclosure: I'm not related with the seller anyhow.
Anyway, I bought the 4 pairs of Spark blue and 2 pairs of Xenon white LED bulbs from him at $18 ($3 x 6 pairs) plus $6.80 (shipping). What a big deal?
The seller is no longer listing these bulbs on eBay, but you may ask him to list them or search on google to find the same LED bulbs. These are wide angle LED bulbs (Cross reference: #24 or T6.5) and 3-power LED wedge bulbs for using in instrument panel and gauges working at
12V. (FYI: #74 blubs (5 mm) are not right size on our RL, and single LED bulbs are not bright at all. They are not wide resulting a dim area. I learned it from a trial and error)
I'm not writing how to disassemble the instrument cluster in this thread. You can find a decent how to remove the instrument cluster if you search on this thread. (Caution: You must be very gentle to unscrew and tighten screws on the back panel of the instrument cluster. Otherwise you will mess up the whole cluster. And also there are two types of screws so you must memorize which one goes where.)
97_RLer
I have a question about the daylight operation of this setup. The RL cluster is lighted at full brightness during the day (headlights not on) so are these LEDs bright enough to light up the instruments in sunlight? Also, do they dim when you turn on the headlights like the normal bulbs do? Can you also adjust brightness like normal?
02-01-2008, 11:43 PM
#7
Ultimate DIYer
Thread Starter
Originally Posted by Megatron
I have a question about the daylight operation of this setup. The RL cluster is lighted at full brightness during the day (headlights not on) so are these LEDs bright enough to light up the instruments in sunlight? Also, do they dim when you turn on the headlights like the normal bulbs do? Can you also adjust brightness like normal?
The following users liked this post:
Patro (07-24-2023)
Trending Topics
02-02-2008, 12:03 AM
#8
Ultimate DIYer
Thread Starter
Here are some more pics.....
Here are some more pics for your reference.........
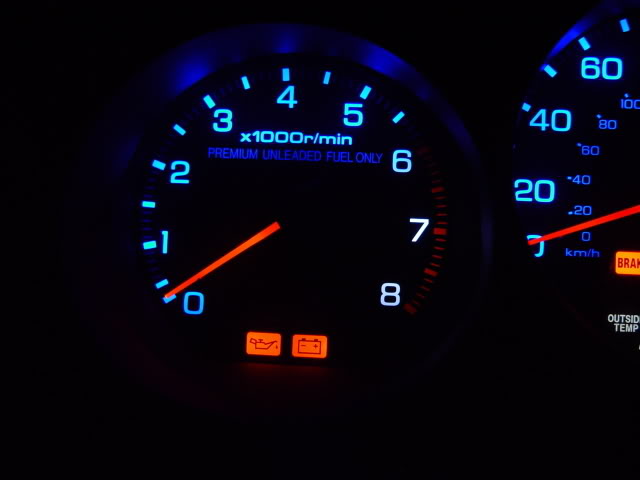
<Nightshot-Tacometer>
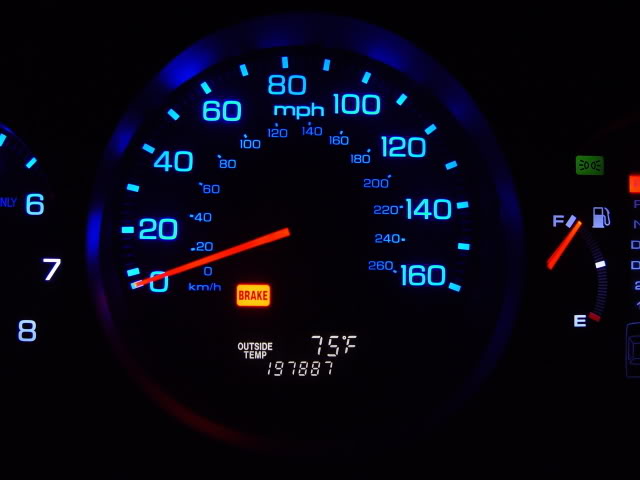
<Nightshot-Speedometer>

<Nightshot-Fuel and Temp gauge>
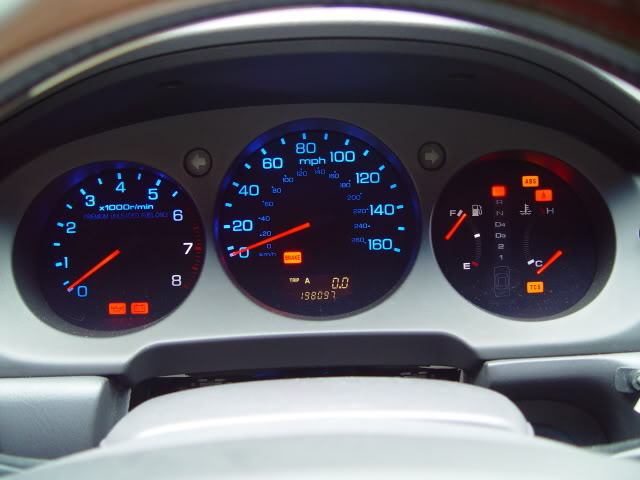
<Day shot of instrument cluster>
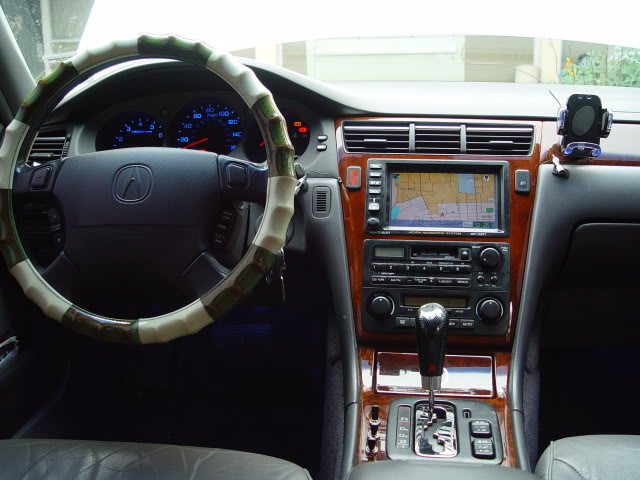
<Day shot of interior>
97_RLer
<Nightshot-Tacometer>
<Nightshot-Speedometer>
<Nightshot-Fuel and Temp gauge>
<Day shot of instrument cluster>
<Day shot of interior>
97_RLer
The following 3 users liked this post by 97_RLer:
The following users liked this post:
Patro (07-24-2023)
02-03-2008, 01:54 PM
#10
Senior Moderator
Join Date: May 2003
Location: Better Neighborhood, Arizona
Posts: 45,634
Received 2,328 Likes
on
1,308 Posts
Did you upgrade your navigation system too? That looks to be 2001 or newer 
The following users liked this post:
Patro (07-24-2023)
The following users liked this post:
Patro (07-24-2023)
02-03-2008, 10:05 PM
#12
Ultimate DIYer
Thread Starter
96-04 Acura RL instrument gauge cluster removal procedure
Originally Posted by Jimmay
hey,if you know a link on how to take apart the dash to get to the instrument cluster could you share it??? or if you wouldnt mind explaining it. Thanks
It involves the removal of shift selector console, audio unit and climate control console, and instrument panel to remove the gauge cluster. You may need to refer the repair manual for better understanding.
1. Unscrew the shift knob.
2. Pop off the black gear select cover. There are four clips to pop off.
3. Pop off the wood console panel and pull it out to access the two bolts at the bottom (96-04). There also are four clips to pop off.
4-1. Remove the center air vent (96-98 only). There are eight clips totally. Four are up and the other are down of the center air vent. Insert a flat-head screw driver under the center air vent to pry the clips up and pull it then insert the screw driver upper the center air vent to pry the clips down and pull it gently.
4-2. Remove the two bolts on top of the center console, then, carefully pull the climate control and audio unit assembly out. You don�t need to pull it out completely (96-98 only).
4-3. Remove the center console lower carpets from each side (99-04 only). You can see a screw bolt each side. Unscrew them and then, carefully pull the climate control and audio unit assembly out. You don�t need to pull it out completely.
Now you can start to remove the instrument panel.
5. Remove the two screws located at the upside of the instrument panel.
6. Detach the four clips by gently pull the right and the bottom of the instrument panel.
7. Pull the instrument panel form the right side and top down. Use a flat-head screw driver to push the two clips from the left side air vent and pull the instrument panel.
8. Remove a connector for select and reset switch.
9. Remove 4 screws holding the gauge cluster.
10. Pull the gauge cluster and disconnect the two connectors on top back side of it.
Now the gauge cluster is out and you need to remove the back panel of it to access the 10 bulbs.
11. Remove three screws and pull the white plastic face back plate. DO NOT try to remove the front plate of the gauge cluster and DON�T touch any needle of the cluster. Otherwise, you will need a new gauge cluster.
12. Remove totally 20 screws from the back panel. There are two types of screws (6 and 14 screws). The description of the screws is shown on the board but you must not be confused with them.
13. Remove the board by pulling and swinging it.
14. Remove the 10 filament bulbs and replace with the amazing LED bulbs. LED bulbs have a polarity so you have to place them in right direction. You need to figure out which side is positive on the board. You�d better check which side is positive on each LED bulb by a 12V source even though the polarity is written on the LED bulbs. Manufacturers used to label the polarity wrong on the bulbs. It happened on me, and 4 out of 12 LED bulbs had the wrong polarity indication.
15. Installation of all things is reverse. (Caution: DO NOT push or over-tighten those 20 screws on the back side of the gauge cluster board when you unscrew or re-screw them. The plastic board is easy to be marred.)
FYI: Don�t buy the wire-lead wedge type LED bulbs. They are easy to be non-functional when you push them into the wedge base because the wire-lead between the resistor and LED is apt to be broken. The LED itself has 180,000 hours of lifetime. But all LED bulbs working on 12V directly have a built-in resistor which has 47K ohms. LED itself is only working at 3.2-3.6V, thus, it requires a resistor to work at 12V properly by ohm�s law.
Please correct me if I�m wrong. Pleae put up with wrong grammar if any........^_*
97_RLer
The following 4 users liked this post by 97_RLer:
 02-09-2008, 02:46 AM
#14
Ultimate DIYer
Thread Starter
Sources to find the LED bulbs
A number of folk asked me where they can buy the LED bulbs. So I searched the internet for about half an hour. At first, I�m sorry but I had misguided you that the cross reference for RL�s gauge cluster bulb is #24 but #37 (6 mm) is right bulb. As I told you #74 (5 mm) is smaller than OEM bulbs. Anyway, you can search on the internet, �T6.5 3-LED bulb�, then, you can find the same bulbs that I bought. Google will show you a number of Chinese websites. I don�t know you can directly place an order at there or not.
Anyway, the best way to get the LED bulbs that I would recommend is email to eBay ID, warden_jp2002. I�m sure that he is the cheapest and fastest in the world.
Another choice is���.
http://cgi.ebay.com/PAIR-12v-T6-5-WE...QQcmdZViewItem
I found the seller on eBay (ID: brightlightautoparts) who are in Australia. The seller are selling the same LED bulbs and a pair of the LED bulbs at AU $8.50 plus AU $15.00 shipping to USA. So expensive!!!��..
Another choice is ���
http://cgi.ebay.com/T5-37-Wedge-12V-...QQcmdZViewItem
The eBay seller (ID: p0o0ohbear) is also from Australia. The LED bulbs are not the same type but are also 3-LED wide angle bulbs. They are selling at AU $3.95 as a pair plus AU $6.00 shipping to USA. Each additional shipping fee is AU $1.00.
Good luck to find good LED bulbs at cheap price���.
97_RLer
The following users liked this post:
kc2k5champ (08-16-2014)
02-10-2008, 06:37 PM
#16
Instructor
Join Date: Dec 2006
Age: 53
Posts: 213
Likes: 0
Received 0 Likes
on
0 Posts
Not bad - looking good , Ive been through this about a year ago and tried several different bulbs, these seem to work the best.just wondering though,on the rpm cluster half of the 6 and the 7 & 8 numbers still seem to be white and also on the fuel gauge side it all seems to show white? the mph is the only part that seems to be illuminated properly
02-11-2008, 02:14 AM
#17
Ultimate DIYer
Thread Starter
Originally Posted by GSARL
Not bad - looking good , Ive been through this about a year ago and tried several different bulbs, these seem to work the best.just wondering though,on the rpm cluster half of the 6 and the 7 & 8 numbers still seem to be white and also on the fuel gauge side it all seems to show white? the mph is the only part that seems to be illuminated properly
The following users liked this post:
kc2k5champ (08-16-2014)
03-06-2008, 01:14 AM
#18
Advanced

Join Date: Oct 2007
Age: 38
Posts: 60
Likes: 0
Received 0 Likes
on
0 Posts
nice write up. I was wondering though if these would be the correct bulbs to get. http://cgi.ebay.com.au/T5-12V-Shifte...742.m153.l1262
i think I'd like white all around the most and since 2 of my bulbs are out why not replace with led.
i think I'd like white all around the most and since 2 of my bulbs are out why not replace with led.
03-07-2008, 06:30 PM
#20
Ultimate DIYer
Thread Starter
Originally Posted by MasterD86
nice write up. I was wondering though if these would be the correct bulbs to get. http://cgi.ebay.com.au/T5-12V-Shifte...742.m153.l1262
i think I'd like white all around the most and since 2 of my bulbs are out why not replace with led.
i think I'd like white all around the most and since 2 of my bulbs are out why not replace with led.
Originally Posted by Jimmay
I have a questions relating to the stock bulbs. Are they all clear bulbs or are there diffrent color ones. Also how many do i need? Thanks for your help
04-08-2008, 10:45 AM
#22
Ultimate DIYer
Thread Starter
Here is a good news!
Finally the eBay seller, warden_jp2002, lists the same bulbs on eBay at the cheapest price. The title is "2pcs 24 T6.5 Instrument Panel 3 LED Bulbs".
Here is the link.
eBay Motors: 2pcs 24 T6.5 Instrument Panel 3 LED Bulbs(Blue/White) (item 190212426319 end time Apr-12-08 03:17:18 PDT)
Finally the eBay seller, warden_jp2002, lists the same bulbs on eBay at the cheapest price. The title is "2pcs 24 T6.5 Instrument Panel 3 LED Bulbs".
Here is the link.
eBay Motors: 2pcs 24 T6.5 Instrument Panel 3 LED Bulbs(Blue/White) (item 190212426319 end time Apr-12-08 03:17:18 PDT)
04-08-2008, 10:48 PM
#24
Ultimate DIYer
Thread Starter
Originally Posted by supernick37
i am excited...
but i am debating on the blue or red... hummm blue is rad, red is different... a bit like STi gauges...
what to do?
but i am debating on the blue or red... hummm blue is rad, red is different... a bit like STi gauges...
what to do?
04-09-2008, 01:02 AM
#25
Rampaging RL
Join Date: Apr 2008
Location: Vantucky, WA
Age: 40
Posts: 12
Likes: 0
Received 0 Likes
on
0 Posts
yeah... i know about that... but i figure that (in my crazy symmetrical mind) i dont have a manual so i dont need to watch for redline... so i dont think ill mind

 04-25-2008, 08:26 PM
#28
Senior Moderator
Join Date: May 2003
Location: Better Neighborhood, Arizona
Posts: 45,634
Received 2,328 Likes
on
1,308 Posts
Bulbs are here. Going to put them in tomorrow 
04-26-2008, 02:03 AM
#29
Senior Moderator
Join Date: May 2003
Location: Better Neighborhood, Arizona
Posts: 45,634
Received 2,328 Likes
on
1,308 Posts
Ok, I ended up doing it tonight because the old lady is sick and I had nothing better to do. The dash is all torn out and I'll put that back together in the morning.
Notes:
- It is a REAL pain in the ass to remove the wood panels
- The gauges look good, but i wish the bulbs were a mixture of white/blue instead of either white and blue. You can easily guess where the blue bulb is and where the white bulb is (etc)
- It took me about 4 hours off and on to do all this. Probably will take me about 30 minutes to put it all back together. Took me so long because I was being careful and didnt want to scratch anything.
The following users liked this post:
Vernondo (08-25-2023)
04-26-2008, 11:18 PM
#30
Ultimate DIYer
Thread Starter
Hope you like your new LED gauges, Ken!!!!! BTW, what year of RL do you have? Did you have a test light up or not? Have you check the polarity of each LED bulb? Even though the polarity is written on the bulb wedge, some of them are wrong as I mentioned earlier. So you'd better light up each LED with other 12V source to make sure of it.
Anyway, good luck on your project!
Anyway, good luck on your project!
The following users liked this post:
Patro (10-16-2023)
04-27-2008, 11:55 AM
#31
Senior Moderator
Join Date: May 2003
Location: Better Neighborhood, Arizona
Posts: 45,634
Received 2,328 Likes
on
1,308 Posts
I love them. I have a 2002 RL.
All the bulbs work, thanks for letting me know about the polarity issue. Two were mislabeled. The left and right gauges are blue. The center is white. Pics coming soon.
All the bulbs work, thanks for letting me know about the polarity issue. Two were mislabeled. The left and right gauges are blue. The center is white. Pics coming soon.
05-01-2008, 11:21 AM
#32
Advanced
Join Date: Oct 2007
Age: 38
Posts: 60
Likes: 0
Received 0 Likes
on
0 Posts
getting ready to do this finally.(yay spring semester is over!) as far as the polarity issue, would it hurt anything if I put the bulbs in the wrong way and plug in the car to test? and if one or more don't work just switch them around?
05-01-2008, 03:26 PM
#33
Senior Moderator
Join Date: May 2003
Location: Better Neighborhood, Arizona
Posts: 45,634
Received 2,328 Likes
on
1,308 Posts
Originally Posted by MasterD86
getting ready to do this finally.(yay spring semester is over!) as far as the polarity issue, would it hurt anything if I put the bulbs in the wrong way and plug in the car to test? and if one or more don't work just switch them around?
05-04-2008, 10:59 AM
#34
Intermediate

Join Date: Mar 2007
Age: 36
Posts: 38
Likes: 0
Received 0 Likes
on
0 Posts
Been a while since I posted here . . . just ordered all Xenon White bulbs...only 3 months late huh?  Will post pictures with complete DIY images and all . . . give me a week - 2 weeks. Also should have the full 1st gen RL shop manual online...pretty cool PDF, interactive.
Will post pictures with complete DIY images and all . . . give me a week - 2 weeks. Also should have the full 1st gen RL shop manual online...pretty cool PDF, interactive.
05-07-2008, 07:22 AM
#36
Advanced
Join Date: Oct 2007
Age: 38
Posts: 60
Likes: 0
Received 0 Likes
on
0 Posts
Originally Posted by WtaggiN
Been a while since I posted here . . . just ordered all Xenon White bulbs...only 3 months late huh? Will post pictures with complete DIY images and all . . . give me a week - 2 weeks. Also should have the full 1st gen RL shop manual online...pretty cool PDF, interactive.
Will post pictures with complete DIY images and all . . . give me a week - 2 weeks. Also should have the full 1st gen RL shop manual online...pretty cool PDF, interactive.
05-11-2008, 02:33 PM
#39
Intermediate
Join Date: Mar 2007
Age: 45
Posts: 36
Likes: 0
Received 0 Likes
on
0 Posts
Thanks 97 Rler for all the information, I really like the new look I been wanted to get ready of those yellow light for the longest, I just replace my light bulbs with the led bulbs I run into a little problem, now my speed cluster not working, I fallow all the instruction all the screws or in the right place, do you know if there a fuse that I can check or if it expensive to replace
05-12-2008, 04:30 PM
#40
Intermediate
Join Date: Mar 2007
Age: 36
Posts: 38
Likes: 0
Received 0 Likes
on
0 Posts
Check to see that your connector screws are (1) too tight or (2) too loose. Make sure not to overtighten these screws, otherwise, you're screwed. HAHAHAHAHA, yes, I made that up. That is probably your problem, happened in my 94 ES300 when I replaced the bulbs.
Still haven't gotten my bulbs yet...hopefully they are sitting nice and snug in my mailbox right now...still going to post DIY so check for updates!
Still haven't gotten my bulbs yet...hopefully they are sitting nice and snug in my mailbox right now...still going to post DIY so check for updates!