The Rebirth - CCColtsicehockey TSX Thread
 11-08-2012, 02:30 PM
#41
I spend 2 much time here
 11-08-2012, 02:32 PM
#42
Moderator
Regional Coordinator (Southeast)
Regional Coordinator (Southeast)
Thread Starter
Join Date: Dec 2003
Location: Mooresville, NC
Age: 38
Posts: 43,593
Received 3,789 Likes
on
2,555 Posts
The following users liked this post:
Aman (11-08-2012)
11-08-2012, 03:32 PM
#44
Moderator
Regional Coordinator (Southeast)
Regional Coordinator (Southeast)
Thread Starter
Join Date: Dec 2003
Location: Mooresville, NC
Age: 38
Posts: 43,593
Received 3,789 Likes
on
2,555 Posts
I do too as you can tell which is why I always include so much.
11-08-2012, 06:09 PM
#46
Moderator
Regional Coordinator (Southeast)
Regional Coordinator (Southeast)
Thread Starter
Join Date: Dec 2003
Location: Mooresville, NC
Age: 38
Posts: 43,593
Received 3,789 Likes
on
2,555 Posts
11-08-2012, 06:40 PM
#47
25 Posts per page over here bitch

Now you have to explain to me why you'd go with a Euro R tranny

 11-09-2012, 08:51 AM
#50
Senior Moderator
About time. Jeesh..... I could have swapped the engine and trans and wiring in a weekend 
Looks good
Looks good
11-09-2012, 08:53 AM
#51
I spend 2 much time here
noticed that also but didn't want to say anything, didnt have the heart to after all the blood, sweat and tears that went into this project.
11-09-2012, 09:37 PM
#52
Your Friendly Canadian
Join Date: Dec 2007
Location: Toronto, Ontario
Age: 31
Posts: 17,431
Received 1,485 Likes
on
1,049 Posts
I get the feeling that after all this work, painting the bumper isn't really a big deal 
11-10-2012, 09:10 AM
#54
Moderator
Regional Coordinator (Southeast)
Regional Coordinator (Southeast)
Thread Starter
Join Date: Dec 2003
Location: Mooresville, NC
Age: 38
Posts: 43,593
Received 3,789 Likes
on
2,555 Posts
11-10-2012, 09:10 AM
#55
Moderator
Regional Coordinator (Southeast)
Regional Coordinator (Southeast)
Thread Starter
Join Date: Dec 2003
Location: Mooresville, NC
Age: 38
Posts: 43,593
Received 3,789 Likes
on
2,555 Posts
11-10-2012, 02:08 PM
#56
Whats up with RDX owners?
iTrader: (9)

Damn, Im pissed I didnt go to Charlotte to see this in person. It looks great though
11-10-2012, 08:16 PM
#57
Stage 1 Audi S5
Very Nice and while I didnt think I would like that bumper, it looks incredible on. I kinda forgot your old thread a beatituful Sunday to take pics or something and opening to find a destroyed car.
Oh, your gf has some long fingers haha
Oh, your gf has some long fingers haha
11-10-2012, 08:22 PM
#58
Senior Moderator
Join Date: May 2000
Location: Brooklyn, NY USA
Age: 47
Posts: 17,085
Received 740 Likes
on
309 Posts
Looks great! You spared no expense in the details, man!
Just one question though...What's up with the canards? I find it pointless for a FWD car, especially where it won't see speeds in turns where the canards actually have an effect...
Just one question though...What's up with the canards? I find it pointless for a FWD car, especially where it won't see speeds in turns where the canards actually have an effect...
11-10-2012, 11:11 PM
#59
The attention to detail here is amazing! It's awesome that you're not settling for anything less than "do it right, or don't do it".
Please upload more pictures and keep the back-stories coming! I have to admit, they are very interesting to read. Good luck with the TSX and any future mods you do, CC.
Please upload more pictures and keep the back-stories coming! I have to admit, they are very interesting to read. Good luck with the TSX and any future mods you do, CC.
11-11-2012, 03:30 PM
#61
Moderator
Regional Coordinator (Southeast)
Regional Coordinator (Southeast)
Thread Starter
Join Date: Dec 2003
Location: Mooresville, NC
Age: 38
Posts: 43,593
Received 3,789 Likes
on
2,555 Posts
11-12-2012, 07:38 AM
#62
Moderator
Regional Coordinator (Southeast)
Regional Coordinator (Southeast)
Thread Starter
Join Date: Dec 2003
Location: Mooresville, NC
Age: 38
Posts: 43,593
Received 3,789 Likes
on
2,555 Posts

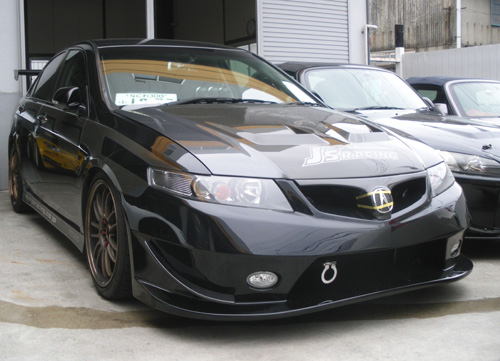
I do unfortunately not have the canards the bumper normally comes with but rather the canards meant for the OEM bumper. Here are what the correct ones.
The attention to detail here is amazing! It's awesome that you're not settling for anything less than "do it right, or don't do it".
Please upload more pictures and keep the back-stories coming! I have to admit, they are very interesting to read. Good luck with the TSX and any future mods you do, CC.
Please upload more pictures and keep the back-stories coming! I have to admit, they are very interesting to read. Good luck with the TSX and any future mods you do, CC.
11-12-2012, 09:31 PM
#63
Whats up with RDX owners?
iTrader: (9)
I was talking to Tyler about your TSX the other day, and we both agreed you made an excellent choice going with the Js bumper over the Spoon bumper
The following users liked this post:
CCColtsicehockey (11-14-2012)
11-14-2012, 01:14 PM
#64
Moderator
Regional Coordinator (Southeast)
Regional Coordinator (Southeast)
Thread Starter
Join Date: Dec 2003
Location: Mooresville, NC
Age: 38
Posts: 43,593
Received 3,789 Likes
on
2,555 Posts
Thanks. Still have to put the Spoon bumper on once I get all the other stuff to go with it. I think you guys will be surprised how good it looks. Still my favorite bumper though the J's is a close second.
03-26-2018, 03:48 PM
#65
Moderator
Regional Coordinator (Southeast)
Regional Coordinator (Southeast)
Thread Starter
Join Date: Dec 2003
Location: Mooresville, NC
Age: 38
Posts: 43,593
Received 3,789 Likes
on
2,555 Posts
Place holder 1
03-26-2018, 03:48 PM
#66
Moderator
Regional Coordinator (Southeast)
Regional Coordinator (Southeast)
Thread Starter
Join Date: Dec 2003
Location: Mooresville, NC
Age: 38
Posts: 43,593
Received 3,789 Likes
on
2,555 Posts
Place holder 2
03-26-2018, 03:48 PM
#67
Moderator
Regional Coordinator (Southeast)
Regional Coordinator (Southeast)
Thread Starter
Join Date: Dec 2003
Location: Mooresville, NC
Age: 38
Posts: 43,593
Received 3,789 Likes
on
2,555 Posts
Place holder 3
03-26-2018, 03:48 PM
#68
Moderator
Regional Coordinator (Southeast)
Regional Coordinator (Southeast)
Thread Starter
Join Date: Dec 2003
Location: Mooresville, NC
Age: 38
Posts: 43,593
Received 3,789 Likes
on
2,555 Posts
Place holder 4
03-26-2018, 03:49 PM
#69
Moderator
Regional Coordinator (Southeast)
Regional Coordinator (Southeast)
Thread Starter
Join Date: Dec 2003
Location: Mooresville, NC
Age: 38
Posts: 43,593
Received 3,789 Likes
on
2,555 Posts
I figured it is best to probably keep the TSX seperate from my Vagon thread even know some posts have been put in there. Going to fill those placeholder posts in with posts from Vagon thread that should have been in here.
I am making the first change to her in a long time right now. After showing for so many years and the car being more show than anything else I took the car to the dragon back in November 2016. I had an absolute blast with it. I had planned to do some upgrades after that but not long after as many of you know I had some serious issues with my V Wagon which ate all my car mod money until pretty much now.
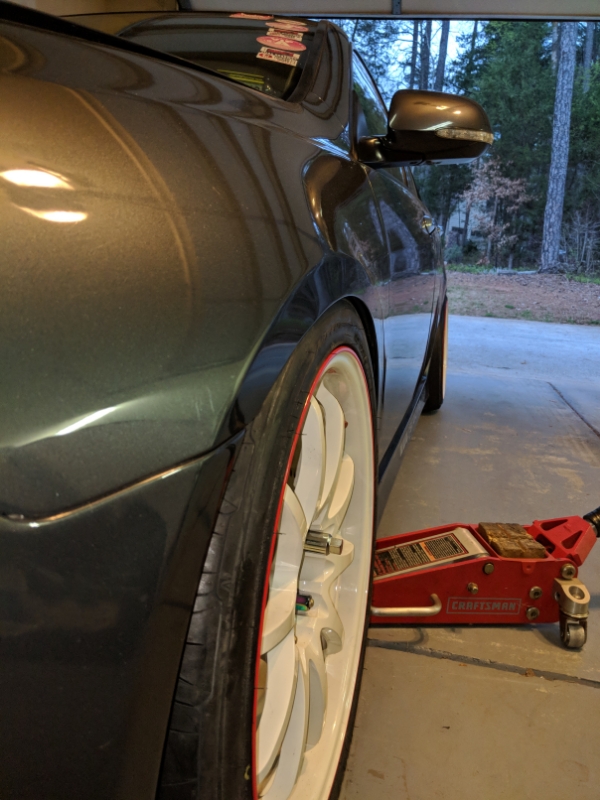
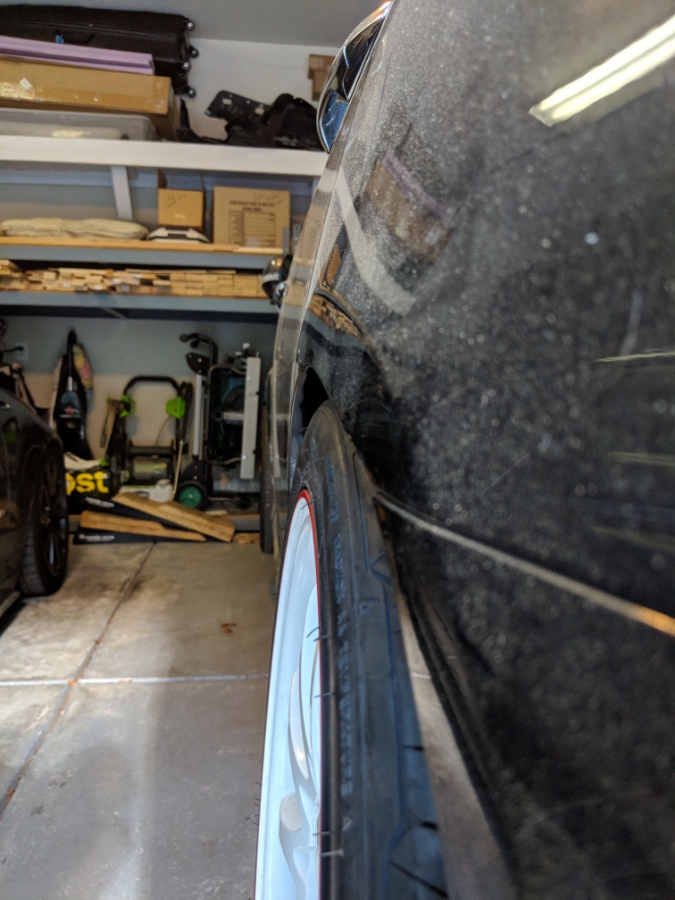
I want to build the car more now for the mountains and maybe even eventually take it to the track. So out with the skinny stretched 215/40-18 tires on the 18x9 and in with some meaty 255/35-18 tires.
255/35-18 Nitto Invo. Really wanted to do some Yokohama AD08R but was trying to stay within a budget for the time being to see home much I enjoy the car in this configuration. If I love it I will switch out for those at it is pretty much never driven in the rain and only on weekends so having a soft track focused tire won't be the end of the world.
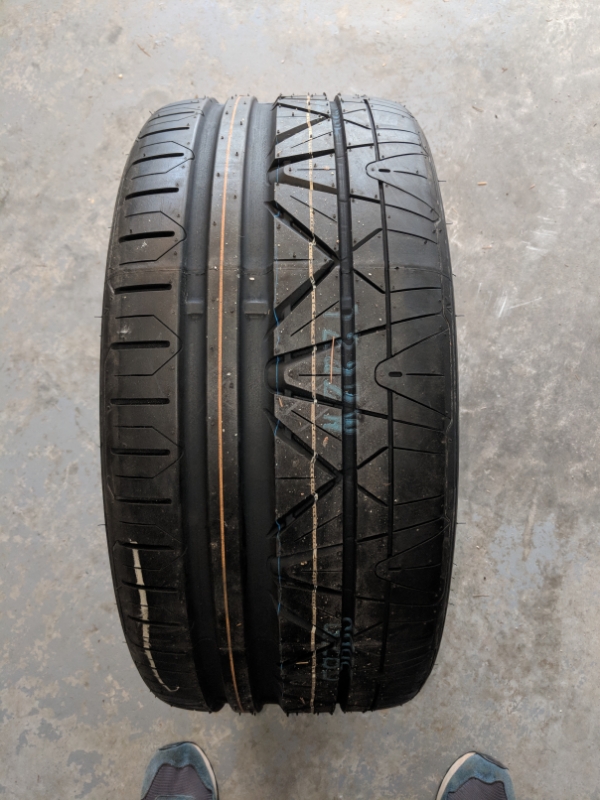
Old vs New
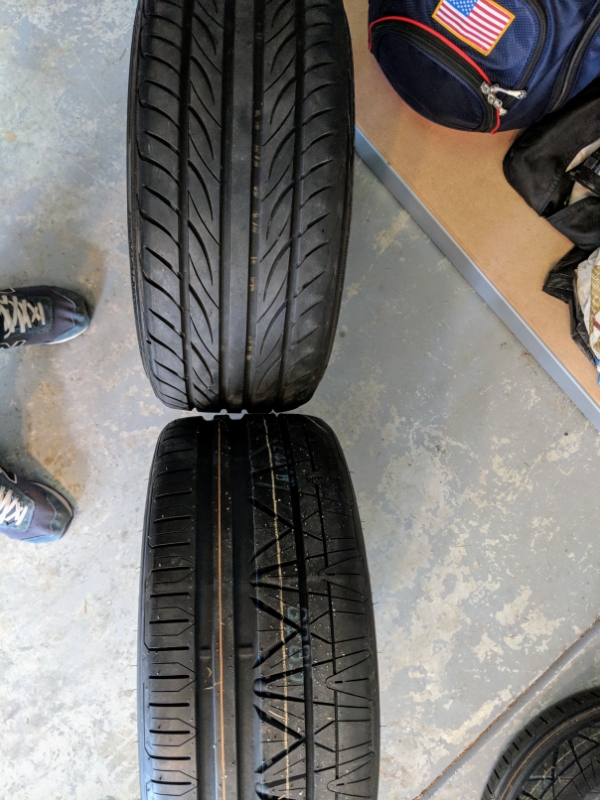
Some nice straight sidewalls
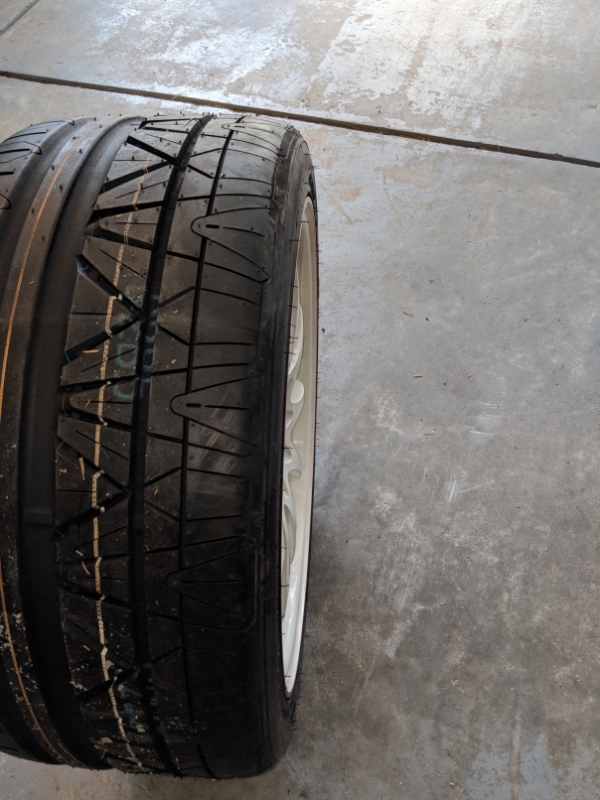
Old setup on the car still in the background as I only had two of the tires mounted for now as I wasn't sure they would fit and really didn't want to do any fender work.

Raised the car up 1/2in to get them to fit and even be able to turn the wheel.

Thinking I will probably raise it another 3/4in so I have space for suspension travel with the beefier tires. Hopefully this will be enough.

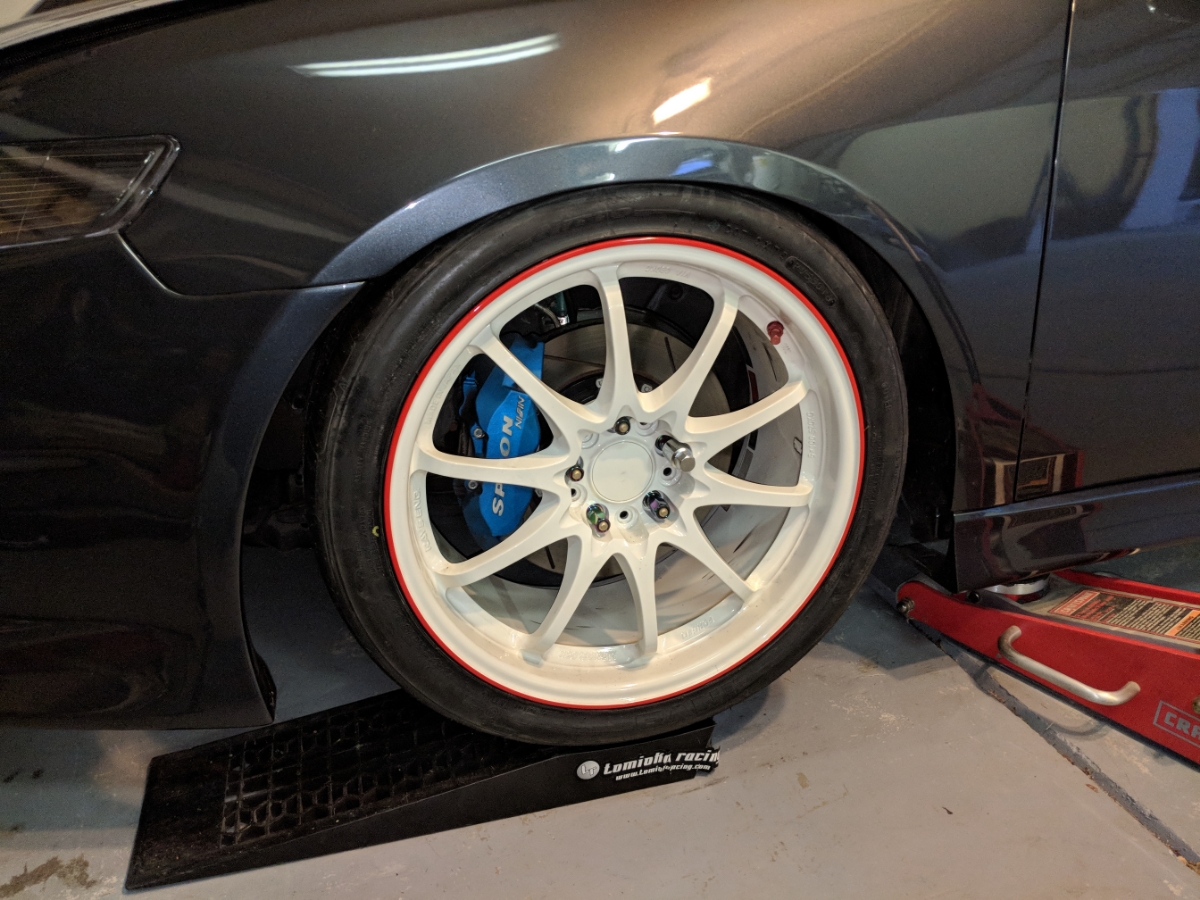
For the rears I have to finally install my extended studs I bought years ago to replace the factory studs I cut so I could use bolt on spacers. I will also be removing most of the negative camber I had been running to fit wide wheels with stretched tires so I can run the rears mostly flat now instead.
I am making the first change to her in a long time right now. After showing for so many years and the car being more show than anything else I took the car to the dragon back in November 2016. I had an absolute blast with it. I had planned to do some upgrades after that but not long after as many of you know I had some serious issues with my V Wagon which ate all my car mod money until pretty much now.
I want to build the car more now for the mountains and maybe even eventually take it to the track. So out with the skinny stretched 215/40-18 tires on the 18x9 and in with some meaty 255/35-18 tires.
255/35-18 Nitto Invo. Really wanted to do some Yokohama AD08R but was trying to stay within a budget for the time being to see home much I enjoy the car in this configuration. If I love it I will switch out for those at it is pretty much never driven in the rain and only on weekends so having a soft track focused tire won't be the end of the world.
Old vs New
Some nice straight sidewalls
Old setup on the car still in the background as I only had two of the tires mounted for now as I wasn't sure they would fit and really didn't want to do any fender work.
Raised the car up 1/2in to get them to fit and even be able to turn the wheel.
Thinking I will probably raise it another 3/4in so I have space for suspension travel with the beefier tires. Hopefully this will be enough.
For the rears I have to finally install my extended studs I bought years ago to replace the factory studs I cut so I could use bolt on spacers. I will also be removing most of the negative camber I had been running to fit wide wheels with stretched tires so I can run the rears mostly flat now instead.
 03-28-2018, 02:59 PM
#71
Moderator
Join Date: Aug 2014
Location: Dirty H-Town, Amerikkka
Posts: 28,432
Received 7,772 Likes
on
5,045 Posts
I was behind a nice clean 1G TSX a while back and man, what a great looking car. Interested to see where you take this one.
The following users liked this post:
CCColtsicehockey (04-02-2018)
03-28-2018, 05:21 PM
#72
Turd Polisher
iTrader: (1)
I like this update!
Track spec TSX ftmfw!
Track spec TSX ftmfw!
The following users liked this post:
CCColtsicehockey (04-02-2018)
08-04-2018, 08:53 PM
#73
Moderator
Regional Coordinator (Southeast)
Regional Coordinator (Southeast)
Thread Starter
Join Date: Dec 2003
Location: Mooresville, NC
Age: 38
Posts: 43,593
Received 3,789 Likes
on
2,555 Posts
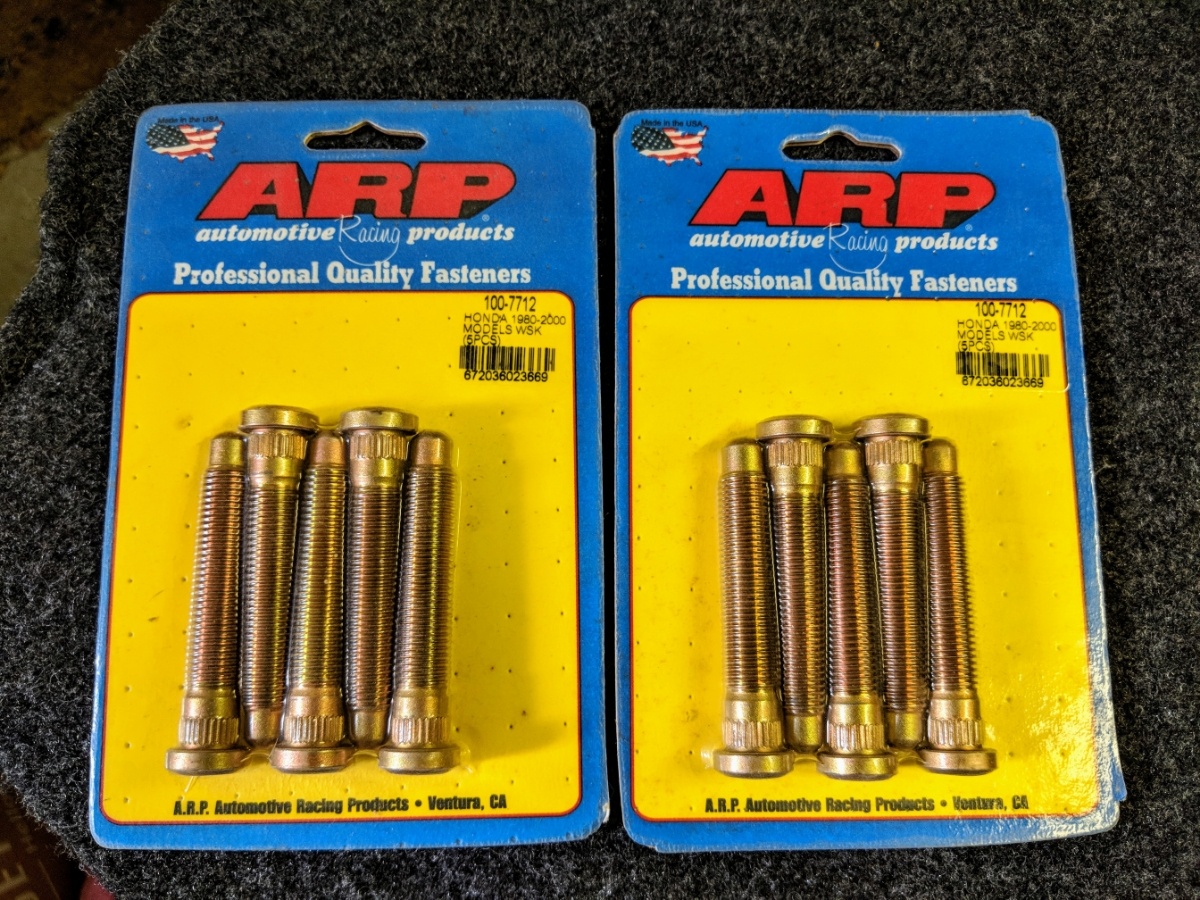
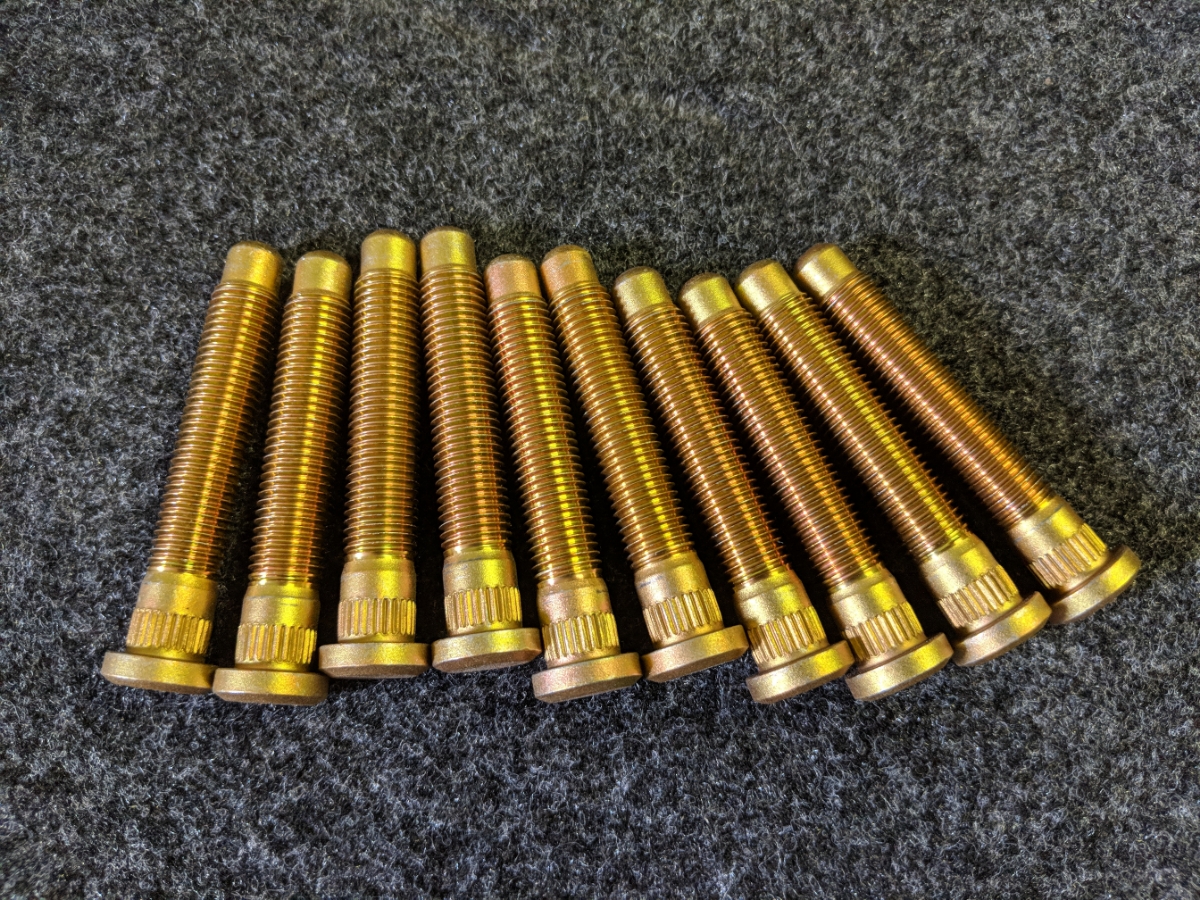
So it only took 3 months but I finally got around to changing out my rear cut studs for the ARP extended ones I bought years ago. I had kept putting this off for fear it was going to be a pain in the ass. Ended up not being difficult at all.
New ARP studs. Opened and put in the freezer as it is supposed to make pulling them in easier.

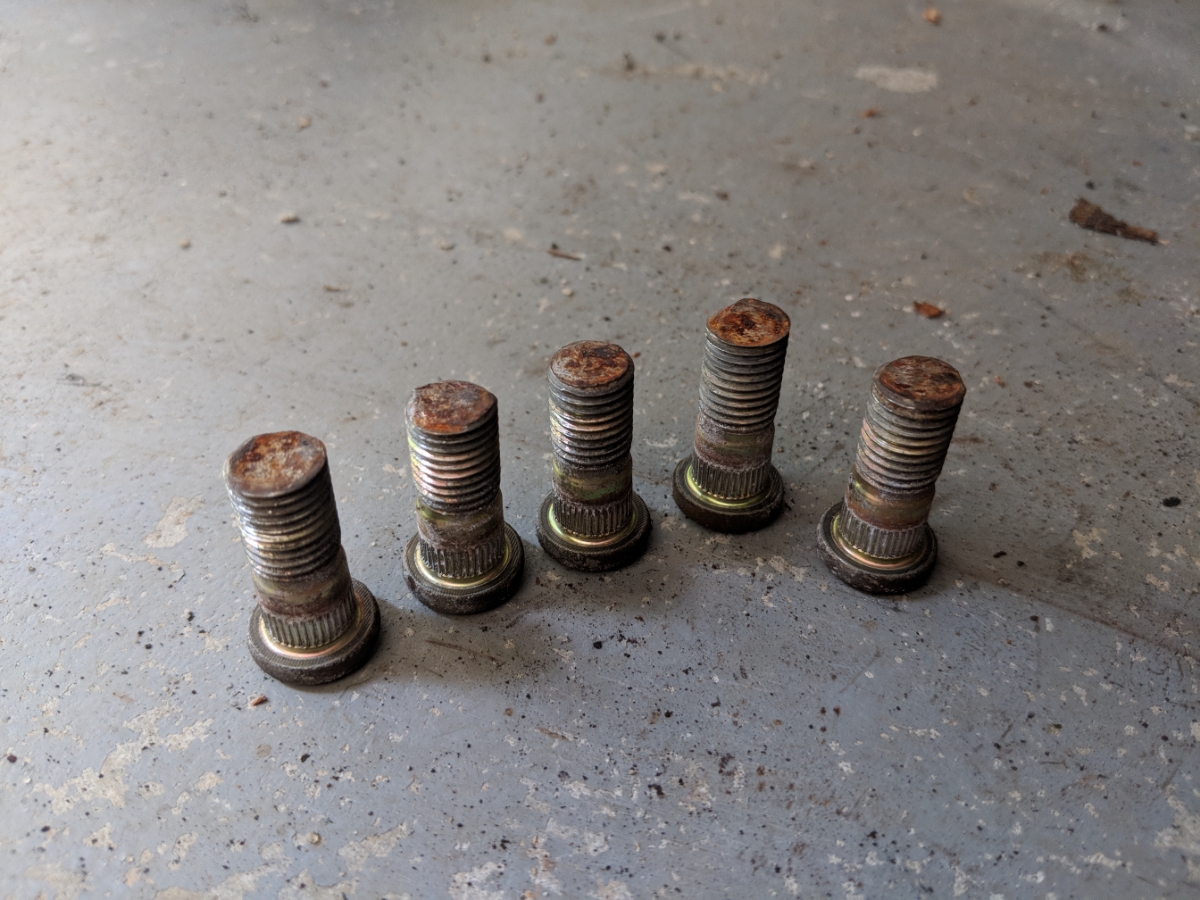
The soon to be trash cut studs. Cut them years ago to take the easy route and use bolt on spacers. If I knew it would have been this easy I would have just went this route first.
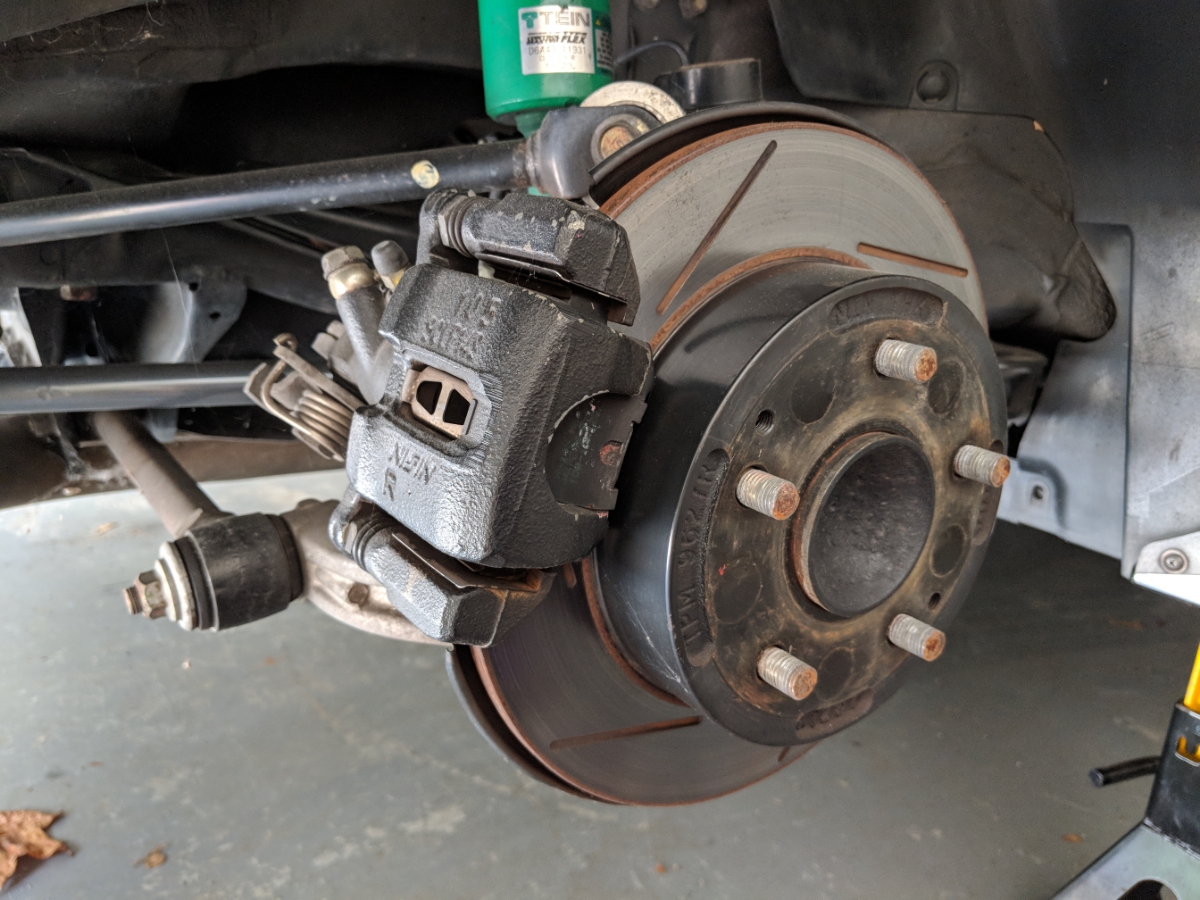
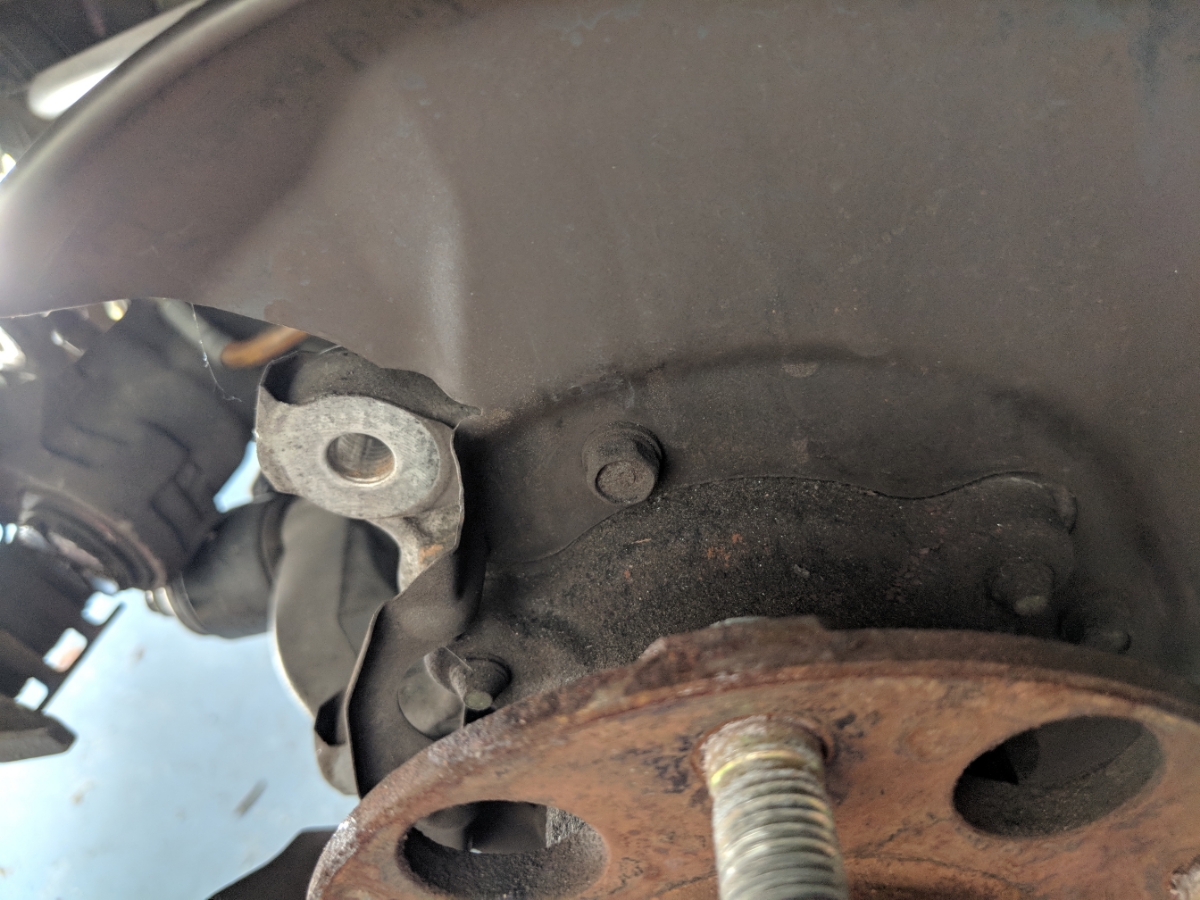
Remove the two bolts holding the sliding caliper on.

Then remove the two bolts holding the caliper bracket on.
Once that is off you can remove the caliper
I could really use some new hubs it seems. This is what you get for starting out with your car up north.
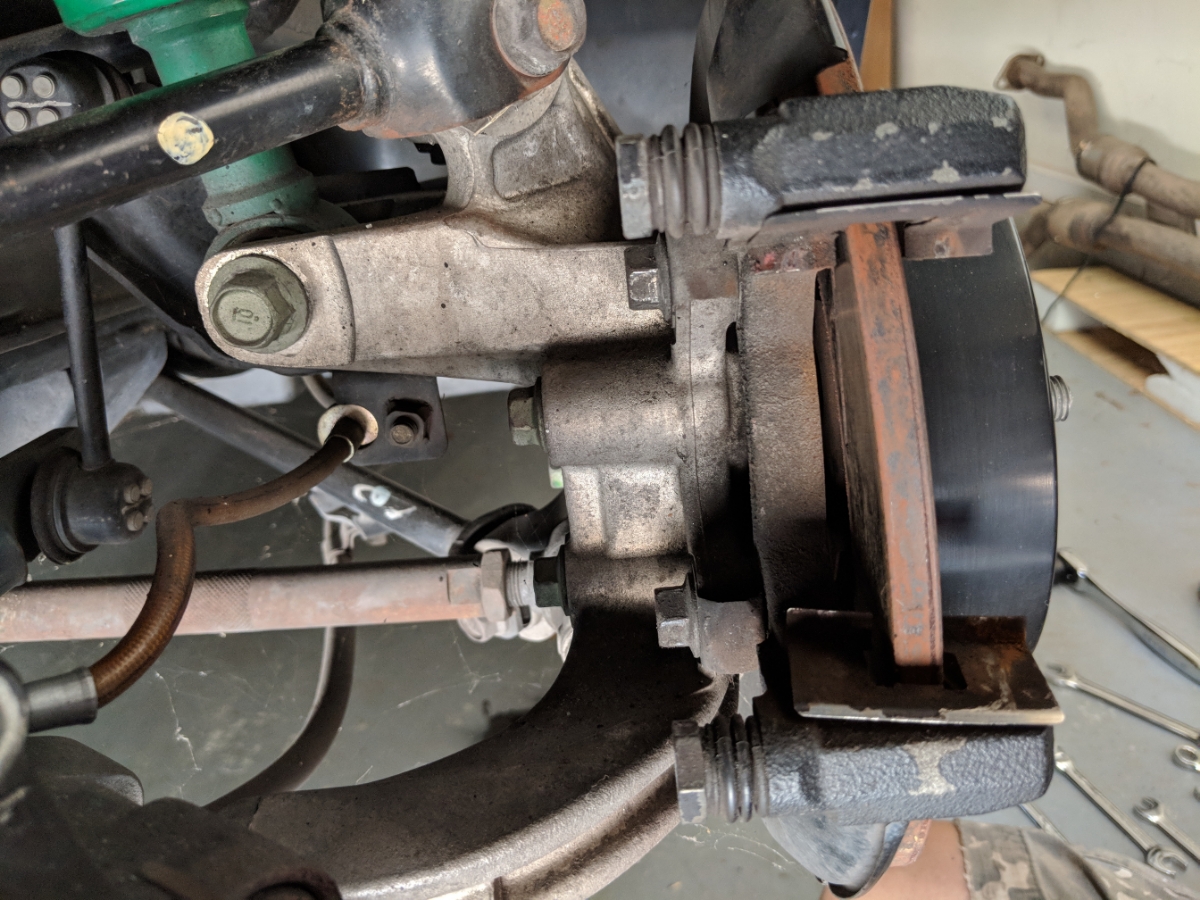
Remove the three screws holding on the dust shield
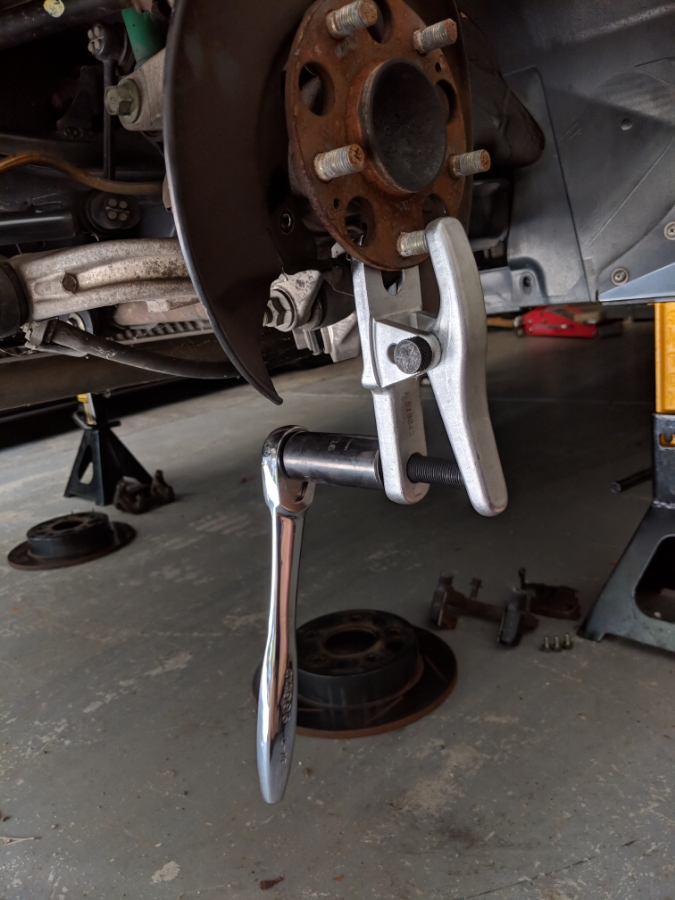
My makeshift press. I read this on another forum about using a balljoint press to press out wheel studs. It works really well. I started using a ratchet to do it but later switched to using my cordless impact which made it go really fast.
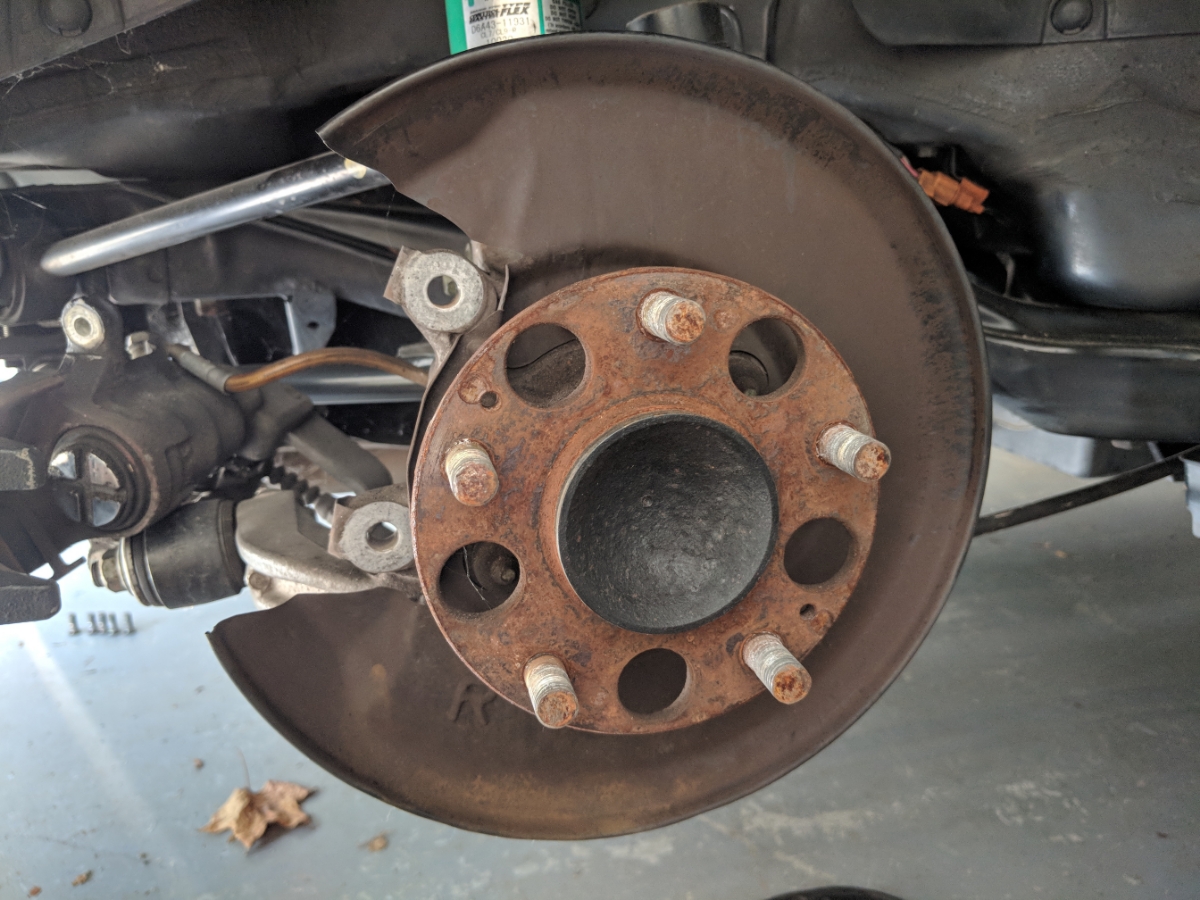
The old junk all removed
Had to take a break to run to the store for some large nuts and washers for the next part. So grabbed a shot of the car up on the stands.

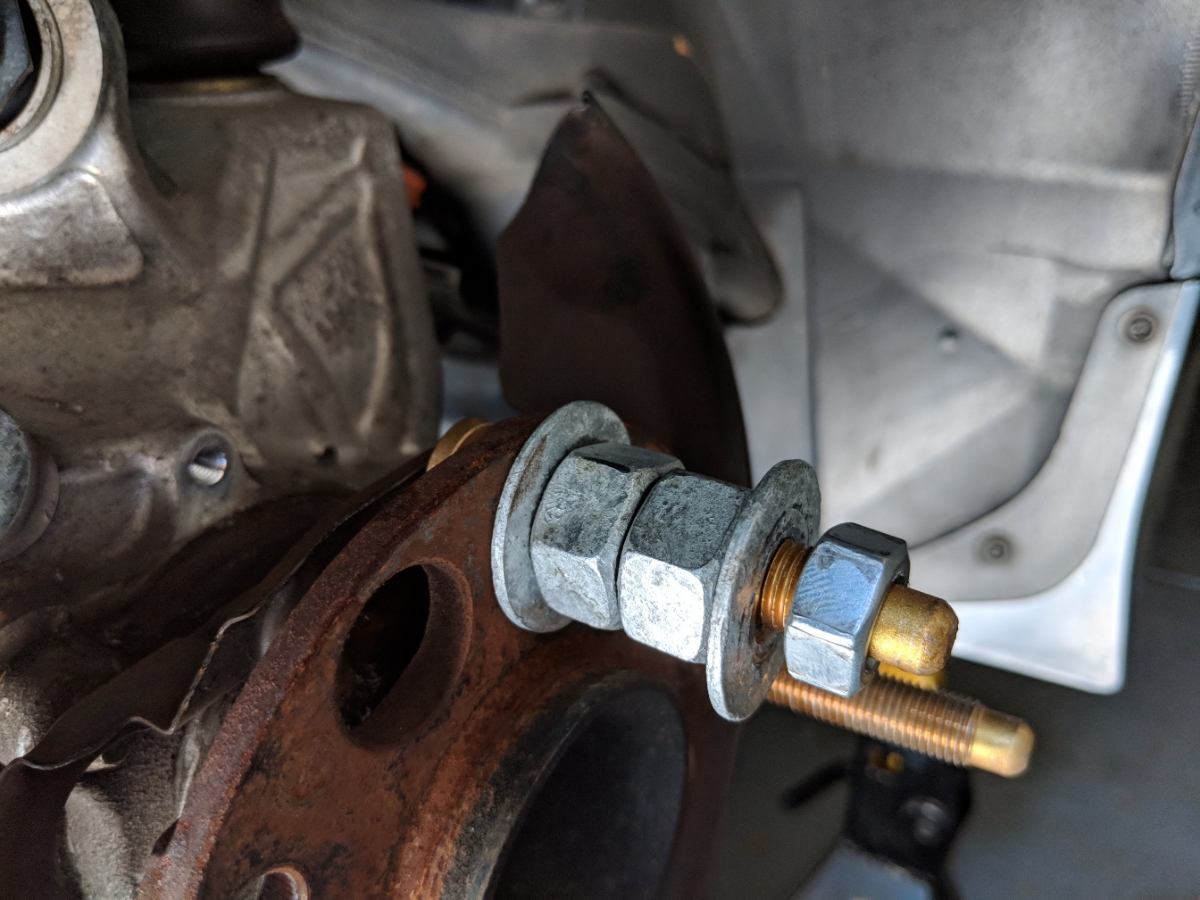
Large washed, two large nuts that are bigger than the stud, another washer, and then a nut the same thread pitch as the lugs. I torqued it all on slowly while watching from the back to see when it was fully pulled in. Started again using a ratchet but quickly switched to my cordless impact.
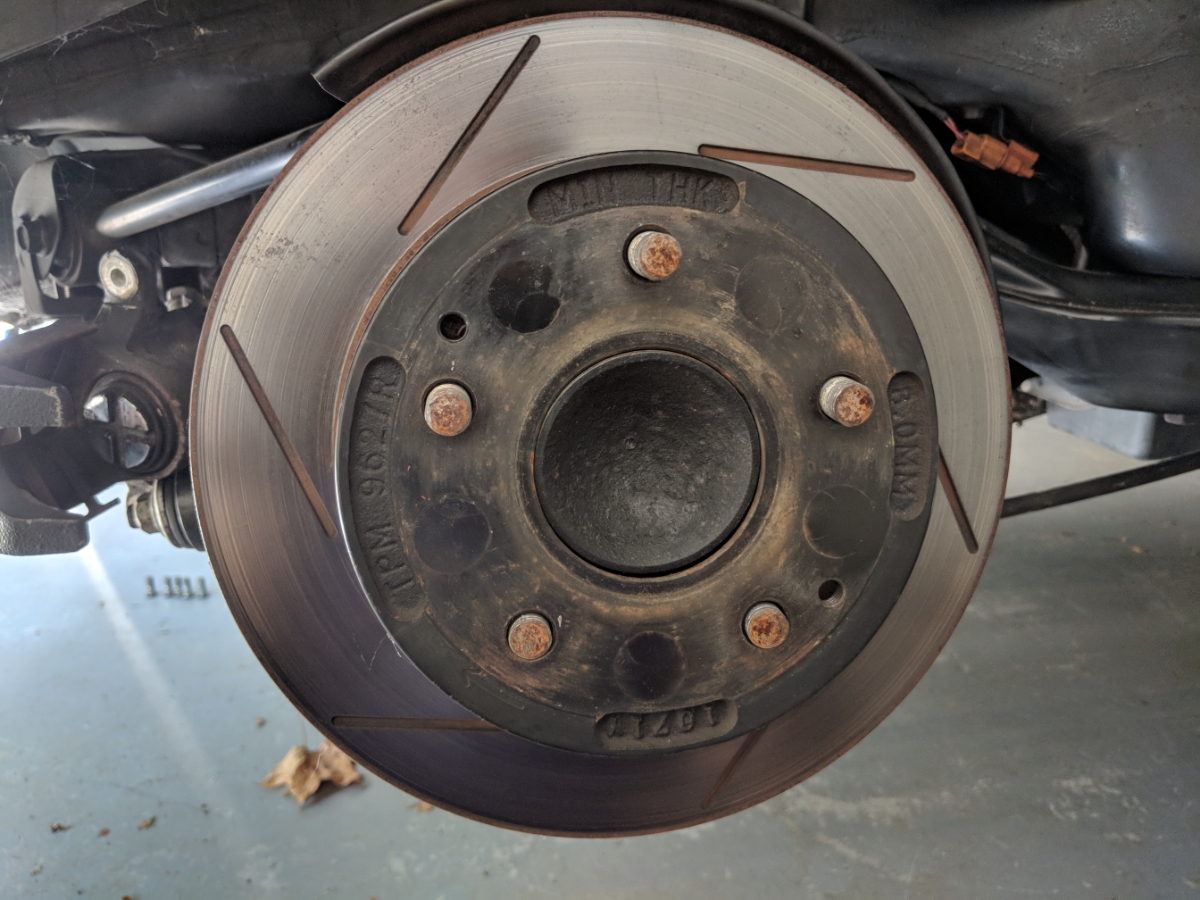
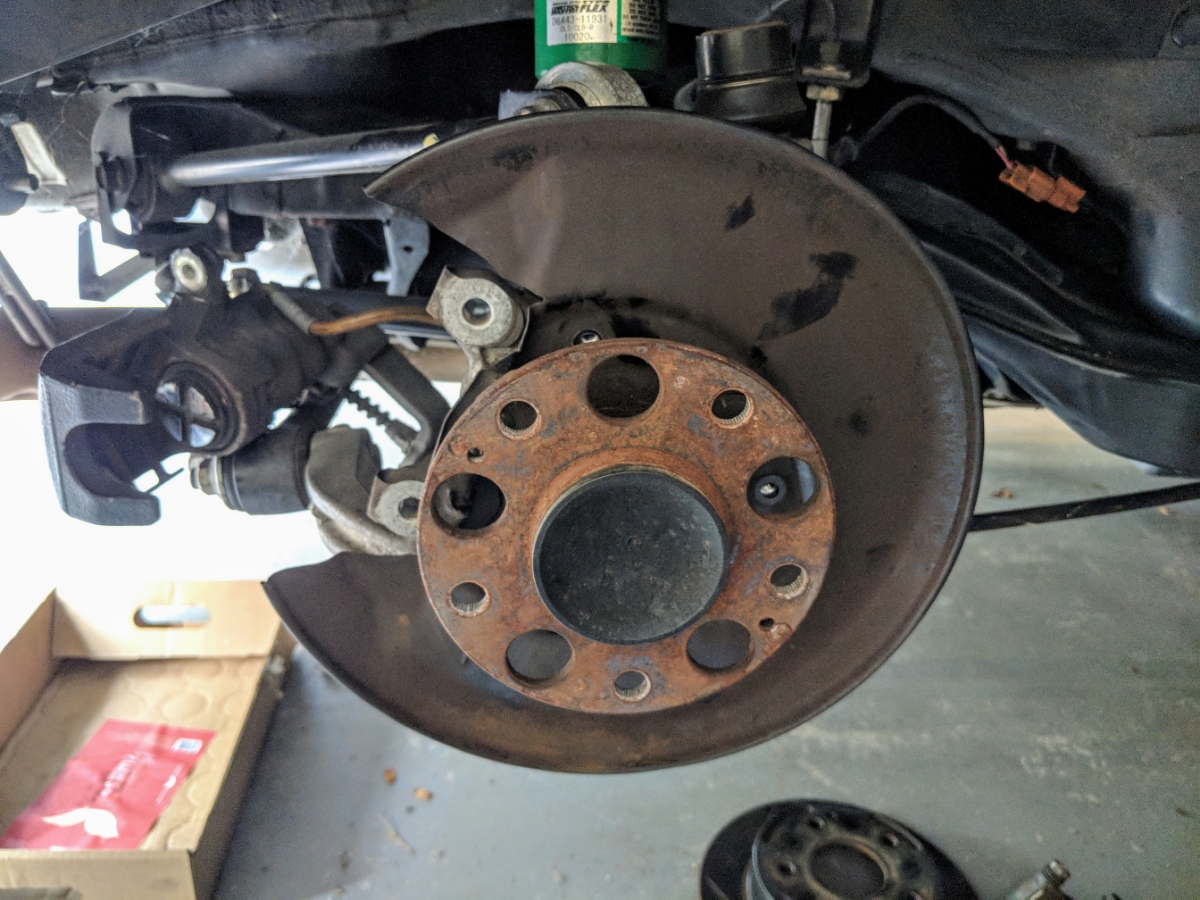
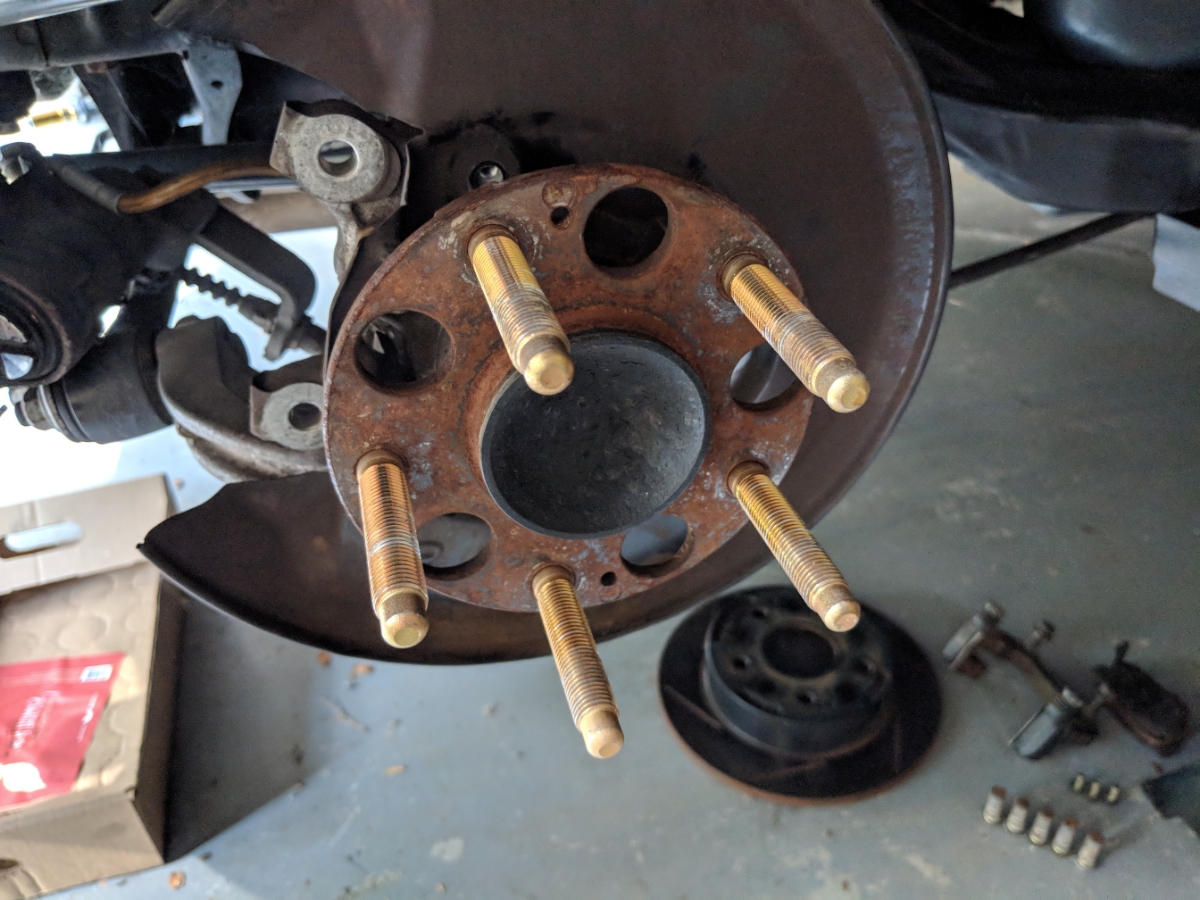
All pressed in
Everything back together

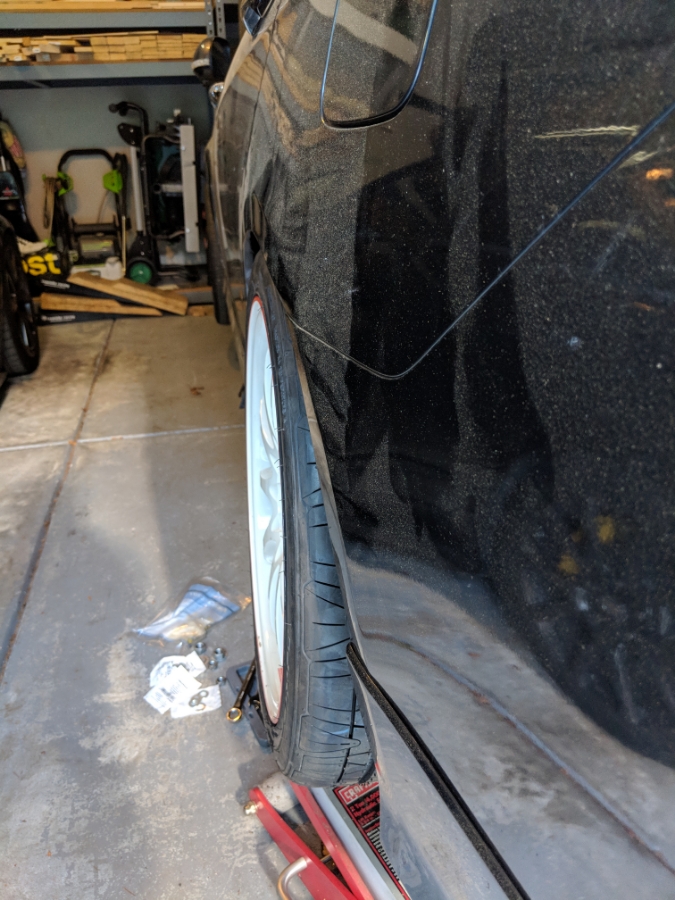
Moved onto testing out the suspension and jacking the wheel up to see how it would sit. Ended up raising the back of the car 5/8 of an inch to clear the larger tires.
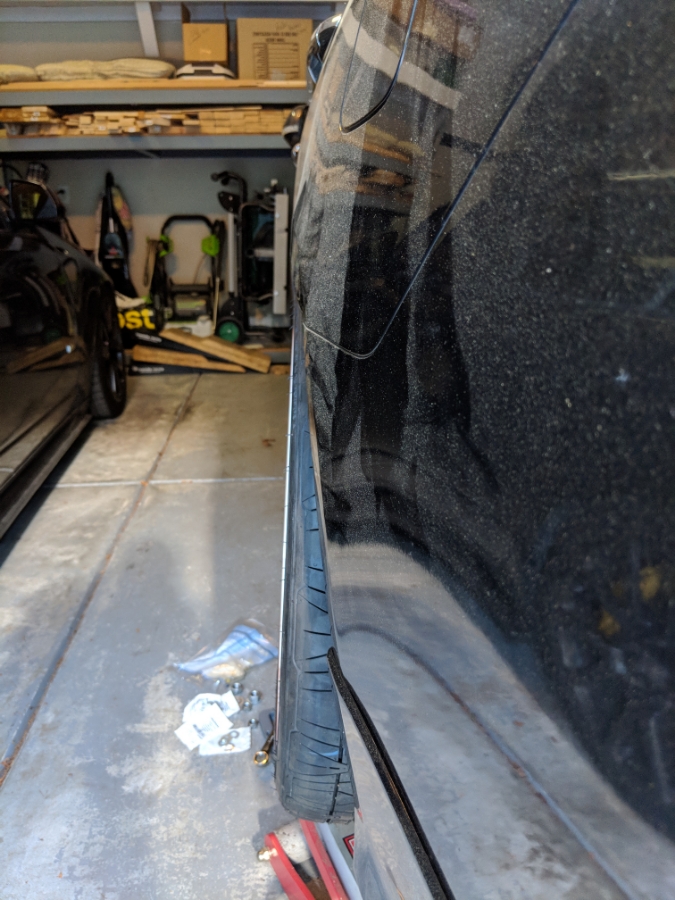
All finished.

255 meat all around now. Widest tires I have ever run on the car before was 225. So these are a significant increase for me.
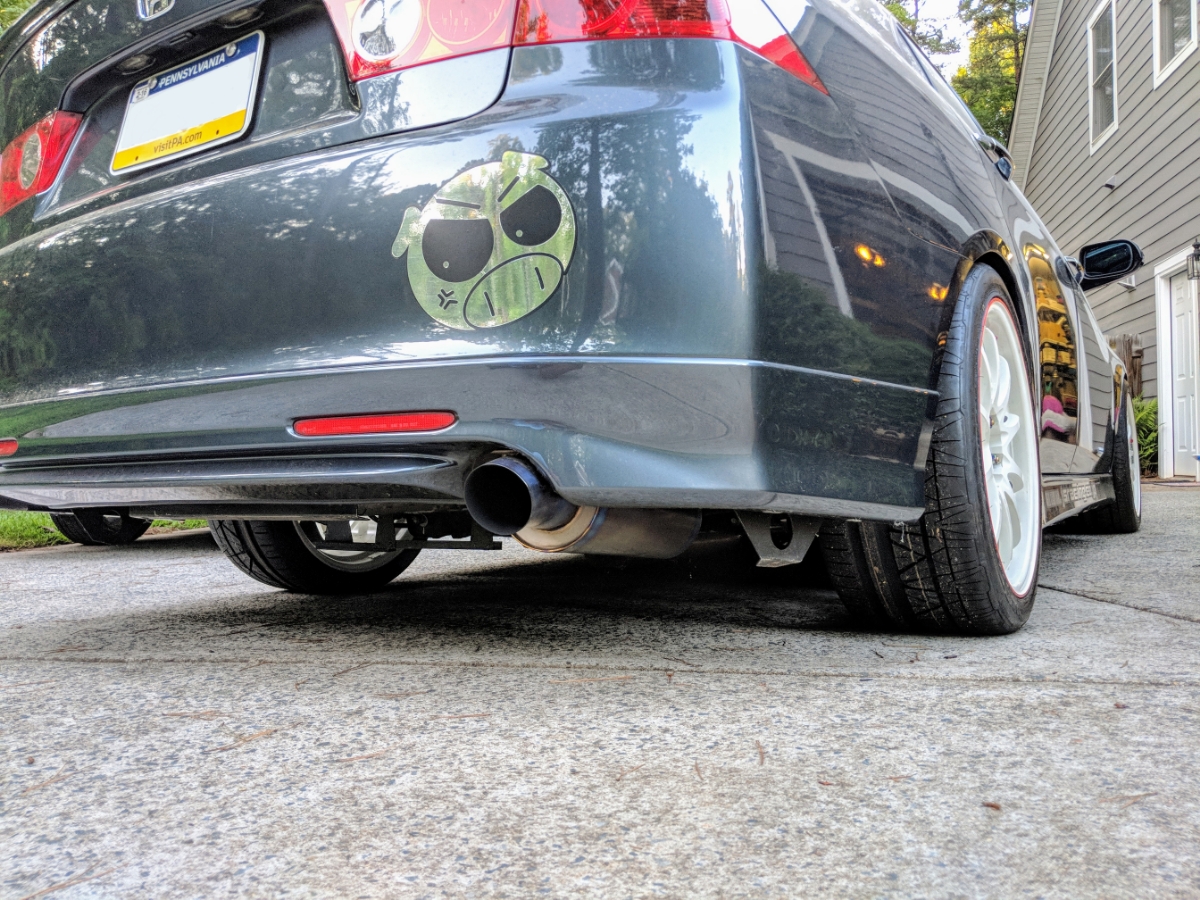
I think I have some more space I can play with in the rear. I think I can pull some camber out and allow the wheel to be 2-3mm closer to the rear fender. Maybe even 5mm possibly. Will test some 5mm spacers as some point to see what I can do.
Have some additional new parts coming for the car for the first time in a long time. Hopefully I will receive them and get them installed before my fall trip to the Dragon.
New ARP studs. Opened and put in the freezer as it is supposed to make pulling them in easier.
The soon to be trash cut studs. Cut them years ago to take the easy route and use bolt on spacers. If I knew it would have been this easy I would have just went this route first.
Remove the two bolts holding the sliding caliper on.
Then remove the two bolts holding the caliper bracket on.
Once that is off you can remove the caliper
I could really use some new hubs it seems. This is what you get for starting out with your car up north.
Remove the three screws holding on the dust shield
My makeshift press. I read this on another forum about using a balljoint press to press out wheel studs. It works really well. I started using a ratchet to do it but later switched to using my cordless impact which made it go really fast.
The old junk all removed
Had to take a break to run to the store for some large nuts and washers for the next part. So grabbed a shot of the car up on the stands.
Large washed, two large nuts that are bigger than the stud, another washer, and then a nut the same thread pitch as the lugs. I torqued it all on slowly while watching from the back to see when it was fully pulled in. Started again using a ratchet but quickly switched to my cordless impact.
All pressed in
Everything back together
Moved onto testing out the suspension and jacking the wheel up to see how it would sit. Ended up raising the back of the car 5/8 of an inch to clear the larger tires.
All finished.
255 meat all around now. Widest tires I have ever run on the car before was 225. So these are a significant increase for me.
I think I have some more space I can play with in the rear. I think I can pull some camber out and allow the wheel to be 2-3mm closer to the rear fender. Maybe even 5mm possibly. Will test some 5mm spacers as some point to see what I can do.
Have some additional new parts coming for the car for the first time in a long time. Hopefully I will receive them and get them installed before my fall trip to the Dragon.
Last edited by CCColtsicehockey; 08-04-2018 at 08:55 PM.
The following users liked this post:
CCColtsicehockey (08-06-2018)
02-11-2019, 09:29 AM
#75
Moderator
Regional Coordinator (Southeast)
Regional Coordinator (Southeast)
Thread Starter
Join Date: Dec 2003
Location: Mooresville, NC
Age: 38
Posts: 43,593
Received 3,789 Likes
on
2,555 Posts
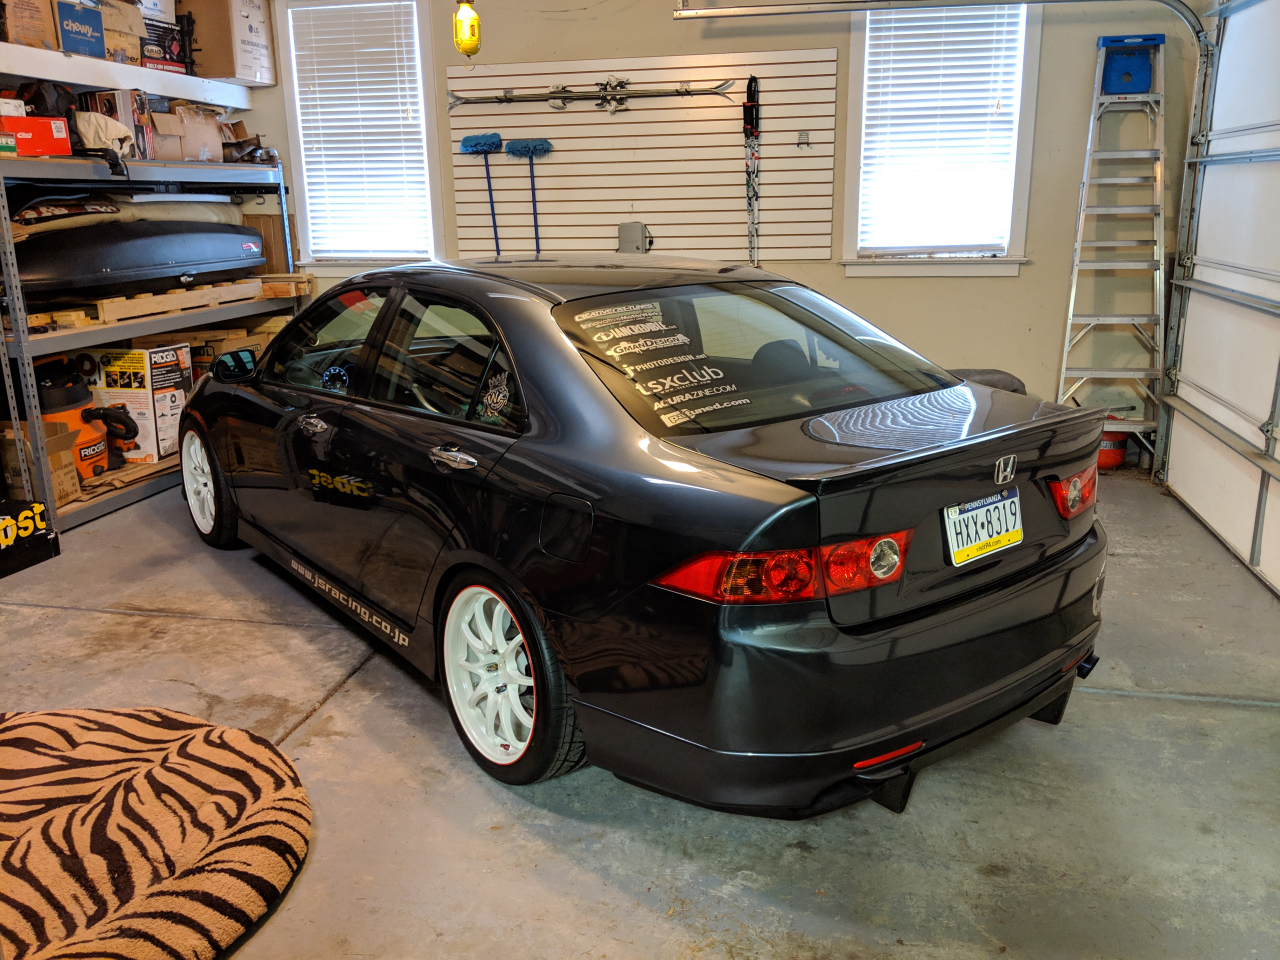
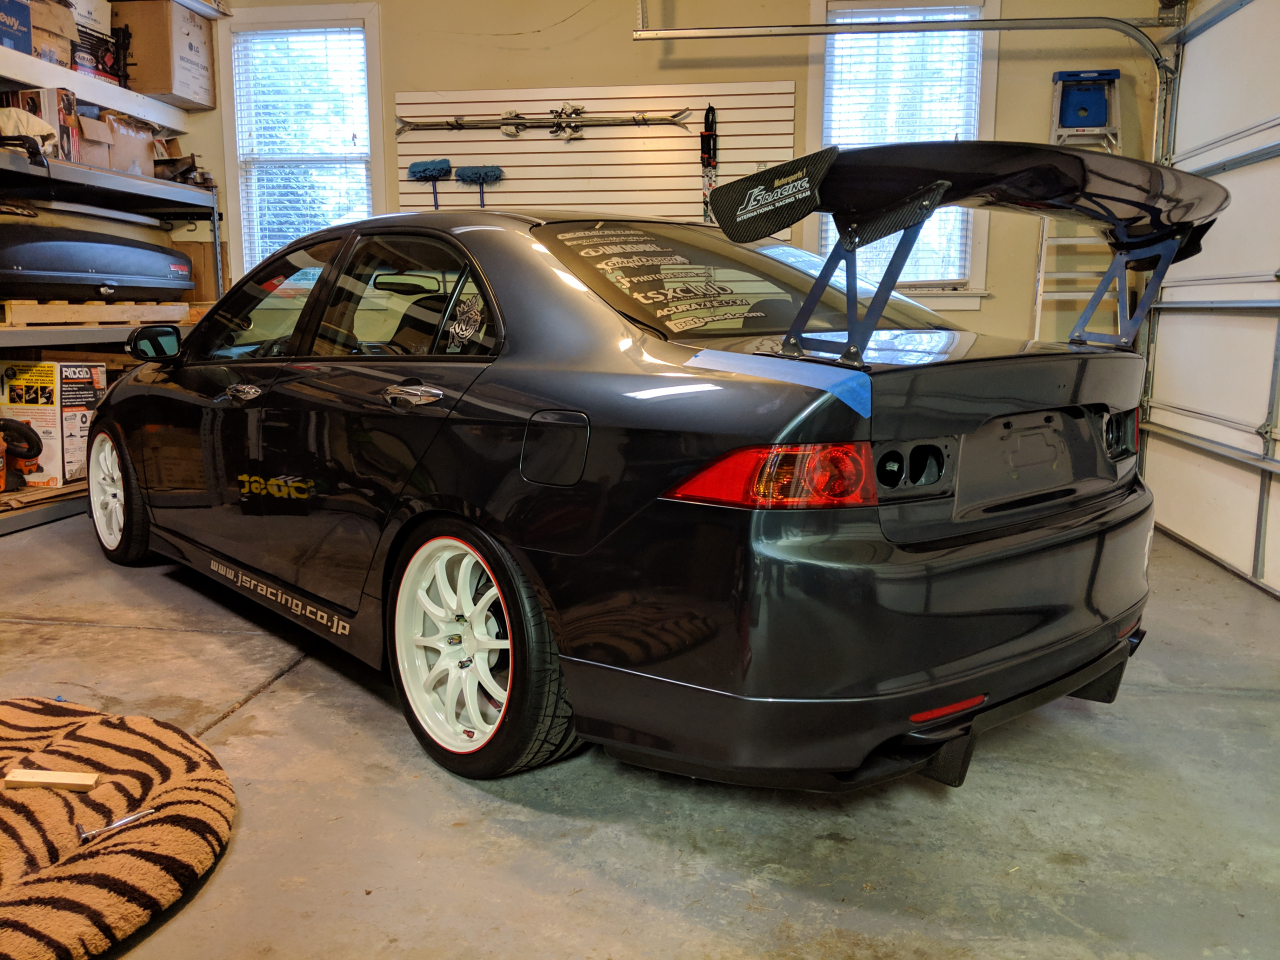
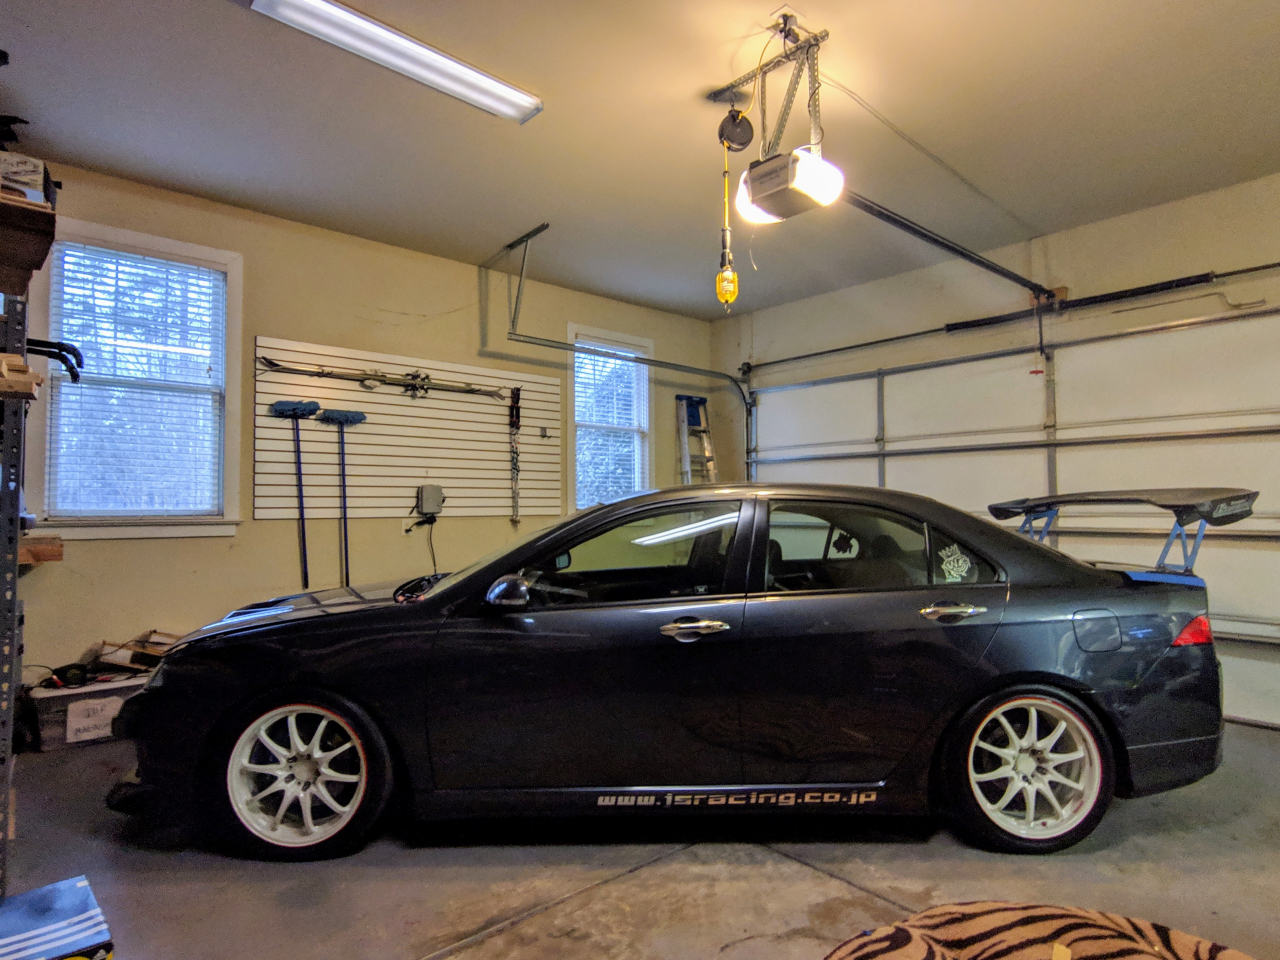
So finally got around to install my J's Racing wing that I have had laying around since about July. I was waiting for my dad to bring down my extra trunk lid from my storage unit up in PA so didn't have that till about Oct/Nov and then the holidays and all. I wanted to use the spare trunk so I had a way to revert in case I decided against this long term. My trunk on the current car had been installed after the egging of my car years back. This won't be the finished look because I still need to vinyl wrap the trunk since it is in bad shape with eggshell scratches and just the generally faded paint over the years. The paint on the car was never a full respray but everything was resprayed during about a two-year period and blended on the doors between the egging and the deer accident.
The dog bed was put in the garage so I had a safe soft spot to lay the trunks and wing during the install
Trunk lid liner removed.

Lights came out next

While removing the lights I found on of the pins had cracked off as it was still stuck in the sheet metal once I removed the light. Nothing a little glue can't fix I hope.

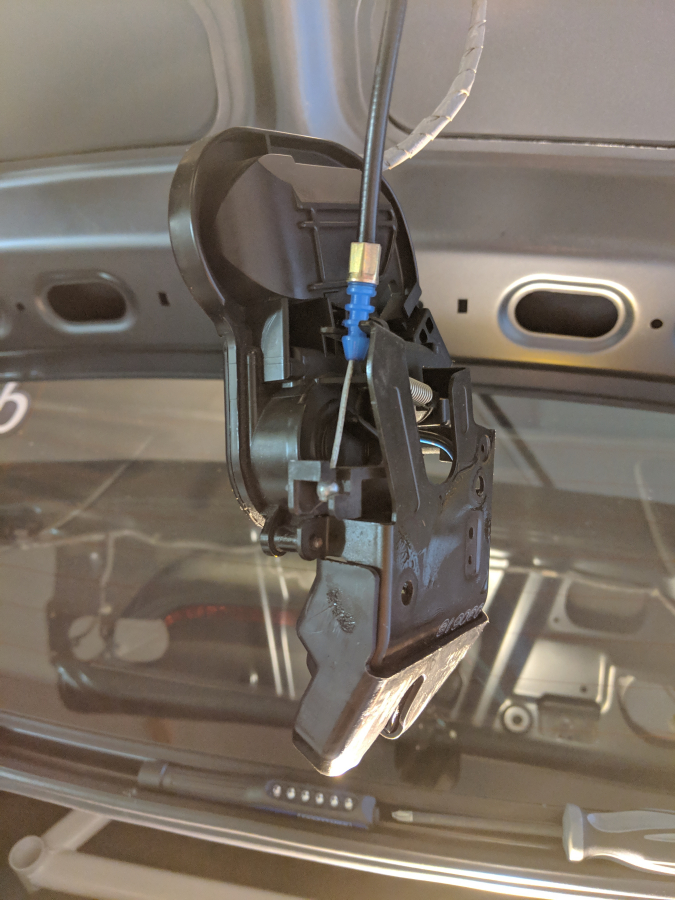
Trunk latch removed
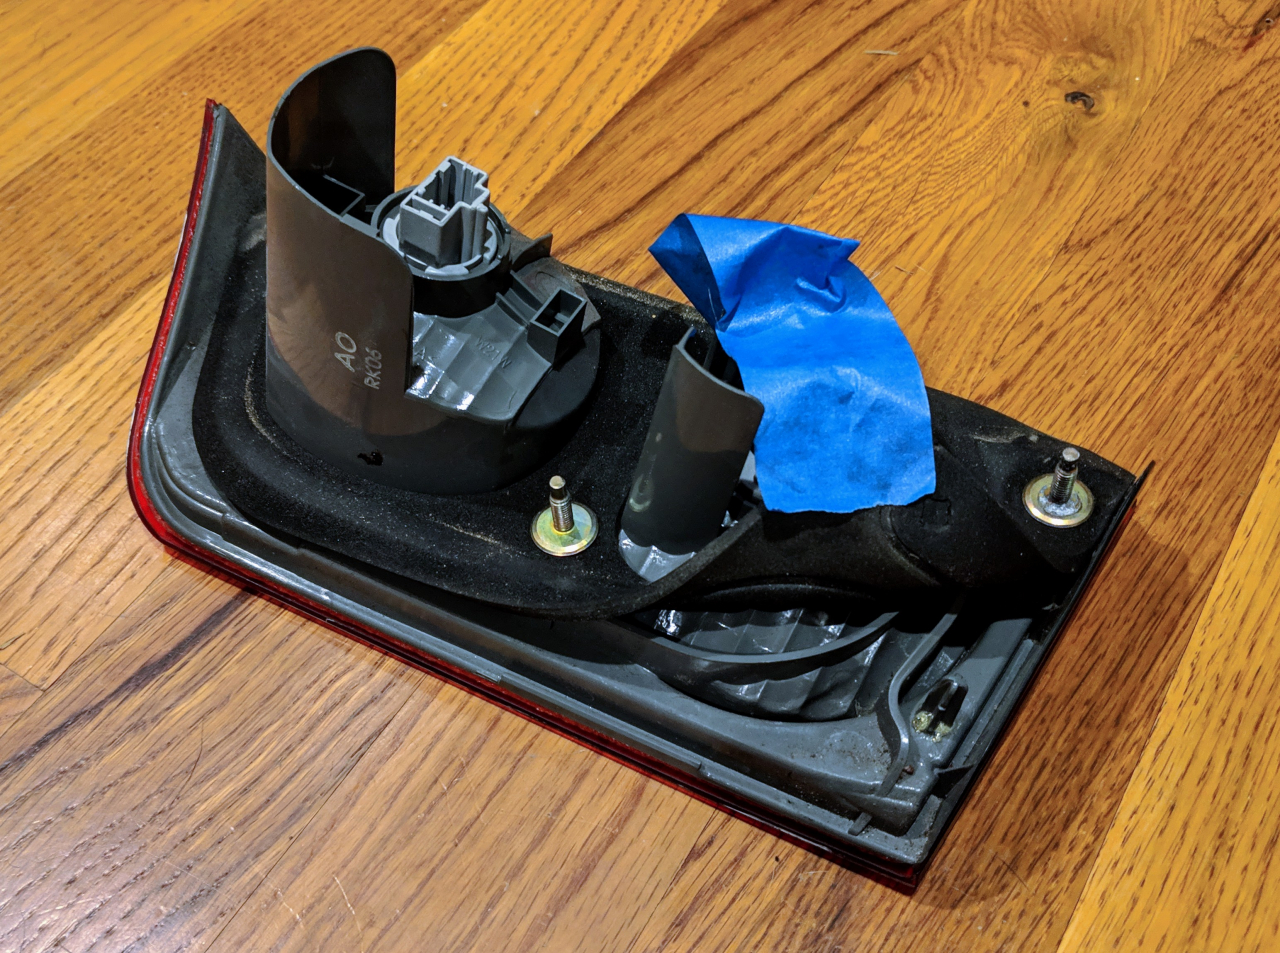
License plates light trim and lights were removed next. Figured out the body shop had put these back together wrong. They had the lights under the trim for some reason. Noticed over the years the clear plastic has yellowed a bit so I will be purchasing new lenses for these lights. Might use it as a chance to upgrade to LED too.
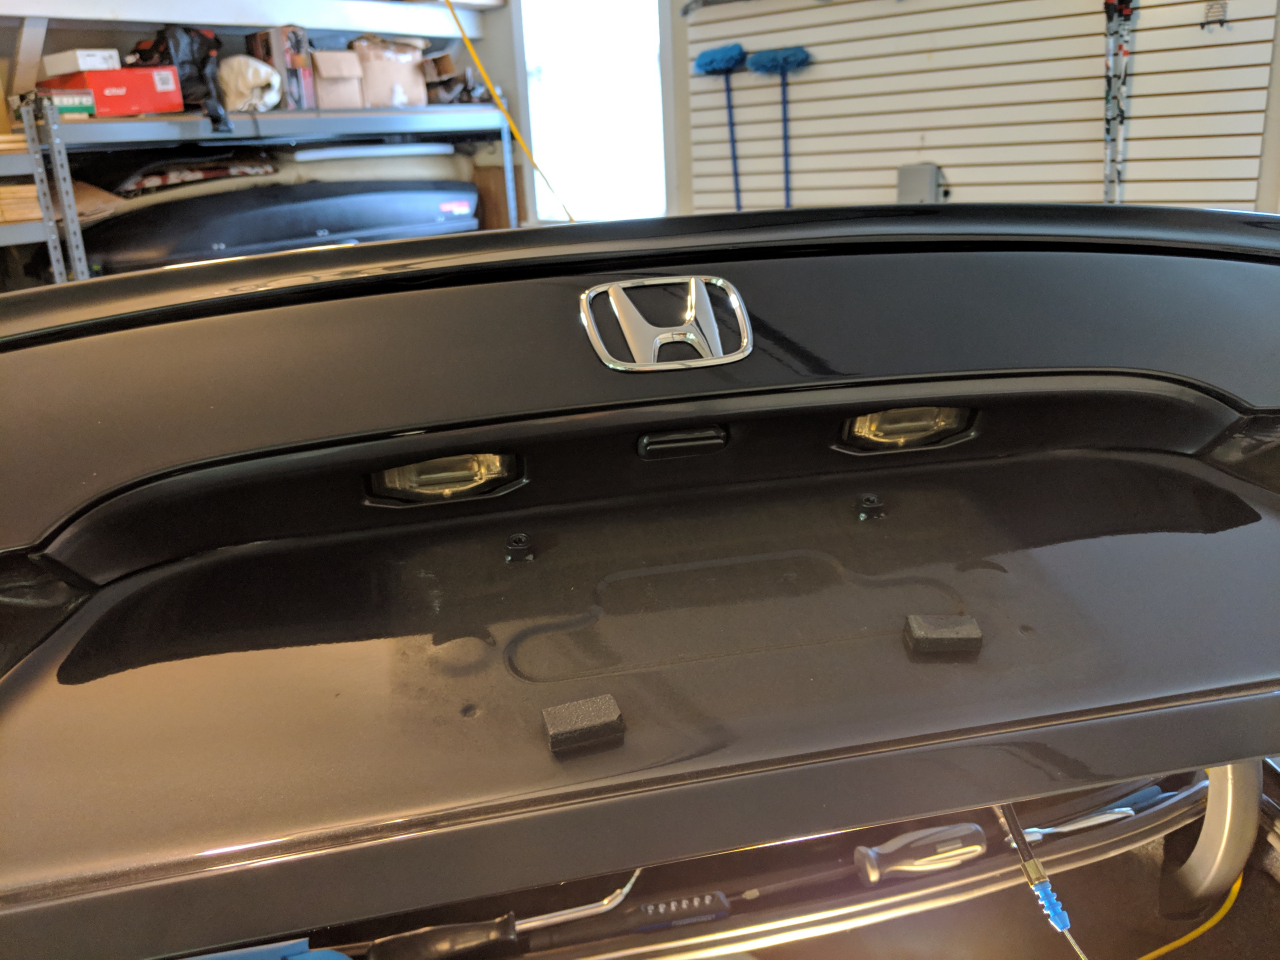
Trim, lights, and trunk button removed

Onto the wires
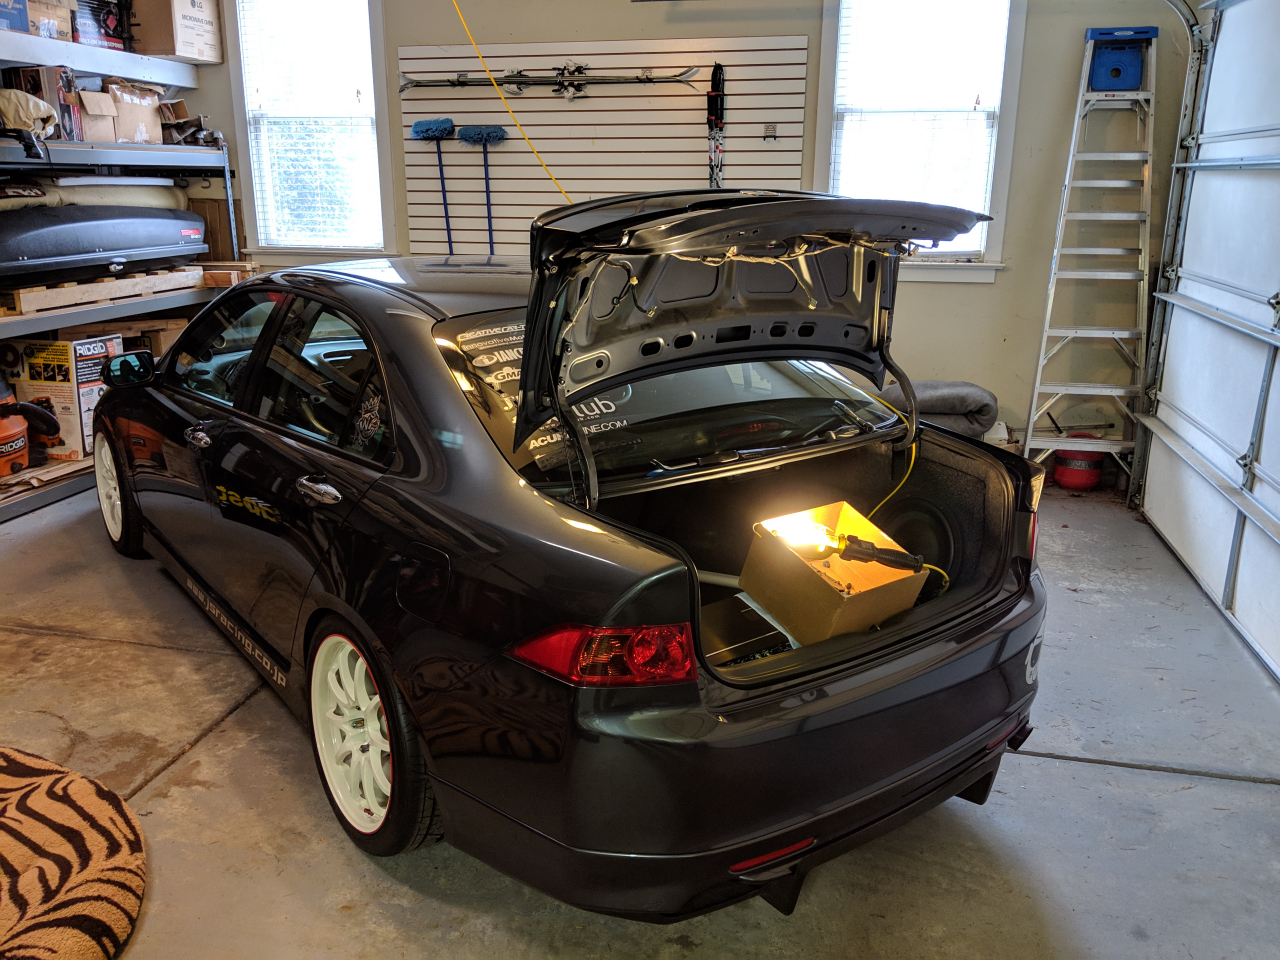
Old trunk installed

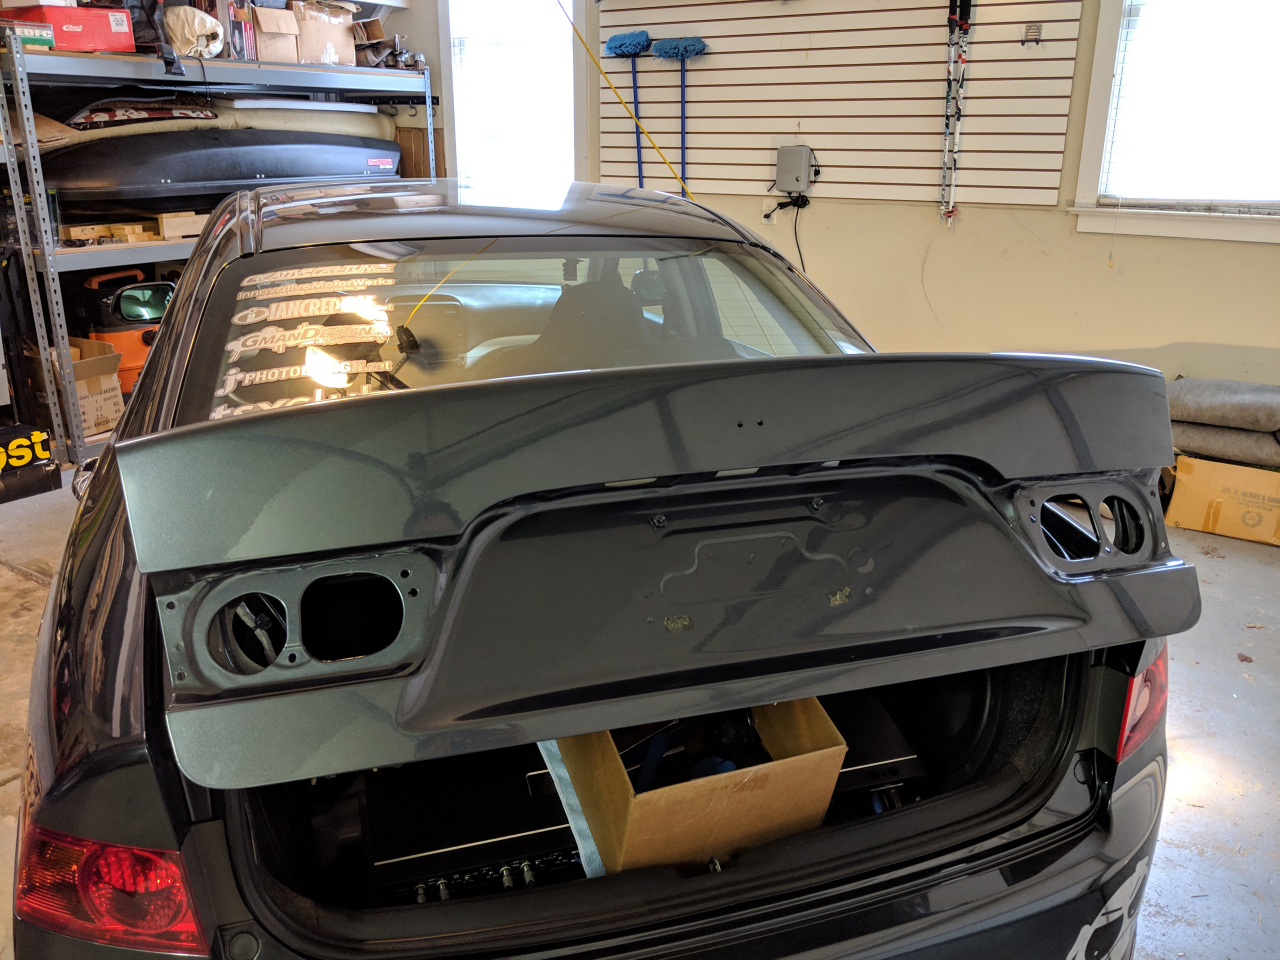
Taped up the trunk even though scratches really wouldn't be a big deal I didn't want to accidentally gouge anything and ruin the mostly smooth surface I had for wrapping.
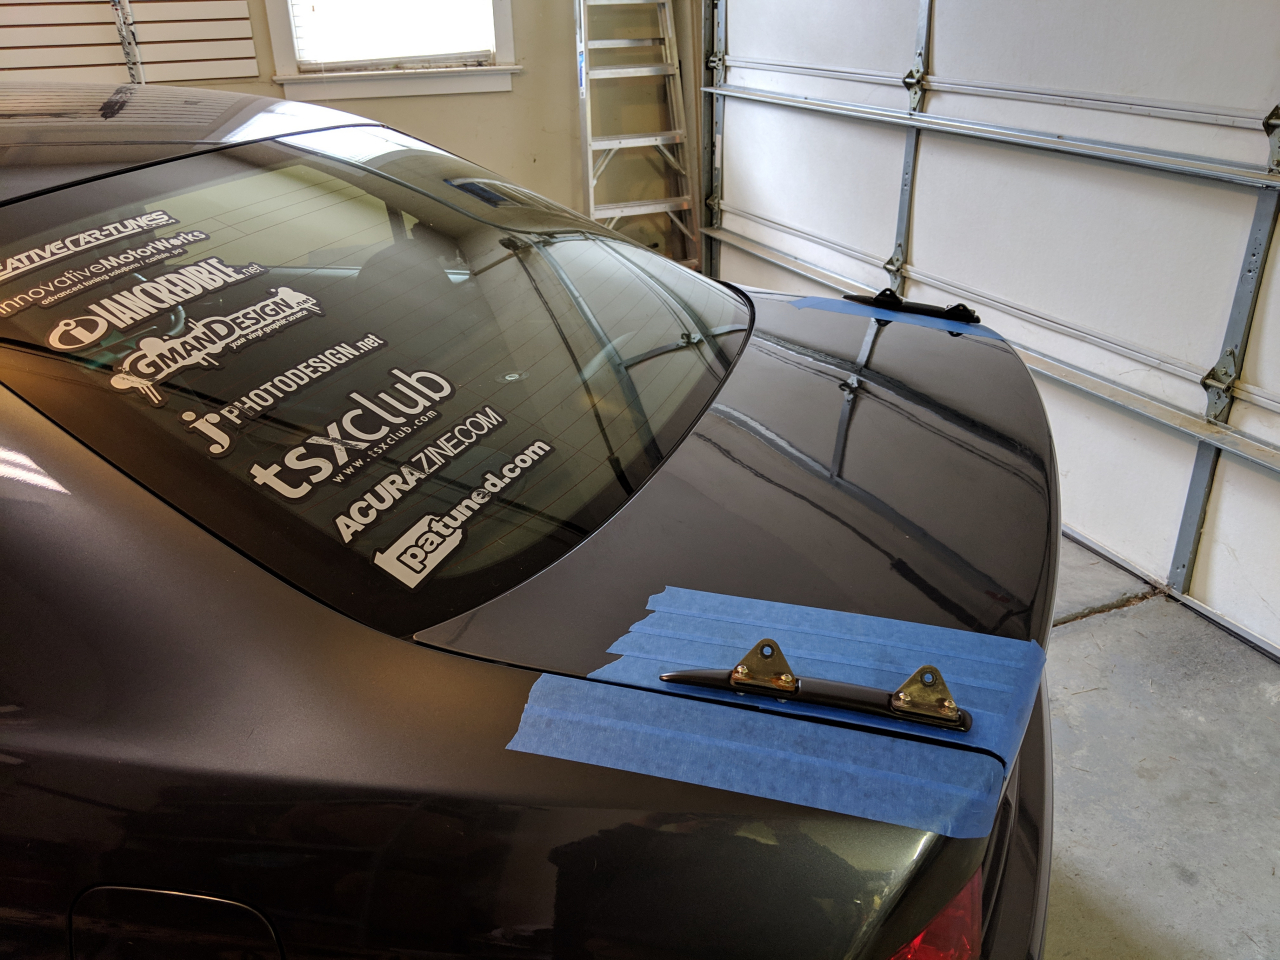
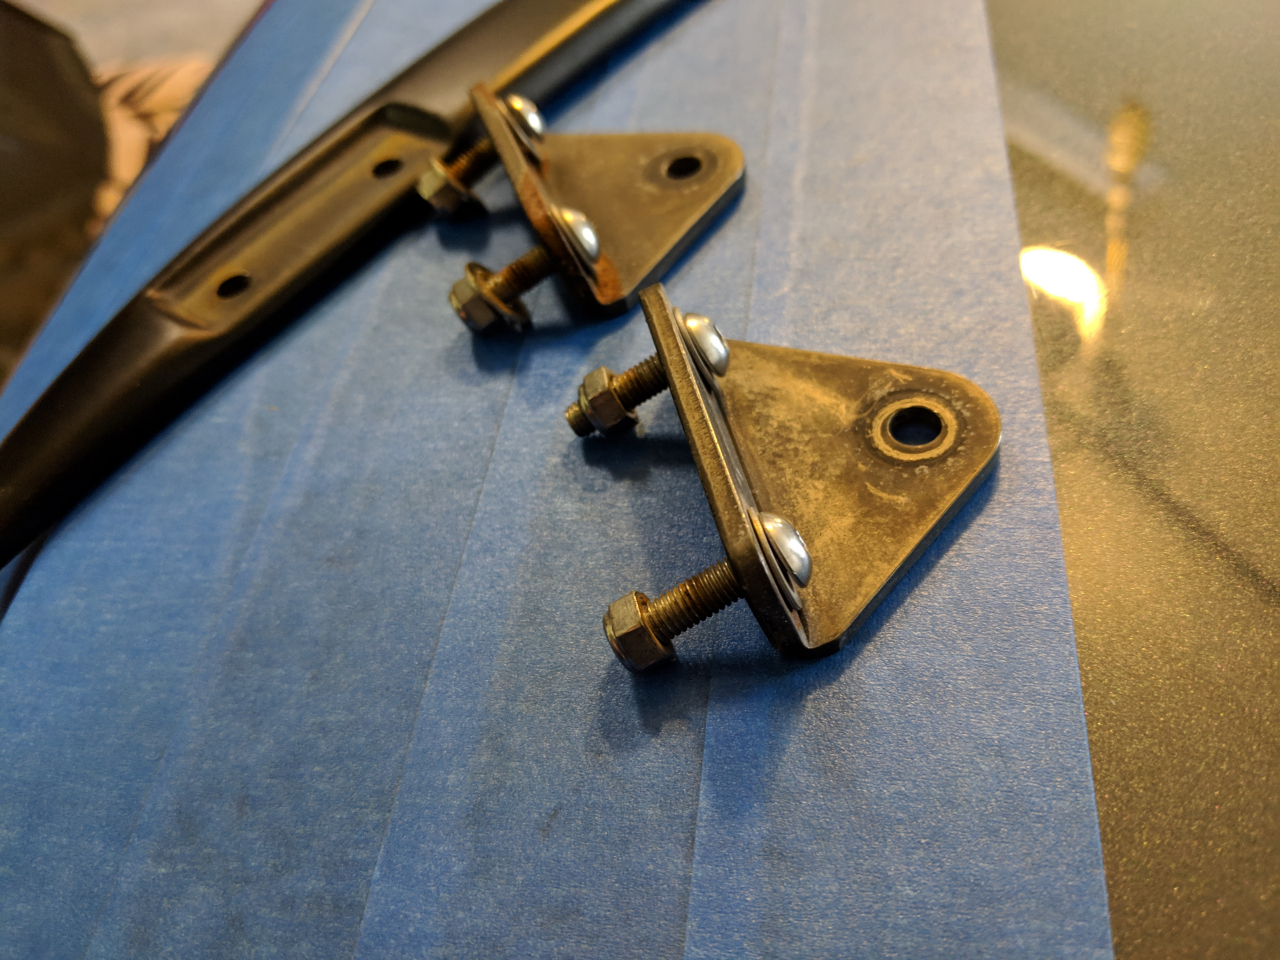
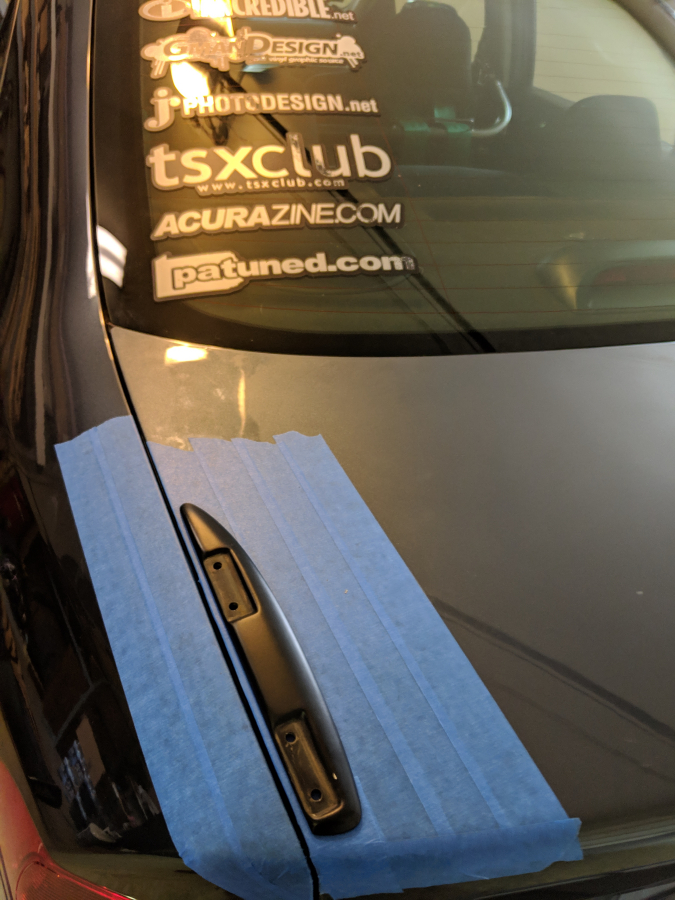
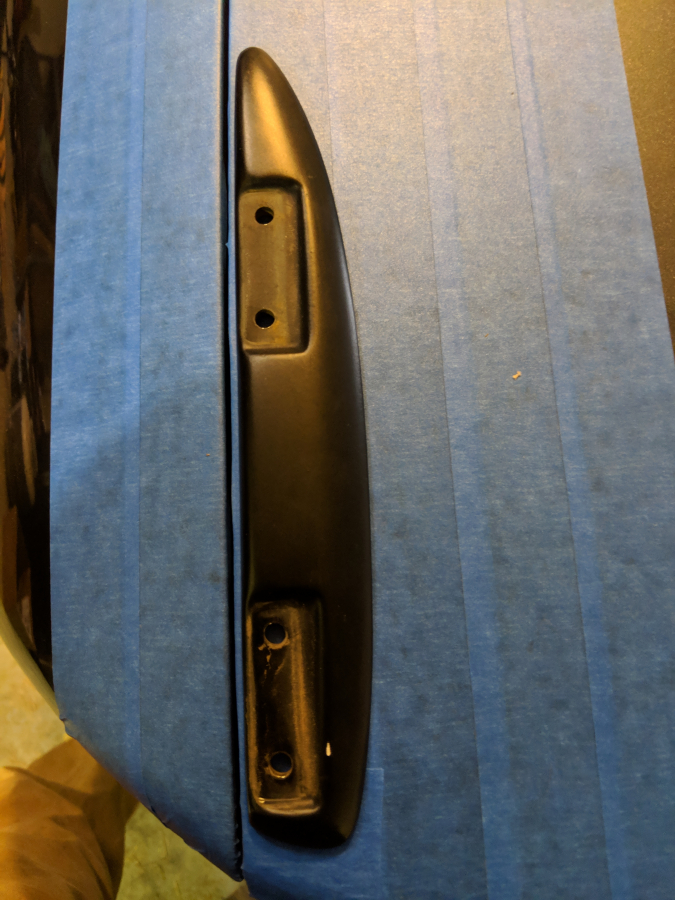
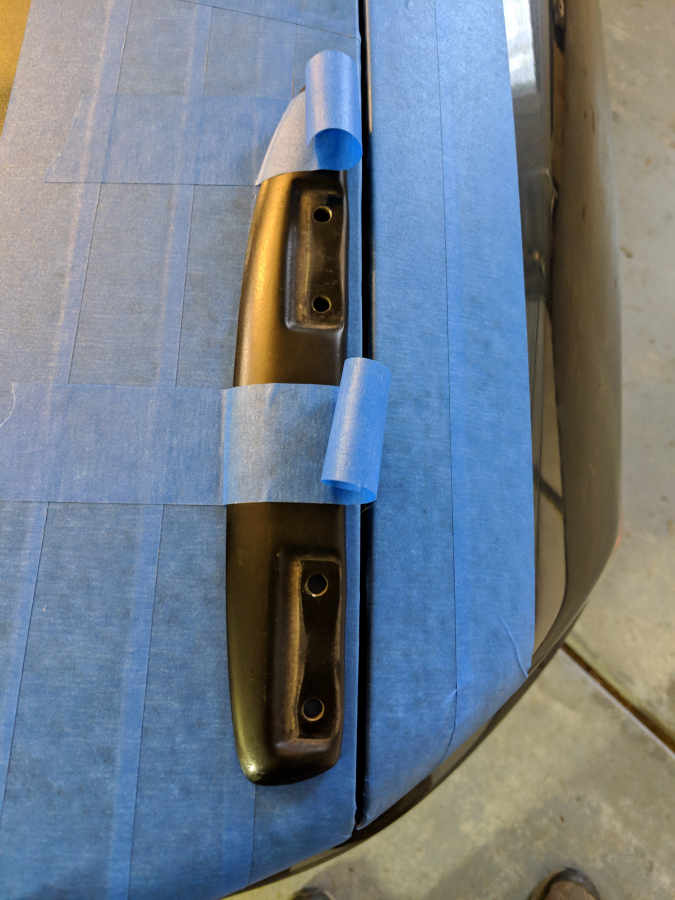
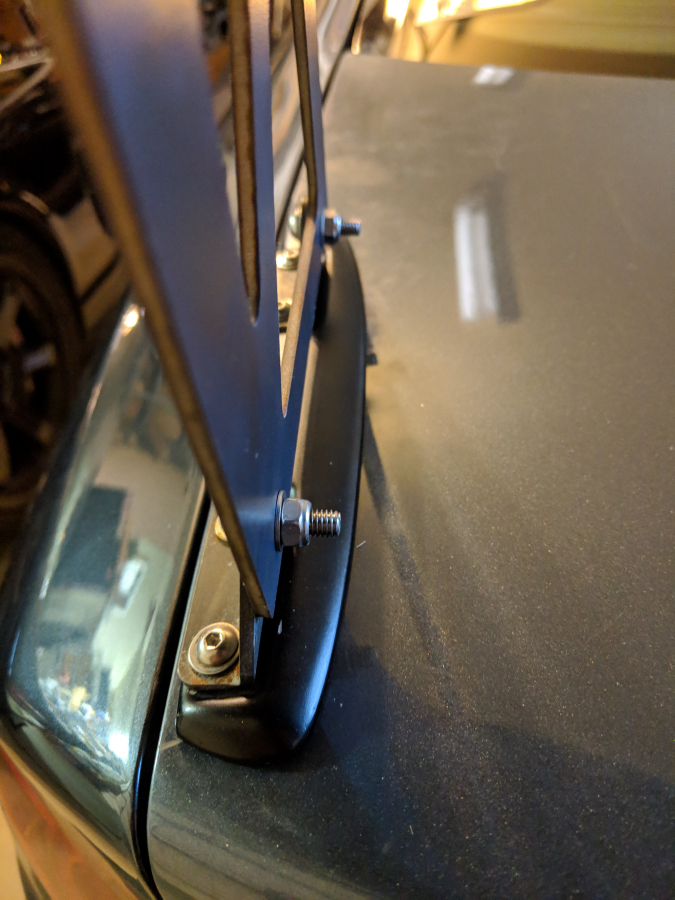
This wing is used and the hardware is a little rough. Looking into getting custom titanium mounting brackets made. If can't get those done for the right price then I will have the existing ones powder coated.
Tried the wing both forward a bit and then all the way back.


Chose to do all the way back. First alignment. Measure once, then twice, then thee more times.

Final location verified. Getting ready to drill.

Drilled pilot marks with the brackets still tapped on. Then removed brackets to finish the holes.


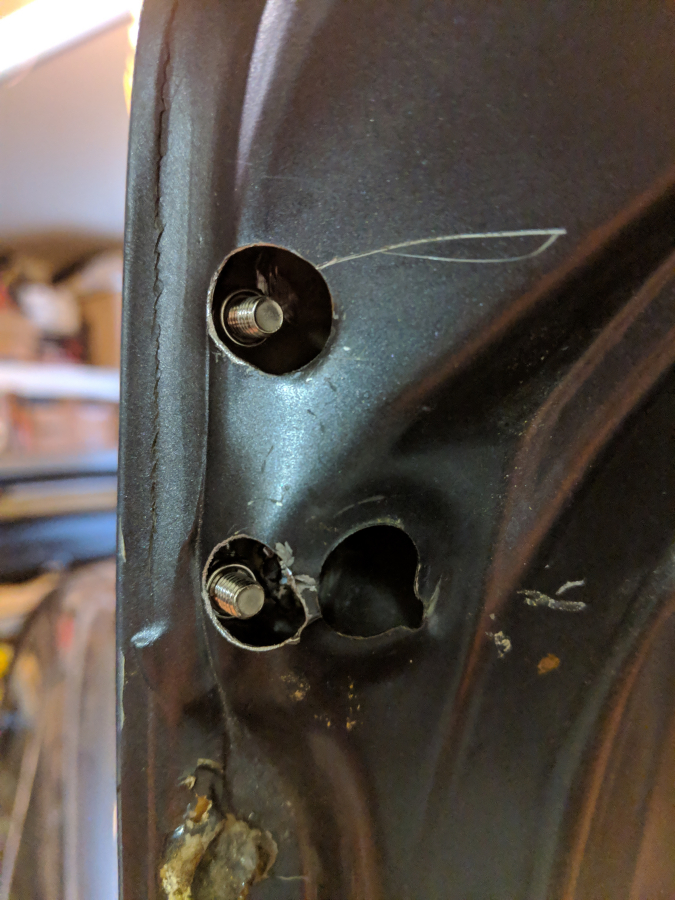
First set of holes finished. The two holes furthest toward the trunk bend would need to have the sheet metal enlarged to fit a socket through to bolt the spoiler on.
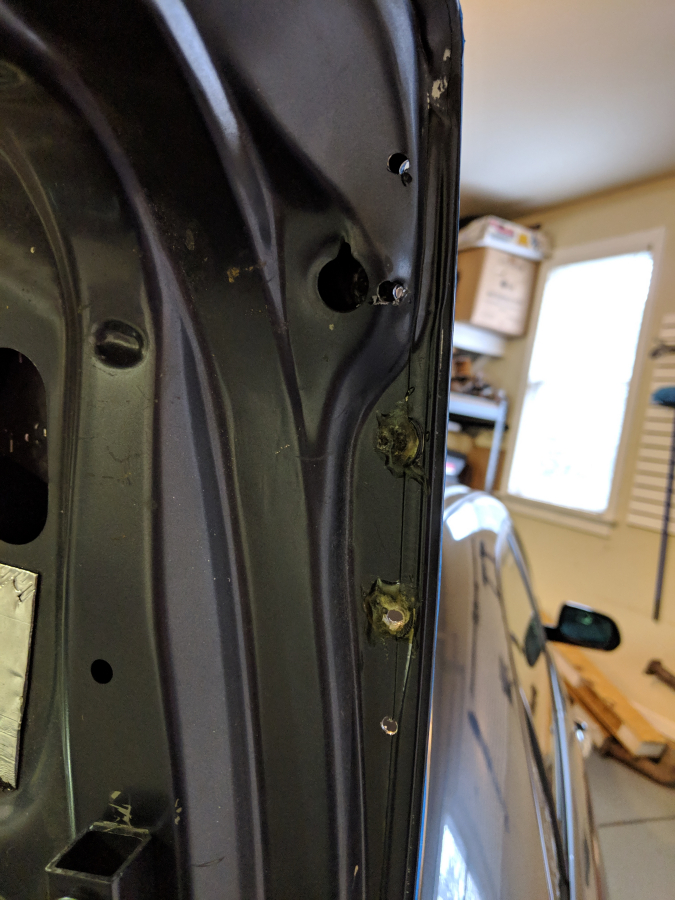
Other side
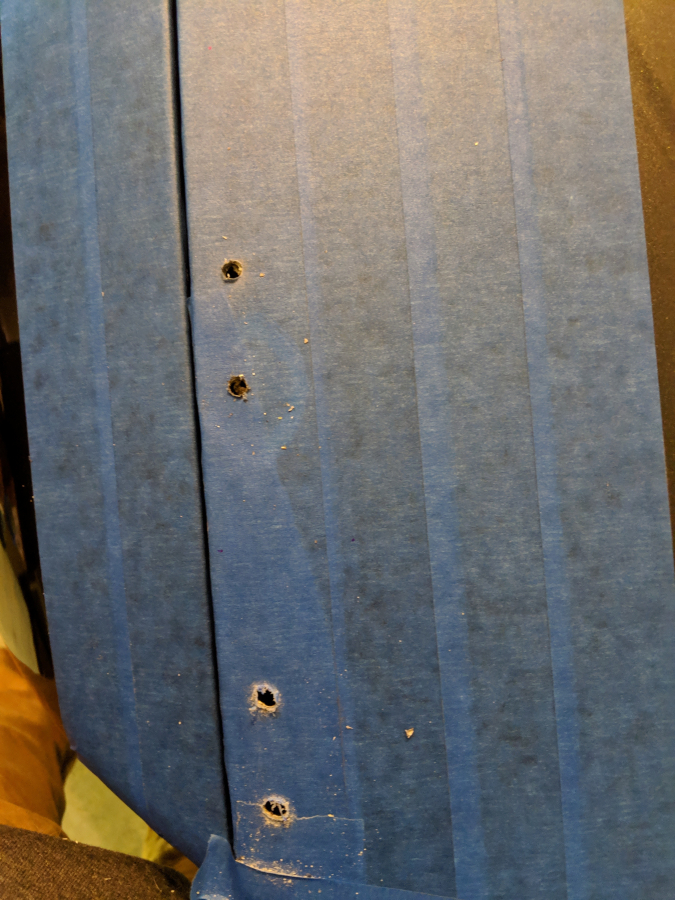
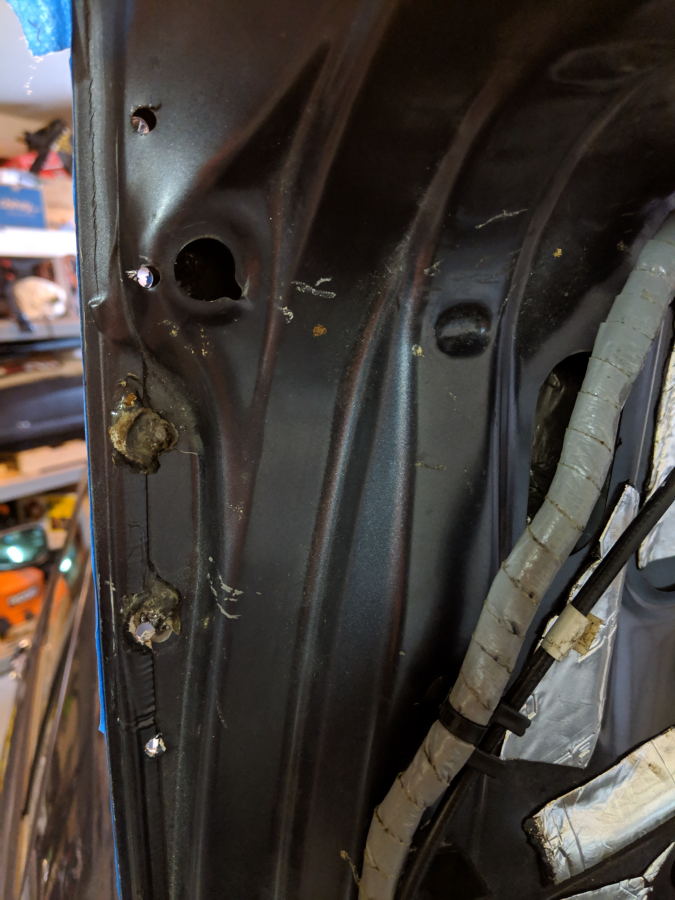
First bracket bolted on. In the second shot you can see the enlarged hole. That was probably one of the most nerve racking parts having to drill the first layer but not the second.
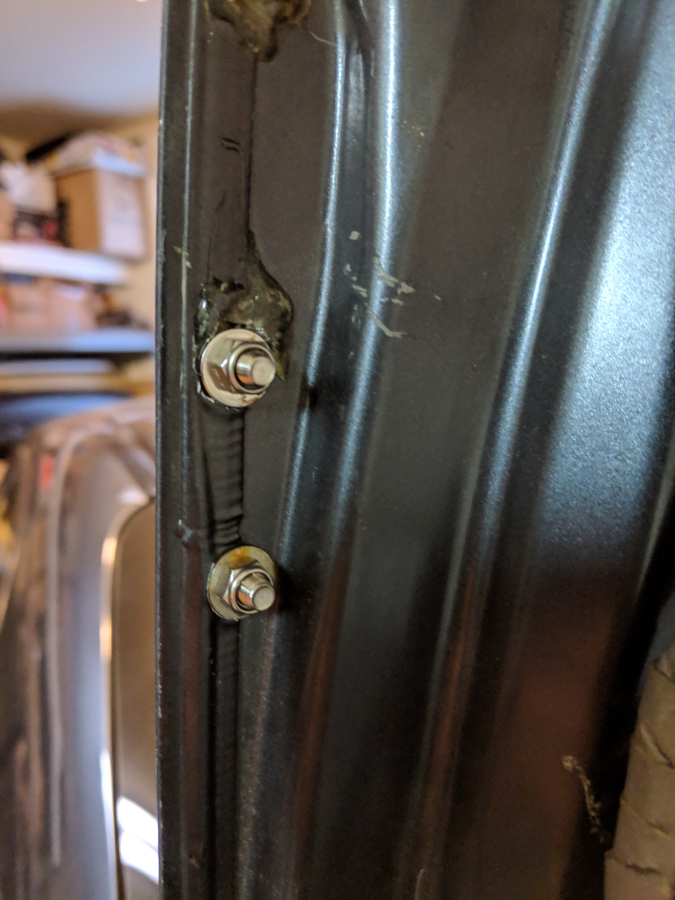

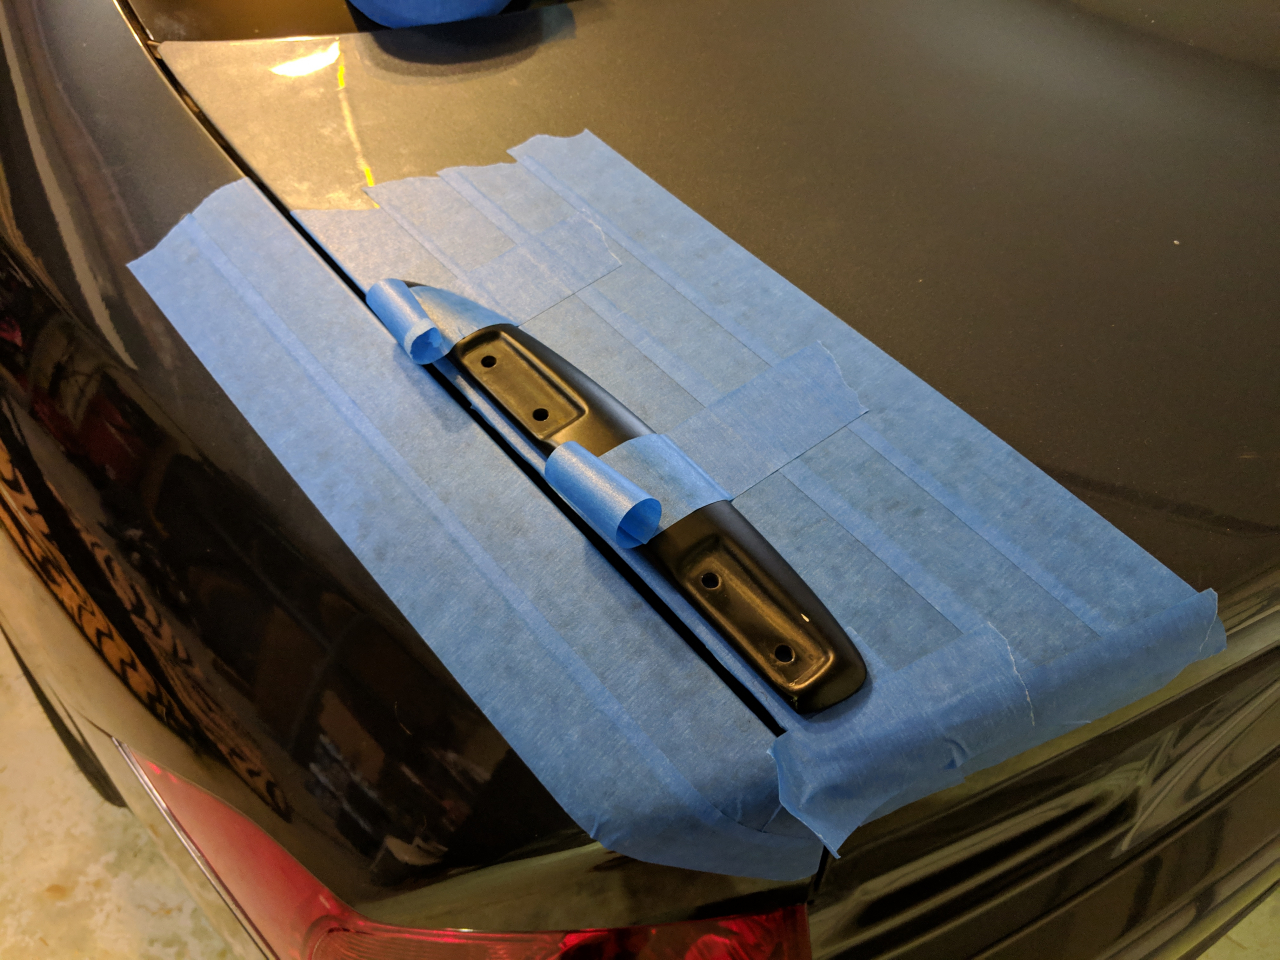
Wing installed. Trunk won't go fully back together till I have time to vinyl wrap it. It was too cold yesterday for the vinyl to adhere properly. It would have also been a huge undertaking to get both done in the same day so glad I decided to make them two separate projects. It will also allow me to order the extra parts I need.
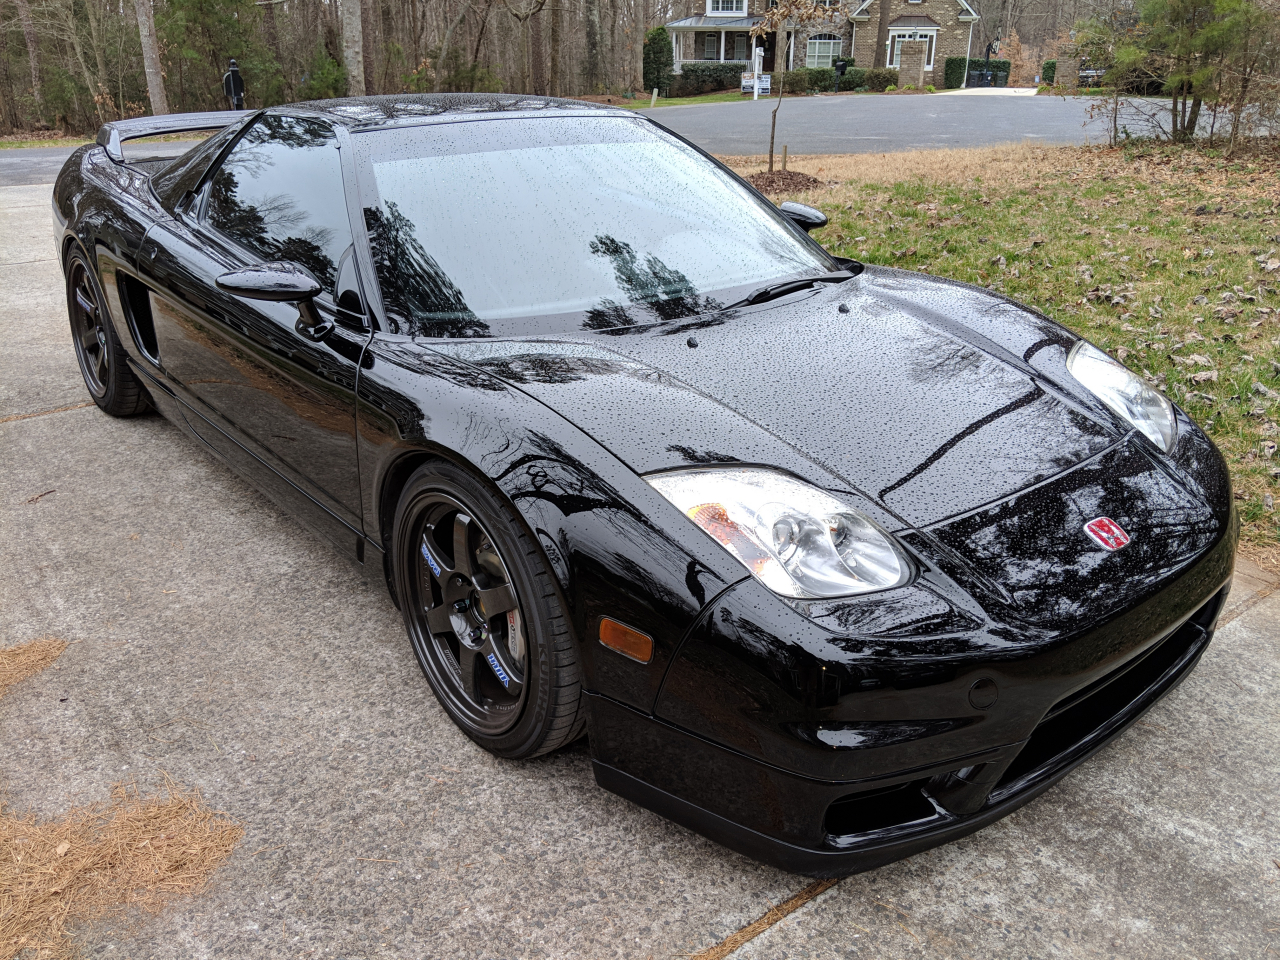
Consequences of a open garage to work on. A surprise shower on a completely clean NSX.
Want to get some better hardware too that is exact right length bolts so you don't see the extra threads. Might also use some penta security nuts as those will give a nicer finished look and also make it impossible to steal the wing off the car.
Some outside completed pictures


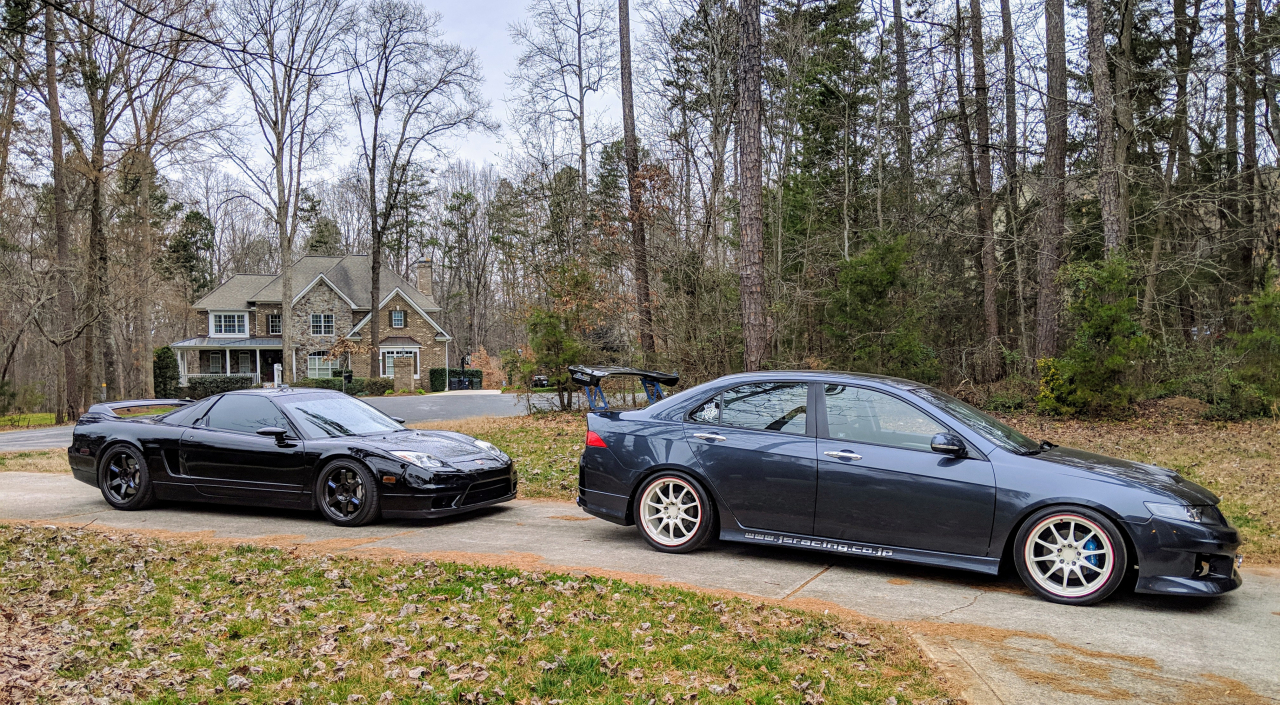
My two favorite Honda's back in the garage.

The dog bed was put in the garage so I had a safe soft spot to lay the trunks and wing during the install
Trunk lid liner removed.
Lights came out next
While removing the lights I found on of the pins had cracked off as it was still stuck in the sheet metal once I removed the light. Nothing a little glue can't fix I hope.
Trunk latch removed
License plates light trim and lights were removed next. Figured out the body shop had put these back together wrong. They had the lights under the trim for some reason. Noticed over the years the clear plastic has yellowed a bit so I will be purchasing new lenses for these lights. Might use it as a chance to upgrade to LED too.
Trim, lights, and trunk button removed
Onto the wires
Old trunk installed
Taped up the trunk even though scratches really wouldn't be a big deal I didn't want to accidentally gouge anything and ruin the mostly smooth surface I had for wrapping.
This wing is used and the hardware is a little rough. Looking into getting custom titanium mounting brackets made. If can't get those done for the right price then I will have the existing ones powder coated.
Tried the wing both forward a bit and then all the way back.
Chose to do all the way back. First alignment. Measure once, then twice, then thee more times.
Final location verified. Getting ready to drill.
Drilled pilot marks with the brackets still tapped on. Then removed brackets to finish the holes.
First set of holes finished. The two holes furthest toward the trunk bend would need to have the sheet metal enlarged to fit a socket through to bolt the spoiler on.
Other side
First bracket bolted on. In the second shot you can see the enlarged hole. That was probably one of the most nerve racking parts having to drill the first layer but not the second.
Wing installed. Trunk won't go fully back together till I have time to vinyl wrap it. It was too cold yesterday for the vinyl to adhere properly. It would have also been a huge undertaking to get both done in the same day so glad I decided to make them two separate projects. It will also allow me to order the extra parts I need.
Consequences of a open garage to work on. A surprise shower on a completely clean NSX.
Want to get some better hardware too that is exact right length bolts so you don't see the extra threads. Might also use some penta security nuts as those will give a nicer finished look and also make it impossible to steal the wing off the car.
Some outside completed pictures
My two favorite Honda's back in the garage.
02-11-2019, 12:17 PM
#78
Moderator
Regional Coordinator (Southeast)
Regional Coordinator (Southeast)
Thread Starter
Join Date: Dec 2003
Location: Mooresville, NC
Age: 38
Posts: 43,593
Received 3,789 Likes
on
2,555 Posts
Here is where the tire/wheel rack came from. https://www.carguygarage.com/fourtiertireshe.html I had it shipped to a buddies used car dealership to avoid the +$150 residential delivery fee.
The following users liked this post:
juniorbean (02-11-2019)
02-11-2019, 12:19 PM
#79
Moderator
Regional Coordinator (Southeast)
Regional Coordinator (Southeast)
Thread Starter
Join Date: Dec 2003
Location: Mooresville, NC
Age: 38
Posts: 43,593
Received 3,789 Likes
on
2,555 Posts
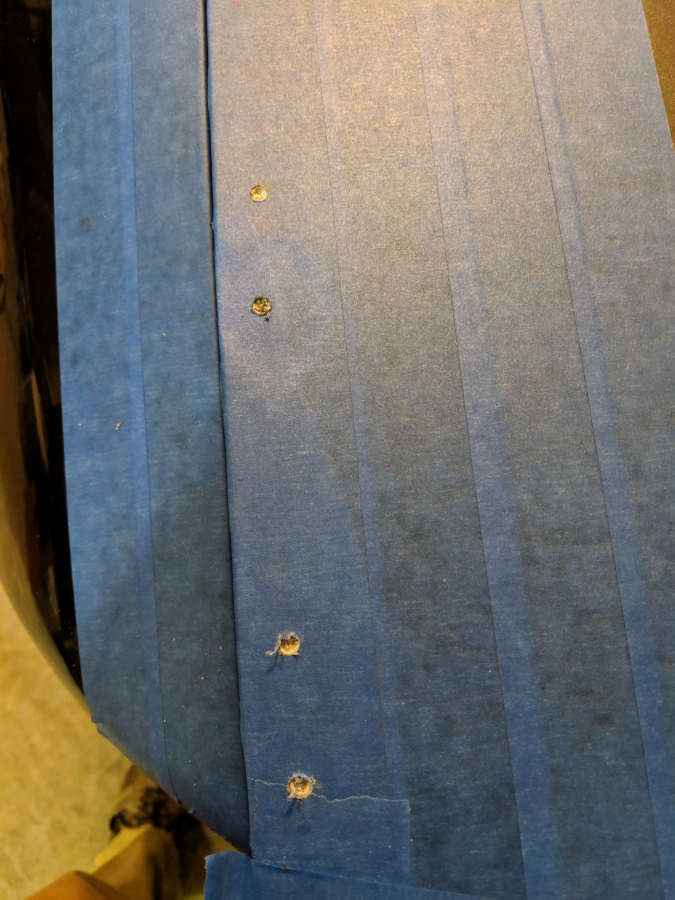
One thing I am worried about is water/moisture getting into the trunk through those two holes that are now cut outside of the rubber trunk seal area. Not sure the best way to seal those against that. The only thing so far I can think of is maybe some dynomat like material full put over the hole.
02-11-2019, 12:34 PM
#80
That never even crossed my mind. Wonder what the best way to approach that is. Maybe a can of Rustoleum and a foam brush?
One thing I am worried about is water/moisture getting into the trunk through those two holes that are now cut outside of the rubber trunk seal area. Not sure the best way to seal those against that. The only thing so far I can think of is maybe some dynomat like material full put over the hole.
One thing I am worried about is water/moisture getting into the trunk through those two holes that are now cut outside of the rubber trunk seal area. Not sure the best way to seal those against that. The only thing so far I can think of is maybe some dynomat like material full put over the hole.
As for the holes, spray them with Flex Seal. That stuff is becoming my Frank's Red Hot for work in and around the house b/c I spray that shit on everything
