GM 3.4V6-Lower Intake Manifold gasket repair
 05-15-2008, 09:10 AM
#1
Suzuka Master
Thread Starter
iTrader: (1)
If you think Acura/Honda had issues with their defective tranny's, check this out.
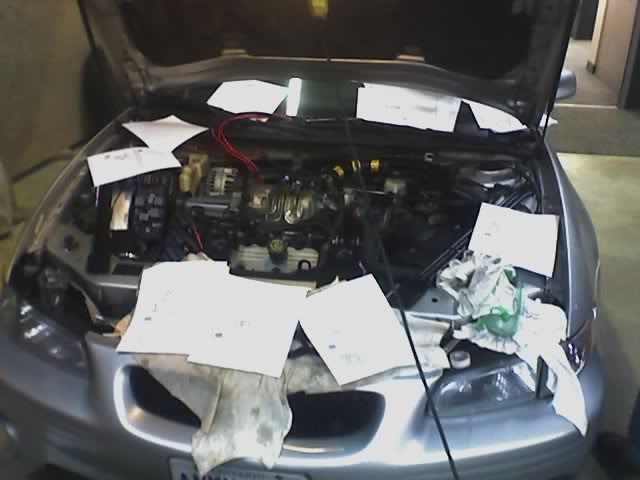
I just completed one of these repairs on my mother's 2001 Olds Alero with 49,150 miles.

http://d-tips.com/General/Articles/a...sket/art10.art
Went to three authorized GM dealers in my area and received an average cost estimate of $840 for this repair.
I decided to DIY, and saved about 83% of what a dealer would have charged.
FEL-PRO #ms98003T {gasket set};
ACDELCO #217461 seal kit, f/injn fuel rl; $91.06
Permatex Ultra Black Hi-Temp RTV silicone; 6.40
GTX 5QT Motor oil & puralator filter
Dex cool antifreeze; 25.61
Push Rod Remover Tool (LIS48500) 22.47
$145.54
http://www.denlorstools.com/home/dt1...hrod_tool.html
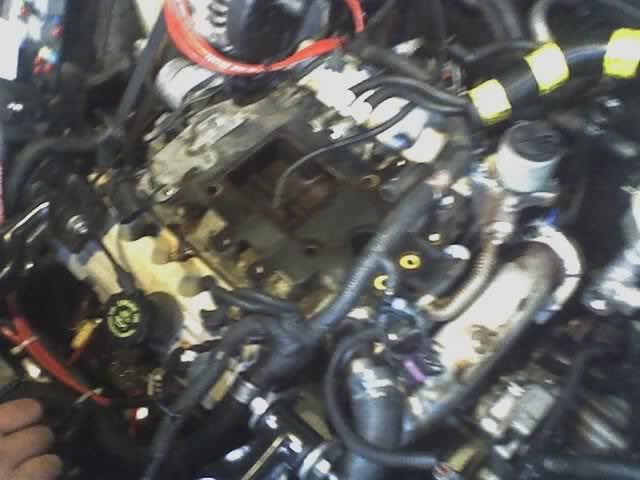
Takeing my time, it took one day to label and tear down to the LIM, one day to clean up the dex cool and oil goo all over the lower intake; valve covers, upper intake plenum ect; one day to reassemble.
Best part about it was that it cranked-up on the first try.


Gonna try to get a wopping $50 dollars back on a claim regarding this class action law suit settlement.
http://www.girardgibbs.com/dexcool.html#faq_1
Anyone else been touched by this GM-Dex cool Cluster fawk
I just completed one of these repairs on my mother's 2001 Olds Alero with 49,150 miles.
http://d-tips.com/General/Articles/a...sket/art10.art
Went to three authorized GM dealers in my area and received an average cost estimate of $840 for this repair.
I decided to DIY, and saved about 83% of what a dealer would have charged.
FEL-PRO #ms98003T {gasket set};
ACDELCO #217461 seal kit, f/injn fuel rl; $91.06
Permatex Ultra Black Hi-Temp RTV silicone; 6.40
GTX 5QT Motor oil & puralator filter
Dex cool antifreeze; 25.61
Push Rod Remover Tool (LIS48500) 22.47
$145.54
http://www.denlorstools.com/home/dt1...hrod_tool.html
Takeing my time, it took one day to label and tear down to the LIM, one day to clean up the dex cool and oil goo all over the lower intake; valve covers, upper intake plenum ect; one day to reassemble.
Best part about it was that it cranked-up on the first try.
Gonna try to get a wopping $50 dollars back on a claim regarding this class action law suit settlement.
http://www.girardgibbs.com/dexcool.html#faq_1
Anyone else been touched by this GM-Dex cool Cluster fawk
 05-15-2008, 09:36 AM
#2
Senior Moderator
I know a few people, (co-workers, relatives) Its about a $1200 repair up here. In one case $3k since coloant went into the block.
Had a 3.4 myself but got rid of it with about 80K km's on the odo.
Had a 3.4 myself but got rid of it with about 80K km's on the odo.
05-15-2008, 10:26 AM
#3
'Big Daddy Diggler'
What does that have to do with Hondas tranny's. Honda's transmissions were way worse of a problem. My TL downshifted at 70 to 2nd almost causing me to get creamed from behind. That problem with the 3.4 is common on certain engines, not all. It's an easy fix for any gear head. The only thing is that its time consuming so it costs a pretty penny.
05-15-2008, 12:38 PM
#4
Suzuka Master
Thread Starter
iTrader: (1)
[QUOTE=bigman]What does that have to do with Hondas tranny's. Honda's transmissions were way worse of a problem. My TL downshifted at 70 to 2nd almost causing me to get creamed from behind.[QUOTE]
The comparison I was attempting to make was in relation to how large a problem this was, like with Acura's tranny issue. Dude, I don't envy your sudden downshift mishap, in fact it's a dam shame just like this issue. However, if you look at the broad range of GM vehicles that have had this problem, it's just a large hassle/expense that people have to deal with if it happens to them.
How many tens of thousands of these cars were manufactured for the regular folk that buy these brands? To them, it's a big deal to dish out hundreds of dollars to repair a defect that should not have been.
1995-2003 3.1 & 3.4 V6-Buick Century, Rendezvous, Regal, Skylark
Chevrolet Impala, Lumina, Malibu, Monte Carlo, Venture, Corsica, Beretta, Lumina APV; Oldsmobile Alero, Cutlass (Supreme and Ciera), Silhouette Pontiac Aztek, Grand Am, Grand Prix, Montana, Trans Sport
1995-2004 3.8 V6-Buick LeSabre, Park Avenue, Regal, Riviera
Chevrolet Camaro, Impala, Lumina, Monte Carlo
Oldsmobile Eighty-Eight, Intrigue, LSS, Ninety-Eight
Pontiac Bonneville, Firebird, Grand Prix
1995-2000 4.3 v6-Chevrolet Blazer, Chevrolet S-10
GMC Envoy, Jimmy, S-15
Oldsmobile Bravada
The comparison I was attempting to make was in relation to how large a problem this was, like with Acura's tranny issue.
Dude, I don't envy your sudden downshift mishap, in fact it's a dam shame just like this issue. However, if you look at the broad range of GM vehicles that have had this problem, it's just a large hassle/expense that people have to deal with if it happens to them. How many tens of thousands of these cars were manufactured for the regular folk that buy these brands? To them, it's a big deal to dish out hundreds of dollars to repair a defect that should not have been.
1995-2003 3.1 & 3.4 V6-Buick Century, Rendezvous, Regal, Skylark
Chevrolet Impala, Lumina, Malibu, Monte Carlo, Venture, Corsica, Beretta, Lumina APV; Oldsmobile Alero, Cutlass (Supreme and Ciera), Silhouette Pontiac Aztek, Grand Am, Grand Prix, Montana, Trans Sport
1995-2004 3.8 V6-Buick LeSabre, Park Avenue, Regal, Riviera
Chevrolet Camaro, Impala, Lumina, Monte Carlo
Oldsmobile Eighty-Eight, Intrigue, LSS, Ninety-Eight
Pontiac Bonneville, Firebird, Grand Prix
1995-2000 4.3 v6-Chevrolet Blazer, Chevrolet S-10
GMC Envoy, Jimmy, S-15
Oldsmobile Bravada
05-15-2008, 01:32 PM
#5
Moderator
The difference is that once the FEL-PRO kit is installed, the gasket is likely to outlast the vehicle. Once the gasket problem is fixed, the 3.4 is bulletproof.
However, these older GM vehicles are hardly reliable. Have fun with the water pump, heater core, alternator (Delco ones are junk), etc.
However, these older GM vehicles are hardly reliable. Have fun with the water pump, heater core, alternator (Delco ones are junk), etc.
05-15-2008, 01:44 PM
#6
Suzuka Master
Thread Starter
iTrader: (1)
Originally Posted by SodaLuvr
The difference is that once the FEL-PRO kit is installed, the gasket is likely to outlast the vehicle. Once the gasket problem is fixed, the 3.4 is bulletproof.
However, these older GM vehicles are hardly reliable. Have fun with the water pump, heater core, alternator (Delco ones are junk), etc.
However, these older GM vehicles are hardly reliable. Have fun with the water pump, heater core, alternator (Delco ones are junk), etc.
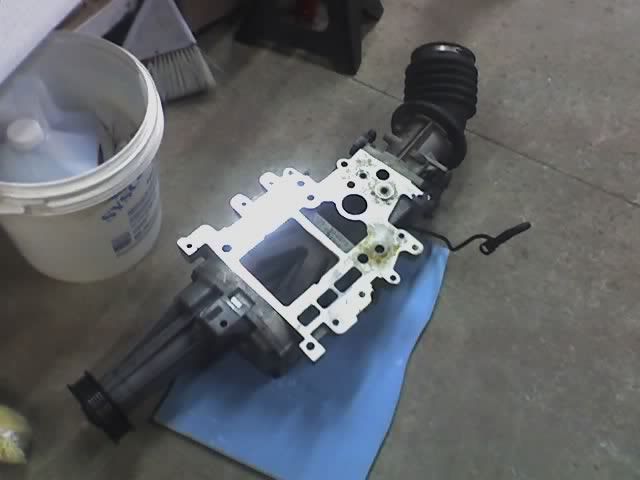
Yes sir, you are correct, the FEL-PRO kit is made of stamped metal with the molded rubber gasket configuration around the intake ports and water jacket openings. When I removed the old original GM gasket, the thing practically broke to pieces in my hands.
When I opened the FEL-PRO gasket kit and first observed the new gasket, it was like hell yes! This is top quality.All of the other forums covering these cars and this issue recommended using the FEL-PRO kit over the updated OEM kit because there where individuals who had had their car repaired at steelerships and they began to leak again

So far, the water pump, heater core, alternator have held up
 05-15-2008, 01:47 PM
#7
Moderator
Originally Posted by zeta
All of the other forums covering these cars and this issue recommended using the FEL-PRO kit over the updated OEM kit because there where individuals who had had their car repaired at steelerships and they began to leak again
So far, the water pump, heater core, alternator have held up
So far, the water pump, heater core, alternator have held up
I thought the updated GM kit was just as good as the FEL-PRO kit by Federal-Mogul. I have noticed that ever since GM switched to the updated kit on the 04 and newer GM 3.4 and 3.5 (LX9), there have been virtually no intake gasket leaks.
Trending Topics
05-15-2008, 01:54 PM
#9
Moderator
Originally Posted by dom
Co-worker with a 01 Grand Am (220K km's) just did his 3rd gasket repair. How long has this FEL-PRO kit been available?
http://www.aftermarketnews.com/defau...e=art&id=73486
05-15-2008, 02:22 PM
#10
Suzuka Master
Thread Starter
iTrader: (1)
Originally Posted by SodaLuvr
Wow, really? I thought the updated GM kit was just as good as the FEL-PRO kit by Federal-Mogul. I have noticed that ever since GM switched to the updated kit on the 04 and newer GM 3.4 and 3.5 (LX9), there have been virtually no intake gasket leaks.
I thought the updated GM kit was just as good as the FEL-PRO kit by Federal-Mogul. I have noticed that ever since GM switched to the updated kit on the 04 and newer GM 3.4 and 3.5 (LX9), there have been virtually no intake gasket leaks. I thought my torque wrench was clapped; however, it is just a common occurence with these manifolds. Then, after all of the bolts had a good torque of 115 in/lbs, you are supposed to torque the outer 4 bolts (two on each side) down to 18 ft/lbs. Anyway, that's what I did to make sure this thing was on. Seems to have worked great! No leaks so far.In addition, what I did to insure the best possible seal at the end ridges between the heads was to put a cut piece of thin gasket material sandwiched between two separate layers of RTV when it came time to drop it all in (LIM). One other guy mentioned this on another forum and said it worked well for him. A bit of overkill, but I'll take it, rather then do this BS again.
05-15-2008, 02:25 PM
#11
Senior Moderator
Been there replaced one on my grand parents lumina.
12-12-2008, 09:09 AM
#12
5th Gear

Join Date: Dec 2008
Posts: 5
Likes: 0
Received 0 Likes
on
0 Posts
A couple of questions
Hi,
I know this thread is quite old now, but I am facing the same dilemma that you did with regard to a leaking intake manifold gasket. My question is; are you a mechanic? Do you think that this is a task that someone like myself could attempt given that I have some mechanical knowledge?
Also, are there any surprises I should be aware of when I start pulling the hoses etc off the engine.
I would be very grateful for any help or advice you may have to offer.
Thanks.
12-12-2008, 09:11 AM
#13
Senior Moderator
You can tackle this project yourself. Its not terribly difficult. Just have the new gaskets on hand, a liquid gasket and coolant to refill after the job is done.
Oh and old shop rags and oildry/cat litter(for the floor) to absorb any coolant that comes out.
Oh and old shop rags and oildry/cat litter(for the floor) to absorb any coolant that comes out.
12-12-2008, 10:31 AM
#14
5th Gear
Join Date: Dec 2008
Posts: 5
Likes: 0
Received 0 Likes
on
0 Posts
thanks. I appreciate the info. All the repair shops make it sound like you are about to embark on some intrepid major journey filled will peril lol.
12-12-2008, 11:03 AM
#15
2008 Acura TL

This happened to my old buick, it was leaking coolant, and the car was overheating, until there was no more coolant at all, and it had a leak in the intake manifold, so I had to get it fixed, and it was expensive.
12-12-2008, 10:34 PM
#16
Suzuka Master
Thread Starter
iTrader: (1)
[QUOTE=alerobasher;10279765 My question is; are you a mechanic?[/QUOTE]
Not by trade. I sit behind a computer all day and analyze spreadsheets in order to post complex journal entries.
Certainly. First buy an inexpensive 'Haynes' repair manual for your make and model GM car. The detail may be sparse; however, it will provide enough info. to get'er done.
Before starting the repair, turn your heater dial all the way on. This will help bleed the air out of the cooling system when you go to refill.
Label all hose/vacuum connections to expedite reassembly. In my case, this was the single most important step which enabled the car to fire up on the first try with no problems.
Beware of the fuel rail o-rings upon disconnection, they tend to pop out (get lost) and/or shred.
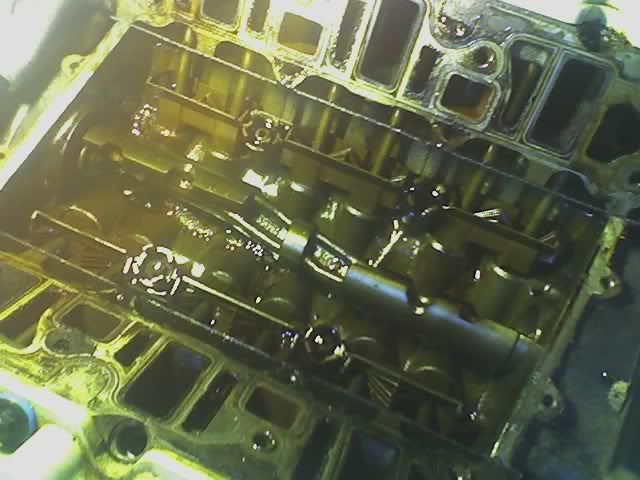
Keep all of your intake and exhaust push rods in the order of disassembly. They are different lengths and you DO NOT want to reinstall them incorrectly.
Do the repair over a few days if possible. Your back will thank you later . In addition, perform a 'dry run' of placing the LIM on the motor with gaskets in place to help orient yourself to the procedure before final assembly. It's important to place the LIM in the right spot the first time to avoid 'sliding' it side to side to insert/align the LIM bolts when the RTV has been applied..
Apply a healthy bead of RTV on the end ridges. Also apply some RTV just under the new gasket right at the distal edge where the gasket meets the end ridge. Leaks tend to occur there if not properly sealed.
I replaced the thermostat and the oil driveshft o-ring while the access was easy.
The four LIM end bolts on the 3.4 V6 (two on the pulley side;two on the thermostat side) are difficult to torque without a metric 'crows foot' set. Northern Tool has a cheap set available.
Use the updated torque sequence. The FELPRO gasket set I received included one. Spend the extra money and get the FELPRO kit.
The pushrod tool helped tremendously, but is no necessary.
Good luck.
Not by trade. I sit behind a computer all day and analyze spreadsheets in order to post complex journal entries.
Before starting the repair, turn your heater dial all the way on. This will help bleed the air out of the cooling system when you go to refill.
Label all hose/vacuum connections to expedite reassembly. In my case, this was the single most important step which enabled the car to fire up on the first try with no problems.
Beware of the fuel rail o-rings upon disconnection, they tend to pop out (get lost) and/or shred.
Keep all of your intake and exhaust push rods in the order of disassembly. They are different lengths and you DO NOT want to reinstall them incorrectly.
Do the repair over a few days if possible. Your back will thank you later
. In addition, perform a 'dry run' of placing the LIM on the motor with gaskets in place to help orient yourself to the procedure before final assembly. It's important to place the LIM in the right spot the first time to avoid 'sliding' it side to side to insert/align the LIM bolts when the RTV has been applied..Apply a healthy bead of RTV on the end ridges. Also apply some RTV just under the new gasket right at the distal edge where the gasket meets the end ridge. Leaks tend to occur there if not properly sealed.
I replaced the thermostat and the oil driveshft o-ring while the access was easy.
Use the updated torque sequence. The FELPRO gasket set I received included one. Spend the extra money and get the FELPRO kit.
The pushrod tool helped tremendously, but is no necessary.
Good luck.
12-13-2008, 03:17 PM
#17
That was uncalled for...
We did it on our Grand Prix by choice at 100,000 km's only as preventitive measures. Now the car has been running like a champ and currently has 394,000km's... Granted our car is the 3.8L it still has the faimed lower intake manifold gasket problems.
BTW GM has issued a service bulletin on this. They refunded us our $240.00 that it cost in parts. See if a dealer will do the same. Provide all reciepts.
BTW GM has issued a service bulletin on this. They refunded us our $240.00 that it cost in parts. See if a dealer will do the same. Provide all reciepts.
12-18-2008, 07:02 PM
#18
5th Gear
Join Date: Dec 2008
Posts: 5
Likes: 0
Received 0 Likes
on
0 Posts
Intake manifold removal continued...
Not by trade. I sit behind a computer all day and analyze spreadsheets in order to post complex journal entries.
I Know just what you mean, I perform a similar job.
Certainly. First buy an inexpensive 'Haynes' repair manual for your make and model GM car. The detail may be sparse; however, it will provide enough info. to get'er done.
- I have the manual and printed off a lot of instructions from a walkthrough on another web site.
Before starting the repair, turn your heater dial all the way on. This will help bleed the air out of the cooling system when you go to refill.
Label all hose/vacuum connections to expedite reassembly. In my case, this was the single most important step which enabled the car to fire up on the first try with no problems.
Beware of the fuel rail o-rings upon disconnection, they tend to pop out (get lost) and/or shred.
I should be able to just leave the fuel rail attached to the LIM right? And thereby reduce the risk of losing/damaging o-rings?
Keep all of your intake and exhaust push rods in the order of disassembly. They are different lengths and you DO NOT want to reinstall them incorrectly.
I will be sure!
Do the repair over a few days if possible. Your back will thank you later. In addition, perform a 'dry run' of placing the LIM on the motor with gaskets in place to help orient yourself to the procedure before final assembly. It's important to place the LIM in the right spot the first time to avoid 'sliding' it side to side to insert/align the LIM bolts when the RTV has been applied..
Apply a healthy bead of RTV on the end ridges. Also apply some RTV just under the new gasket right at the distal edge where the gasket meets the end ridge. Leaks tend to occur there if not properly sealed.
Are you referring to the "end ridge" that looks like an "S" shape between the valves on each side of the engine?
I replaced the thermostat and the oil driveshft o-ring while the access was easy.
I have a new thermostat but don't know what you are referring to when you talk about the "oil driveshaft o-ring" can you quote a part number for the o-ring, or some way to describe the o-ring I need when I go to Napa?
The four LIM end bolts on the 3.4 V6 (two on the pulley side;two on the thermostat side) are difficult to torque without a metric 'crows foot' set. Northern Tool has a cheap set available.
Sorry about all the questions, what is a "crows foot"?
Use the updated torque sequence. The FELPRO gasket set I received included one. Spend the extra money and get the FELPRO kit.
I bought the felpro permadry plus kit
The pushrod tool helped tremendously, but is no necessary.
Good luck.
I Know just what you mean, I perform a similar job.
Certainly. First buy an inexpensive 'Haynes' repair manual for your make and model GM car. The detail may be sparse; however, it will provide enough info. to get'er done.
- I have the manual and printed off a lot of instructions from a walkthrough on another web site.
Before starting the repair, turn your heater dial all the way on. This will help bleed the air out of the cooling system when you go to refill.
Label all hose/vacuum connections to expedite reassembly. In my case, this was the single most important step which enabled the car to fire up on the first try with no problems.
Beware of the fuel rail o-rings upon disconnection, they tend to pop out (get lost) and/or shred.
I should be able to just leave the fuel rail attached to the LIM right? And thereby reduce the risk of losing/damaging o-rings?
Keep all of your intake and exhaust push rods in the order of disassembly. They are different lengths and you DO NOT want to reinstall them incorrectly.
I will be sure!
Do the repair over a few days if possible. Your back will thank you later
. In addition, perform a 'dry run' of placing the LIM on the motor with gaskets in place to help orient yourself to the procedure before final assembly. It's important to place the LIM in the right spot the first time to avoid 'sliding' it side to side to insert/align the LIM bolts when the RTV has been applied..Apply a healthy bead of RTV on the end ridges. Also apply some RTV just under the new gasket right at the distal edge where the gasket meets the end ridge. Leaks tend to occur there if not properly sealed.
Are you referring to the "end ridge" that looks like an "S" shape between the valves on each side of the engine?
I replaced the thermostat and the oil driveshft o-ring while the access was easy.
I have a new thermostat but don't know what you are referring to when you talk about the "oil driveshaft o-ring" can you quote a part number for the o-ring, or some way to describe the o-ring I need when I go to Napa?
The four LIM end bolts on the 3.4 V6 (two on the pulley side;two on the thermostat side) are difficult to torque without a metric 'crows foot' set. Northern Tool has a cheap set available.
Sorry about all the questions, what is a "crows foot"?
Use the updated torque sequence. The FELPRO gasket set I received included one. Spend the extra money and get the FELPRO kit.
I bought the felpro permadry plus kit
The pushrod tool helped tremendously, but is no necessary.
Good luck.
Thanks for all the useful info, and I look forward to seeing your comments about my questions.
Adrian.
12-19-2008, 06:32 PM
#19
Suzuka Master
Thread Starter
iTrader: (1)
Fuel rail o-rings: You can try to leave these connected; however, the Haynes manual (#38026) I used had this (fuel rail disconnection) as a step in the section for the LIM removal.
End ridges: Yes, this is the 'S' shaped areas on each side that will receive the RTV for sealing the LIM ends to the engine.
'Oil pump drive' shaft o-ring: This is the circular looking cap, held in place by a two prong fork with a single bolt. It's on the thermostat side of the 3.4 V6, right next to the end ridge. You will not miss it, but it's difficult to see unless you have the upper & lower IM's removed. Oil was leaking at this location, so I changed the o-ring. I called my local GM dealer and asked them for 'the o-ring that goes on the oil pump drive shaft' for my 02 Alero and they hooked me up. Sorry, don't have the part #. Basically, it's the old distributor shaft location before they went with electronic ignition. If yours is not leaking oil, don't bother with it.
Crows foot wrenches:
http://www.northerntool.com/webapp/w...m_ite=handtool
This is where I got mine.
Make sure you clean all gasket and RTV mateing surfaces thoroughly with acetone to insure proper adhesion/sealing.
12-23-2008, 02:14 PM
#20
5th Gear
Join Date: Dec 2008
Posts: 5
Likes: 0
Received 0 Likes
on
0 Posts
Intake all done
Well, I am pleased to say that I started this repair on the weekend (last Saturday) and just got the car back together today (Tuesday).
I really took my time and found that labeling each wire etc was so very helpful in expediting the reassembly.
The whole thing was a complete success and I am relieved that I actually undertook the task myself. I don't think a repair shop would have taken the time to clean every surface, prep the engine etc before putting it back together as I did.
All in all I have to say a big thank you to you all for your help and advice. It's not a task that I would want to have to do again, but it wasn't as daunting as I had expected it to be and could do it again comfortably.
Thanks,
Adrian
12-23-2008, 07:15 PM
#21
Suzuka Master
Thread Starter
iTrader: (1)
Congrats, I know I had a big smile on my face when the car fired on the first try. Gave myself a pat on the back for saving $695 and knowing the job was done right.
BTW, How did you handle the pushrod removal step?
Be sure to monitor the coolant level for the first 50-100 miles or so.
For the first time, I took my mothers Alero on a 200 mile trip the other day and it performed with no issues. Actually it achieved a better mpg (32mpg at 75mph) then my S/C'd CLS-6 (28 to 29mpg at 75mph). Go figure. I ran the tires with a little more pressure, so that helped.
Peace
12-24-2008, 04:31 AM
#22

The difference is that once the FEL-PRO kit is installed, the gasket is likely to outlast the vehicle. Once the gasket problem is fixed, the 3.4 is bulletproof.
However, these older GM vehicles are hardly reliable. Have fun with the water pump, heater core, alternator (Delco ones are junk), etc.
However, these older GM vehicles are hardly reliable. Have fun with the water pump, heater core, alternator (Delco ones are junk), etc.
12-24-2008, 09:05 AM
#23
Three Wheelin'

Wow, my wife had a Venture that had this done back in 2003. We had a mechanic friend do it. I had no idea that this was such a widespread problem. Shortly after this repair, we dumped the Venture for an Ody.
01-11-2009, 10:23 AM
#24
5th Gear
Join Date: Dec 2008
Posts: 5
Likes: 0
Received 0 Likes
on
0 Posts
Congrats, I know I had a big smile on my face when the car fired on the first try. Gave myself a pat on the back for saving $695 and knowing the job was done right.
BTW, How did you handle the pushrod removal step?
Be sure to monitor the coolant level for the first 50-100 miles or so.
For the first time, I took my mothers Alero on a 200 mile trip the other day and it performed with no issues. Actually it achieved a better mpg (32mpg at 75mph) then my S/C'd CLS-6 (28 to 29mpg at 75mph). Go figure. I ran the tires with a little more pressure, so that helped.
Peace
BTW, How did you handle the pushrod removal step?
Be sure to monitor the coolant level for the first 50-100 miles or so.
For the first time, I took my mothers Alero on a 200 mile trip the other day and it performed with no issues. Actually it achieved a better mpg (32mpg at 75mph) then my S/C'd CLS-6 (28 to 29mpg at 75mph). Go figure. I ran the tires with a little more pressure, so that helped.
Peace
Last edited by alerobasher; 01-11-2009 at 10:27 AM.

Thread
Thread Starter
Forum
Replies
Last Post
rp_guy
Member Cars for Sale
9
07-16-2017 07:33 AM
InFaMouSLink
Car Parts for Sale
6
10-27-2015 06:52 PM