
TSX: doing my own amp install (complete nub, need guidance)
 03-09-2008, 12:28 AM
#41
Instructor
Thread Starter

Join Date: Jan 2008
Age: 39
Posts: 154
Likes: 0
Received 0 Likes
on
0 Posts
Alright, I still havn't looked into the kick panels...but I did get the console near the floor out and I tried the last hour or so trying to get a coat hanger throught the carpet so I could use it to fish the wires through. THERES NO WAY I see myself getting the harness/crutchfield harness through the carpet...hopefully I come up with something while sleeping.
Other then that, I made a lot of progress today. Just need to route those wires SO close yet so far and do the power tomorrow/monday.
Other then that, I made a lot of progress today. Just need to route those wires SO close yet so far and do the power tomorrow/monday.
 03-09-2008, 12:53 AM
#42
Instructor
Thread Starter
Join Date: Jan 2008
Age: 39
Posts: 154
Likes: 0
Received 0 Likes
on
0 Posts
03-09-2008, 09:29 AM
#43
Have someone lift the carpet a bit by where the cables exit and use something more flexible then a coat hanger because it has to be able to make the turn to come up after it comes out from under the carpet. See Max� photo labeled �Getting through that 1ft of carpet was the most difficult part!�.
The coat hanger could make good speaker wire�.
jeff
The coat hanger could make good speaker wire�.
jeff
03-09-2008, 04:19 PM
#44
Originally Posted by michep21
Alright, I still havn't looked into the kick panels...but I did get the console near the floor out and I tried the last hour or so trying to get a coat hanger throught the carpet so I could use it to fish the wires through. THERES NO WAY I see myself getting the harness/crutchfield harness through the carpet...hopefully I come up with something while sleeping.
Other then that, I made a lot of progress today. Just need to route those wires SO close yet so far and do the power tomorrow/monday.
Other then that, I made a lot of progress today. Just need to route those wires SO close yet so far and do the power tomorrow/monday.
First, the trim piece above the door sill;
On the passenger side, it just pops off, two clips, just yank on it, it should pop right off, from there, on the kick panel, at the back of the kick panel (engine bay side), there is a blue clip, the kick panel wraps around it like a "U", pull the panel down to get it out of the blue clip, then there is a backwards C that hooks onto the weatherstrip looking thing. Push in and forward to get that piece out, then theres one more clip, but at this point, you can just pull it and it shold come right out.
For the driver side;
To get the door sill thing off (the one attached to your trunk release lever), if you look by the key lock there, there is a piece that slides off, you may need a small flathead to pop it off. Once it's off, theres one screw, take that screw off, and slide it around the lever to take the piece out, and repeat the same steps as the passenger side to get the kick panel off.
As for running mercman's harness, like jeff did; i used an extension to lift up the carpet as I was snaking the wire. Except, i taped the rca's to 4ga wire and ran it like that, since the 4ga wire I had was just stiff enough, then just took off the tape, and pulled the 4ga wire back through. it still took maybe 30minutes of frustration during the bend, but eventually it worked.
To run the wire through the center console like max did, the piece around the shifter, first take off the "cd holder" bin, the doubledin top one, i figured you got that far already. Then there should be two bolts, which holds the not an ashtray bin in place, take those two bolts off, and the not an ashtray bin should come out with a little bit of persuation (The n-a-a bin, i'm not positive this piece needs to be taken out, i might've taken it out for another mod; don't remember) Now to get the center piece off, you just pull on it, however, this piece is pretty fragile, as it's maybe only 1" wide per side, be very careful with this. After the front side is off, I used a flathead taped with elec. tape, between the emergency breaks and the cup holder door, i stuck it between, and slowly pryed it up, it's just one clip there, should be pretty easy to do
03-09-2008, 11:52 PM
#45
Instructor
Thread Starter
Join Date: Jan 2008
Age: 39
Posts: 154
Likes: 0
Received 0 Likes
on
0 Posts
Originally Posted by mercman
The coat hanger could make good speaker wire�.
jeff
jeff


And wong, I've got teh wire all teh way to the beginning of the carpet...so tomorrow I'm gonna get something like an extension cord and try to get it through and get someone to hold it up with all their might....
Also, I looked and couldn't find the hole or bushing where CC drilled their hole to run the power wire...
SO, I'm going to use merc's method of using the factory grommet...just some questions/precautions
1. When I run the power and put the fuse within 12 inches, is there any set way I Should go... I don't want my wire to get in the way or touch anything thats hot, spinning, or whatever in normal or unique situations.
2. Once I get it through the factory grommet where does it come out, and if it comes out behind the center console will it cause noise interference?
3. Which side is it easier (in terms of panel removal, overall ease) and better (minimal interference) to run the power wire, since i'm running the speaker wire/harness down the middle.
TIA guys! I hope I can finish the speaker wire, tweets, and harness tomorrow. I also hope I get responses so I can start the power wire

I'll snap some pics of my firewall and my progress for pointers tomorrow
btw ACURAZINE=
 03-10-2008, 12:55 AM
#46
I've got a 4ga run down both passenger side and driver side. I found that running wire from the grommet to the rear was easier on the passenger side, while running wire through the grommet was easier on the driver side.
For the driver side, pop off the bottom panel under the steering wheel, and the kick panel/door sill panel (to run wire under). After popping off the bottom panel, you should be able to see the grommet fairly easily. I used a flat head, taped the wire to it, and poked through the grommet, once it was through, I held on to the wire with one hand, and pulled the flat head back out, so that the wire doesn't come back out with it. Took about 5 minutes to run it through the firewall on this side. However, taking the door sill piece takes a bit longer on this side. however, you may end up using a shorter length of wire, since this is the same side as the battery.
For the passenger side, same pieces gets taken off; when running wire through the grommet, you do it through the engine bay, snake the wire in, and you kind of just have to get lucky, it should come out around the bottom of the glove box area. It took me 20 minutes to snake this one down. After getting the wire through, just do the same procedure to run the wire under the sills. Running through this side may use ~4-5ft more wire, since you have to route the wire in the engine bay to not hit anything hot or spinning for safety.
In terms of difficulty, they are both about the same. But if I were to choose to again, it would be through the driver side, just because it's easier to get through the grommet.
On "which way to go" with the wire in the engine bay, I tried to keep it all around the right side, since most of the hot/spinning stuff were to the front/left. I went under and around the intake tube, zip tied on both sides so that it doesn't move. My run through the driver side pretty much goes straight to the grommet from there, just zip tied to existing wire so that it's not loose. For the passenger side wire, from the intake tube, it pretty much goes near the front tower bar, and routed along the bar, and into the grommet.
03-10-2008, 06:56 AM
#47
Professional Newbie
Join Date: Apr 2004
Location: Boston, MA
Age: 36
Posts: 1,197
Likes: 0
Received 0 Likes
on
0 Posts
I used the factory grommet. If you take off the kick panel underneath the glove box (it just pops off, pull down on it) then you'll see the end of your wire in the passenger footwell pretty easily. Also, running it down the passenger side seemed like the best route for me to go.
IDK if you've gotten the wires under that section of carpet yet, but I just taped the harness wires to the end of a coat hanger, and pulled the coat hanger through, which in turn pulled the wires. Took all of 2 minutes to get the wires through once I had everything all set up and taped on, just make sure you bend the coat hanger well. You can also push it as far back as you can and then reach down and grab the end of the coat hanger.
IDK if you've gotten the wires under that section of carpet yet, but I just taped the harness wires to the end of a coat hanger, and pulled the coat hanger through, which in turn pulled the wires. Took all of 2 minutes to get the wires through once I had everything all set up and taped on, just make sure you bend the coat hanger well. You can also push it as far back as you can and then reach down and grab the end of the coat hanger.
03-10-2008, 05:37 PM
#48
Instructor
Thread Starter
Join Date: Jan 2008
Age: 39
Posts: 154
Likes: 0
Received 0 Likes
on
0 Posts
Alright, so I got the factory amp out and the kick panels up. I almost got all of the tape off of the factory grommet. But, now I can't seem to get the rubber boot to pop out. I'm pressing the "earing" and "pressing to the center" as previous posters have said...but it's not giving at all and I can't take it out. Am I just a puss, or am I doing something wrong?
03-10-2008, 07:26 PM
#50
Instructor
Thread Starter
Join Date: Jan 2008
Age: 39
Posts: 154
Likes: 0
Received 0 Likes
on
0 Posts
Originally Posted by wong05tsx
I don't recall having to take any tape off of the grommet, the rubber grommet just takes a little bit of force to pop off
Now once I use a AA to find which of the crutchfield wires correspond to my front mids, I can run the rest of the crutchfield speaker wires, merc's harness/remote turn on wire, and some more speaker wire to bring back up to the front crossovers by taping that shit to the coat hanger.
I'm ecstatic by doign those 2 things (gromett and coat hanger under carpet) I'm now done with the hard part (at least I hope).
 03-10-2008, 10:23 PM
#52
Instructor
Thread Starter
Join Date: Jan 2008
Age: 39
Posts: 154
Likes: 0
Received 0 Likes
on
0 Posts
Crossover/ Wiring Questions
Okay, I just got the tweeter covers off and now I got a couple of questions:
1. How should I go about disconnecting the factory tweeters? should I just cut the wire from the top and electric tape the end? or what else?
2. On the passenger side when I fished my new tweeter wire through, it's goign to be awfully close to the power wire that I'm going to run ther...is this gonna be a problem? So far I'm thinking of mounting my passenger crossover on the passenger side kickpanel (by the doorsill), and the driver side in the kick panel.
3. Since the crossovers need a (+) and a (-) input frmo the amp, does that mean I need to run 4 individual pieces of wire from the amp to the crossover (2 each to 2 crossovers), I don't know if the type of speaker wire I have makes a difference, but its from knukconeptz and something about twisted....anyways here's a pic of the crossver and the speaker wire.
03-10-2008, 10:35 PM
#53
For the stock tweeters I just cut my wire off sinec I figured if I did ever need to hook them back up, I can just solder some wire to it.
There shouldn't be any problem with speaker wire being near your power wire. All my speaker wire is beside my power wire in my trunk (some even zip tied to it), and I have not had any problems with noises. Although, the only noise I do get is from my first generation guinea pig harness, which goes away whenever I pinch on the RCA's, I just have to live with it for now until I have the money to get the fix from jeff.
I have my passenger side xover on the kick panel, and the driver side xover on the black piece that's under the dash.
If you're planning to have the xovers up front, you just need two runs to the front, assuming your speaker wires are in pairs, and assuming your amps are in your trunk. If you're putting the xovers in the trunk, then you need two runs to the front.
The way passive works is:
Mids ---> xover
Tweets ---> xover
xover ---> amp
in scenario words;
the closer you have your xover to your speakers, the shorter amount of speaker wire you will need. If you want the xovers in the back for the bling factor, you'd need to run the wires for the mids all the way back to the xover, and the tweets all the way back to the xover, and from the xover to the amp.
03-10-2008, 10:42 PM
#54
Instructor
Thread Starter
Join Date: Jan 2008
Age: 39
Posts: 154
Likes: 0
Received 0 Likes
on
0 Posts
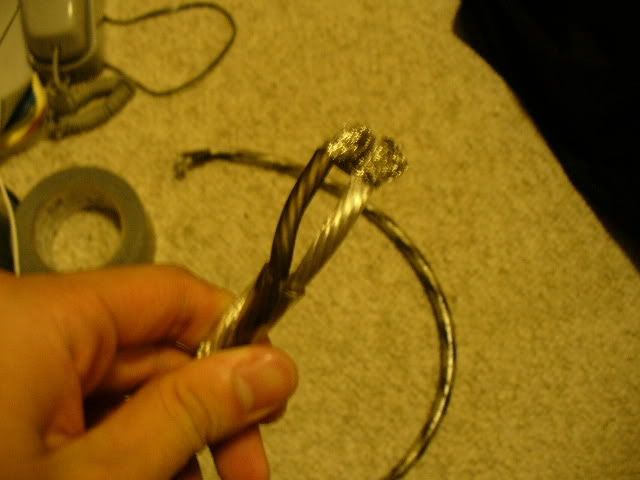
General progress for those like me later on ;)
This is the factory grommet, I took the black tape off and the yellow tape is still on. I may have to take it off to get the wire through the same hole, I tried briefly to no avail so far. Also, to get the wire in, start from the engine side and just fish as much in as you can, then go under the passenger footwell and you'll see the tip of your wire, like wong said you just have to get lucky.

Merc said to use petroleum jelly to get it through the factory hole. My amp wire has this protective casing, so we'll see how I get it in.

This is the infamous one foot carpet. I got the coat hanger through my starting on the console side and furiouisly pushing it through while my brother pulled the carpet up...then once I saw the wire, I used pliers to pull it up.

Here's the center console, for this go back to my "useful threads" post the webshots gallery by relik2004 was a LIFESAVER

This is where I'm planning to mount my passenger side crossover for my front comps, where the tap is...LET ME KNOW IF ITS A BAD PLACE LOL

This is where I'm planning on putting my driver's side crossover for my front comps...where the patch is also LET ME KNOW IF ITS A BAD PLACE

And finally here's a picture of my tweeter cover popped open ( I accidently broke the stock tweeter cover, but I'm not using it anyways,and I used a paper clip to pry it up.

AND FINALLY...one question
If those 2 proposed crossover points are bad...how do I extend my tweeter wires, because right now the dealer cut them pretty short...so?
Merc said to use petroleum jelly to get it through the factory hole. My amp wire has this protective casing, so we'll see how I get it in.
This is the infamous one foot carpet. I got the coat hanger through my starting on the console side and furiouisly pushing it through while my brother pulled the carpet up...then once I saw the wire, I used pliers to pull it up.
Here's the center console, for this go back to my "useful threads" post the webshots gallery by relik2004 was a LIFESAVER
This is where I'm planning to mount my passenger side crossover for my front comps, where the tap is...LET ME KNOW IF ITS A BAD PLACE LOL
This is where I'm planning on putting my driver's side crossover for my front comps...where the patch is also LET ME KNOW IF ITS A BAD PLACE
And finally here's a picture of my tweeter cover popped open ( I accidently broke the stock tweeter cover, but I'm not using it anyways,and I used a paper clip to pry it up.
AND FINALLY...one question
If those 2 proposed crossover points are bad...how do I extend my tweeter wires, because right now the dealer cut them pretty short...so?
03-10-2008, 10:54 PM
#55
Instructor
Thread Starter
Join Date: Jan 2008
Age: 39
Posts: 154
Likes: 0
Received 0 Likes
on
0 Posts
Originally Posted by wong05tsx
For the stock tweeters I just cut my wire off sinec I figured if I did ever need to hook them back up, I can just solder some wire to it.
There shouldn't be any problem with speaker wire being near your power wire. All my speaker wire is beside my power wire in my trunk (some even zip tied to it), and I have not had any problems with noises. Although, the only noise I do get is from my first generation guinea pig harness, which goes away whenever I pinch on the RCA's, I just have to live with it for now until I have the money to get the fix from jeff.
I have my passenger side xover on the kick panel, and the driver side xover on the black piece that's under the dash.
If you're planning to have the xovers up front, you just need two runs to the front, assuming your speaker wires are in pairs, and assuming your amps are in your trunk. If you're putting the xovers in the trunk, then you need two runs to the front.
The way passive works is:
Mids ---> xover
Tweets ---> xover
xover ---> amp
in scenario words;
the closer you have your xover to your speakers, the shorter amount of speaker wire you will need. If you want the xovers in the back for the bling factor, you'd need to run the wires for the mids all the way back to the xover, and the tweets all the way back to the xover, and from the xover to the amp.
There shouldn't be any problem with speaker wire being near your power wire. All my speaker wire is beside my power wire in my trunk (some even zip tied to it), and I have not had any problems with noises. Although, the only noise I do get is from my first generation guinea pig harness, which goes away whenever I pinch on the RCA's, I just have to live with it for now until I have the money to get the fix from jeff.
I have my passenger side xover on the kick panel, and the driver side xover on the black piece that's under the dash.
If you're planning to have the xovers up front, you just need two runs to the front, assuming your speaker wires are in pairs, and assuming your amps are in your trunk. If you're putting the xovers in the trunk, then you need two runs to the front.
The way passive works is:
Mids ---> xover
Tweets ---> xover
xover ---> amp
in scenario words;
the closer you have your xover to your speakers, the shorter amount of speaker wire you will need. If you want the xovers in the back for the bling factor, you'd need to run the wires for the mids all the way back to the xover, and the tweets all the way back to the xover, and from the xover to the amp.
I have the amps in the trunks and I basically have to have the X-overs up front too. I'm using the civic harness so the mid corresponding wires go to the xover, the tweets go to the xover and I need a (+) and (-), my 4 channel amp has these separated (so it has 8 inputs, for 4 speakers). What I was asking is, do I need one speaker wire for (+) another for (-) on the driver's side and another (+) and (-) for the passenger.
I don't know if my speaker wire comes in a set....
http://www.knukonceptz.com/productDe...prodID=KAR16SS
That's the speaker wire I have. If it is in fact in a "pair" then do I just split it at the two ends and (where it connects to the xover, and where it connects to the amp) and otherwise run it together?
Let me know based on the speaker wire I have. Thanks in advance, and once I do more I'll update with pics.
03-10-2008, 11:03 PM
#56
On the stock grommet, i used a small exactly knife and slowly see-saw'ed a small cut, so that I can slide my 4ga wire between it, be very careful so that you don't cut any of that existing wire. Might want to be a little more cautious if you're planning to do this since you took the tape off; that is if you do decide to try this.
Kicker hyperflex ftmfw =)
Passenger side; that's the same place I have mine, I've got velcro tape to hold it there. Havn't had any problems yet, and its been close to a year.
I used twistie caps to extend my tweeter wire on the driver side, on the passenger side i just snaked a new one down.
Kicker hyperflex ftmfw =)
Passenger side; that's the same place I have mine, I've got velcro tape to hold it there. Havn't had any problems yet, and its been close to a year.
I used twistie caps to extend my tweeter wire on the driver side, on the passenger side i just snaked a new one down.
03-10-2008, 11:12 PM
#57
Originally Posted by michep21
Thanks for the prompt replies.
I have the amps in the trunks and I basically have to have the X-overs up front too. I'm using the civic harness so the mid corresponding wires go to the xover, the tweets go to the xover and I need a (+) and (-), my 4 channel amp has these separated (so it has 8 inputs, for 4 speakers). What I was asking is, do I need one speaker wire for (+) another for (-) on the driver's side and another (+) and (-) for the passenger.
I don't know if my speaker wire comes in a set....
http://www.knukonceptz.com/productDe...prodID=KAR16SS
That's the speaker wire I have. If it is in fact in a "pair" then do I just split it at the two ends and (where it connects to the xover, and where it connects to the amp) and otherwise run it together?
Let me know based on the speaker wire I have. Thanks in advance, and once I do more I'll update with pics.
 (1000w goes through them, anyway
  )
)Just cut open the outside clear jacket, and that silver and black speaker wire will be exposed, then just strip that jacket and theres some copper for ya to hook up. [So, yes, just cut open the two ends, one at the amp end, and one at the xover end.)
I like these because it almost garauntee's there won't be a short in the speaker wire since the outside jacket is pretty thick, it also gives it a cleaner install look
 . so yes, they are a "pair"
For your first question, I didn't fully understand it, but here's a shot at it
for every speaker that you have, there is 1 + and 1 -
I also take it that you're using a 4channel amp to power just your fronts?
If so, you will need to run it bridged, look at your manual to see which set-up is to run them bridged, typically, it is the two far ends. also, you would need to Y-split the input rca's.
If that wasn't what you meant, here's another stab at it.
4 wires (two from tweeter, two from mid) goes to your xover, from your xover, two wires goes to the trunk. This applies for both xovers; so 4 (2 pairs)wires total going to the trunk a +/- for Front left, and a +- for front right.
If you need any pictures, i can go take some
Last edited by wong05tsx; 03-10-2008 at 11:15 PM.
03-10-2008, 11:29 PM
#58
Instructor
Thread Starter
Join Date: Jan 2008
Age: 39
Posts: 154
Likes: 0
Received 0 Likes
on
0 Posts
Word
Originally Posted by wong05tsx
If that wasn't what you meant, here's another stab at it.
4 wires (two from tweeter, two from mid) goes to your xover, from your xover, two wires goes to the trunk. This applies for both xovers; so 4 (2 pairs)wires total going to the trunk a +/- for Front left, and a +- for front right.
If you need any pictures, i can go take some
Oh and that'd be great if you could take a pic...the only thing I wanna see is how you stripped it (i'm assuming you used black for the (-) and the silver one for (+).
So 2 paired wires, one to each crossover (+/- and +/-) Got it!

 03-11-2008, 08:53 AM
#60
Originally Posted by michep21
Okay, I just got the tweeter covers off and now I got a couple of questions:
1. How should I go about disconnecting the factory tweeters? should I just cut the wire from the top and electric tape the end? or what else?
1. How should I go about disconnecting the factory tweeters? should I just cut the wire from the top and electric tape the end? or what else?
Also, do not cut the gourmet. Just remove the tape and feed the wire thru from the back. I feed a small wire thru from the front and taped to the 4 Ga, then with a little petroleum jelly on the 4ga I pulled it thru the gourmet. Reinstall the gourmet and tape it closed again.
jeff
03-11-2008, 02:40 PM
#61
Professional Newbie
Join Date: Apr 2004
Location: Boston, MA
Age: 36
Posts: 1,197
Likes: 0
Received 0 Likes
on
0 Posts
I thought I should mention that you should use some high quality zip-ties in the engine bay (and really throughout the whole car). TY-Rap makes some really good ones that are heat and UV resistant. Not that you're going to be getting a lot of sun under your hood, but my point is they'll stand up well. The ones that came with my amp kit snapped and I had loose wire in my engine bay, NOT GOOD. So just make sure you get some good ones.
03-11-2008, 04:54 PM
#62
Instructor
Thread Starter
Join Date: Jan 2008
Age: 39
Posts: 154
Likes: 0
Received 0 Likes
on
0 Posts
Help!
Alright, I hear another snag...hopefully my last one. I can't get the power wire through the passenger side between the front and rear (basically where the seat belt column is) Can it even be done...I know a lot of you guys ran the power down the passenger side...so how did you do this?
I got all the speaker wires and harness/remote lead already to teh trunk. I just can't get the power, right now I have it in the kick panel but when I try fishing it through the seat belt thing there's nothign doing...can the panel be taken off?
LET ME KNO, and thanks in advance.
I got all the speaker wires and harness/remote lead already to teh trunk. I just can't get the power, right now I have it in the kick panel but when I try fishing it through the seat belt thing there's nothign doing...can the panel be taken off?
LET ME KNO, and thanks in advance.
03-11-2008, 05:21 PM
#63
Originally Posted by michep21
Alright, I hear another snag...hopefully my last one. I can't get the power wire through the passenger side between the front and rear (basically where the seat belt column is) Can it even be done...I know a lot of you guys ran the power down the passenger side...so how did you do this?
I got all the speaker wires and harness/remote lead already to teh trunk. I just can't get the power, right now I have it in the kick panel but when I try fishing it through the seat belt thing there's nothign doing...can the panel be taken off?
LET ME KNO, and thanks in advance.
I got all the speaker wires and harness/remote lead already to teh trunk. I just can't get the power, right now I have it in the kick panel but when I try fishing it through the seat belt thing there's nothign doing...can the panel be taken off?
LET ME KNO, and thanks in advance.
https://acurazine.com/forums/audio-video-electronics-navigation-22/need-help-running-wires-into-tsx-doors-new-amp-speakers-366374/
^
I actually didn't have to go through all that work, I was able to tuck it under. A bit more work, but if you want to have it ran through easier, the links above
03-11-2008, 06:03 PM
#64
and a quote from Reach's post in a thread a page back
Originally Posted by Reach
To remove the b-pillar trims (what I think you're talking about), you need to remove both front and rear door sill trims, then move the seats all the way forward, and then you can pop out the trim. It has 4 pop clips down low, 2 toward the front and 2 toward the rear, fairly symmetrically. Then the assembly just hinges at the top so you need to swing it out, toward the center of the car, until you can get the plastic hinge tops out easily.
This required some bit of force and bending to remove it entirely as I did. If all you're doing is a wire tuck, just pop the 4 trim clips and pull out the bottom a little bit to tuck the wires, then replace.
This required some bit of force and bending to remove it entirely as I did. If all you're doing is a wire tuck, just pop the 4 trim clips and pull out the bottom a little bit to tuck the wires, then replace.
03-11-2008, 07:15 PM
#65
Instructor
Thread Starter
Join Date: Jan 2008
Age: 39
Posts: 154
Likes: 0
Received 0 Likes
on
0 Posts
Alright I got it under t he seatbelt pillar...im making a ton of progress got the power too....
NOW COMES THE GROUND! I saw where merc suggested it...but CC might have already done one. I see a gold ground and im posting the pic soon is that from old wiring or does it have somethign to do with the car (maybe DVD nav) im posting a pic of my trunk tell me where i should ground THANKS IN ADVANCE!
NOW COMES THE GROUND! I saw where merc suggested it...but CC might have already done one. I see a gold ground and im posting the pic soon is that from old wiring or does it have somethign to do with the car (maybe DVD nav) im posting a pic of my trunk tell me where i should ground THANKS IN ADVANCE!
 03-11-2008, 08:16 PM
#67
Instructor
Thread Starter
Join Date: Jan 2008
Age: 39
Posts: 154
Likes: 0
Received 0 Likes
on
0 Posts
Also, I'm reading the BALUN instructions that merc gave, and the directions say connect the "red fused lead to the amp turn on wire."
I'm assuming this is the remote lead from the harness and i'm going to "daisy chain" it to the other amps... (how should I ground the balun?)
And i'm still trying to figure out if that gold bolt is good enough for the ground.
Once I get this ground shit figured out, I can connect the amps and balun
I'm assuming this is the remote lead from the harness and i'm going to "daisy chain" it to the other amps... (how should I ground the balun?)
And i'm still trying to figure out if that gold bolt is good enough for the ground.
Once I get this ground shit figured out, I can connect the amps and balun
03-11-2008, 08:28 PM
#68
That existing ground should be fine, you can always make a new one near it, just sand it down to bare shiny metal, and use self tapping screws.
On the BALUN, the red fused lead, just daisy chain that along with your remote wire. I'm assuming you have a ground block since you're running more than one amp. Not sure what block you're using, but the kicker one from the kit has 5 outputs, I grounded mine to the block. If not, just slap a ring terminal to the end of of the ground wire, and hook it up along with that existing ground.
After grounding your amps, just start up your car, and rev a little, a bad ground usually leads to an alternator whine (whining when rpm goes up)
03-11-2008, 09:16 PM
#69
Originally Posted by michep21
Also, I'm reading the BALUN instructions that merc gave, and the directions say connect the "red fused lead to the amp turn on wire."
I'm assuming this is the remote lead from the harness and i'm going to "daisy chain" it to the other amps... (how should I ground the balun?)
And i'm still trying to figure out if that gold bolt is good enough for the ground.
Once I get this ground shit figured out, I can connect the amps and balun
I'm assuming this is the remote lead from the harness and i'm going to "daisy chain" it to the other amps... (how should I ground the balun?)
And i'm still trying to figure out if that gold bolt is good enough for the ground.
Once I get this ground shit figured out, I can connect the amps and balun
You can ground the BALUN any where that is convenient but try to avoid the same bolt as the amp ground (on the chassis).
jeff
03-11-2008, 10:56 PM
#70
Instructor
Thread Starter
Join Date: Jan 2008
Age: 39
Posts: 154
Likes: 0
Received 0 Likes
on
0 Posts
Okay, so I'm sure you (wong and merc) know that I'm kind of a moron when it comes to this car audio stuff (many thanks for holding my hand and walking me through), it's really starting to shape up...but still have a few ?s that I need clearing up.
1. Can one of you point me a nice place to ground from my picture? Is the red or green arrow any good, if theres a better one plz arrow it or describe it.
2. This goes to merc, should I ground the balun to my dist block or can I use the FP? I know in the instructions that you attached with the balun you say not to use the same as amp (im assuming ebcause of ground loops), but then what can I use since the given wire on the balun is pretty short... let me know
and here's my pic
EDIT: my power wire comes from the right side of the pic...so I guess something on that side is better to keep the ground short...please LET ME KNOW
Last edited by michep21; 03-11-2008 at 10:58 PM.
03-11-2008, 11:33 PM
#71
Dang those are some good looking arrows, photoshop?
Mercman had a pic in one of his threads showing where he grounded his. It's in the same spot as that FP bolt, except on the opposite side of the car. He used the existing bolt there, i can't find where that pic is, but you should be able to see it.
If not, I'd say the green arrow is good, however, I would do it a little farther to the right, as I don't have a clue where the fuel line/pump is, I wouldn't want to accidently puncture a pipe or fuel tank while screwing. That whole piece there is welded to the chassis, so it should be a good ground.
I made my own ground under the rear seats (the slant side), is part of the same piece of metal, so I can only assume the spot you're looking at is just as good.
03-11-2008, 11:40 PM
#72
Instructor
Thread Starter
Join Date: Jan 2008
Age: 39
Posts: 154
Likes: 0
Received 0 Likes
on
0 Posts
Is this the merc pic?...you sure there was an existing bolt there? SO I dont have to drill anywhere or use a self tapping screw?
and yeah lol, 'twas photoshop, I see I accidently got some gradient on my red arrow lawl

and yeah lol, 'twas photoshop, I see I accidently got some gradient on my red arrow lawl
03-12-2008, 02:54 PM
#75
Professional Newbie
Join Date: Apr 2004
Location: Boston, MA
Age: 36
Posts: 1,197
Likes: 0
Received 0 Likes
on
0 Posts
Yeah that hole is definitely not stock. The stock grounding point is in the middle of the car along that same rail. I'm considering moving my grounding point to the bolt on that bar under the rear seat.
03-12-2008, 11:13 PM
#76
Instructor
Thread Starter
Join Date: Jan 2008
Age: 39
Posts: 154
Likes: 0
Received 0 Likes
on
0 Posts
Problem
Alright, so I wired everything up today: The balun, the harnesses, the speakers, the tweeters, and did the ground on the hole right next to the fuel pump...
Well first of all, my battery was almost dead so I got a jump but when I try to play all I hear is clipping from all four speakers and a loud pop when I turn the stereo off...
1. Is this because of a shorted wire (is that when wire's touch)
2. A bad ground, my uncle helped and he insisted the hole next to the fuel pump is fine and says one of my wires must be shorted
I was hoping that it's a bad ground and moving it will fix it but u guys are the experts. Even though I didnt forsee this happening I'm only shaken not stirred.
Some other points:
-Both amps turn on. When I turn the volume all the way up to 40, I hear sound from the cdplayer but its clipped.
- I cut the wires I don't need from the crutchfield harness and taped the heads and taped them all together...
-Could it be a low battery?
-wires got cut while running them through that bitch carpet?
-explain the loud pop
- I grounded my balun to the ground dist block which has 4 outputs
-and yes, bully was right maybe this is a bit over my head but im hoping that i have a quick fix...
03-13-2008, 07:00 AM
#77
Professional Newbie
Join Date: Apr 2004
Location: Boston, MA
Age: 36
Posts: 1,197
Likes: 0
Received 0 Likes
on
0 Posts
Is this going on with the engine running, or are you just on accessory power?
I had a loud pop when I turned my stereo on, I'm pretty sure it's a grounding issue, unfortunately it's the stock head unit's ground which I can't readily access. I'd say check your grounds.
There's nothing under that carpet that would cut the wires, it's all foam. The only possibility is that they got cut on the edge of the carpet.
03-13-2008, 08:36 AM
#78
Instructor
Thread Starter
Join Date: Jan 2008
Age: 39
Posts: 154
Likes: 0
Received 0 Likes
on
0 Posts
This is going on with the engine running.
Another couple of points that might make a difference...
- the screw and bolt my uncle used were random, from his tool box nothing special.
-On the passenger side in the front the power wire is pretty close to the front passenger speaker wire...
lets see
Another couple of points that might make a difference...
- the screw and bolt my uncle used were random, from his tool box nothing special.
-On the passenger side in the front the power wire is pretty close to the front passenger speaker wire...
lets see
03-13-2008, 12:24 PM
#79
A few basic checks,
Is the ground tight? Give it a twist to see if it is loose.
Is the metal under the ground free of paint and down to bare metal?
Remember that the Battery (power) terminal on the amp is fused at a high amperage so don�t accidentally shot it or you will get fireworks.
Take some measurements (write them down and post them)
With the engine off and the battery fully charged; Measure the voltage at the battery
1) Measure the voltage between the AMP ground terminal and the amp power terminal.
2) Measure the voltage on the amp turn on wire
Turn on the HU at zero volume and re-measure the power and turn on voltages tests 1+2
Turn the HU volume up so you can hear music and re-measure the amp power test 1
Start the engine, let it idle and repeat all the tests.
Post all your readings.
Also, what year and do you have NAV?
03-13-2008, 10:31 PM
#80
Instructor
Thread Starter
Join Date: Jan 2008
Age: 39
Posts: 154
Likes: 0
Received 0 Likes
on
0 Posts
Originally Posted by mercman
A few basic checks,
Is the ground tight? Give it a twist to see if it is loose.
Is the metal under the ground free of paint and down to bare metal?
Remember that the Battery (power) terminal on the amp is fused at a high amperage so don't accidentally shot it or you will get fireworks.
Take some measurements (write them down and post them)
With the engine off and the battery fully charged; Measure the voltage at the battery
1) Measure the voltage between the AMP ground terminal and the amp power terminal.
2) Measure the voltage on the amp turn on wire
Turn on the HU at zero volume and re-measure the power and turn on voltages tests 1+2
Turn the HU volume up so you can hear music and re-measure the amp power test 1
Start the engine, let it idle and repeat all the tests.
Post all your readings.
Also, what year and do you have NAV?