
Dom's Navi to DVD Install

Guinea Pig
Joined: Apr 2005
Posts: 4,104
Likes: 2
From: At home
OK- I got my Navi unit installed! Will post pics later. But as for now I only have the Navi converter installed, no audio yet. But that's ok for now, since my video source isn't hooked up yet. All of my problems are solved that I was having before. I tested it and it works.
1. Found the card with my security code.
2. The Screen stays on once "OK" has been selected upon initialization.
3. I used the yellow and red wire going to the stock OEM amp/plug to power the filter, then ran the 12v out from the filter to my TV Tuner and Doms Navi uint.
4. I twisted the black wire and unshielded wire together and grounded them next to the unit. The main ground I connected back behind the stereo near the OEM amp.
Now, I have to decide how and where to put the PS2. The rear of the PS2 shows it needs 8.5volts for power. I am gonna try to convert 12v to 8.5dc instead of going from 12vdc to 110vac back to 8.5v.
Then the next step is going to be sound. Tonight is going to be amplifier connection 101!

Instructor
Joined: Jun 2004
Posts: 223
Likes: 0
From: bay Area
The Ice-Link has no RCA out, it just has one plug that plugs directly into the the back of the system. Guess I'm going to need to buy a power inverter, since I'll probalby put my xbox in there until I buy a dvd player w tuner. Are there any wires I can tap into near the passenger seat to power the inverter or do I need to use the cigarette lighter?


10th Gear
Joined: Jun 2005
Posts: 10
Likes: 0
this is the converter
Originally Posted by scturborr
What converter unit are you referring to? Do you have a picture or a link to a website to purchase this? Thanks!
-SCTurboRR
-SCTurboRR
https://acurazine.com/forums/showthr...&page=10&pp=25

Teh seX
Joined: Jul 2003
Posts: 532
Likes: 0
From: unknown
Originally Posted by CJams
Now, I have to decide how and where to put the PS2. The rear of the PS2 shows it needs 8.5volts for power. I am gonna try to convert 12v to 8.5dc instead of going from 12vdc to 110vac back to 8.5v.
how did you end up doing this? i am also going to use a ps2
Guinea Pig
Joined: Apr 2005
Posts: 4,104
Likes: 2
From: At home
I threw a PS2 slim in the glove box. I got the power from an ac to dc converter that I put under the passenger seat. I ran the cigarette plug for the adapter under the center console. The adapter gives me an extra 110v plug for other stuff as well.
The Power of a Grill
Joined: Oct 2004
Posts: 864
Likes: 1
From: San Antonio, TX
Originally Posted by CJams
OK- I got my Navi unit installed! Will post pics later. But as for now I only have the Navi converter installed, no audio yet. But that's ok for now, since my video source isn't hooked up yet. All of my problems are solved that I was having before. I tested it and it works.
1. Found the card with my security code.
2. The Screen stays on once "OK" has been selected upon initialization.
3. I used the yellow and red wire going to the stock OEM amp/plug to power the filter, then ran the 12v out from the filter to my TV Tuner and Doms Navi uint.
4. I twisted the black wire and unshielded wire together and grounded them next to the unit. The main ground I connected back behind the stereo near the OEM amp.
Now, I have to decide how and where to put the PS2. The rear of the PS2 shows it needs 8.5volts for power. I am gonna try to convert 12v to 8.5dc instead of going from 12vdc to 110vac back to 8.5v.
Then the next step is going to be sound. Tonight is going to be amplifier connection 101!
1. Found the card with my security code.
2. The Screen stays on once "OK" has been selected upon initialization.
3. I used the yellow and red wire going to the stock OEM amp/plug to power the filter, then ran the 12v out from the filter to my TV Tuner and Doms Navi uint.
4. I twisted the black wire and unshielded wire together and grounded them next to the unit. The main ground I connected back behind the stereo near the OEM amp.
Now, I have to decide how and where to put the PS2. The rear of the PS2 shows it needs 8.5volts for power. I am gonna try to convert 12v to 8.5dc instead of going from 12vdc to 110vac back to 8.5v.
Then the next step is going to be sound. Tonight is going to be amplifier connection 101!
were you ever able to post pics of your install? did you put the navi unit on the kick panel? if so, where did you ground it? why not use power from the cigarette lighter next to "not an ashtray" power (spliced in)? is this power different from the amp power? hehe, so many question - i just dont want to screw this thing up.
my plan: navi behind passenger kickpanel, power filter on back wall behind center console and blitzsafe adapter sitting on top of amp - all 3 secured with industrial velcro. I have found a dvd/mp3 player that fits in the center console pocket and have dremeled out the back to fit the end of the unit, so now when the cover is closed it is compeletly hidden. Just not sure where to get power, i wanted to splice into the power outlet/lighter plug next to "not an ashtray", while keeping power to the plug for the filter and run both the dvd and the navi unit through the power filter. Will i get different results from splicing into amp power? and where do i ground the navi unit? i can ground the power filter to the little grounding wheel behind the console, yes? if not, then where? My hands hurt.
Guinea Pig
Joined: Apr 2005
Posts: 4,104
Likes: 2
From: At home
I have a couple of pics somewhere around here. My unit is behind the kick panel and I tapped in to the wire from the amp because upgraded the amp at the same time so the power wire was just sittong there available. I think I used the ground from the amp as well. I also extended the wires for the swithch and replaced doms switch with a black plastic one from radio shack. Then I mounted it to the left of the steering wheel by the moornroof switch.
My power filter is mounted by velcro to the left of the storage compartment on the plastic wall in the center console. I used a Soundgate Aux3 for my sounds and that is just sitting where the OEM amp use to be.
I don't see any reason you can't use the "Not an ashtray" power for the unit.
Hope this helps.
The Power of a Grill
Joined: Oct 2004
Posts: 864
Likes: 1
From: San Antonio, TX
so you grounded the wires by attaching them to other wires that were already grounded? is that right? does the amp wire run along the right side of the car, with the wires that i am going to cut? are these the wires you are talking about?
thanks, cjams, i can always count on you for help.
mike
thanks, cjams, i can always count on you for help.
mike
Guinea Pig
Joined: Apr 2005
Posts: 4,104
Likes: 2
From: At home
I think I grounded the unit to the same point everything else is grounded to back there. I might have soldered it directly to the OEM amp ground wire left over from the amp removale. Can't remember now. either should work fine.
The amp wires do not run down the passenger side of the car, they are located behind the "not an ashtray". You don't need to tap in to the OEM amp though. I did it since everything was done at 1 time and it was accesable.
YW! Anytime!
Good Luck on the install, you will love it!
The amp wires do not run down the passenger side of the car, they are located behind the "not an ashtray". You don't need to tap in to the OEM amp though. I did it since everything was done at 1 time and it was accesable.
YW! Anytime!
Good Luck on the install, you will love it!

Banned
Joined: Nov 2005
Posts: 3,716
Likes: 0
hi TSX559 (and those who did this) I have a  question....
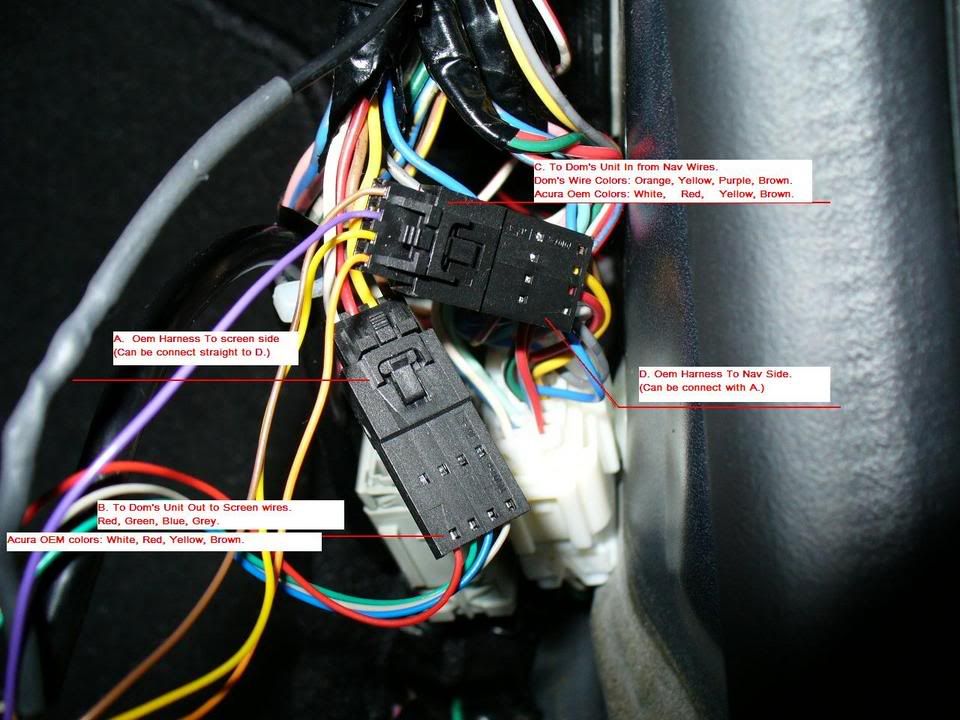
this is one of the pics you took of the exposed wires, 4 of which you cut:

I don't quite understand the instruction from Dom:
the part about "Navigation side" and "screen side"
The notes I added to the pic, is that what the instruction means ?
i.e
top 4 w/r/y/b wires = "Screen side"
lower 4 w/r/y/b wires = "Nav side"

thanks
question....this is one of the pics you took of the exposed wires, 4 of which you cut:
I don't quite understand the instruction from Dom:
the part about "Navigation side" and "screen side"
Originally Posted by Dom's instruction
"YOU MUST CUT THESE WIRES IN HALF!!!! LEAVING YOU WITH A NAVIGATION SIDE AND A SCREEN SIDE"
Red, Green, Blue and Gray wires on the DB9 cable go towards the Screen.
Orange(red mate), Yellow(Green mate), Purple(Blue mate), and Brown(Gray mate) goes towards the Nav unit.
Red, Green, Blue and Gray wires on the DB9 cable go towards the Screen.
Orange(red mate), Yellow(Green mate), Purple(Blue mate), and Brown(Gray mate) goes towards the Nav unit.
i.e
top 4 w/r/y/b wires = "Screen side"
lower 4 w/r/y/b wires = "Nav side"
thanks
Banned
Joined: Nov 2005
Posts: 3,716
Likes: 0
Originally Posted by Jonesi
Yes, You're Navi screen is going to the front of your car and the Navi Unit is in the trunk.
[Pic 6]
in post#2 seem to you the OPPOSITE of the instruction ?
 or am I just a dumb n00b

The Power of a Grill
Joined: Oct 2004
Posts: 864
Likes: 1
From: San Antonio, TX
i believe it is noted that these pictures were actually wired backwards. use the sheet that came with the box. those colors are correct. but like Jonesi said, the screen side is the side to the front and the nav side is the side towards the trunk (or the wires that are still connected to the connector). Like i said before, disconnect the connector, cut the wires, go inside and connect half the wires to the connector, then go back out and connect the other half. that way, half the colors have been eliminated. (im colorblind, so it took me a long freakin time and some trust for my friends).

Intermediate
Joined: Jan 2005
Posts: 26
Likes: 0
Yes, follow dom's instruction for the color code going to screen side and nav side. Works perfectly for me. I just did it this weekend.
Instead of just solder the wires, i used some 4 pin molex connecters so i can take out dom's unit when i needed to.
Instead of just solder the wires, i used some 4 pin molex connecters so i can take out dom's unit when i needed to.
Guinea Pig
Joined: Apr 2005
Posts: 4,104
Likes: 2
From: At home
Originally Posted by ultragamma
Instead of just solder the wires, i used some 4 pin molex connecters so i can take out dom's unit when i needed to.
Intermediate
Joined: Jan 2005
Posts: 26
Likes: 0
It is 2 pair of connectors, 2 female and 2 male.
1. cut the in car harness wires, 4 wires basically. put in the molex female for screen side. and male to nav side.
2. Put the corresponding wires to molex male for dom's unit to screen side and female to nav side.
Then you can always disconnect the molex and hook up OEM harness like they were and take out the dom's unit.
I will take a picture when i have the chance.

5th Gear
Joined: Feb 2006
Posts: 5
Likes: 0
 You gus are awesome, I just got my unit in today and I have not slept even thought I work 3th shift. This week was long waiting for the unit. With all the help from you guys I should install it in no time. I think I have to sleep because I will end up doing something wrong. Thnks for the help guys, Good Times!
I plan to install a 5.1 digital processor with the center speaker, will see how that turns out , will keep you guys posted
Banned
Joined: Nov 2005
Posts: 3,716
Likes: 0
Ultragamma...
hey ultragamma ! what kind of "Molex" connectors are those ?! got a link where I can buy from ?
Went to Radioshack today - the ones they have :[This] is still too big (#22 min) for the wires on the DB9 cable.
thanks
Went to Radioshack today - the ones they have :[This] is still too big (#22 min) for the wires on the DB9 cable.
thanks
 I don't plan on selling my TSeX....ever.
Intermediate
Joined: Jan 2005
Posts: 26
Likes: 0
It is not just for later taking out, also for cleaner installation.
Here are the part numbers. I do not have a link, but i think you can get them at www.digikey.com for pretty cheap.
16-02-0097 and 50-57-9404 is the female pin and housing.
16-02-0109 and 70107-0003 is male pin and housing.
You don't necessary get the same type i use, just get some that is good enough for 26awg wires on the DB9.
Good luck

Banned
Joined: Nov 2005
Posts: 3,716
Likes: 0
Originally Posted by ultragamma
It is not just for later taking out, also for cleaner installation.
Here are the part numbers. I do not have a link, but i think you can get them at www.digikey.com for pretty cheap.
16-02-0097 and 50-57-9404 is the female pin and housing.
16-02-0109 and 70107-0003 is male pin and housing.
You don't necessary get the same type i use, just get some that is good enough for 26awg wires on the DB9.
Good luck
Here are the part numbers. I do not have a link, but i think you can get them at www.digikey.com for pretty cheap.
16-02-0097 and 50-57-9404 is the female pin and housing.
16-02-0109 and 70107-0003 is male pin and housing.
You don't necessary get the same type i use, just get some that is good enough for 26awg wires on the DB9.
Good luck
Are the D-sub wire really 26 AWG ? or they're 28 ?
I finally found them yesterday at http://www.mouser.com/
those numbers are Mouser "stock numbers"
They're called "MOLEX 2.54mm / .100" SL� Connectors" (Mouser catalog p. 1071)
But..
Did you crimp them with MOLEX crimp tool or a generic one ?
(was told by Mouser tech that you're "supposed" to use the tool ($297))
Last edited by huckleberry; Mar 17, 2006 at 01:07 AM.
Tint The Windshield
Joined: Jun 2005
Posts: 618
Likes: 2
From: Gaithersburg, MD
I'm getting Dom's Navi PnP converter installed today, as well as the Accellevision 8500, and also a rear backup camera (from Ebay - the one the size of a quarter). I'll post pics whenever I get the chance to do so. Hopefully before the weekend's end, but I'm def. going to be a busy bee!
I know most of you would say to install it myself but since I'm an accountant and don't have time for that during the busyiest time of the year right now .... i wouldn't have time to do do that until april 16th. and i want it in now! haha. not the worst way I've wasted $330 dollars labor including a better hardwired FM modulator.

I know most of you would say to install it myself but since I'm an accountant and don't have time for that during the busyiest time of the year right now .... i wouldn't have time to do do that until april 16th. and i want it in now! haha. not the worst way I've wasted $330 dollars labor including a better hardwired FM modulator.
Instructor
Joined: May 2004
Posts: 179
Likes: 0
From: Southern New England
Iwent back to edit my above post, but couldnt due to the 5 minute rule.... 
:troutslap
After tax time (meaning after 4/15, 6/15 or 10/15, lol , I would have them hard wire the sound to the head unit (much better than any FM Modufooker). Try the FM mod out, but I have tried both and like the aux-in much better especially in NYC. I hear it on the time thing (esp at this time of the year, wait until the first week of April the the fun comes on ...time IS money.
Have fun with the setup, it ROCKS!
Originally Posted by huckleberry
wow $330 and you don't even get real audio.
So this $330 is charged by the hours ?
So this $330 is charged by the hours ?
After tax time (meaning after 4/15, 6/15 or 10/15, lol
, I would have them hard wire the sound to the head unit (much better than any FM Modufooker). Try the FM mod out, but I have tried both and like the aux-in much better especially in NYC. I hear it on the time thing (esp at this time of the year, wait until the first week of April the the fun comes on ...time IS money. Have fun with the setup, it ROCKS!

Intermediate
Joined: Mar 2006
Posts: 37
Likes: 0
From: Colorado
Parts Search
I just wanted to thank everyone for the great tech support on how to convert the stock navi to play dvd also. My biggest thing is trying to find other sources of the part to convert it. I am looking and searching for the part to do this but i was looking for some other places mabey websites or other shops that are selling the product at a rather cheaper price than 600 or 400 dollars. i guess i am looking for a rgb converter or another type. Thanks
Banned
Joined: Nov 2005
Posts: 3,716
Likes: 0
Originally Posted by Polishd
I just wanted to thank everyone for the great tech support on how to convert the stock navi to play dvd also. My biggest thing is trying to find other sources of the part to convert it. I am looking and searching for the part to do this but i was looking for some other places mabey websites or other shops that are selling the product at a rather cheaper price than 600 or 400 dollars. i guess i am looking for a rgb converter or another type. Thanks
you sound like you're looking for the Holy Grail.
So is this "Dom's Unit" what you been searching all over the world for ?
What else are you looking for ?
Guinea Pig
Joined: Apr 2005
Posts: 4,104
Likes: 2
From: At home
Originally Posted by Polishd
I just wanted to thank everyone for the great tech support on how to convert the stock navi to play dvd also. My biggest thing is trying to find other sources of the part to convert it. I am looking and searching for the part to do this but i was looking for some other places mabey websites or other shops that are selling the product at a rather cheaper price than 600 or 400 dollars. i guess i am looking for a rgb converter or another type. Thanks
Tint The Windshield
Joined: Jun 2005
Posts: 618
Likes: 2
From: Gaithersburg, MD
Yeah I paid $330 to get the backup camera, dvd installed in the glove box with 2 toggle switches in there too, Dom's Navi converter, FM modulater (a hard wired one -- not Dom's) etc. etc. I ended up loosing my car for 3 days bc the place got swamped with work and fell behind. Either way it was all good tho, bc I got my '98 TL to drive around too. The install is perfect! I will post pictures if/when I get a chance to.