D.I.Y. Retain your navi prompts w/ aftermarket headunit
 04-30-2006, 01:57 PM
#1
should i spend more in
Thread Starter
As we all know, with the TL's and CL's w/ navi, once you install an aftermarket deck, you lose the voice prompts. Well, I know a lot of you were like  . But there are some of us who actually like to hear the lady chime in and tell us where to go. Most of my passengers think it's pretty
  . I have to say, I tend to agree with them.
Anyway, after searching this site, I found that most people thought it couldn't be done easily. Well, they thought it could be done easily, you'd just have to install a seperate amplified speaker. Another solution I found was to put a relay between the speakers. Well, I didn't like either of those options. And I'm not hating on something you may have had installed in your ride. I'm just saying, that's not what I wanted, no disrespect.
So I continued to research. I looked thru this forum, the TL forum, CL forum, Ody ( Honda Odyssey) forum, Lexus IS, and the Pilot forums oh and the12volt. I put together bits and pieces I found on these sites and found a very good, very simple solution.
This solution offers the same functionality as the OEM setup. When you are listening to your radio source (radio, cd, cd changer, Ipod, whatever) sound comes thru all speakers. Duh. But when you have a navi prompt, the radio source is muted in the front left/right speakers and the lady guides you to your destination. After she is done, your radio source returns in your front speakers AUTOMATICALLY. No flipping switches, no changing sources, just like OEM designed it to be. I know some of you may be wondering if the directions are cut off b/c of the time of the "switch." Calm your worries, you won't miss anything, you still even get the "ding."
So, after 2.5 days of riding with my dash apart to & from work to get this thing figured out. I finally completed the installation on yesterday. I've only owned my 03 TL since Sepetember of 05 and I don't have a lot of posts here on the site b/c I mainly just read and look at pictures. I figured this would be my way of giving back for all the things I have learned on this site. Just so you know, I have written this in a very K.I.S.S. (Keep It Stupid Simple) kind of format as to assume that whoever is reading this knows nothing and has no experience with electronics. Hopefully this will keep questions and confusion to a bare minimum.
Disclaimer: This mod was performed on an 03 Acura TL-S w/ navi & onstar. As such the wiring diagram may vary for other years and models. I am in no way responsible if you mess your stuff up, so please make sure you have your stuff together before you proceed.
So with all that out of the way, let's get down to business.
Tools Needed:
Acura TL or CL w/ navi
1 MPSS-4 Audio Source Switcher

(1) RCA Coupler (found at radioshack)
(2) RCA Couplers if you don't have an external amp and only want the front speakers to mute
(3) RCA Couplers if you don't have an external amp and want to mute all the speakers.

(1) Low Voltage Transistor (comes in pack of 15 at radioshack)

Pair of RCA audio patch cables for every coupler you decided you needed above(red/white that are used to hook up amps etc.)

(1) Aftermarket deck WITH FRONT RCA OUTPUTS!!
18-16 gauge wire
Soldering iron
(1) Voltmeter
Black electrical tape
(1) Exacto knife
About 2 hours of free time to complete the install
The first step required is to remove the center console so that you may access and remove your radio. If you don't already know how to do this, the directions can be found here . At step 19, you will have to unplug the harness for your cigarette lighter. Keep this handy as we will use it later. I would also strongly advise you to remove your radio fuse from the passenger side fuse box. Refer to your owner's manual for exact location of the fuse to pull.
Once you have your radio and climate control removed, find your radio wire harness that you used to install your aftermarket deck. It will be blue and look like this.

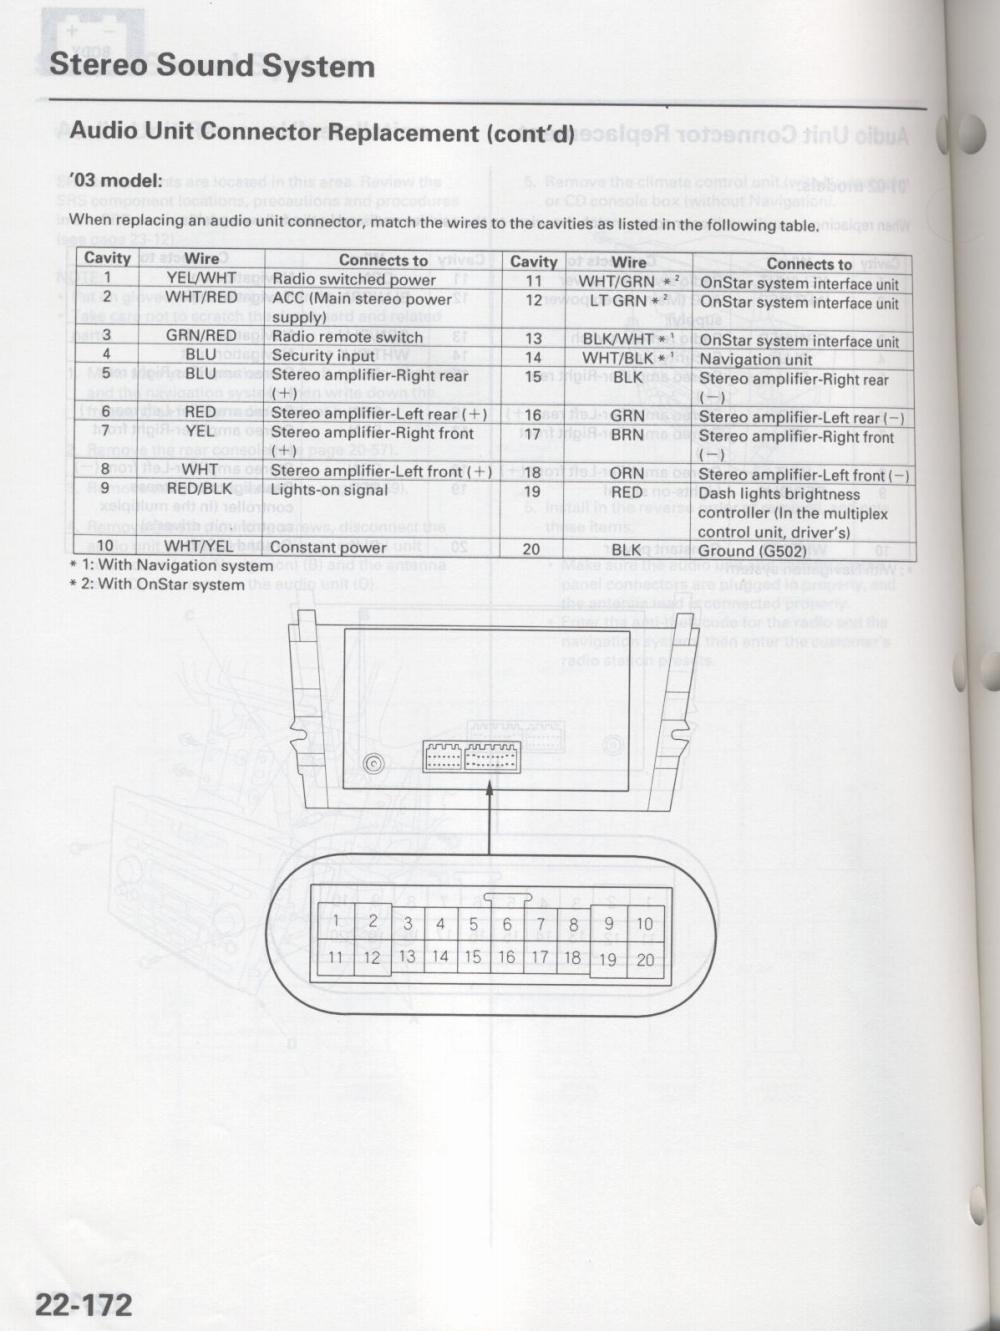
We will be working with the blue 20 pin connector coming from the Acura. So, if you want to free up some space, disconnect your radio wire harness and carefully place it and your radio to the side. We will be dealing with pins 13 and 14. See below.
 .
.
Now that you have your two wires located, let's prepare to connect our switcher. I used a transistor b/c they take a small amount of voltage to trigger. The navi mute wire sends a 12v signal to the radio to mute the front speakers, but for some reason when I hooked this wire directly to the MPSS-4's yellow trigger wire, the voltage would drop to 1 which isn't enough to trigger the switcher. I even tried using a relay, but the wire still didn't provide enough juice to trigger the realy. So that left me with transistor.
With your transistor in hand, you will notice there are 3 wires/prongs whatever coming out of the bottom.

The front is flat while the back is round. So looking at the front (flat side) with the prongs pointed up, you have prong 1, prong 2, and prong 3. Prong 1 will connect with the yellow trigger wire of the MPSS-4, prong 2 will be to a 12v source, and prong 3 will connect with the navi mute wire (Pin 14 white/black). I recommend that you bend (be gentle) the 1st & 3rd prongs to reduce the risk of your wires touching. So go ahead and connect at least 6" of wire to prongs 2 & 3. This will give you some flexibility when it comes to splicing into the various areas. After you have connected your wires, I recommend you solder them to the transistor. The finished product should look something like this.

Now, we will take the wire connected to prong 3 and splice it into our navi mute wire which is White/Black (pin 14). DO NOT cut the white/black wire (unless you have absolutely no plans to return the car to stock or go back to a factory system.) I have no desire to go back to stock or trade in either, but you never know what may come up, so I just spliced into it. Next, take prong 1 and connect it to the yellow wire of the mpss-4. We didn't connect a wire to this prong in the previous step b/c there is no need, just attach the yellow one to it and solder. Prong 2 will need to be connected to a 12v source. For this, I used the cigarette lighter harness that you unplugged while removing your center console(step 19 of the guide linked.) Splice into the white/red wire. Again, DO NOT cut this wire, simply splice into it. While splicing this wire, I also suggest that you add the red wire from your MPSS-4 to this splice also. This will power the MPSS-4. Once all the connections are made, solder everything and wrap it in black electrical tape. For the transistor, wrap each individual prong with tape and then the entire thing together if you so desire. Also, let's go ahead and ground the MPSS-4. Take the black wire from the unit and you have two options here; option 1, splice into the ground wire on your radio harness (this is what I did) or option 2, find a metal ground point in the car to ground to, sand back paint if there is any and screw it down.
Once all these connections are made, we are finished with our power connections. The only thing left to do is audio.
At this moment, I would like to explain how this MPSS-4 is going to work. On your instruction sheet, or if you haven't ordered one yet you can see it here you will notice an application 1 and 2. We are going to use application 2 b/c in application 1 our radio would power off, and we don't want that to happen. So we are going to connect our navi to the Source 2 Front input and our radio to Source 1 Front input. The gray and orange wires of the mpss-4 will be connected together, and we will not connect the blue remote wires (if you have an amp, leave your turn on wire connected as is.)
If you have your interior speakers connected to an aftermarker amp, like I do, then your life will be a great deal easier than those that don't. You don't "have" to have an amp, it does cut out a lot of extra wiring and splicing. At any rate, I will give directions on both routes. The first part is the same for both scenarios so let's get started so you can wrap this up.
Take your RCA cables and cut it about 6" from the RCA ends.

Now take the end of your cable, the cut side, and strip back the black sheathing about 1 1/2 inches. You will see exposed wire (negative sheild) and wire inside a red or white jacket (positive signal). Twist the negative sheild together b/c it will be in seperate strands. Next take your exacto knife, and strip back about an inch of the jacket. You don't have to be exact on your measurements but the idea is to leave enough of the jacket so that the negative sheild doesn't come in contact with the positive signal. Do this for both jacks so they resemble the picture below.

Take the positive wires and splice them into the Black/White (pin 13) wire of the wire harness. The negative wires can be spliced into the Black (pin 20) ground wire or can be ran to a ground of their own. Solder connections and wrap in black tape. These RCA's will then be connected to the coupler which will then connect to the Source 2 Front inputs of the MPSS-4.
Now there are a few options of how you want the speakers to mute. You can mute the driver's speaker only, you can mute the front 2, the 2 left, or all four. I chose to have my front 2 mute. For the front 2 to mute, simply connect the front output RCA's on your radio to the Source 1 Front inputs on your MPSS-4. (Leave your rear speaker outputs if attached connected to the RCA's that run to the amp, don't run these thru the MPSS-4.) If you only want the front driver speaker to switch, only connect the Front Left RCA's, 2 left, connect Front Left & Rear Left from radio to MPSS-4, all speakers, connect both Front & Rear to the input F&R of source 1 on your MPSS-4.
It is imperative that that inputs for Source 1 match the inputs of Source 2. In other words, if you want the 2 left speakers to mute. Then the navi RCA's should be connected to Front Left & Rear Left of Source 1 and the radio should be connected to Front Left & Rear Left of Source 2.
If you have an aftermarket amp connected to your interior speakers, then simply connect the outputs of the MPSS-4 to the RCA cables that run to your amp (make sure your outputs match your inputs.) If that's you, then you are done! Re-insert your radio fuse and give it a whirl.
If you don't have an aftermarket amp, don't worry, simply follow the procedures above where we cut off the RCA ends and cut them open to reveal the wires inside. Make as many of these as you need to connect to your interior speakers.
Front Left & Right = 2
Front Left = 1
Front Left & Rear Left = 2
All = 4
Once you have made your RCA's, attach them to the correct output of the MPSS-4 and then connect them to the radio side of your radio's wire harness speaker wires. Do not splice into these wires, but cut them in half. Refer to your radio's owner's manual for correct wiring colors.
Once you've got all that soldered and wired up, put your fuse back in and give it a test run.
If all went well, your lady should be back. Goodluck guys and I hope this helps a bunch of you out!!
"DING" you are free to move about the country.
. But there are some of us who actually like to hear the lady chime in and tell us where to go. Most of my passengers think it's pretty . I have to say, I tend to agree with them. Anyway, after searching this site, I found that most people thought it couldn't be done easily. Well, they thought it could be done easily, you'd just have to install a seperate amplified speaker. Another solution I found was to put a relay between the speakers. Well, I didn't like either of those options. And I'm not hating on something you may have had installed in your ride. I'm just saying, that's not what I wanted, no disrespect.
So I continued to research. I looked thru this forum, the TL forum, CL forum, Ody ( Honda Odyssey) forum, Lexus IS, and the Pilot forums oh and the12volt. I put together bits and pieces I found on these sites and found a very good, very simple solution.
This solution offers the same functionality as the OEM setup. When you are listening to your radio source (radio, cd, cd changer, Ipod, whatever) sound comes thru all speakers. Duh. But when you have a navi prompt, the radio source is muted in the front left/right speakers and the lady guides you to your destination. After she is done, your radio source returns in your front speakers AUTOMATICALLY. No flipping switches, no changing sources, just like OEM designed it to be. I know some of you may be wondering if the directions are cut off b/c of the time of the "switch." Calm your worries, you won't miss anything, you still even get the "ding."
So, after 2.5 days of riding with my dash apart to & from work to get this thing figured out. I finally completed the installation on yesterday. I've only owned my 03 TL since Sepetember of 05 and I don't have a lot of posts here on the site b/c I mainly just read and look at pictures. I figured this would be my way of giving back for all the things I have learned on this site. Just so you know, I have written this in a very K.I.S.S. (Keep It Stupid Simple) kind of format as to assume that whoever is reading this knows nothing and has no experience with electronics. Hopefully this will keep questions and confusion to a bare minimum.
Disclaimer: This mod was performed on an 03 Acura TL-S w/ navi & onstar. As such the wiring diagram may vary for other years and models. I am in no way responsible if you mess your stuff up, so please make sure you have your stuff together before you proceed.
So with all that out of the way, let's get down to business.
Tools Needed:
Acura TL or CL w/ navi
1 MPSS-4 Audio Source Switcher
(1) RCA Coupler (found at radioshack)
(2) RCA Couplers if you don't have an external amp and only want the front speakers to mute
(3) RCA Couplers if you don't have an external amp and want to mute all the speakers.
(1) Low Voltage Transistor (comes in pack of 15 at radioshack)

Pair of RCA audio patch cables for every coupler you decided you needed above(red/white that are used to hook up amps etc.)
(1) Aftermarket deck WITH FRONT RCA OUTPUTS!!
18-16 gauge wire
Soldering iron
(1) Voltmeter
Black electrical tape
(1) Exacto knife
About 2 hours of free time to complete the install
The first step required is to remove the center console so that you may access and remove your radio. If you don't already know how to do this, the directions can be found here . At step 19, you will have to unplug the harness for your cigarette lighter. Keep this handy as we will use it later. I would also strongly advise you to remove your radio fuse from the passenger side fuse box. Refer to your owner's manual for exact location of the fuse to pull.
Once you have your radio and climate control removed, find your radio wire harness that you used to install your aftermarket deck. It will be blue and look like this.

We will be working with the blue 20 pin connector coming from the Acura. So, if you want to free up some space, disconnect your radio wire harness and carefully place it and your radio to the side. We will be dealing with pins 13 and 14. See below.
.Now that you have your two wires located, let's prepare to connect our switcher. I used a transistor b/c they take a small amount of voltage to trigger. The navi mute wire sends a 12v signal to the radio to mute the front speakers, but for some reason when I hooked this wire directly to the MPSS-4's yellow trigger wire, the voltage would drop to 1 which isn't enough to trigger the switcher. I even tried using a relay, but the wire still didn't provide enough juice to trigger the realy. So that left me with transistor.
With your transistor in hand, you will notice there are 3 wires/prongs whatever coming out of the bottom.

The front is flat while the back is round. So looking at the front (flat side) with the prongs pointed up, you have prong 1, prong 2, and prong 3. Prong 1 will connect with the yellow trigger wire of the MPSS-4, prong 2 will be to a 12v source, and prong 3 will connect with the navi mute wire (Pin 14 white/black). I recommend that you bend (be gentle) the 1st & 3rd prongs to reduce the risk of your wires touching. So go ahead and connect at least 6" of wire to prongs 2 & 3. This will give you some flexibility when it comes to splicing into the various areas. After you have connected your wires, I recommend you solder them to the transistor. The finished product should look something like this.

Now, we will take the wire connected to prong 3 and splice it into our navi mute wire which is White/Black (pin 14). DO NOT cut the white/black wire (unless you have absolutely no plans to return the car to stock or go back to a factory system.) I have no desire to go back to stock or trade in either, but you never know what may come up, so I just spliced into it. Next, take prong 1 and connect it to the yellow wire of the mpss-4. We didn't connect a wire to this prong in the previous step b/c there is no need, just attach the yellow one to it and solder. Prong 2 will need to be connected to a 12v source. For this, I used the cigarette lighter harness that you unplugged while removing your center console(step 19 of the guide linked.) Splice into the white/red wire. Again, DO NOT cut this wire, simply splice into it. While splicing this wire, I also suggest that you add the red wire from your MPSS-4 to this splice also. This will power the MPSS-4. Once all the connections are made, solder everything and wrap it in black electrical tape. For the transistor, wrap each individual prong with tape and then the entire thing together if you so desire. Also, let's go ahead and ground the MPSS-4. Take the black wire from the unit and you have two options here; option 1, splice into the ground wire on your radio harness (this is what I did) or option 2, find a metal ground point in the car to ground to, sand back paint if there is any and screw it down.
Once all these connections are made, we are finished with our power connections. The only thing left to do is audio.
At this moment, I would like to explain how this MPSS-4 is going to work. On your instruction sheet, or if you haven't ordered one yet you can see it here you will notice an application 1 and 2. We are going to use application 2 b/c in application 1 our radio would power off, and we don't want that to happen. So we are going to connect our navi to the Source 2 Front input and our radio to Source 1 Front input. The gray and orange wires of the mpss-4 will be connected together, and we will not connect the blue remote wires (if you have an amp, leave your turn on wire connected as is.)
If you have your interior speakers connected to an aftermarker amp, like I do, then your life will be a great deal easier than those that don't. You don't "have" to have an amp, it does cut out a lot of extra wiring and splicing. At any rate, I will give directions on both routes. The first part is the same for both scenarios so let's get started so you can wrap this up.
Take your RCA cables and cut it about 6" from the RCA ends.

Now take the end of your cable, the cut side, and strip back the black sheathing about 1 1/2 inches. You will see exposed wire (negative sheild) and wire inside a red or white jacket (positive signal). Twist the negative sheild together b/c it will be in seperate strands. Next take your exacto knife, and strip back about an inch of the jacket. You don't have to be exact on your measurements but the idea is to leave enough of the jacket so that the negative sheild doesn't come in contact with the positive signal. Do this for both jacks so they resemble the picture below.

Take the positive wires and splice them into the Black/White (pin 13) wire of the wire harness. The negative wires can be spliced into the Black (pin 20) ground wire or can be ran to a ground of their own. Solder connections and wrap in black tape. These RCA's will then be connected to the coupler which will then connect to the Source 2 Front inputs of the MPSS-4.
Now there are a few options of how you want the speakers to mute. You can mute the driver's speaker only, you can mute the front 2, the 2 left, or all four. I chose to have my front 2 mute. For the front 2 to mute, simply connect the front output RCA's on your radio to the Source 1 Front inputs on your MPSS-4. (Leave your rear speaker outputs if attached connected to the RCA's that run to the amp, don't run these thru the MPSS-4.) If you only want the front driver speaker to switch, only connect the Front Left RCA's, 2 left, connect Front Left & Rear Left from radio to MPSS-4, all speakers, connect both Front & Rear to the input F&R of source 1 on your MPSS-4.
It is imperative that that inputs for Source 1 match the inputs of Source 2. In other words, if you want the 2 left speakers to mute. Then the navi RCA's should be connected to Front Left & Rear Left of Source 1 and the radio should be connected to Front Left & Rear Left of Source 2.
If you have an aftermarket amp connected to your interior speakers, then simply connect the outputs of the MPSS-4 to the RCA cables that run to your amp (make sure your outputs match your inputs.) If that's you, then you are done! Re-insert your radio fuse and give it a whirl.
If you don't have an aftermarket amp, don't worry, simply follow the procedures above where we cut off the RCA ends and cut them open to reveal the wires inside. Make as many of these as you need to connect to your interior speakers.
Front Left & Right = 2
Front Left = 1
Front Left & Rear Left = 2
All = 4
Once you have made your RCA's, attach them to the correct output of the MPSS-4 and then connect them to the radio side of your radio's wire harness speaker wires. Do not splice into these wires, but cut them in half. Refer to your radio's owner's manual for correct wiring colors.
Once you've got all that soldered and wired up, put your fuse back in and give it a test run.
If all went well, your lady should be back. Goodluck guys and I hope this helps a bunch of you out!!
"DING" you are free to move about the country.
 04-30-2006, 02:08 PM
#2
should i spend more in
Thread Starter
Some pics of my finished install with DOM's tvandnav2go. I have a JVC KD-AVX1. It has video outs which I connected to the nav screen.

Also, this list comes up on the navi screen for mp3/wma cd's also plays mp3/wma dvd's (gotta love that!)

If you find or know of better ways to do this, please post suggestions. I am in no way a professional, just a guy that dabbles and knows enough to get in trouble.

Also, this list comes up on the navi screen for mp3/wma cd's also plays mp3/wma dvd's (gotta love that!)

If you find or know of better ways to do this, please post suggestions. I am in no way a professional, just a guy that dabbles and knows enough to get in trouble.
 04-30-2006, 09:55 PM
#7
should i spend more in
Thread Starter
Thanks a lot guys. (w00t for 100th post.) Just hope this is something that can be useful to the members here for a while. First time being stickied too. 
Trending Topics
05-03-2006, 10:58 PM
#11
6th Gear
Join Date: Feb 2006
Age: 39
Posts: 6
Likes: 0
Received 0 Likes
on
0 Posts
Voice prompt works, how about OnStar?
Great info on the installation. Thank You! However, I noticed you said your vehicle was also equiped with the OnStar... Does that also work after you installed this switch? I've been having this debate for quite sometime with myself: upgrade to the Double DIN Kenwood DVD player and loose the OnStar phone or keep the OnStar (and prompts) but not have a great looking (and sounding) system. Let me know!
Again, Thanks for the great info!
Again, Thanks for the great info!
05-04-2006, 07:42 AM
#12
should i spend more in
Thread Starter
I don't know, I doubt you retain it. I don't use Onstar since I have Navi and a cellphone, it is of no use to me. I'm sure if you had some way of deciphering what pins a11 and a12 exact functions were then you could. I think Onstar mutes all speakers instead of just the front ones.
05-04-2006, 01:26 PM
#13
6th Gear
Join Date: Feb 2006
Age: 39
Posts: 6
Likes: 0
Received 0 Likes
on
0 Posts
Originally Posted by Superb
I don't know, I doubt you retain it. I don't use Onstar since I have Navi and a cellphone, it is of no use to me. I'm sure if you had some way of deciphering what pins a11 and a12 exact functions were then you could. I think Onstar mutes all speakers instead of just the front ones.
Thanks again!
05-04-2006, 02:38 PM
#14
1st Gear

Join Date: May 2006
Age: 41
Posts: 1
Likes: 0
Received 0 Likes
on
0 Posts
oem navigation to dvd
i need help...does anybody know what i need to do..to make my oem navi monitor play dvd?..i just purchased a dvd head unit but the audio guy said i need a video interface also...what is that? could somebody tell me how much will it cost? how does it work? any information will do..thanks
05-09-2006, 08:17 PM
#15
should i spend more in
Thread Starter
Originally Posted by gman4ever15
So when you hit the OnStar button on the mirror, what happens for you? Normally, if you are not subscribed, you get the computer lady trying to sell you a subscription. If you are subscribed, it will try to connect you. If you have a chance, press that little blue button and let us know if you get any sound.
Thanks again!
Thanks again!
06-11-2006, 09:13 PM
#16
OnE LiFe tO LiVe..F*Ck iT

Join Date: Apr 2006
Location: QuEeNZ<NY
Age: 41
Posts: 5
Likes: 0
Received 0 Likes
on
0 Posts
Originally Posted by Superb
Well, I tried this out today, and you don't get any sound......unless, you have navi running and press the "voice" button on the screen to force it to mute, then you hear the Onstar lady fine. So the Onstar has it's own mute wire. Maybe this weekend, I'll test to see which one it is. It's either pin 11 or 12.
06-19-2006, 02:38 PM
#18
Instructor

Join Date: Nov 2005
Age: 46
Posts: 164
Likes: 0
Received 0 Likes
on
0 Posts
I could be wrong but, wouldn't it be alot easier just to add an auxiliary input audio adapter such as the UsaSpec or Soundgate, then feed the audio out from the aftermarket head unit through the stock system? This way, you would save yourself the trouble and still maintain the full functionality of the navigation.
06-21-2006, 01:46 PM
#19
should i spend more in
Thread Starter
Originally Posted by Masterpoolcat
I could be wrong but, wouldn't it be alot easier just to add an auxiliary input audio adapter such as the UsaSpec or Soundgate, then feed the audio out from the aftermarket head unit through the stock system? This way, you would save yourself the trouble and still maintain the full functionality of the navigation.

 08-16-2008, 02:58 PM
#25

Your post is probably one of the most important posts ever for those of us with navigation. The audio function of the navigation system is just as important as the display to me and I was dismayed to have lost it when I replaced my factory head unit with a Pioneer DVD changer. I have been stalling for about a year now but now I am ready to attempt your solution. I went to the radio shack website and I noticed that there are several possibilities for the transistors you suggested. Can you provide the product ID (CAT no.) used by radio shack to identify the product for the transistors you used ? I can't read it from the photo, despite zooming in.
Thanks much and I'll let you know how it goes!
Thanks much and I'll let you know how it goes!
 05-24-2009, 03:26 AM
#27
7th Gear

Join Date: May 2009
Posts: 7
Likes: 0
Received 0 Likes
on
0 Posts
thanks for the DIY,
I have a Pioneer AVH-P7480DVD that i wanted to put in but have been holding off on it since i didn't want to lose the navi prompt. I find it a lot safer to drive and just listen for the instructions then having to look at the navi screen.
I have a Pioneer AVH-P7480DVD that i wanted to put in but have been holding off on it since i didn't want to lose the navi prompt. I find it a lot safer to drive and just listen for the instructions then having to look at the navi screen.
05-28-2009, 12:51 AM
#28
Intermediate
Hello guys, just got an 03 CLS about 2 months ago. Saw this write up and was funny cuz this is something im about to start doing. I work for an automotive interface company and I have a solid plan to make a simple plug in interface. Both for 01 to 02 NAV and 03 NAV/OS. I know about the onstar but I think I found a simple way to bypass it completely. A few other projects is adding buttons to steering wheel controls and maybe using OS buttons on mirror for BT use on aftermarket radio. I'll post pics and a walk thru whenever i'm done. Might need help posting stuff up. Later fellas.
07-06-2009, 10:44 PM
#32
Intermediate
sorry about the delays. had to finish my wifes Civic before i can touch my Acura. Her car is done for now (just need to re-upholster the trunk...cosmetic crap). Found everything i need. Hope to have something hopefully within a week...two max.
07-22-2009, 12:19 AM
#35
Intermediate
Hello guys, just finished installing my Pioneer deck using the Bose amp (for now). Sounds better than I expected.
The prompts are all there. Didn't drive around yet but every time you touch the button for the nav to speak it sounds just perfect. I also added a mute function to my harness so it also sends a mute signal to the aftermarket deck. So it mutes all of the new deck audio when speaking through the front speakers.
The new peice I made can be removed and returned to stock instantly. No wires cut behind the radio at all. Completely plug in.
I also added the SWI-PS harness and installed the interface.
Now I'm going to look at how to add buttons for radio controls to the steering wheel.
Car still in peices. Doing remote start this weekend and hopefully figuring out how to use factory mic to onstar along with buttons to control built in BT on Pioneer deck.
07-22-2009, 04:08 AM
#36
Hello guys, just finished installing my Pioneer deck using the Bose amp (for now). Sounds better than I expected.
The prompts are all there. Didn't drive around yet but every time you touch the button for the nav to speak it sounds just perfect. I also added a mute function to my harness so it also sends a mute signal to the aftermarket deck. So it mutes all of the new deck audio when speaking through the front speakers.
The new peice I made can be removed and returned to stock instantly. No wires cut behind the radio at all. Completely plug in.
I also added the SWI-PS harness and installed the interface.
Now I'm going to look at how to add buttons for radio controls to the steering wheel.
Car still in peices. Doing remote start this weekend and hopefully figuring out how to use factory mic to onstar along with buttons to control built in BT on Pioneer deck.
The prompts are all there. Didn't drive around yet but every time you touch the button for the nav to speak it sounds just perfect. I also added a mute function to my harness so it also sends a mute signal to the aftermarket deck. So it mutes all of the new deck audio when speaking through the front speakers.
The new peice I made can be removed and returned to stock instantly. No wires cut behind the radio at all. Completely plug in.
I also added the SWI-PS harness and installed the interface.
Now I'm going to look at how to add buttons for radio controls to the steering wheel.
Car still in peices. Doing remote start this weekend and hopefully figuring out how to use factory mic to onstar along with buttons to control built in BT on Pioneer deck.
 when come to radio.
07-22-2009, 06:33 AM
when come to radio.
07-22-2009, 06:33 AM
#37
9th Gear

Join Date: Feb 2006
Age: 44
Posts: 9
Likes: 0
Received 0 Likes
on
0 Posts
Hello guys, just finished installing my Pioneer deck using the Bose amp (for now). Sounds better than I expected.
The prompts are all there. Didn't drive around yet but every time you touch the button for the nav to speak it sounds just perfect. I also added a mute function to my harness so it also sends a mute signal to the aftermarket deck. So it mutes all of the new deck audio when speaking through the front speakers.
The new peice I made can be removed and returned to stock instantly. No wires cut behind the radio at all. Completely plug in.
I also added the SWI-PS harness and installed the interface.
Now I'm going to look at how to add buttons for radio controls to the steering wheel.
Car still in peices. Doing remote start this weekend and hopefully figuring out how to use factory mic to onstar along with buttons to control built in BT on Pioneer deck.
The prompts are all there. Didn't drive around yet but every time you touch the button for the nav to speak it sounds just perfect. I also added a mute function to my harness so it also sends a mute signal to the aftermarket deck. So it mutes all of the new deck audio when speaking through the front speakers.
The new peice I made can be removed and returned to stock instantly. No wires cut behind the radio at all. Completely plug in.
I also added the SWI-PS harness and installed the interface.
Now I'm going to look at how to add buttons for radio controls to the steering wheel.
Car still in peices. Doing remote start this weekend and hopefully figuring out how to use factory mic to onstar along with buttons to control built in BT on Pioneer deck.
07-29-2009, 06:47 PM
#39
9th Gear
Join Date: Feb 2006
Age: 44
Posts: 9
Likes: 0
Received 0 Likes
on
0 Posts