|
|
|
|
|||||||
| Register | Forum | Garage | Photo Gallery | FAQ | Members List | Calendar | Auto Loans | Insurance | Search | Today's Posts | Mark Forums Read | Advertise | Passport | Auto Escrow |
|
|
|

|
|
|
LinkBack | Thread Tools | Display Modes |
 08-30-2009, 05:25 PM
|
#1 (permalink) |
|
Senior Member
Join Date: Jan 2007
Location: Central, FL
Age: 33
Posts: 321
|
DIY: Removing Slave Cylinder Damper
This was originally posted on an Acura TL forum. After reading it and looking at my Si, I realized it will work. This worked on my 07 Si and most likely will work for all from 06-up. *NEW INFO* It appears some or all 06 models are slightly different. Same basic design though, just a different approach!
The guys on the Acura forum refer to it as a check valve but I think its more like a damper. From my understanding it slows down the clutch engagement. Probably to make it "smoother". After I did this and bled the clutch, the pedal was really soft. I pumped it a few times and it got stiffer but not like before. Once I started driving it, the pedal pressure came back. This will make the clutch engage/disengage much quicker, just like a traditional clutch does. I noticed it "hits" the tires alot harder on quick/spirited shifts. Here is the write up posted by Black_05_TL_6SP on Acurazine.com. Anything in blue text is stuff I added. I also added everything after step 7. **DISCLAIMER** Neither Black_05_TL_6SP or myself are responsible for damages/injuries that occur while you or your friend(s) is/are performing this modification. "Removing the Valve. 1. Remove unit from car or purchase replacement. Cost - $60-80 (If you are getting up there in mileage I would suggest purchasing a new one.) I unbolted the SC from the motor (2 12mm bolts) and then unbolted the clutch line bracket from the top of the trans (1 10mm bolt) and pulled the SC up to the top of the battery. Be careful not to bend the hard line. With the SC up at this height, you can unhook the feed line without making a mess. Lay down a towel so it there is any fluid spilled it wont get on the paint! 2.Parts and tools needed - Mini hook set, DOT 3 fluid, Needle nose pliers, and something very thin to use to push the check valve out. I used a very small but long Allen wrench that I had. 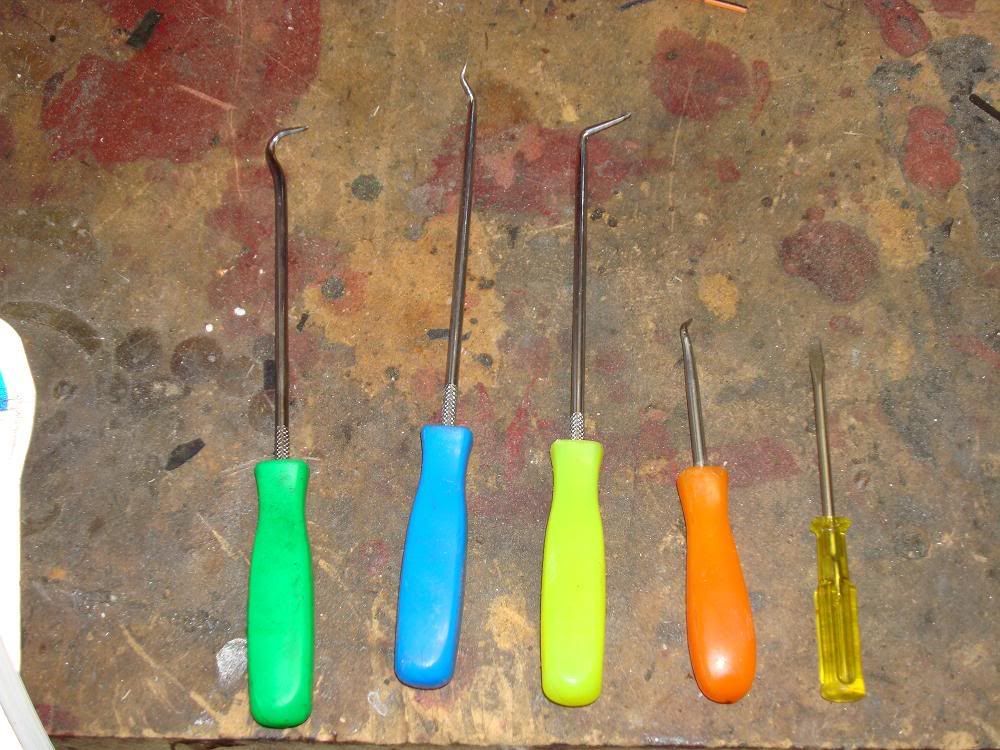 3. Using the 90deg and the round hook I was able to remove the ring. I used the 90deg to hold the ring in place while I used the round hook to slide the ring from its locked position. The ring has a inward slope and an outward slope. Be careful not to let the ring shoot off or do this some where you can find it easily. 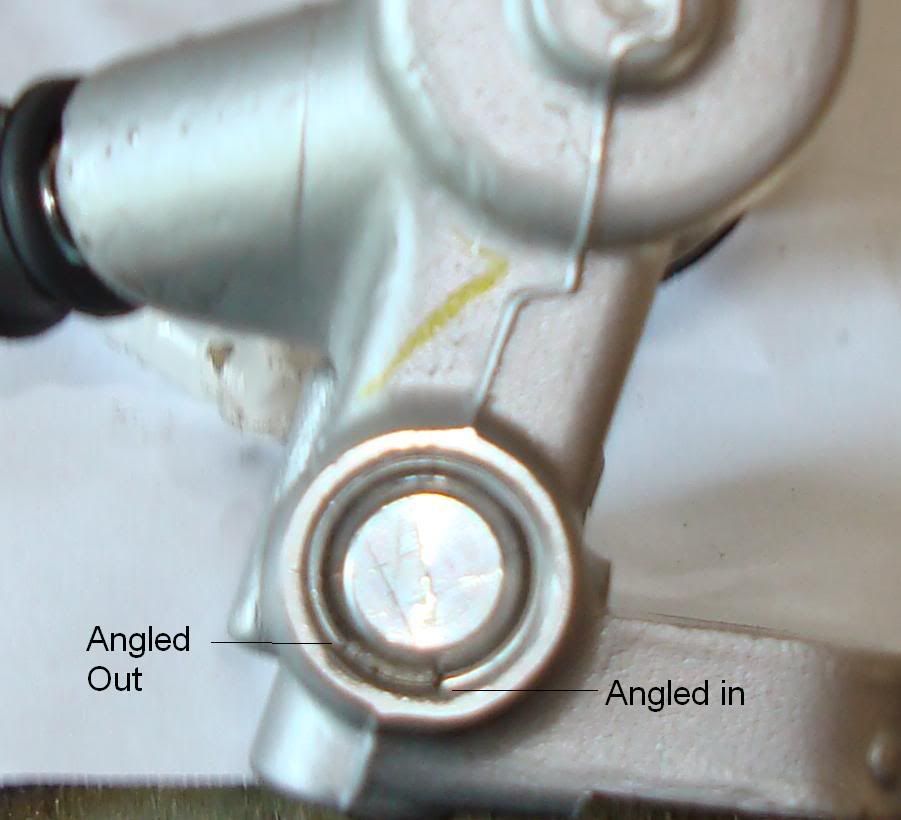 Note - The ring removed 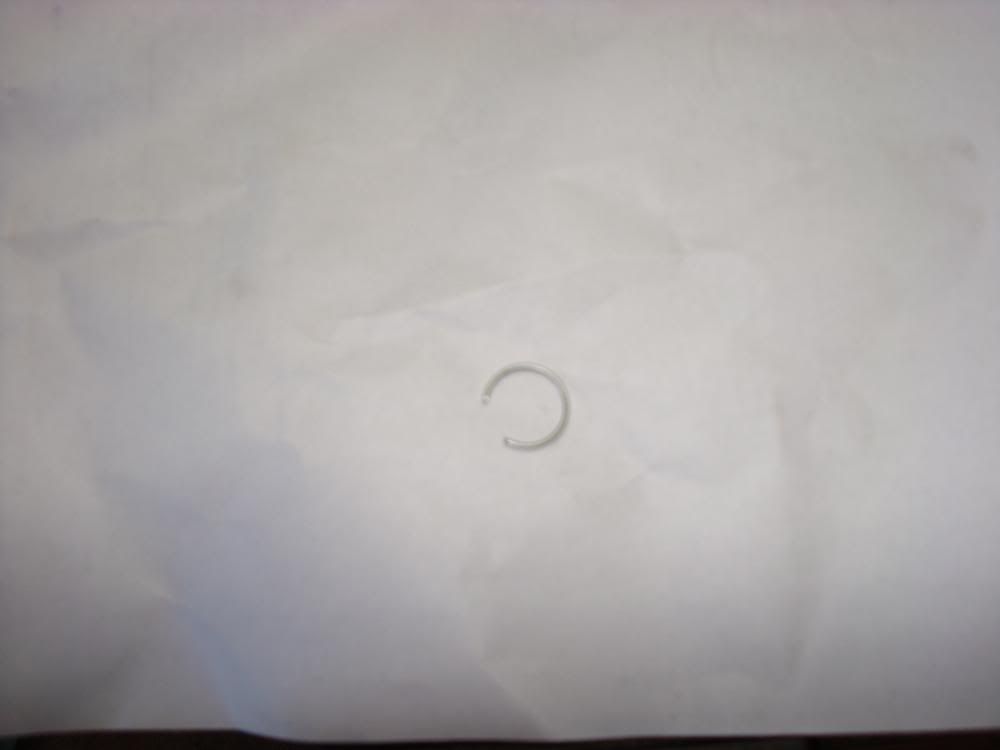 4. With the ring removed, I used the needle nose to remove the cap from the SC. It has to be worked out, so rock it a bit and it will come up and out. 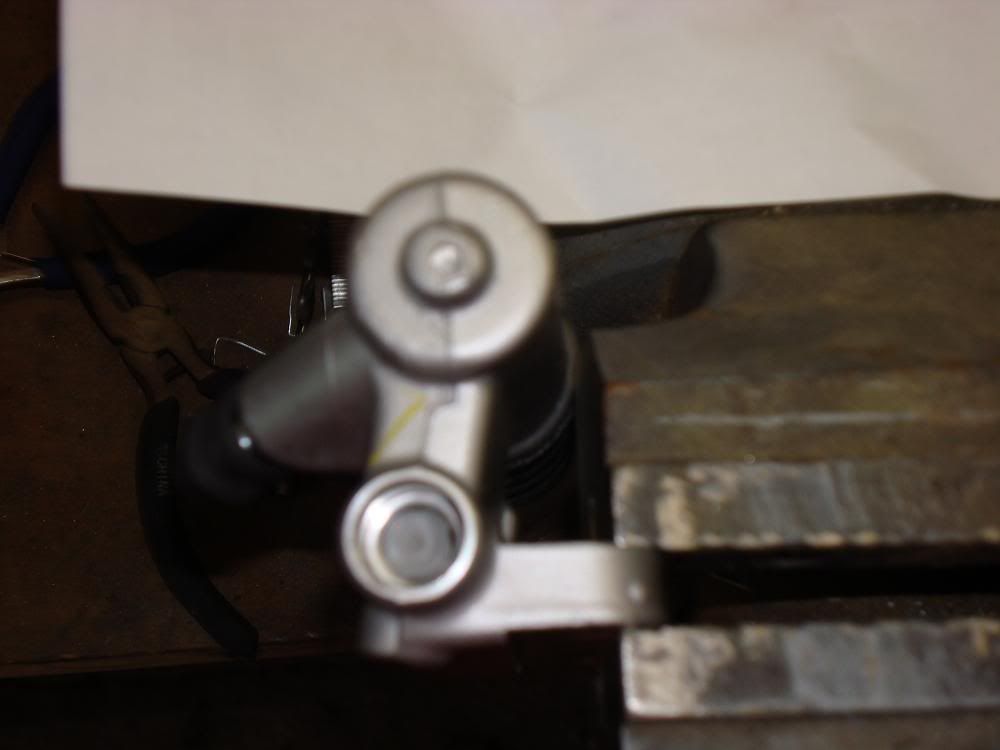 Note- Ring and Cap 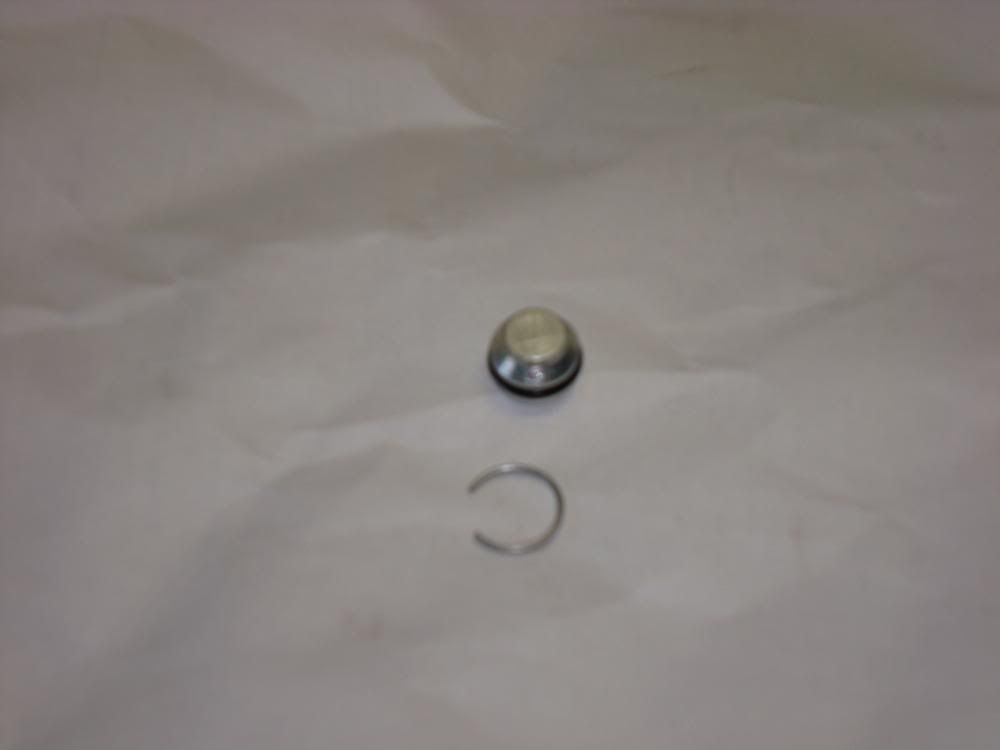 5. Removal of the check valve. I used a long Allen key that was very thin to fit into the hose feed side of the SC. As previously mentioned in another post, be careful not to hit the brass part of the fitting, it can damage it. This is why I used a very thin object. I had to tap the Allen key with a hammer to get the damper out 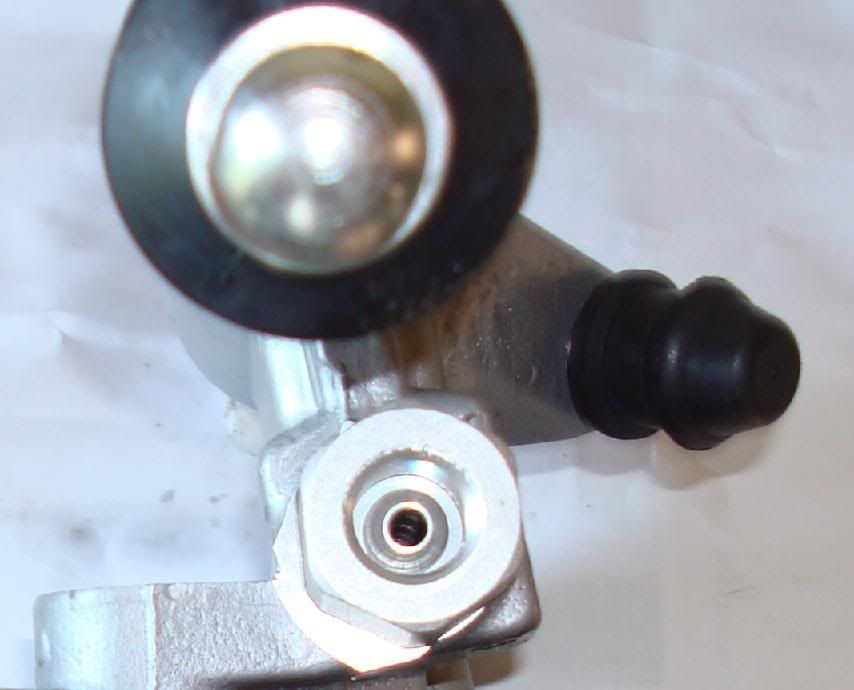 6. With the check valve removed you can reassemble the SC. Start by putting the end cap back in and making sure it is fully seated back in the SC. 7. You will finally reinstall the ring. Install one side of it and use some needle nose to work the ring in. You may want to keep your finger over the ring so that if it slips it will not shoot off." 8. Reinstall the SC in the reverse order of removal. DONT BEND THE HARD LINE! 9. Open the clutch fluid reservoir, if its low, top it off. Using an 8mm wrench, open the bleeder valve on the end of the SC and let it drip. DO NOT TOUCH THE CLUTCH PEDAL! Let it drip until you dont see anymore air bubbles. Make sure you keep an eye on the fluid level in the reservoir, dont let it below the MIN line. 10. Once the bubbles are gone, and the reservoir level is below the MAX line, screw in the bleeder with your fingers and give it a 1/4-1/2 turn with the wrench. Top off the reservoir to the MAX line and put the lid back on it. 11. Clean up with your favorite hand cleaner and go for a test drive! Enjoy  -Frankie Last edited by Frankie Figs; 12-14-2009 at 09:53 PM. |

|


|
| Sponsored Links | |||
|
Advertisement |
|
||
|
11-28-2009, 08:22 PM
|
#7 (permalink) |
|
Senior Member
Join Date: Jan 2007
Location: Central, FL
Age: 33
Posts: 321
|
I would assume it would eliminate the 2nd gear grind on a new/low mileage trans but mine is already damaged from me trying to drive it like I should have been able to. Now its boned! Im gonna have it rebuilt by a K series tranny guru, I just have to find the right guy for the job!
|
|
|
|
|
11-28-2009, 08:41 PM
|
#8 (permalink) |
|
VIP Member
 Join Date: Nov 2007
Location: Lynnfield, MA
Age: 44
Posts: 10,300
Mike
  iTrader: 11 reviews
  |
It's a delay valve. And it only limits fluid flow back into the CMC so it has no effect on disengagement. It only slows down the engagement of the clutch to "smooth" out upshifts. This will do nothing for second gear grind issues.
|
|
|
|
|
11-30-2009, 10:32 PM
|
#10 (permalink) |
|
Banned
Member
Join Date: May 2009
Location: Detroit, Mi
Posts: 306
Alex
iTrader: 1 reviews
|
Well after reading this i decided to just give it a shot again, this time with a grinder! I ground down most of the metal around the snap ring to get it off. I used some linesmen pliers to pull out the plug and then used a screw to anchor the check valve and pull it out. I bled the clutch and took it for a ride....
I must say i feel STRONGLY about this fixing the 2nd gear problem. I banged 2nd about 6 times on my drive and it went in perfectly every time. Nothing has helped this much. The clutch grabs much firmer and the feel is excellent. I really suggest doing this mod... if anyone needs any help i would be more than happy to do a write up (since our slaves are a little different then the TLs alex |
|
|
|
|
12-08-2009, 11:02 AM
|
#11 (permalink) | |
|
Senior Member
Join Date: Jan 2007
Location: Central, FL
Age: 33
Posts: 321
|
Quote:
|
|
|
|
|
|
12-08-2009, 11:36 AM
|
#13 (permalink) | |
|
Senior Member
Join Date: Jan 2007
Location: Central, FL
Age: 33
Posts: 321
|
Quote:
 My cars out of warranty so thats why I gave it a shot. I wish I had done it sooner!! My cars out of warranty so thats why I gave it a shot. I wish I had done it sooner!!
|
|
|
|
|
|
12-09-2009, 12:35 AM
|
#14 (permalink) | |
|
Banned
Member
Join Date: May 2009
Location: Detroit, Mi
Posts: 306
Alex
iTrader: 1 reviews
|
Mine is an 06, it is definitely different... regardless it still had the same kind of damper in it.
Quote:
|
|
|
|
|
|
12-14-2009, 09:50 PM
|
#15 (permalink) | |
|
Senior Member
Join Date: Jan 2007
Location: Central, FL
Age: 33
Posts: 321
|
Quote:
|
|
|
|
|
|
02-16-2010, 11:12 PM
|
#17 (permalink) |
|
Senior Member
Join Date: Jan 2010
Location: Dublin, CA
Age: 31
Posts: 317
Garrett
iTrader: 11 reviews
|
well since someone else bumped this for me i dont feel so bad haha
i have an 09 with the second gear grind. got it "fixed" last week but i just grinded twice today!!  what have people experienced with this mod? what have people experienced with this mod?
|
|
|
|
|
09-16-2010, 10:18 AM
|
#18 (permalink) |
|
Junior Member
Join Date: Nov 2009
Posts: 3
iTrader: 0 reviews
|
I posted this in the TL thread also
You guys do realize that this valve keeps the pressure from blowing the seals over time in upstream part of the system right? It's there to control the pressure feedback when the pressure plate springs release. With it out there is a pulse of high pressure back into the system that puts a lot of extra pressure on the clutch master cyl seals. This valve controls that flow to even out the upstream pressure. Honda puts it there for a reason. This lil trick has been around for a while and I have personally replaced failed parts because of it. It's not like the engineers at Honda put extra crap in there just to hinder performance on the car. If this was a reliable way to run the system i'm sure they wouldn't have included it. By doing this mod you will prob see premature seal failure and will prob end up sitting on the side of the road when the seals fail and the clutch won't engage. Just some food for thought. Last edited by i-mod; 09-16-2010 at 10:21 AM. |
|
|
|
|
| Thread Tools | |
| Display Modes | |
|
|
 LinkBacks (?)
LinkBack to this Thread: https://www.8thcivic.com/forums/diy-honda-civic-transmission/174405-diy-removing-slave-cylinder-damper.html
|
||||
| Posted By | For | Type | Date | |
| A-113: Removal of Slave Cylinder checkvalve!!! - Page 7 - AcuraZine Community | This thread | Refback | 07-31-2011 09:43 PM | |
|
Similar Threads
|
||||
| Thread | Thread Starter | Forum | Replies | Last Post |
| DIY- Removing taillights/Bumper. | Daryl Nilsen | DIY Honda Civic Exterior Style Mods | 113 | 03-14-2017 09:51 PM |
| DIY: Removing the R18 shift knob (MT) | splew | DIY Honda Civic Interior Style Mods | 45 | 02-07-2013 05:24 PM |
| Review/DIY for ixizconcept's ixizHood damper!!!! | tehcodeman | Inside and Out | 30 | 03-12-2009 07:36 PM |


 The Yes
 2010 Chevrolet Corvette Grand Sport


 Linear Mode


