TEIN EDFC: Active DIY Install and Review!
 01-04-2015, 06:59 PM
#1
Safety Car
Thread Starter
iTrader: (5)
TEIN EDFC: Active DIY Install and Review!
This install and review is based on the TEIN EDFC Active kit that changes your coilover stiffness based on speed and acceleration. To sum it up, this is the only mod where my wife said my car improved (of course I think all my mods have done that haha).
I’ve had this kit running since October 2013 and it was very new back then but I’m just now getting around to making this thread. If anyone else has this product (or the PRO version) and has more input or better input, please add it to this thread. It’s really a great product and I hope this thread either a) helps someone determine if the kit is right for them, or b) help someone install the kit on their own.
This is NOT the regular EDFC kit....this is the "wireless" one that can change your front and rear damping automatically based on your driving conditions (no user input). This is only compatible with TEIN coilovers.
TEIN link: TEIN.com: EDFC ACTIVE - PRODUCTS
TEIN promo video: EDFC ACTIVE Promotion Video(English) - YouTube
The only DIY install I could find when I received my product: DIY: Tein EDFC Active Install - Scion FR-S Forum Subaru BRZ Forum Toyota 86 GT 86 Forum AS1 Forum - FT86CLUB
Google drive install PDF from TEIN: https://drive.google.com/file/d/0B4d...ew?usp=sharing
I bought the EDFC Active kit new from XLR8 back in October 2013 and bought used motors "for the TL" from AZ member Kennedy, wired everything up and then when I went to the last step, putting on the motors, I was stuck because the motors were not the right thread size. AZ member Kennedy sold me motors that DO NOT FIT the TL, REFUSED to acknowledge that both me and TEIN reps said the motors would never work on a TEIN setup for the TL, and REFUSED to even try to refund me any money, even when I said I would take less than I paid him for them. It’s pathetic people like him that ruin the trust on the forum
Later that week I got the new motors I had to buy from XLR8 and props to Josh at XLR8 for getting them out to me asap since Kennedy screwed me. if he ever mans up for a refund i still have them laying useless in my closet...enough on the rant, it will come around to those that deserve it.
INSTALL
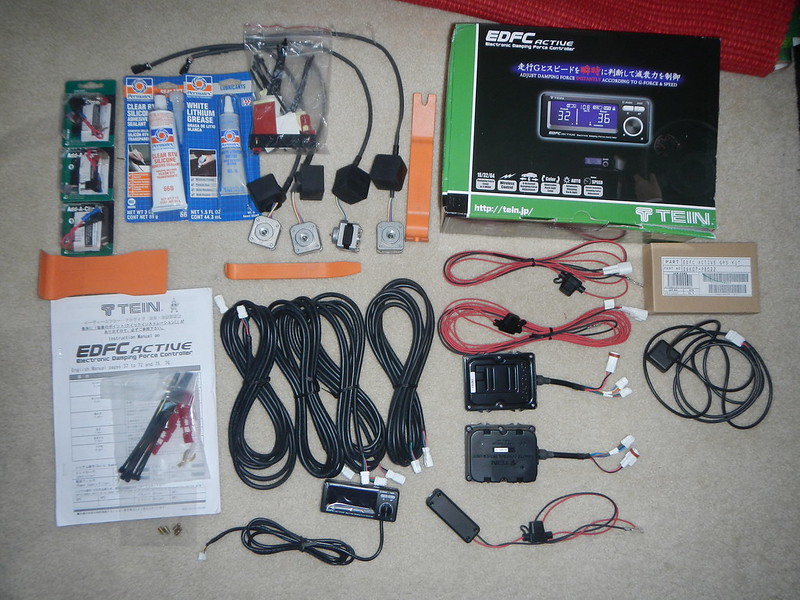
Here's the box for the kit, along with all the inside contents laid out.

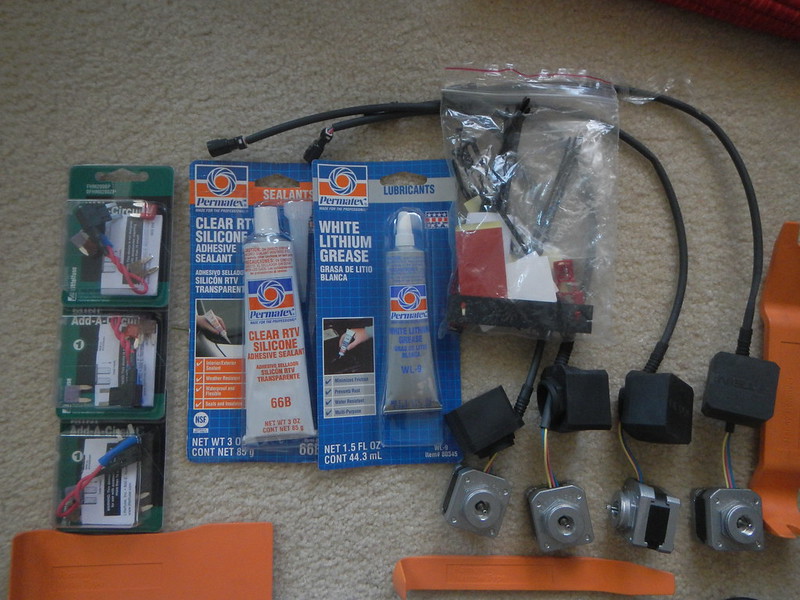
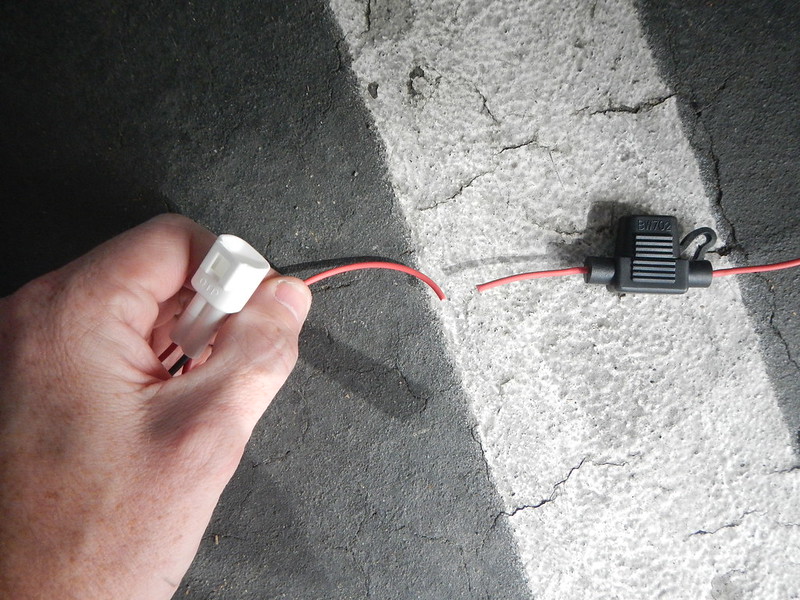
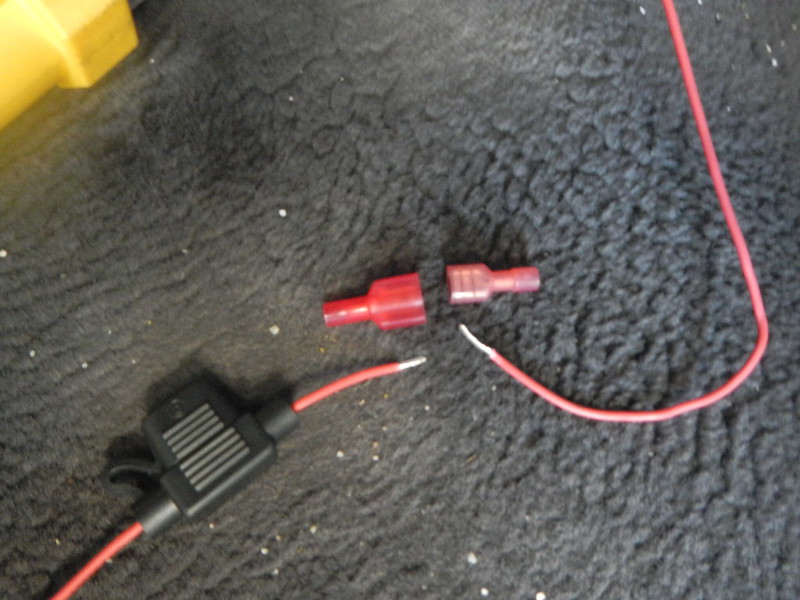
On my own I bought silicone sealant, white lithium grease, and 3 add-a-fuse circuits. You could tap the front and rear into nearby powered wires, but in talking with the RallyDirect guy in the DIY link above, he mentioned that they powered with one wire and ended up blowing fuses. He recommended using a separate fuse for each power wire to avoid any blown fuses. That is why I ran the wires up to the fuse box and used an add a fuse for each one.
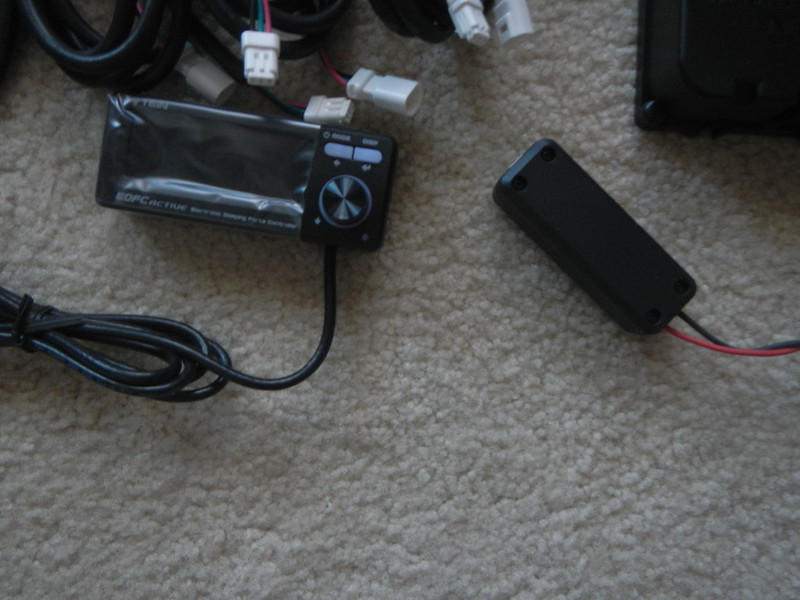
these are the "wireless" controllers, one for the front and one for the rear. they are wireless when communicating to the main control unit inside the car, but they still need power input and also provide power to each of the motors (3 wires, so 1 wire to each coilover in the front or back, and one for power).
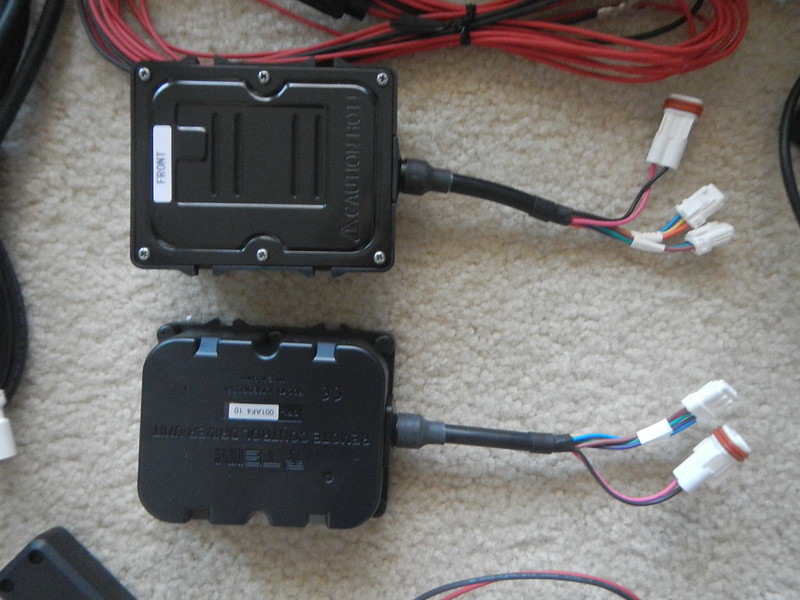
this is the main control unit and display that goes inside your car.
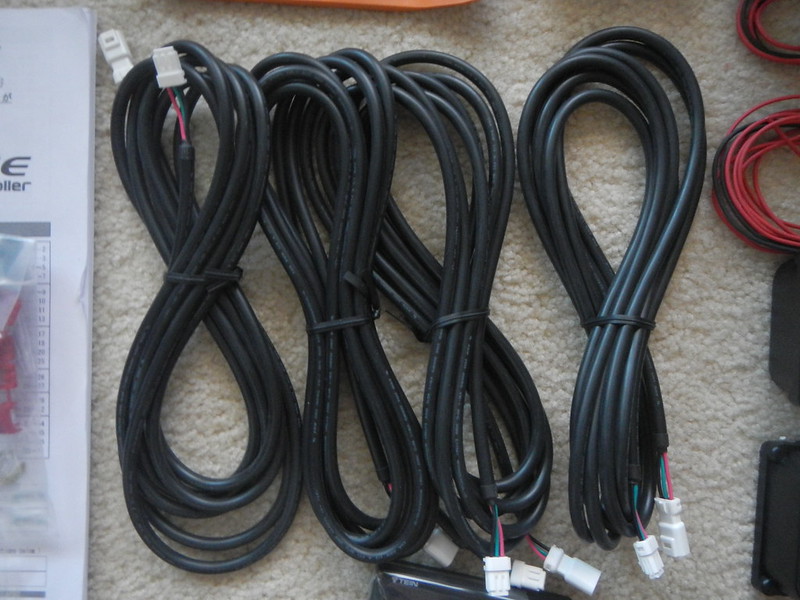
these are the cords that go from the front or back controller to each of the coilovers
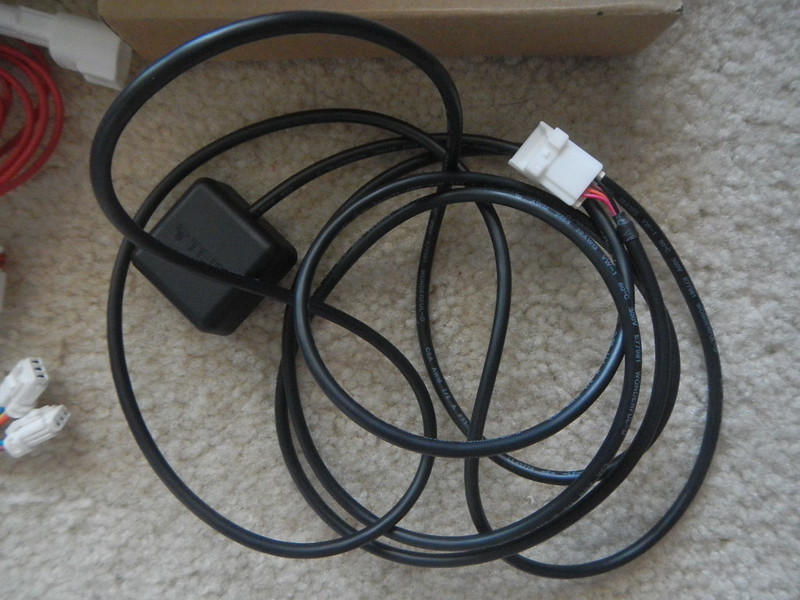
this is the optional GPS unit. this is an extra charge but worth it. the EDFC Active kit on it's own changes the damping based on g-forces (accelerating and braking), but the GPS kit also adds in adjustments based on speed range, giving full dynamic damping. For example, it’s a certain setting from 0-25 mph, then gets stiffer when 26-40 mph, stiffer 41-50, stiffer 51-65 and stiffer more after 65 mph (you can change the speed range also)…and this is before the damping changes based on g-forces.
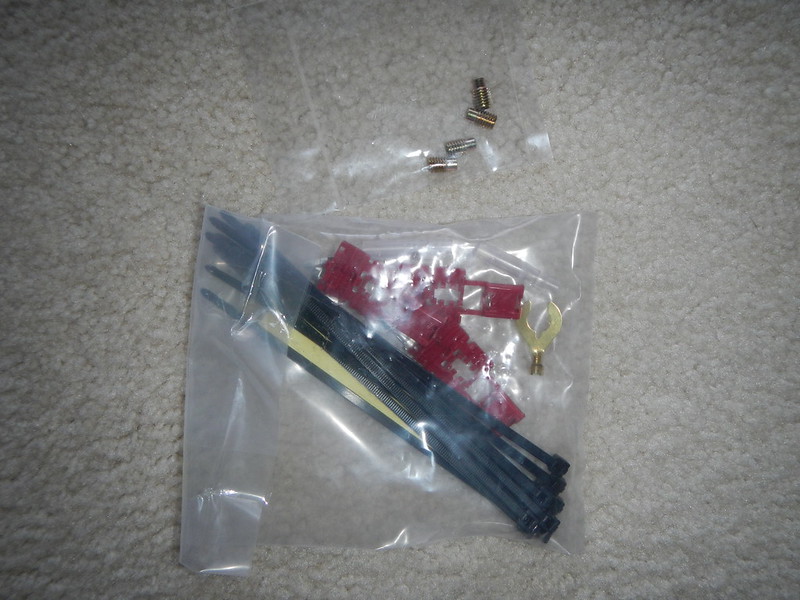
power cords, zip ties, and connectors

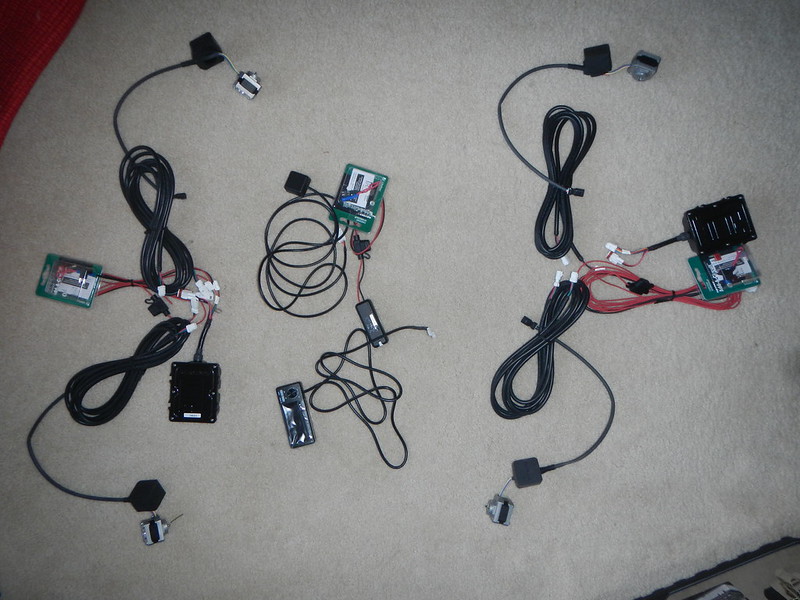
i did a "mock" install and laid out how it would wire up on my floor. the left is the front which includes a controller, a power cord, add a fuse, two cables to the coilovers, and the two motors. the right is the same but for the rear. in the middle is the GPS sensor, the main control unit, and the add a fuse.
THE REAR INSTALL
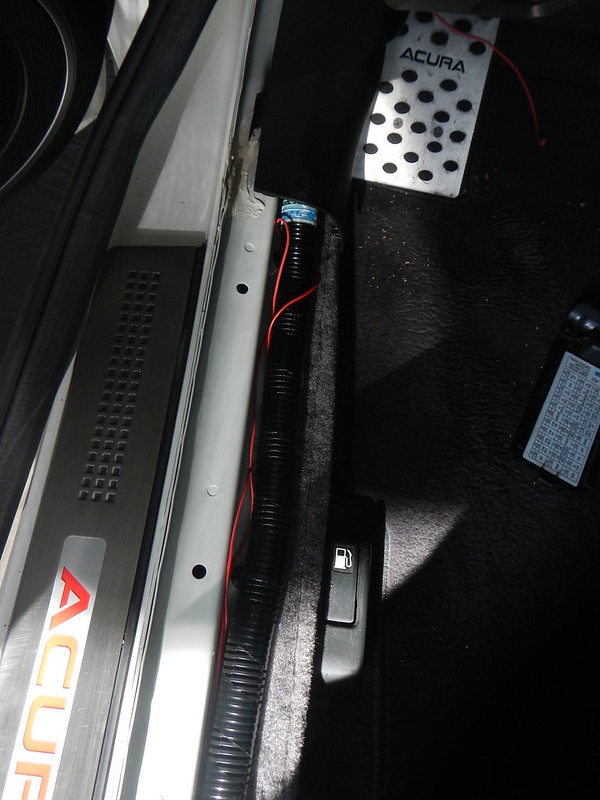
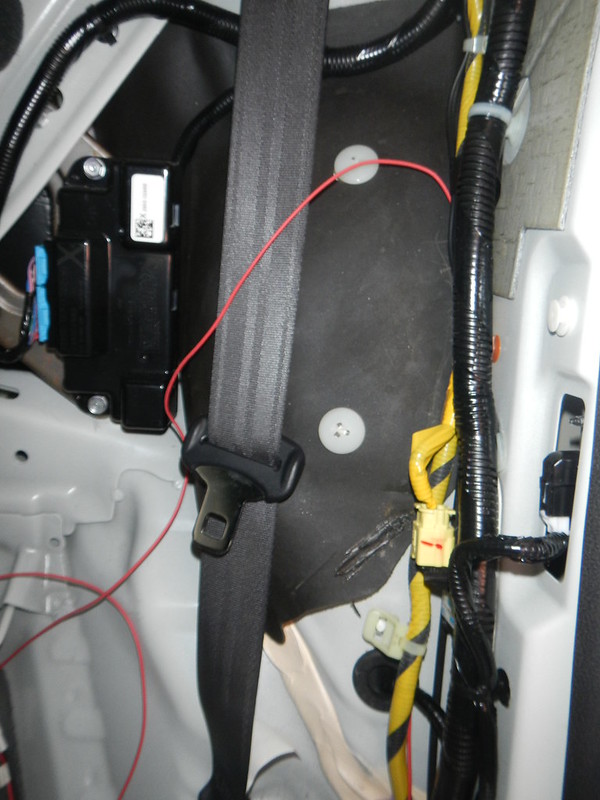
First I connected the add a fuses to the interior fuse box and ran the rear controller power wire under the driver side door sills (wiring is a little messy, some of those are for my LED door sills)
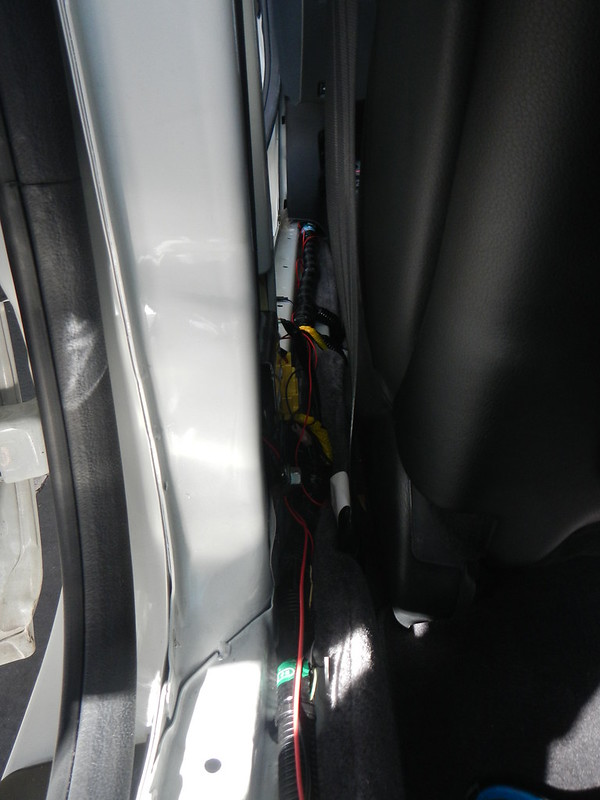
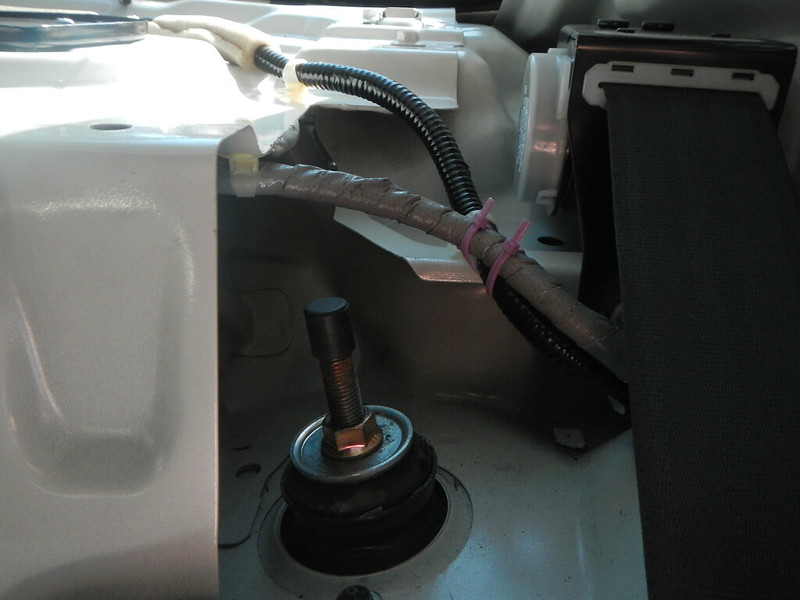
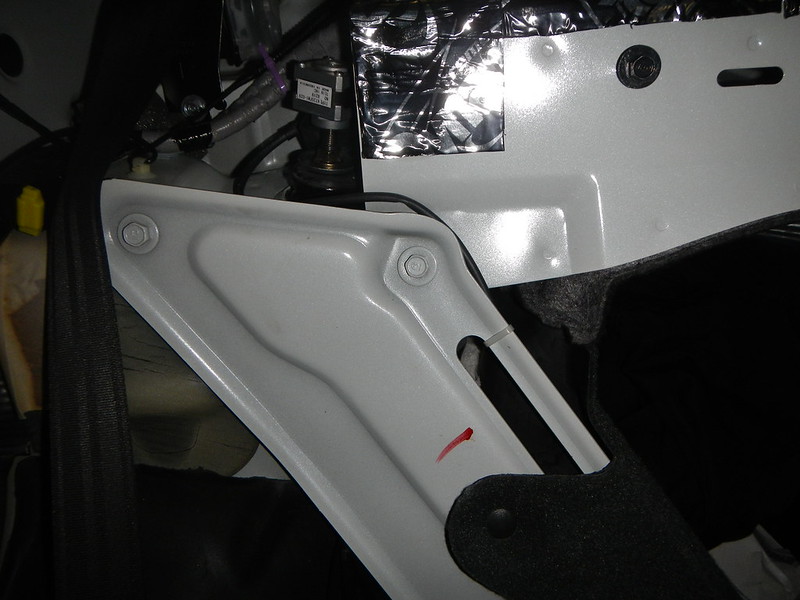
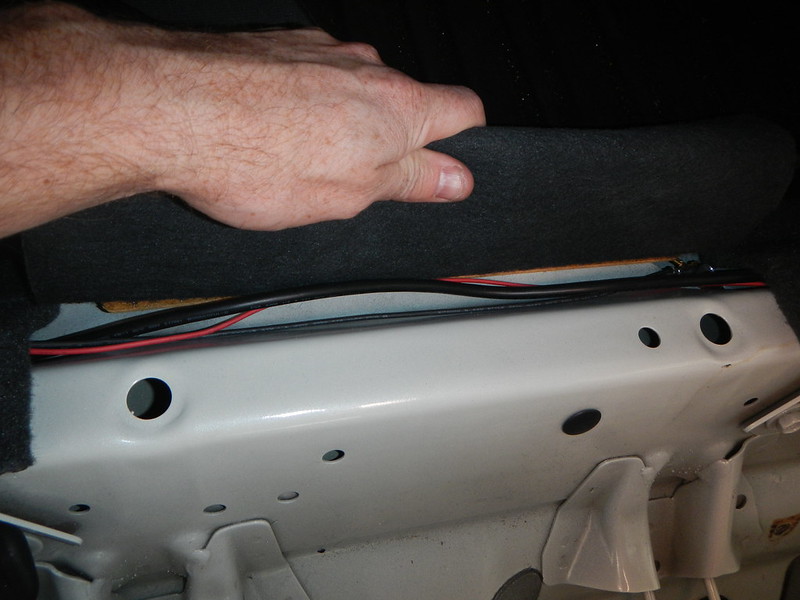
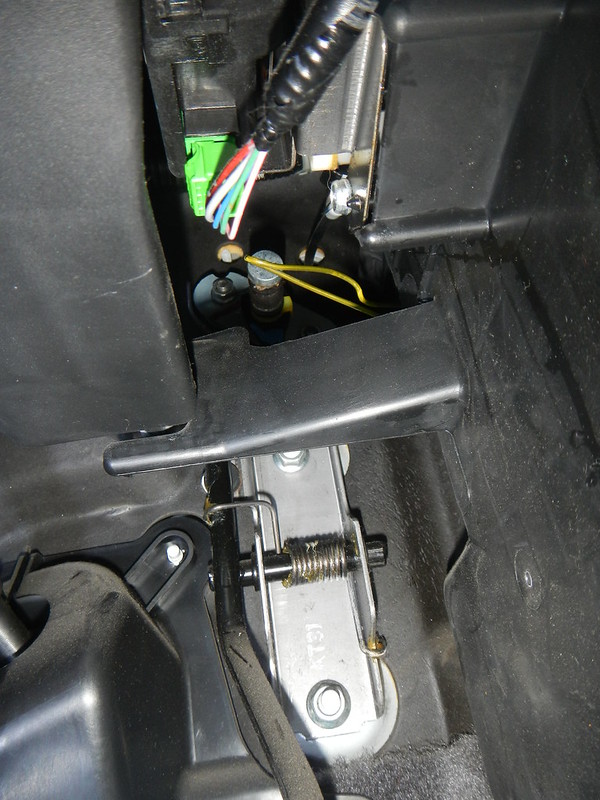
I then went up the frame for the rear seat and zip tied the power cord to the yellow covered cables. Then I came back down through the triangle opening (ziptied to frame) to place the grounding point underneath the trunk carpet.

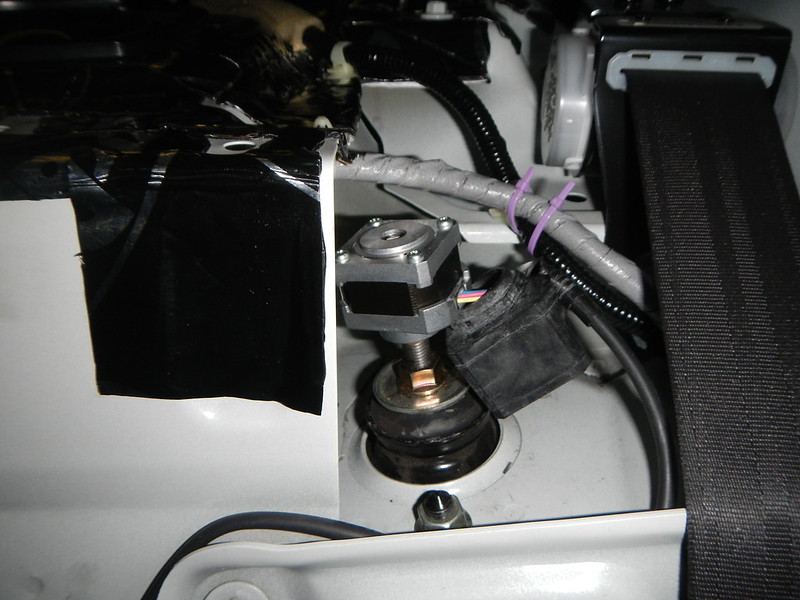
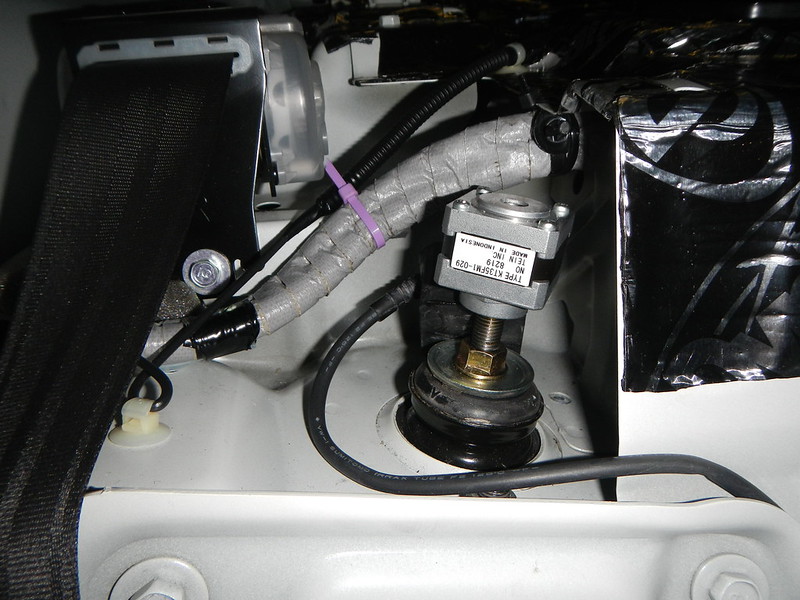
Next, I started to make room on top of the coilovers so that I could place the motors on the coilovers. On the driver’s rear side I ziptied the cable bundle as far away as possible from the top of the coilover while still using each of the OEM cable ties and mounts.

Final setup – rear driver
For the passenger rear side, I had to take out some of the OEM cable mounts and then ziptied the bundle away from the coilover otherwise the motor wouldn’t fit on that side.
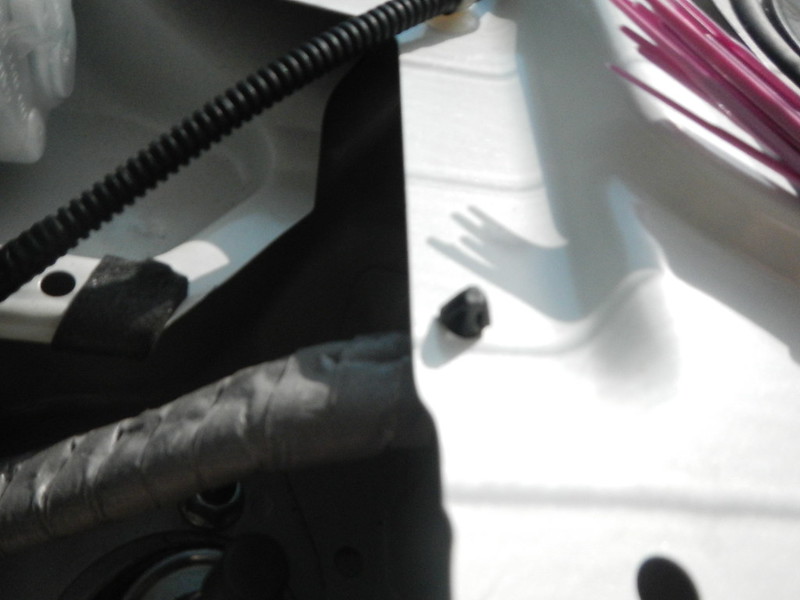
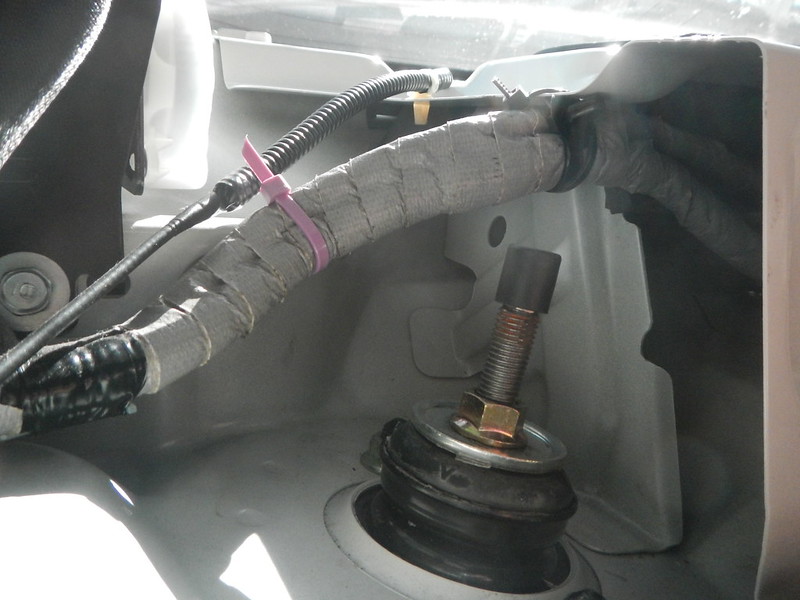
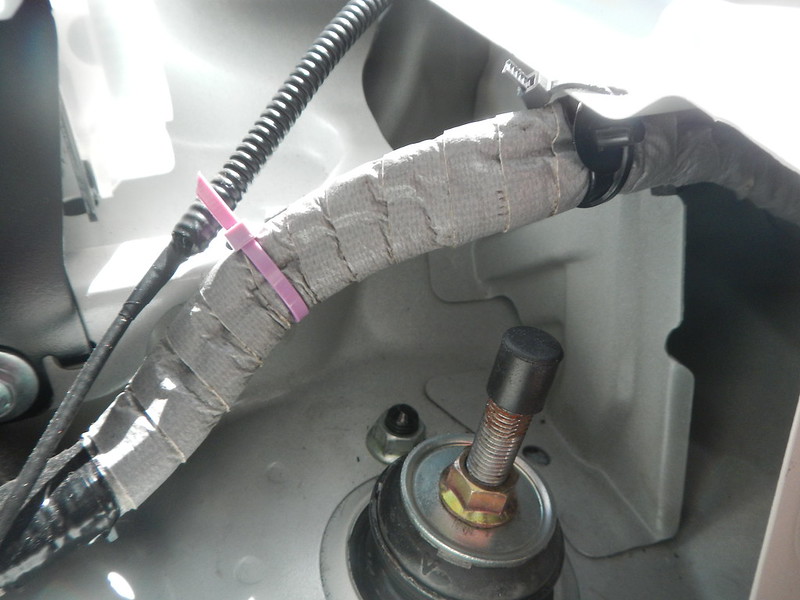
Final setup – rear passenger
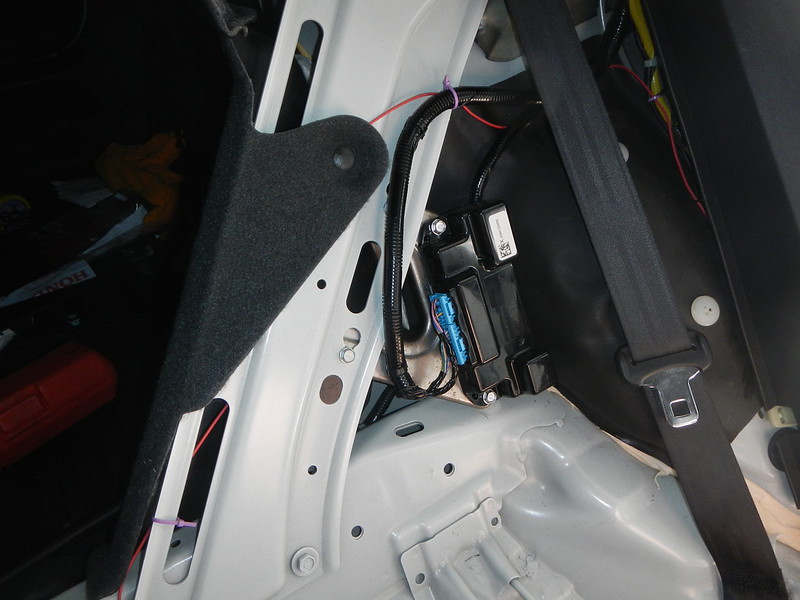
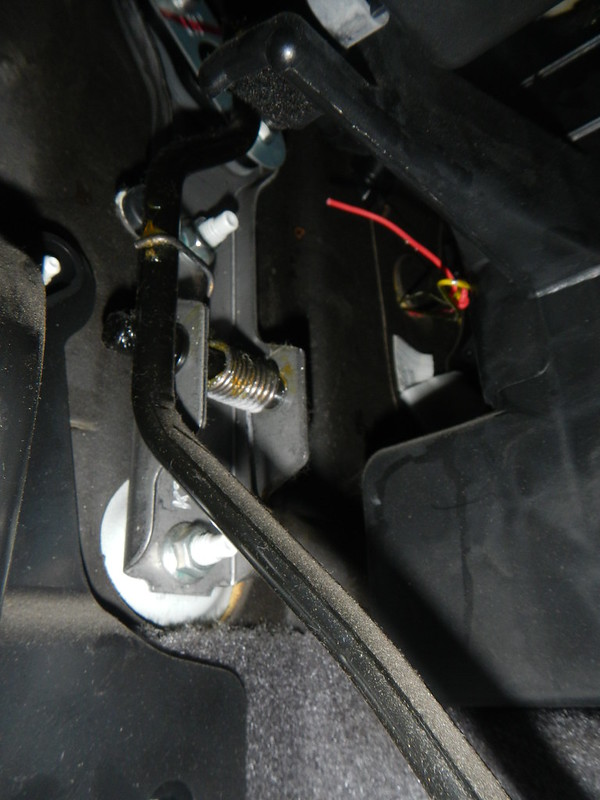
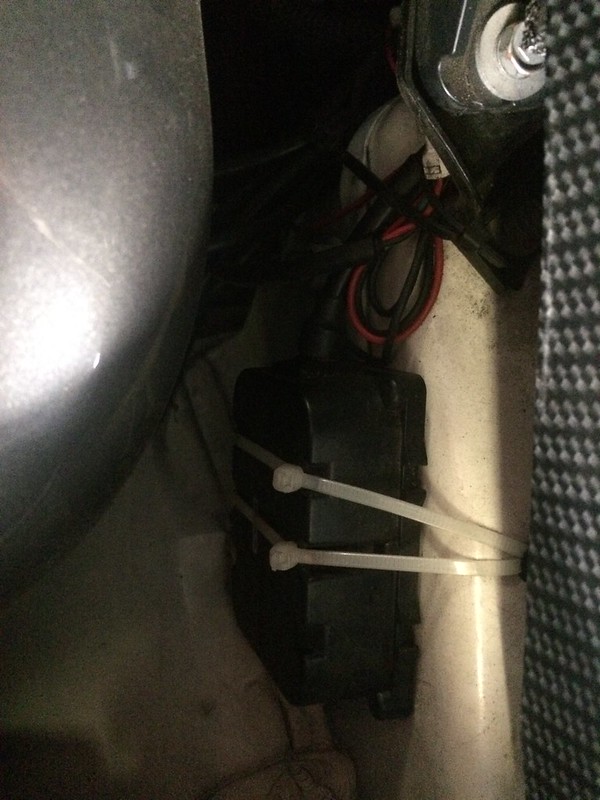
I then mounted the rear controller on the rear passenger side, using the triangle in the frame. There is a nice nook behind the frame where the controller can sit and be ziptied snug. There is also some room for airflow since the controllers get warm under operation. The first two show the original wiring and the later pics show it cleaned up later.
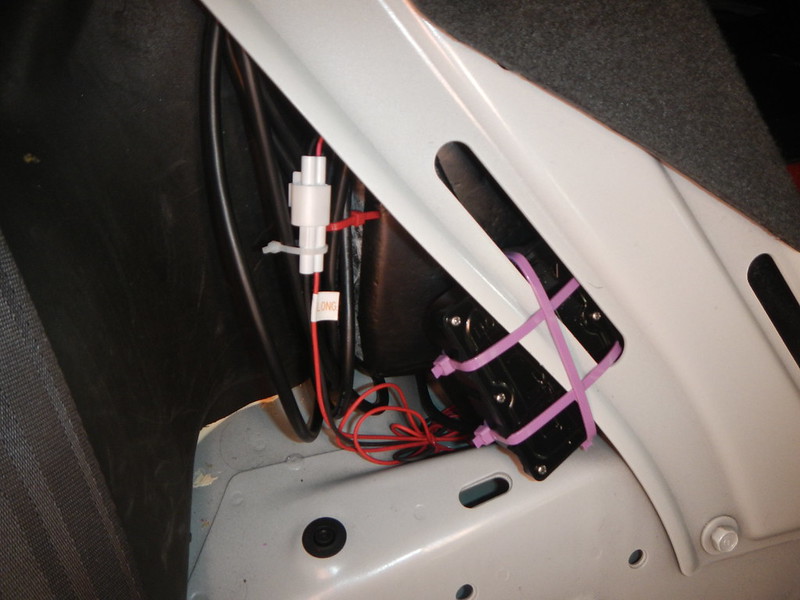
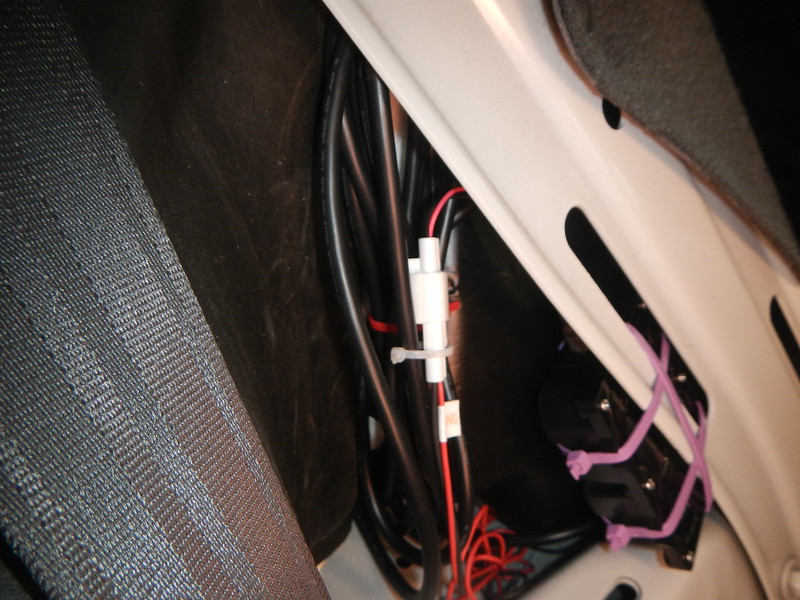
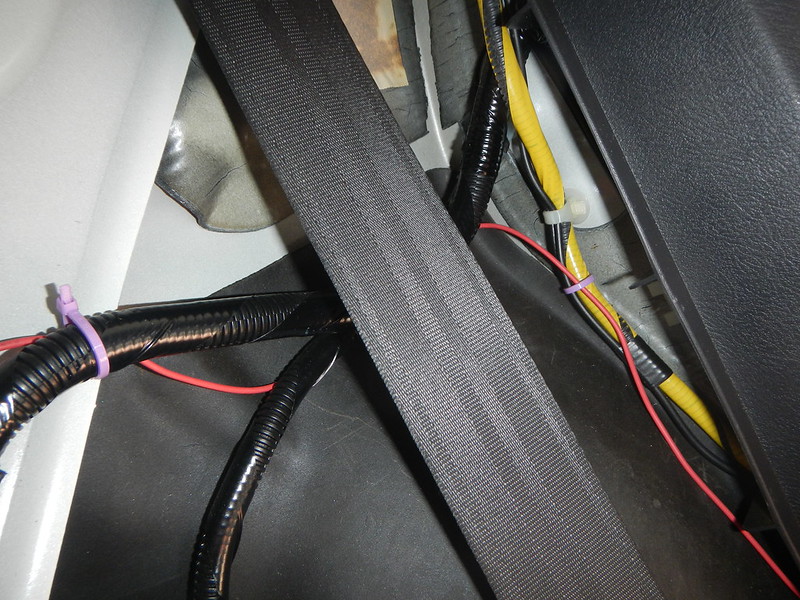
The power cord and the rear driver’s side coilover cable were run under the trunk carpet behind the seats.
THE FRONT INSTALL
The front is an easier install because the wiring doesn’t need to go far and there is better access.
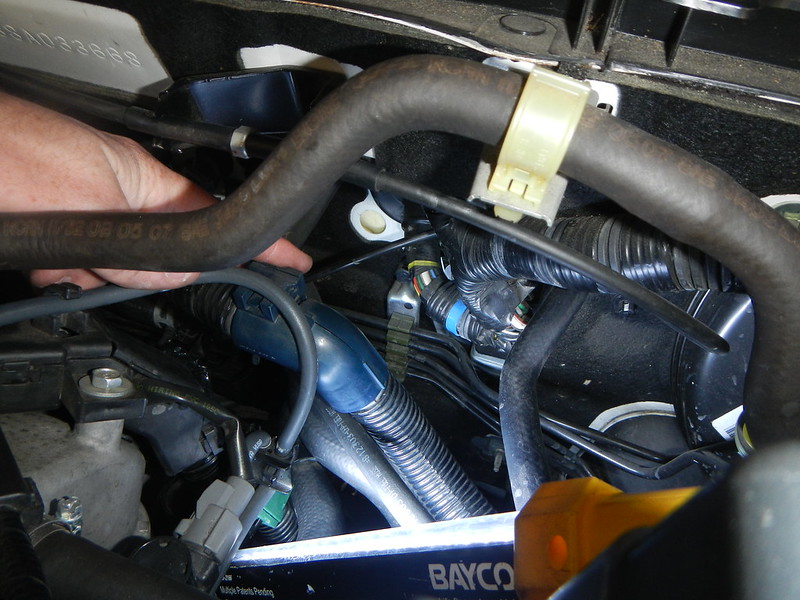
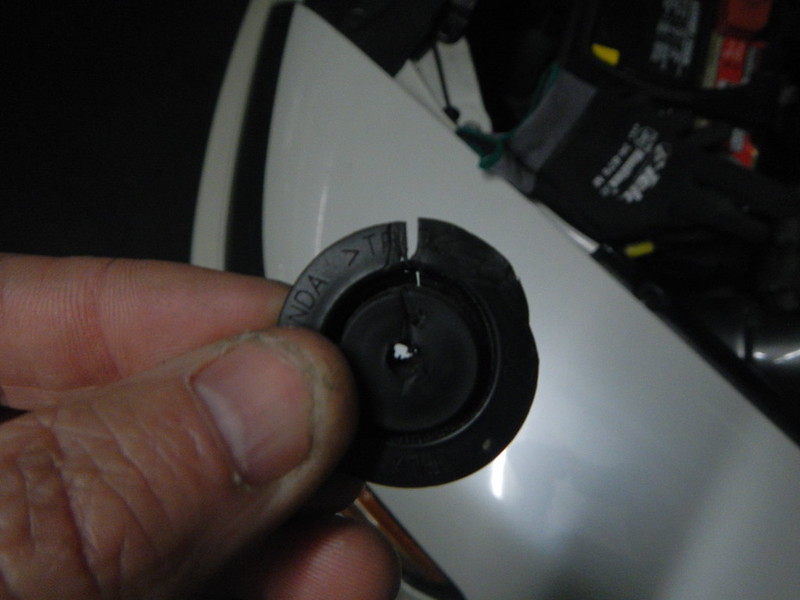
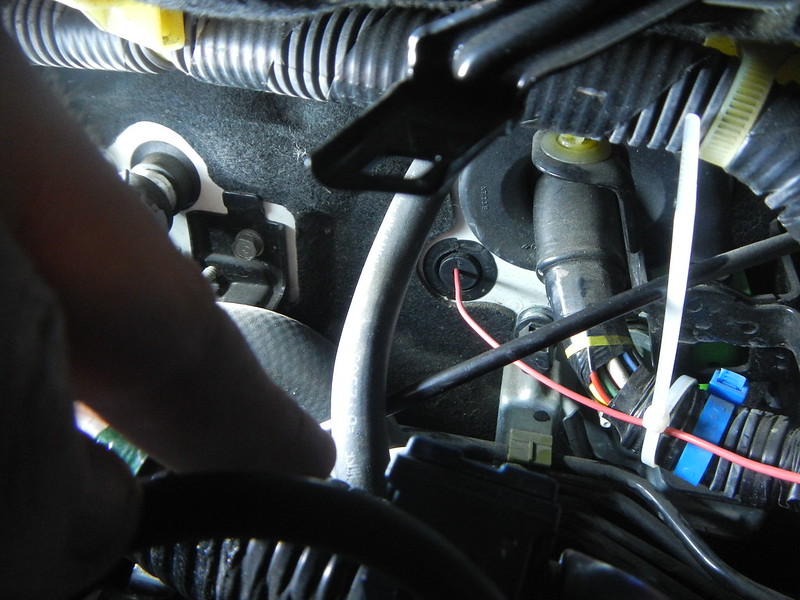
The hardest part of the front install is locating the grommet covering the hole in the firewall and routing the power wire through. The hole can be seen where the yellow foam is…this is after the grommet was removed (grommet shown later). The hole is in the very center of the engine bay

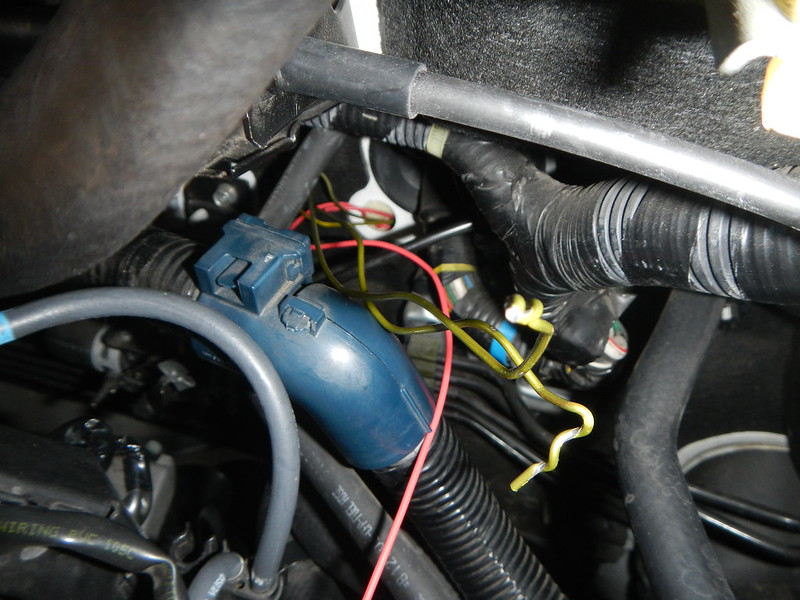
You have to cut the power cord to get it through easier and avoid tugging on the actual connectors. I cut the power cord on the engine bay side and wrapped it around a metal hanger and stuck it through the firewall. You can see where it pops up on the other side (interior of car, behind the radio/nav system). After it comes through, reconnect the wires by crimping or soldering.

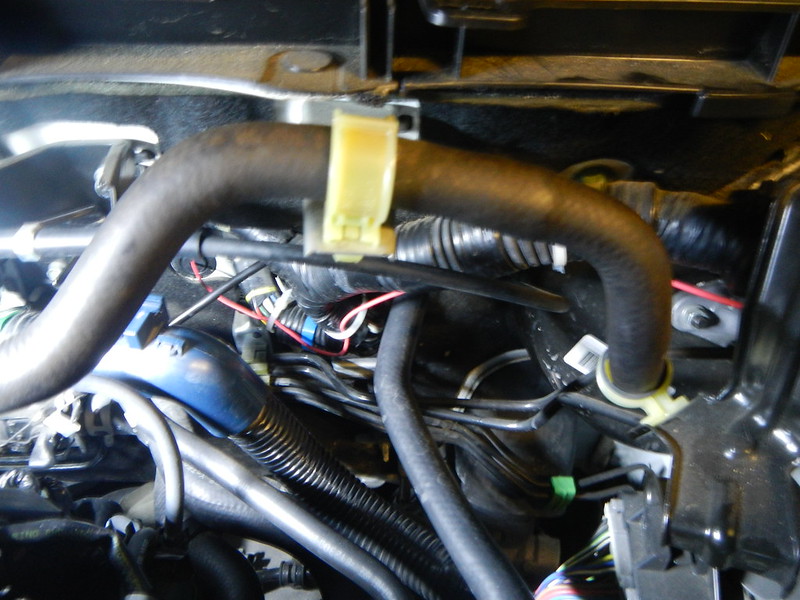
This is the grommet and the cord after going through the firewall. I cut a slit in the grommet for the wire.
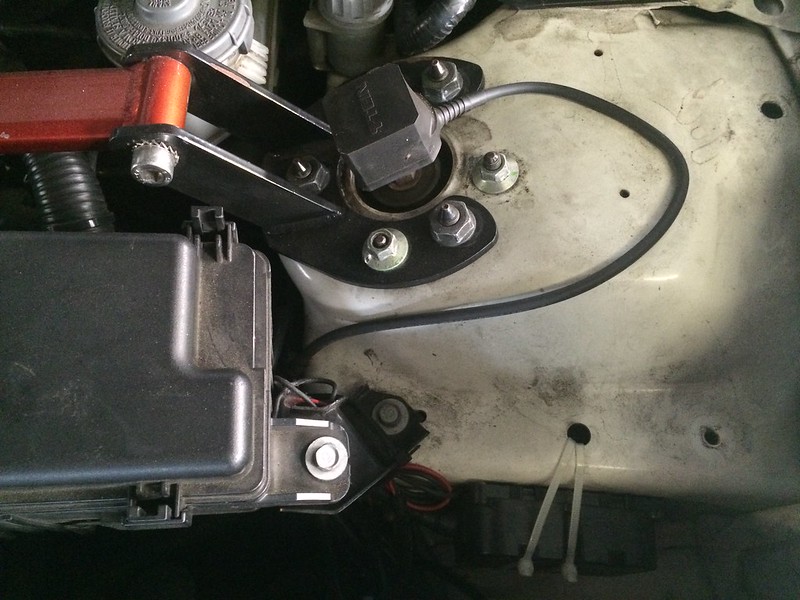
For a ground, I just chose an existing ground location next to the upper transmission mount.

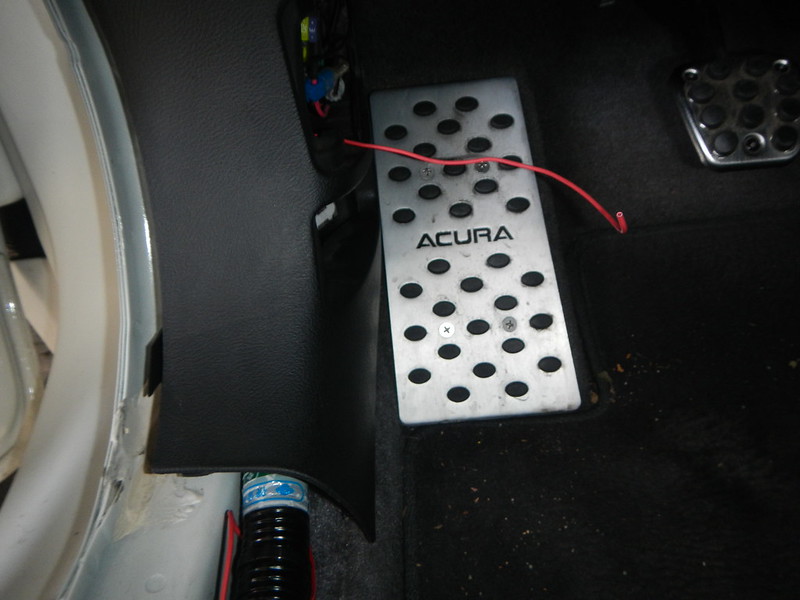
I didn’t take pictures of it, but for the coilover cables I just ran it along the accelerator cable and zip tied it to similar brackets. After I put each rubber motor cover on the motors, I sealed off the bottom of the cover with silicone sealant just to be safe. TEIN said this is not necessary unless the motors are inverted, but I figure this would keep out dust and water since this is my daily driver. I also sealed up all connectors at the point where the wires lead into the connectors.
I mounted the front driver unit next to the fuse box under the hood. It’s in an area that is not directly exposed to high temperatures or water, and so far there have been no issues. I emailed TEIN these pics and they said there shouldn’t be any problem with that location.
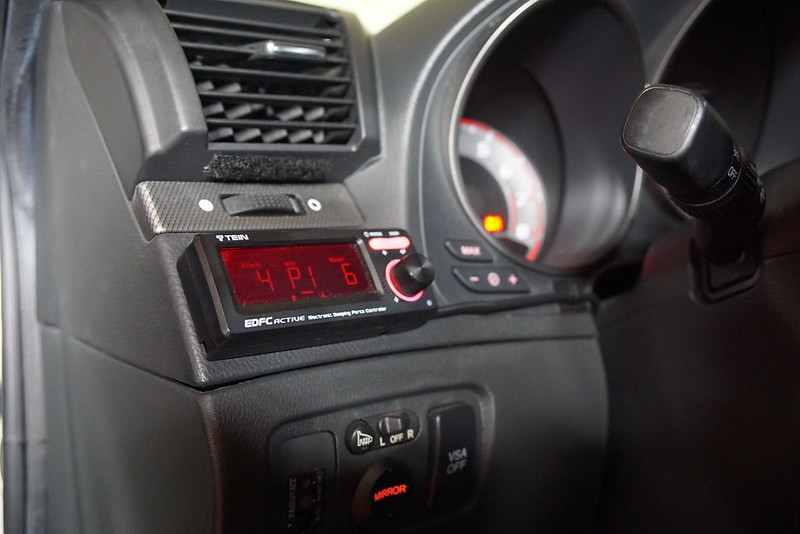
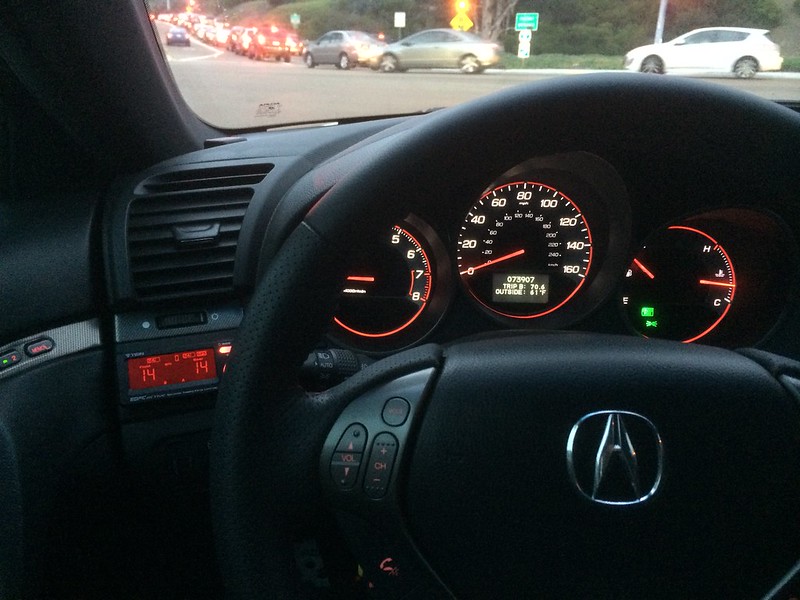
The EDFC Active kit has many different display colors, brightness levels, automatic dimming, etc, I decided to go with red to match the Type S interior. The display unit just has double sided tape and it stays on firm. I then routed the power cable and the gps cord towards the steering wheel area and under the dash. You can also see where I placed the GPS sensor, it’s the black box on the dash near the left side above the vent. It has to have a somewhat open area to link up to satellites
I also put some black Velcro under the air vent (not visible) and made my own small felt cover. I only put the cover on when I park in a sketchy area so that people can’t see the display unit when I’m not in the car. When I drive, the cover is never on, it’s in my door pocket. Just the Velcro is there all the time and it’s not noticeable since it’s on the underside of a ledge.

Last edited by thoiboi; 07-24-2017 at 01:50 PM.
 01-04-2015, 07:00 PM
#2
Safety Car
Thread Starter
iTrader: (5)
REVIEW
To determine baseline damping levels (where you start with no acceleration/braking/movement), I drove the car trying different manual settings. I ended up with the following settings:
My mode (setting G2, S2 � changes based G-forces and speed range): starts at 10 front, 10 rear and ends up at 6 front, 6 rear before accel/braking adjustments
�wife mode� (when my wife or other company is in the car and want a softer ride, setting G2, S1 � changes based on G-forces and speed range but starts softer): starts at 14 front, 14 rear and ends up at 10 front, 10 rear before accel/braking adjustments
If I want a spirited drive, I put the settings to manual and go to the preset value of 0 front, 0 rear for the stiffest setting
Things that I like:
- MANY preset options available: you can even run this in manual mode like the original EDFC kit, you just push a few buttons and it scrolls through each option.
- There are 10 manual presets and 4 dynamic presets. There�s also a combination of dynamic settings that kick in only certain sensors.
- The damping changes based on speed and acceleration, providing optimal damping based on your situation
- The motors respond very quickly (I believe it�s 250 milliseconds in my discussions with TEIN) for changing conditions
- Many display options, including color, dimming, and data presented
- Display unit is pretty small compared to the original EDFC product
- Fairly easy install
Things that could be improved:
- Side to side adjustability (available with new PRO version)
- Less motor adjustments (available with new PRO version)
- When stopped on hills, you can hear the motors moving because the sensor thinks you are accel/braking but very slowly (available with new PRO version)
- Possibility that the system could wear out faster over time (since the motors are changing the coilover damping ability pretty often). I talked to TEIN about this and they said they did studies on wear that there should be minimal impact to the life of the coilover. No issues in 1.5 years but we�ll see!
I don�t know if the extra $200 or so for the PRO version is worth it since the current kit is already pretty expensive (about 600 for motors and EDFC kit)
Overall�.a GREAT upgrade and one of the top 3 that I�ve done to my car!! It is expensive but I have no regrets that I made this purchase, it makes my daily driver that much more fun (and comfortable) to drive. Let me know if anyone has any questions!
The following 8 users liked this post by sockr1:
4drviper (01-06-2015),
ATLS15 (01-14-2017),
bluetl04 (03-07-2015),
cokorote (01-08-2015),
Corey_Straker (01-08-2015),
and 3 others liked this post.


The following users liked this post:
T�rk (01-10-2018)
01-09-2015, 12:19 AM
#6
Safety Car
Thread Starter
iTrader: (5)
when i added the rv6 strut bar, i had to cut off/dremel some of the interference areas on the engine covers to make it fit. nothing major but i did do a little bit of work to make them fit. the problem area is at the right side of the strut bar. you can see in this pic that the cover is raised a little bit but all the tabs are locked in so it's not going anywhere. here's how my engine bay sits:

Trending Topics
01-22-2015, 11:45 PM
#8
Very well done and clean install. The Velcro cover to hide the display is nice touch.
However, it is always disappointing to see people getting screwed by sellers of products. Seems to happen all the time.
Your wife shouldn't MAKE you do anything you don't want to.
However, it is always disappointing to see people getting screwed by sellers of products. Seems to happen all the time.
Your wife shouldn't MAKE you do anything you don't want to.
The following users liked this post:
1fstTL (06-12-2015)
06-06-2015, 04:58 PM
#11
Safety Car
Thread Starter
iTrader: (5)
Those are hydro dipped engine bay covers, done locally by some marines out of their garage. You lay a sheet of any paint or paint design in a tank of water, and then press the item into the sheet. The water evenly pressurizes the paint over the item and then you clear coat it after. Usually pretty expensive but they gave me a deal and I thought it was pretty unique. I did a lot of prep work before that though
06-06-2015, 05:07 PM
#12
Thanks!!
Those are hydro dipped engine bay covers, done locally by some marines out of their garage. You lay a sheet of any paint or paint design in a tank of water, and then press the item into the sheet. The water evenly pressurizes the paint over the item and then you clear coat it after. Usually pretty expensive but they gave me a deal and I thought it was pretty unique. I did a lot of prep work before that though
Those are hydro dipped engine bay covers, done locally by some marines out of their garage. You lay a sheet of any paint or paint design in a tank of water, and then press the item into the sheet. The water evenly pressurizes the paint over the item and then you clear coat it after. Usually pretty expensive but they gave me a deal and I thought it was pretty unique. I did a lot of prep work before that though
Pretty slick. Nice work.
I'm also seriously considering this suspension set up as well. How's it been working out? And do you have harsh winters where you live? Before I drop $1500+ ...just wanted to ensure reliably, and resilience to harsh conditions. I live in the Northeast, and we don't exactly have easy going winters.
06-17-2015, 05:56 AM
#13
Safety Car
Thread Starter
iTrader: (5)
Pretty slick. Nice work.
I'm also seriously considering this suspension set up as well. How's it been working out? And do you have harsh winters where you live? Before I drop $1500+ ...just wanted to ensure reliably, and resilience to harsh conditions. I live in the Northeast, and we don't exactly have easy going winters.
I'm also seriously considering this suspension set up as well. How's it been working out? And do you have harsh winters where you live? Before I drop $1500+ ...just wanted to ensure reliably, and resilience to harsh conditions. I live in the Northeast, and we don't exactly have easy going winters.
06-13-2016, 08:12 PM
#14
Advanced

Join Date: Mar 2008
Age: 46
Posts: 92
Likes: 0
Received 0 Likes
on
0 Posts
sockr1
I think I was sent the wrong motors as well... I ordered the motor kit EDK05-10100 but they don't seem to fit properly. I removed the top, removed the inner 3mm allen screw, replaced it with the bronze 3mm screw so it was flush, when I attempt to put the motor on, it will not grab on to the top of the coil overs. Did you do anything differently than I described?
I not sure if you looked at your part number on the bottom of the motor or not, the set that I have read EDC01-K1466
Waiting to hear back from Excelerate Performance but since they are closed for the day I was hoping you or someone on here would know.
Thanks in advance.
06-14-2016, 09:44 AM
#15
Safety Car
Thread Starter
iTrader: (5)
sockr1
I think I was sent the wrong motors as well... I ordered the motor kit EDK05-10100 but they don't seem to fit properly. I removed the top, removed the inner 3mm allen screw, replaced it with the bronze 3mm screw so it was flush, when I attempt to put the motor on, it will not grab on to the top of the coil overs. Did you do anything differently than I described?
I not sure if you looked at your part number on the bottom of the motor or not, the set that I have read EDC01-K1466
Waiting to hear back from Excelerate Performance but since they are closed for the day I was hoping you or someone on here would know.
Thanks in advance.
I think I was sent the wrong motors as well... I ordered the motor kit EDK05-10100 but they don't seem to fit properly. I removed the top, removed the inner 3mm allen screw, replaced it with the bronze 3mm screw so it was flush, when I attempt to put the motor on, it will not grab on to the top of the coil overs. Did you do anything differently than I described?
I not sure if you looked at your part number on the bottom of the motor or not, the set that I have read EDC01-K1466
Waiting to hear back from Excelerate Performance but since they are closed for the day I was hoping you or someone on here would know.
Thanks in advance.
also you do not need the motor extension kit to install the motors and use edfc.
06-18-2017, 03:03 PM
#18
K-Fed's Stunt Double
hey sock,
first off: thank you for your tutorial. i have had my EDFC wiring harness for over ten years, and can appreciate a thorough DIY as you've provided since it is a non-trivial thing to do (i was lucky my dealership, the same south-side one i've bashed in recent posts, came through on the installation--and warranteed it!)
i have a question about your active/active pro wiring harness compared to the "regular" EDFC kit.
if i understand correctly, the motor mounts for the active pro/active/regular EDFC are all the same, so i was hoping to get some clarification as to what changes if i want to switch to an active pro EDFC.
my wiring harness connectors for the motors look the same, so i am planning to buy a set of motors and the controller in the near-future (hopefully an active pro).
i did notice that, instead of wiring the motors via harness into the controller directly, the active pro/active controllers seem to allow them to connect to those black boxes which then communicate wirelessly with the motors.
is there any difference in the actual wiring harness that runs from the motors to the area where the controller is? it seems the same but i wanted to be sure.
- like, my wiring harness looks the same as yours but i can't see the little red power cable the way you have near the motors. i am pretty sure my kit never had that separate wire and i'm wondering if that's just for the GPS addon (which i do not plan to get)
Last edited by broly; 06-18-2017 at 03:08 PM. Reason: just providing a little more info; don't think i have the red wire that's different from the motor mount wires edit2:removing excess 'the'
06-19-2017, 09:48 AM
#19
Safety Car
Thread Starter
iTrader: (5)
hey sock,
first off: thank you for your tutorial. i have had my EDFC wiring harness for over ten years, and can appreciate a thorough DIY as you've provided since it is a non-trivial thing to do (i was lucky my dealership, the same south-side one i've bashed in recent posts, came through on the installation--and warranteed it!)
i have a question about your active/active pro wiring harness compared to the "regular" EDFC kit.
if i understand correctly, the motor mounts for the active pro/active/regular EDFC are all the same, so i was hoping to get some clarification as to what changes if i want to switch to an active pro EDFC.
my wiring harness connectors for the motors look the same, so i am planning to buy a set of motors and the controller in the near-future (hopefully an active pro).
i did notice that, instead of wiring the motors via harness into the controller directly, the active pro/active controllers seem to allow them to connect to those black boxes which then communicate wirelessly with the motors.
is there any difference in the actual wiring harness that runs from the motors to the area where the controller is? it seems the same but i wanted to be sure.
first off: thank you for your tutorial. i have had my EDFC wiring harness for over ten years, and can appreciate a thorough DIY as you've provided since it is a non-trivial thing to do (i was lucky my dealership, the same south-side one i've bashed in recent posts, came through on the installation--and warranteed it!)
i have a question about your active/active pro wiring harness compared to the "regular" EDFC kit.
if i understand correctly, the motor mounts for the active pro/active/regular EDFC are all the same, so i was hoping to get some clarification as to what changes if i want to switch to an active pro EDFC.
my wiring harness connectors for the motors look the same, so i am planning to buy a set of motors and the controller in the near-future (hopefully an active pro).
i did notice that, instead of wiring the motors via harness into the controller directly, the active pro/active controllers seem to allow them to connect to those black boxes which then communicate wirelessly with the motors.
is there any difference in the actual wiring harness that runs from the motors to the area where the controller is? it seems the same but i wanted to be sure.
- like, my wiring harness looks the same as yours but i can't see the little red power cable the way you have near the motors. i am pretty sure my kit never had that separate wire and i'm wondering if that's just for the GPS addon (which i do not plan to get)
- the motors are the same for normal EDFC and this kit
- the black boxes communicate via wireless to the controller. they are hard wired to the motors. if you do not have the black boxes, you cannot use the edfc active main controller
- the red cable gives you power for the wireless black boxes and the motors
- if you get the edfc active, i highly recommend you get the gps add on. it's one of the best features because you can have your car be on soft settings for slow speeds and stiffen up as you go faster. for example you could be almost full soft under 15mph but then have it ramp up as you gain speed and provide that suspension stability. i think it's like $75 which is nothing if you are buying a $600 system
- the gps add on is just that tiny square box that i have on my dash and it connects via hard wire to the main controller on the dash
let me know if you have more questions!
The following users liked this post:
broly (06-19-2017)
06-19-2017, 11:52 AM
#20
K-Fed's Stunt Double
thanks for the compliments, write ups take time but if it can help out one person it was worth it!
- the motors are the same for normal EDFC and this kit
- the black boxes communicate via wireless to the controller. they are hard wired to the motors. if you do not have the black boxes, you cannot use the edfc active main controller
- the red cable gives you power for the wireless black boxes and the motors
- if you get the edfc active, i highly recommend you get the gps add on. it's one of the best features because you can have your car be on soft settings for slow speeds and stiffen up as you go faster. for example you could be almost full soft under 15mph but then have it ramp up as you gain speed and provide that suspension stability. i think it's like $75 which is nothing if you are buying a $600 system
- the gps add on is just that tiny square box that i have on my dash and it connects via hard wire to the main controller on the dash
let me know if you have more questions!
- after looking closer, now i see what you did. you pretty much tucked the black box in engine bay and somewhere in the back, and ran the little red wire it needs for power through the firewall (instead of running the motor wires through, which are thicker)
- since i have a "hole" in my firewall already from my regular motor mount wires going to the regular edfc controller, i think i should be able to keep the black boxes inside the vehicle, under the dash (may take some planning/coordinating, but it should)
i do believe though, that the wiring harnesses are the same for the active pro and the normal (when we are talking about the wiring from the motors to the controller)
- correct me if i'm wrong here, because i see that hte motor mount wiring connector hasn't changed.
- so it seems that red wire and the black boxes would be the new wrinkle, where i'd have my black boxes inside the car since the motor mount connector harness (from my regular) already has them under my dashboard
- again, do correct me if i'm wrong
- so it seems that red wire and the black boxes would be the new wrinkle, where i'd have my black boxes inside the car since the motor mount connector harness (from my regular) already has them under my dashboard
this is delighting information. now that i know the difference in our setups, which is/are:
- your design choice of having the black boxes "outside" the dash lead to you running the power cable, making the cabin wiring certainly neater
- my installer's design choice of running the motor wires through the firewall (no active pro existed at the time), means i'd have to keep the black boxes inside and jerry-rig the power
thanks again man.
 06-20-2017, 09:41 AM
#22
Safety Car
Thread Starter
iTrader: (5)
ahhhh i see, the red wires are to power the wireless module (black boxes)! makes sense.
i do believe though, that the wiring harnesses are the same for the active pro and the normal (when we are talking about the wiring from the motors to the controller)
this is delighting information. now that i know the difference in our setups, which is/are:
thanks again man.
- after looking closer, now i see what you did. you pretty much tucked the black box in engine bay and somewhere in the back, and ran the little red wire it needs for power through the firewall (instead of running the motor wires through, which are thicker)
- since i have a "hole" in my firewall already from my regular motor mount wires going to the regular edfc controller, i think i should be able to keep the black boxes inside the vehicle, under the dash (may take some planning/coordinating, but it should)
i do believe though, that the wiring harnesses are the same for the active pro and the normal (when we are talking about the wiring from the motors to the controller)
- correct me if i'm wrong here, because i see that hte motor mount wiring connector hasn't changed.
- so it seems that red wire and the black boxes would be the new wrinkle, where i'd have my black boxes inside the car since the motor mount connector harness (from my regular) already has them under my dashboard
- again, do correct me if i'm wrong
- so it seems that red wire and the black boxes would be the new wrinkle, where i'd have my black boxes inside the car since the motor mount connector harness (from my regular) already has them under my dashboard
this is delighting information. now that i know the difference in our setups, which is/are:
- your design choice of having the black boxes "outside" the dash lead to you running the power cable, making the cabin wiring certainly neater
- my installer's design choice of running the motor wires through the firewall (no active pro existed at the time), means i'd have to keep the black boxes inside and jerry-rig the power
thanks again man.
for the power wires, i added an "add a fuse" to each power wire and then used those fuses to piggy back on 3 different fuses in the fuse box. if you haven't used one before, look them up they are really helpful in adding more electronics safely. make sure you use 3 different fuse locations as there were issues from some other users that blew fuses when they tied all 3 power wires into the same fuse.
03-28-2018, 11:24 AM
#25
Thanks for nice write up. I have also installed this set to my 2008 KB1.
Have you updated the controller from EDFC Active to ActivePRO?
Have you updated the controller from EDFC Active to ActivePRO?
03-28-2018, 07:00 PM
#26
Safety Car
Thread Starter
iTrader: (5)
youre welcome! I didn�t ever upgrade because it wasn�t worth the cost to me. I�m trying to hold off on more mods for now because I will be selling my car in about 2 years or so.
06-02-2018, 08:52 PM
#27
4th Gear

Join Date: Mar 2018
Age: 39
Posts: 4
Likes: 0
Received 0 Likes
on
0 Posts
i understand this is an old post...i'm in a process of finishing EDFC install...ran into few issues (wiring through firewall, mounting front driver unit, and tucking wires in the hood for motors) any input other than the great detailed DIY post.
Thanks in advance
Thanks in advance
06-03-2018, 12:04 AM
#29
4th Gear
Join Date: Mar 2018
Age: 39
Posts: 4
Likes: 0
Received 0 Likes
on
0 Posts
im installing this kit on 2006 Base TL 6-MT
I was able to install rear motors and the driver with minimal issue.
However, front of the car almost have me giving up...i was able to jerry rig it but my concern is longevity of the wires underneath the hood.
1.) cant seem to fish power wire through the firewall for front motor driver. So i connected the power wire directly to the battery (temporary solution)
Thinking about tapping into front fuse box attaching �add-a-circuit� fuse
2.) good place to mount the front motors driver.
what do you have it zip-tied to?
There�s no through whole underneath fuse box
3.) motor-wires are behind and away from the engine in a conduit.
I test drove it for 10-15mins today...as you already know that place gets hot.
My concern driving in long rush hour commute in 100+ Texas weather. wires/connectors might melt.
Question for you:
how and where do you have your�s run from one motor to another?
Also, I see you have EDFC compatible strut mount bar...where did you mount all the wires that were mounted onto the stock strut-mount bar?

Thread
Thread Starter
Forum
Replies
Last Post
cycdaniel
1G TSX Performance Parts & Modifications
8
12-17-2019 10:58 AM
BoricuaTL
Car Parts for Sale
138
04-08-2016 01:08 PM
handsom-hustla
Car Parts for Sale
70
11-13-2015 05:04 PM
Skirmich
2G TL (1999-2003)
37
09-15-2015 06:41 PM