Window Regulator Replacement DIY
 02-07-2010, 05:48 PM
#1
CL in lawnmower status
Thread Starter
Window Regulator Replacement DIY
credit goes to BOBUTLER for the original write up and pics, and for starboy2nv for providing the link for it for a while
now that the website is down, i'm just gonna copy it back up here, since i copied all the writing/pics off of the website before
The Acura CL forum as been a wonderful resource for me, so I figure it's only right to give back by documenting my window regulator replacement. I am not the most mechanically inclined guy, but have learned over the years that with patience, forethought, (and the forum) I can surprise myself and actually fix something. It's satisfying, and nice to avoid being ripped off by the dealer.
Window Regulator Replacement - Driver's Side
6/3/05
A quick search on the Acura CL forum makes it clear that these go out a lot. This DIY was done on my '99 Acura CL 3.0. Some say this is a 30 minute job, and I might be able to accomplish that now that I know how. If you're not too confident, take your time and allow a couple of hours, maybe more for bandaids and beverages.
Parts: I got mine on eBay from "am-autoparts" seller for $37.95 plus $15 shipping. UPS shipping was 5 days across the country. It was listed as driver's side for a 94-97 Accord 2-door. A few concerns: It is slower up than my previous motor, by about 1 second. The one-click auto-down (driver's side) no longer works. There is a clanking sound when the motor activates which was not present before.
Step 1 - Remove / Drop Plastic Sheeting:
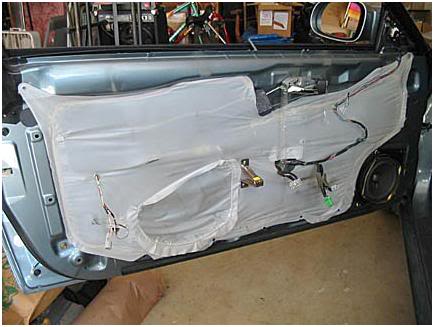
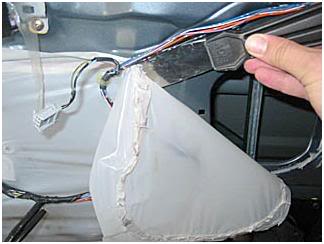
I was worried about removing the white plastic sheeting, but it was not a problem. I understand the sheet is an important moisture barrier that should be retained. I used a metal putty blade to slowly separate it (and the goopy sealant) from the door skin. The sealant remained flexible and worked just fine for re-attaching the sheeting. I only removed the sheeting from the areas I needed to access, and let it dangle down. The sealant is sticky, so watch out. There is a fastener holding the sheeting at each corner of the door. Some wiring harness retaining clips go through it, so I removed them with my putty blade and needle nose pliers. There is also an arm-rest bracket (pictured) that I removed (2 screws) in order to move the sheet. I immediately re-installed this, just to keep track of the screws and where it was supposed to go.
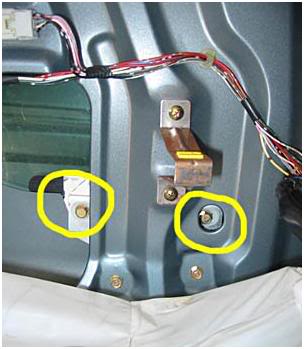
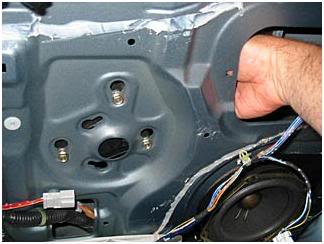
Step 2 - Identify the Regulator Bolts (4 in yellow circles), Motor Bolts (3 in squares), and Window Lift Bolts (2 yellow arrows). All are 10mm:
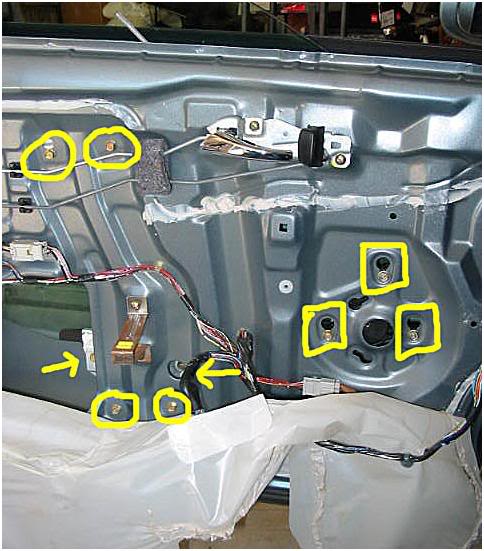
The window lift is the part of the regulator that attaches to the window with 2 bolts. Access to the right bolt is through a round hole in the door skin (right yellow arrow). Thus, the lift (and window) must be positioned so you can get at the bolt through this hole.
Step 3 - Position the Window:
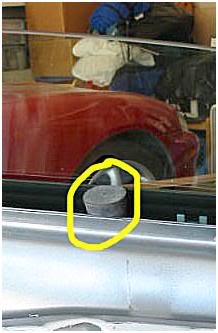
From the big opening, you should be able to lift up the window to position the lift bolts for access. Some have suggested using a piece of wood to prop up the window from inside the door (I couldn't find a piece the right size), others have used wooden wedges between the window and top of window sill (I couldn't find any suitable wedges either). I had good success with a rubber stopper in the window sill. Make sure you get the window firmly stopped - you don't want it dropping down and breaking!
Step 4 - Remove Window Lift Bolts - 2, 10mm.
Step 5 - Raise the Window all the way Up:
The hardware will be easier to remove if the window is out of the way. Carefully raise it up and re-position whatever stopper you are using.
Step 6 - Remove Regulator Bolts - 4, 10mm.
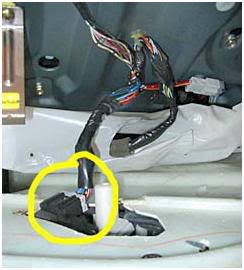
Step 7 - Disconnect Motor Wiring Plug and Harness Clip:
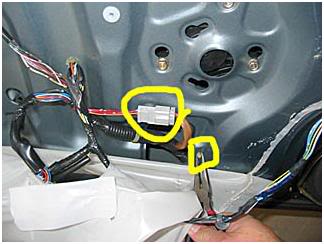
This wiring plug is easy to reach and disconnect (unlike some in the door panel removal). Notice the little harness clip coming through from the inside of the door skin (yellow square in photo). I used needle nose pliers to compress and push this clip through to the inside (where it remains attached to the motor harness). My replacement regulator/motor had this clip already attached.
Step 8 - Loosen 3 Motor Bolts.
Step 9 - Remove Regulator and Motor:
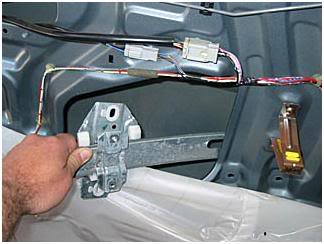
You can jiggle the regulator around and remove it from the large opening. It's cables will be attached to the motor, so you can only get it out so far.
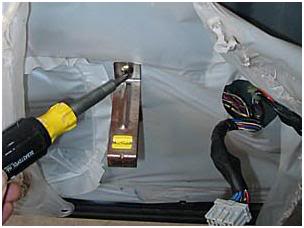
Because the motor bolt holes in the door skin are "slotted," you can just loosen the bolts. The photo shows access through the hole to the right of the motor. When you're ready, you can reach in, and lift up the motor. Put your other arm in the big opening from the left, and meet the motor inside the door, and pull it out the big opening.
Remember to save all the bolts for the new hardware.
Step 10 - Insert and Install New Regulator and Motor:
This is basically the reverse of what you just did. If you pre-attach the 3 motor bolts and leave them loose, you can hook the motor into its location from the inside and then tighten the bolts. Connect the motor wiring harness and get that inside clip positioned and punched through. Positioning the window regulator and re-attaching the 4 bolts is a snap. I sensed that these bolts could be stripped if over-tighened, so I didn't overdo it.
Note: I was a bit concerned about binding, and did not fully tighten the regulator bolts until after step 13, just to let the hardware position itself. I'm not sure this was necessary.
Step 11 - If necessary, hook up the power window harness and position the window lift:
Looking from the top, you see the door skin and the inside of the door panel, with the power window harness re-connected.
My new regulator lift was not in the right position to line up the bolts, and I could not move it by hand. I had to bring the door panel over and hook up the power window harness, and then use the switch to position the lift. Then, unhook the harness, of course, and get back to the job at hand.
Step 12 - Lower the window by hand, Install the lift bolts:
Remove your stopper and line up the window with the lift bolts. I found that the window rested securely on the lift, and did not need any other support while the bolts were installed. Again, I don't think the bolts want to be over tightened.
Step 13 - Test the window by re-attaching the switch from the panel.
(Does your one-touch down still work? Mine didn't.)
If you waited to tighten the 4 regulator bolts, tighten them now.
Step 14 - Re-install the Door Panel:
(I have a DIY in the works for this . . . check back ;-)
Step 15 - Pat yourself on the pack, boast loudly to your family and friends, run the window up and down until you're sick of it, and then do something fun with that $300 you didn't pay to the dealer service!
now that the website is down, i'm just gonna copy it back up here, since i copied all the writing/pics off of the website before
The Acura CL forum as been a wonderful resource for me, so I figure it's only right to give back by documenting my window regulator replacement. I am not the most mechanically inclined guy, but have learned over the years that with patience, forethought, (and the forum) I can surprise myself and actually fix something. It's satisfying, and nice to avoid being ripped off by the dealer.
Window Regulator Replacement - Driver's Side
6/3/05
A quick search on the Acura CL forum makes it clear that these go out a lot. This DIY was done on my '99 Acura CL 3.0. Some say this is a 30 minute job, and I might be able to accomplish that now that I know how. If you're not too confident, take your time and allow a couple of hours, maybe more for bandaids and beverages.
Parts: I got mine on eBay from "am-autoparts" seller for $37.95 plus $15 shipping. UPS shipping was 5 days across the country. It was listed as driver's side for a 94-97 Accord 2-door. A few concerns: It is slower up than my previous motor, by about 1 second. The one-click auto-down (driver's side) no longer works. There is a clanking sound when the motor activates which was not present before.
Step 1 - Remove / Drop Plastic Sheeting:
I was worried about removing the white plastic sheeting, but it was not a problem. I understand the sheet is an important moisture barrier that should be retained. I used a metal putty blade to slowly separate it (and the goopy sealant) from the door skin. The sealant remained flexible and worked just fine for re-attaching the sheeting. I only removed the sheeting from the areas I needed to access, and let it dangle down. The sealant is sticky, so watch out. There is a fastener holding the sheeting at each corner of the door. Some wiring harness retaining clips go through it, so I removed them with my putty blade and needle nose pliers. There is also an arm-rest bracket (pictured) that I removed (2 screws) in order to move the sheet. I immediately re-installed this, just to keep track of the screws and where it was supposed to go.
Step 2 - Identify the Regulator Bolts (4 in yellow circles), Motor Bolts (3 in squares), and Window Lift Bolts (2 yellow arrows). All are 10mm:
The window lift is the part of the regulator that attaches to the window with 2 bolts. Access to the right bolt is through a round hole in the door skin (right yellow arrow). Thus, the lift (and window) must be positioned so you can get at the bolt through this hole.
Step 3 - Position the Window:
From the big opening, you should be able to lift up the window to position the lift bolts for access. Some have suggested using a piece of wood to prop up the window from inside the door (I couldn't find a piece the right size), others have used wooden wedges between the window and top of window sill (I couldn't find any suitable wedges either). I had good success with a rubber stopper in the window sill. Make sure you get the window firmly stopped - you don't want it dropping down and breaking!
Step 4 - Remove Window Lift Bolts - 2, 10mm.
Step 5 - Raise the Window all the way Up:
The hardware will be easier to remove if the window is out of the way. Carefully raise it up and re-position whatever stopper you are using.
Step 6 - Remove Regulator Bolts - 4, 10mm.
Step 7 - Disconnect Motor Wiring Plug and Harness Clip:
This wiring plug is easy to reach and disconnect (unlike some in the door panel removal). Notice the little harness clip coming through from the inside of the door skin (yellow square in photo). I used needle nose pliers to compress and push this clip through to the inside (where it remains attached to the motor harness). My replacement regulator/motor had this clip already attached.
Step 8 - Loosen 3 Motor Bolts.
Step 9 - Remove Regulator and Motor:
You can jiggle the regulator around and remove it from the large opening. It's cables will be attached to the motor, so you can only get it out so far.
Because the motor bolt holes in the door skin are "slotted," you can just loosen the bolts. The photo shows access through the hole to the right of the motor. When you're ready, you can reach in, and lift up the motor. Put your other arm in the big opening from the left, and meet the motor inside the door, and pull it out the big opening.
Remember to save all the bolts for the new hardware.
Step 10 - Insert and Install New Regulator and Motor:
This is basically the reverse of what you just did. If you pre-attach the 3 motor bolts and leave them loose, you can hook the motor into its location from the inside and then tighten the bolts. Connect the motor wiring harness and get that inside clip positioned and punched through. Positioning the window regulator and re-attaching the 4 bolts is a snap. I sensed that these bolts could be stripped if over-tighened, so I didn't overdo it.
Note: I was a bit concerned about binding, and did not fully tighten the regulator bolts until after step 13, just to let the hardware position itself. I'm not sure this was necessary.
Step 11 - If necessary, hook up the power window harness and position the window lift:
Looking from the top, you see the door skin and the inside of the door panel, with the power window harness re-connected.
My new regulator lift was not in the right position to line up the bolts, and I could not move it by hand. I had to bring the door panel over and hook up the power window harness, and then use the switch to position the lift. Then, unhook the harness, of course, and get back to the job at hand.
Step 12 - Lower the window by hand, Install the lift bolts:
Remove your stopper and line up the window with the lift bolts. I found that the window rested securely on the lift, and did not need any other support while the bolts were installed. Again, I don't think the bolts want to be over tightened.
Step 13 - Test the window by re-attaching the switch from the panel.
(Does your one-touch down still work? Mine didn't.)
If you waited to tighten the 4 regulator bolts, tighten them now.
Step 14 - Re-install the Door Panel:
(I have a DIY in the works for this . . . check back ;-)
Step 15 - Pat yourself on the pack, boast loudly to your family and friends, run the window up and down until you're sick of it, and then do something fun with that $300 you didn't pay to the dealer service!

The following 3 users liked this post by mitch14:
02-08-2010, 03:07 PM
#3
Senior Moderator
Regional Coordinator
(Mid-Atlantic)
Regional Coordinator
(Mid-Atlantic)
iTrader: (6)
Thanks for rehosting Mitch 
03-19-2010, 12:09 AM
#4
Land of Pleasant Living
Join Date: Sep 2005
Posts: 2,619
Likes: 0
Received 0 Likes
on
0 Posts
Hey guys, I just did this yet again, but the one I bought this time gave me back my 1 touch down feature! I had been without it for the longest time.
I can't speak to how long this thing lasts, but it was 40 bucks shipped, and gave me back 1-touch.
It is part number 741-715 from partsman888 on ebay.
Here's a link to an example, but it will probably not work once the auction ends.
http://cgi.ebay.com/ebaymotors/NEW-9...item414c4f7733
I can't speak to how long this thing lasts, but it was 40 bucks shipped, and gave me back 1-touch.
It is part number 741-715 from partsman888 on ebay.
Here's a link to an example, but it will probably not work once the auction ends.
http://cgi.ebay.com/ebaymotors/NEW-9...item414c4f7733
06-17-2010, 08:31 AM
#6
Senior Moderator
Regional Coordinator
(Mid-Atlantic)
Regional Coordinator
(Mid-Atlantic)
iTrader: (6)
The cable connected to the regulator snapped
Trending Topics
06-17-2010, 11:36 AM
#8
Senior Moderator
Regional Coordinator
(Mid-Atlantic)
Regional Coordinator
(Mid-Atlantic)
iTrader: (6)
This is it, you have to replace the reg
07-17-2010, 11:30 AM
#10
Sanest Florida Man
 Thanks for reposting this! This better be the last time I have to do this! This is my 3rd time in 2 years changing this, I spent $100 for the part this time from Advance Auto Parts it should be better than the cheap eBay parts I was getting.
07-27-2010, 12:49 AM
Thanks for reposting this! This better be the last time I have to do this! This is my 3rd time in 2 years changing this, I spent $100 for the part this time from Advance Auto Parts it should be better than the cheap eBay parts I was getting.
07-27-2010, 12:49 AM
#12
Safety Car

Join Date: May 2004
Location: Somewhere in Denver, CO
Age: 39
Posts: 4,447
Likes: 0
Received 1 Like
on
1 Post
God, after I replaced my window regulator 3+ years ago my driver side door has had a rattle that drives me crazy. I've taken the panel off several times trying to fix it to no avail. Any suggestions?
 09-02-2010, 05:47 PM
#14
Instructor

Join Date: Oct 2007
Location: N/A
Age: 39
Posts: 114
Likes: 0
Received 0 Likes
on
0 Posts
my window is really STUCK down, like, i can't raise it to get to the bolts to disconnect the regulator. what do i do? it's in its tracks, but the regulator died and i need to replace it, but it's not just sliding up when i pull on it. HALP
09-18-2010, 02:46 PM
#15
Racer
my driver windows goes up and down fine when its warm, but when it's colder (like 12midnight every night this week when I get off work) it won't go down ... regulator?

 04-21-2011, 05:47 PM
#18
CL in lawnmower status
Thread Starter
^
i was just re-hosting the write-up and pics
but i appreciate your thanks, and this is what we are all about here at acurazine, helping each other out...
i think our unofficial title was "Acurazine, better than google, with insults" or something to that effect
now would one of the mods (Chris) or others like to help by changing the title to "Regulator" instead of "Regular" i don't know how that got there:troutslap
04-22-2011, 08:59 PM
#19
Suzuka Master
06-01-2011, 07:16 PM
#22
Suzuka Master
dumb question, but have you checked to make sure everything is connected, and the window lock rocker switch isn't engaged (it's the one above your switches on the drivers side control panel).
06-06-2011, 06:15 PM
#24
5th Gear

Join Date: Dec 2006
Age: 52
Posts: 5
Likes: 0
Received 0 Likes
on
0 Posts
Door Panel Reinstall - HELP!
I just successfully replaced my driver side power window regulator on my 97 Acura CL. The DIY guide worked great and the window is working when I plug the door panel in.
Except now I cannot seem to get the door panel back on. I am specifically having trouble getting the top felt part to slide into the metal lip on the door without breaking it off. The fel lip is already pretty flimsy. Can someone please give me a suggestion for gtting the panel back on???? I could find anything for getting the panel back on, once you've got it removed.
Thanks, if I can get this door panel back on without taking it to the shop I'll have save hundreds!
-Charlie
06-06-2011, 11:23 PM
#25
Your Girlfriend is in my
Haha funny Idea but it might work? Silcone it back on to the panel? I learned that when your putting your panel back on, you have to go at an angle, then slide it in. Took me a while to realize that.
- RemieGino14 -
- RemieGino14 -
08-06-2013, 04:01 PM
#29
2nd Gear

Thanks for the write up - notes taken
Great write up - made it so much simpler than going blind.....
Couple of notes -
-the replacement unit I ordered came with studs - no use for the bolts that came out - AND - had to run and grab some 6mm nuts.
-I am not sure I really needed a new regulator - after installing, the window was doing the same thing - working hard and stopping part way up. As before I could give it an assist by pulling by hand and get it closed but it was not wanting to go up. Nothing left to lose I took the silicone spray and flooded the tracks on both sides - from top to bottom. After a few trips up and down it all is good........argh - I think I wasted $53.
Anyone need a driver side regulator?
Thanks to all the members for sharing info - tons of good folks here.
The following users liked this post:
97BlackAckCL (08-07-2013)
08-07-2013, 12:34 PM
#30
Senior Moderator
Regional Coordinator
(Mid-Atlantic)
Regional Coordinator
(Mid-Atlantic)
iTrader: (6)
Good info, where did you get the silicone spray?
09-23-2013, 01:20 AM
#31
1st Gear

Join Date: Sep 2013
Posts: 1
Likes: 0
Received 0 Likes
on
0 Posts
front driver window
window pwer down but will not power up, replaced it with a new regulator and motor assembly. and would not go up still, accidently hit the auto down and it went down lol now cant get it to power up? help, winter is comin new baby on the way and 2 girlfriends upset because i have no car to drive!!
09-23-2013, 09:12 AM
#32
Senior Moderator
Regional Coordinator
(Mid-Atlantic)
Regional Coordinator
(Mid-Atlantic)
iTrader: (6)
Could be the relay, or the auto switch
12-21-2013, 06:13 PM
#33
Level: Noob
iTrader: (1)
Nobody has posted here in a while, but don't trust these crappy overseas parts from fleabay. I bought a regulator, put it in, 4 months later it crapped out on me. Gonna order the part from honda this time and see how that goes. If it fails too, I'm just gonna start JB-Welding that piece of plastic back on.
07-01-2014, 10:17 PM
#34
CL in lawnmower status
Thread Starter
Nobody has posted here in a while, but don't trust these crappy overseas parts from fleabay. I bought a regulator, put it in, 4 months later it crapped out on me. Gonna order the part from honda this time and see how that goes. If it fails too, I'm just gonna start JB-Welding that piece of plastic back on.
08-19-2015, 11:37 PM
#35
5th Gear
Join Date: Dec 2006
Age: 52
Posts: 5
Likes: 0
Received 0 Likes
on
0 Posts
Some additional info:
I've had to do this now 3 times on my driver side (and once on the passenger side) and I've learned a few helpful things that aren't in this fantastic DIY.
1. Save your receipt! Should be a lifetime warranty and there is a good chance it will break again as the plastic pieces in the pulley break often. It seems to be one of the few weak links in this car. And I got this part today for free!
2. REPLACING THE DOOR PANEL - Wedge in the top part of the door panel from from the front part to the back, securing it over the door's metal lip first. And then you have to apply a good amount of force downward to get the door handle through its hole and to get the panel into its position. You really have to push down hard to get it in, it feels like your gonna break it kind of. Then just snap in the rest.
3. Make sure the felt part at the top of the door panel is attached firmly to the door panel before reattaching, it makes it easier. It can easily be tighten up with a pair of needle nose pliers.
4. I pop my rearview mirror control switch out and pull the wires through the hole before reattaching the door panel. Plugging the rear view mirror control switch in can be a pain otherwise. And the rear mirror control pops out and back in easily, no tools needed.
5. It's much easier imo to have a second person hold the window up for you while you secure the bolts instead of using the rubber stopper method.
This thread alone has saved me a couple thousand dollars. I've lost count of all the DIY I've used on here. Thanks so much, I hope this helps someone.

Thread
Thread Starter
Forum
Replies
Last Post
cycdaniel
1G TSX Performance Parts & Modifications
8
12-17-2019 10:58 AM
NBP_BALLER
2G TL Performance Parts & Modifications
5
09-23-2015 08:18 PM
ahsm
3G TL Problems & Fixes
3
09-09-2015 08:35 AM