When you click on links to various merchants on this site and make a purchase, this can result in this site earning a commission. Affiliate programs and affiliations include, but are not limited to, the eBay Partner Network.
Before we start I would like to say that there is already a guide on AcuraZine found here about a TLX subwoofer install. It was out of date, and I successfully installed my sub this weekend so I figured I would post an up to date version of this guide with pictures.
This is the second car this sub has been in, so install was pretty straight forward for me. I will include pictures with each step to better explain how I did things. I will note that the electrical system in this car was pretty complex so I tried to avoid tapping into anything that could be potentially harmed.
Components being installed:
RockFord Fosgate P3D2-12 600 RMS Subwoofer (in box - QBOMB)
Precision Power P1000 Monoblock Amp
Scosche 1200 Watt Wiring Kit
Scosche Line Out Converter
Additional Items/Tools needed:
Speaker Wire (12-18 Gauge)
10mm Wrench
Wire Cutters
Electrical Tape
X-Acto or Scissors
Step 1: Routing the power wire
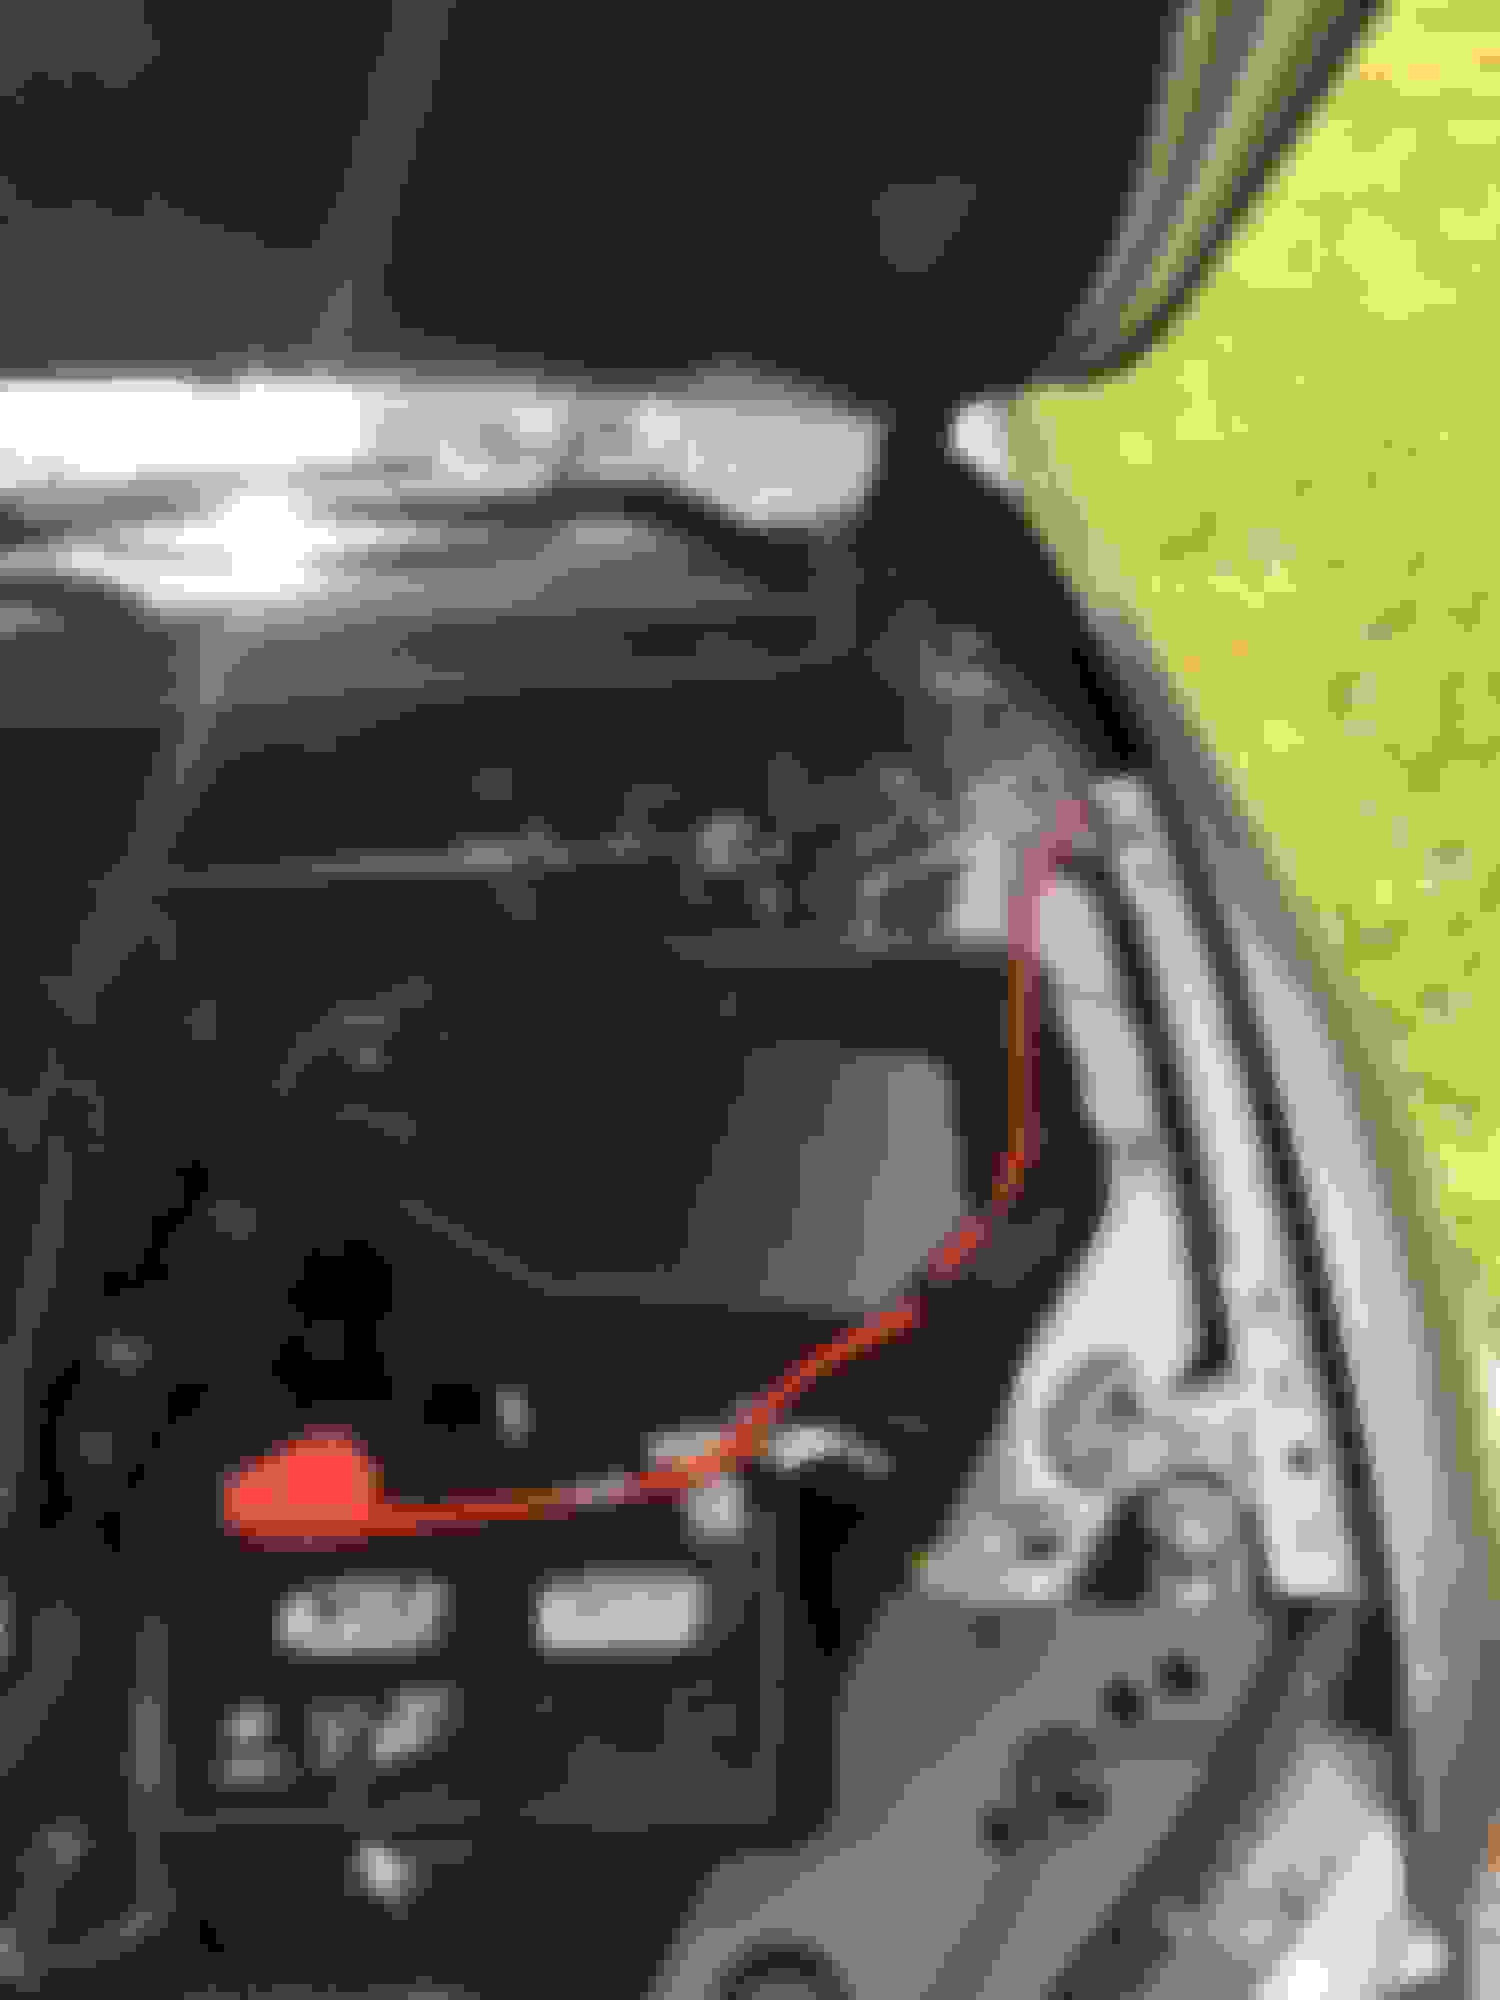
This by far was the most time-consuming step as there were no visible holes in the firewall. As noted by Flexin5, the hood cable goes through a grommet above the fuse box that is big enough to fit 4 gauge wire through.
Moving to the engine bay, there is a plastic covering the right fender so that will have to be removed (4 clips).
Every power wire is different, but mine already had the fuse attached on the end so I couldn�t just run the wire from the footwell. I found some rope and ran it through the hood cable grommet from the footwell to the engine bay. I then pulled the rope up from the fender and taped the power wire to the rope. After that I slowly pulled the rope back into the footwell making sure not to tug too hard and lose the power wire.
(Do not plug anything into amp yet)
Step 2: Signal/Turn on wire
To turn the amp on I tapped into the cigarette lighter on the driver side. The small carpet panel will have to be removed to access the cigarette lighter wire. I spliced the lighter wire and attached the remote wire and taped everything together.
Next, I ran the remote wire and the power wire back to the trunk.
(Do not plug anything into amp yet)
Step 3: Ground wire
What�s neat about the new TLX compared to the older models is the rear seats fold down making it easier to run wires and find ground spots. If you fold the driver side rear seat down you will notice there is a flap of carpet that can be pulled up and expose chassis metal.
I found the metal from the seat connected to the chassis was an easy and good ground spot.
(Do not plug anything into amp yet)
Step 4: Line Out Converter
I opted out on not purchasing an aftermarket radio since the TLX has its own unique display that works great and is specific to the vehicle. A line out converter was used to convert speaker signals to RCA signals.
I tapped into the factory subwoofer harness in the trunk. You will have to detach some of the upper carpet to expose the OEM subwoofer wire loom.
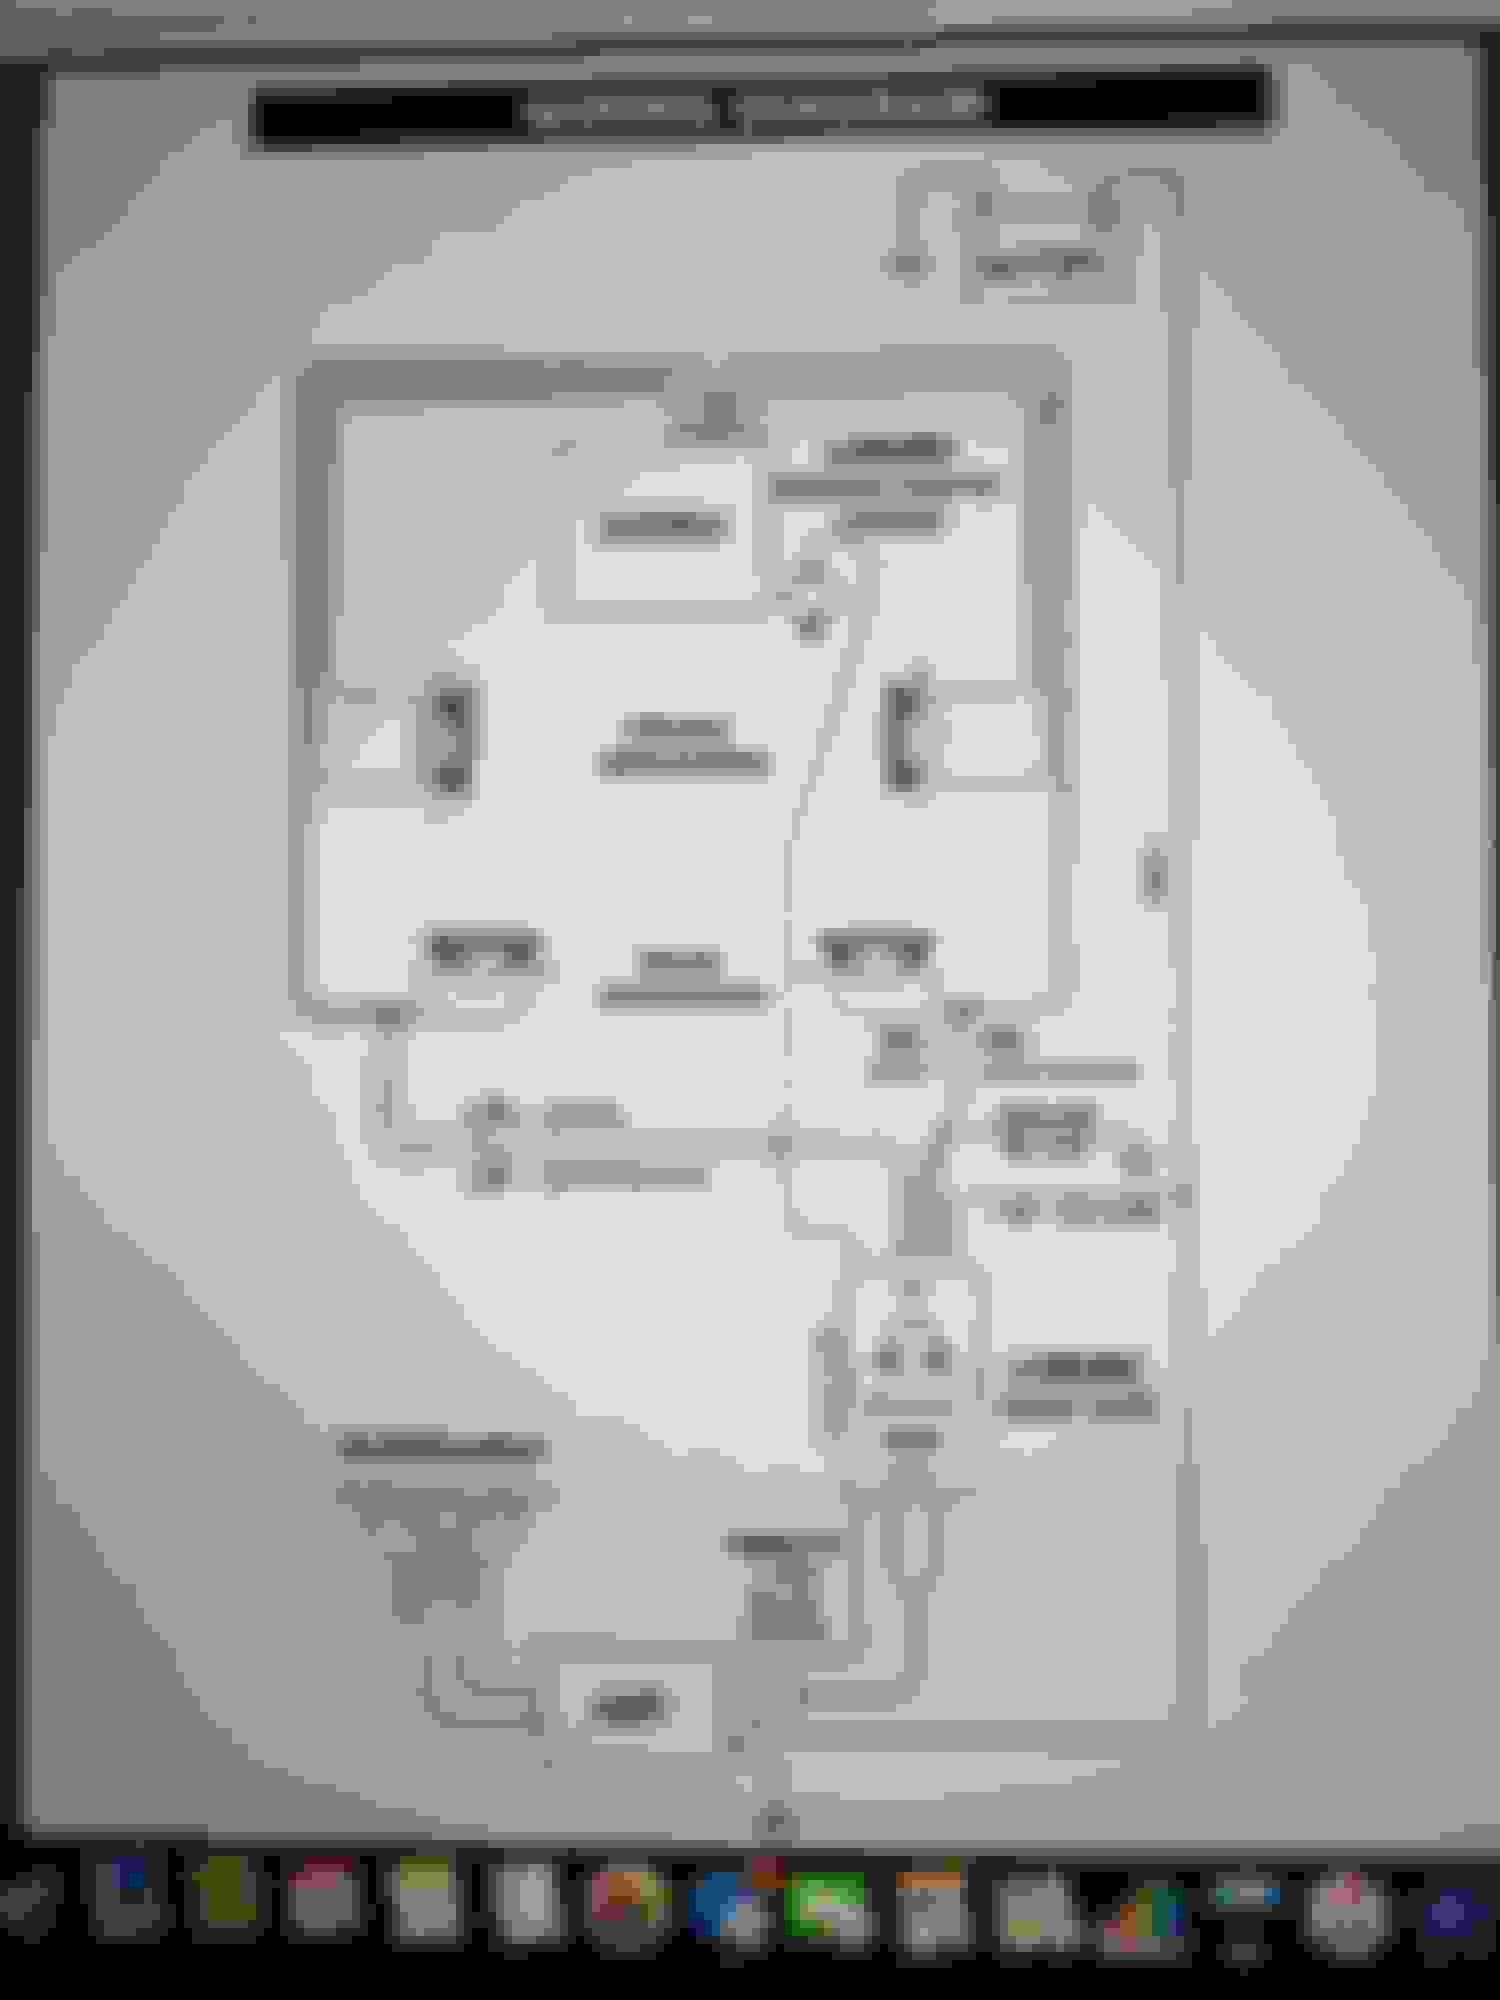
Next, I cut back the black wire coating and spliced into the two wires. I then proceeded to wire the line out converter following this wiring diagram
Basically took the two negative wires from the converter, twisted them together, and attached them to the red wire and taped it up. Same thing for the two positive wires on the converter and attached them to the gray wire and taped it up.
Next, you will need 3 lines of speaker wire to complete the converter.
Signal/Turn on Wire
Ground
Power
Tape speaker wire to the designated lines from the converter and run it towards your amp.
You can now take your RCA cables and plug them into the converter and plug them into your amp.
Step 5: Plugging wires into amp and finishing touches
There is actually a specific way you should plug your wires in your amp so you don�t short anything or make sparks in the back of your trunk (it�s happened before don�t ask lol).
2 Ground Wires
2 Signal/Turn on Wires
2 Power Wires
If you did everything properly your amp will turn on and your subwoofer will work.
If your converter came with a bass knob you can go ahead and plug that into the converter, not the amp and run the knob to where you desire.
Hope this tutorial helped anyone who was looking for some help as I couldn�t find much on here before. Enjoy your new bumping ride
Thanks for this. Can't see the pictures though! Especially interested in a visual of where and how the power cable is being routed. From another tutorial it signed as though the fender had to come off? Maybe I read that wrong. I took the side cowl off inside the hood and didn't see much of anything.
Also I bought zero gauge to run so I'm hoping that's going to work.
You know now that I'm thinking about it, the hood latch route for power cable seems like it's dangerous. If your car gets hit at the fender then it could cut the power wire and it would make contact with the chassis ground. It definitely looks like it's between the fender and the engine bay
You know now that I'm thinking about it, the hood latch route for power cable seems like it's dangerous. If your car gets hit at the fender then it could cut the power wire and it would make contact with the chassis ground. It definitely looks like it's between the fender and the engine bay
I went thru the same route as OP. Unless you want to drill a new hole into the firewall, this is the quick and easy way to run that power cable. Just get a longer cable and leave some extra cable length (can't think of the better way to say this) in the fender if you afraid it might snap and make contact. I used gauge 4 cable, plenty of those expanding foam to prevent from rubbing. No issue with the cable so far.
I went thru the same route as OP. Unless you want to drill a new hole into the firewall, this is the quick and easy way to run that power cable. Just get a longer cable and leave some extra cable length (can't think of the better way to say this) in the fender if you afraid it might snap and make contact. I used gauge 4 cable, plenty of those expanding foam to prevent from rubbing. No issue with the cable so far.
Well, if you add a breaker or fuse within 12 inches of the battery like your supposed to then it would just trip the breaker or pop the fuse in any pinch/cut event.
Well, if you add a breaker or fuse within 12 inches of the battery like your supposed to then it would just trip the breaker or pop the fuse in any pinch/cut event.
Who would not add a fuse/breaker when running the power cable? lol. I guess the extra length of cable could consider a second security feature lol.
^ drilling a hole in the firewall is a huge pain in the ass even after removing the sound insulating foam. I busted a brand new drill bit because the metal was so strong
Hi, so I'm in the middle (or near the end rather) of installing a simple Rockford Fosgate P300 sub with internal amp. I have it grounded. I have tapped into original rear deck sub wires (pain in the ass). I have tried for a couple hours to run this power wire through this tiny grommet as you (and one other) have suggested. My hands are big, but not huge. I can't get within a few inches of that grommet to remove it or run the wire. Any suggestions? I'd rather not cut into the firewall.
Hi Tyler, I just punched a the grommet out with a screwdriver and ran the wrire through. This should leave enough room to jam it in there, it's hard but it will fit a 4 gauge.
Reposting Josh.berkowitz's original post with pictures embedded for everyone's benefit going forward. All credit goes to Josh.berkowitz!
Before we start I would like to say that there is already a guide on AcuraZine found here about a TLX subwoofer install. It was out of date, and I successfully installed my sub this weekend so I figured I would post an up to date version of this guide with pictures.
This is the second car this sub has been in, so install was pretty straight forward for me. I will include pictures with each step to better explain how I did things. I will note that the electrical system in this car was pretty complex so I tried to avoid tapping into anything that could be potentially harmed.
Components being installed:
RockFord Fosgate P3D2-12 600 RMS Subwoofer (in box - QBOMB)
Precision Power P1000 Monoblock Amp
Scosche 1200 Watt Wiring Kit
Scosche Line Out Converter
Additional Items/Tools needed:
Speaker Wire (12-18 Gauge)
10mm Wrench
Wire Cutters
Electrical Tape
X-Acto or Scissors
Step 1: Routing the power wire
This by far was the most time-consuming step as there were no visible holes in the firewall. As noted by Flexin5, the hood cable goes through a grommet above the fuse box that is big enough to fit 4 gauge wire through.
Moving to the engine bay, there is a plastic covering the right fender so that will have to be removed (4 clips).
Every power wire is different, but mine already had the fuse attached on the end so I couldn�t just run the wire from the footwell. I found some rope and ran it through the hood cable grommet from the footwell to the engine bay. I then pulled the rope up from the fender and taped the power wire to the rope. After that I slowly pulled the rope back into the footwell making sure not to tug too hard and lose the power wire.
(Do not plug anything into amp yet)
Step 2: Signal/Turn on wire
To turn the amp on I tapped into the cigarette lighter on the driver side. The small carpet panel will have to be removed to access the cigarette lighter wire. I spliced the lighter wire and attached the remote wire and taped everything together.
Next, I ran the remote wire and the power wire back to the trunk.
(Do not plug anything into amp yet)
Step 3: Ground wire
What�s neat about the new TLX compared to the older models is the rear seats fold down making it easier to run wires and find ground spots. If you fold the driver side rear seat down you will notice there is a flap of carpet that can be pulled up and expose chassis metal.
I found the metal from the seat connected to the chassis was an easy and good ground spot.
(Do not plug anything into amp yet)
Step 4: Line Out Converter
I opted out on not purchasing an aftermarket radio since the TLX has its own unique display that works great and is specific to the vehicle. A line out converter was used to convert speaker signals to RCA signals.
I tapped into the factory subwoofer harness in the trunk. You will have to detach some of the upper carpet to expose the OEM subwoofer wire loom.
Next, I cut back the black wire coating and spliced into the two wires. I then proceeded to wire the line out converter following this wiring diagram
Basically took the two negative wires from the converter, twisted them together, and attached them to the red wire and taped it up. Same thing for the two positive wires on the converter and attached them to the gray wire and taped it up.
Next, you will need 3 lines of speaker wire to complete the converter.
Signal/Turn on Wire
Ground
Power
Tape speaker wire to the designated lines from the converter and run it towards your amp.
You can now take your RCA cables and plug them into the converter and plug them into your amp.
Step 5: Plugging wires into amp and finishing touches
There is actually a specific way you should plug your wires in your amp so you don�t short anything or make sparks in the back of your trunk (it�s happened before don�t ask lol).
2 Ground Wires
2 Signal/Turn on Wires
2 Power Wires
If you did everything properly your amp will turn on and your subwoofer will work.
If your converter came with a bass knob you can go ahead and plug that into the converter, not the amp and run the knob to where you desire.
Hope this tutorial helped anyone who was looking for some help as I couldn�t find much on here before. Enjoy your new bumping ride
I’d like to mention that anytime you make your own ground that you should sand the location down to bars shiny metal no matter what to ensure a good connection as the power flow needs this or the performance will be reduced and excessive heat will occur among other side effects.
I personally never ground to sheet metal and look for a thick support type metal to ground to like the seat bolt hinge location you spoke of and use a Dremel to grind to bare metal and then use old left over clear coat or colored touched up paint on top of it all when finished to avoid rust etc.
I also noticed that if your not using a capacitor to stiffen up your current I do what’s called the “Big 3” or even do both and google will will guide you to what it is. The Acura seems to use light duty ground and power cables in the vehicle so the Big 3 will help out more than you can imagine.
Another note is to actually remove the stock subwoofer so that hole will act as a port to allow the bass to enter the cabin more freely without having to make any other alterations. If you don’t remove the subwoofer it still sort of helps you as it becomes a passive radiator for a micro amount of boosted output but might not be noticeable but looks cool if you watch it while your at high volume as it moves tremendously even though it is disconnected.
My plan was to make a ported enclosure that used an external/adjustable port that would mate up to the size and location of the stock subwoofer hole to allow for the perfect, smooth, non turbinate bass and also avoid that trunk rattle.
Finally, if your TLX has the fake sound generator/ Noise canceler thing I unplugged mine under the glove box as that made a monster of a difference to avoid conflict in the subs output as well as removing that fake engine sound.
There are a few more tips but I should’ve not hijacked your already great thread and like I said, thank you for the well written write up and images as I think it will help many here when they use the search feature.
 07-24-2017, 01:39 PM