A-113: Removal of Slave Cylinder check valve!!!
 07-28-2009, 04:20 PM
#81
Ryan Christopher
so I am a little confused...
If I have a 04 TL is there a check valve?
from a previous post it stated the 04 TL part is the same as the 03 CL-S part which does not have the check valve
Is this correct?
No point in buying the part if my car is already tweaked
And if it does not have a check valve then is there something else that has to be done?
 07-29-2009, 02:06 AM
#84
Thanks for the info, but I'm still lost. I don't even know where this thing is located. So am I supposed to hollow this thing out? Where can I find more info on this? Sorry... I'm slow.
07-29-2009, 07:52 AM
#87
Chapter Leader (NY/NJ)
iTrader: (10)
i see alot of people just buying new sc's. is it worth buying a new one and doing this, or just ripping the old one out and modding it? if its the same thing, is anyone just throwing away their old sc? i'd pay a little something for it so i can actually see what im doing or just modding it then quick swap and not having my car down for the extra 1-2 hours to mod this.
07-29-2009, 08:32 AM
#88
Yeah I see it, and I see what you're doing when it's off the car. But I'm a real newb at this. I don't even know where it's located...  Should I just get a tech manual? It's cool, I guess I can ask a local mechanic and just figure it out. And would InfamousLinks idea be better? I'd rather not have my car down for that long either.
Edit... actually I looked it up... on OEM Acura parts... it's about 58. bucks... it might just be worth it to get a new one and mod it that way.
Should I just get a tech manual? It's cool, I guess I can ask a local mechanic and just figure it out. And would InfamousLinks idea be better? I'd rather not have my car down for that long either.Edit... actually I looked it up... on OEM Acura parts... it's about 58. bucks... it might just be worth it to get a new one and mod it that way.
Last edited by Maddizm; 07-29-2009 at 08:35 AM.
07-29-2009, 08:34 AM
#89
I wish one of you was local to feel the difference before going on the mission of doing this. I've countered the delay effect during normal driving by not totally depressing the clutch. Especially during 1st to 2nd shifts.
07-29-2009, 08:54 AM
#90
Ryan Christopher
I will post up detailed instructions and photos. I will try and get them up this evening. It is pretty straight forward, but the right tools are required.
07-29-2009, 09:09 AM
#91
Even though I had this done at a shop, it seems pretty easy. It only took 30 mins to do. I should have waited to do it myself after seeing how easy it was.
You can actually see it when you look between the radiator and the engine block. It's the most forward part of the tranny. I can slip my hand down there and touch the top of the slave cylinder itself. Just not sure the best way to take it off.
Opel - You need to include instructions on how to take this thing off and bleeding the lines after the reinstall. I think that is why most are hesitate in doing this.
The best way to describe this: Normal drive is the same to me. You'r more likely to scratch the gears from 1st to 2nd if you not carefully. I've done it twice because I got lazy. If you shift quick and precise, it should not be a problem. Other than that, not much difference. For performance driving, prepare to feel your front end tear from the car! At least for me anyway. There is no slippage what so ever. You will enjoy it!
You can actually see it when you look between the radiator and the engine block. It's the most forward part of the tranny. I can slip my hand down there and touch the top of the slave cylinder itself. Just not sure the best way to take it off.
Opel - You need to include instructions on how to take this thing off and bleeding the lines after the reinstall. I think that is why most are hesitate in doing this.
The best way to describe this: Normal drive is the same to me. You'r more likely to scratch the gears from 1st to 2nd if you not carefully. I've done it twice because I got lazy. If you shift quick and precise, it should not be a problem. Other than that, not much difference. For performance driving, prepare to feel your front end tear from the car! At least for me anyway.
There is no slippage what so ever. You will enjoy it!
07-29-2009, 09:22 AM
#92
Former Whyner
Even though I had this done at a shop, it seems pretty easy. It only took 30 mins to do. I should have waited to do it myself after seeing how easy it was.
You can actually see it when you look between the radiator and the engine block. It's the most forward part of the tranny. I can slip my hand down there and touch the top of the slave cylinder itself. Just not sure the best way to take it off.
Opel - You need to include instructions on how to take this thing off and bleeding the lines after the reinstall. I think that is why most are hesitate in doing this.
The best way to describe this: Normal drive is the same to me. You'r more likely to scratch the gears from 1st to 2nd if you not carefully. I've done it twice because I got lazy. If you shift quick and precise, it should not be a problem. Other than that, not much difference. For performance driving, prepare to feel your front end tear from the car! At least for me anyway. There is no slippage what so ever. You will enjoy it!
You can actually see it when you look between the radiator and the engine block. It's the most forward part of the tranny. I can slip my hand down there and touch the top of the slave cylinder itself. Just not sure the best way to take it off.
Opel - You need to include instructions on how to take this thing off and bleeding the lines after the reinstall. I think that is why most are hesitate in doing this.
The best way to describe this: Normal drive is the same to me. You'r more likely to scratch the gears from 1st to 2nd if you not carefully. I've done it twice because I got lazy. If you shift quick and precise, it should not be a problem. Other than that, not much difference. For performance driving, prepare to feel your front end tear from the car! At least for me anyway.
There is no slippage what so ever. You will enjoy it!
07-29-2009, 09:43 AM
#94
07-29-2009, 12:54 PM
#95
Former Whyner
07-29-2009, 01:59 PM
#97
Well...I had to change my slave a few months back...just not looking forward to having to do it again if the feeling isn't worthwhile.
Some tips from my experience...you CAN reach it from above...bleeding is the fun part. NOT. First of all...use the slave like a syringe and dip the opening into the brake fluid container and fill it up...that's that much less air you'll be trying to displace when bleeding.
CAREFUL with your paint!
Do yourself a favor...get the driver side wheel off and take off that little plastic flap going into the engine bay... prop a cut 2/4 or broom handle between the back of the disc brake and the tip of the slave engagement fork...very hard to describe but it'll be obvious what I mean when you're in there. Then that will get the last bit of air out so you get full pressure back to the pedal. This was my method but something similar is suggested in the service manual.
Does this make sense?
07-29-2009, 02:14 PM
#98
Three Wheelin'
Thread Starter
its not hard man....bleeding the clutch, its easier when you got another person...pretty much u level off the fluid and pump the clutch about 10 times...and u hold the pedal all the way down,,,while holding the pedal down, you gotta open up the bleed off valve and let the fluid squirt out, the u tighten it back up, and pump the clutch pedal again...10 more times...hold it down, open the bleeder, let the pressure squirt out...u keep doing this until you get full pedal...do this while maintaining sufficient fluid in the reservoir....then go back and drive 
and taking that thing off is easy from the top...theres pretty clear pictures on the first post...print one out and go pop the hood....look untill u recognize the part... its held in place by 2 bolts....easiest thing to take off besides a fuse....
i would go out and take some pics...but i dont have the car with me... i just finished assembling the top half of the motor lol
07-29-2009, 03:06 PM
#100
Three Wheelin'
Thread Starter
07-29-2009, 07:27 PM
#101
Well here is the way I did it. The SC is on the side of the engine that faces the front of the car. It sits just below and to the left of the lower radiator hose next to the battery. there are 2ea 12mm bolts that attach it to the block. There is also a black bracket that holds a grey wire that goes to the sensor on the exhaust manifold. You will need a 17mm and a 10mm wrench to remove the fluid line. I was expecting fluid to pour out but it didn't. then it just come right out.
I then followed the instructions at the begining of the post but I purchased a ring pick set to remove the metal ring and that made the job so much easier. I was getting pissed after 30min of trying to use everything else I had around the house that was not working. be sure to hit the top like he said to help relieve the presure from the ring. I also used the pick to pull out the plastic piece. I then did everything in reverse to put it all back together.
I had by wife help me bleed the clutch. You will need an 8mm wrench for that.
Now the clutch feels the way it should.
I always had a hard time making smooth shift for 1st to 2nd. Now i can. all shifts feel much smoother.
I would have posted some picks but its to hard when you 2 kids are getting into everything. I hope this helps
Last edited by pinina; 07-29-2009 at 07:31 PM.
07-31-2009, 10:55 AM
#104
To the OP...
THANK YOU THANK YOU THANK YOU!!!
Dude...thank you for taking the time to do a write up.
I have some additions...
I bit the bullet and did this yesterday and my car FINALLY drives the way it should. Like every other manual transmissoin I've ever driven. No more dreaded jerky 1st to 2nd shifts. Instand power and response...I thought it was drive by wire but it turns out it was this stupid little plastic thing. Making shifting smooth...if you don't mind waiting a second before giving it gas.
Only additions to the original write up I'll make are:
This mod is free...easy...extends the life of the clutch...and finally makes this car a dream to drive. Whether you beat on on the car or just drive it normally...this mod makes a difference IMO...I tried doing both yesterday and it took me right back to driving my RSX Type S.
Anyway...suggestions:
This mod was a no brainer and would have taken me 30 min. if I had known what I'm about to tell you.
That O ring is a B****...I was sitting on my garage floor for an hour...took a drive to the auto parts store...to no avail. Almost quit...then I had an idea.
Move ring around to where the open part was in an ideal location for...pause...wait for it...a little channel cut out with a dremel.

I did that and then twisted one edge of the ring into the exposed part and with a pick...POP...it was out. Do it in a plastic bag because when it popped off it flew!
Another recommendation about hammering from the other side of the opening is not to damage the little hole where the fluid goes in. I flattened it not knowing that the checkvalve was actually under it (this will all make sense when you're looking at it). No biggy...just got a drillbit that fit the opening and drilled it back out.
Reversed and had my gf help me bleed it...easy and perfect.
Here it is removed: The plastic thing on the left...

So again...thank you thank you thank you!
THANK YOU THANK YOU THANK YOU!!!
Dude...thank you for taking the time to do a write up.
I have some additions...
I bit the bullet and did this yesterday and my car FINALLY drives the way it should. Like every other manual transmissoin I've ever driven. No more dreaded jerky 1st to 2nd shifts. Instand power and response...I thought it was drive by wire but it turns out it was this stupid little plastic thing. Making shifting smooth...if you don't mind waiting a second before giving it gas.
Only additions to the original write up I'll make are:
This mod is free...easy...extends the life of the clutch...and finally makes this car a dream to drive. Whether you beat on on the car or just drive it normally...this mod makes a difference IMO...I tried doing both yesterday and it took me right back to driving my RSX Type S.
Anyway...suggestions:
This mod was a no brainer and would have taken me 30 min. if I had known what I'm about to tell you.
That O ring is a B****...I was sitting on my garage floor for an hour...took a drive to the auto parts store...to no avail. Almost quit...then I had an idea.
Move ring around to where the open part was in an ideal location for...pause...wait for it...a little channel cut out with a dremel.
I did that and then twisted one edge of the ring into the exposed part and with a pick...POP...it was out. Do it in a plastic bag because when it popped off it flew!
Another recommendation about hammering from the other side of the opening is not to damage the little hole where the fluid goes in. I flattened it not knowing that the checkvalve was actually under it (this will all make sense when you're looking at it). No biggy...just got a drillbit that fit the opening and drilled it back out.
Reversed and had my gf help me bleed it...easy and perfect.
Here it is removed: The plastic thing on the left...
So again...thank you thank you thank you!
07-31-2009, 11:27 AM
#105
Three Wheelin'
Thread Starter
To the OP...
THANK YOU THANK YOU THANK YOU!!!
Dude...thank you for taking the time to do a write up.
I have some additions...
I bit the bullet and did this yesterday and my car FINALLY drives the way it should. Like every other manual transmissoin I've ever driven. No more dreaded jerky 1st to 2nd shifts. Instand power and response...I thought it was drive by wire but it turns out it was this stupid little plastic thing. Making shifting smooth...if you don't mind waiting a second before giving it gas.
Only additions to the original write up I'll make are:
This mod is free...easy...extends the life of the clutch...and finally makes this car a dream to drive. Whether you beat on on the car or just drive it normally...this mod makes a difference IMO...I tried doing both yesterday and it took me right back to driving my RSX Type S.
Anyway...suggestions:
This mod was a no brainer and would have taken me 30 min. if I had known what I'm about to tell you.
That O ring is a B****...I was sitting on my garage floor for an hour...took a drive to the auto parts store...to no avail. Almost quit...then I had an idea.
Move ring around to where the open part was in an ideal location for...pause...wait for it...a little channel cut out with a dremel.
I did that and then twisted one edge of the ring into the exposed part and with a pick...POP...it was out. Do it in a plastic bag because when it popped off it flew!
Another recommendation about hammering from the other side of the opening is not to damage the little hole where the fluid goes in. I flattened it not knowing that the checkvalve was actually under it (this will all make sense when you're looking at it). No biggy...just got a drillbit that fit the opening and drilled it back out.
Reversed and had my gf help me bleed it...easy and perfect.
Here it is removed: The plastic thing on the left...
So again...thank you thank you thank you!
07-31-2009, 11:58 AM
#108
that's a good idea...at least that way your car will be intact while you get comfortable with removing it.
Plus, I just had to change my slave at 35k miles due to a leaking o ring...but that was a few months ago before I knew about this.
Plus, I just had to change my slave at 35k miles due to a leaking o ring...but that was a few months ago before I knew about this.
07-31-2009, 12:25 PM
#111
Three Wheelin'
Thread Starter
The dremel definitely helps..as it did for you...I didn't have a dremel handy at the time... I was pretty much hanging out at my friends...talking cars...it popped into my head and I did it right there on the street with whatever tools I had...which I ended up angle cutting 2 small flat screw drivers to make them needle pointy and that's how I popped the ring out...I pretty much try and make things happen with what I got..I get eager to do it right there an then.
The words "wait & patience" don't exist in my vocabulary lol.
I'm glad some of you guys that did this, come back here and share the new discoveries that help simplify this. I hope more ppl do this...
Its such a killer to fun driving and it sucks for ppl not being able to take full advantage of their cars due to things like this.
My write up and instructions are prob not the clearest...however I tried lol... I suck at teaching, but I'm decent at performing myself.
07-31-2009, 12:34 PM
#112
Chapter Leader (NY/NJ)
iTrader: (10)
im at the airport in ohio flying to NYC (back HOME) and ima do this tomorrow morning. anyone else in the BX or around wanna do this hit me up. we'll tackle this small feat tomorrow morning.
07-31-2009, 12:37 PM
#113
just an FYI...aside from being completely reversible...if you use the dremel idea (or have luck with the two sharp objects method) your car will only be out of commission for a whopping 30 minutes including bleeding.
07-31-2009, 12:40 PM
#114
lol...well I was home...and went to advance auto for a set of picks and still didn't have success so i got frustrated and the dremel idea came to me...
dude...getting the dremel out and making the groove and removing the ring took under a minute!
dude...getting the dremel out and making the groove and removing the ring took under a minute!
07-31-2009, 03:28 PM
#115
Your sig says AT TL. This mod is for manual trans only, right?
There's no clutch master/slave cylinder for AT's afaik.
08-01-2009, 09:04 AM
#117
Ryan Christopher
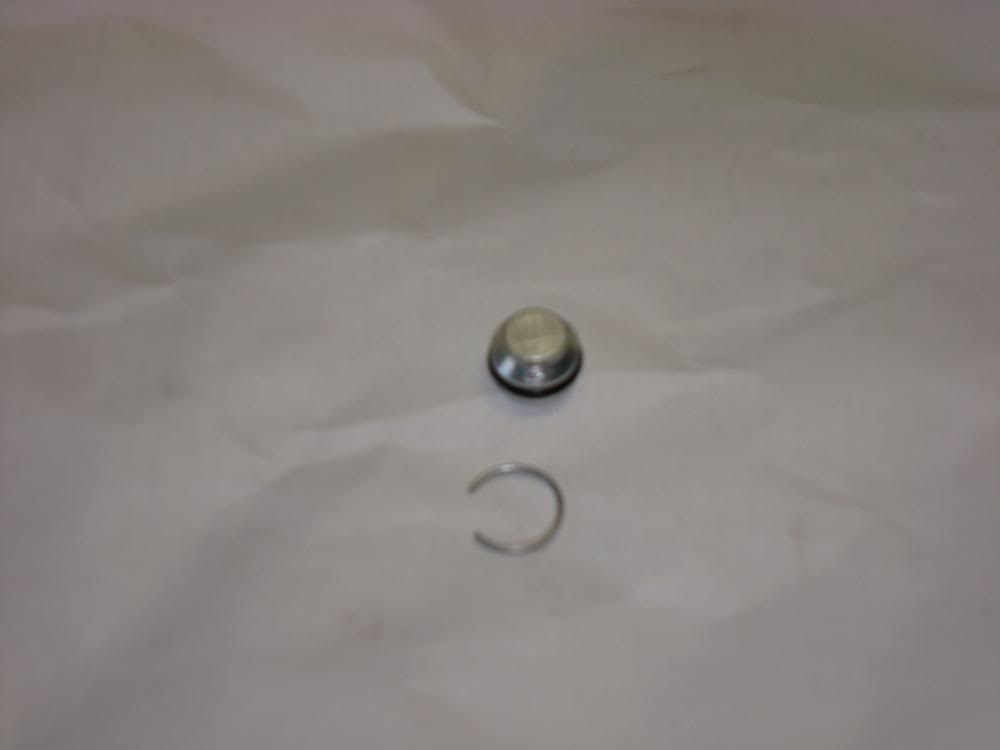
Removing the Valve.
1. Remove unit from car or purchase replacement. Cost - $60-80 (If you are getting up there in mileage I would suggest purchasing a new one.)
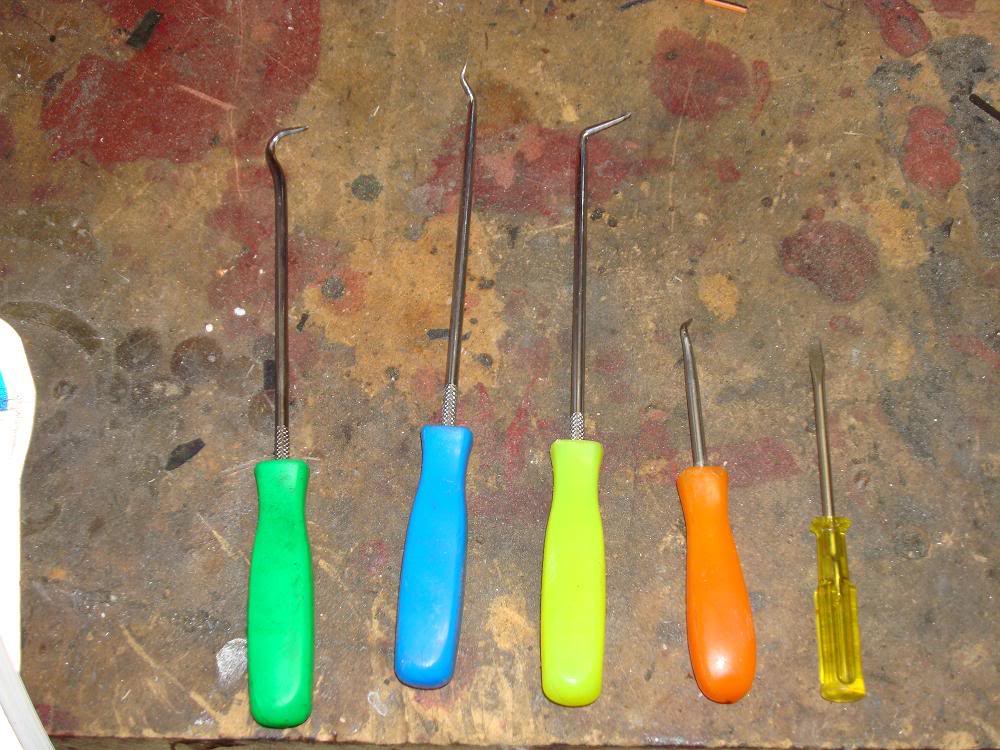
2.Parts and tools needed - Mini hook set, DOT 3 fluid, Needle nose pliers, and something very thin to use to push the check valve out. I used a very small but long Allen wrench that I had.
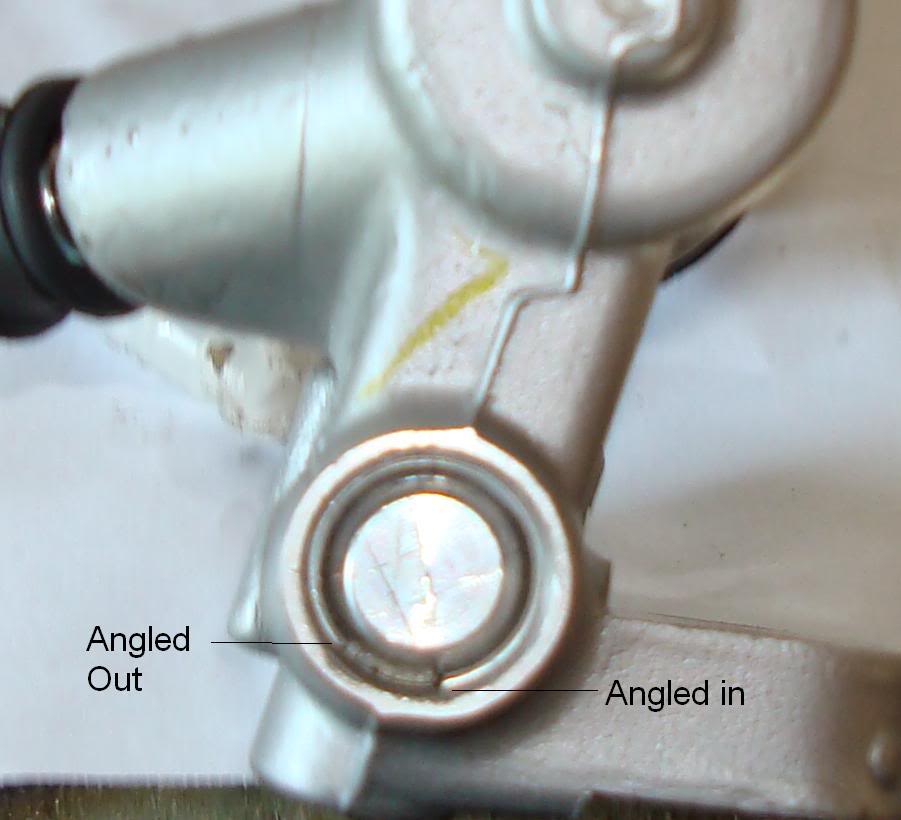
3. Using the 90deg and the round hook I was able to remove the ring. I used the 90deg to hold the ring in place while I used the round hook to slide the ring from its locked position. The ring has a inward slope and an outward slope. Be careful not to let the ring shot off or do this some where you can find it easily.
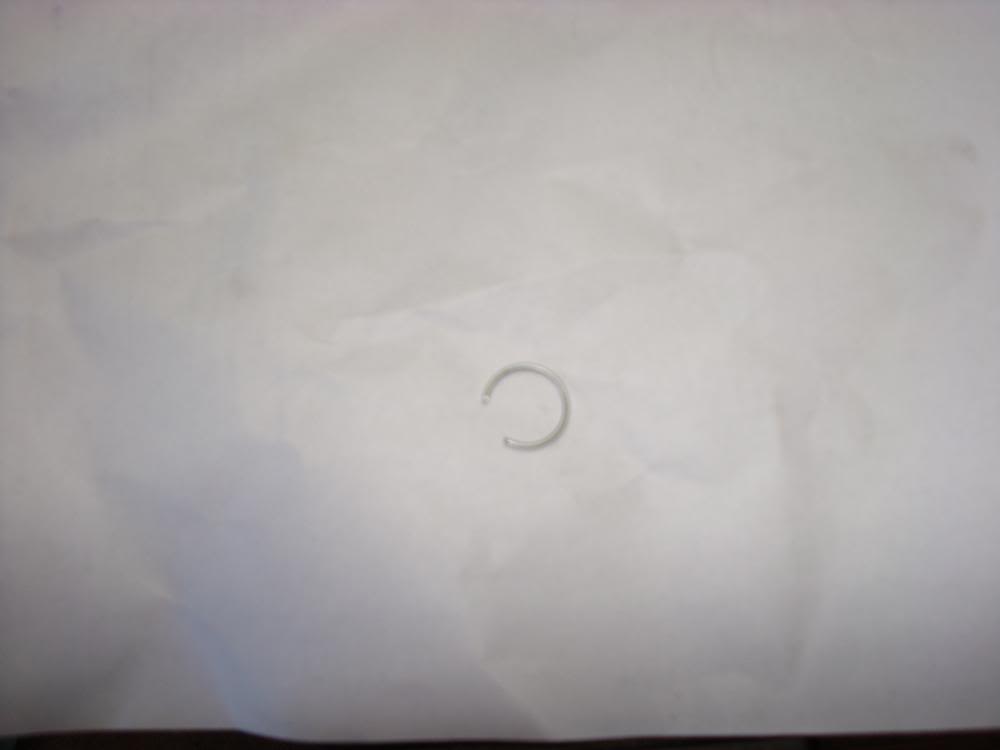
Note - The ring removed
4. With the ring removed, I used the needle nose to remove the cap from the SC. It has to be worked out, so rock it a bit and it will come up and out.
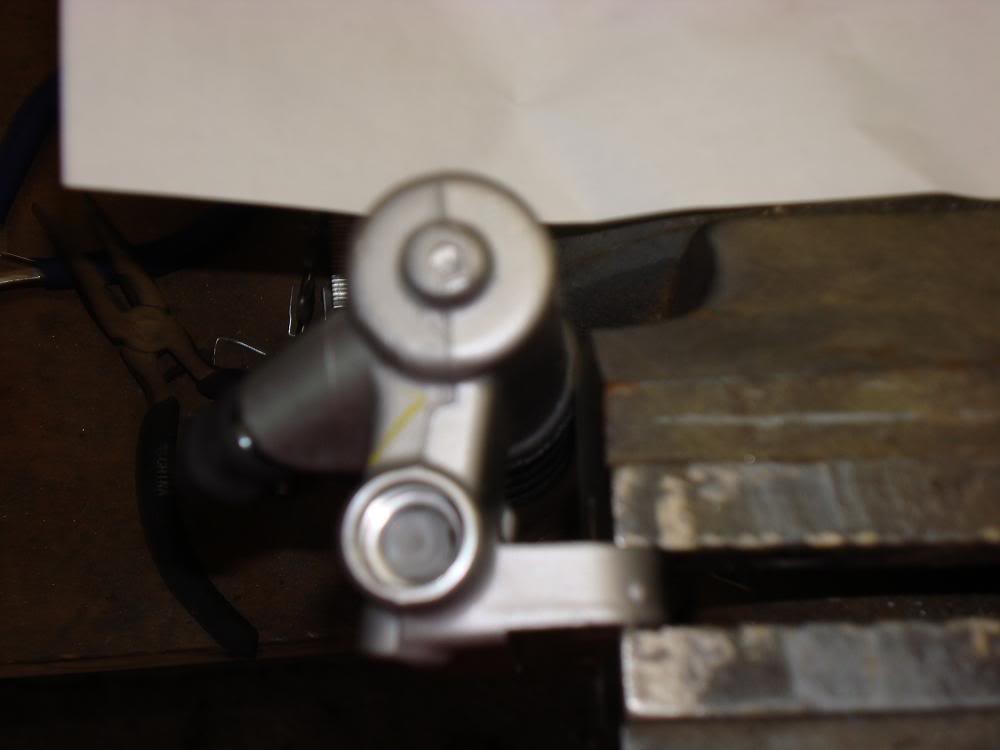
Note- Ring and Cap
5. Removal of the check valve. I used a long Allen key that was very thin to fit into the hose feed side of the SC. As previously mentioned in another post, be careful not to hit the brass part of the fitting, it can damage it. This is why I used a very thin object.
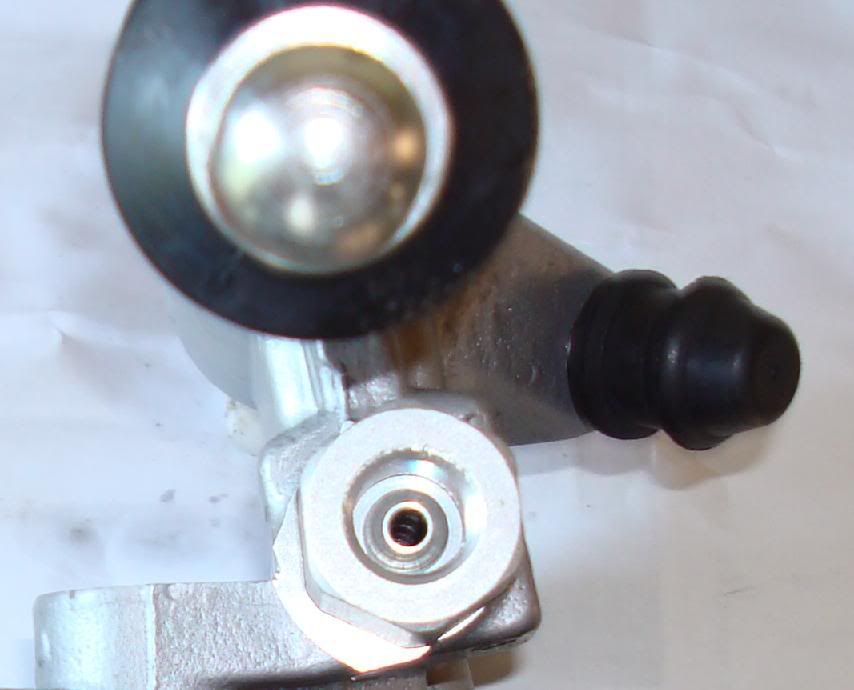
6. With the check valve removed you can reassemble the SC. Start by putting the end cap back in and making sure it is fully seated back in the SC.
7. You will finally reinstall the ring. Install one side of it and use some needle nose to work the ring in. You may want to keep your finger over the ring so that if it slips it will not shot off.
I hope to get to install it on the car this weekend and will take pictures and write up the rest of the install.
1. Remove unit from car or purchase replacement. Cost - $60-80 (If you are getting up there in mileage I would suggest purchasing a new one.)
2.Parts and tools needed - Mini hook set, DOT 3 fluid, Needle nose pliers, and something very thin to use to push the check valve out. I used a very small but long Allen wrench that I had.
3. Using the 90deg and the round hook I was able to remove the ring. I used the 90deg to hold the ring in place while I used the round hook to slide the ring from its locked position. The ring has a inward slope and an outward slope. Be careful not to let the ring shot off or do this some where you can find it easily.
Note - The ring removed
4. With the ring removed, I used the needle nose to remove the cap from the SC. It has to be worked out, so rock it a bit and it will come up and out.
Note- Ring and Cap
5. Removal of the check valve. I used a long Allen key that was very thin to fit into the hose feed side of the SC. As previously mentioned in another post, be careful not to hit the brass part of the fitting, it can damage it. This is why I used a very thin object.
6. With the check valve removed you can reassemble the SC. Start by putting the end cap back in and making sure it is fully seated back in the SC.
7. You will finally reinstall the ring. Install one side of it and use some needle nose to work the ring in. You may want to keep your finger over the ring so that if it slips it will not shot off.
I hope to get to install it on the car this weekend and will take pictures and write up the rest of the install.
The following users liked this post:
VmtSquad (04-19-2012)
08-01-2009, 07:35 PM
#120