Changing the rotors. Questions....
 08-14-2014, 12:59 AM
#1

Changing the rotors. Questions....
I will be replacing my rotors here on 11 SH-AWD soon with some slotted ones and changing the pads to ceramic pads. I will be painting the calipers with high temp spray paint also in silver or grey. Any tips you guys can give me? Read that the rotors are a PITA to get off on the 3rd gen with the screws. Do our 4th gens have this? How do our tire pressure indicators work? Anything I need to be careful of when taking off the tires? I have experience with brakes just haven't messed with anything this new with pressure sensors before.
Thanks in advance.
Thanks in advance.
 08-14-2014, 02:23 AM
#2
Instructor

Just buy yourself a cheap impact screwdriver such as this:
http://www.harborfreight.com/impact-...ase-37530.html
This screwdriver will make removing the rotor retaining screws super easy.
With regards to the tire pressure sensors...You have nothing to worry about. The sensors are inside the tire. Basically, the tire fill valve is part of the sensor.
http://www.harborfreight.com/impact-...ase-37530.html
This screwdriver will make removing the rotor retaining screws super easy.
With regards to the tire pressure sensors...You have nothing to worry about. The sensors are inside the tire. Basically, the tire fill valve is part of the sensor.
The following users liked this post:
ffmjst (08-14-2014)
08-14-2014, 06:17 AM
#3
Advanced

The inside "hat" of the rotors can corrode if you live in an area where they salt the roads. I had to use a 3 jaw puller to remove mine, as the fit between the rotor and axle flange is minimal. If it is heavily corroded it will be difficult if not impossible to remove with out the puller.
08-17-2014, 08:13 AM
#5
Burning Brakes
I have never resolved the question as to why these little screws are used by Honda. But I'm pretty sure the engineers there generally know what they are doing, and the real reason for their use is not to piss off driveway mechanics. Sometimes these screws are brass and sometimes they are aluminum. So it is easy to strip the Phillips head pattern. A couple points not usually mentioned:
1. These screws locate the rotor so it can only go on one way. That is, the same stud will go through the same hole in the rotor every time if the screws are used as intended. So the balance with the hub and the rotor will be the same every time. Of course this will not be relevant when the rotor is replaced by a new one. 2. The use of the screws causes the installer to get the rotor on straight and not cocked. The rotor should be flush against the hub before you start tightening the lug nuts. This seems to be a good idea. Again, not every mfr uses this, so it's not a big reason on its own. 3. Finally, I have heard it said that the screws hold the rotors in place and prevent damage as the car rolls down the assembly line during manufacture. Maybe.
In any event, since the screws are so soft it is very easy to drill them out if necessary, in a few seconds. If you don't own a small drill and a proper drill bit, well......what can I say......?
Bottom line, I always reuse them, and since I maintain my brakes regularly, they are not a problem after the first time.
08-17-2014, 08:17 AM
#6
Burning Brakes
Another point I should have mentioned. Someone above was asking about the TPMS sensors. I would be more concerned about the brake system (ABS) sensors. You should minimize the amount of hammering and rough treatment at the rotors so as to not damage the brake system sensors.
08-24-2014, 03:47 PM
#7
Thanks guys. I'm going to tackle this on my week off next week. Going to paint the calipers too. Probably going to sand them with a dremel then prime paint 2-3 coats and clear them. Going to be time consuming and yeah I see myself drilling these screws out. I have a good drill. What size are these screws btw so I can just replace them and put some anti-sieze on them? I'll keep updated on this thread with pics and any tips I can give you guys. Thank you all for the replies!
Trending Topics
08-24-2014, 06:06 PM
#8
Drifting

I'll be doing my rotors and pads next weekend. I plan on using some PB blaster on those rotor screws before using an impact driver on them. While I'm a fan of Harbor Freight tools, my one and only problem happened to be with that impact driver when I replaced the rotors on my Honda Pilot- the bit actually shattered and I wound up going to Napa to buy another tool and returned the HF tool.
I also bought some RDX caliper covers to dress up the front calipers a little bit without painting them. I'm looking forward to some StopTech slotted rotors next weekend and will get to break them in on a road trip that following week.
I also bought some RDX caliper covers to dress up the front calipers a little bit without painting them. I'm looking forward to some StopTech slotted rotors next weekend and will get to break them in on a road trip that following week.
The following users liked this post:
DrewSO (08-31-2014)
08-31-2014, 10:55 PM
#10
I'll be doing my rotors and pads next weekend. I plan on using some PB blaster on those rotor screws before using an impact driver on them. While I'm a fan of Harbor Freight tools, my one and only problem happened to be with that impact driver when I replaced the rotors on my Honda Pilot- the bit actually shattered and I wound up going to Napa to buy another tool and returned the HF tool.
I also bought some RDX caliper covers to dress up the front calipers a little bit without painting them. I'm looking forward to some StopTech slotted rotors next weekend and will get to break them in on a road trip that following week.
I also bought some RDX caliper covers to dress up the front calipers a little bit without painting them. I'm looking forward to some StopTech slotted rotors next weekend and will get to break them in on a road trip that following week.
09-01-2014, 12:02 AM
#11
kid dynamite

Join Date: Oct 2013
Location: guilford,ct
Age: 56
Posts: 10
Likes: 0
Received 0 Likes
on
0 Posts
i only use harbor freight if its a one job deal.the quality isnt there which youve proven............................................ .................................................. .................................................. ......................................
09-04-2014, 10:56 AM
#15
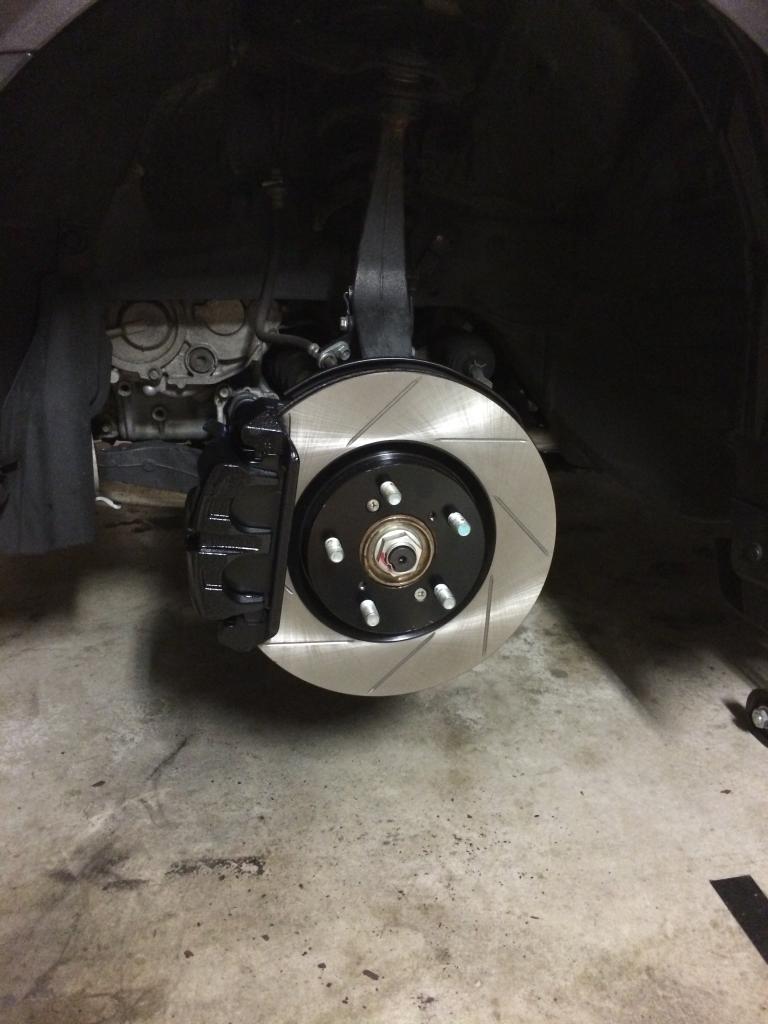
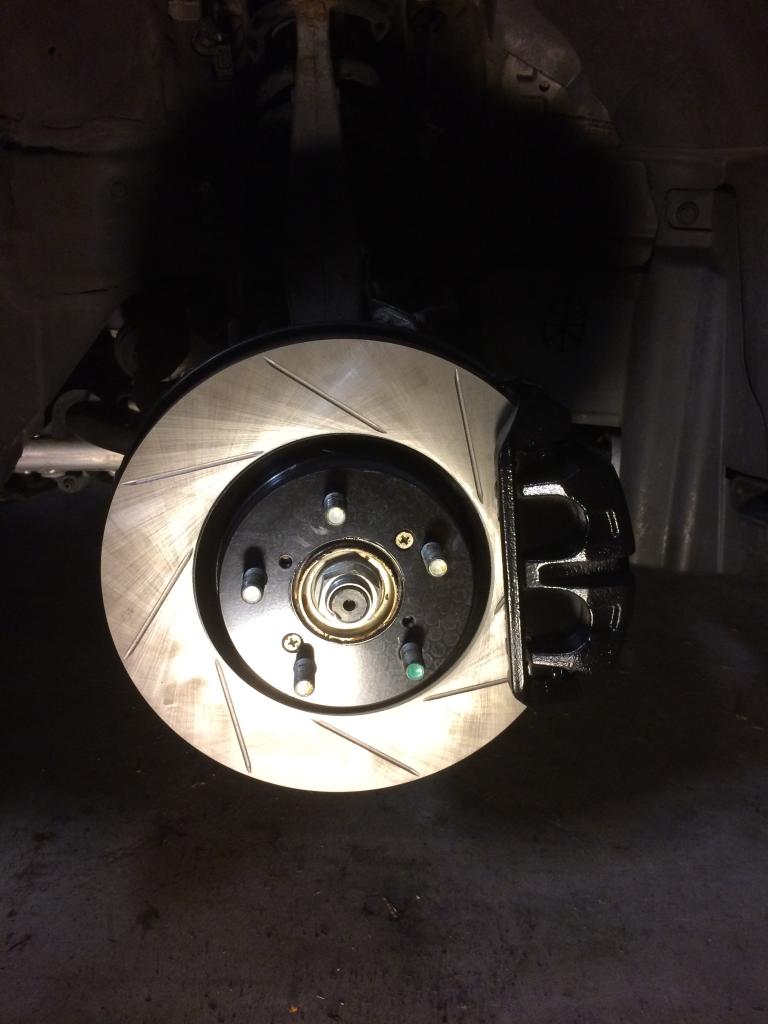
So I completed the rotors. Took me 8 hours in total (mainly waiting on paint to dry).
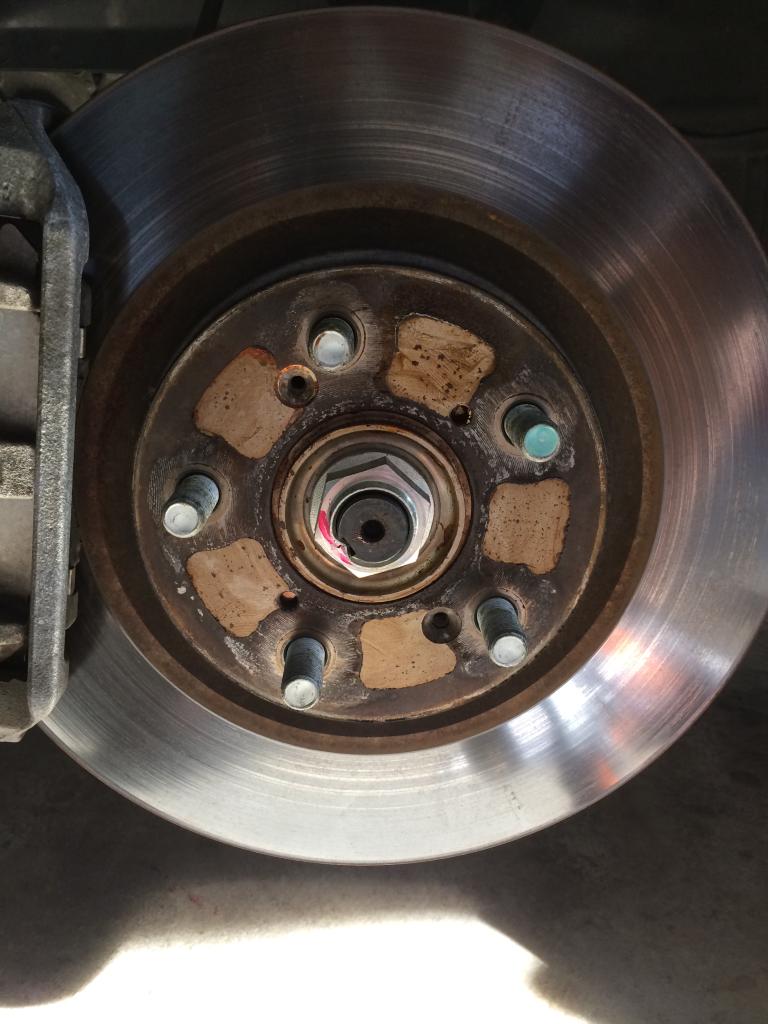
Here's a before pic of the old rotors and calipers.....
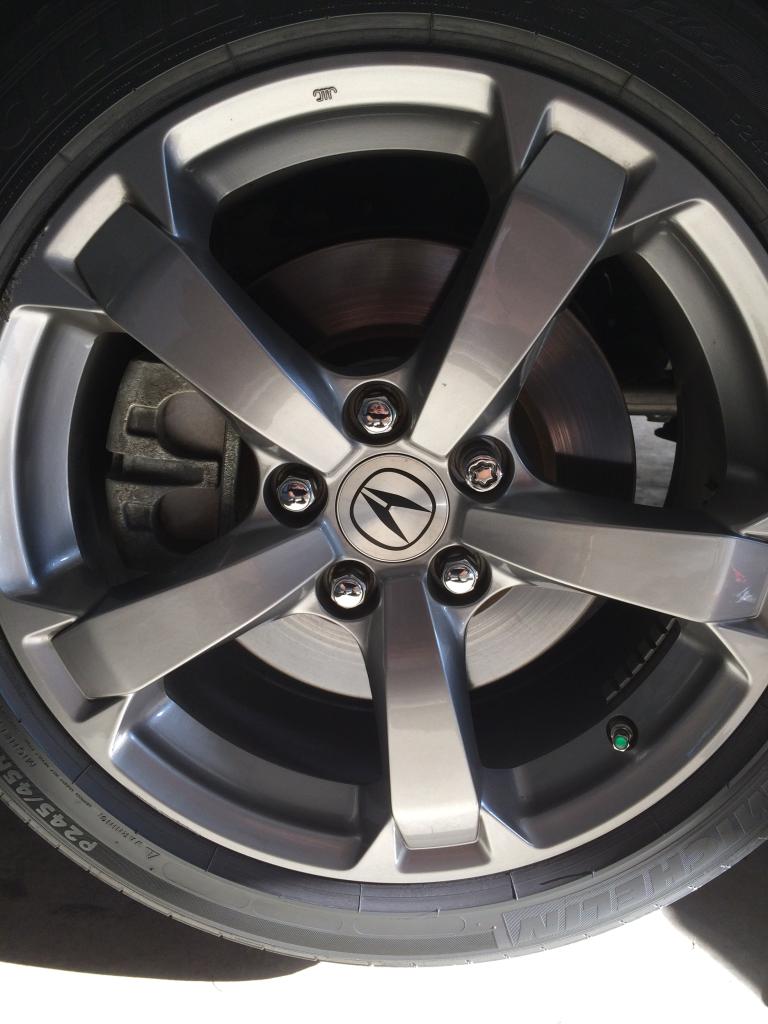
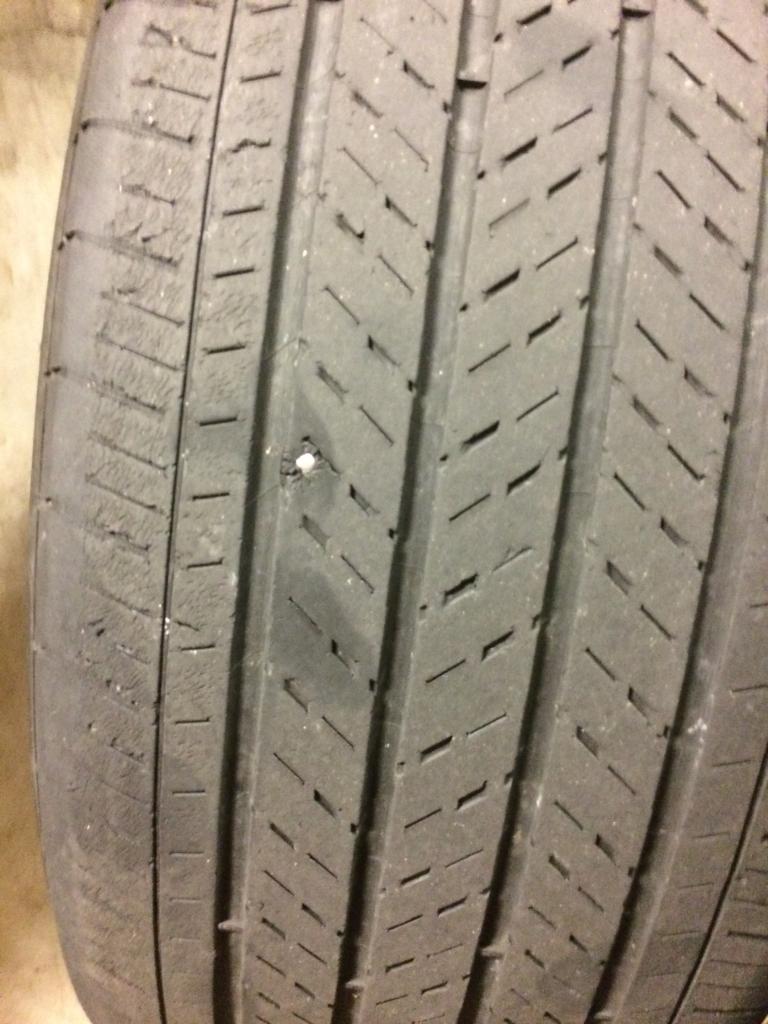
After I got the tire off I found a nail stuck in it along with the other front tire as well. Great....Time for new tires soon.
Pesky screws came out just fine applying pressure on a cordless drill with hammer drill abilities...
Used a wire brush to sand off the calipers and scratch them some to get the paint to stick and applied primer.
Waited so I stared at some Hope Alexa pics on Instagram and made her my WCW between paint coats and she liked my pic. Made my day. Yeah, I'm in love....

Finished product....
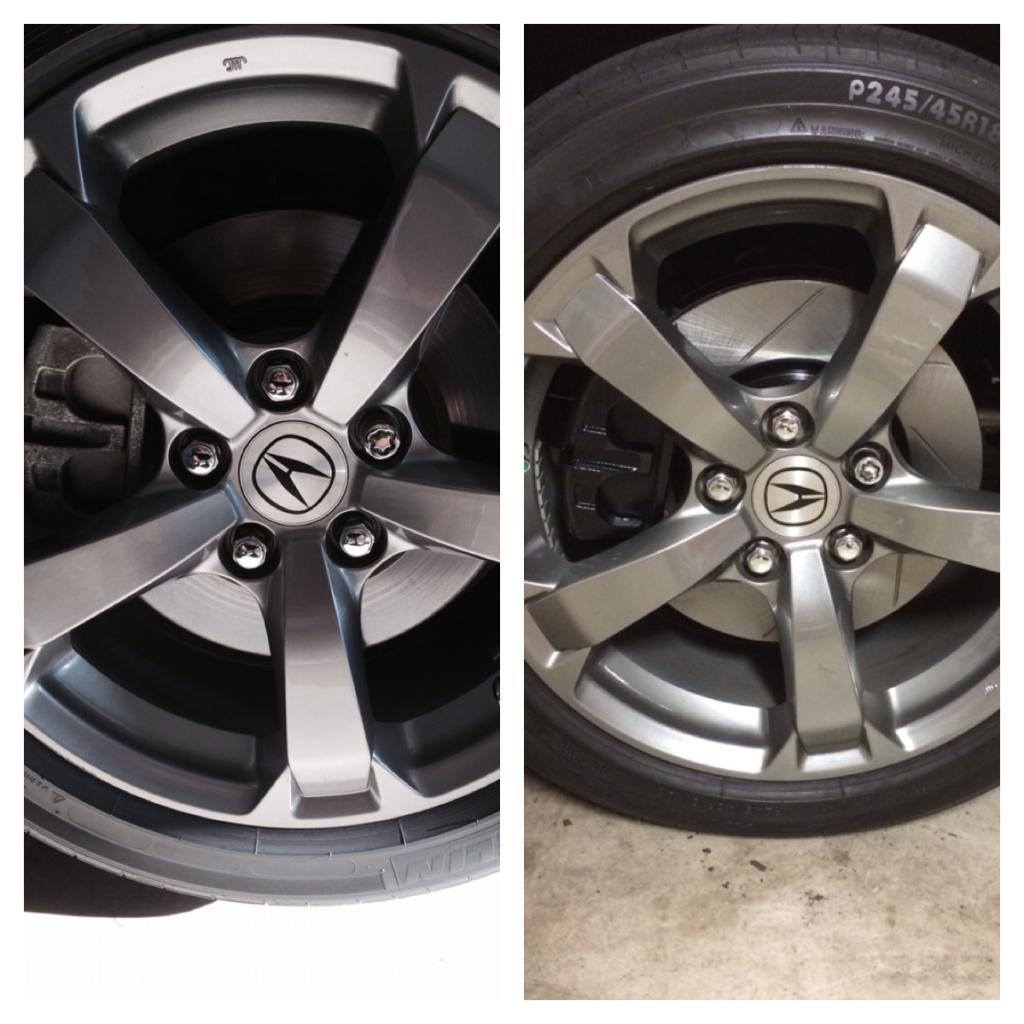
Side by side
Rear
Here's a before pic of the old rotors and calipers.....

After I got the tire off I found a nail stuck in it along with the other front tire as well. Great....Time for new tires soon.

Pesky screws came out just fine applying pressure on a cordless drill with hammer drill abilities...

Used a wire brush to sand off the calipers and scratch them some to get the paint to stick and applied primer.

Waited so I stared at some Hope Alexa pics on Instagram and made her my WCW between paint coats and she liked my pic. Made my day. Yeah, I'm in love....

Finished product....

Side by side

Rear
 09-07-2014, 11:59 AM
#18
So the rears are making noise even without applying the brake. I did compress the pistons and put the pads on correctly. Could they be sticking? Weird. The fronts arent making any noise at all.
09-14-2014, 03:38 PM
#20
Racer

i just did all 4 rotors and pads on mine, did you adjust the hand brake tension? Do the wheels turn when you have handbrake released? Maybe, just maybe the handbrake setting has changed and it is now dragging the rotors.
For the clunking I had it on my front rotors. In my case it was 2 things, 1st the pins that hold the bracket did not move very well, I had to re-grease and make sure they move smoothly. 2nd the screws that hold the rotor were loose and the rotor was not lined up perfectly, when I put my wheels on it did not tighten the rotor to the hub correctly and it was clunking quite a bit, the faster I went the worst it got. 20 minute fix and it has been good for a week now. Not sure if similar thing can happen on rears but that solved it for me.
For the clunking I had it on my front rotors. In my case it was 2 things, 1st the pins that hold the bracket did not move very well, I had to re-grease and make sure they move smoothly. 2nd the screws that hold the rotor were loose and the rotor was not lined up perfectly, when I put my wheels on it did not tighten the rotor to the hub correctly and it was clunking quite a bit, the faster I went the worst it got. 20 minute fix and it has been good for a week now. Not sure if similar thing can happen on rears but that solved it for me.
09-15-2014, 11:46 PM
#21
Re-Grease the pins? Howd you do that? All I see is the two bolts that go on the back of the caliper (not the caliper bracket itself). I tightened those. The slides are in a rubber boot.
09-16-2014, 09:18 PM
#22
Racer
Once you take off the caliper the sliders just pop out of the rubber boot. I cleaned these up and re-greased with a silicone based caliper brake grease. Its been 6 days for me and the clunking has gone away all seems good.
09-19-2014, 09:15 PM
#23
Burning Brakes
The pins are very important in the proper functioning of the calipers.
The pins must be free to move in and out. The rubber boots just keep dirt and water out. When the brakes are applied the piston moves out to apply the inner pad against the rotor. But the caliper itself moves the opposite direction (Newton's 3rd law, so called action and reaction) and in doing so it applies the outer pad against the rotor.
If you find that one pad is wearing and the other is not, it means the caliper is seized or stuck on the pins.
The pads should wear evenly. If you find that a pad is worn unevenly so that it is becoming "wedge shaped"
it means that the pad is sticking in it's holder.

Thread
Thread Starter
Forum
Replies
Last Post
mada51589
3G TL Problems & Fixes
79
05-03-2022 08:54 PM