
 07-13-2016, 05:20 PM
Last edit by: IB Advertising
See related guides and technical advice from our community experts:
- Acura How to Paint Brake Calipers
Step by step instructions for do-it-yourself repairs.

Painted BRAKE CALIPERS: PICS Products & DIY steps
11-23-2011, 10:36 AM
#1

Painted BRAKE CALIPERS: PICS Products & DIY steps
Ok, my brakes are up for replacing soon and been on the fence of changing my rotors (at least the front) to POWER STOPS or something along that line. (Any recommendations ROTORS & PADS) While under the fender with this job, I was thinking of painting of painting my calipers with some G2 Epoxy paint as I have several times in the past with several cars. Any pics of other DIY jobs for those who can't afford ROTORA BBK and some Hi-end dollar kits like myself  ...LOL!
I am in a toss up of the following colors:
ORANGE
RED
BLACK
GOLD
BLUE
Pics details please: Thanks!
...LOL! I am in a toss up of the following colors:
ORANGE
RED
BLACK
GOLD
BLUE
Pics details please: Thanks!
 11-23-2011, 10:50 AM
#2
Team Owner
iTrader: (2)
Join Date: Jan 2008
Location: Kansas City, MO (Overland Park, KS)
Posts: 36,545
Received 6,470 Likes
on
5,162 Posts
I'd say go with red, and them do a little trimming around the nose and rear grill, like I did....
11-23-2011, 10:58 AM
#3
RED is always spot on and can NEVER go wrong! Especially on BLACK! But at the same time...Its common....Common for that reason already stated

BTW, what do u mean trimmed around nose and grill? With the red?
 maybe not. I want to keep the MURDERED classey look going on the body as much as possible and just letting the color pop by themselves behind my wheels. Mr Bell, where is your pics sir!?
 did u notice I used the QUOTE WITH COMMENT button...lmao!


 11-23-2011, 12:39 PM
#4
go orange. it would look awesome on a black car with your gunmetal wheels
11-23-2011, 02:27 PM
#5

But for some reason, I think the orange will be killin em! For example, who the hell would have though ORANGE rear vgiew mirrors and ORANGE wheels would have looked good... BLAH! No one! Execpt the one dam member who did it (forgot his name) and IT LOOKED FKN AMAZING!!!
Last edited by JayVee; 11-23-2011 at 02:31 PM.
11-23-2011, 04:07 PM
#7
Drifting
think out of the box man  don't do something so simple
2011 lexus starphire pearl.... very pearl blue in direct sun light
think of any car color you like and get the paint from this site.....
http://www.automotivetouchup.com/
super easy to do.... first use some simple green clean the calipers.... use some 600 grit sand paper to scuff up.... then spray on paint 4 coats and then use there high gloss clear and do 4 coats as well.... paint looks awesome... cans spray like an air brush you will be happy!
we just did my friends G37s in 2004 nissan A17 lemans sunset color they sparkle like mad in direct sun ....
don't do something so simple 2011 lexus starphire pearl.... very pearl blue in direct sun light
think of any car color you like and get the paint from this site.....
http://www.automotivetouchup.com/
super easy to do.... first use some simple green clean the calipers.... use some 600 grit sand paper to scuff up.... then spray on paint 4 coats and then use there high gloss clear and do 4 coats as well.... paint looks awesome... cans spray like an air brush you will be happy!
we just did my friends G37s in 2004 nissan A17 lemans sunset color they sparkle like mad in direct sun ....
Trending Topics
11-23-2011, 04:54 PM
#8
Good Question... Thanks!
Regular stock base model calipers / AT
That color is ill! Pics of it complete with wheels and tires pls! And all that was done while still assembled?
Regular stock base model calipers / AT
think out of the box man don't do something so simple

2011 lexus starphire pearl.... very pearl blue in direct sun light
think of any car color you like and get the paint from this site.....
http://www.automotivetouchup.com/
super easy to do.... first use some simple green clean the calipers.... use some 600 grit sand paper to scuff up.... then spray on paint 4 coats and then use there high gloss clear and do 4 coats as well.... paint looks awesome... cans spray like an air brush you will be happy!
we just did my friends G37s in 2004 nissan A17 lemans sunset color they sparkle like mad in direct sun ....

don't do something so simple 2011 lexus starphire pearl.... very pearl blue in direct sun light
think of any car color you like and get the paint from this site.....
http://www.automotivetouchup.com/
super easy to do.... first use some simple green clean the calipers.... use some 600 grit sand paper to scuff up.... then spray on paint 4 coats and then use there high gloss clear and do 4 coats as well.... paint looks awesome... cans spray like an air brush you will be happy!
we just did my friends G37s in 2004 nissan A17 lemans sunset color they sparkle like mad in direct sun ....
Last edited by Steven Bell; 01-12-2012 at 09:03 PM. Reason: Merged Posts.
 11-23-2011, 06:57 PM
#10
Suzuka Master
think out of the box man don't do something so simple
2011 lexus starphire pearl.... very pearl blue in direct sun light
think of any car color you like and get the paint from this site.....
http://www.automotivetouchup.com/
super easy to do.... first use some simple green clean the calipers.... use some 600 grit sand paper to scuff up.... then spray on paint 4 coats and then use there high gloss clear and do 4 coats as well.... paint looks awesome... cans spray like an air brush you will be happy!
we just did my friends G37s in 2004 nissan A17 lemans sunset color they sparkle like mad in direct sun ....
don't do something so simple 2011 lexus starphire pearl.... very pearl blue in direct sun light
think of any car color you like and get the paint from this site.....
http://www.automotivetouchup.com/
super easy to do.... first use some simple green clean the calipers.... use some 600 grit sand paper to scuff up.... then spray on paint 4 coats and then use there high gloss clear and do 4 coats as well.... paint looks awesome... cans spray like an air brush you will be happy!
we just did my friends G37s in 2004 nissan A17 lemans sunset color they sparkle like mad in direct sun ....
11-23-2011, 08:23 PM
#11
stop quoting the pics for goodness sake!
murph, surprised you didn't point him at this thread...
https://acurazine.com/forums/3g-tl-performance-parts-modifications-112/d-097-brembo-caliper-color-combos-not-56k-829109/
Jay...good stuff here...will help you make a decision.
I'm in the same boat, wasn't sure what to do with...but I'm going with silver with black brembo letters. Funny enough, was in the same debate in my head...so easy to take the blue theme too far for me...red is not an option, copper/orange is nice, but I feel like it might stand out TOO Much. Not sure...
11-27-2011, 10:51 AM
#13
Ok...so this long holiday weekend, decided to tackle this, since I knew I could leave my car out of commission and take my time.
Got 2 things done, swapped out my ebay special jpower front camber balljoint to the spc one. I have to say, the jpower people did a GREAT job of copying the style. It's identical, save for the 17mm castle nut vs the 16mm spc (lucky I realized before I stripped it). Also, the SPC one, when you tighten it down, it actually presses the balljoint into the upper control arm, the ebay one was moveable as soon as you'd loosen the upper nut.
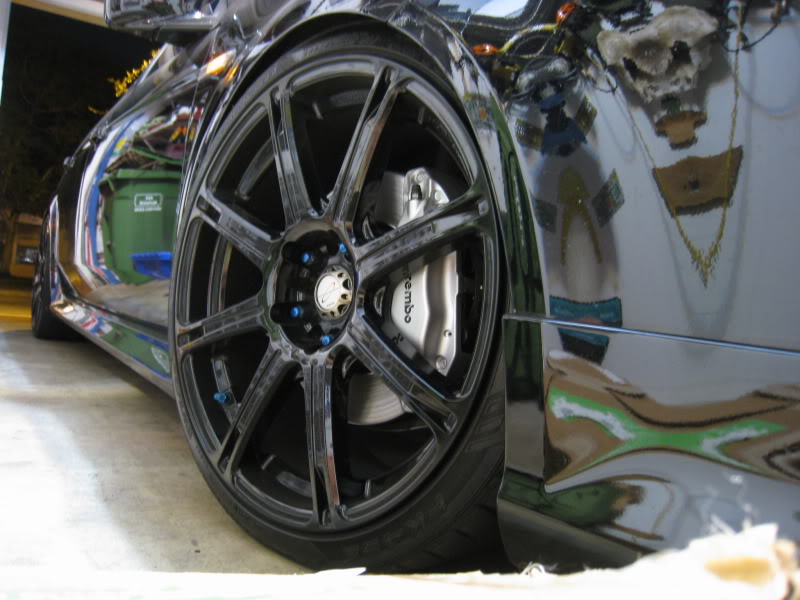
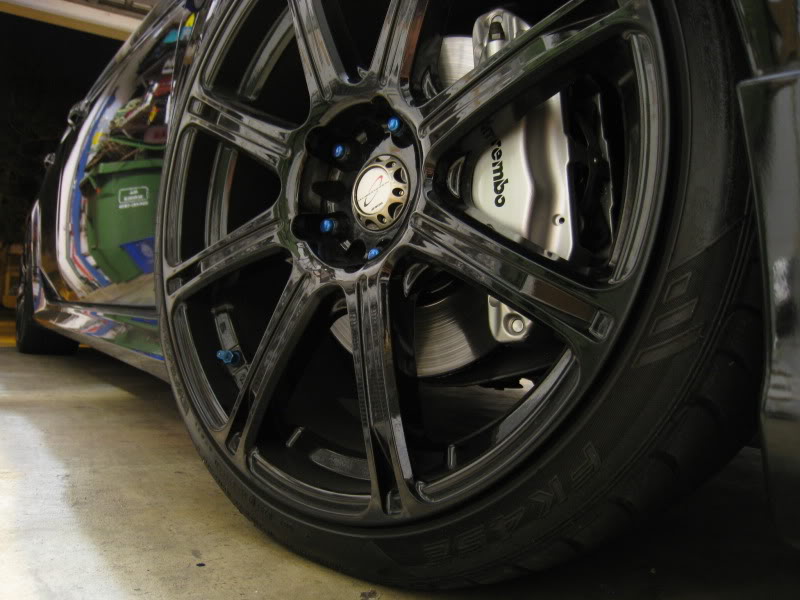
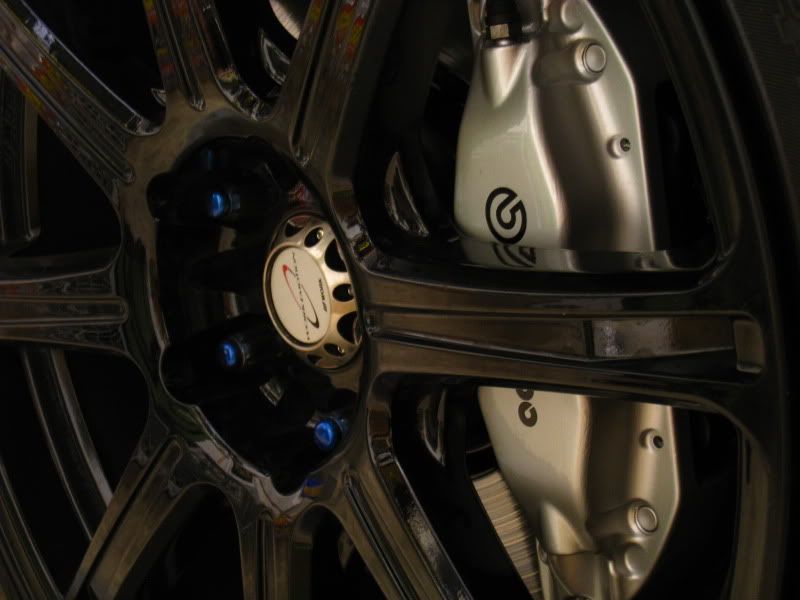
Next up, I got my brake calipers and hubs/discs done. I had done a half assed job of spraying the discs in silver a year ago, but I definitely didn't prep correctly. I'll probably end up getting some zinc plated brakemotive discs down the line, but this'll buy me some time.
On to the pics...I made a semi DIY, although I'm sure it's pretty self explanatory. Won't bother with the camber pics, although there's one of the spc one installed.
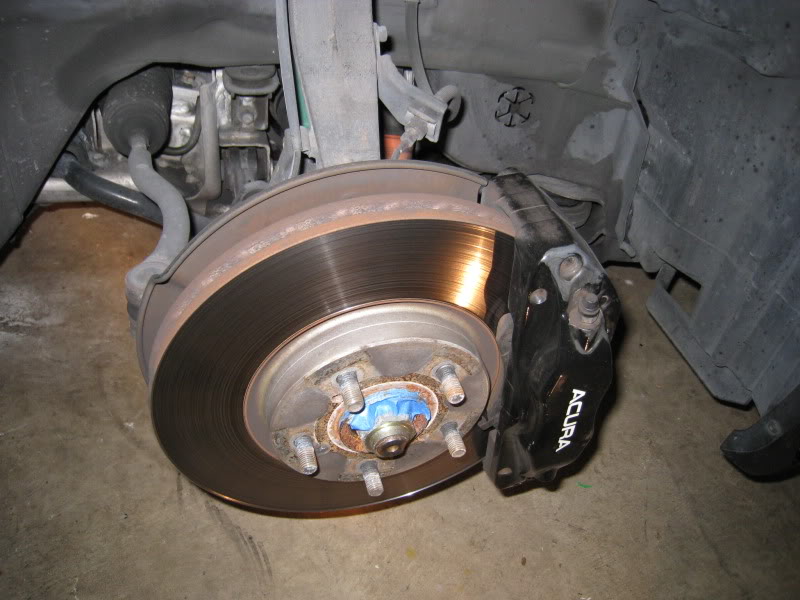
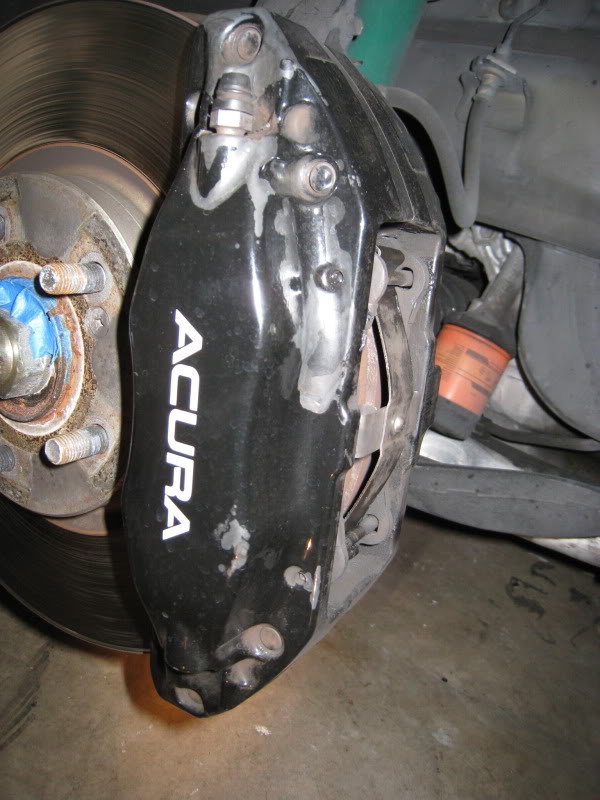
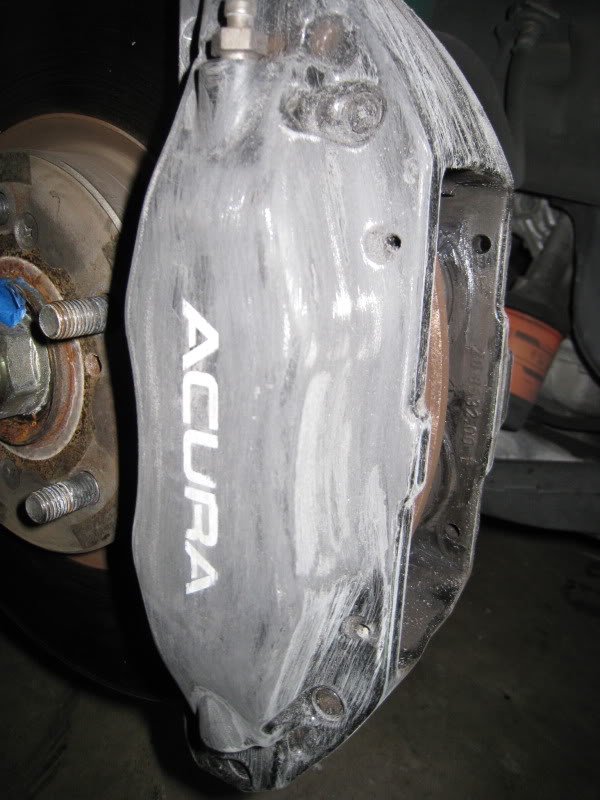
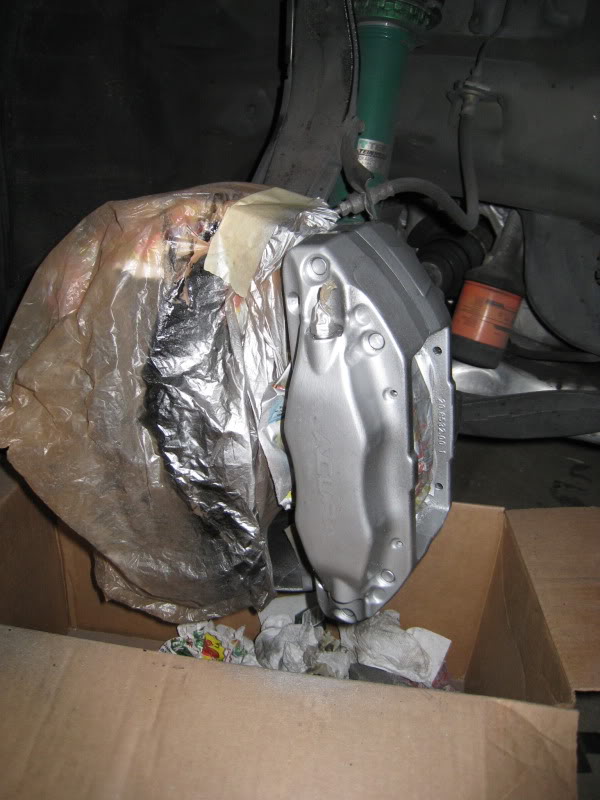
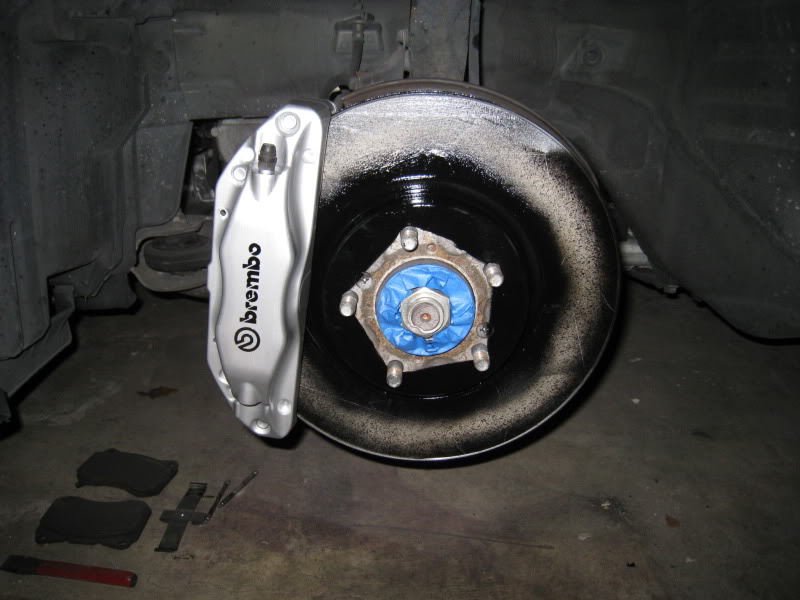
Here's what we're starting with...some rusty hubs and here are some good pics of the bubbling that was occurring on my brembos...the final push I needed to go ahead with repainting them.
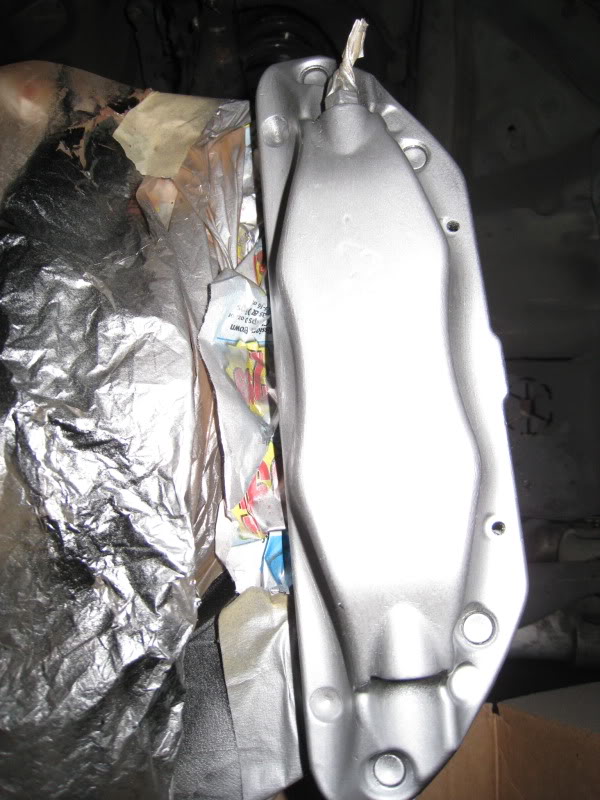
prepped everything at once, wiped down with some natural solvent stuff for the kitchen, then sanded with 50 grit and then 150, then wiped down again, then taped up, then wiped down with IPA. I learned on one side, use 150, the 50 leaves deep scratch marks, but you have to look closely to see them.
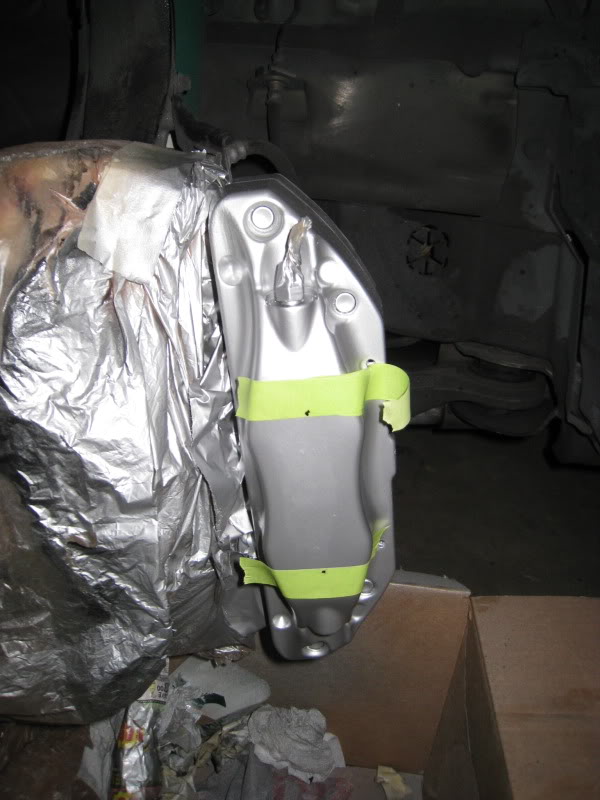
depending on your rims, you can see some parts of where the rim seats against the hub, so paint that too...covered the lugs, you don't want a few millimeters of paint on those.
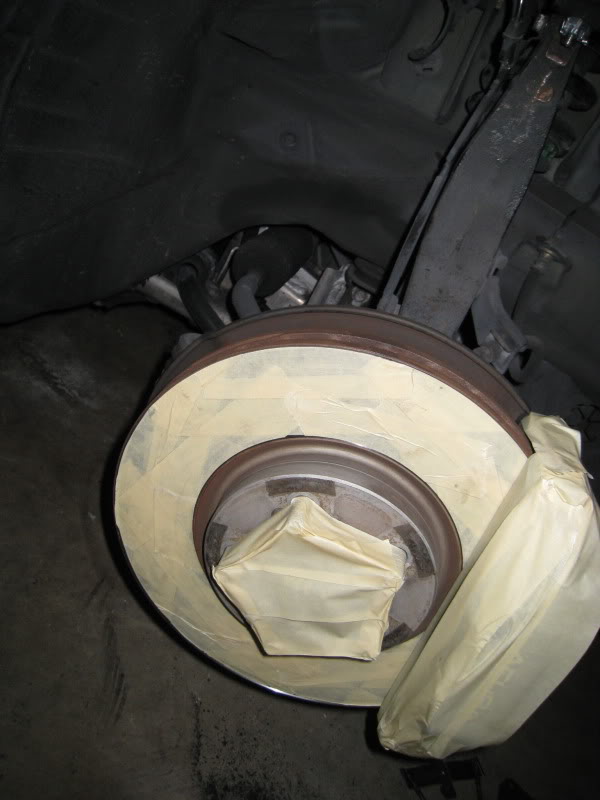
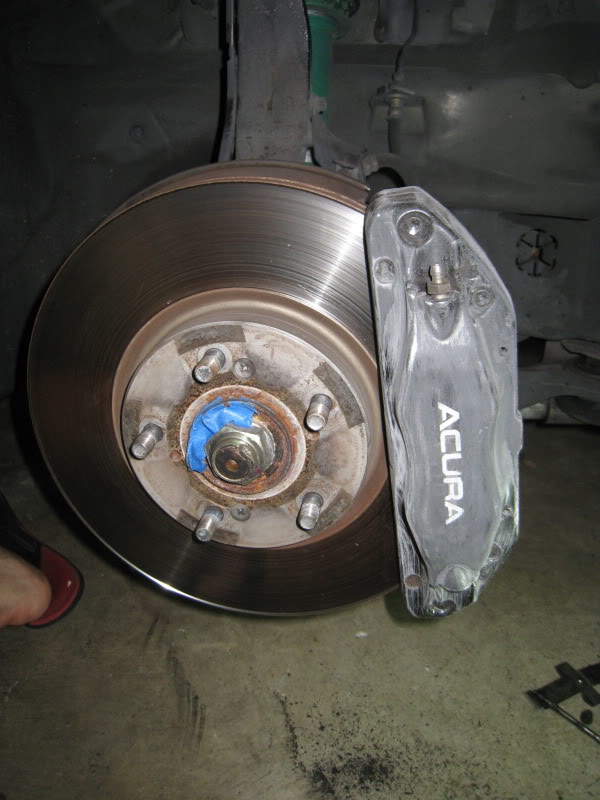
Ok, HUB done...
For the discs...the brakes will take care of scraping and burning off any extra paint after, but you don't want all that gunk on there...I used 1.5" painters tape, put on long straight strips to cover the most area...then I put a razor blade on the grooves and spun the disc by hand to cut a perfect circle. Took about 5 minutes per disc and made cleanup a breeze (nonexistent). An ounce of prevention...pound of cure, right?
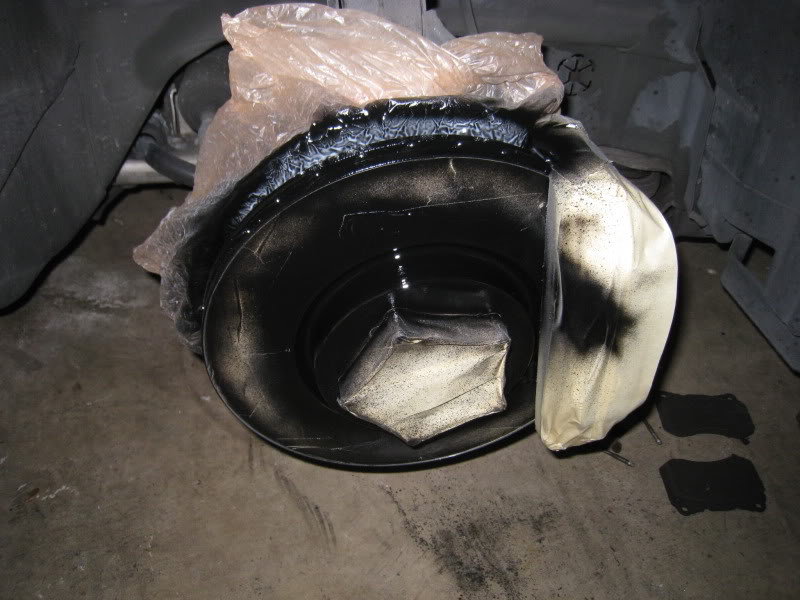
Once that was dry (and after getting home from the UM game)...I reversed the process...covered up the disc and secluded the caliper. I will make this recommendation when doing this, if you want to do it right and get good coverage and NOT on your pads or have weird paint lines where you should have painted but didn't because you had to tape and overtaped (if you've ever painted calipers back in the day you'll know what I mean). The level of detail and perfection is the line in the sand that separates if something looks oem and classy or like a hack job and why would you do that to that poor tl look from people. SO REMOVE THE BRAKE PADS/SLIDES/PINS. Seriously. Takes an extra few minutes but makes it easier to mask under...I basically just put a piece of newspaper and then slid it under the caliper.
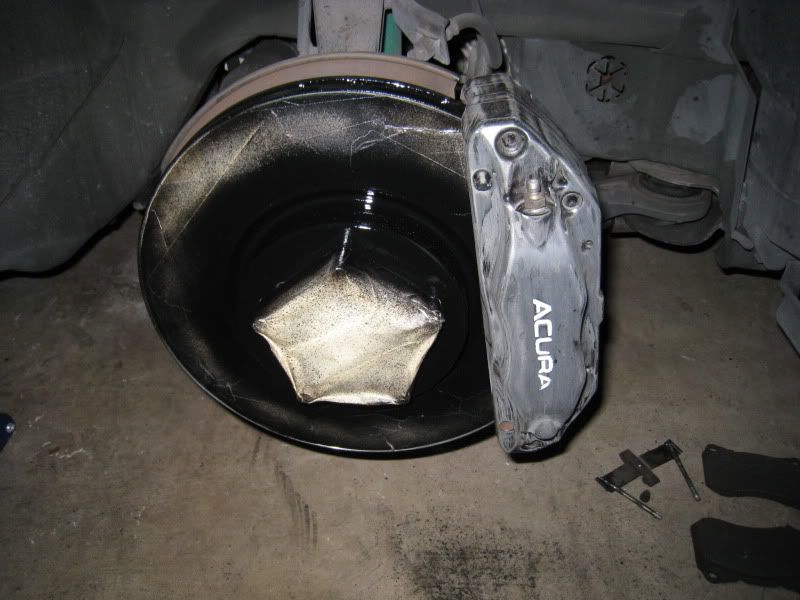
Already looking pretty good...OK, now, let me say this too...get a bearing on where the decal ends up...once this thing touches the semi wet paint (i installed after 30 minutes after the last coat of the base silver color, after an hour, they say not to do another coat of anything for a week) it will stick and NOT move. I messed up the first time...the pulled the letters off and put on my second one...but you could kind of see the ghosted image of where I messed up and put down the original letters...so scrapped it all and sanded it all back down and redid it. Then I measured where the center was vertically for a bearing, and then eyeballed horizontally...got it right. Only had 4 black decals so once I messed up the first two...ZERO margin for error.

Then clear it...I did 3 coats of base, 3 of clear.
Rears done...
and now the fronts...
with the tein and spc, it looks like Christmas under my fender!
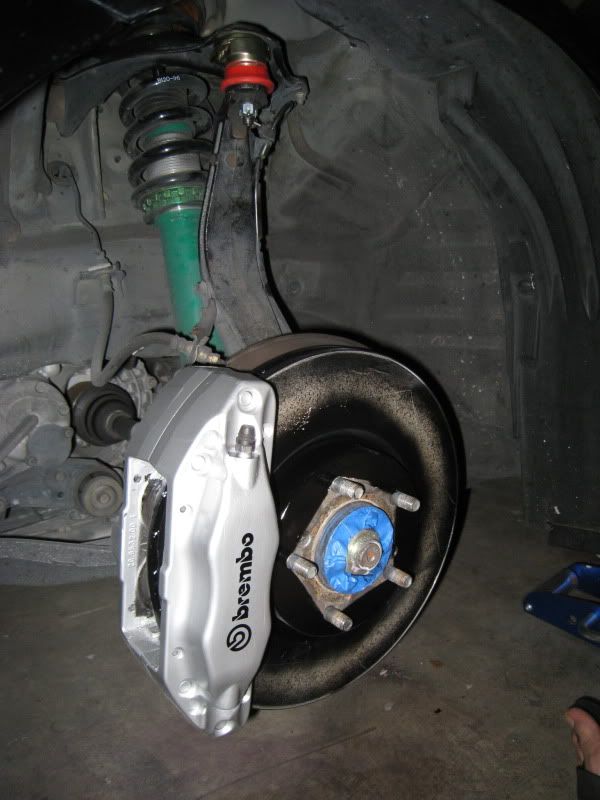
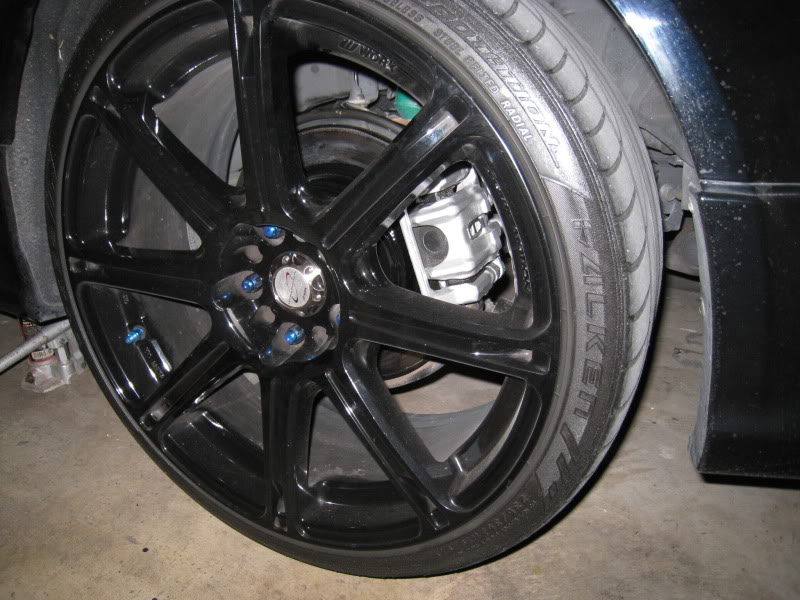
and here it is, complete...

Got 2 things done, swapped out my ebay special jpower front camber balljoint to the spc one. I have to say, the jpower people did a GREAT job of copying the style. It's identical, save for the 17mm castle nut vs the 16mm spc (lucky I realized before I stripped it). Also, the SPC one, when you tighten it down, it actually presses the balljoint into the upper control arm, the ebay one was moveable as soon as you'd loosen the upper nut.
Next up, I got my brake calipers and hubs/discs done. I had done a half assed job of spraying the discs in silver a year ago
, but I definitely didn't prep correctly. I'll probably end up getting some zinc plated brakemotive discs down the line, but this'll buy me some time. On to the pics...I made a semi DIY, although I'm sure it's pretty self explanatory. Won't bother with the camber pics, although there's one of the spc one installed.
Here's what we're starting with...some rusty hubs and here are some good pics of the bubbling that was occurring on my brembos...the final push I needed to go ahead with repainting them.
prepped everything at once, wiped down with some natural solvent stuff for the kitchen, then sanded with 50 grit and then 150, then wiped down again, then taped up, then wiped down with IPA. I learned on one side, use 150, the 50 leaves deep scratch marks, but you have to look closely to see them.
depending on your rims, you can see some parts of where the rim seats against the hub, so paint that too...covered the lugs, you don't want a few millimeters of paint on those.
Ok, HUB done...
For the discs...the brakes will take care of scraping and burning off any extra paint after, but you don't want all that gunk on there...I used 1.5" painters tape, put on long straight strips to cover the most area...then I put a razor blade on the grooves and spun the disc by hand to cut a perfect circle. Took about 5 minutes per disc and made cleanup a breeze (nonexistent). An ounce of prevention...pound of cure, right?
Once that was dry (and after getting home from the UM game)...I reversed the process...covered up the disc and secluded the caliper. I will make this recommendation when doing this, if you want to do it right and get good coverage and NOT on your pads or have weird paint lines where you should have painted but didn't because you had to tape and overtaped (if you've ever painted calipers back in the day you'll know what I mean). The level of detail and perfection is the line in the sand that separates if something looks oem and classy or like a hack job and why would you do that to that poor tl look from people. SO REMOVE THE BRAKE PADS/SLIDES/PINS. Seriously. Takes an extra few minutes but makes it easier to mask under...I basically just put a piece of newspaper and then slid it under the caliper.
Already looking pretty good...OK, now, let me say this too...get a bearing on where the decal ends up...once this thing touches the semi wet paint (i installed after 30 minutes after the last coat of the base silver color, after an hour, they say not to do another coat of anything for a week) it will stick and NOT move. I messed up the first time...the pulled the letters off and put on my second one...but you could kind of see the ghosted image of where I messed up and put down the original letters...so scrapped it all and sanded it all back down and redid it. Then I measured where the center was vertically for a bearing, and then eyeballed horizontally...got it right. Only had 4 black decals so once I messed up the first two...ZERO margin for error.
Then clear it...I did 3 coats of base, 3 of clear.
Rears done...
and now the fronts...
with the tein and spc, it looks like Christmas under my fender!
and here it is, complete...
The following 3 users liked this post by rockstar143:
11-27-2011, 11:10 AM
#15
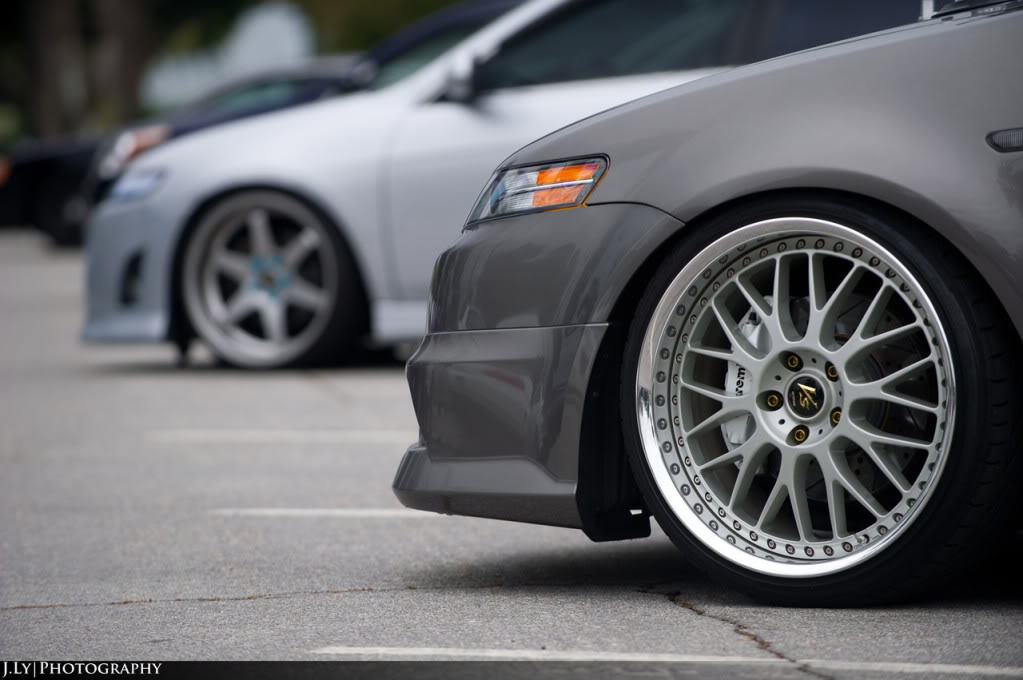
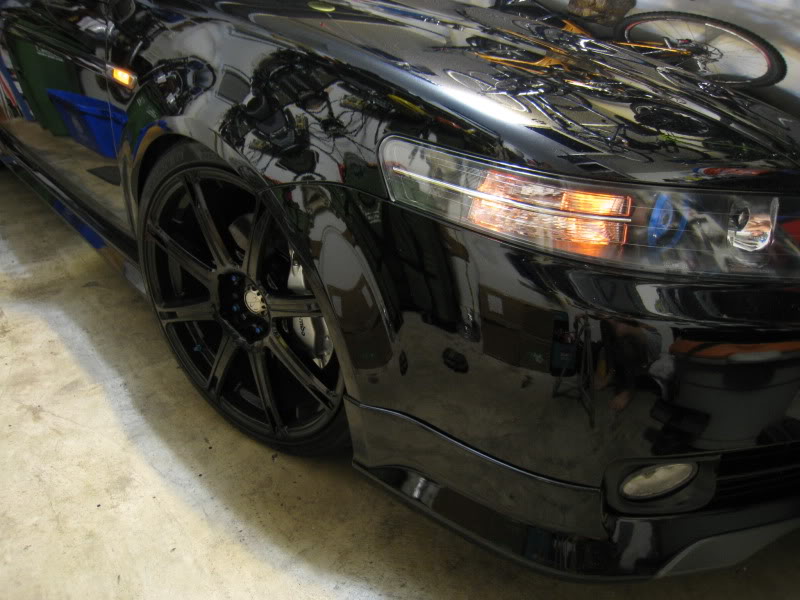
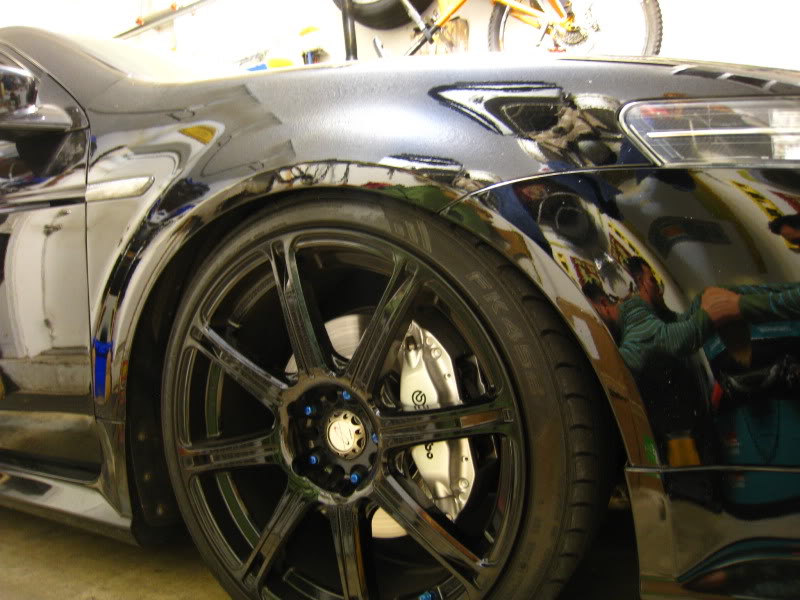
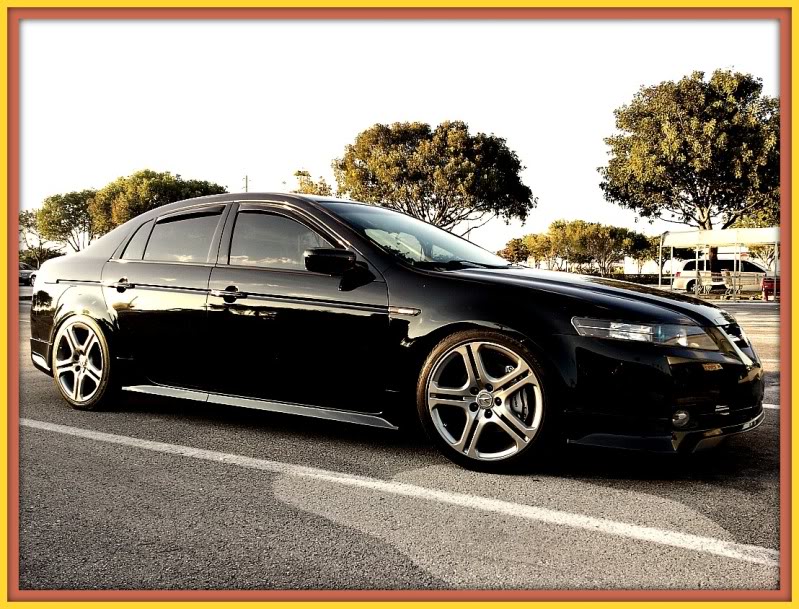
thanks, man...in this day and age, the huge lips and deep concaves are the in thing...but I still love a classic wheel that has the spokes go all the way to the edge.
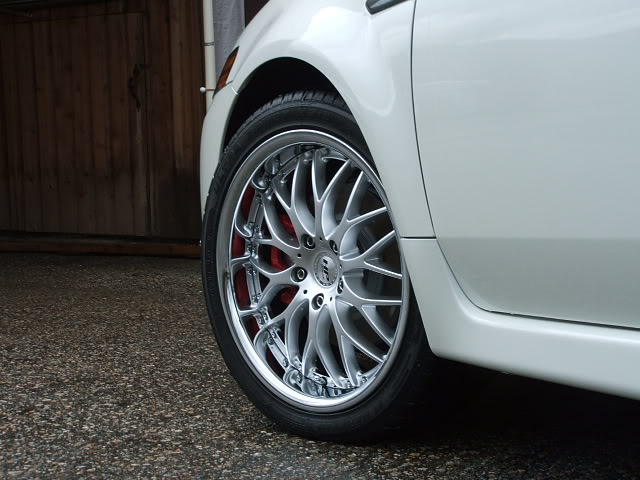
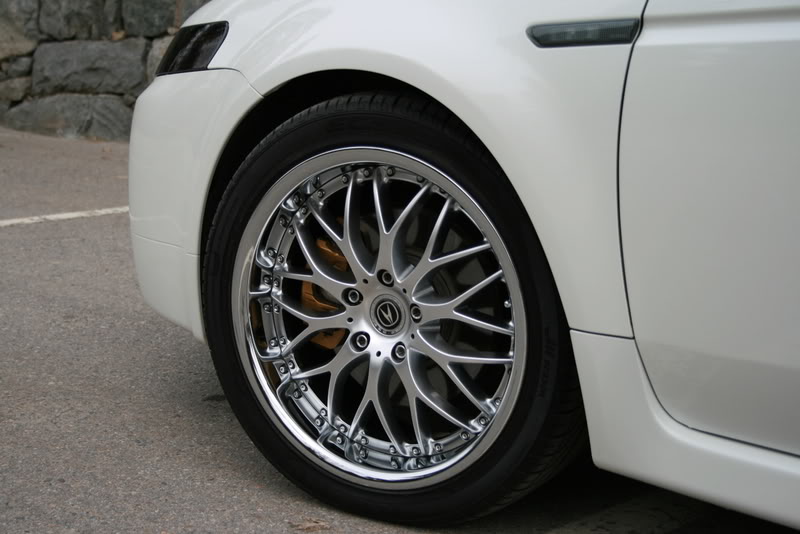
I'm happy with it...love how the calipers make the rim pop. I guess it's reversed for a black wheel, normally you want a dark caliper to not detract from the wheel, but in this case, I feel like it adds some needed contrast.
I'm happy with it...love how the calipers make the rim pop. I guess it's reversed for a black wheel, normally you want a dark caliper to not detract from the wheel, but in this case, I feel like it adds some needed contrast.
11-27-2011, 08:01 PM
#16
Rockstar143...Freekin LOVE IT! Looks spot on and AMAZING! The silver does great for the black on black... Blue would have looked pimp too due to your lugs. But the job looks PERFECT! ...I also have been thinking it over and going very conservative and siding with a metalic silver or shade of metalic charcoal. But I have also considered a TEAL green or blue shade also. A dark color because them being stockers... If I had BIG BOYS BBK, it would have been a done deal and no thread needed...CRAZY COLOR on its way! But they lil O Stockers and just thinking of a nice dark color not bringing to much BLING to em and adding ACURA decal to the front and calling it a day
The following users liked this post:
rockstar143 (11-27-2011)
11-27-2011, 08:17 PM
#17
Hmmm...thanks Jay...
So you decided on the color already!??! I was VERY close to doing the same engine bay color I used, it's like a burnt orange engine paint by duplicolor...but I felt like it'd be too loud. It being blue...felt like it would be bordering on being TOO matchy...the headlight ring, the lugs, the valvestem covers...etc...
Thank you for the compliment, friend...I'm VERY happy with it.
 ... Just a thought today.
  11-28-2011, 10:25 AM
#20
Thanks man...you probably will...my dentist is on Brickell... Plus, I grew up in Little Havana and all my friends family live between there, Westchester and little Gables.
If we ever get another meet together, I'm sure we'll all link up.
Plus, I grew up in Little Havana and all my friends family live between there, Westchester and little Gables. If we ever get another meet together, I'm sure we'll all link up.
11-28-2011, 01:29 PM
#22
RIGHT?!?! Thanks Murph...I think it must be the reverse contrast i was looking for...usuallly you want a dark caliper to not detract from the wheel...but with a black wheel the silver makes the rim kinda pop and stand out. I really love it...thanks for the inspiration.
The following users liked this post:
rockstar143 (11-28-2011)
01-11-2012, 04:32 PM
#28

Hi rockstar143, I assume that you actually have the TL stock non-type S caliper. I am trying to buy stickers on line (Acura), do you happen to have the dimension for the stickers needed? And would the sizes be the same between front and back calipers?
01-11-2012, 05:58 PM
#29
I do...
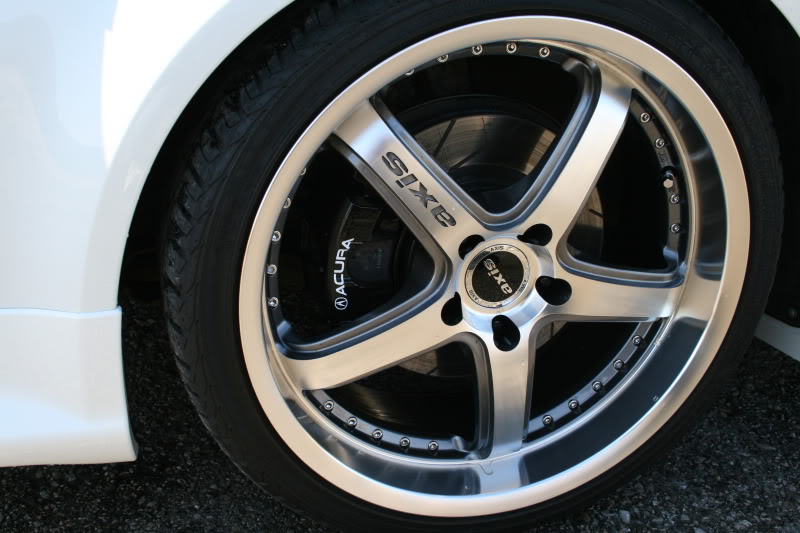
the sticker was 3.5" for the front and 2.5" for the rear.
I have Brembo's otherwise I wouldn't have put the sticker on there...maybe Acura but not Brembo. My rears don't have stickers for that reason.
Ebay person I bought from was
http://www.ebay.com/itm/Brembo-Brake...#ht_500wt_1156
the sticker was 3.5" for the front and 2.5" for the rear.
I have Brembo's otherwise I wouldn't have put the sticker on there...maybe Acura but not Brembo. My rears don't have stickers for that reason.
Ebay person I bought from was
http://www.ebay.com/itm/Brembo-Brake...#ht_500wt_1156
01-11-2012, 06:16 PM
#30
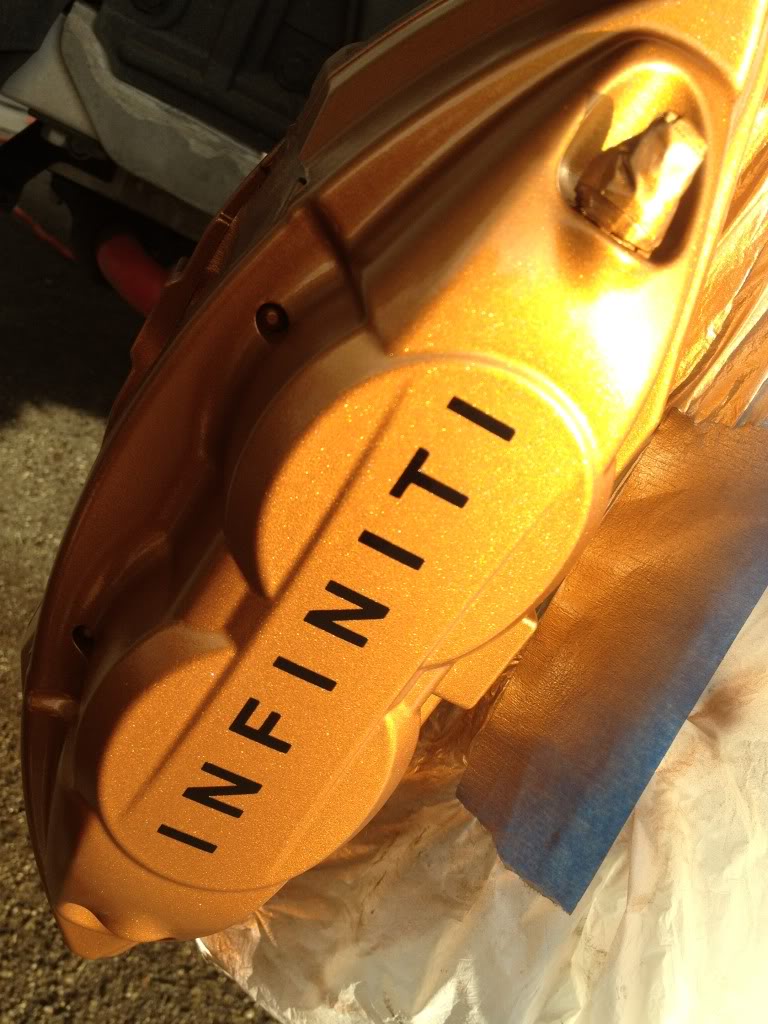
^ I did the same thing on another vehicle (ebay decals) ... It looked AMAZING! I painted all 4 cali. GOLD with the G2 kit and applied HONDA on the front cali. of a Honda Civic EG with ITR brake conv... Sorta like a OEM BBK! Turned out Schweeeeet!
Hey! ...GOLD would look pretty bad ass on my current set up with my TL and stand out thru all the dark theme I have now... :/ Hmmmmmm...
Hey! ...GOLD would look pretty bad ass on my current set up with my TL and stand out thru all the dark theme I have now... :/ Hmmmmmm...
01-12-2012, 03:05 PM
#32
takin care of Business in
iTrader: (5)
Join Date: Jan 2008
Location: Kansas City, MO
Age: 40
Posts: 30,994
Received 4,732 Likes
on
4,064 Posts
^^^ 
Murph and Rockstar's silver makes you think twice about any other color....
Murph and Rockstar's silver makes you think twice about any other color....
The following users liked this post:
rockstar143 (01-12-2012)
01-12-2012, 07:09 PM
#36
takin care of Business in
iTrader: (5)
Join Date: Jan 2008
Location: Kansas City, MO
Age: 40
Posts: 30,994
Received 4,732 Likes
on
4,064 Posts
^^^ i know right....
PS: remind me never to park next to his car LOL....
PS: remind me never to park next to his car LOL....
The following users liked this post:
rockstar143 (01-12-2012)
01-12-2012, 08:57 PM
#37
Team Owner
iTrader: (2)
Join Date: Jan 2008
Location: Kansas City, MO (Overland Park, KS)
Posts: 36,545
Received 6,470 Likes
on
5,162 Posts
RED is always spot on and can NEVER go wrong! Especially on BLACK! But at the same time...Its common....Common for that reason already stated
BTW, what do u mean trimmed around nose and grill? With the red? maybe not. I want to keep the MURDERED classey look going on the body as much as possible and just letting the color pop by themselves behind my wheels. Mr Bell, where is your pics sir!?
did u notice I used the QUOTE WITH COMMENT button...lmao!
BTW, what do u mean trimmed around nose and grill? With the red?
maybe not. I want to keep the MURDERED classey look going on the body as much as possible and just letting the color pop by themselves behind my wheels. Mr Bell, where is your pics sir!? did u notice I used the QUOTE WITH COMMENT button...lmao!
Jay, sorry I'm just seeing your question. Check out "My Garage" by clicking on the name of my car at the top of my signature-it's linked. Pictures are in My Garage.
And yes, nice job on using the "Quote with Comment button"!
01-12-2012, 09:18 PM
#38
Thanks fellas, and sorry, I'd delete the picture but swoosh would cut me. He says once I post a pic it better stay.
Anyway, I'm definitely open to seeing these new creative colors y'all keep pretending like you're going to paint your calipers...get it!
Anyway, I'm definitely open to seeing these new creative colors y'all keep pretending like you're going to paint your calipers...get it!
01-12-2012, 09:21 PM
#39
takin care of Business in
iTrader: (5)
Join Date: Jan 2008
Location: Kansas City, MO
Age: 40
Posts: 30,994
Received 4,732 Likes
on
4,064 Posts
^^^ my browser got casssssshhhhh (cache)
so i can still see the pic LOL.... yipppiieeeee
so i can still see the pic LOL.... yipppiieeeee