DIY: HT-Spec Coilver Install for Dummies! (or any other suspension!) 3G Garage #D-091
 04-17-2011, 10:20 AM
#1
Fearless DIY Guy
Thread Starter
iTrader: (2)
DIY: HT-Spec Coilver Install for Dummies! (or any other suspension!) 3G Garage #D-091
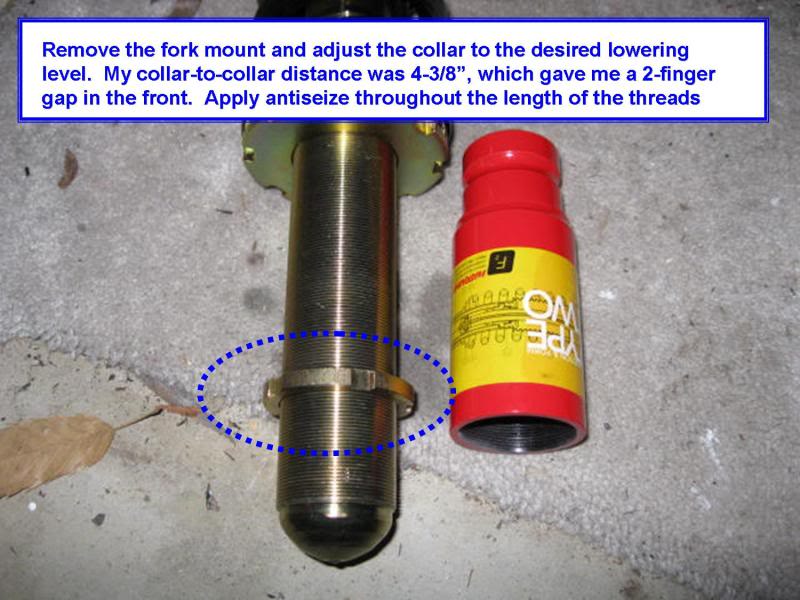
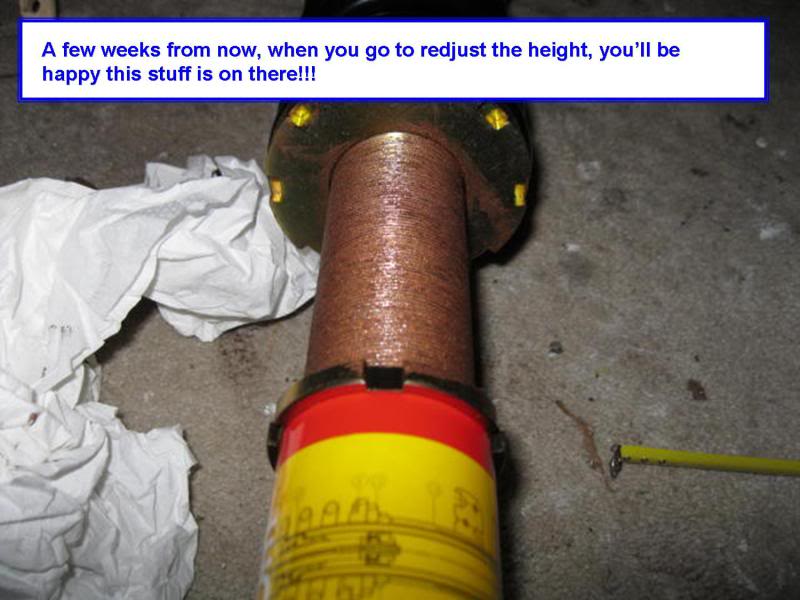
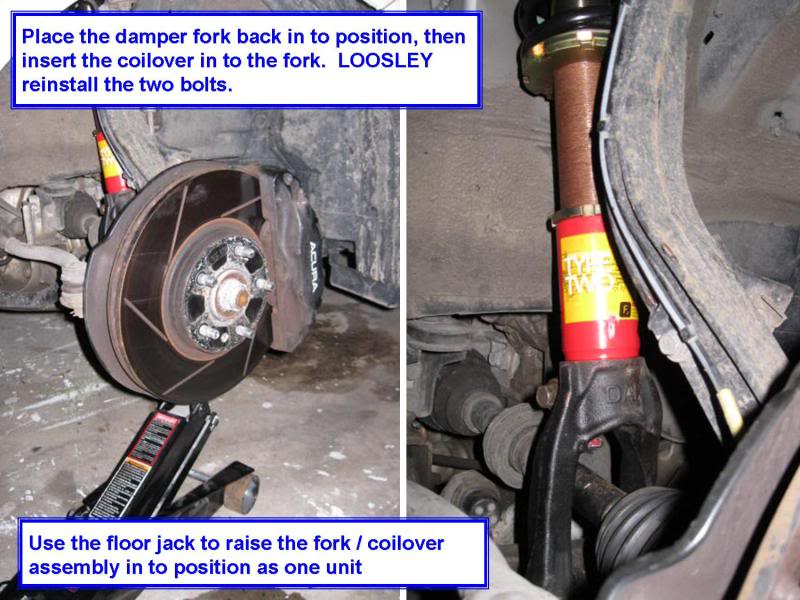
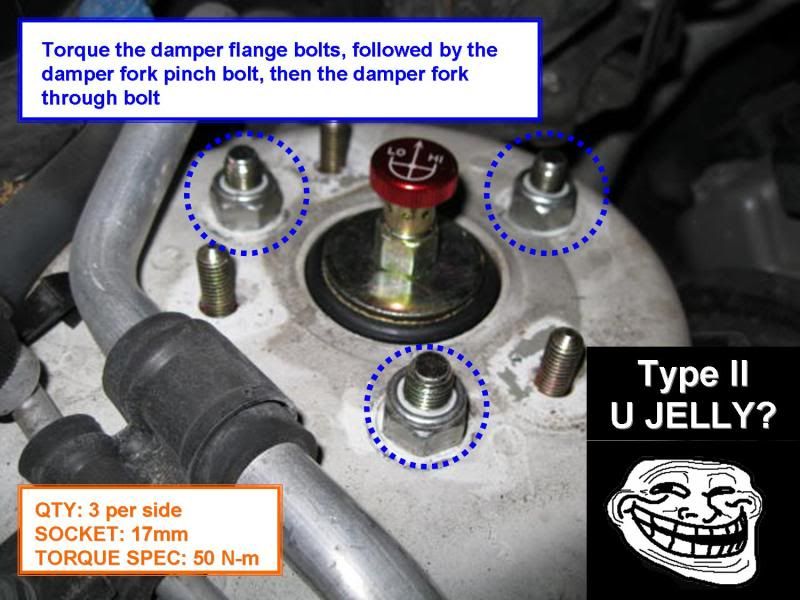
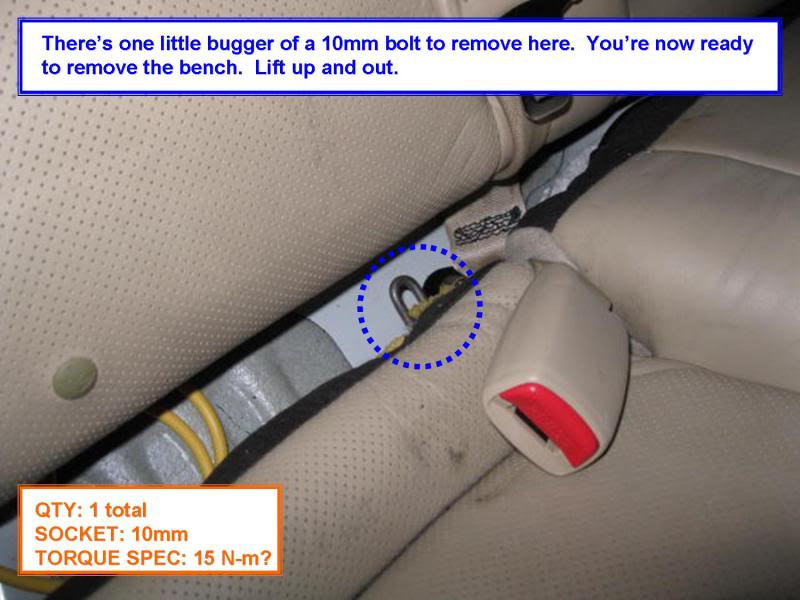
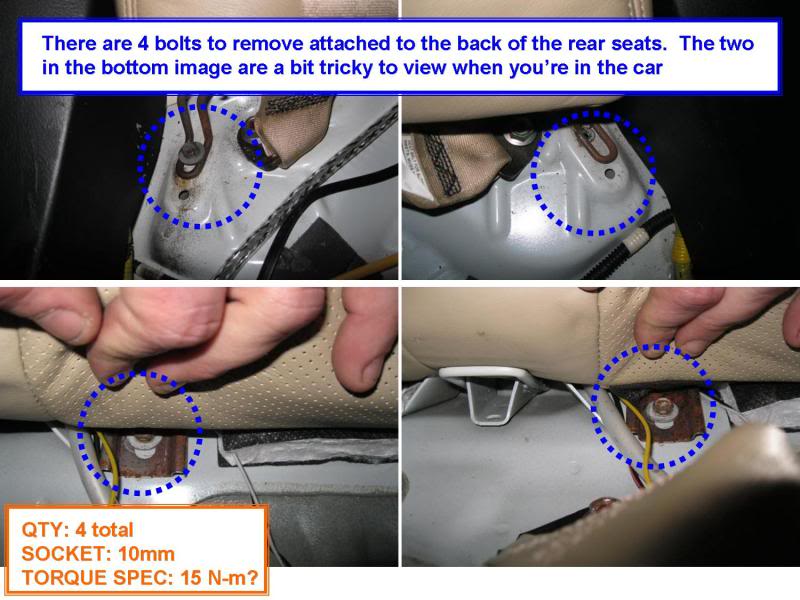
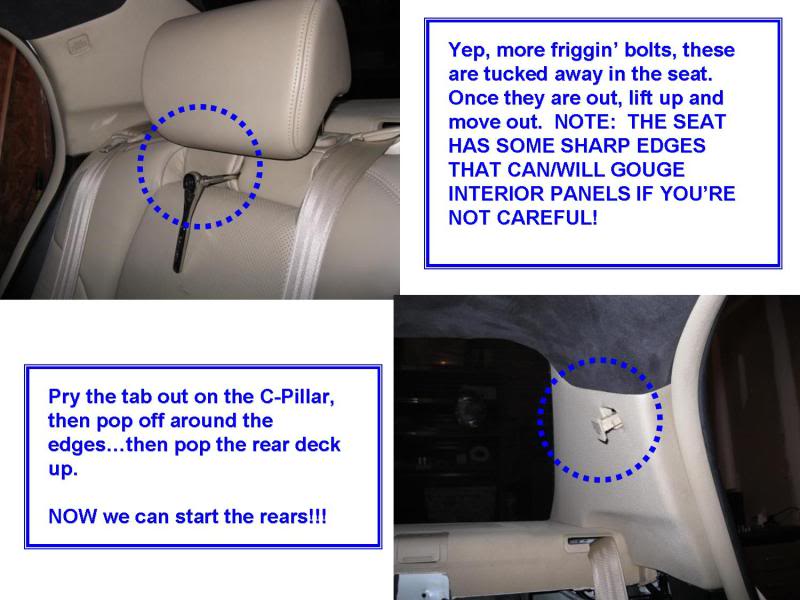
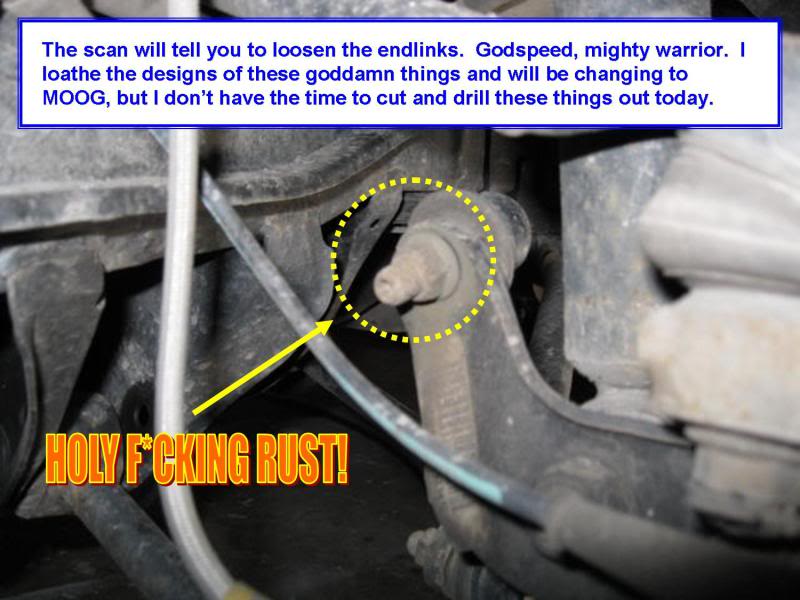
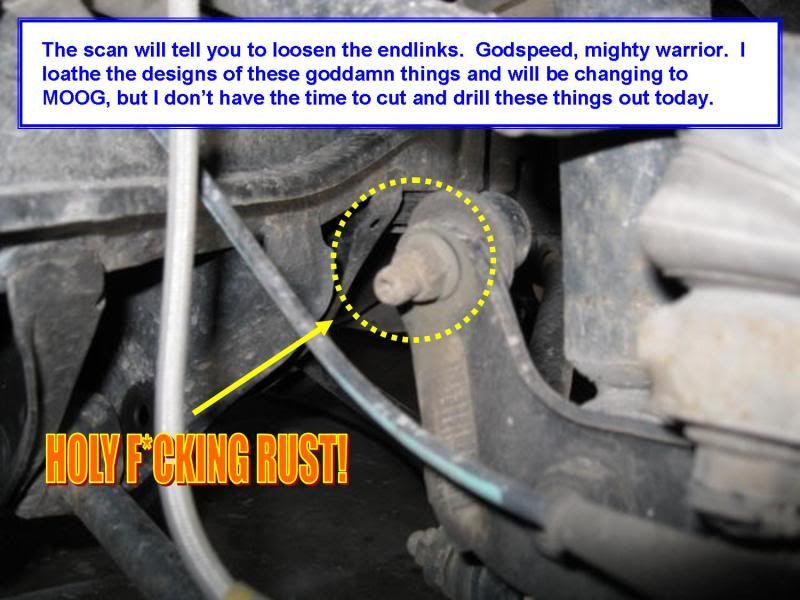
Ladies & Gentlemen, I present to you a DIY for the installation of HT-Spec coilovers: THE COILOVER INSTALL GUIDE FOR DUMMIES. This is the DIY for the 'rest of us' that are weekend wrenchers at best and may not be wholly fluent in the arena of suspension installations. This aims to detail all of the little nuances the other DIYs leave out and should provide you with a full knowledge base to handle every little WTF-isms that arise during the install. I hope this help, and keep on moddin'!
CLICK HERE FOR THE OFFICIAL SCAN
SPECIAL THANKS TO THESE MEMBERS:
Marcus DiSabella of HEEL TOE for calling me back when I needed it most (THAT'S CUSTOMER SERVICE, FOLKS)
Bearcat94, for pointing out the obvious
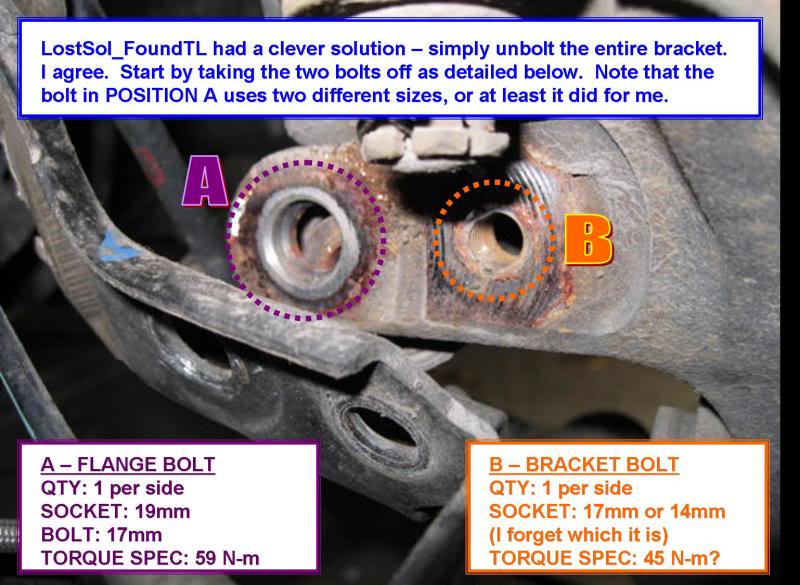
LostSol_FoundTL, for his killer suggestion in the rear
tldude876, for giving me a call when I was WTF'ed
AckTL05 / chinaone - for hanging in the wings if I needed it
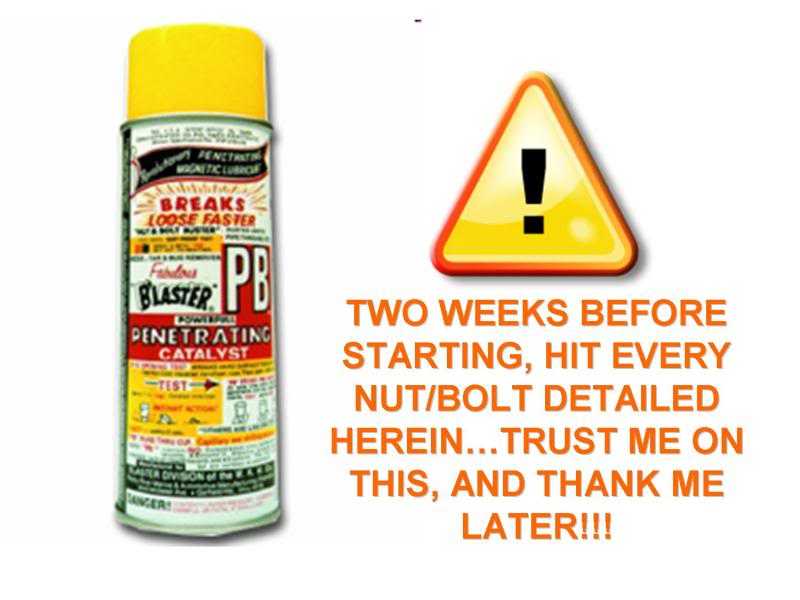
OBLIGATORY DISCLAIMER DONGLE: Some of the torque values were not readily available, so I used an approximation for the torque spec. This is a recount of my personal approach ONLY, I assume 0 liability for anything that happens should you follow the details contained herein.
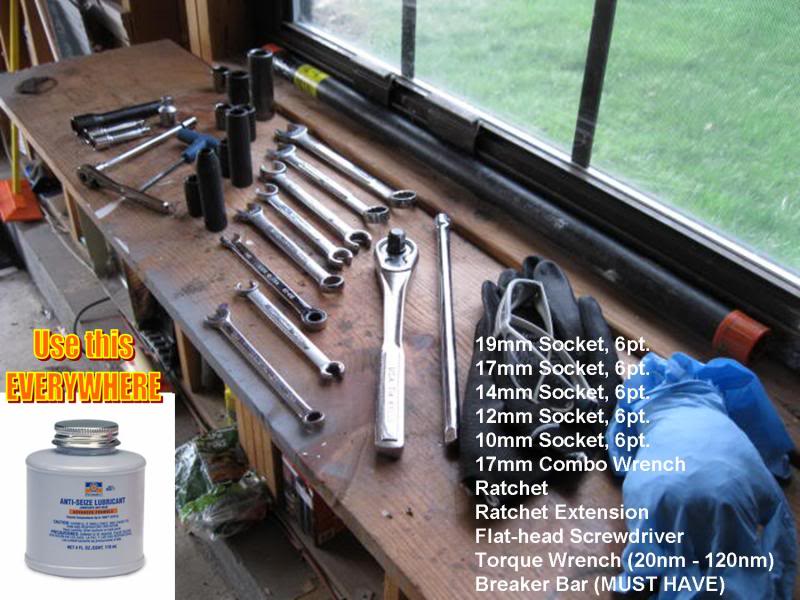
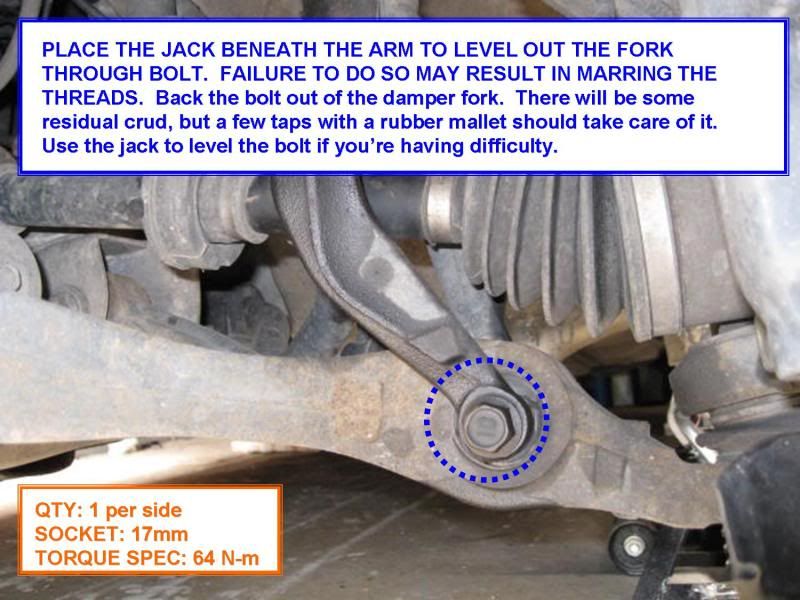
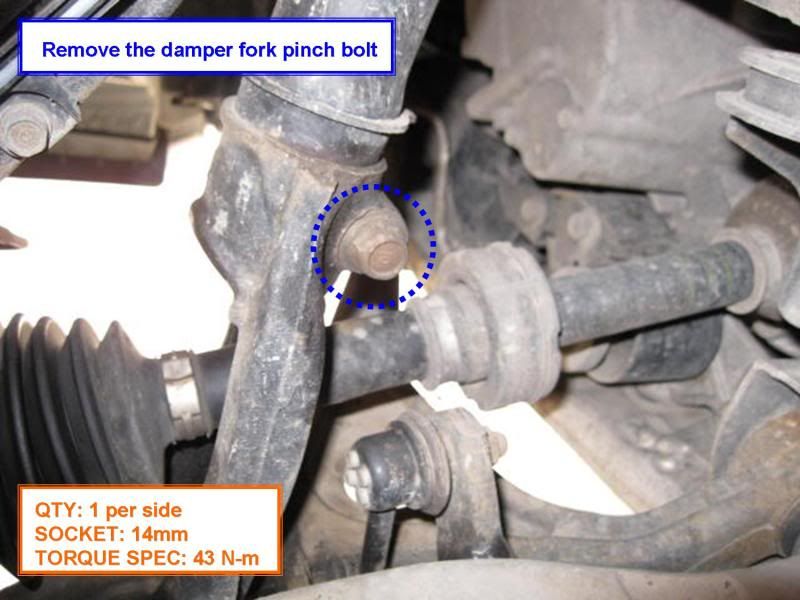
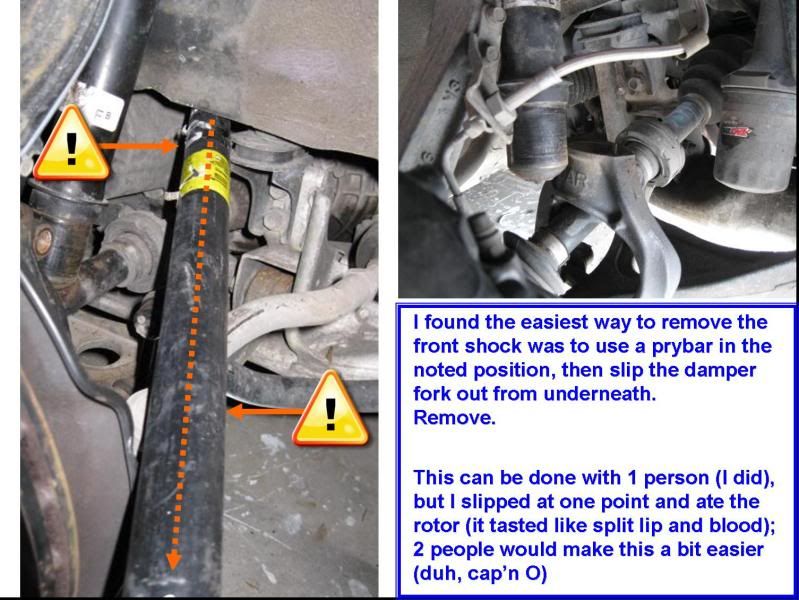
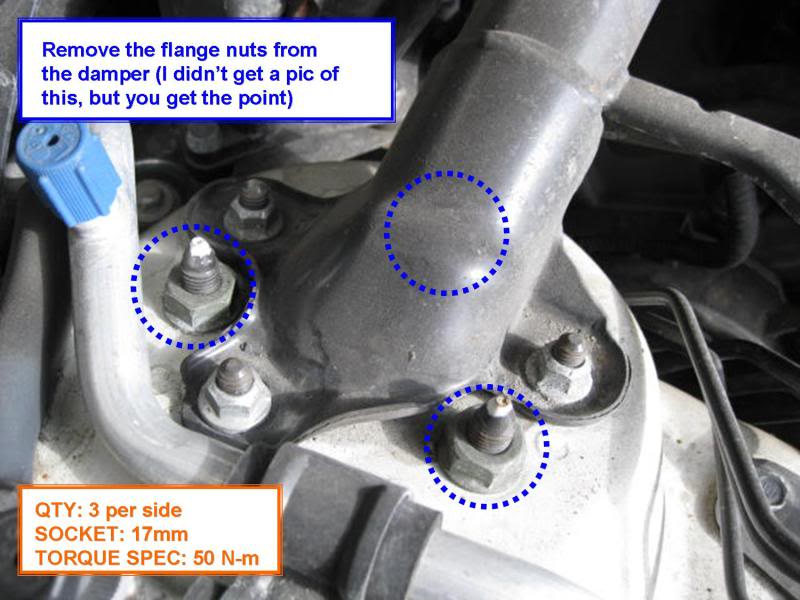
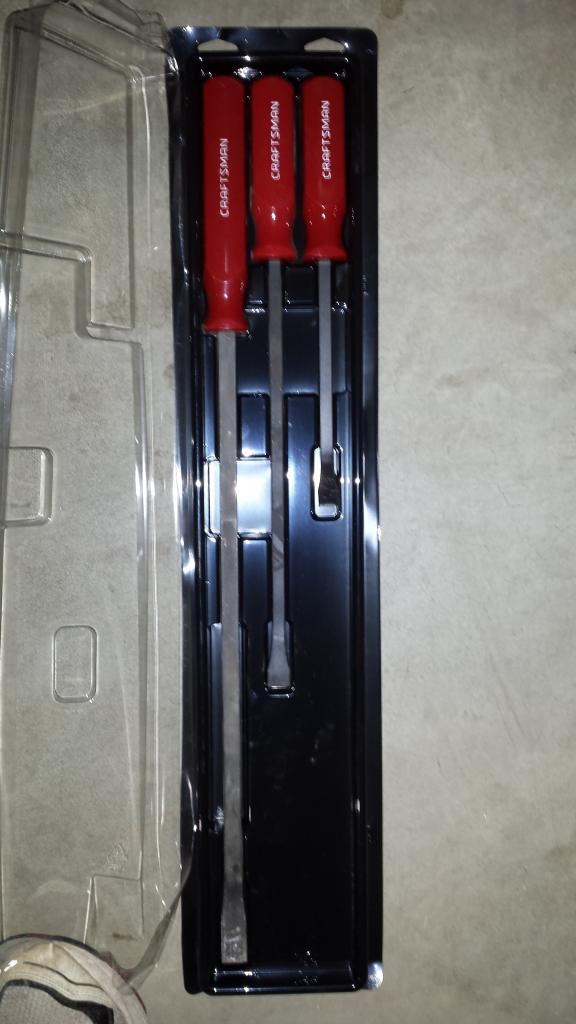
TOOLS/PREP
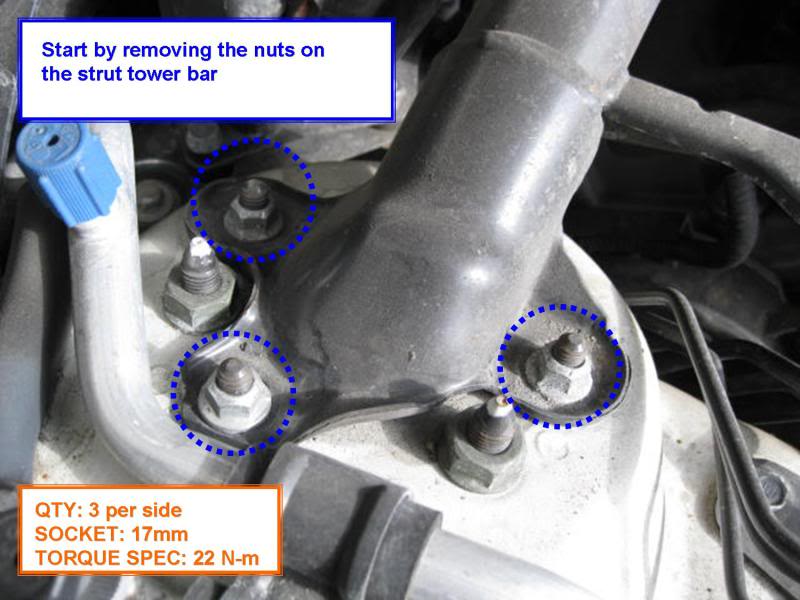
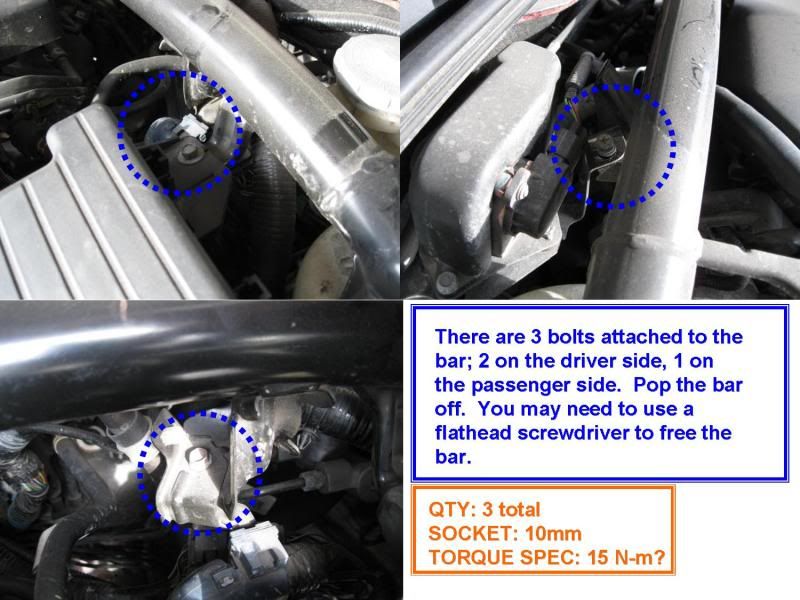
FRONTS
REARS


From nfnsquared:
So I finally got around to installing my ASPEC dampers. Thanks to this excellent DIY and the suggestion to remove the bracket vice end link (LostSol), this is a very easy job IMO.
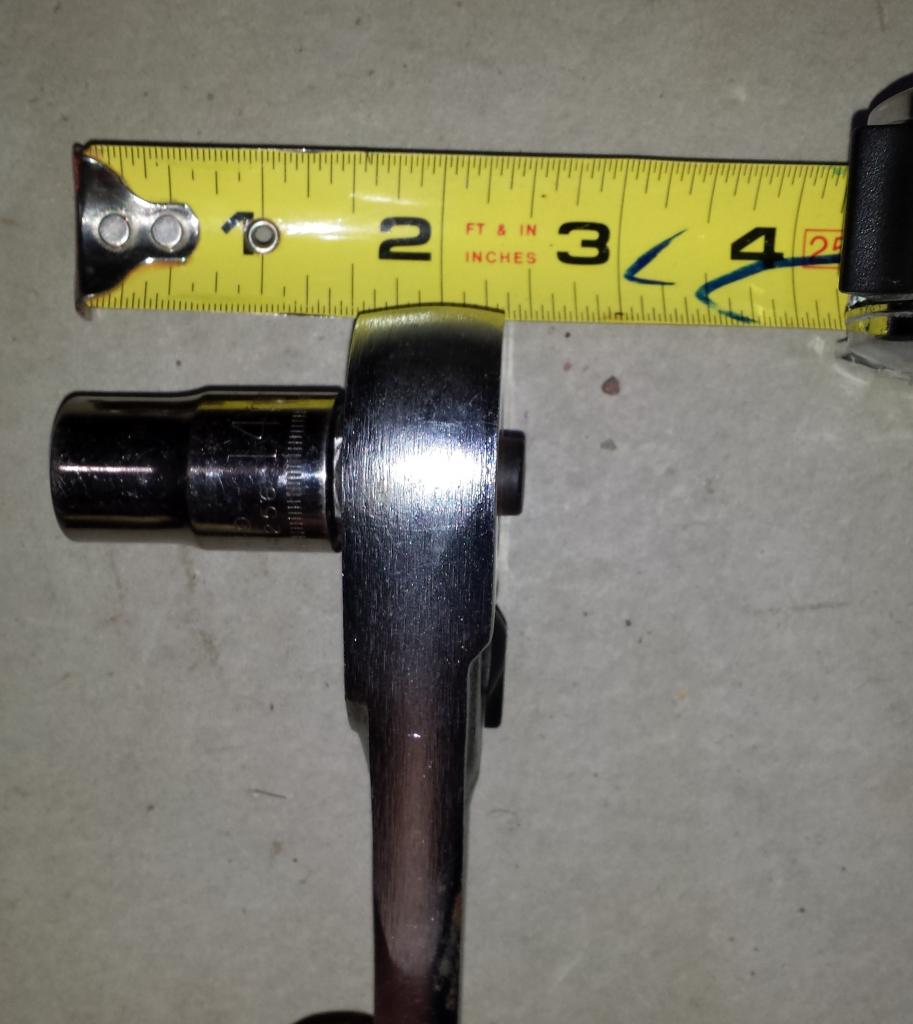
IMO, the #1 most important tool for this DIY is:
To add to DM's excellent DIY:
1. Seat cushion removal: Use DM's photo to see the "sweet spot" to push down with one hand. Put your other hand on the seat hook knob while pressing down and when you find the "sweet spot" with the first hand you will feel the pressure release on the hook knob. Pop the knob out when you feel the pressure release:
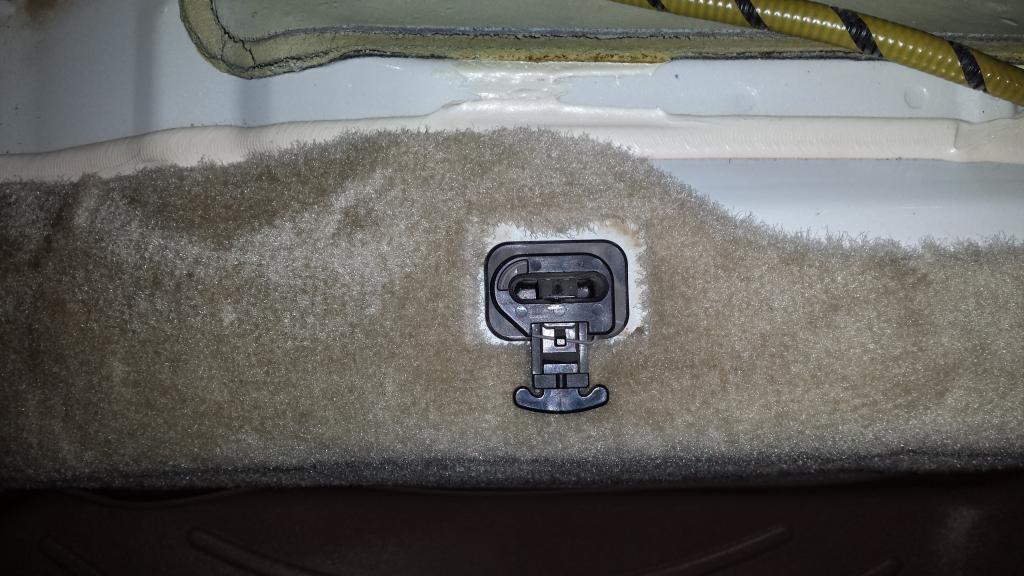
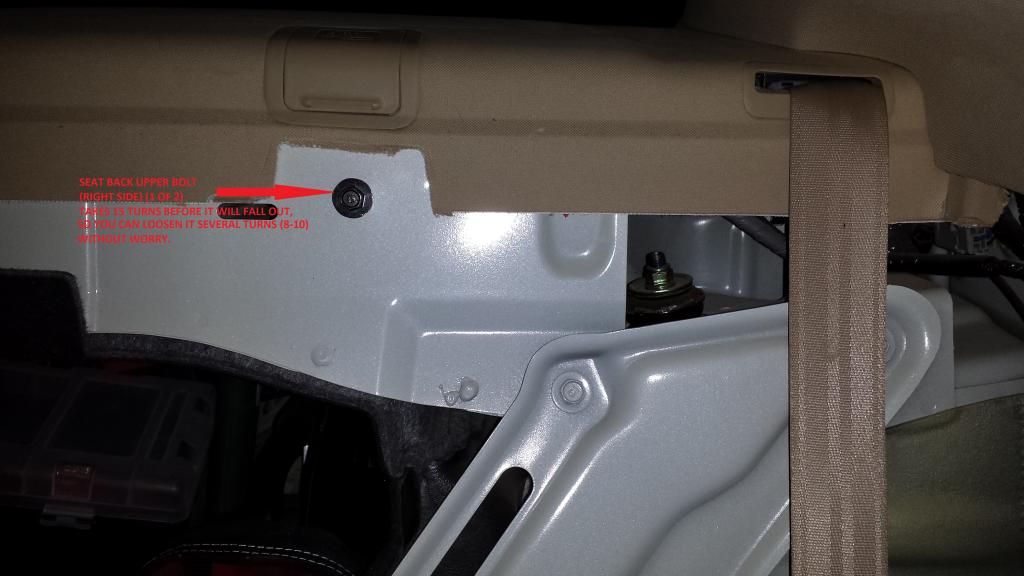
2. The rear seat back upper bolts (2) have 15 turns of threads, so you can loosen them many turns without having to worry about them coming loose:
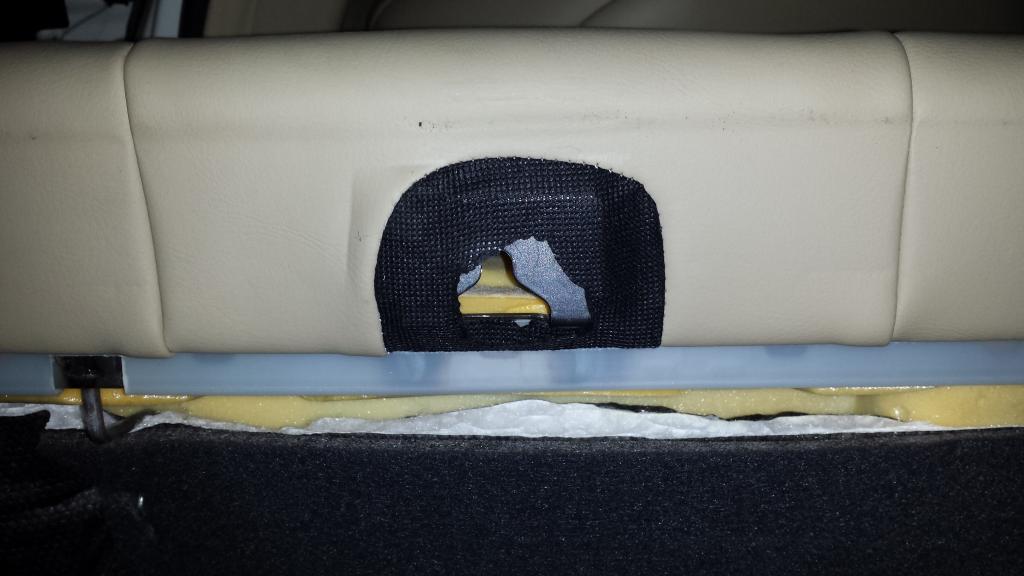
Picture of seat back "hook" for upper bolt:
3. No need to pop the C-pillars or raise the rear deck to access the upper flange nuts. I had plenty of room to fit my 1/2" socket wrench to loosen and my 3/8" torque wrench to tighten:
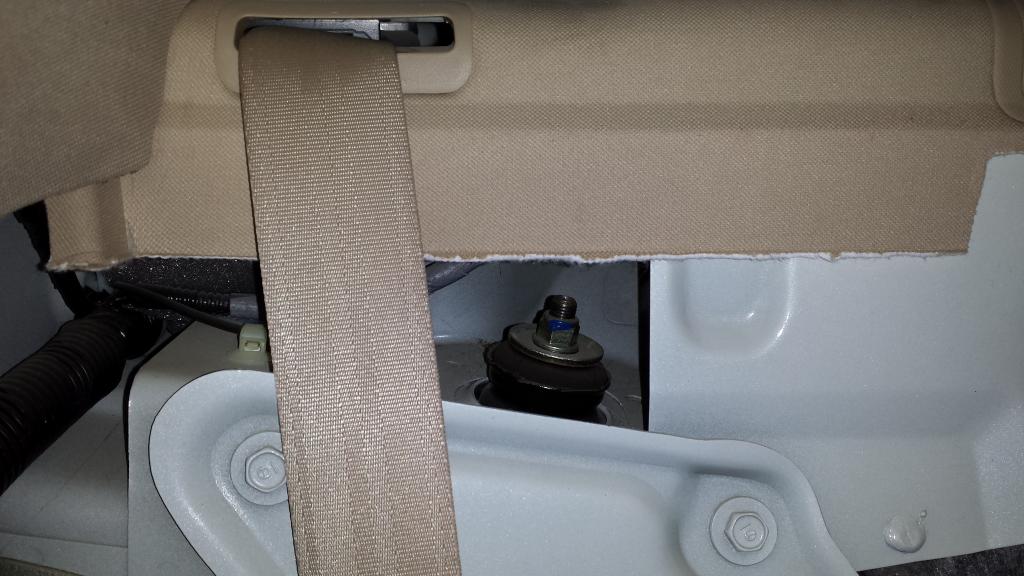
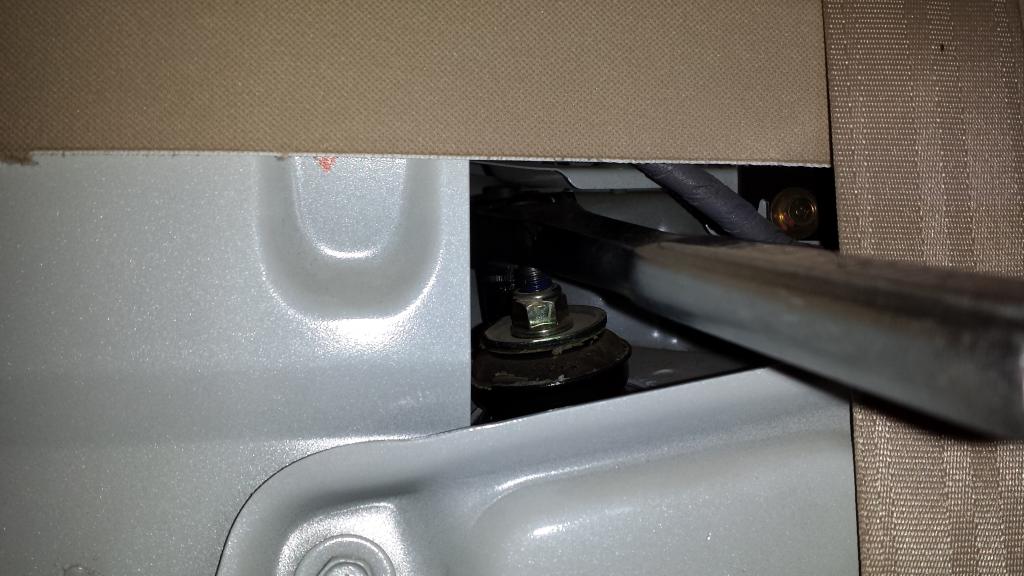
4. More bracket pics:
5. A large pry bar makes removal and installation of the dampers soooo much easier. Once the damper bolt and nuts are removed, the damper will drop down. Using the pry bar, I was able to lower the knuckle enough to tilt the upper portion of the damper toward the outside of the fender, clear the fender and then pull it out:
6. Installation of the rear dampers was just the reverse of the above. Again, a piece of cake if using a large pry bar. Once the damper is in position, you can push it up to align the upper flange bolts with the holes in the deck. While holding the damper in this position, you can reach inside with the other hand and put a nut on one of the flange bolts to hold it in position:
I don't really have anything to add for the front dampers, other than using a large pry bar makes it much easier!
Again, thanks to DM for the excellent DIY!!
CLICK HERE FOR THE OFFICIAL SCAN
SPECIAL THANKS TO THESE MEMBERS:
Marcus DiSabella of HEEL TOE for calling me back when I needed it most (THAT'S CUSTOMER SERVICE, FOLKS)
Bearcat94, for pointing out the obvious
LostSol_FoundTL, for his killer suggestion in the rear
tldude876, for giving me a call when I was WTF'ed
AckTL05 / chinaone - for hanging in the wings if I needed it
OBLIGATORY DISCLAIMER DONGLE: Some of the torque values were not readily available, so I used an approximation for the torque spec. This is a recount of my personal approach ONLY, I assume 0 liability for anything that happens should you follow the details contained herein.
TOOLS/PREP
FRONTS
REARS
From nfnsquared:
So I finally got around to installing my ASPEC dampers. Thanks to this excellent DIY and the suggestion to remove the bracket vice end link (LostSol), this is a very easy job IMO.
IMO, the #1 most important tool for this DIY is:
To add to DM's excellent DIY:
1. Seat cushion removal: Use DM's photo to see the "sweet spot" to push down with one hand. Put your other hand on the seat hook knob while pressing down and when you find the "sweet spot" with the first hand you will feel the pressure release on the hook knob. Pop the knob out when you feel the pressure release:
2. The rear seat back upper bolts (2) have 15 turns of threads, so you can loosen them many turns without having to worry about them coming loose:
Picture of seat back "hook" for upper bolt:
3. No need to pop the C-pillars or raise the rear deck to access the upper flange nuts. I had plenty of room to fit my 1/2" socket wrench to loosen and my 3/8" torque wrench to tighten:
4. More bracket pics:
5. A large pry bar makes removal and installation of the dampers soooo much easier. Once the damper bolt and nuts are removed, the damper will drop down. Using the pry bar, I was able to lower the knuckle enough to tilt the upper portion of the damper toward the outside of the fender, clear the fender and then pull it out:
6. Installation of the rear dampers was just the reverse of the above. Again, a piece of cake if using a large pry bar. Once the damper is in position, you can push it up to align the upper flange bolts with the holes in the deck. While holding the damper in this position, you can reach inside with the other hand and put a nut on one of the flange bolts to hold it in position:
I don't really have anything to add for the front dampers, other than using a large pry bar makes it much easier!
Again, thanks to DM for the excellent DIY!!
Last edited by Steven Bell; 10-05-2014 at 09:56 PM.

The following 14 users liked this post by DeathMetal:
4drviper (11-02-2012),
Azonics (09-15-2014),
BreezyTL (06-14-2013),
CBPTypeS (08-31-2013),
easygoingtl (04-09-2012),
and 9 others liked this post.
04-17-2011, 10:34 AM
#5
Chapter Leader (Central Florida)
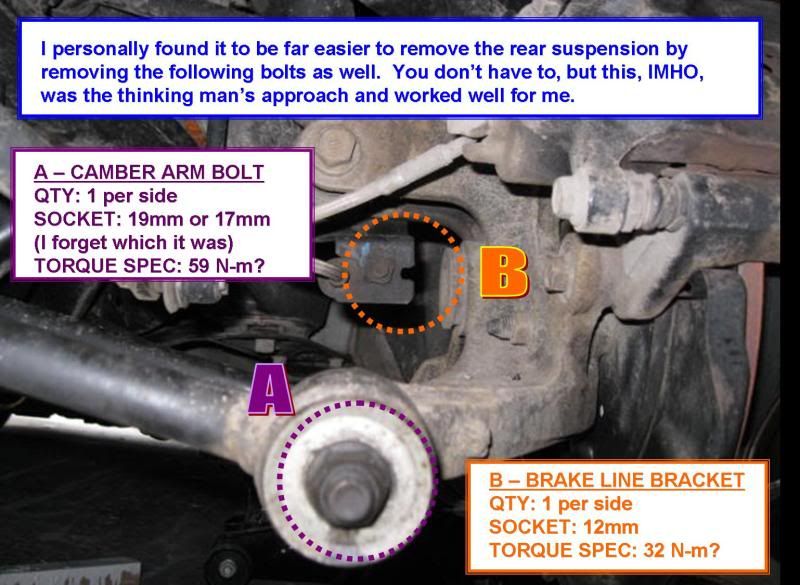
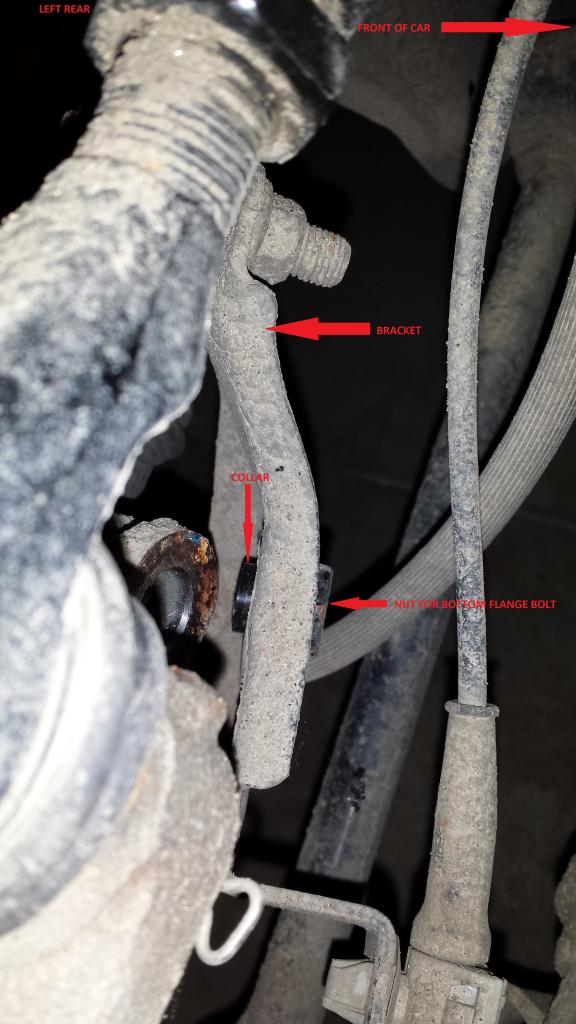
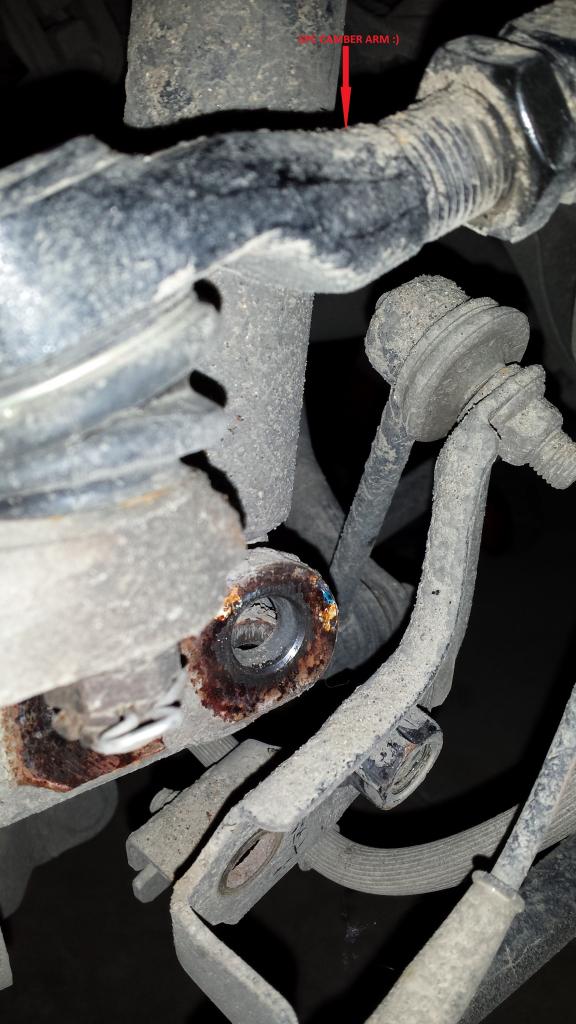
glad you took my suggestion for the endlink bracket! the only thing i did different was to remove the bolt holding the brake line to it as well,then fold the entire endlink and bracket away (towards the back of the car). Then you can just slip the bottom of the shock down and around the suspension link directly under it and it will have enough room to come out through the top, without having to remove the camber link!
04-17-2011, 12:06 PM
#6
AZ Community Team

Join Date: May 2007
Location: N35�03'16.75", W 080�51'0.9"
Posts: 32,488
Received 7,770 Likes
on
4,341 Posts
Only thing I'll add is that if you choose to go about the End-Link removal the conventional way don't forget:
- that you have to use an allen wrench to hold the bolt while you remove the nut. Otherwise you'll strip them.
- And that you have to load the suspension when your re-tighten.
FWIW - southern cars have a much easier time with this than those that get snow, salt and road grime in the winter. In some cases, the other (better) alternate solution is new end-links and a Sawzall.
 .....
.....- that you have to use an allen wrench to hold the bolt while you remove the nut. Otherwise you'll strip them.
- And that you have to load the suspension when your re-tighten.
FWIW - southern cars have a much easier time with this than those that get snow, salt and road grime in the winter. In some cases, the other (better) alternate solution is new end-links and a Sawzall.
04-17-2011, 12:09 PM
#7
AZ Community Team
Join Date: May 2007
Location: N35�03'16.75", W 080�51'0.9"
Posts: 32,488
Received 7,770 Likes
on
4,341 Posts
DM - Great write up and pics. Garaged. Well done. 
Post pics of the newly lowered car!!
Question: Were you able to replace the OE front strut brace over the adjusting knob on these coils?
Post pics of the newly lowered car!!
Question: Were you able to replace the OE front strut brace over the adjusting knob on these coils?
Trending Topics
04-17-2011, 03:32 PM
#8
Deathmetal, thank you for the wonderful detailed write up with pictures of installing coilovers for dummies . Also another thanks goes out to Bearcat94 for making this detailed write up a sticky .
. Also another thanks goes out to Bearcat94 for making this detailed write up a sticky .
04-17-2011, 03:38 PM
#9
Intermediate
Join Date: Jul 2008
Age: 38
Posts: 34
Likes: 0
Received 0 Likes
on
0 Posts
Great write up wish this was around when I did mine! but by the second time it's really easy....let me know if you wanna meet up....I'm free today(Sunday 4:38pm) and Monday....you got my number just hit me up

 04-18-2011, 08:59 AM
#15
Registered 3.5L Member
 04-18-2011, 09:13 AM
#16
AZ Community Team
Join Date: May 2007
Location: N35�03'16.75", W 080�51'0.9"
Posts: 32,488
Received 7,770 Likes
on
4,341 Posts
Check here for additional details (and Service Manual Scans):
F-070: DIY: How to remove the back seats to put the suspension?
https://acurazine.com/forums/showthread.php?t=107568
04-18-2011, 01:43 PM
#18
AZ Community Team
Join Date: May 2007
Location: N35�03'16.75", W 080�51'0.9"
Posts: 32,488
Received 7,770 Likes
on
4,341 Posts
Well, that's not what I meant, but it might work.
It has to do with the way the hook on the back of the seat works. You just loosen the bolt in the seam a few turns, then lift the rear seat back off the hook and over the bolt. Look at the linked page on rear seat removal - there's a picture.
It has to do with the way the hook on the back of the seat works. You just loosen the bolt in the seam a few turns, then lift the rear seat back off the hook and over the bolt. Look at the linked page on rear seat removal - there's a picture.
04-19-2011, 09:38 PM
#19
^^^I agree, I also only have the rear seat held back in with the 2 bolts on the sides, not the one in the middle. Much easier to take out that way.
Also, leave rear seats out until you are happy with your settings. Also do fronts together and backs together...doing one side at a time puts weird pressure on the suspension nuts and makes it a lot harder to get the bolts out.
Also, give us a friggin picture of the drop!
Also, leave rear seats out until you are happy with your settings. Also do fronts together and backs together...doing one side at a time puts weird pressure on the suspension nuts and makes it a lot harder to get the bolts out.
Also, give us a friggin picture of the drop!
04-20-2011, 12:27 PM
#20
OOOOOH
Good write-up.
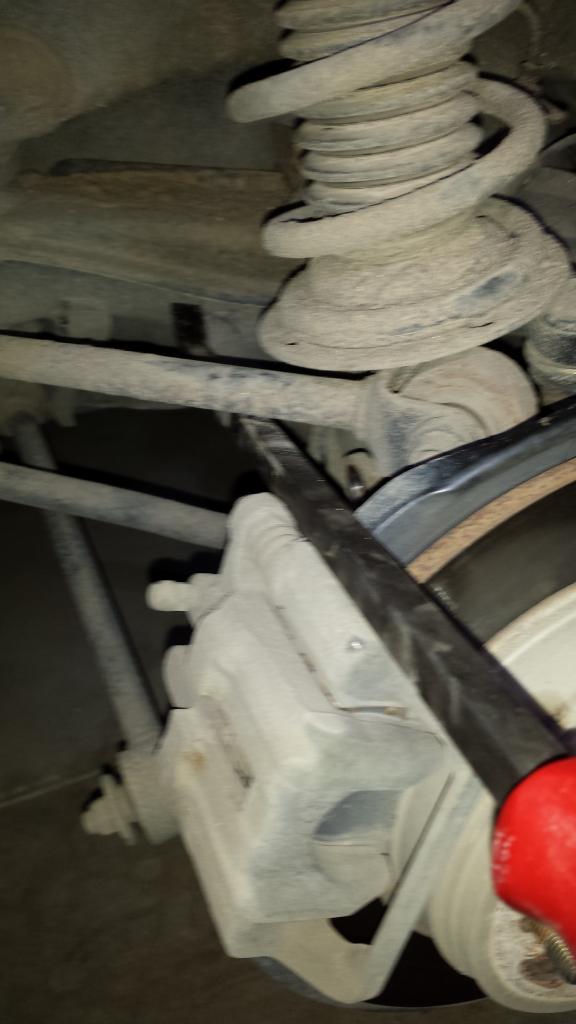
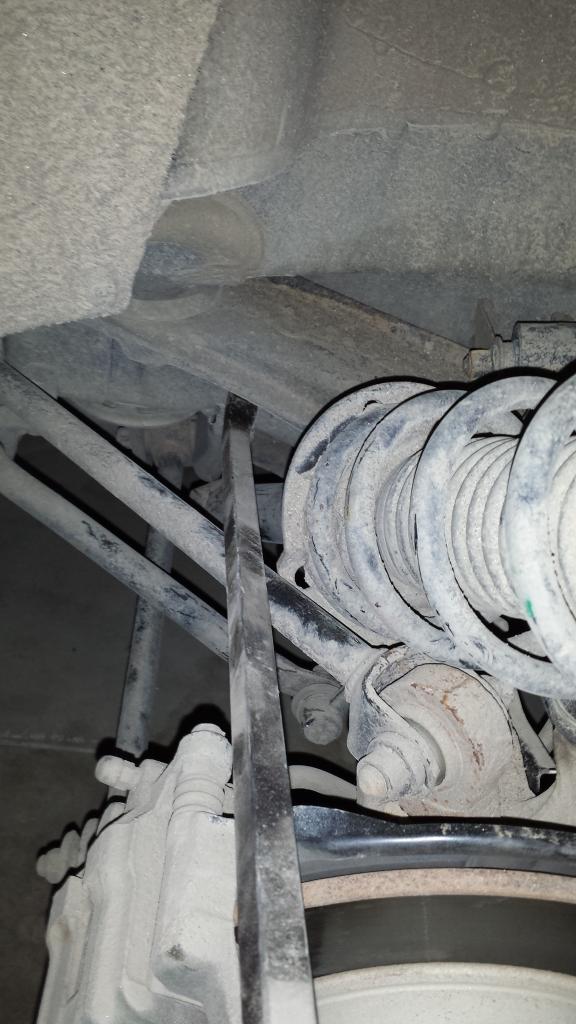
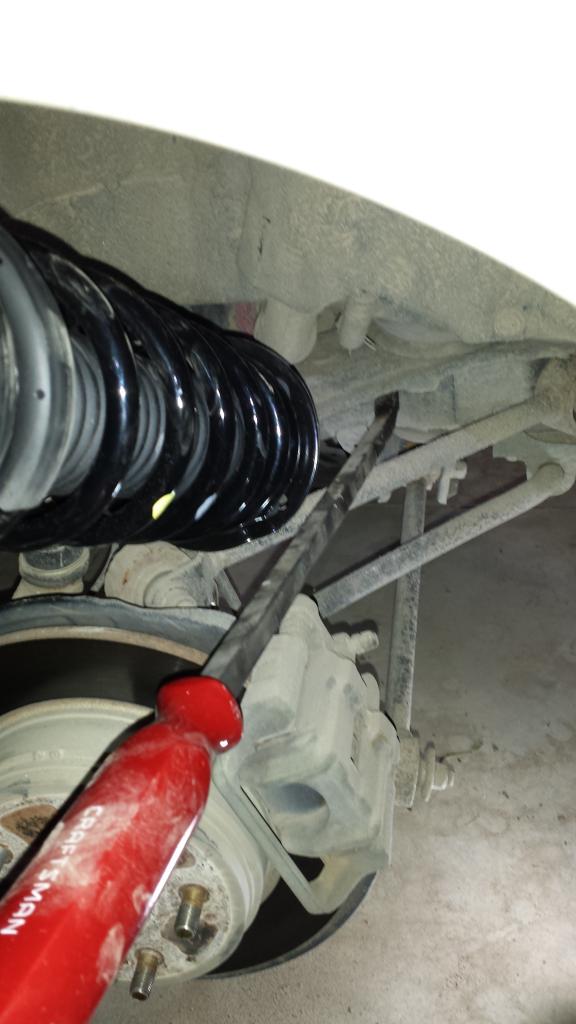
I think I speak for the rest of the Northeast Crew when I say it's MUCH easier to unbolt the endlink bracket than to undo to endlink itself. We never touch those damn things unless they are coming off and getting thrown away!!
The bracket swings away from the knuckle nice and easy
I think I speak for the rest of the Northeast Crew when I say it's MUCH easier to unbolt the endlink bracket than to undo to endlink itself. We never touch those damn things unless they are coming off and getting thrown away!!
The bracket swings away from the knuckle nice and easy
04-29-2011, 02:13 PM
#22
06 ThugLuv
F MY A....front went smooth on tuesday i just need to dial it in more (too low)
The rear went differant...so the seat is retarded but dont be affraid of it. the rear left side went smooth...unbolted the shock mount and disconected the sway bar link and moved it out of the way...i dropped the shock and pushed the bottom inward to get the top to clear the fender, then pulled it right out..the the instal was easier then removal... then attemted this on the right side but i fucked up.
I did the same thing on the right but it immidiately went wrong as soon as i took out the lower shock bolt..the susspention dropped and removing and the smae mount for the bolt is the same mount for the sway bar link....well there was soo much pressure on the sway bar link the it didnt come clen out...so we pryed the shit out of it to get it out. so after i put the coilover in i tried to put the lower shock bolt in but it wasnt alligning...eventually i got it to thread in like two threads then just stopped..so i needed to finnish my car so i could drive it...so i said fuck it man..and got the impact and crossthreaded the shit out of it all the way in. the connected the sway bar link....
i noticed the link looked more forward then the left side. what happend was we used the mount as leverage to pry on the sway bar link...and it bent it forward and thats alos the same mount that has the shock bolt hole. with the welded nut on it...the sway bar connected easy cuz its on two lil ball joints. but the lower shock mount bolt was slightly un alligned enough to fuck me over.
I need to fix this fast but correctly..i dont want to get my car alligned before i fix this problem that would be a waste of money.
If you didnt get lost in that story what should i do??
04-29-2011, 05:10 PM
#24
06 ThugLuv
i know...i hate grammer and spelling..my bad....right now my bigger issue is my front is settling in and now scrapping the shit out of my tire...so i need to raise my front.
im going to open up a word document and re explain my self and use spell check..
im so stressed out right now...
im going to open up a word document and re explain my self and use spell check..
im so stressed out right now...
04-29-2011, 06:05 PM
#26
06 ThugLuv
My problems with Coil install
First problem:
where I work on my car….I’m in the military and we have a auto hobby shop on base where u take ur car in and rent a lift and check out tools for like 6 bucks a hour..Which is all bad ass…but I get off in enough time to work on my car for 2-3 hours…there is no time for rework or adjusting..cuz my car needs to be put back together so I can go home
The front:
Before I put them in I screwed the red sleeve in all the way. The overall install was easy. Then we took the car off the lift and it was too low. So my buddy who is all into DIY slammed cars...just said we need to raise it so we started rising` it by the springs…so right now my springs are adjusted high and my bottom sleeve is on full drop. And now that the coils are settling in its going even lower and I have to sacrifice my left tire to make a left turn. I have a nasty gash in my tires. Today I’m going in by myself and disconnecting the the lower shock bolt and adjusting my ride height like that. And maybe lowering the spring back to where it was…
The rear the bigger problem:
The seats were gay but I can tell I’m going to get mad when I put it back in..I’m leaving the back seat out till I get my car fixed and dialed in exactly how I want it. The removal looked very simple. We took out the lower shock bolt. Un did the top hat. Tried pulling it out then we saw that if we removed the sway bar link we would have more play with the shock to easier remove it. I disconnected the link at the point where it connects to the same piece of metal(mount) that the lower shock mount bolt threads into(mine had a welded nut on it for the shock bolt). That made the removal of the coil over real easy then the install was also easy
AHAHHHH MOMENT!!! I just figured out what went wrong!!!!!!
With the new coil over installed on the left side the suspension sits tucked up in the car..and the sway bar also goes up!..so when I repeated this process on the right side after the lower shock mount bolt was out…right when I undid the sway bar link my suspention dropped more than the sway bar on the left side would let it. So my sway bars threads was holding the entire stock shock decompression which it made it hard as fuck to get out…so we decided pry the sway bar link out even though it might mess up the threads. We slid the crow bar up in there and for the leverage point we used the mount that both the sway bar and the threaded side of the lower shock mount bolt goes into….all that force bent the shit out of that mount. But we didn’t know it yet. When we go to do the install, I get the sway bar link in easy because it’s got two little ball joints on each end that will slide in where ever. Buuttttttttt, the lower shock mount bolt went in easy until it reached that fuckin bent mount…it was able to screw in maybe two turns then it stopped. I’m a aviation mech I know what it feels like to cross thread bolts. And I knew if I go any further it would cross thread….and for the life of me I could not figure out what the fuck had happened...but it was closing time at the hobby shop and if you leave your car there over night it cost 200 bucks…FUCK THAT..so I grabbed the impact gun and screw that sonna bitch in all cross threaded and once the bolt started commin out the other end I saw it was crooked…F MY A…
So now I am un able to raise my rear end because I don’t want to adjust the springs..i want to adjust my lower sleeves….but I need to either tap new threads or replace that mount. I hope to god that mount is held on by a bolt if that bitch is welded on welllll F MY A.
After work today..I’m going to raise my front just to get it able to make normal turns on the road….then after that I’m going to drink a lot of chemically off balancing beverages…in the hope that when I wake up from Acoma..i will realize this was all an elaborate joke, then we can all laugh about it.
04-29-2011, 11:06 PM
#27
Fearless DIY Guy
Thread Starter
iTrader: (2)
FRONT
Return the springs to the original position ASAP!!! The instructions SPECIFICALLY STATE DO NOT ALTER THE SPRING PERCH...this alters the factory preload settings and voids any warranty. All adjustments for height should occur from the lower of the two upper collars ONLY.
REARS
You're going to have to replace the mount. A cross threaded bolt is not going to have the same holding power as the properly installed bolt which will either lead to failure of the bolt, and God help you if that happens as it's going to cost you some considerable money.
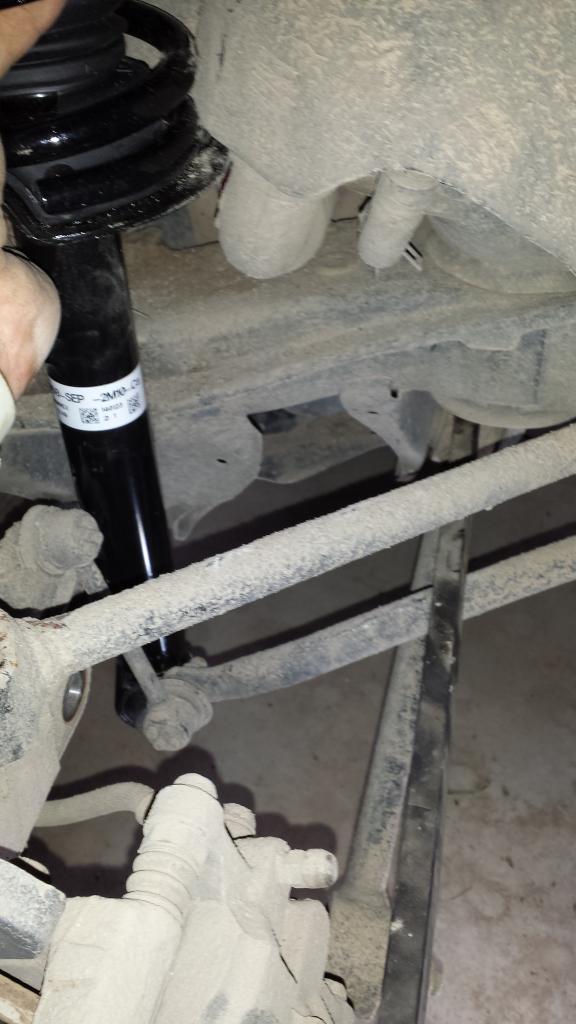
I am assuming you mean the disconnected bracket pictured below?
http://i369.photobucket.com/albums/o...Install/18.jpg
Return the springs to the original position ASAP!!! The instructions SPECIFICALLY STATE DO NOT ALTER THE SPRING PERCH...this alters the factory preload settings and voids any warranty. All adjustments for height should occur from the lower of the two upper collars ONLY.
REARS
You're going to have to replace the mount. A cross threaded bolt is not going to have the same holding power as the properly installed bolt which will either lead to failure of the bolt, and God help you if that happens as it's going to cost you some considerable money.
I am assuming you mean the disconnected bracket pictured below?
http://i369.photobucket.com/albums/o...Install/18.jpg
04-30-2011, 09:47 AM
#28
^^^glad it got figured out...
I learned this going the hard way initially...and this is why I said you must do front together and back together. To take the tension off anything (sway bars etc) that tie one side to the other. Makes the install 1 BILLION percent easier.
And believe it or not, on my Megans on my RSX, I didn't understand the concept of preload and the first time I installed I was using preload for the height adjustment. Don't think I ever got it right after that, come to think of it.
 05-16-2011, 08:30 AM
#31
I wouldn't say easily...but if you have an pivoting socket attachment you MAY be able to get it from the side. Those 2 14MM bolts aren't torqued down that hard...
You can adjust the dampening without removing the rear deck. But either way, it only takes 2 pull out things (the ABS thing) and lifting up and out...not too difficult. Good time to add some deadening and a little polyfill to get rid of rattles etc too.
You can adjust the dampening without removing the rear deck. But either way, it only takes 2 pull out things (the ABS thing) and lifting up and out...not too difficult. Good time to add some deadening and a little polyfill to get rid of rattles etc too.
05-16-2011, 10:17 AM
#32
-------Tim-------
^Good point! Well said "Rockstar", I had no problems getting the 2 14mm out. On the rear deck(very good point), I will be removing it in the future, to put down some sound deadening. Should have done this at the same time, damn rattles!
05-16-2011, 10:29 AM
#33
Thanks man...yeah, I've done it once and need to redo it myself. I STILL have a rattle from the 12's. I actually want to get some batting or foam and actually cut out the shape of the rear and then screw it down into place (since it'll pop up if held only by the clips) to stop all noise period!
06-26-2011, 08:41 PM
#35
RLTW!!

Nice. Great Job!
 12-19-2011, 05:48 PM
#37
Hey guys, sorry to bring back a new thread but tried installing my lowering springs on my TL and... did not go to well haha. Have some ranting... and some questions.
1. After struggling to get the rear seats out (bolt holding them down stripped the supporting metal so it kept spinning without coming out), I started to get the flange nuts out from behind the seats holding the suspension up. I got all of them out rather easy, but one started to get stripped. After some time and more PB, I got it out, although the screw that it attaches to got stripped on the tip a bit. More on this later.
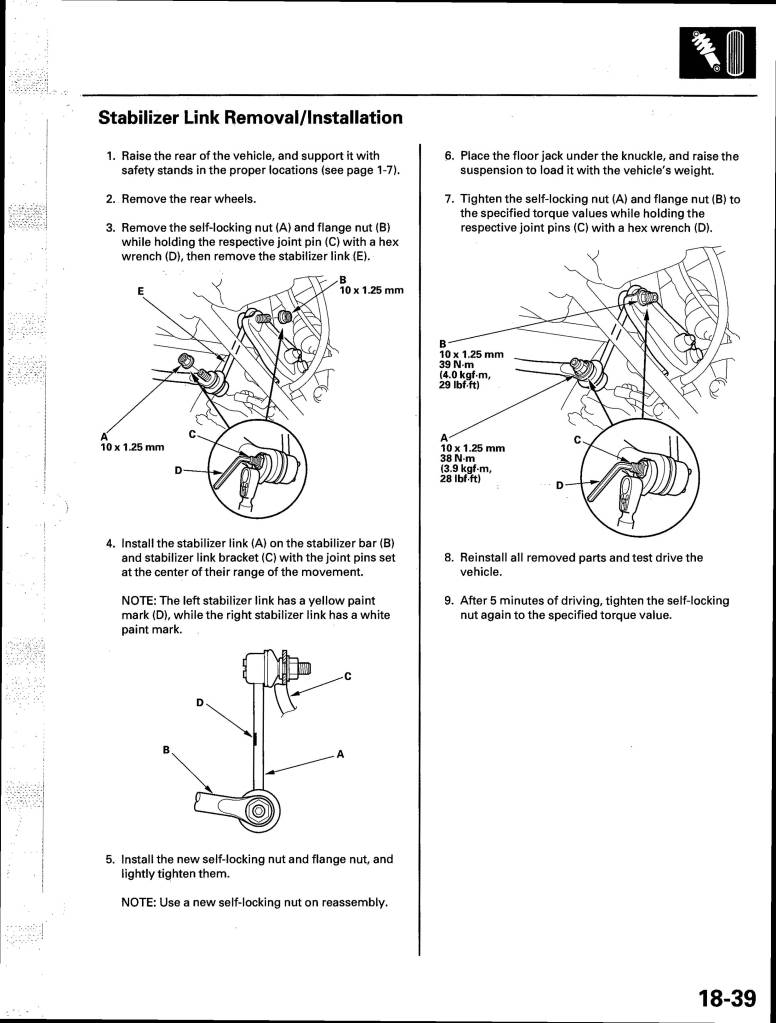
2. We started to work on the suspension assembly for the rear. We tried following this scans and this thread, although we got confused as to which bracket to take off, etc. We started with the stabilizer link as per the scans, but we must've went for the wrong one. We worked on the flange nut closer to the brake caliper - one that did not have the hex on the other side. It started to loosen when... the bolt broke in half.
I quickly went to acura and ordered 2 (just in case) stabilizing links (because they dont just sell the bolt) which come in tomorrow. We did not pursue any more because somehow I had to get home soon, sun was setting, etc. Everything went back in place ok, EXCEPT for the flange nut on that one stripped screw on the interior for the suspension assemble. After some test driving... drove it home for 30 min... with one stabilizing link not connected and on the other side, with one flange nut missing. It drove fine somehow.
For now, I am concentrating on getting the stabilizer link back to normal. Does anyone know a possible solution to fix the stripped flange screw? This is the one behind the back seat near the C pillar, on both sides of the shock. Its definitely not the bolt, but the screw that it bolts into. I cannot think of a way to get it to attach.
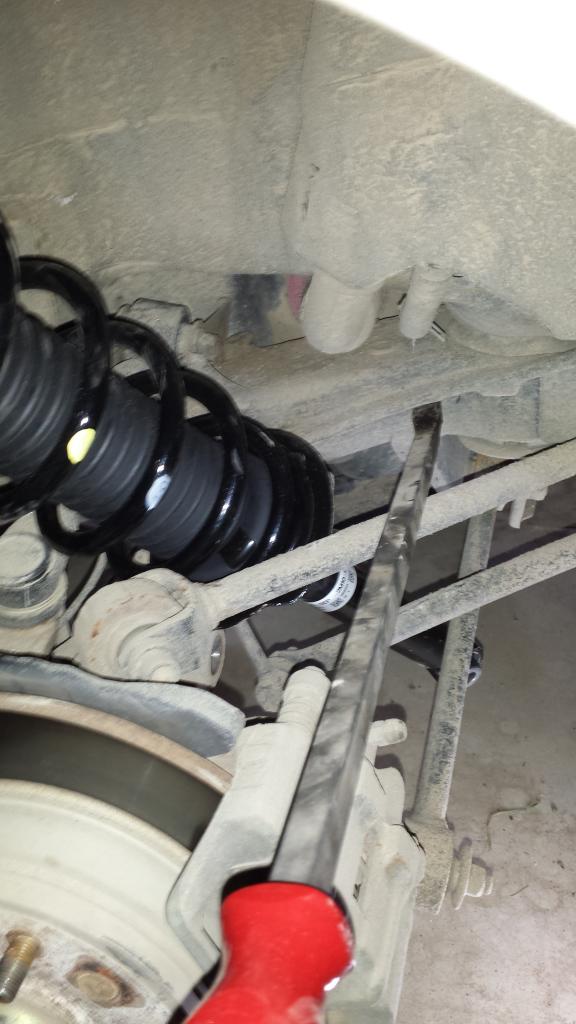
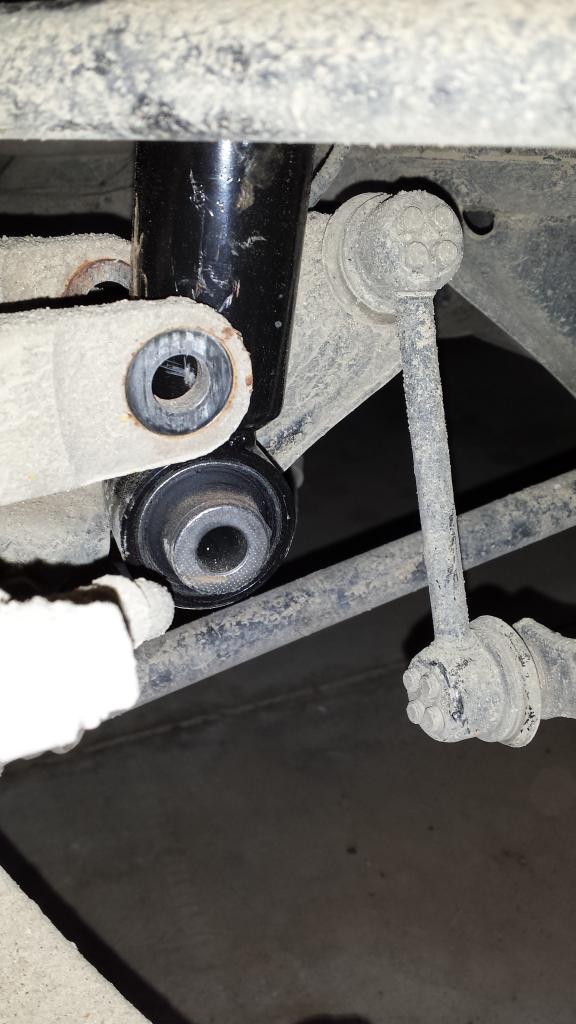
Here are some pictures of the broken bolt of the stabilizing link. We should disconnect the further one next time? Where there is a hex on the other side? any advice is appreciated!


The broken bolt exposed

Where it used to attach.

At this point, Im having second thoughts of doing the whole install, although I have to reinstall the stabilizing link bars anyway. Hopefully the rest of it is straightforward.
1. After struggling to get the rear seats out (bolt holding them down stripped the supporting metal so it kept spinning without coming out), I started to get the flange nuts out from behind the seats holding the suspension up. I got all of them out rather easy, but one started to get stripped. After some time and more PB, I got it out, although the screw that it attaches to got stripped on the tip a bit. More on this later.
2. We started to work on the suspension assembly for the rear. We tried following this scans and this thread, although we got confused as to which bracket to take off, etc. We started with the stabilizer link as per the scans, but we must've went for the wrong one. We worked on the flange nut closer to the brake caliper - one that did not have the hex on the other side. It started to loosen when... the bolt broke in half.
I quickly went to acura and ordered 2 (just in case) stabilizing links (because they dont just sell the bolt) which come in tomorrow. We did not pursue any more because somehow I had to get home soon, sun was setting, etc. Everything went back in place ok, EXCEPT for the flange nut on that one stripped screw on the interior for the suspension assemble. After some test driving... drove it home for 30 min... with one stabilizing link not connected and on the other side, with one flange nut missing. It drove fine somehow.
For now, I am concentrating on getting the stabilizer link back to normal. Does anyone know a possible solution to fix the stripped flange screw? This is the one behind the back seat near the C pillar, on both sides of the shock. Its definitely not the bolt, but the screw that it bolts into. I cannot think of a way to get it to attach.
Here are some pictures of the broken bolt of the stabilizing link. We should disconnect the further one next time? Where there is a hex on the other side? any advice is appreciated!


The broken bolt exposed

Where it used to attach.

At this point, Im having second thoughts of doing the whole install, although I have to reinstall the stabilizing link bars anyway. Hopefully the rest of it is straightforward.
12-19-2011, 06:49 PM
#38
That happens to a lot of you northerners, go to Acura and order a new one...or get a similar one at the auto parts store, last I recall they were MUCH cheaper there.
IIRC (it's been a while) you were supposed to undo the bottom one that connects directly to the rear sway bar, not the bracket. BUT, same end result...all you needed was to move it out of the way.
To answer your question, don't go auto crossing but you'll be fine driving around like that for a bit. I did...rear will be more squirrely than normal but your rims won't fall off or anything.
GOOD LUCK!
The following users liked this post:
Bearcat94 (12-19-2011)
12-20-2011, 10:28 AM
#39

Sway bar links are like 20 bucks, which, big picture, is nothing. if you're removing them, might as well replace them anyway. you guys should invest in some air tools. doing suspension without them is tough.
good write up, cept for one thing. the first bolts you say to remove for the strut bar? def 12mm, not 17mm.
i get my ht-specs in a couple days. ill post pic when theyre installed
good write up, cept for one thing. the first bolts you say to remove for the strut bar? def 12mm, not 17mm.
i get my ht-specs in a couple days. ill post pic when theyre installed


