D.I.Y. Relaxing your suspension bushings
 05-13-2013, 10:53 AM
#1
:what:
Thread Starter
D.I.Y. Relaxing your suspension bushings
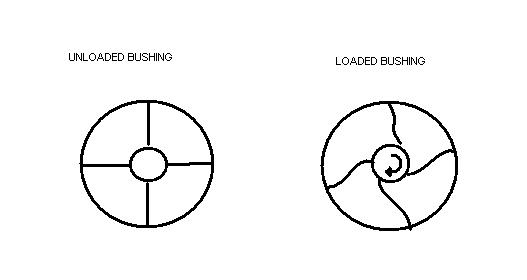
When our bushings are installed on our cars, they are installed and torqued at stock ride height. So when we lower the car, it puts a tremendous amount of torsional pressure on the bushings. (Especially if you have installed and torqued arms or suspension components while the car was raised in the air with the suspension hanging.) Our bushings are designed to be unloaded at ride height. All of the weight of the vehicle should be carried by the spring not the bushings. See diagram below.
The point of unloading the bushings is:
1) To achieve a more positive, less bouncy ride.
2) To prolong the life of the bushings.
What motivated me to do this? After putting the coils on my car, I had an issue getting the car ride height to be consistent at each corner. Each shock was adjusted at a different position...I knew this wasn't right. After seeing another member (muffinman) post that he had this issue and had to loosen and re-tighten the bolt at the base of his rear shock to correct it, I took it a step farther and did ALL of the bushings. They definitely needed it!!!
The way to unload them is to jack the car, remove a wheel, put a block or jack stand or jack under that wheels suspension or hub, and lower the car back down to ride height to put the vehicles weight back on the suspension.
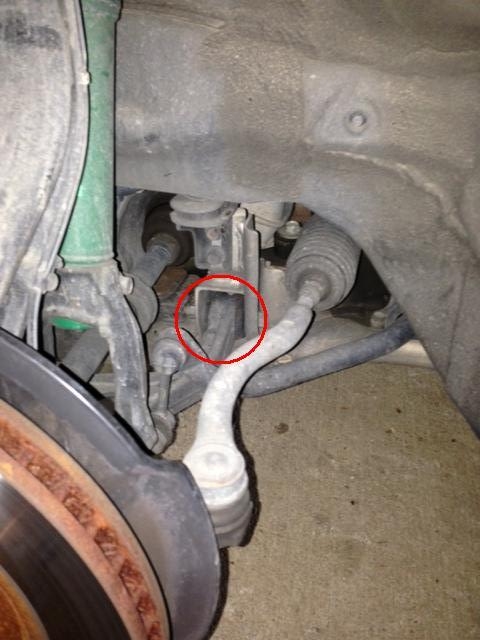
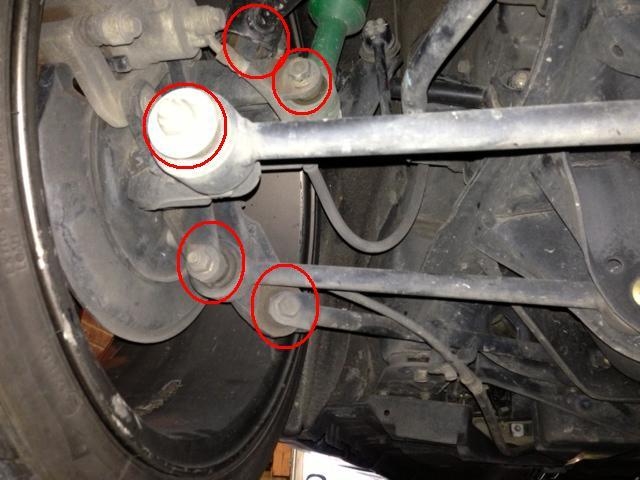
On the front, loosen and re-tighten the LCA (lower control arm) bushing bolt.
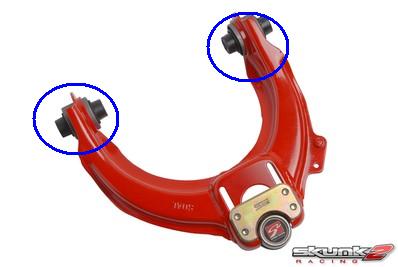
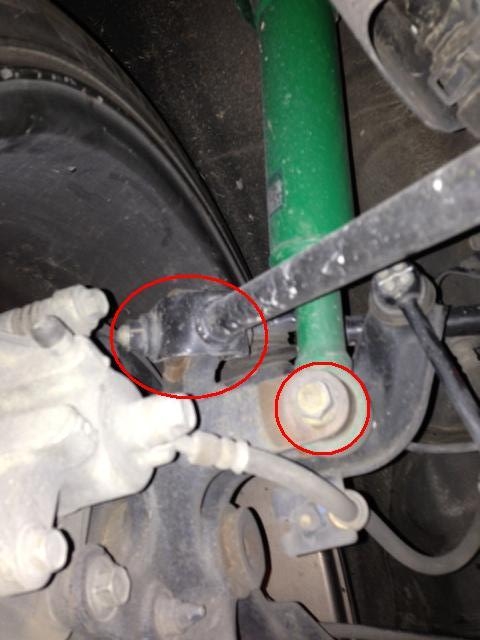
Loosen and re tighten UCA (upper control arm) bushing bolts. You will likely see and hear the center of the bushing rotate as the stress is relieved. Several of mine made a loud 'pop' as they released their tension. (Sorry, I forgot to get a pic of the UCA bolts installed on the car.)
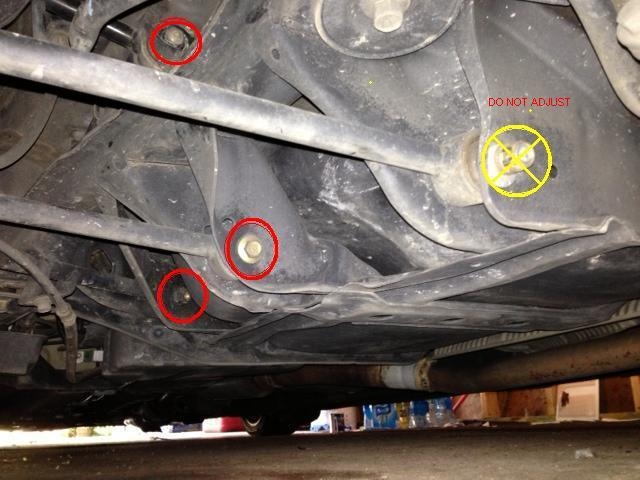
On the rear, put vehicles weight on the suspension just as with the front. Loosen and re tighten all the arm busing bolts (except the toe adjustment....DON'T touch that one). Also do the bushing at the base of the rear shock.
Some of these bushings actually "popped" into place on my car when I did this. The car was also significantly lower (especially in the front). I didn't measure, but I would guess that my car dropped around 3/8 - 1/2" after releasing the bushing tension.
The difference in the ride was notable!!! I never said anything to the wife about doing this and when she rode in the car the next time she said "Ohhh your shocks have really settled in. This thing rides sooo much better than it did when you first put them on!!" Music to mah ears!!!
I believe most of us can benefit from this.
I hope this helps some of you guys!

The point of unloading the bushings is:
1) To achieve a more positive, less bouncy ride.
2) To prolong the life of the bushings.
What motivated me to do this? After putting the coils on my car, I had an issue getting the car ride height to be consistent at each corner. Each shock was adjusted at a different position...I knew this wasn't right. After seeing another member (muffinman) post that he had this issue and had to loosen and re-tighten the bolt at the base of his rear shock to correct it, I took it a step farther and did ALL of the bushings. They definitely needed it!!!
The way to unload them is to jack the car, remove a wheel, put a block or jack stand or jack under that wheels suspension or hub, and lower the car back down to ride height to put the vehicles weight back on the suspension.
On the front, loosen and re-tighten the LCA (lower control arm) bushing bolt.

Loosen and re tighten UCA (upper control arm) bushing bolts. You will likely see and hear the center of the bushing rotate as the stress is relieved. Several of mine made a loud 'pop' as they released their tension. (Sorry, I forgot to get a pic of the UCA bolts installed on the car.)

On the rear, put vehicles weight on the suspension just as with the front. Loosen and re tighten all the arm busing bolts (except the toe adjustment....DON'T touch that one). Also do the bushing at the base of the rear shock.


Some of these bushings actually "popped" into place on my car when I did this. The car was also significantly lower (especially in the front). I didn't measure, but I would guess that my car dropped around 3/8 - 1/2" after releasing the bushing tension.
The difference in the ride was notable!!! I never said anything to the wife about doing this and when she rode in the car the next time she said "Ohhh your shocks have really settled in. This thing rides sooo much better than it did when you first put them on!!" Music to mah ears!!!
I believe most of us can benefit from this.
I hope this helps some of you guys!
Last edited by Wacker; 05-13-2013 at 11:03 AM.

The following 13 users liked this post by Wacker:
anthracitecl (05-13-2013),
klene259 (07-26-2013),
MEKO (05-25-2013),
paperboy42190 (05-17-2013),
pohljm (05-13-2013),
and 8 others liked this post.
05-13-2013, 11:02 AM
#2
BANNED
iTrader: (33)

GREAT write up, wacker.
i'm sure this will come in handy for a lot of people.
i'm sure this will come in handy for a lot of people.
The following users liked this post:
Wacker (05-13-2013)
05-13-2013, 12:29 PM
#4
Desert Life Sucks!!
iTrader: (2)
Join Date: May 2011
Location: Land of Entrapment
Age: 46
Posts: 3,455
Received 673 Likes
on
500 Posts
May have to try this before my next alignment.
I did this with the coils and the rear ingalls kit already.
Jacked the knuckle assembly up to where I thought it would be at ride height. Loaded. And then tightened all the bolts up.
Didn't do all of them just the ones I installed/replaced.
Good write-up Wacker.
I did this with the coils and the rear ingalls kit already.
Jacked the knuckle assembly up to where I thought it would be at ride height. Loaded. And then tightened all the bolts up.
Didn't do all of them just the ones I installed/replaced.
Good write-up Wacker.
The following users liked this post:
Wacker (05-13-2013)
The following users liked this post:
Wacker (05-14-2013)
05-17-2013, 05:04 AM
#6
Moderator
iTrader: (7)
I noticed on the OP you didn't put the bushing under the front suspension fork. Any reason why? I realize that bushing doesn't twist as much under spring compression but I think it's enough to warrant relaxing it. And what about the end links? I read that they should be tightened under load too.
Last edited by paperboy42190; 05-17-2013 at 05:18 AM.
The following users liked this post:
Wacker (05-18-2013)
Trending Topics
05-18-2013, 08:43 PM
#8
:what:
Thread Starter
What end links?
The following users liked this post:
Wacker (05-21-2013)
 Thank you for taking the time to share.
The following users liked this post:
Wacker (05-23-2013)
05-25-2013, 02:04 AM
#15
Suzuka Master
iTrader: (1)
Thank youuuu Wacker!!!!!!!!!!!!
05-26-2013, 07:27 PM
#19
:what:
Thread Starter
No. I don't think so. Loaded bushings cause a bouncy harsher ride. What you are experiencing has to do with the materials that the Ingals kit uses compared to the OE. The OE toe arm has bearings instead of bushings. This means they are rigid. The Ingals kit uses a softer urethane material. What you are feeling is the "give" that these bushings have. I modified my stock rear crossmember instead of adding an aftermarket kit. I was at -2.6 rear camber. After my mods, I'm at -1.4. I added adjustable ball joints from ebay up front and that took me from -1.5 to -0.5 on the front. I'm within spec all around now without spending an arm and a leg on iffy quality aftermarket parts. You are more than capable of modding your rear crossmember like I did being that you are also a bodyman. It's simple fab.
The following users liked this post:
poormans_tl69 (05-27-2013)
05-26-2013, 08:28 PM
#20
6speed Anthracite
05-26-2013, 10:56 PM
#22
:what:
Thread Starter
I didn't do anything with the arm. I basically added adjustment to the crossmember at the upper arm (the one with the knuckle). Just like the cam bolt setup on the lower toe arm. I added approx 1/4" of adjustability. That was enough to take away approx 1 degree of negative camber.
05-27-2013, 04:14 AM
#25
Moderator
iTrader: (7)
shouldnt need grease to do this
05-27-2013, 07:56 PM
#26
:what:
Thread Starter
I always jack the rear of my car from the hook on the bottom of the spare tire well and the front from the crossmember so that both wheels come up at the same time. When I did my bushings, I lowered the spindles onto blocks of wood so that the car would be sitting very near ride height. This ensures that the suspension will deflect the same amount as if the car was sitting on the wheels and tires.
05-27-2013, 09:24 PM
#27
CARBON FIBER WDP TL
No. I don't think so. Loaded bushings cause a bouncy harsher ride. What you are experiencing has to do with the materials that the Ingals kit uses compared to the OE. The OE toe arm has bearings instead of bushings. This means they are rigid. The Ingals kit uses a softer urethane material. What you are feeling is the "give" that these bushings have. I modified my stock rear crossmember instead of adding an aftermarket kit. I was at -2.6 rear camber. After my mods, I'm at -1.4. I added adjustable ball joints from ebay up front and that took me from -1.5 to -0.5 on the front. I'm within spec all around now without spending an arm and a leg on iffy quality aftermarket parts. You are more than capable of modding your rear crossmember like I did being that you are also a bodyman. It's simple fab.
Got an alignment already, might go back to make sure its still good. Thanks.
06-04-2013, 12:30 PM
#28
:what:
Thread Starter
I have gotten a few PM's asking for explanation on some details of this. Here's another explanation.
You can do this however you want. What you are trying to achieve is getting the FULL weight of the car ON the suspension with the wheels off while you loosen and re torque the bolts. You can't get to the bolts with the wheels on unless you have a drive on lift. You will need to place blocks of wood, short jack stands, or additional jacks under the hub area of the suspension to compress the suspension as it would be if it was sitting on the tires/wheels. Look closely at the center metal part of the bushings (the part the bolt goes through). You will notice as you loosen the bolts the center part will move as the rubber in the bushing returns to a static position. Some of them may do this abruptly and actually make a pop sound as they snap into place. This restores the full range of motion to the bushings and lengthens the life of the rubber. The ones that moved the most for me were: front upper control arm bushings, rear bushing on front lower control arms (popped), and lower rear shock mount (also popped for me). Doing this with all the bushings will greatly release torsional stress on the bushings and help lengthen bushing life as well as helping the ride of the car somewhat. Like I said. My car dropped about 1/2" lower in the front and an additional 1/4" in the rear after doing this. I was amazed how much tension the bushings were under and am shocked the rubber didn't rip.
Hope this explains it better.
The following users liked this post:
Shoeface (06-04-2013)
06-05-2013, 11:05 PM
#33
:what:
Thread Starter
Before relax.
After relax. I had to do a more extreme fender roll after the relax. Didn't touch my coils at all.
Noticeable height difference.
The following 3 users liked this post by Wacker:
06-07-2013, 09:56 AM
#36
if your'e at the stock ride height, you really shouldn't need to. this isn't because suspension change, this is because suspension change that changed geometry and how the weight of the car sits on the bushings.
I will do this too...probably tomorrow...
Why blocks? Wouldn't you just use a 2nd jack on the lower control arm on the front and below the rear rotor?
I will do this too...probably tomorrow...
Why blocks? Wouldn't you just use a 2nd jack on the lower control arm on the front and below the rear rotor?
The following 2 users liked this post by Wacker:
rockstar143 (06-07-2013),
sauceja (06-07-2013)
The following users liked this post:
Wacker (06-07-2013)
06-07-2013, 01:49 PM
#40
:what:
Thread Starter
The discussion here isn't about tightening things up under load when you add coils or springs. There are multiple bushings in play here that don't get touched during a spring/coilover swap. What we are doing is loosening ALL suspension bushings under load, letting them relax, then re torquing them.