D-042: 3G Front and Rear extended stud install
 01-07-2012, 01:41 PM
#1
Difficulty: 5 out of 10
Time: Give yourself 2 hours. I took 2 and a half, but I'll help you save time by avoiding some of the mistakes I made.
Tools:
19MM socket and ratchet
10MM socket
bungee cord
shop towel
I used some antiseize
light
regular hammer
4 lb sledge
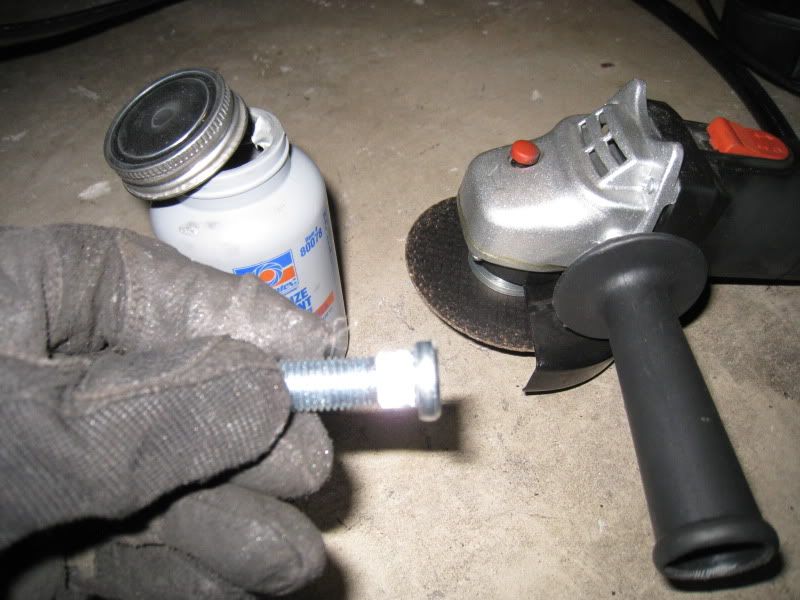
$11 grinder from harbor freight.
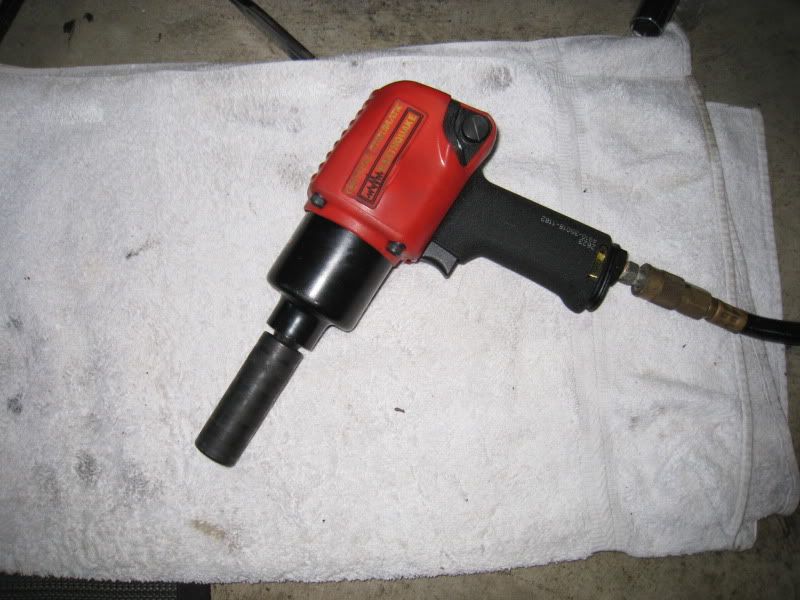
Your hands and patience or a impact gun. I have a compressor and 650 ft/lb earthquake double hammer gun from HB as well. I started out with my lith ion makita, but realized I was pushing it's limits.
Props: To my buddy Nitrous, for confirming the right way was to remove the hub, which I didn't want to do and also for the grinder was a go for extended nuts. Also to OPEL, for being a boss and coming up with this thread:
https://acurazine.com/forums/3g-tl-problems-fixes-114/quick-way-changing-broken-wheel-studs-790653/
I'll start with the DON'Ts:
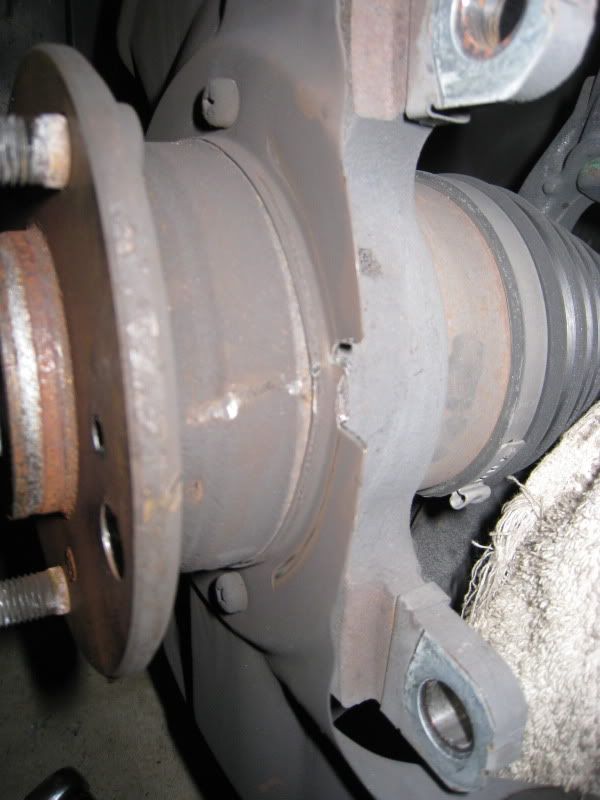
1. Don't hit your hub with your sledgehammer as you hammer our the old studs. Learned the hard way and had a bitch of a time getting the rotor back on and especially the spacer to sit flat. Had to torque it down in a star patter to force it onto the OEM hub. The tolerances are very close so any little nick on the hub with the hammer will keep everything from sliding back on easily.
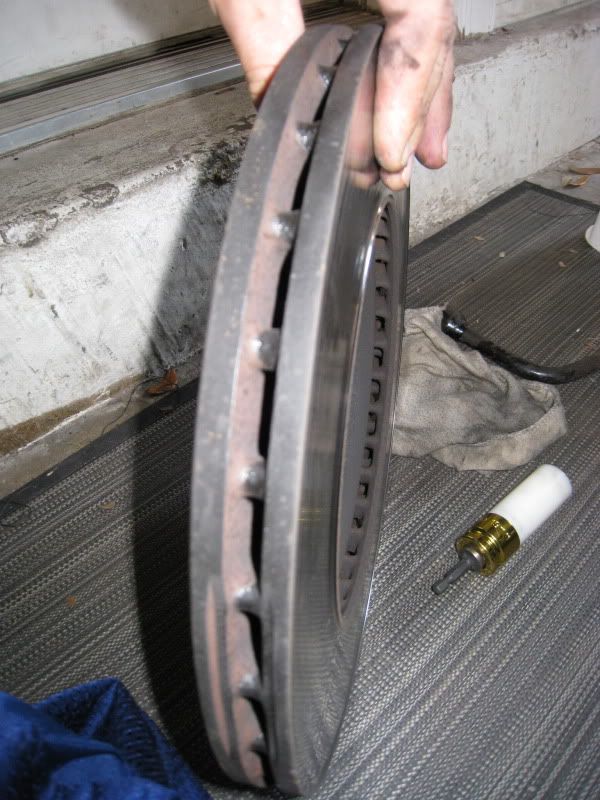
2. Don't, think you're going to save your old studs. If you want to, you can try and grind off the edge of the back of them to get them out without hurting the threads, but if you ever bother putting oem length back in...get new ones anyway. Easier to cut the groove you need to when they are off the car anyway.
3. Don't hit your rotor with your hammer to free it from the hub. I did on the inside and made a few gouges in it. Nothing I care much about, but it's not the way. Hit the hub area a few times and move it around and jiggle it till it comes off.
This DIY is not intended to teach you how to remove your caliper or rotor, but I will include pics. If you can't do those things, this may be too involved.
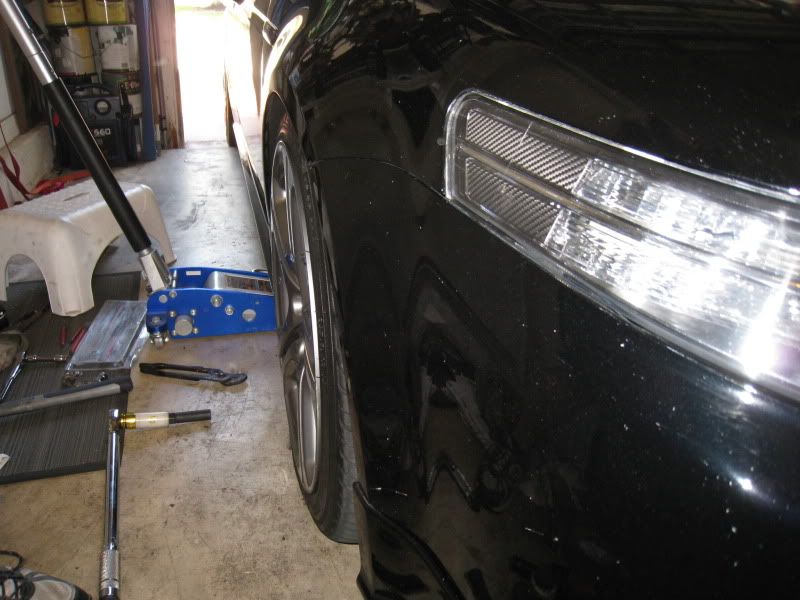
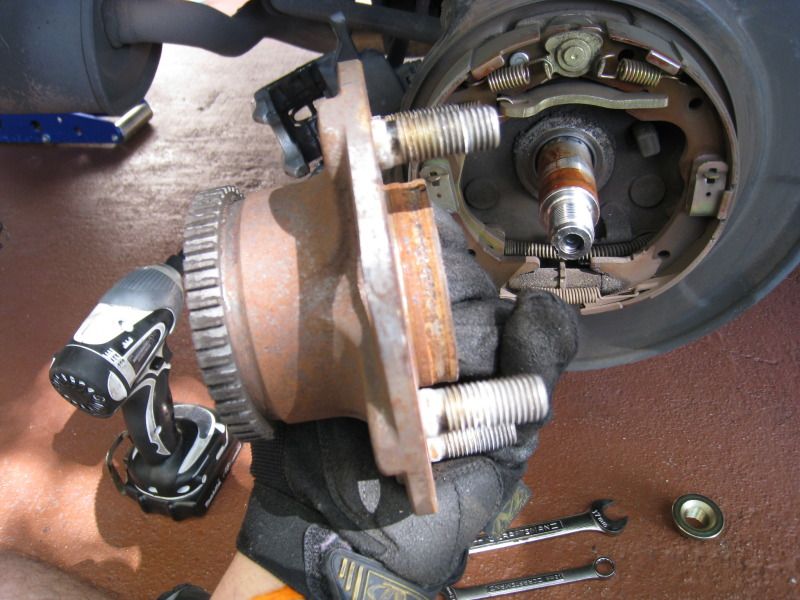
Remove wheel, obviously. Then remove your pads and spring. I know you can take the caliper assembly off in one shot, but I wanted to put some CRC for the pads anyway so why not. Plus, I just painted the calipers and wanted to be able to gently take them off.
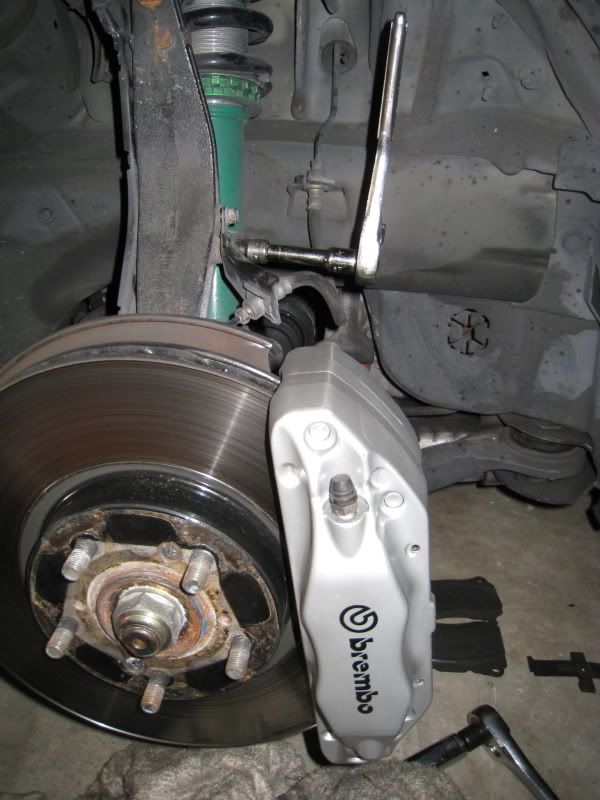
hang caliper up behind rotor
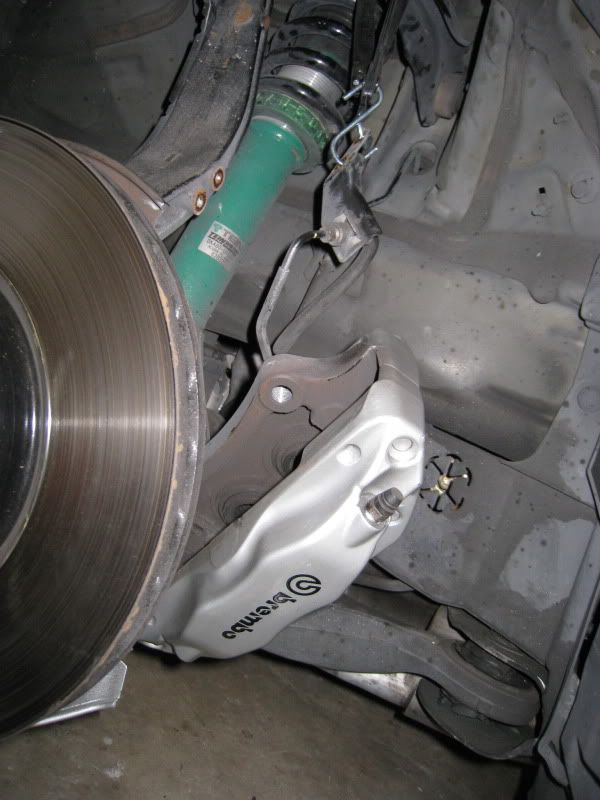
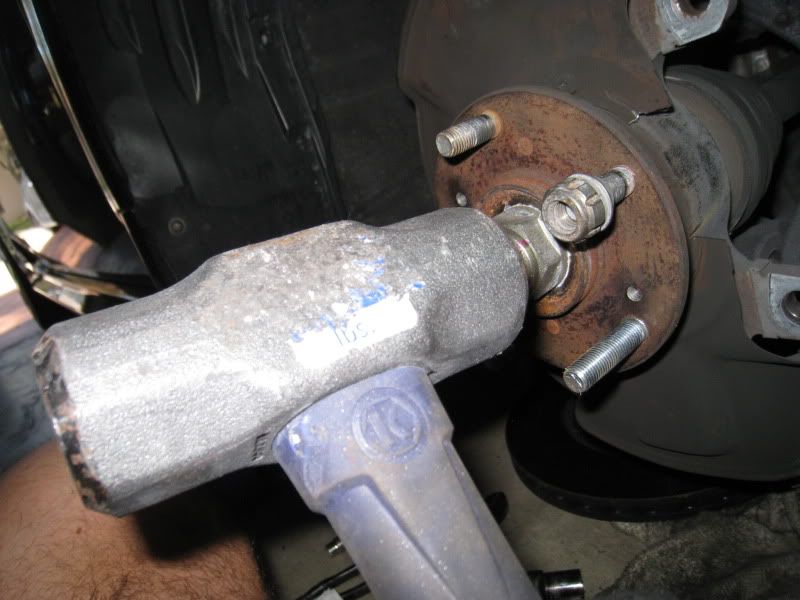
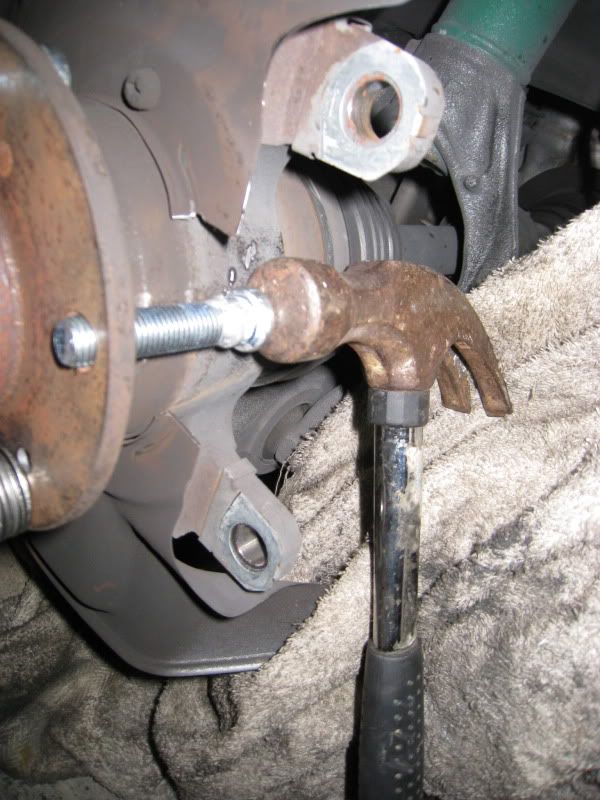
I had done this previously to see how hard it was. Take an impact extension, or something that will sit ON the screw head but NOT hit the rotor itself (since that won't jar the rust free). Whack that bitch with the 4lb sledge a few solid times like it owes you money. That screw will come off faster than your first date's longjohns. Easy.
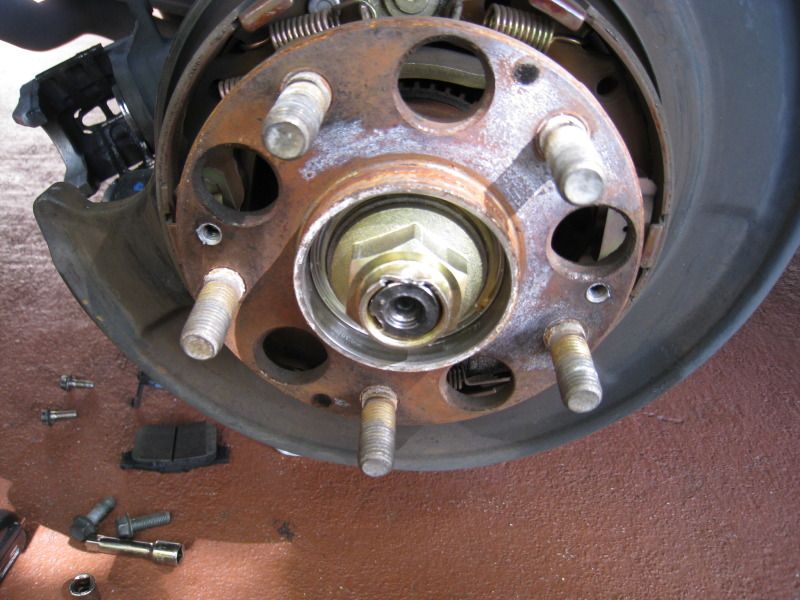
Ok, caliper gone, now jiggle jiggle jiggle...rotor gone
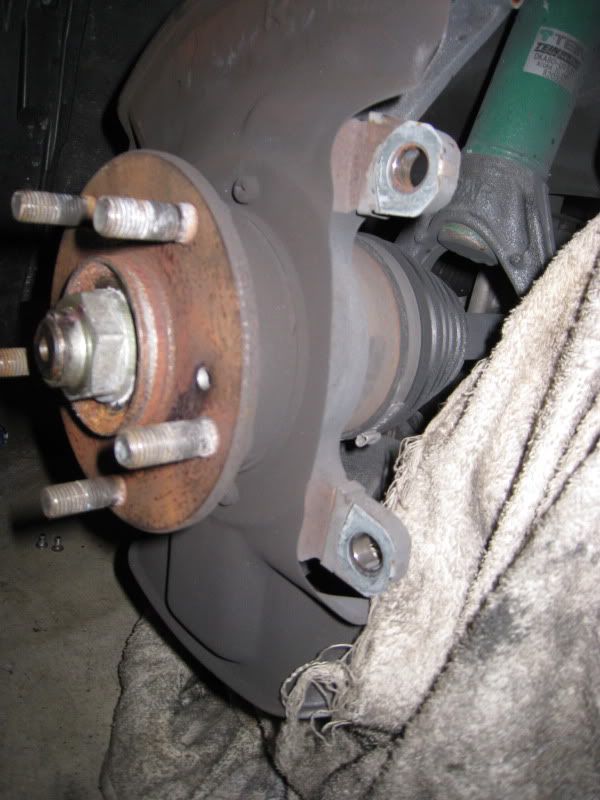
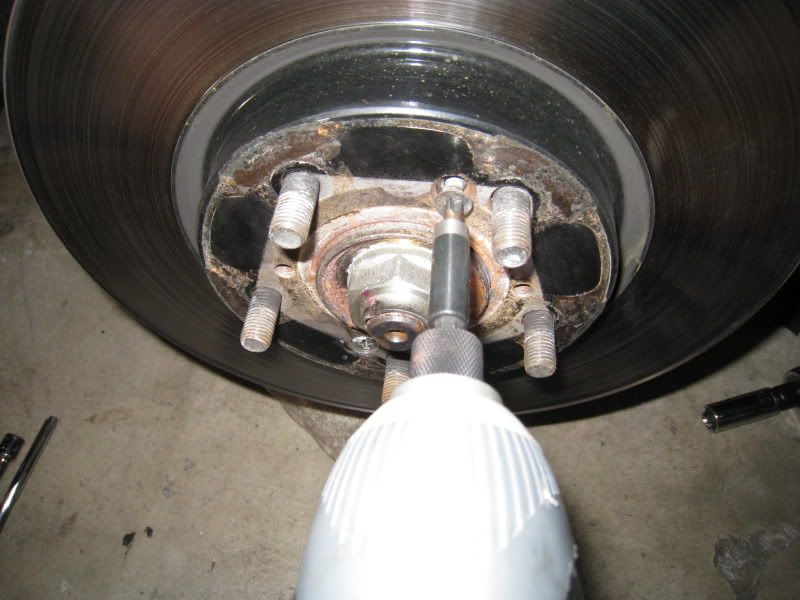
Ok, now, as I get older I take less chances. Put on ye eye protection as well as some ear protection (or an ipod with earbud style headphones) Cut a groove out of the dust cover. I start small and realized after reading Inaccurates thread on this that the dust cover is extraneous. So I cut a pretty decent channel out. You'll see it get bigger.
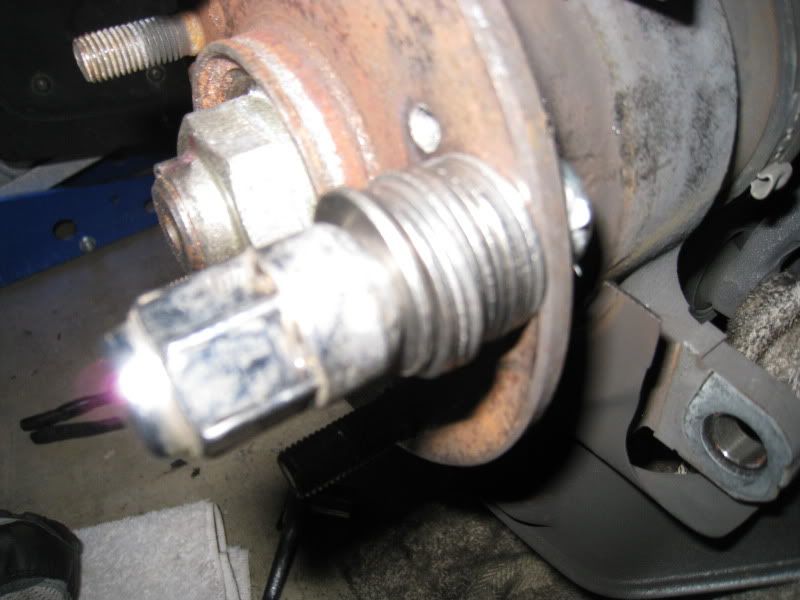
Like I mentioned, originally, I was trying to save the old studs...so I put the bolt on to hammer...once I realized it was useless, I went to town directly on the bolt. Although, in hindsight, the nut probably kept me from hitting the hub on the first side.
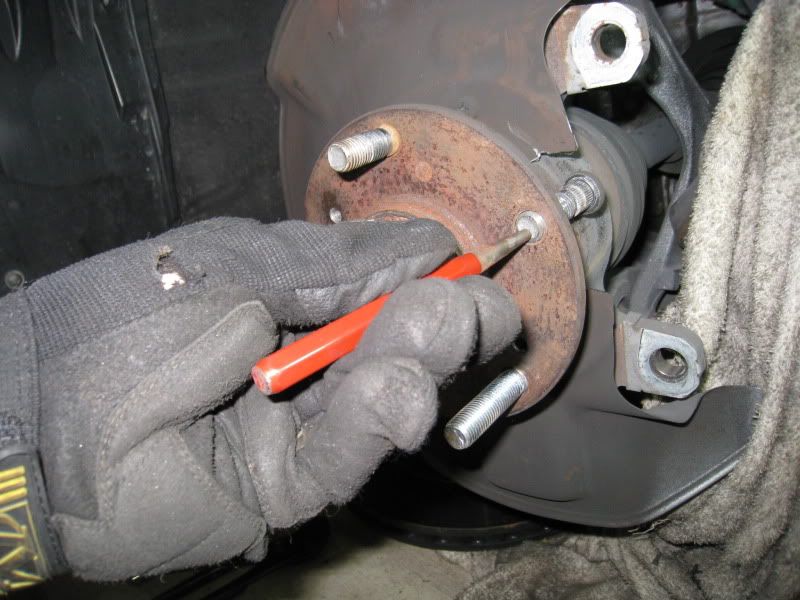
Once almost all the way thru, use a punch and hit it.
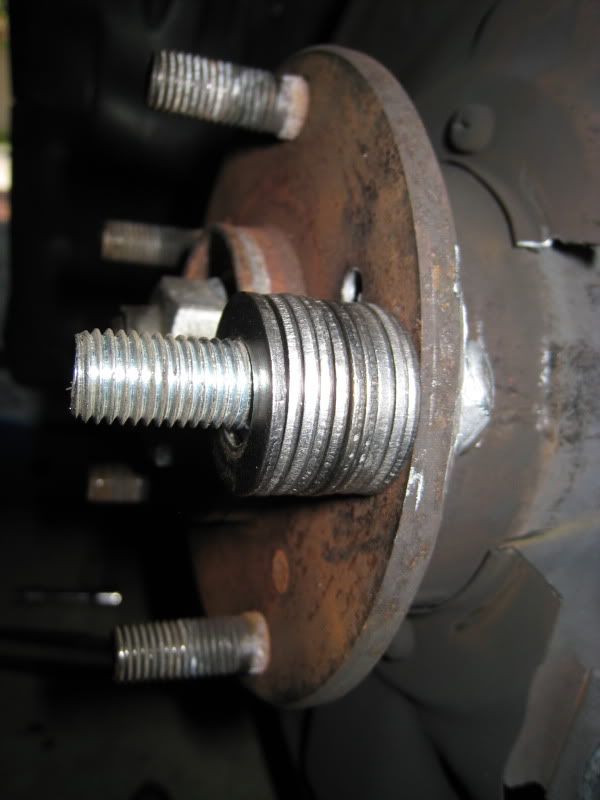
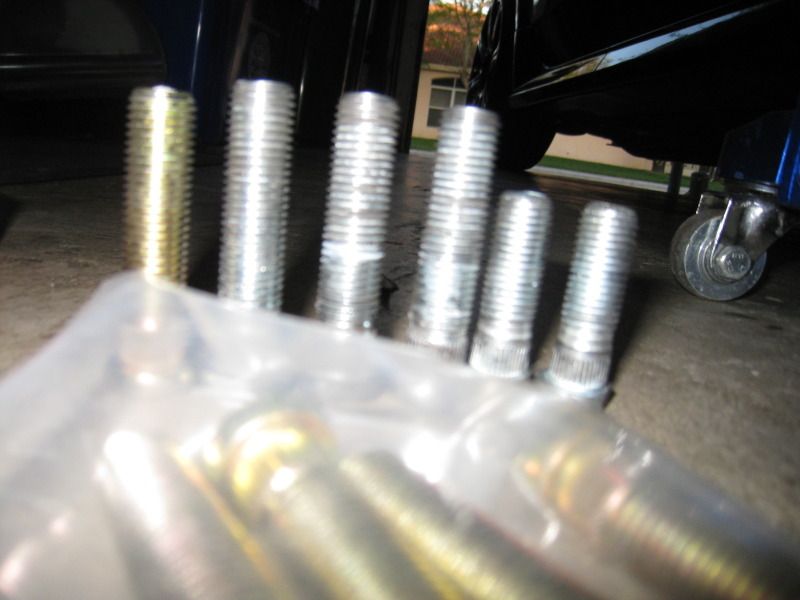
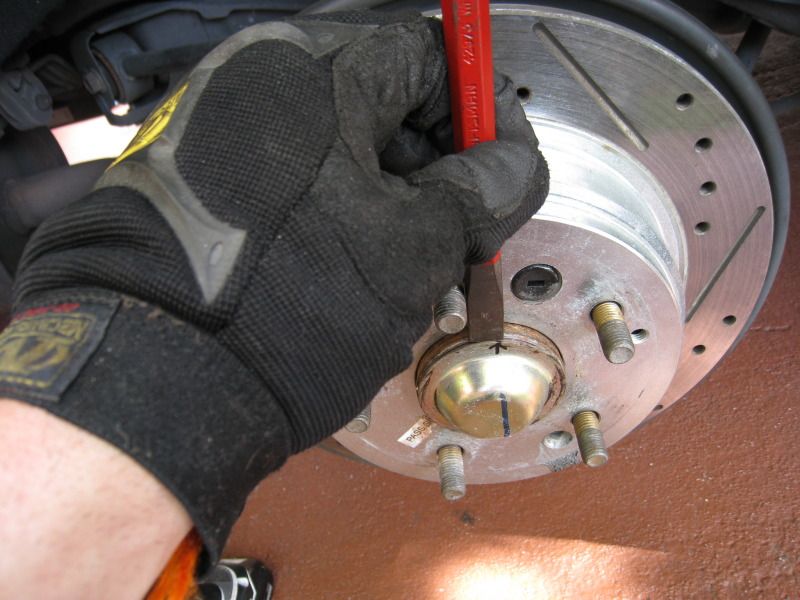
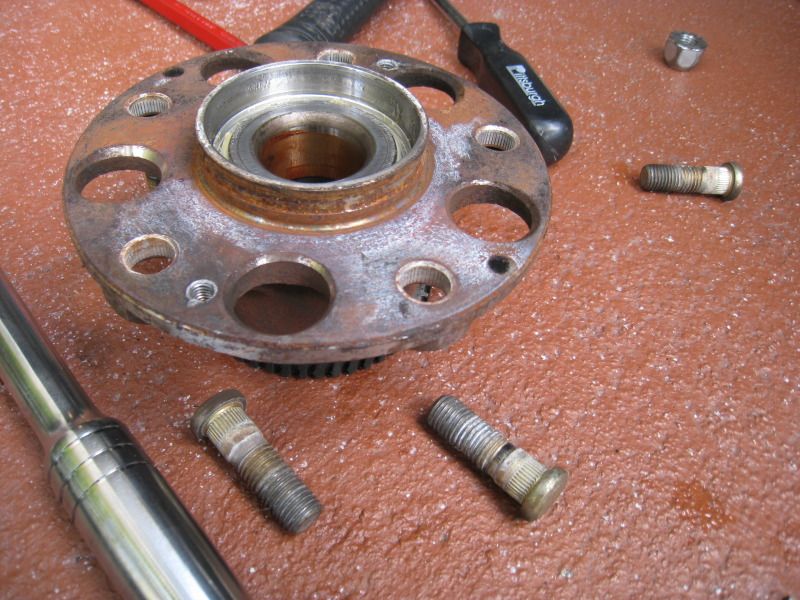
Ok, now here is where you grind the round part off the edge of the new extended stud. In my case, these came with my 10MM eibach spacer set I picked up on ebay for $55 shipped.
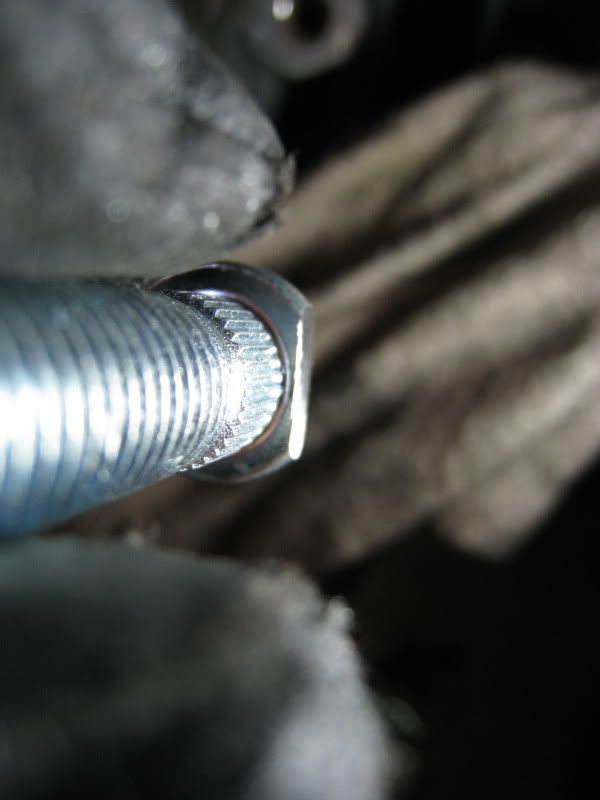
put a little antiseize on it

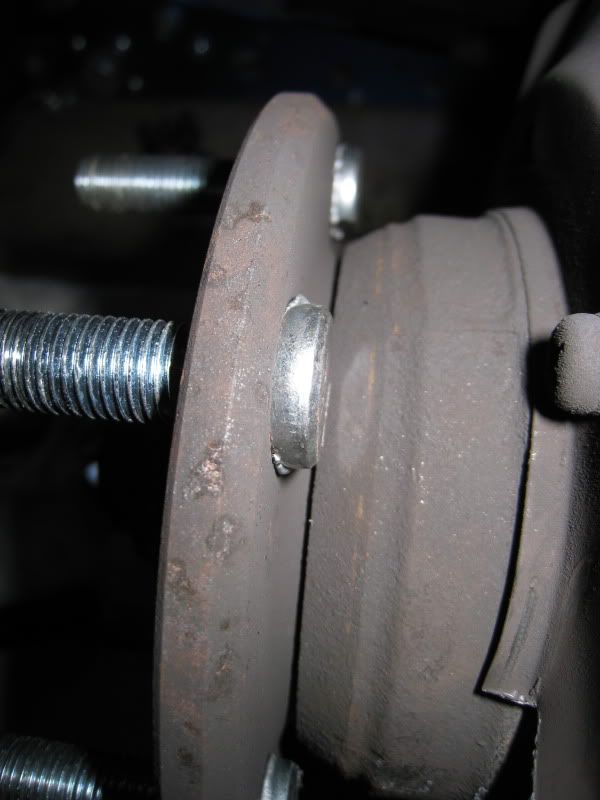
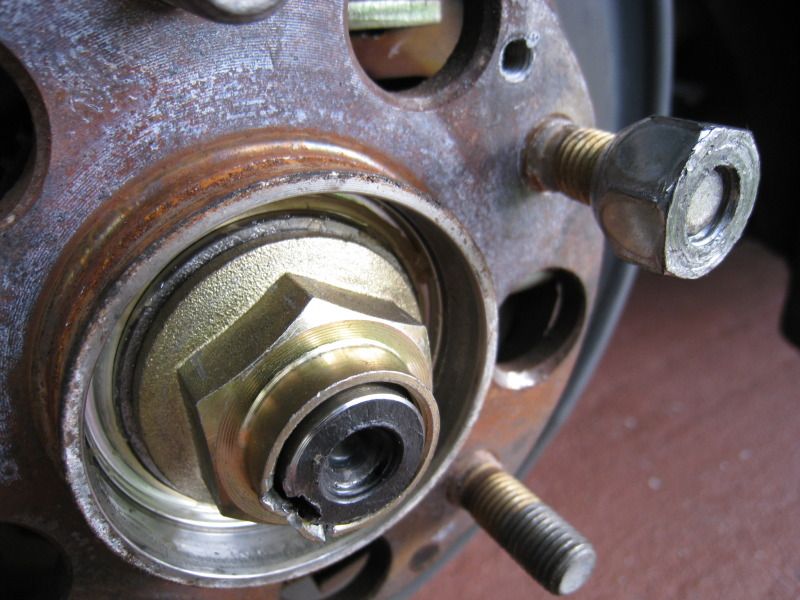
see the bigger channel cut out? now, you will lightly tap past the slight ridge on the axel. I did NOT have to regrind any of them and I didn't grind that much off. Some of them I was able to just push into place by hand.
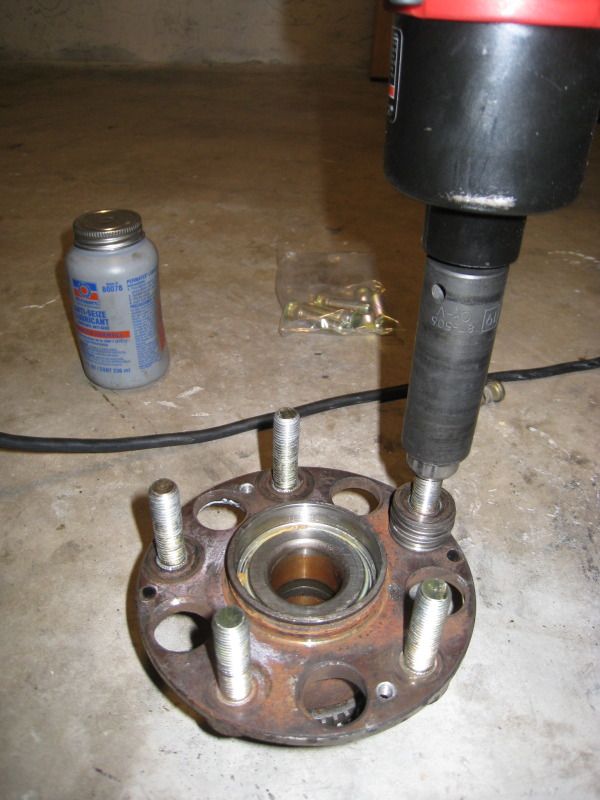
La bestia
some washers from home depot, all of $3
old oem nut
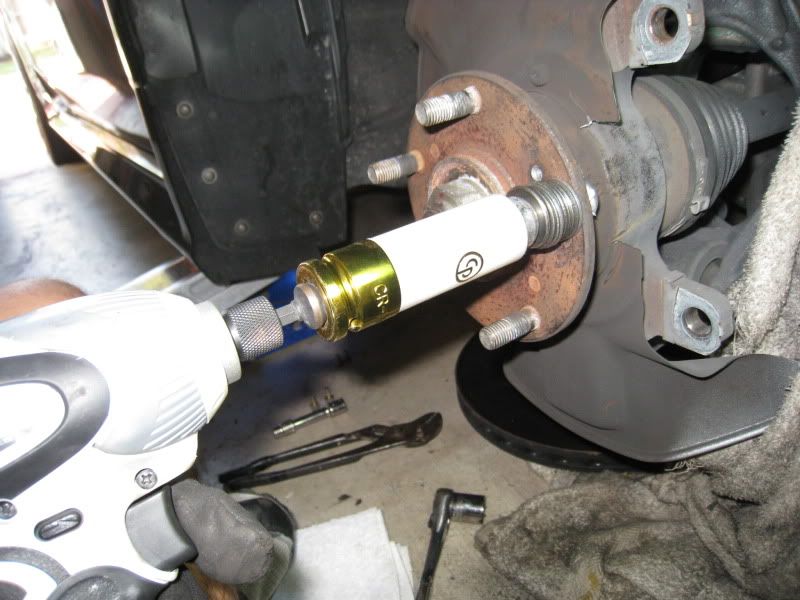
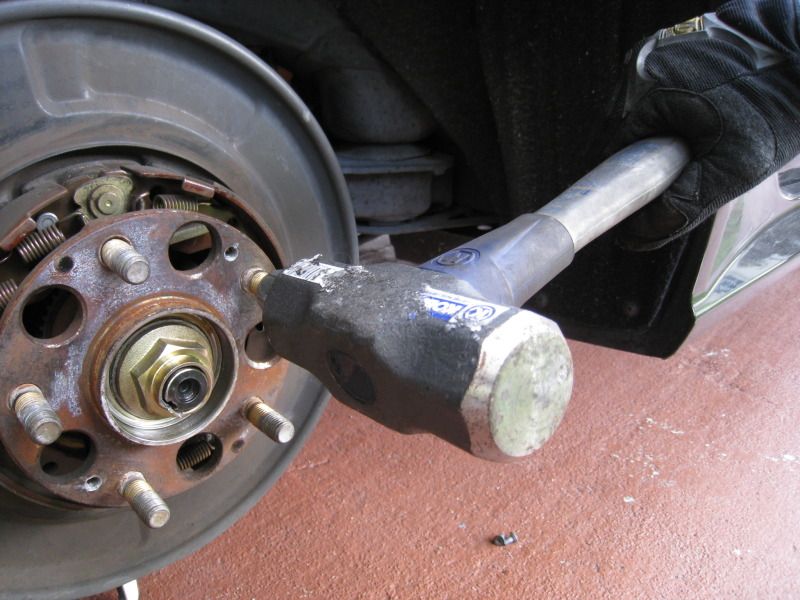
This was when I first hit it with my portable impact hammer. It worked, but wanted make sure I didn't break the shaft of the extension AND wanted the lugs seated right.
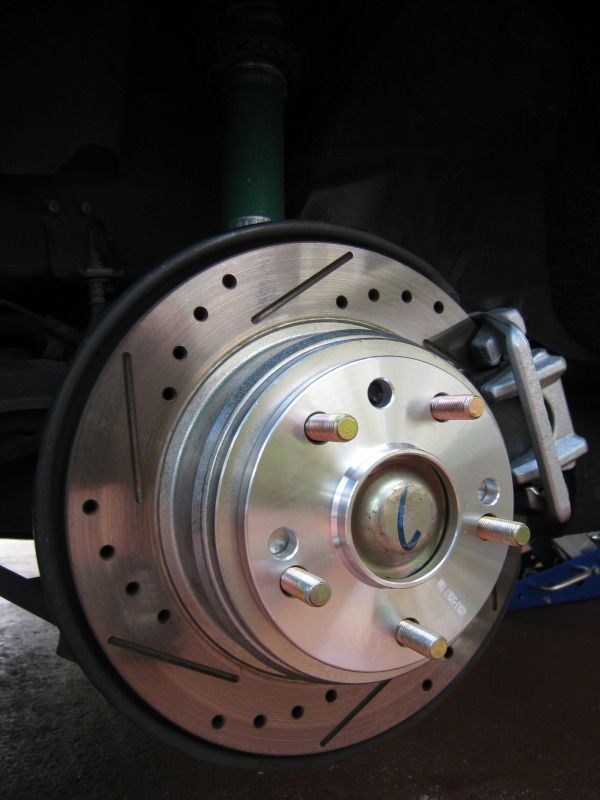
and voila, my friends...

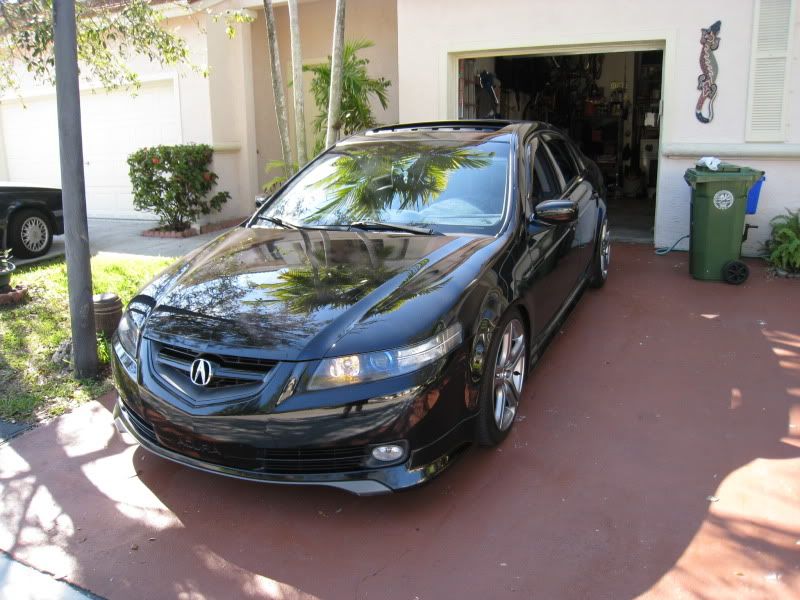
Rockin my aspecs...but I missed my +35 offset of the works...so wanted to add 10MM. I know you can get type II's with a 15MM...but for the front, where all vibrations are super apparent, I wanted a type I...plus, I knew +35 works and is tight...so +30 might have rubbed. I also didn't want to raise the car at all. Flush and low for me. If for whatever reason for whatever reason I ever need to take the spacer off, or go bigger/smaller, I'd probably just get open ended lugnuts anyway.
I have a +25 in the rear already with the 20MM ichiba type II. My aspecs are gunmetal 8.5"ers with a 235 tire.
J.
Hope this helps someone.
Prespacer

Post spacer
Time: Give yourself 2 hours. I took 2 and a half, but I'll help you save time by avoiding some of the mistakes I made.
Tools:
19MM socket and ratchet
10MM socket
bungee cord
shop towel
I used some antiseize
light
regular hammer
4 lb sledge
$11 grinder from harbor freight.
Your hands and patience or a impact gun. I have a compressor and 650 ft/lb earthquake double hammer gun from HB as well. I started out with my lith ion makita, but realized I was pushing it's limits.
Props: To my buddy Nitrous, for confirming the right way was to remove the hub, which I didn't want to do and also for the grinder was a go for extended nuts. Also to OPEL, for being a boss and coming up with this thread:
https://acurazine.com/forums/3g-tl-problems-fixes-114/quick-way-changing-broken-wheel-studs-790653/
I'll start with the DON'Ts:
1. Don't hit your hub with your sledgehammer as you hammer our the old studs. Learned the hard way and had a bitch of a time getting the rotor back on and especially the spacer to sit flat. Had to torque it down in a star patter to force it onto the OEM hub. The tolerances are very close so any little nick on the hub with the hammer will keep everything from sliding back on easily.
2. Don't, think you're going to save your old studs. If you want to, you can try and grind off the edge of the back of them to get them out without hurting the threads, but if you ever bother putting oem length back in...get new ones anyway. Easier to cut the groove you need to when they are off the car anyway.
3. Don't hit your rotor with your hammer to free it from the hub. I did on the inside and made a few gouges in it. Nothing I care much about, but it's not the way. Hit the hub area a few times and move it around and jiggle it till it comes off.
This DIY is not intended to teach you how to remove your caliper or rotor, but I will include pics. If you can't do those things, this may be too involved.
Remove wheel, obviously. Then remove your pads and spring. I know you can take the caliper assembly off in one shot, but I wanted to put some CRC for the pads anyway so why not. Plus, I just painted the calipers and wanted to be able to gently take them off.
hang caliper up behind rotor
I had done this previously to see how hard it was. Take an impact extension, or something that will sit ON the screw head but NOT hit the rotor itself (since that won't jar the rust free). Whack that bitch with the 4lb sledge a few solid times like it owes you money. That screw will come off faster than your first date's longjohns. Easy.
Ok, caliper gone, now jiggle jiggle jiggle...rotor gone
Ok, now, as I get older I take less chances. Put on ye eye protection as well as some ear protection (or an ipod with earbud style headphones) Cut a groove out of the dust cover. I start small and realized after reading Inaccurates thread on this that the dust cover is extraneous. So I cut a pretty decent channel out. You'll see it get bigger.
Like I mentioned, originally, I was trying to save the old studs...so I put the bolt on to hammer...once I realized it was useless, I went to town directly on the bolt. Although, in hindsight, the nut probably kept me from hitting the hub on the first side.
Once almost all the way thru, use a punch and hit it.
Ok, now here is where you grind the round part off the edge of the new extended stud. In my case, these came with my 10MM eibach spacer set I picked up on ebay for $55 shipped.
put a little antiseize on it
see the bigger channel cut out? now, you will lightly tap past the slight ridge on the axel. I did NOT have to regrind any of them and I didn't grind that much off. Some of them I was able to just push into place by hand.
La bestia
some washers from home depot, all of $3
old oem nut
This was when I first hit it with my portable impact hammer. It worked, but wanted make sure I didn't break the shaft of the extension AND wanted the lugs seated right.
and voila, my friends...
Rockin my aspecs...but I missed my +35 offset of the works...so wanted to add 10MM. I know you can get type II's with a 15MM...but for the front, where all vibrations are super apparent, I wanted a type I...plus, I knew +35 works and is tight...so +30 might have rubbed. I also didn't want to raise the car at all. Flush and low for me.
If for whatever reason for whatever reason I ever need to take the spacer off, or go bigger/smaller, I'd probably just get open ended lugnuts anyway. I have a +25 in the rear already with the 20MM ichiba type II. My aspecs are gunmetal 8.5"ers with a 235 tire.
J.
Hope this helps someone.
Prespacer
Post spacer
Last edited by rockstar143; 01-07-2012 at 01:45 PM.

The following 9 users liked this post by rockstar143:
07tl-s6spd (01-07-2012),
AyFeltaTL (06-25-2012),
BxTrini_TL (11-02-2013),
civicdrivr (01-13-2012),
gerzand (01-07-2012),
and 4 others liked this post.
01-07-2012, 01:58 PM
#2
takin care of Business in
iTrader: (5)
Join Date: Jan 2008
Location: Kansas City, MO
Age: 40
Posts: 30,994
Received 4,732 Likes
on
4,064 Posts
damn J....sexy DIY.....
couple steps i thought you were smart as a MOFO....well done, great DIY....
MODS3G Garage please
couple steps i thought you were smart as a MOFO....well done, great DIY....
MODS3G Garage please
The following users liked this post:
rockstar143 (01-07-2012)

The following users liked this post:
rockstar143 (01-07-2012)


The following users liked this post:
BxTrini_TL (11-02-2013)
The following users liked this post:
rockstar143 (01-08-2012)
Trending Topics
01-07-2012, 05:17 PM
#8
Hey Justin...no sir...I just sanded them and painted with high temp silver and added the decal. Ballin on a budget!
Thanks btw...I actually enjoyed this DIY. Other than the part where I had a hard time getting the spacer on due to the missed sledge hits.
Thanks btw...I actually enjoyed this DIY. Other than the part where I had a hard time getting the spacer on due to the missed sledge hits.
01-07-2012, 06:37 PM
#9
takin care of Business in
iTrader: (5)
Join Date: Jan 2008
Location: Kansas City, MO
Age: 40
Posts: 30,994
Received 4,732 Likes
on
4,064 Posts
FLUSH !!!
came out great....
The following users liked this post:
rockstar143 (01-08-2012)
01-07-2012, 07:21 PM
#10
Thanks man...I got the idea for something to pull from a DIY I found, but he used a piece of plumbing pipe. I wasn't sure how thick I needed it so figured washers would allow me to decide how many to use. Turns out, 10 was perfect.
01-07-2012, 08:58 PM
#11
takin care of Business in
iTrader: (5)
Join Date: Jan 2008
Location: Kansas City, MO
Age: 40
Posts: 30,994
Received 4,732 Likes
on
4,064 Posts
^^^ 
10 washers would make ~10 mm which is the extension on the studs so yeah spot on
10 washers would make ~10 mm which is the extension on the studs so yeah spot on
The following users liked this post:
rockstar143 (01-08-2012)
The following users liked this post:
rockstar143 (01-08-2012)
The following users liked this post:
rockstar143 (01-08-2012)
The following users liked this post:
rockstar143 (01-08-2012)
01-08-2012, 12:55 AM
#15
I just figured at 33 cents per washer, 10 would work and the thickness looked about right.No you don't...it sucks...we have to wear shorts and tshirts every day, even today. So rough!


The following users liked this post:
rockstar143 (01-08-2012)
01-08-2012, 10:23 AM
#17
Wow, that's quite the compliment!
It's funny, only 3 years ago...I knew NOTHING of stance. I knew lowering a car and that was about it. But now that I've gotten to learn about offsets and wheels sitting here or there in comparison to the fender. It's hard to go back.
Experience too...I don't think I'll ever have a car, even when I'm older and mature...where I DON'T at least do lowering springs and maybe even spacers on the oem wheels. When I put the aspecs back on I did notice that the 8.5's actually have a bit of concavity to them...and placed properly on each corner of the car, I concur...they look amazing!
J.
01-08-2012, 10:27 AM
#18
And also, crisis averted...after being annoyed by hitting the hub with the hammer, I woke up today, used a mini pry bar to pull the spacer back off and used my dremel with the grinding stone to round out the little nubs that were out of round. FIXED!
So, just be careful with those sledgehammer hits everyone!
So, just be careful with those sledgehammer hits everyone!

The following users liked this post:
rockstar143 (01-09-2012)
01-09-2012, 01:08 AM
#20
AZ Community Team

Join Date: May 2007
Location: N35�03'16.75", W 080�51'0.9"
Posts: 32,488
Received 7,770 Likes
on
4,341 Posts
https://acurazine.com/forums/showpos...8&postcount=44
In the pics with the washers, what are you doing there? Are you using them to "cinch" the new studs in place?
How do you know when the studs are fully and properly seated?
The following users liked this post:
rockstar143 (01-09-2012)
01-09-2012, 09:35 AM
#21
I can take a closer picture, do mean after install? Like, how the spacer looks behind the wheel?
If you're meaning that the rotor is stuck and you're trying to get it off, there is a "proper" (and easy) way to do it. AFTER getting the retaining screws out (or drilling them out), do this:
https://acurazine.com/forums/showpos...8&postcount=44
In the pics with the washers, what are you doing there? Are you using them to "cinch" the new studs in place?
How do you know when the studs are fully and properly seated?
https://acurazine.com/forums/showpos...8&postcount=44
In the pics with the washers, what are you doing there? Are you using them to "cinch" the new studs in place?
How do you know when the studs are fully and properly seated?
Well, I actually didn't have that hard a time getting the rotors off, just a little jiggle here and there and they came off. Thanks for the link though. I slightly damaged the hub perfect circle when I was sledgehammering the oem studs out, actually. The 2nd side, since I knew I wasn't keeping the oem studs, I didn't bother putting the nut on them to hammer them out. So a few of my swings missed and hit the hub.
And yes sir, the washers are used as a spacer to cinch, as you say, the new studs into position. One of my close up pictures shows you, but the new stud will sit completely flush against the back of the flange when it's been pulled in completely. Technically, even if you didn't pull it totally in, when you go to torque down your wheels, that will also pull it in. But I wanted to be sure and used the big impact gun to do it.
J.
Hope that answers all the questions. Main reason I did this DIY was there seemed to be a lot of questions about adding extended studs on the forum. There was a replace studs thread already by OPEL, which helped me visualize, but he expressly mentions that it won't work for extended, and it did. Figured I'd put it out there and document will with pics etc in case you feel it's garage worthy.
The following users liked this post:
Bearcat94 (01-09-2012)
01-09-2012, 10:15 AM
#22
Forgive me for being a devil's advocate, but did you consider that you are potentially damaging your bearings with all this hammering?
The hub to which the studs are inserted is seated on the inner bearing race. You're pounding away with a shock load that is off center and likely causing the bearing to deform.
Personally, I'd go the extra mile and either remove the knuckle assembly so you can pull the hub on a bench or use a hub puller and remove it from the car before going to town with a hammer.
My $0.02
Here's an example that I used long ago on my Integra:
Stud Replacement w/ Hub Removal DIY
Last edited by AndrewA; 01-09-2012 at 10:25 AM. Reason: added external link
01-09-2012, 10:44 AM
#23
Honestly, I appreciate the idea and feedback and think this would be a great place to keep ALL information...but hammering the stud out is how it's done on pretty much ALL cars. I was told if I had pulled the hub out, it would require me to need to replace the bearing. Not an option for me.
Plus, if I hadn't missed...ALL my sledgehammer blows would have ended up ON the oem stud and not the hub at all. Then, when the stud was flush with the hub, I used the punch with the regular hammer to just slightly tap it out the hole. I promise you that no SERIOUS banging took place, other than the hits to the 2 philips screw heads directly with a impact extension to loosen the rust PRIOR to rotor removal.
J.
01-09-2012, 03:34 PM
#24
Moderator
iTrader: (3)
Good lord that's one sexy ass car! Those A-Specs 
Nicely done Jeremy
Nicely done Jeremy
The following users liked this post:
rockstar143 (01-09-2012)
01-09-2012, 03:42 PM
#25
Took you long enough, Tyler! You were my inspiration!
I actually am not AS flush as you since I'm 5mm more sunken in but the tradeoff is how much lower I am, since obviously, I'd be rub city if I was as wide as you.
Thanks for the compliment, bud...we should form a "representin Aspecs Crew" or something.
You were my inspiration! I actually am not AS flush as you since I'm 5mm more sunken in but the tradeoff is how much lower I am, since obviously, I'd be rub city if I was as wide as you.
Thanks for the compliment, bud...we should form a "representin Aspecs Crew" or something.
01-09-2012, 03:45 PM
#26
Moderator
iTrader: (3)
A-Specs are overlooked and I don't understand why, they are gorgeous! Maybe I'll make a thread
So your specs are now...
18x8.5 +35 front
18x8.5 +25 rear
Is that correct?
So your specs are now...
18x8.5 +35 front
18x8.5 +25 rear
Is that correct?
01-09-2012, 04:07 PM
#28
Yes, my friend, that is correct.
8.5" Aspecs with 235 40 rubber.
04socal, thank you!
Also, I'm on Tein SS with about 1/2" left from bottom perch to bottom of shock and 3/4" or so on the rear (to accomodate the weight my box) and camber kits front and rear (upper 1 arm kit) set to about -.5 front camber and -1.5 rear. Basically, stock settings almost.
Fenders rolled all around
Last edited by rockstar143; 01-09-2012 at 04:09 PM.
01-09-2012, 04:08 PM
#29
Moderator
iTrader: (3)
I approve
01-09-2012, 09:39 PM
#32
No sir, I have not, I am on the fence about it. I have a feeling once I sell em, I'll miss them. 
Thanks btw...I tend to agree...now that I've learned about it, I am much more picky about a car looking "right" with not just sitting right, but also the wheels being relatively flush with the fender.
Thanks btw...I tend to agree...now that I've learned about it, I am much more picky about a car looking "right" with not just sitting right, but also the wheels being relatively flush with the fender.
01-13-2012, 11:33 PM
#33
Whats up with RDX owners?
iTrader: (9)

I like. And thanks for the diy
The following users liked this post:
rockstar143 (01-14-2012)
03-26-2012, 06:28 PM
#35
and, for ease of finding for you google searchers out there...
FOR THE REAR (that's what J Lo said...)
Ok, so a few months ago I made a DIY thread for swapping to extended studs to run type 1 spacers etc or just to even change out a stripped one.
Using a friend of mine's information (Nitrous, fender guy and wheel whore extraordinaire), the service manual I bought from ebay...and some tools...I was able to swap out the rears too.
Time: About 2 hours, taking your time.
Difficulty: Probably a 4 out of 10, 10 being difficult.
Tools:
remove your rims, duh, everything needed for that.
12MM, 14MM socket and ratchet and 17MM wrench will get your rear calipers off, I'm assuming you already know how to do that.
Philips to remove your rotor screws (let's hope you've done this before, if not...hammer their heads with a socket extension and sledge to knock rust loose, then impact them off...put some antiseize on the underside of heads to make easy to remove later).
A 32MM socket...preferably 6 point and a 1/2" socket breaker bar...
Lastly...set of punches and hammer to be able to take hub cap off and another to be able to bend notch in hub axle nut out and back in to be taken off.
Ok, so here we go, very easy...hardest part for me was getting the new studs in...I don't know if the knurls were slightly larger or what (more on that later)...but I DID buy the Honda/Acura ones from ebay...they are ichiba ones because believe it or not, it's not that easy to find the stud you want. My goal was to buy a stud that was long enough to run with a 10MM or smaller type 1 spacer...but still short enough to use on the oem rims with NO spacers and oem closed ended lug nuts. Mission accomplished...these are 40mm of threading which is about 10 to 15Mm longer than our oem studs. Perfect...
Ok, so back to it...
here's the ebay link for the extended studs
http://www.ebay.com/itm/230689870057...ht_4294wt_1438
and here is the link to some akata v1 spacers...64.1 so no vibrations...
http://www.ebay.com/itm/330393205317...#ht_1472wt_952
but cheaper to buy individually rather than spending the money on a set of ichiba or eibach at $105+ for the set. This set up ran me $44+$34...
also, if anyone is wondering, I did this to be able to rotate my tires the traditional way. My offsets are 10mm different front rear so I wanted to keep same stance, but be able to rotate. The concavity is so slight you can't tell which one should be front or back anyway
DIY Part...
Here is the stud difference in sizes
rim off, you can get cracking on removing the hub center.
I marked the position but it's uneccessary
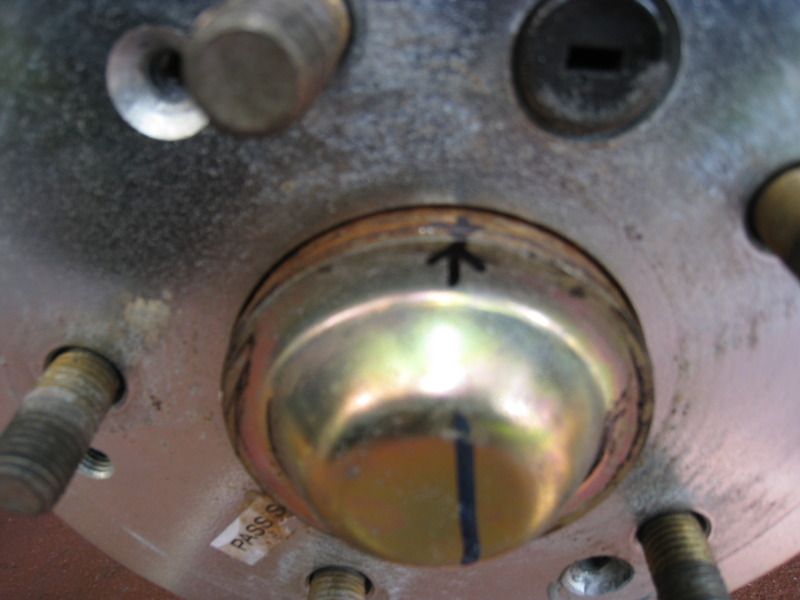
Here's what's under...don't worry about marking this either, when you retorque, it'll be at same position. (come to think of it, this kinda removes the need for a torque wrench...)

use the punch to hammer that little dip in the nut straight, or at least straight enough to get the socket turning. Don't full remove nut yet, just hand tighten it back on. Easier to knock the studs out while on the car.
Here it is, with caliper off, and rotor removed.
Hammer off studs, using a open ended nut to avoid damaging the studs
get some motherfkrrrrrr
once they are all out, undo the 32MM nut and this thing slides RIGHT off...
clearly, this picture is from when I first took it off prior to realizing easier to knock them off while on the car
momma said knock you out...
I do NOT know why the knurls were so hard going in but I had to hit them with my impact gun on full torque...and it still took a while to get them all the way in. On the 2nd side, I used some antiseize to kinda lube up entry (that's what HE said!!!) of the knurl into it's seat...helped...also found a larger washer that helped center the lug nut I was using to torque down
Once that's done...
torque the center axle nut back to 134ft/lb torque...tap the little groove back in, and put it all back together...
yay!

Done
That's it...feel free to add to this, or ask anything I may have missed. Enjoy!
J.
FOR THE REAR (that's what J Lo said...)
Ok, so a few months ago I made a DIY thread for swapping to extended studs to run type 1 spacers etc or just to even change out a stripped one.
Using a friend of mine's information (Nitrous, fender guy and wheel whore extraordinaire), the service manual I bought from ebay...and some tools...I was able to swap out the rears too.
Time: About 2 hours, taking your time.
Difficulty: Probably a 4 out of 10, 10 being difficult.
Tools:
remove your rims, duh, everything needed for that.
12MM, 14MM socket and ratchet and 17MM wrench will get your rear calipers off, I'm assuming you already know how to do that.
Philips to remove your rotor screws (let's hope you've done this before, if not...hammer their heads with a socket extension and sledge to knock rust loose, then impact them off...put some antiseize on the underside of heads to make easy to remove later).
A 32MM socket...preferably 6 point and a 1/2" socket breaker bar...
Lastly...set of punches and hammer to be able to take hub cap off and another to be able to bend notch in hub axle nut out and back in to be taken off.
Ok, so here we go, very easy...hardest part for me was getting the new studs in...I don't know if the knurls were slightly larger or what (more on that later)...but I DID buy the Honda/Acura ones from ebay...they are ichiba ones because believe it or not, it's not that easy to find the stud you want. My goal was to buy a stud that was long enough to run with a 10MM or smaller type 1 spacer...but still short enough to use on the oem rims with NO spacers and oem closed ended lug nuts. Mission accomplished...these are 40mm of threading which is about 10 to 15Mm longer than our oem studs. Perfect...
Ok, so back to it...
here's the ebay link for the extended studs
http://www.ebay.com/itm/230689870057...ht_4294wt_1438
and here is the link to some akata v1 spacers...64.1 so no vibrations...
http://www.ebay.com/itm/330393205317...#ht_1472wt_952
but cheaper to buy individually rather than spending the money on a set of ichiba or eibach at $105+ for the set. This set up ran me $44+$34...
also, if anyone is wondering, I did this to be able to rotate my tires the traditional way. My offsets are 10mm different front rear so I wanted to keep same stance, but be able to rotate. The concavity is so slight you can't tell which one should be front or back anyway
DIY Part...
Here is the stud difference in sizes
rim off, you can get cracking on removing the hub center.
I marked the position but it's uneccessary
Here's what's under...don't worry about marking this either, when you retorque, it'll be at same position. (come to think of it, this kinda removes the need for a torque wrench...)
use the punch to hammer that little dip in the nut straight, or at least straight enough to get the socket turning. Don't full remove nut yet, just hand tighten it back on. Easier to knock the studs out while on the car.
Here it is, with caliper off, and rotor removed.
Hammer off studs, using a open ended nut to avoid damaging the studs
get some motherfkrrrrrr
once they are all out, undo the 32MM nut and this thing slides RIGHT off...
clearly, this picture is from when I first took it off prior to realizing easier to knock them off while on the car
momma said knock you out...
I do NOT know why the knurls were so hard going in but I had to hit them with my impact gun on full torque...and it still took a while to get them all the way in. On the 2nd side, I used some antiseize to kinda lube up entry (that's what HE said!!!) of the knurl into it's seat...helped...also found a larger washer that helped center the lug nut I was using to torque down
Once that's done...
torque the center axle nut back to 134ft/lb torque...tap the little groove back in, and put it all back together...
yay!
Done
That's it...feel free to add to this, or ask anything I may have missed. Enjoy!
J.
03-26-2012, 06:53 PM
#36
Wow, that's amazing the inner race didn't pull out of the wheel bearing in the rear. Usually they get left behind on the spindle.
BTW: Wouldn't you want to slide the hub off BEFORE hammering out the studs? If you hammer them while the hub is still on the car, all the shock is going straight into the wheel bearing.
Also, you don't want to link to a direct auction on ebay. Once that particular auction number ends, your links will no longer work. It's best to create a detailed search on ebay and then copy the url for that search and post it here. This way we will be able to link ebay given your specific search parameters which "should" bring us right to the part/seller. Perhaps these will stay around in the future:
http://www.ebay.com/dsc/i.html?_sop=...35mm&_osacat=0
http://www.ebay.com/sch/i.html?_nkw=...0&LH_PrefLoc=2
If not, it will at least provide the user with search info after they click it.
Last edited by 94eg!; 03-26-2012 at 07:00 PM.
03-26-2012, 08:34 PM
#37
Gotcha, thanks man...I always figured it would link to the auction ending and then it says "see other items" etc. But good call!
About hammering them out while on the car...I'm not sure, but I thought it would be more difficult to hold the hub straight and hard enough to allow the studs to get hammered out. I did bolt the nut back down pretty hard, hard enough to hold the bearing in place. All seemed ok today, at least!
About hammering them out while on the car...I'm not sure, but I thought it would be more difficult to hold the hub straight and hard enough to allow the studs to get hammered out. I did bolt the nut back down pretty hard, hard enough to hold the bearing in place. All seemed ok today, at least!
03-26-2012, 09:00 PM
#38
Whats up with RDX owners?
iTrader: (9)
I hammered them while still on the car, but I was in a rush. Also, only on one side did the inner race stick to the spindle (passenger). The driver side slid off nicely.
Ideally, I would have bought new hubs and prepared everything beforehand, that way I wouldnt exert too much pressure on the hub bearings plus I get new bearings at the same time. Two birds, one stone.
Ideally, I would have bought new hubs and prepared everything beforehand, that way I wouldnt exert too much pressure on the hub bearings plus I get new bearings at the same time. Two birds, one stone.
03-26-2012, 11:24 PM
#39
About hammering them out while on the car...I'm not sure, but I thought it would be more difficult to hold the hub straight and hard enough to allow the studs to get hammered out. I did bolt the nut back down pretty hard, hard enough to hold the bearing in place. All seemed ok today, at least!
But I have done them off the car it's pretty easy as well. Just set the hub atop a pair of 2x4s and hammer away.
I also installed a couple ARP studs on the front of my Civic. Those things were a total bear to press in. Took all my might to turn the lug nut and pull them in. And I only did 4. Much tighter fit than necessary. I wonder if maybe I didn't line the splines up right or something. The stud fit tight before it even hit the splines so I couldn't tell if they were keyed up or what.
 03-27-2012, 07:38 AM
#40
Yeah, man...really had me wondering if the seller had sent me the wrong knurl size...or if I didn't line the splines up right, but they were ALL hard.
2nd side, was MUCH easier since I put a dab of antiseize on the spline area all the way around...
J.
2nd side, was MUCH easier since I put a dab of antiseize on the spline area all the way around...
J.