When you click on links to various merchants on this site and make a purchase, this can result in this site earning a commission. Affiliate programs and affiliations include, but are not limited to, the eBay Partner Network.
First off, I want to thank triax37 for posting this how-to.
I came to this post because my '07 TL threw a P0134, which is also the Bank 1 Sensor 1, though instead of high voltage as indicated by P2251, P0134 is low voltage.
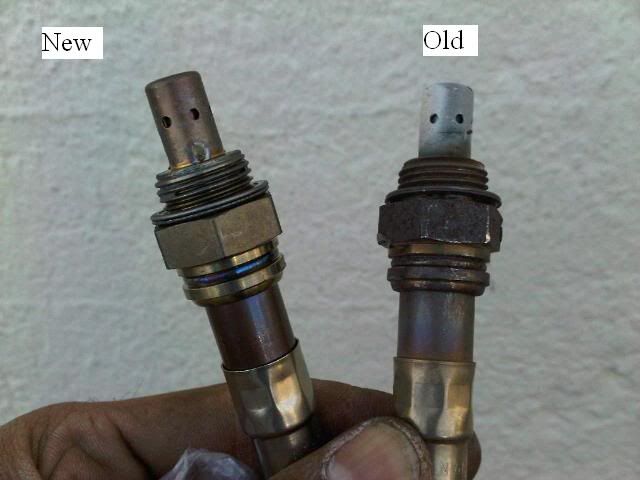
I purchased a NTK 24302 replacement sensor from Amazon for $95 shipped 2-day via Prime; could have gotten it for $88 shipped, but it wouldn't have arrived in time for the weekend. In any case it was $100 cheaper than my local dealer. BTW, NTK is the OEM for Acura. Here's a picture of my original sensor next to the new one from Amazon:
You can see they look almost identical, down to the blue ring around the base, and the original is likewise marked "NTK."
I only have a little bit to add to the how-to. First off, I'd add to the list of tools required. I suggest a "mirror on a stick" to help get a better view of the sensor's coupling. This will help in locating and using the two clips required to disengage it. I'd also add a 22mm oxygen sensor socket (available from Amazon for $10) and a torque wrench capable of 33 ft-lbs. Without these you can't torque the sensor to the correct specs.
Next, here is the torque spec for the strut brace:
Lastly, for those who asked for a more verbose explanation of the sensor's location, it is directly opposite the front O2 sensor (other side of the engine from it). I'm 5'10" and I had to lay across the engine compartment from the passenger side to get a glimpse of the wires coming up out of the top of the sensor. The sensor isn't really visible from the driver's side as there's stuff in the way.
I only have a little bit to add to the how-to. First off, I'd add to the list of tools required. I suggest a "mirror on a stick" to help get a better view of the sensor's coupling. This will help in locating and using the two clips required to disengage it. I'd also add a 22mm oxygen sensor socket (available from Amazon for $10) and a torque wrench capable of 33 ft-lbs. Without these you can't torque the sensor to the correct specs.
Great suggestions...thanks for adding them! Glad to know about the computer code you mentioned as well as the additional tools.
Sunday morning, my battery was dead. I put the charger on it all day, but it wouldn't take a charge. This morning, I measured a drain on the battery of about 260 mA and confirmed no lights, etc. were left on. On a whim, I unplugged the new O2 sensor and saw the current draw drop to about 70-80 mA, which seemed more reasonable for when the car should be sitting with everything "off." I plugged the sensor back in and the current stayed at about 70-80 mA, so I figured I was good. It's almost like the sensor control circuit was in a funk and powering the sensor, even though the key wasn't even in the ignition.
My battery was at the end of its life anyway, so I replaced it this morning on the way to work. During my commute, though, the car seemed to be running a little sluggishly and my average fuel mileage was about 21 MPG vs. the normal 28 or so I usually see. The idle seems low at around 500-700 RPM, so I'm wondering if I might have a bad sensor. It's not throwing any codes and there is no CEL, like there was when I started this project.
My ECU threw this code P0137 which when I looked up is the 02 sensor, but the OP stated a different code, I bought the NKG sensor from amazon, but now I'm confused and not sure if this is the correct sensor I bought. any help would be appreciated.
My ECU threw this code P0137 which when I looked up is the 02 sensor, but the OP stated a different code, I bought the NKG sensor from amazon, but now I'm confused and not sure if this is the correct sensor I bought. any help would be appreciated.
Bumping for you - hope someone helps you. No thoughts from me, other than the below link. Maybe consider a new thread highlighting code P0137?
Hey everyone - I just replaced my rear upstream O2 sensor (after 90k miles, P2251 popped on), and thought I would do a quick DIY since I didn't see an official one. The difficulty is probably a "2" (scale of 1-5), and would cost $100+ labor from the dealer. It took me about 1 hour. For what it's worth, my freeway mileage increased from 25mpg to 32mpg:
Part: O2 Sensor - 36531-RCA-A02 SENSOR, LAF ($120'ish)
Tools: 10mm, 12mm socket wrench, and O2 socket wrench or large adjustable wrench, arms and hands
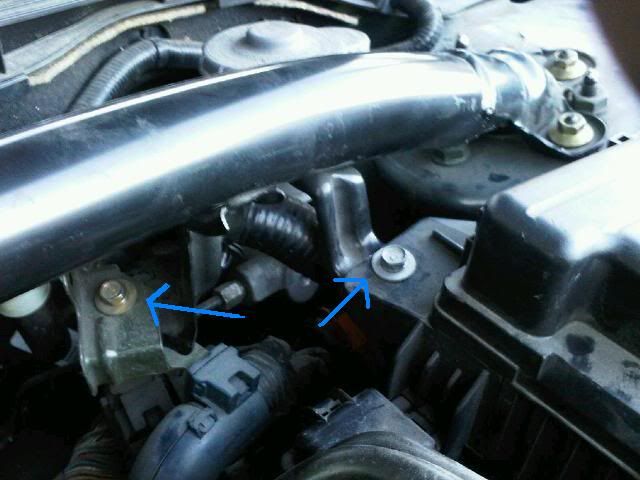
Remove strut tower bar
1. Three 12mm bolts on left side and three 12mm bolts on right side.
2. Drivers side - there are two 10mm bolts (blue arrows), and 2 plastic clips holding cables to the strut bar - I didn't take a picture of the clips, but they are pretty easy to see.
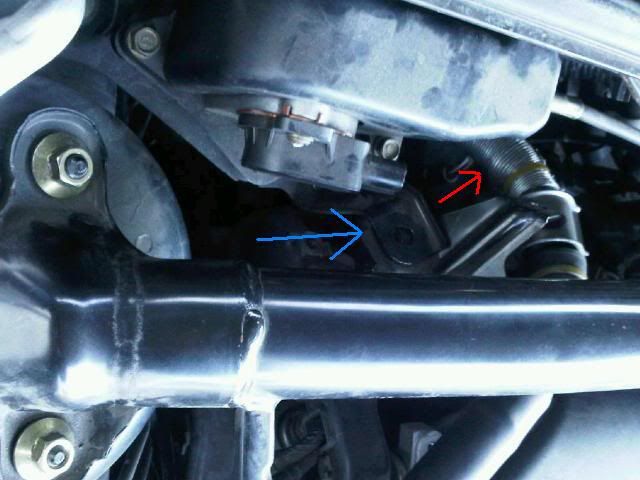
3. Passenger side - there is one 10mm bolt (blue arrow) holding the bar down. There is a clip obstructing access to the pictured bolt, so remove this. After you remove the clip and bolt, swivel the part attached to the firewall (red arrow) so that it is out of the way of the strut bar bracket.
4. Now, remove the strut bar. It may require some jiggling - just keep pulling.
Remove the old O2 sensor
5. Find sensor - it's located in Bank 1 of the engine, on the passenger side, between the engine and firewall. You'll see it - trust me. The sensor is pointed towards the ground, with wires pointed in the air.
6. The sensor unscrews with an O2 socket wrench, or (if you're lucky like me) a large adjustable wrench. A socket wrench or adjustable wrench will fit down there, so lean against the passenger fender (cover it with a workmat if you have one), and get your head and arms in there. Some (like me) had better luck with a warm engine, but it's just an option. Lefty-loosey...and once you get some give, don't unscrew it all the way.
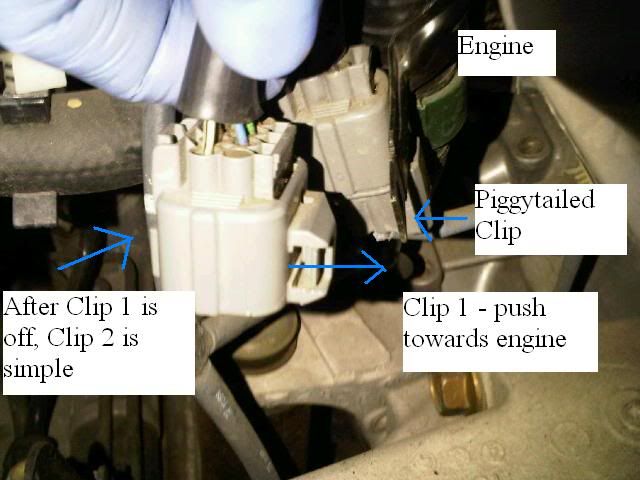
7. Now unclip the harness - there are two mounting points, (i) a piggytailed clip facing the engine, and (ii) the standard O2 sensor harness clip facing the cabin. Do the one facing the engine first - push the metal piece away from the harness, towards the engine, and slide off the O2 sensor harness off the piggytailed connection. Now that the harness is free, you can easily unclip the harness. Unscrew the rest of the way, and remove.
* Unfortunately, I spent the most time on this because I didn't realize there were two clips holding it to the car. Once I removed the piggytailed connection, the other one was easy.
Install New O2 Sensor
8. DO NOT TOUCH the new O2 Sensor's head. If you bought a new sensor from Honda, it will have loctite on the threads, but not a bad idea to put some more on there. Hold via handle, and gently insert into engine. Screw / torque down to 33 lb.ft.
9. Connect harness.
Put everything back together
10. Slide back on to piggytailed connection.
11. Replace Strut bar, including ancillary screws and clips.
12. Reset ECU - I unplugged battery, and had my navigation/radio codes handy to get them functioning again.
Great write up, I recently pulled a P2243 Bank 1 Sensor 1. Do you have any experience with that specific sensor?
Hey - sorry, I (luckily) haven't had to deal with that issue yet. I think you found the other thread...good luck!
Hey man thanks, probably look to do it after awhile. On a sidenote I haven't notice a change in my mpg (mph 21/mpg 19 city only). How urgent should I be with the replacing the rear upstream A/F?
Hey man thanks, probably look to do it after awhile. On a sidenote I haven't notice a change in my mpg (mph 21/mpg 19 city only). How urgent should I be with the replacing the rear upstream A/F?
I wish I had a complete understanding, so I'll defer to other smarter folks on this board. FWIW, what I recall reading is that if the sensors aren't working correctly, the engine can run rich (more fuel is used than necessary). A rich engine can ruin the catalytic converters, which are very expensive. So if all that's true, you should try to get it done sooner vs. later, ideally in the next few weeks. Good luck and please keep us posted!
I wish I had a complete understanding, so I'll defer to other smarter folks on this board. FWIW, what I recall reading is that if the sensors aren't working correctly, the engine can run rich (more fuel is used than necessary). A rich engine can ruin the catalytic converters, which are very expensive. So if all that's true, you should try to get it done sooner vs. later, ideally in the next few weeks. Good luck and please keep us posted!
Sounds good, just ordered a new Honda/Acura Oem sensor for $102. Way better than the price the dealerships gave me @ $231. I had to argue with the honda guy to even receive a price, as he was advising they would be a different part. Should've known better as they overfilled my TFluid by a quart last drain and fill. I will let you know how it goes, thanks for the help.
Some input for anyone attempting to change these sensors.
-The clip for the rear upstream is a bitch. Good luck.
-If you have a supercharger, drop the radiator fan to make it easier to get to the sensor. I thought I was going to have to remove the supercharger in order to get it out but got lucky somehow by doing this.
-The bosch sensors did not fit inside the hole due to the design of the sensor. I do not recommend buying this brand unless you want to find out for yourself why they don't fit inside the hole. I should have taken a photo of it before I returned them.
-I believe the NTK sensors for the upstream are the same for the front and rear: part number 24302 , which I am about to order.
At this point I haven't taken a look at the downstream sensors but I have the denso ones ready to install.
I wish I had a complete understanding, so I'll defer to other smarter folks on this board. FWIW, what I recall reading is that if the sensors aren't working correctly, the engine can run rich (more fuel is used than necessary). A rich engine can ruin the catalytic converters, which are very expensive. So if all that's true, you should try to get it done sooner vs. later, ideally in the next few weeks. Good luck and please keep us posted!
So went to change it one blistering morning here in Michigan and it wouldn't budge, used everything I had.. nothing. It looks like whoever change it last over-torqued it and over time may have melted to the threads.. lol. After that and leaving it unplugged for awhile car was vibrating upon start and drive. Turned it off and let it set while I scheduled an appointment with a mach shop. Went to take it to shop, and cel/mil wasn't on nor was it vibrating. Since then when the weather has dropped to 20s over night the cel would come on, but then would go off after driving it for the day. When the weather has been warmer over night, it wont illuminate at all. Not sure what to do. I haven't replaced it yet...
So went to change it one blistering morning here in Michigan and it wouldn't budge, used everything I had.. nothing. It looks like whoever change it last over-torqued it and over time may have melted to the threads.. lol. After that and leaving it unplugged for awhile car was vibrating upon start and drive. Turned it off and let it set while I scheduled an appointment with a mach shop. Went to take it to shop, and cel/mil wasn't on nor was it vibrating. Since then when the weather has dropped to 20s over night the cel would come on, but then would go off after driving it for the day. When the weather has been warmer over night, it wont illuminate at all. Not sure what to do. I haven't replaced it yet...
Sounds like you'll need a shop to take it off - they may use a butane torch to heat everything up, which should do the trick. If you have access to an impact driver, you could try obtaining an oxygen sensor socket and trying its power to loosen the threads....
Well, here she blows... mechanic put torch on it, finally busted lose. Threads inside the manifold were shot. Technician used a tap and die set to re thread. $50, definitely glad i found the mechanic! other option would to replace manifold. Yikes!
Hi, I have a MDX 07, 140k, and bought 4 new oxygen sensors. Had a problem with removing the rear upper one...plastic clips. Thanks for to ALL, for their tips. Here's another tip. Since I had the new ones, I unwrapped the rear/upper one, studied the clip actions (design) of the new one before trying to remove the old one. It helped me visualize which way to locate/reach/feel/push the clip. With an auto mechanic 2" mirror, adjustable/extension/with small led flashlight, I checked out its lay out. Additionally, I did the front/upper one(easier) first and got some helpful experience. Lastly, I wish I could shrink my hands...😀😏
I'm finding mixed info on the web and I'm hoping you guys can clear this up. I have a 2004 Acura TL throwing code P0134 indicating Bank 1, Sector 1 needs replacement.
Bank 1 = upstream = in the engine bay
Is sector 1 the sensor against the firewall? or near the radiator?
Which part number I should use? Guessing it's different from OPs since he had a different code.
The rest of the write-up is great, and very clear. Thanks so much!
Found a diagram.
Bank 1 Sensor 1 = in the engine bay, against the firewall - same as OP.
Bank 1 Sensor 2 = radiator side.
Ordered Denso 234-5010 from Amazon for $87, which is the OEM part according to Amazon fit finder.
I am coming up on 100k miles soon and was wondering if I should replace both upstream oxygen sensors as preventative maintenance? I haven't experienced any issues yet.
Is it usually just the upstream that go bad or can either upstream or downstream go bad, wasnt sure if one was more likely than another?!
In my opinion, there are two ways to think about this:
Do not replace them - the car will let you know if the sensors aren't working correctly. It's about $100/each for the parts, so better to save that money, especially if they work fine and you may unexpectedly sell the car before they need replacing.
Replace them proactively - they likely will go bad at some point around 100k-150k, so if you plan to keep the car to 200k+ miles, replace them. If they do go out, more fuel would likely go through the engine and into the catalytic converters, which if not fixed for a long-term period, *could* lead to premature failure of that part.
Found a diagram.
Bank 1 Sensor 1 = in the engine bay, against the firewall - same as OP.
Bank 1 Sensor 2 = radiator side.
Ordered Denso 234-5010 from Amazon for $87, which is the OEM part according to Amazon fit finder.
Thanks guys!
Hey thanks for mentioning this o2 sensor. Can you please verify which one this is? I thought the bank 1 sensor 2 was the one by the j pipe. Thanks!
I have a dilemma after changing my rear no 1 oxygen sensor in my 2005 RL. I started with a P2251 code and no changes in mpg. 3weeks later after intermittent P2251's, I pop a P0134 code and suddenly I'm getting outrageously high mpg, seriously up to 10 mpg increase. So oxy sensor change becomes imminent. Sensor changed 2 weeks ago with Bosch part. Mpg returns to normal for the first 75 miles, 13.9 city. Suddenly it jumps to 16 to18 mpg, city. My biggest concern is that I am causing the ECU to run the engine too lean and damage will ensue? Any ideas?
My 2007 TL-S has been throwing the P0154 and P2254 codes for a while now, and I really need to take care of this. But, all the different terms being used (bank 1, front bank, upstream, downstream, etc.) has been making my head spin. So, to figure out what part I needed to order, I built this little table. Hope it helps someone figure out which part they need! (Sorry for the formatting - I wish we could create tables in a post)
Codes: P0134, P2251 Position: Bank 1, Sensor 1 (AKA rear bank, upstream) Acura part: 36531-RCA-A02 SENSOR, LAF
Codes: P0140 Position: Bank 1, Sensor 2 (AKA rear bank, downstream) Acura part: 36542-RKB-004 SENSOR (same as bank 2 sensor 2 - not a typo)
Codes: P0154, P2254 Position: Bank 2, Sensor 1 (AKA front bank, upstream) Acura part: 36531-RDM-A01 SENSOR, LAF
Codes: P0160 Position: Bank 2, Sensor 2 (AKA front bank, downstream) Acura part: 36532-RKB-004 SENSOR (same as bank 1 sensor 2 - not a typo)
Simply put, Bank 1 on this car is the side of the engine/exhaust manifold to the fire wall, bank 2 is the one you first see when opening the hood. Then from each bank, sensor 1 or 2, well sensor 1 is the top sensor, so that'll be the one ontop of each exhaust manifold. Sensor 2 will be down from sensor 1, so downstream. So for your codes p2251 its the one ontop of manifold and against the firewall. upstream just refers to being the upper one or "sensor 1" and downstream would be sensor 2
Oh, I was wondering, when changing the O2 sensor, do you HAVE TO disconnect the battery? Or do they say that just to reset the MIL codes? I have an ODBII scanner so it would be much easier for me to leave the battery connected and just clear the codes with my scanner.
Thanks to pkarandi for mapping out the part numbers to the different sensors earlier in this thread. I have an '05 5AT and I'm trying to figure out which Denso parts map to the two upstream sensors he listed:
Position: Bank 1, Sensor 1 (AKA rear bank, upstream) Acura part: 36531-RCA-A02 SENSOR, LAF
Position: Bank 2, Sensor 1 (AKA front bank, upstream) Acura part: 36531-RDM-A01 SENSOR, LAF
Both Amazon & Rock Auto seem to think this one part is for both the front & rear upstream sensors, but I've been burned by their compatibility matrix before and it's clear that there are two different Acura part numbers:
Can someone clarify which one this Denso maps to (believe it's the rear upstream based on comments in the reviews) and what the Denso part would be for the other upstream? Also, are the NTK/NGK equivalent because Amazon says this one maps to both the front & rear upstreams as well:
Thanks to pkarandi for mapping out the part numbers to the different sensors earlier in this thread.
No problem spamcop. Glad it was helpful. I was also trying to figure out which Denso part mapped to the Acura part (figured it would save me a $100), but to no avail. I just gave up and paid $170 for the Acura part from one of those online acura oem parts places. At this point, I just want to take care of the issue so I can get rid of that damn CEL!
My part should arrive within the next day or two. I found these two videos on youtube for replacing the bank2 sensor1 part for an MDX, but it appears to be very similar to our TL's. Looks like a fairly straightforward job (I know, famous last words!)
I just installed the new O2 sensor for Bank 2, Sensor 1 (P0154 code, Acura part 36531-RDM-A01 SENSOR) and I was happily surprised at how easy it was. It took me longer to gather my tools and then clean up than it did to actually replace the sensor.
I used the first video I listed in my post #72. My 2007 TL-S was actually much easier than the MDX in the video. Also, this is much easier than the Bank 1, Sensor 1 replacement (which was the OP's bad sensor) A few notes that might help...
First, before trying to disconnect the connector, remove it from the bracket. This is super easy, if you know how to do it, but super frustrating if not! Use this comment from the first youtube video I linked in post #72 to help:
One thing I would add to that comment is when you stick the screwdriver in the slot, push the connector downward to remove it from the bracket. (I have also added this comment to the youtube video)
Make sure you have the right tools to make your life easier. I had a tough time getting the old sensor loose, but a quick trip to my toolbox to get my 3/8 drive breaker bar made it a snap. Tools needed overall:
1) 3/8-inch drive torque wrench
2) 3/8-inch drive breaker bar
3) 3/8-inch drive 6-inch extension
4) small screwdriver
5) O2 sensor socket
6) and of course the replacement sensor and some anti-seize lube
Oh, I was wondering, when changing the O2 sensor, do you HAVE TO disconnect the battery? Or do they say that just to reset the MIL codes? I have an ODBII scanner so it would be much easier for me to leave the battery connected and just clear the codes with my scanner.
Answering my own question here...
I replaced the sensor WITHOUT disconnecting the battery. Then I reset the CEL codes using my OBDII scanner. It did not seem to cause any problems!
I joined just so I could thank triax37 for this write up (I know it's an old thread). I wish I'd read step #7 better bere spending 45 minutes trying to unplug the old sensor without disconnecting it from the mounting tab. After a reread it look about a minute.
I have an alternative solution to get at the electrical sensor borne of pain and frustration.
The first connector that must be released is a pain to get to release. I was working blind in trying the get the connector off the metal tang. However, the metal tang that this connects to is part of the connector to the Oxygen sensor itself, not the harness.
Assuming the objective is to change the O2 sensor (and not to test the sensor), the plastic part of the connector that connected to the metal tang is going to be replaced anyway. Use a screwdriver to destroy the plastic connector next to the metal and out pops the connector. Then the 2nd clip is straightforward.
Bank 2 super easy lol. I watched Eric The Car Guy video and he had many unnecessary steps. Rear took about 40 minutes to remove,install and put everything back CEL went off immediately, let's see if it stays off
* Job requires an inline O2 sensor socket, offset socket does not have clearance
* Squeeze the bottom of the connector to disengage from the bracket first, then disconnect
* Use penetrating oil and warm the engine before removal, however, be careful of hot exhaust pipes
* Threading new sensor can be tricky due to tight clearance
 08-23-2015, 01:14 AM