
'04 to '08 front lower control arm bushing failure - please read and look

 03-17-2013, 08:46 PM
#962
Instructor

Join Date: Apr 2007
Location: Toms River, NJ
Age: 43
Posts: 118
Likes: 0
Received 0 Likes
on
0 Posts
Just to update, I tried this today and I was not able to press the bushing out. I'm pretty sure it's the fault of the Powerbuilt socket I got from Amazon due to the fact that it's the only real difference between what I used and what nfn and wacker were successful using. When I tried to tighten the nut, the socket would not stay straight. The socket has a more curvy design and a circular indentation around the drive opening which could have caused the angle. So obviously stick to the Tractor Supply socket if you want to build this tool.
03-17-2013, 09:16 PM
#963
Race Director
Just to update, I tried this today and I was not able to press the bushing out. I'm pretty sure it's the fault of the Powerbuilt socket I got from Amazon due to the fact that it's the only real difference between what I used and what nfn and wacker were successful using. When I tried to tighten the nut, the socket would not stay straight. The socket has a more curvy design and a circular indentation around the drive opening which could have caused the angle. So obviously stick to the Tractor Supply socket if you want to build this tool.
There should be enough exposed threads on the end of the bolt to fully thread the nut on the bolt before you start cranking with serious pressure. Otherwise the bolt may strip. Also, I recommend coating the bolt threads with grease before starting.
Also, I sprayed PB on the edge of the bushings before starting. I didn't wait but 5 minutes or so, so not sure how much it helped if at all. My bushings were not badly rusted.
Not sure what to recommend as the next step. Maybe the safe bet is to go ahead and buy the TS socket before your next attempt. But on the 2nd attempt, maybe try first with the PB socket and see if any hints I gave above help. If so, then you could return the TS socket and not be out any $$$$. Good luck!
03-17-2013, 11:47 PM
#964
Instructor
Join Date: Apr 2007
Location: Toms River, NJ
Age: 43
Posts: 118
Likes: 0
Received 0 Likes
on
0 Posts
Hard to say if it was the Powerbuilt socket or not. Even with the TS socket, it had a tendency to get off-center and as I was starting the process I had to back the pressure off a couple of times to re-center it before I started cranking down on the nut. This happens because the bushing hole is not exactly centered.
There should be enough exposed threads on the end of the bolt to fully thread the nut on the bolt before you start cranking with serious pressure. Otherwise the bolt may strip. Also, I recommend coating the bolt threads with grease before starting.
Also, I sprayed PB on the edge of the bushings before starting. I didn't wait but 5 minutes or so, so not sure how much it helped if at all. My bushings were not badly rusted.
Not sure what to recommend as the next step. Maybe the safe bet is to go ahead and buy the TS socket before your next attempt. But on the 2nd attempt, maybe try first with the PB socket and see if any hints I gave above help. If so, then you could return the TS socket and not be out any $$$$. Good luck!
 Gotta love salt.
03-18-2013, 12:15 AM
Gotta love salt.
03-18-2013, 12:15 AM
#965
I aplaud you guys for trying to do it in a simple way. I just watched mine today get pushed out in a 20 ton press and it wasn't that easy. My mechanic had to wrestle with the ball joints, the dealer must of used an air gun when the transmission was done from what I hear. How do you replace the bearings in these cars, seems tough.
Here is a pic of new bushings.
Here is a pic of new bushings.
03-18-2013, 12:36 AM
#966
Race Director
I did soak it in PB before making the attempt. I tried several times but it would just go off center every time and the bushing wouldn't budge. I was able to thread the nut on about half way by hand, then tightened it down and it did get fully threaded on before it started to get very tight. Mine are pretty rusty, I posted pics here and that was 8k miles and another winter ago Gotta love salt.
Gotta love salt.
I aplaud you guys for trying to do it in a simple way. I just watched mine today get pushed out in a 20 ton press and it wasn't that easy. My mechanic had to wrestle with the ball joints, the dealer must of used an air gun when the transmission was done from what I hear. How do you replace the bearings in these cars, seems tough.
Here is a pic of new bushings.
Here is a pic of new bushings.

However, the other 2 bushings on the LCA are deeper and are probably proportionately harder to "pop", dunno.
Last edited by nfnsquared; 03-18-2013 at 12:43 AM.
03-18-2013, 06:41 PM
#968
1st Gear

Join Date: Mar 2012
Age: 37
Posts: 1
Likes: 0
Received 0 Likes
on
0 Posts
I aplaud you guys for trying to do it in a simple way. I just watched mine today get pushed out in a 20 ton press and it wasn't that easy. My mechanic had to wrestle with the ball joints, the dealer must of used an air gun when the transmission was done from what I hear. How do you replace the bearings in these cars, seems tough.
Here is a pic of new bushings.
Here is a pic of new bushings.
03-20-2013, 05:10 PM
#970
Moved to the LOU
iTrader: (6)
so after a service at the stealership they told me mine were starting to crack and probably would need replaced before summer. Quote was $643 which included the alignment.
After reading through this thread it seems we have several options on replacing the compliance bushing. has anyone come to a conclusion on what is the most cost effective/longevity repair?
Fastline bushings are $300, OEM replacements are $26 each on oemacuraparts.com. Not sure how much the accord set runs but I am sure it's similar. Also noticed the set of blue bushings but can't remember the name but I do remember someone saying the contacted all the distributers in the US and could not get them.
04-05-2013, 06:23 AM
#974
 04-06-2013, 01:24 AM
#976
No problem guys. I was a test car, I didnt buy them from a store. I know someone who is getting these parts and will be offering press in for them. It looked hard when mine were done and some tools were made special. Pm me if i can help someone.
The following users liked this post:
rockstar143 (04-06-2013)
04-11-2013, 12:58 AM
#977

I aplaud you guys for trying to do it in a simple way. I just watched mine today get pushed out in a 20 ton press and it wasn't that easy. My mechanic had to wrestle with the ball joints, the dealer must of used an air gun when the transmission was done from what I hear. How do you replace the bearings in these cars, seems tough.
Here is a pic of new bushings.
Here is a pic of new bushings.
Just curious, how does it change your offset? Seems like it would affect the toe?
04-11-2013, 01:48 AM
#978
I aplaud you guys for trying to do it in a simple way. I just watched mine today get pushed out in a 20 ton press and it wasn't that easy. My mechanic had to wrestle with the ball joints, the dealer must of used an air gun when the transmission was done from what I hear. How do you replace the bearings in these cars, seems tough.
Here is a pic of new bushings.
Here is a pic of new bushings.
I found an online vendor that sells the Super Pro bushings but they're pricey.
Have to be special ordered and if you order the whole set it's like $474.91
It's $185.21 for just the compliance bushings. Seems the fastline bushings at heeltoe are less expensive than the super pro bushings (given you get the whole set for the LCA).
Anyhow if anyone is interested I was able to find them by special order on
energysuspensionparts by searching for P/N.
04-11-2013, 01:52 AM
#979
1. Heel toe doesn't give you the lower shock mount bushing.
2. God knows when those spheres are gonna wear and have play within the housing.
3. The Heeltoe compliance bearing doesn't come with a dust boot
4. Eccentric compliance bushing is for caster. But the tech better be damn good at what he does in which orientation (s)he presses those eccentric bad boys in.
5. Dust boot or not, If only Heeltoe bearings came with 50k mile warranty I would've already bought a set
Last edited by 4drviper; 04-11-2013 at 01:56 AM.
04-11-2013, 02:58 AM
#980
1. Heel toe doesn't give you the lower shock mount bushing.
2. God knows when those spheres are gonna wear and have play within the housing.
3. The Heeltoe compliance bearing doesn't come with a dust boot
4. Eccentric compliance bushing is for caster. But the tech better be damn good at what he does in which orientation (s)he presses those eccentric bad boys in.
5. Dust boot or not, If only Heeltoe bearings came with 50k mile warranty I would've already bought a set
2. God knows when those spheres are gonna wear and have play within the housing.
3. The Heeltoe compliance bearing doesn't come with a dust boot
4. Eccentric compliance bushing is for caster. But the tech better be damn good at what he does in which orientation (s)he presses those eccentric bad boys in.
5. Dust boot or not, If only Heeltoe bearings came with 50k mile warranty I would've already bought a set
I asked about the eccentric ones because the photos posted above they look like they're the eccentric super pros and was curious.
05-02-2013, 11:39 AM
#981
Instructor
Got 2 transmission mounts, front engine mount, side engine mount replaced. Still hear clunking on uneven pavement/speed bumps from front driver's side area. My bushing is a little torn, could this be causing the clunk?
Also was quoted $240 to replace both bushings, that a good deal?
Also was quoted $240 to replace both bushings, that a good deal?
05-02-2013, 11:31 PM
#982
Instructor
Got 2 transmission mounts, front engine mount, side engine mount replaced. Still hear clunking on uneven pavement/speed bumps from front driver's side area. My bushing is a little torn, could this be causing the clunk?
Also was quoted $240 to replace both bushings, that a good deal?
Also was quoted $240 to replace both bushings, that a good deal?
06-03-2013, 09:41 PM
#988
Just to update, I tried this today and I was not able to press the bushing out. I'm pretty sure it's the fault of the Powerbuilt socket I got from Amazon due to the fact that it's the only real difference between what I used and what nfn and wacker were successful using. When I tried to tighten the nut, the socket would not stay straight. The socket has a more curvy design and a circular indentation around the drive opening which could have caused the angle. So obviously stick to the Tractor Supply socket if you want to build this tool.
I used a grade 8 8" bolt, nut and 2 thick washers. Pressed it out fine, but pressing in the new one was a little difficult. Really needed a longer bolt, so I started the bushing with the socket and a hammer tapping it in until I could get a few threads on the bolt and push it in using the socket setup.
Worked fine, even used an electric impact gun to do it. I have the makita BTW450Z though. Hit the bushing with PB about a week before doing it and then again while I was changing out my passenger axle when I did this job. I also completely removed the control arm for the car since it was easier and I already had the coil-over out and the balljoint popped since I was doing the axle.
06-05-2013, 03:42 PM
#989
8th Gear

Join Date: Jul 2010
Location: San Diego, CA
Age: 35
Posts: 8
Likes: 0
Received 0 Likes
on
0 Posts
just got a call from the dealership saying the bushings are torn 30-40%.
Not car savvy at all so should I just have the dealership replace them for the $5-600 bucks or wait a lil while
Not car savvy at all so should I just have the dealership replace them for the $5-600 bucks or wait a lil while
06-07-2013, 10:22 AM
#991
Id say buy the bushings online. Take it to a local shop and have them replaced for a few hundred.
The following users liked this post:
glennjr15 (01-06-2017)
06-08-2013, 06:20 AM
#992
:what:
He said he wasnt car savvy. Removing the LCA can be a pain. DIY bushing replacing can be a little frustrating if things dont work. While this thread may have useful instruction for someone comfortable with cars, I dont think someone who is uncomfortable working on cars should tackle a job like this.
Id say buy the bushings online. Take it to a local shop and have them replaced for a few hundred.
Id say buy the bushings online. Take it to a local shop and have them replaced for a few hundred.
06-23-2013, 01:46 PM
#993

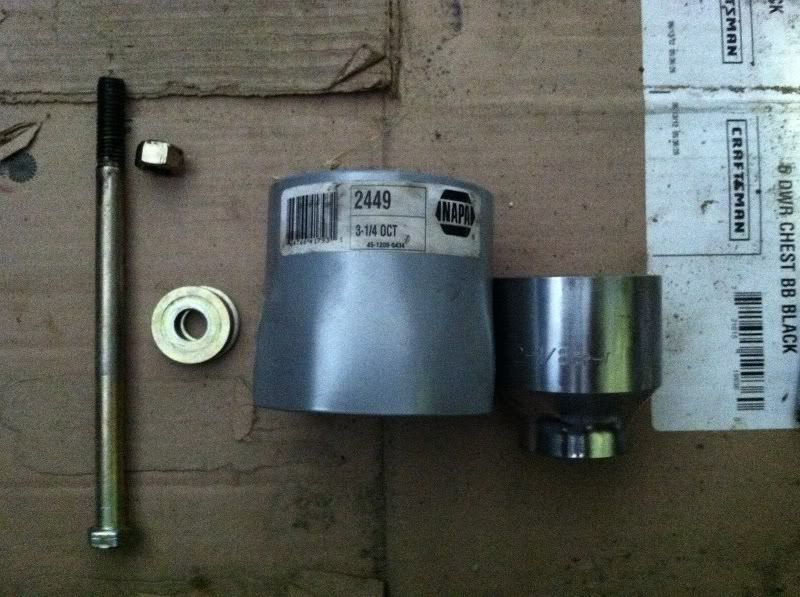
I can confirm what MLue1 posted in #650 and #651: There is plenty of room to press out all 3 bushings with the control arm still on the car (still attached via the ball joint). If you have the tool or a homemade tool like I made, there is absolutely no reason to mess with the ball joint. My homemade tool cost me about $50 after taxes and military discounts:
A. 1/2" x 8" Grade 5 bolt (press out)
B. 1/2" x 9"" Grade 5 bolt (press in) (10" will work if you can't find a 9", also, the 8" will work, but you'll have to manually tap the bushing in about 3/8" to have enough threads for the nut to catch)
C. Grade 5 1/2" washers and nuts
D. 3 1/4" socket from Napa ($35)
E. 2 1/8" socket from Tractor Supply ($15)
Notes:
1. I did freeze the bushings as previously suggested. They went in very easy.
2. Lightly sanded the inside of the control arm and put a light coat of grease on it and the bushing.
3. You'll want to use a cheater/breaker bar. I used the jack handle. Slid right over my 1/2" Craftsman socket wrench.
Works perfectly!! (And yes, I need to sweep my garage. Having no floor drains in a heated garage sucks!!)
Kukos on the great work you've done, you've made it easier and cheaper for others to do. Thanks for the mention above, that's prolly the only mention I've gotten since I posted a while ago. I didn't think anyone was following the approach I took of not removing the LCA, as people on the board seem to only follow the comments of the more established Members.
Last edited by MLue1; 06-23-2013 at 02:00 PM. Reason: adding comment
The following users liked this post:
rockstar143 (06-21-2016)
06-23-2013, 11:07 PM
#994
Race Director
^^^ Credit where credit is due
I'm not one of the dumbasses in this forum who worship only certain posters
I'm not one of the dumbasses in this forum who worship only certain posters
06-24-2013, 08:21 AM
#995
Sure you do, but you only worship yourself. If you were more humble and slightly nicer, you'd get a lot more respect and kudos. We all know you know your stuff...
MLue1, if I ever do end up having to do this again, I would likely give your method a shot. So thank you for having shared it.
MLue1, if I ever do end up having to do this again, I would likely give your method a shot. So thank you for having shared it.
06-25-2013, 08:52 PM
#996
takin care of Business in
iTrader: (5)
Join Date: Jan 2008
Location: Kansas City, MO
Age: 40
Posts: 30,994
Received 4,732 Likes
on
4,064 Posts
sub'd....I might be visiting this soon 
06-25-2013, 10:59 PM
#997
Race Director
06-25-2013, 11:12 PM
#998
takin care of Business in
iTrader: (5)
Join Date: Jan 2008
Location: Kansas City, MO
Age: 40
Posts: 30,994
Received 4,732 Likes
on
4,064 Posts
^^^ I wanted to get fastline to stiffen up the chassis a little bit more, but if the OEM with different bushings/etc works better, I might go the cheaper route
What do you recommend for my car? I dont track it but I know I might in the coming year or so...
What do you recommend for my car? I dont track it but I know I might in the coming year or so...
06-26-2013, 10:03 AM
#999
Race Director
Dunno. If the Fastline bushings were $100, I wouldn't hesitate to give them a try.
My OEM bushings weren't torn badly and I really can't tell a difference with the new OEM bushings installed.
On the plus side, the Fastline bushings appear to hold up well to harsh winters (see the review by MacKenzie001). And he gives them high marks...
My OEM bushings weren't torn badly and I really can't tell a difference with the new OEM bushings installed.
On the plus side, the Fastline bushings appear to hold up well to harsh winters (see the review by MacKenzie001). And he gives them high marks...
Last edited by nfnsquared; 06-26-2013 at 10:05 AM.
The following users liked this post:
swoosh (07-05-2013)
06-26-2013, 10:15 AM
#1000
Race Director
iTrader: (1)
If the car is your DD Anil I'd stay with OEM if it were me...
The following users liked this post:
swoosh (07-05-2013)