My Type-S gauge bezel retroed to '04 plus dinoc :D:D
 04-18-2010, 10:46 PM
#1
Race Director
Thread Starter
iTrader: (1)
My Type-S gauge bezel retroed to '04 plus dinoc :D:D
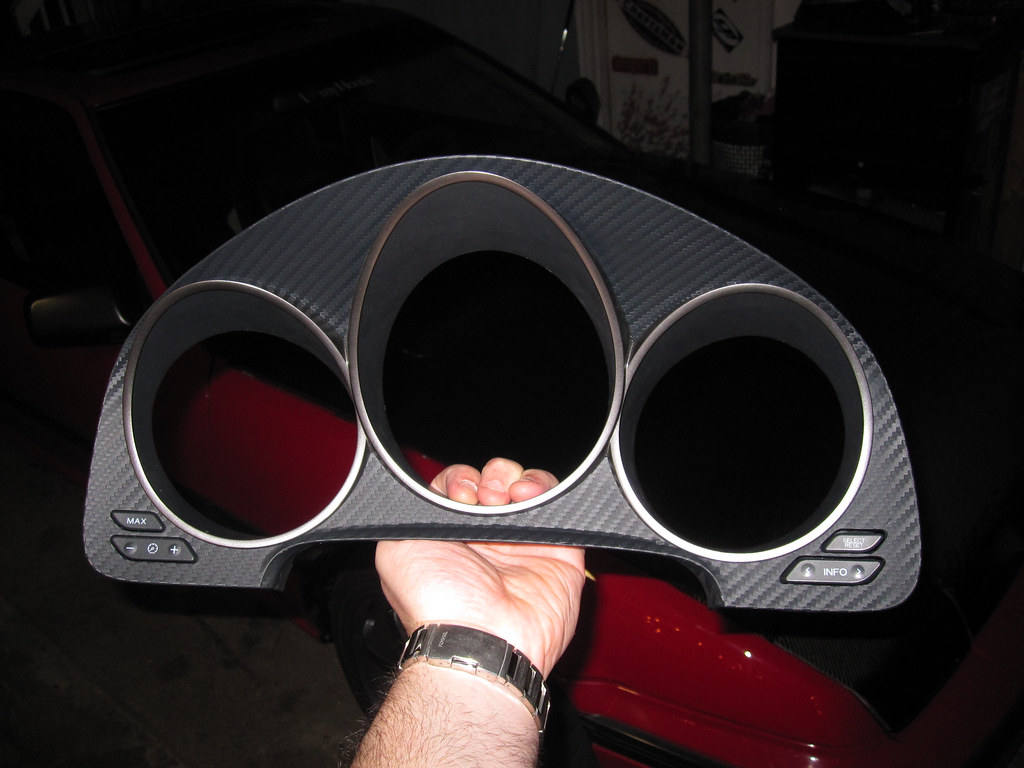
So, I'm actually pretty happy with this. This is the type-s gauge bezel with the silver rings that I retroed to fit the 04-06 buttons. After that I di-noced it. Anyways, the cutting of the holes was tedious, the mouting of the buttons tedious, the di-noc tedious, but the results are amazing!
Enjoy!
Enjoy!
 04-18-2010, 11:42 PM
#6
Race Director
Thread Starter
iTrader: (1)
It's already in but it's dark and I wasn't happy with the photos I was getting. More tomorrow. 
And no, not selling. Hah.
And no, not selling. Hah.
Trending Topics
04-19-2010, 12:49 AM
#8
Race Director
Thread Starter
iTrader: (1)
04-19-2010, 04:17 AM
#12
04-19-2010, 07:40 AM
#13
Race Director
Thread Starter
iTrader: (1)
That is a boosted 3rd gen prelude running the stock b20
Yea, we could do a photoshoot. I just put on the supercup kit over the weekend too. And I ended up selling the navi kit.
Pics installed after work. Glad you all like it. I've had the bezel for 15 months and slacked. Feels good to have it done.
Pics installed after work. Glad you all like it. I've had the bezel for 15 months and slacked. Feels good to have it done.
04-19-2010, 07:39 PM
#14
Race Director
Thread Starter
iTrader: (1)
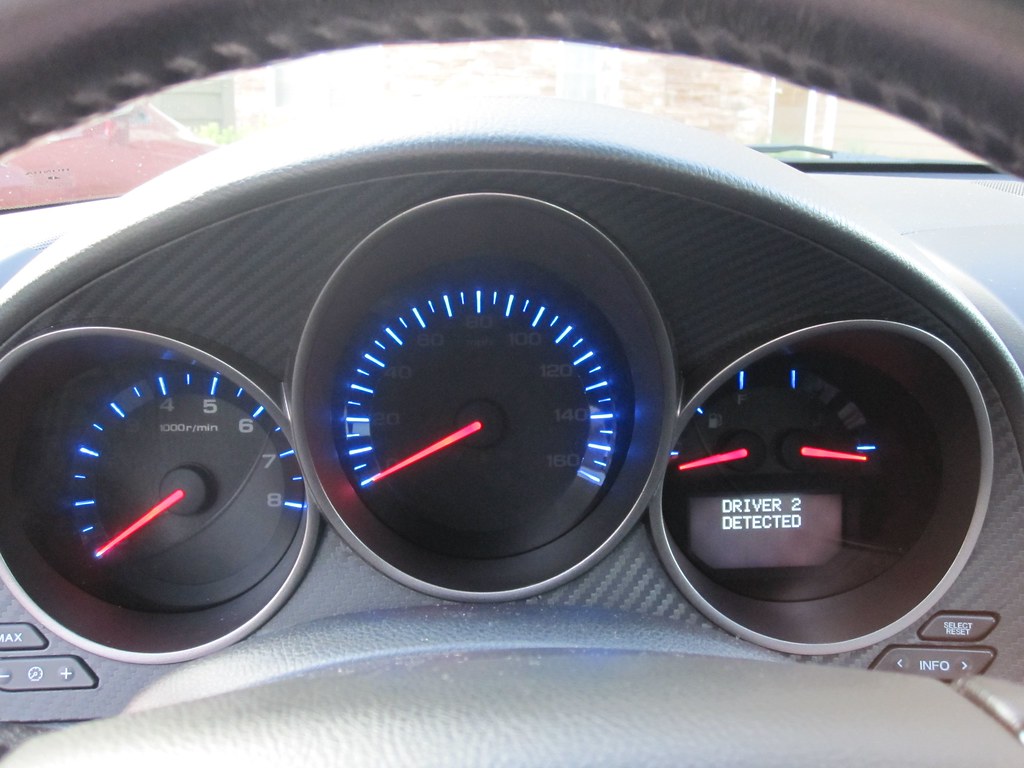
A quick pic installed as requested...
04-19-2010, 07:58 PM
#16
Moderator
iTrader: (3)
Damn that's awesome! Great work.
 04-19-2010, 09:00 PM
#20
Race Director
iTrader: (8)
Damn man, looks clean!
04-19-2010, 09:03 PM
#21
Race Director
Thread Starter
iTrader: (1)
I do have to say though that if you're not doing the type-s bezel it may be more difficult. Since it has the rings, i can cover where the vinyl ends. With the base bezel I'm not sure if you could stretch it all the way down to make it look right.
Well, I'm doing my grille and the lower gray area on the front aspec lip. I'm also doing my valve plastic cover, and maybe the rest of the covers in the bay (if I have enough). I had considered switching the stock cf stuff (I bought the kits too) to match because I like this better. But I wasn't sure if all the pieces can "come off"...?? I don't want to just overlay. I want to take the pieces off so that I can wrap it around. Is that possible with all the cf stuff? Even the door inserts?
04-19-2010, 09:17 PM
#22
[QUOTE=Maharajamd;
Well, I'm doing my grille and the lower gray area on the front aspec lip. I'm also doing my valve plastic cover, and maybe the rest of the covers in the bay (if I have enough). I had considered switching the stock cf stuff (I bought the kits too) to match because I like this better. But I wasn't sure if all the pieces can "come off"...?? I don't want to just overlay. I want to take the pieces off so that I can wrap it around. Is that possible with all the cf stuff? Even the door inserts?[/QUOTE]
dont do the engine cover the di-noc will most certainly come off. theres no way that stuff will stay under the heat. maybe the panels but i doubt the edges will stay.
on the interior parts the center cubys and shift area can be removed, negative on the door pieces or button areas but just like your bezel it can be done, and still look nice.
04-19-2010, 09:33 PM
#24
Race Director
Thread Starter
iTrader: (1)
dont do the engine cover the di-noc will most certainly come off. theres no way that stuff will stay under the heat. maybe the panels but i doubt the edges will stay.
on the interior parts the center cubys and shift area can be removed, negative on the door pieces or button areas but just like your bezel it can be done, and still look nice.
on the interior parts the center cubys and shift area can be removed, negative on the door pieces or button areas but just like your bezel it can be done, and still look nice.
I mean I've seen this on Vette engine bays....twin turbo stuff.
Edit: engine enamel clear coated of course...
04-19-2010, 09:41 PM
#25
dude i highly doubt its the same stuff, you know how this stuff works. just put a blow dryer up to it. your engine gets way hotter than that. and yeah i know what part youre talking about. it gets plenty hot. i had mine wrapped in real 2x2 twill weave CF.
04-19-2010, 09:48 PM
#26

Looks Killer! Question, how did you manage to do the holes so perfect? Did you make a template and what device did you use to cut the holes? I've been wanting to do this for some time as I have that Type-S bezel in my garage but am worried about trashing it the first time around.
04-19-2010, 10:38 PM
#28
Race Director
Thread Starter
iTrader: (1)
Looks Killer! Question, how did you manage to do the holes so perfect? Did you make a template and what device did you use to cut the holes? I've been wanting to do this for some time as I have that Type-S bezel in my garage but am worried about trashing it the first time around.
$40...#5 http://www.acuraoemparts.com/delray/...All&vinsrch=no
04-19-2010, 10:58 PM
#29
Team Owner
iTrader: (2)
Join Date: Jan 2008
Location: Kansas City, MO (Overland Park, KS)
Posts: 36,545
Received 6,470 Likes
on
5,162 Posts
Well done! It really looks terrific.
National Acura Meet-June 6th/Kansas City. Click here for details and to sign up!
.
National Acura Meet-June 6th/Kansas City. Click here for details and to sign up!
.
04-20-2010, 01:06 PM
#32
Race Director
Thread Starter
iTrader: (1)
^Remember a few things here.
1) The piece does have a big contour...so no matter what the lines will appear to be 'off'.
2) It was NOT easy at all to do that. I started at the top and worked to the middle, then left to right. By the time I got to the lower right corner area, everything was messed up and contorted. I thought I was going to have to pull it all off and get a new piece.
I didn't mention this, but there are two splices in there. Bet you can't figure out where. Heck I can barely see it when I'm looking at it from 5 inches away.
So no it's not perfect. But I'm pretty sure I'm the first to do the dinoc or cf that piece. I also think my gaps byt he buttons are the best I've seen with this yet too.
And you're right about the engine cover. The "cf" itself is rated for very high temp, but the bond isn't. Surface temp shouldn't be more then 150*. However, I think if I used the primer and then clear coated it with high temp clear, I think it may work. I dunno. I'll grab a gun and see how hot that plastic gets after so hard use.
04-25-2010, 08:22 AM
#34
10th Gear

Join Date: Apr 2010
Age: 44
Posts: 13
Likes: 0
Received 0 Likes
on
0 Posts
^Remember a few things here.
1) The piece does have a big contour...so no matter what the lines will appear to be 'off'.
2) It was NOT easy at all to do that. I started at the top and worked to the middle, then left to right. By the time I got to the lower right corner area, everything was messed up and contorted. I thought I was going to have to pull it all off and get a new piece.
I didn't mention this, but there are two splices in there. Bet you can't figure out where. Heck I can barely see it when I'm looking at it from 5 inches away.
So no it's not perfect. But I'm pretty sure I'm the first to do the dinoc or cf that piece. I also think my gaps byt he buttons are the best I've seen with this yet too.
And you're right about the engine cover. The "cf" itself is rated for very high temp, but the bond isn't. Surface temp shouldn't be more then 150*. However, I think if I used the primer and then clear coated it with high temp clear, I think it may work. I dunno. I'll grab a gun and see how hot that plastic gets after so hard use.
1) The piece does have a big contour...so no matter what the lines will appear to be 'off'.
2) It was NOT easy at all to do that. I started at the top and worked to the middle, then left to right. By the time I got to the lower right corner area, everything was messed up and contorted. I thought I was going to have to pull it all off and get a new piece.
I didn't mention this, but there are two splices in there. Bet you can't figure out where. Heck I can barely see it when I'm looking at it from 5 inches away.
So no it's not perfect. But I'm pretty sure I'm the first to do the dinoc or cf that piece. I also think my gaps byt he buttons are the best I've seen with this yet too.
And you're right about the engine cover. The "cf" itself is rated for very high temp, but the bond isn't. Surface temp shouldn't be more then 150*. However, I think if I used the primer and then clear coated it with high temp clear, I think it may work. I dunno. I'll grab a gun and see how hot that plastic gets after so hard use.
P.S. ONLY If you got the best quality of 3M di-noc. That is what I heard. haha
04-25-2010, 09:18 AM
#36
If your gonna do the "valve" cover piece try to sand it down to a smooth finish first. The panels under the hood have a coarse finish to them so that is more of the possibility why it wouldn't stick. Sand it down smooth, clean it with alcohol and maybe surface prime it with some sort of bonding agent them wrap it. I would clear coat it a few times too so dirt won't stay trapped on the film. Plus it would stand out more with a glossy look too.
As for your bezel it looks great. That was next on my list too. So far all I have done was the roof console, the fuse box in hte engine bay, and the inner part of the tail lights when the trunk is opened. oh and the top of the trim on the rear type s lip. jptl04 knows what I'm talking about on that one cause after all he sets the mark for it!!
As for your bezel it looks great. That was next on my list too. So far all I have done was the roof console, the fuse box in hte engine bay, and the inner part of the tail lights when the trunk is opened. oh and the top of the trim on the rear type s lip. jptl04 knows what I'm talking about on that one cause after all he sets the mark for it!!
04-25-2010, 07:01 PM
#37
10th Gear
Join Date: Apr 2010
Age: 44
Posts: 13
Likes: 0
Received 0 Likes
on
0 Posts
If your gonna do the "valve" cover piece try to sand it down to a smooth finish first. The panels under the hood have a coarse finish to them so that is more of the possibility why it wouldn't stick. Sand it down smooth, clean it with alcohol and maybe surface prime it with some sort of bonding agent them wrap it. I would clear coat it a few times too so dirt won't stay trapped on the film. Plus it would stand out more with a glossy look too.
As for your bezel it looks great. That was next on my list too. So far all I have done was the roof console, the fuse box in hte engine bay, and the inner part of the tail lights when the trunk is opened. oh and the top of the trim on the rear type s lip. jptl04 knows what I'm talking about on that one cause after all he sets the mark for it!!
As for your bezel it looks great. That was next on my list too. So far all I have done was the roof console, the fuse box in hte engine bay, and the inner part of the tail lights when the trunk is opened. oh and the top of the trim on the rear type s lip. jptl04 knows what I'm talking about on that one cause after all he sets the mark for it!!
05-02-2010, 12:44 PM
#39
Not that easy. The tubes on the new ones stick out a little further so it doesn't line up and leaves a gap. You could in theory cut out the tubes with silver rings and do a transplant but that would be tough.