
Headlight project from hell!
 07-25-2013, 09:54 AM
#81
BANNED
iTrader: (33)

^there isn't one from the factory because its a sealed unit. but yeah there is def room to shove one or two in there.

The following users liked this post:
maharajamd (07-25-2013)
07-25-2013, 10:01 AM
#82
Race Director
Thread Starter
iTrader: (1)
Well I mean, the headlights are sealed up just the same, correct? I know you can't bake and pull the tails apart like the headlights but it still has a bulb hole. I assume the turn signal area in the tails aren't sealed off from the rest of the light. I could be wrong though.
Hey if there is a spot I'll put some in there! Why not?
And I know the bags get pinched in there but I noticed the stocks had some adhesive on them so I figured I'd anchor them down.
Edit: J I just noticed your edit. I didn't do anything like that and I haven't seen any condensation. And we've had some downpours this week. I think baking them on a dry towel, upside down on the front lens, with all bulbs taken out really helped with that. I mean you've got nice and cool AC air in there. Then you throw them in the oven. That air has to produce some moisture. I put the bulbs back in right after I pulled the light out of the oven the last time. :fingerscrossed:
Last edited by maharajamd; 07-25-2013 at 10:07 AM.
07-25-2013, 10:03 AM
#83
takin care of Business in
iTrader: (5)
Join Date: Jan 2008
Location: Kansas City, MO
Age: 40
Posts: 30,994
Received 4,732 Likes
on
4,064 Posts

the pix look great Chad....well done on the headlight
The following users liked this post:
maharajamd (07-25-2013)
07-25-2013, 10:04 AM
#84
BANNED
iTrader: (33)
well, no. the headlights aren't sealed up like the taill lights. heads are held in with clips and butyl rubber sealant. the tails are all one unit, never meant to be taken apart (cut open).
same logic would apply tho. couldn't hurt to throw a bag in each one before resealing them back up. i might just start doing this with peoples lights that i work on.
same logic would apply tho. couldn't hurt to throw a bag in each one before resealing them back up. i might just start doing this with peoples lights that i work on.
The following users liked this post:
maharajamd (07-25-2013)
07-25-2013, 10:07 AM
#85
you, Chad you...always trying to stuff the rear.
No sir, no silica bag, but if you seal the perimeter well with the butyl, you'll have zero issues. If you want to be triple safe, replace the rear gaskets. I've not even used any RTV on it...JUST butyl and spread over the gap and bam...I've had no condensation problems (okay, i had 1 but it was because I hadn't covered the gap upon reinstallation).
No sir, no silica bag, but if you seal the perimeter well with the butyl, you'll have zero issues. If you want to be triple safe, replace the rear gaskets. I've not even used any RTV on it...JUST butyl and spread over the gap and bam...I've had no condensation problems (okay, i had 1 but it was because I hadn't covered the gap upon reinstallation).
The following users liked this post:
maharajamd (07-25-2013)
07-25-2013, 10:12 AM
#86
Race Director
Thread Starter
iTrader: (1)
Thanks man! 
I may go back to the park today and take some pics. We've got a decent camera here at the office I can grab real quick.
I haven't shown my bay yet...
Edit: Hot damn you just use butyl back there? I thought I was going to be epoxing/rtving the tails. Butyl seems so much easier... Question: When you cut the tails, you probably cut out what, 1-2mm of the housing? And when you put them back together, do you have to make sure that's put back to sit flush? Or does the light bolt onto the car via the front lens housing and that doesn't matter? I've never had the tails off so I don't know.
Last edited by maharajamd; 07-25-2013 at 10:15 AM.
07-25-2013, 10:40 AM
#87
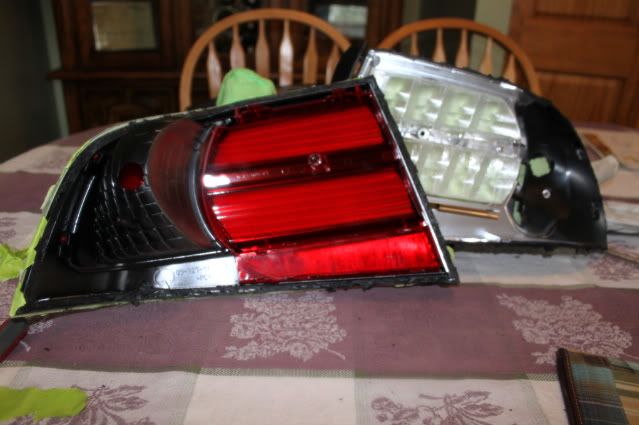
For the tails, they line up after cutting them. There is a bolt the holds the unit all together. Tails aren't as complicated as most might think. The only issue for me is cutting this stupid corner.
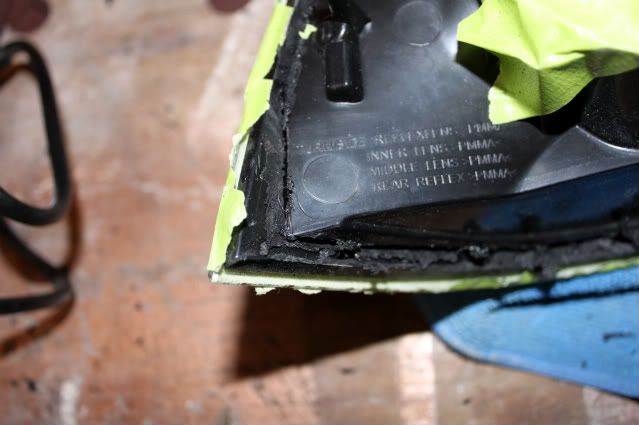
This is the width of the cut all around the taillight.

This is the bolt that holds the housings together, you can see the hole in the middle of the both sides.
This is the width of the cut all around the taillight.
This is the bolt that holds the housings together, you can see the hole in the middle of the both sides.
The following users liked this post:
maharajamd (07-25-2013)
07-25-2013, 10:42 AM
#88
BANNED
iTrader: (33)
^correct. and make sure you use fresh blades every time you cut to minimize gaps/jagged edges when you're piecing the lights back together.
The following users liked this post:
maharajamd (07-25-2013)
07-25-2013, 11:00 AM
#89
Race Director
Thread Starter
iTrader: (1)
If say that cut is 1-2mm thick. When you put them back together do you need to make sure that you stuff 1-2mm off material there to compensate so that the light doesn't sit 1-2mm sunk in on the trunk?
Know what I'm saying? Lol
Which piece bolts to the car. The front half of the housing, the side you seem or the back side piece that you cut off? Is really what I'm asking.
Know what I'm saying? Lol
Which piece bolts to the car. The front half of the housing, the side you seem or the back side piece that you cut off? Is really what I'm asking.
07-25-2013, 11:02 AM
#90
BANNED
iTrader: (33)
what do you mean which piece bolts to the car? the 4 bolts on the backside of the tails are the only thing holding it onto your car (besides the lower bracket, which most people cut off)
The following users liked this post:
maharajamd (07-25-2013)
07-25-2013, 11:08 AM
#91
When you tighten the center bolt to combine front and back half the will still sit with same cutting width so it shouldn't sit in any further than before they were cut. The next set of tails that I do, i'm going to line the back half with JB steelstik, put on the front half and that should perform a perfect seal with no gaps or air pockets, then I would do a final seal with JB kwik weld all along the seam so it will all look seamless.
The following users liked this post:
maharajamd (07-25-2013)
07-25-2013, 11:16 AM
#92
Race Director
Thread Starter
iTrader: (1)
Ahh ok that makes sense now. Thanks fellas!
07-25-2013, 12:45 PM
#93
The outer lens is held in with 2 screws even if you didn't put any sealant they wouldn't fall out (and would make pretty nifty fish tanks if you left them like that).
I only use butyl. I lay a bead of 3/8" rope around...press together and line up any tab and ensure it's pressed back together, put the 2 screws back in and tighten. Then go around the gap with my finger to smooth out the butyl and ensure it goes across the gap along the entire seam.
I only use a fresh blade when the blade wears down to where it's too small to go all the way through the inner double edge. Once open, I also run the blade vertically along the edge the bezel is sitting in...makes it easier to get bezel in/out without hurting the fresh paint. I break off and clean up all slag after this...go all the way around with your fingers, then a file. I actually find that pointy corner the easiest to cut since you don't have to watch your depth...if you're at the right angle you're not cutting into the bezel.
Happy modding!
The following users liked this post:
maharajamd (07-25-2013)
07-25-2013, 01:25 PM
#94
Race Director
Thread Starter
iTrader: (1)
Thanks J.
I'm sure that will all make more sense once I'm balls deep.
I'm sure that will all make more sense once I'm balls deep.
07-31-2013, 07:57 AM
#96
Race Director
Thread Starter
iTrader: (1)
Just an update here...
The stuck lever fixed itself!!! It may have been the railroad bumps I crossed on Monday. To be honest my car is rarely driven at night. Lol Anyway I'm pretty happy with the cut off and color range now. Definitely better then stock.
Maybe because I never paid attention, maybe because these morimoto bulbs aren't the quality of the oe bulbs, but these bulbs tend to pulse a little at the beginning when warming up. Not flicker by any means, the light is constant, but when looking at the light on the wall the color pattern they throw down changes a little until they get warmed up. I'm talking seconds here. Normal?
I've also been making a new "harness" for the wires that go from the interior to the engine bay. Right now I've got a wire for the accord fogs, one for the halos, and one for the independent upper fogs. All varying gauges and colors and each one loose. So I decided since the front half of my wiring is so nice I might as well make something solid for the back half. I'll snap a picture tonight.
Oh and FYI, I was at the Apple store over the weekend, and actually asked an employee for some of the giant silica packs the iMacs come with. She gave me four.
So stop by your local store one day before you redo your heads and they will probably give them to you. Lol
Last edited by Steven Bell; 07-31-2013 at 07:53 PM. Reason: Merged Posts

Thread
Thread Starter
Forum
Replies
Last Post