DIY Leather Seat Restoration (SEM Sure Coat)
 02-09-2016, 10:19 PM
#1
DIY Leather Seat Restoration (SEM Sure Coat)
Hello everyone! It's been a long time since I've posted on the forum, it's funny how your interests can completely shift when you buy a house. Instead of working on my car I'm working on tile and hardwood floor projects.
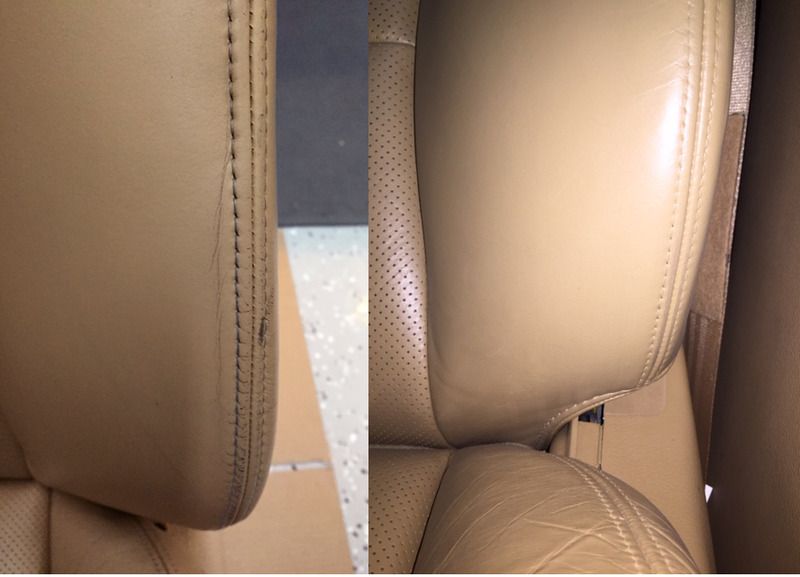
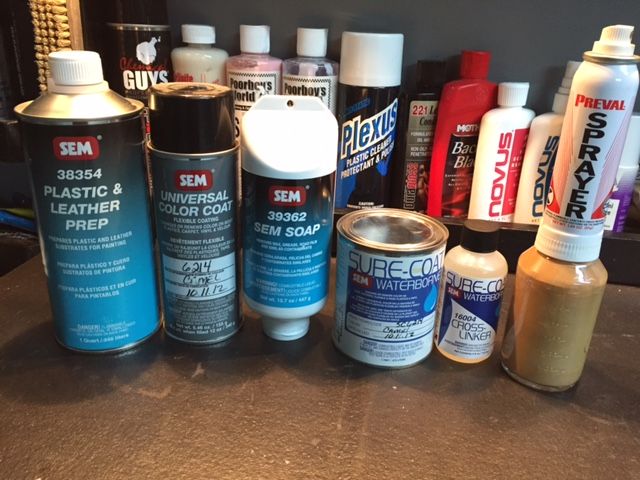
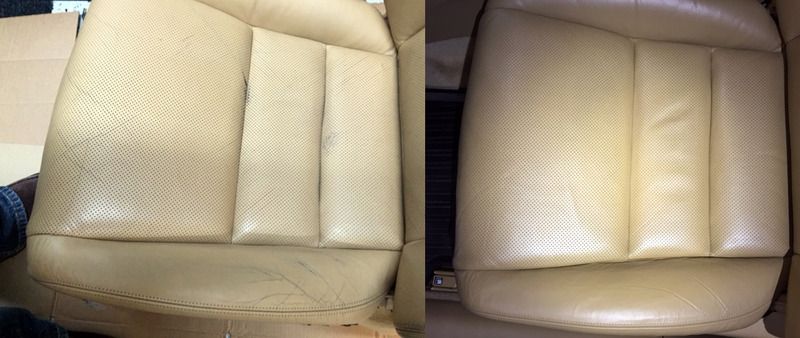
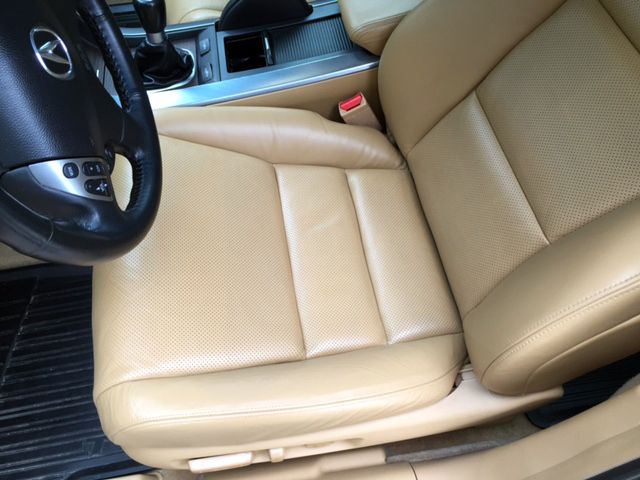
Anyways I just wanted to share my recent experience using SEM Sure coat on my drivers side seat. A few years back (2012 actually as you can see on the can below) I sent my headrest to SEM for them to color match my camel interior. They did this for free actually so they could add it to their color book.
Fast forward 5 year later to this past weekend I finally opened the can!. I actually had my seat out to solder my broken heated seat coil (Which was an easy and free fix by the way) and decided what the hell I better try the SEM out before it goes bad.
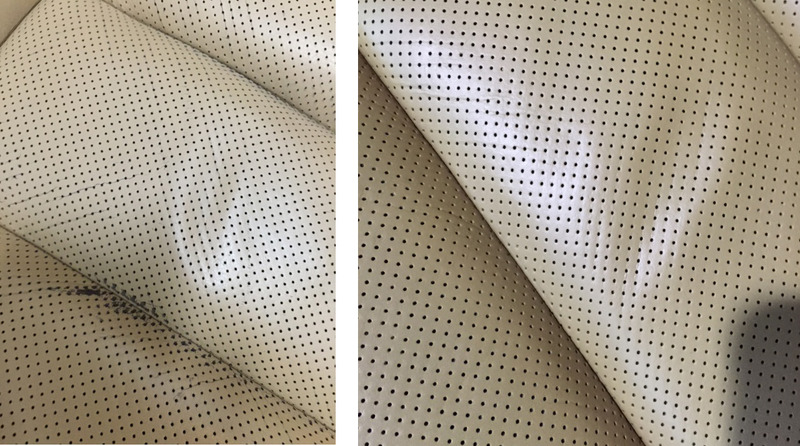
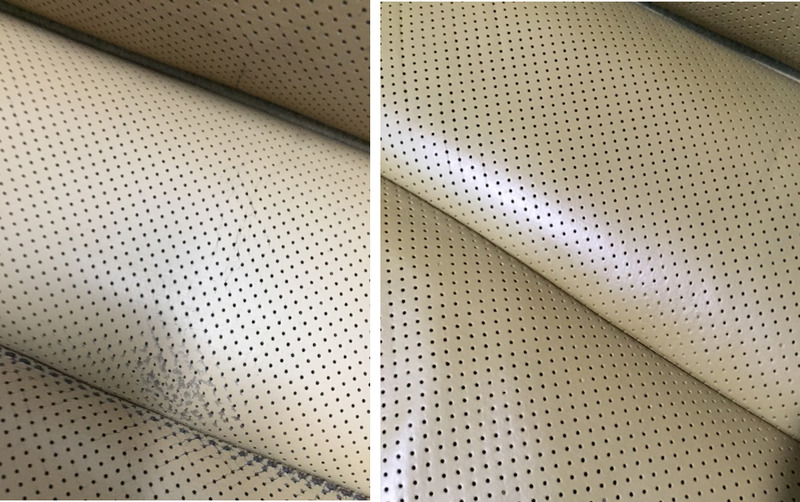
I'm not going into to much detail on the process because I basically followed their instructions (Linked below). I first just brushed with a foam brush then followed up some spray through the preval. Its easy to fill in the perforated holes so you need to keep compressed air handy to open the hole back up.
http://secure.terrys.net/TECH/SEM/colorcoat.pdf
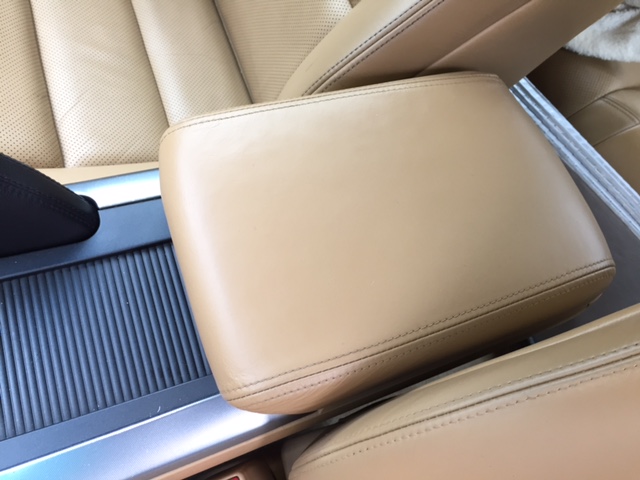
I am very happy with the results but not surprised because every SEM product I have used really has gone above and beyond my expectations. I was going to buy the filler for some of the creases but since this was spur of the moment I decided to just leave them as is. I might go back down the road and fill the creases on the side bolster in with their leather/vinyl filler.
For those of you with "Camel" interior you can order Sure coat or color coat using my color match # SC6214


Anyways I just wanted to share my recent experience using SEM Sure coat on my drivers side seat. A few years back (2012 actually as you can see on the can below) I sent my headrest to SEM for them to color match my camel interior. They did this for free actually so they could add it to their color book.
Fast forward 5 year later to this past weekend I finally opened the can!. I actually had my seat out to solder my broken heated seat coil (Which was an easy and free fix by the way) and decided what the hell I better try the SEM out before it goes bad.
I'm not going into to much detail on the process because I basically followed their instructions (Linked below). I first just brushed with a foam brush then followed up some spray through the preval. Its easy to fill in the perforated holes so you need to keep compressed air handy to open the hole back up.
http://secure.terrys.net/TECH/SEM/colorcoat.pdf
I am very happy with the results but not surprised because every SEM product I have used really has gone above and beyond my expectations. I was going to buy the filler for some of the creases but since this was spur of the moment I decided to just leave them as is. I might go back down the road and fill the creases on the side bolster in with their leather/vinyl filler.
For those of you with "Camel" interior you can order Sure coat or color coat using my color match # SC6214


Last edited by Roger555; 02-09-2016 at 10:27 PM.

 02-10-2016, 11:32 AM
#3
Senior Moderator
WOW! Welcome back Roger!! 
I remember your awesome DIY's from way before I had my TL. it's great that you're still here and posting awesome threads per the usual!

I remember your awesome DIY's from way before I had my TL. it's great that you're still here and posting awesome threads per the usual!
02-10-2016, 09:47 PM
#4
Team Owner
iTrader: (2)
Join Date: Jan 2008
Location: Kansas City, MO (Overland Park, KS)
Posts: 36,545
Received 6,470 Likes
on
5,162 Posts
Looks good, nice work, Roger.
02-11-2016, 12:32 PM
#6
Hello everyone! It's been a long time since I've posted on the forum, it's funny how your interests can completely shift when you buy a house. Instead of working on my car I'm working on tile and hardwood floor projects.
Anyways I just wanted to share my recent experience using SEM Sure coat on my drivers side seat. A few years back (2012 actually as you can see on the can below) I sent my headrest to SEM for them to color match my camel interior. They did this for free actually so they could add it to their color book.
Fast forward 5 year later to this past weekend I finally opened the can!. I actually had my seat out to solder my broken heated seat coil (Which was an easy and free fix by the way) and decided what the hell I better try the SEM out before it goes bad.
I'm not going into to much detail on the process because I basically followed their instructions (Linked below). I first just brushed with a foam brush then followed up some spray through the preval. Its easy to fill in the perforated holes so you need to keep compressed air handy to open the hole back up.
http://secure.terrys.net/TECH/SEM/colorcoat.pdf
I am very happy with the results but not surprised because every SEM product I have used really has gone above and beyond my expectations. I was going to buy the filler for some of the creases but since this was spur of the moment I decided to just leave them as is. I might go back down the road and fill the creases on the side bolster in with their leather/vinyl filler.
For those of you with "Camel" interior you can order Sure coat or color coat using my color match # SC6214
02-11-2016, 06:55 PM
#7
Moderator
iTrader: (3)
Roger!
Trending Topics
02-12-2016, 05:50 PM
#8
Tyler what up! Do you still have a TL?
The cost of the custom Sure-coat pint was $56.00
The other products were all a bit cheaper when I bought them in 2012 but here are the current prices below.
Cross Linker (Optional): $34.00
Cross Linker
SEM Soap: $15.00
Plastic & Leather Prep: $15.00
The cost of the custom Sure-coat pint was $56.00
The other products were all a bit cheaper when I bought them in 2012 but here are the current prices below.
Cross Linker (Optional): $34.00
Cross Linker
SEM Soap: $15.00
Plastic & Leather Prep: $15.00
02-12-2016, 06:08 PM
#9
Moderator
iTrader: (3)
The following users liked this post:
Steven Bell (02-13-2016)
02-17-2016, 10:00 PM
#14
For me personally this is 1/10. Taking the seat out was the hardest part which I only did because I was fixing the heated seat. You could easily do this without removing the seat and only using the foam brush. The product is easy to work with and brush marks fade and level very nicely.
04-06-2016, 11:00 PM
#15

Thanks, Roger555:
I stumble upon your thread, just as I was searching (for many hours) for info on how to do this exact thing with my '08 TL with "tan" interior. Actually, SEM has great instructions on their web site, but most of my time & frustration has been spent trying to figure out how to order the correct color.
(I can't send them a headrest, like you did !!).
I'm having to buy all the supplies via internet (Amazon mostly) because I'm out-of-country and so is my TL and none of those products are available here.
So I have to get it right, during my semi-annual trip to the U.S.
Any suggestions of how to find the correct SEM Color Coat aerosol for doing my carpets?
The leather seats apparently are colored "Creamy Ivory" and SEM has a direct product for that in their Color Classics line. That's what they say to use on leather.
But for carpets I need to use their Color Coat product .... and I can't find any clue as to which of their colors I need for that. They have Buckskin, Camel, etc. etc. but without an actual chart to put against my carpets, I don't know which one to order.
If you have any ideas, please advise.
sounds like you're kind of a legend around this forum, Roger555.
I myself am owner of an Acura only for one month, so I've got a big learning curve ahead. (I spent many years on Cadillac forums, struggling along the learning curve, since I did all my own repairs myself; and there's A LOT of them to do, with a Cadillac!!)
Thanks. Rick
03-08-2019, 05:28 AM
#16
Intermediate

Stuff is good but comes off. Will not hold up well to simply green. I did my seats before I sold my car and got top dollar for it. That�s what this stuff is for. Make it look great and get rid of it. Otherwise, it�s junk.
The following users liked this post:
CLtotheTL32 (03-09-2019)
03-08-2019, 09:52 AM
#18
Burning Brakes

Simple green is a pretty heavy degreaser, I use it on engine bays and wheels, never on leather. Old thread but those seats turned out great! Might see if they have gray fro my typse s seats
03-11-2019, 02:37 PM
#20
Burning Brakes
My rear type s seats are in bad condition but only the gray sections, I think Im going to use this but I looked on the website and they have different styles of gray in the classic coat system, just gotta find most accurate match