Death Metal's Journey (a DIY'ers Worklog for TL Perfection!)
 05-05-2010, 09:37 PM
#201
Fearless DIY Guy
Thread Starter
iTrader: (2)
You remember Ralphie from 'A Christmas Story'? Well, it was one of those kind of days. After a 13 hour workday and a freaking BRUTAL arm workout, I was happy to find not only my Poly RSB bushings here, but my copper clad board as well.
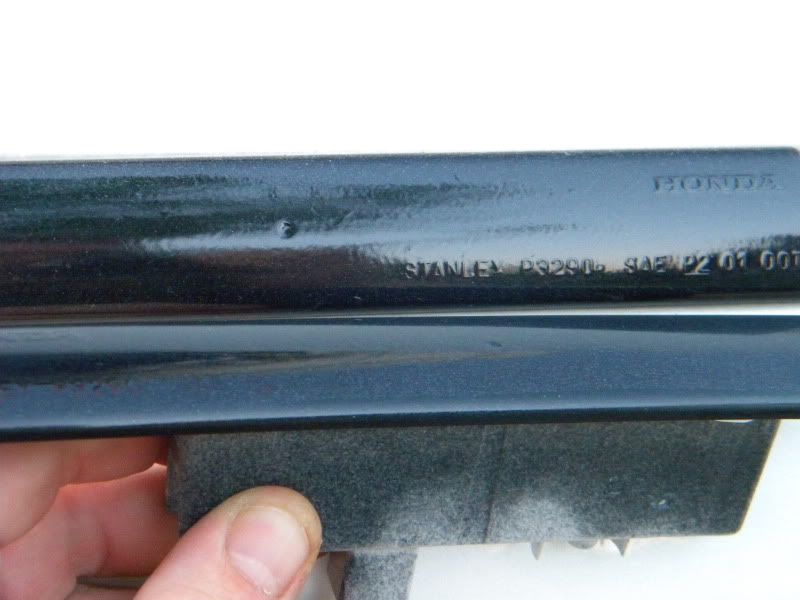
Before jumping the gun and playing garage chemist, I decided to take the radio apart and do a test fit.
WOW. SHITTY LINE-UP, DANNO. Damn, that's no good now, is it? Well, back to the drawing board, eh? (pun fully intended) Hmmm, so I guess we need to get a little unorthodox in our methods to get this 100%, so how about we scale the computer screen to size, and just...
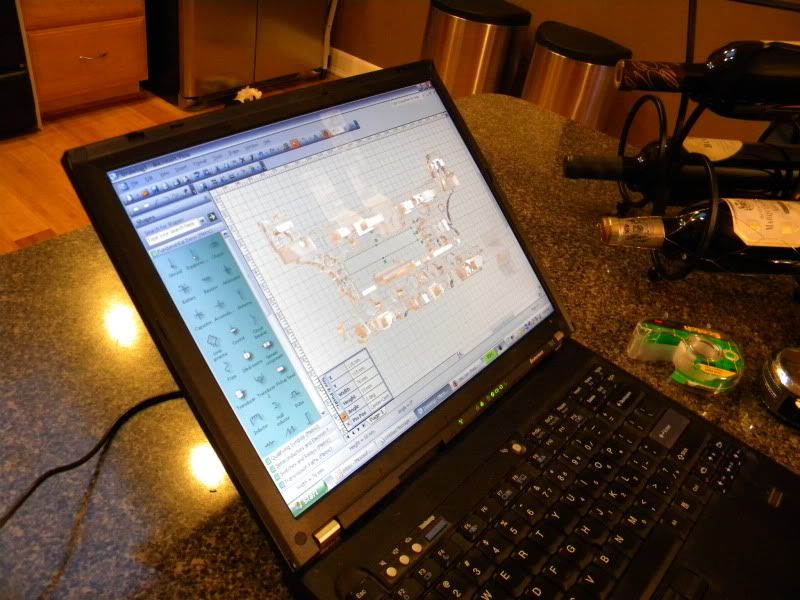
OHHHH, YEAH. That's the ticket. That's right. What you're seeing is the diffuser taped to the comp screen...no way this won't be perfect this time around.
Our second version is MUCH different, and offers us a much bigger challenge...in the last version, I failed to account for the button openings and mounting pins...not so this time. Looks like I am going to have to put the color sand/buff off to the side for tomorrow night and focus on board design. We'll do the board tomorrow, brakes on Friday (maybe RSB while we're at it), and color sand on Saturday.
Last Sunday was a wedding, which has really thrown a wrench in my week since, well, it was a freaking Sunday wedding. I'm the d00d on the right, just posting a pic of the missus, my brother, and his SO.

Before jumping the gun and playing garage chemist, I decided to take the radio apart and do a test fit.
WOW. SHITTY LINE-UP, DANNO. Damn, that's no good now, is it? Well, back to the drawing board, eh? (pun fully intended) Hmmm, so I guess we need to get a little unorthodox in our methods to get this 100%, so how about we scale the computer screen to size, and just...
OHHHH, YEAH. That's the ticket. That's right. What you're seeing is the diffuser taped to the comp screen...no way this won't be perfect this time around.
Our second version is MUCH different, and offers us a much bigger challenge...in the last version, I failed to account for the button openings and mounting pins...not so this time. Looks like I am going to have to put the color sand/buff off to the side for tomorrow night and focus on board design. We'll do the board tomorrow, brakes on Friday (maybe RSB while we're at it), and color sand on Saturday.
Last Sunday was a wedding, which has really thrown a wrench in my week since, well, it was a freaking Sunday wedding. I'm the d00d on the right, just posting a pic of the missus, my brother, and his SO.
 05-05-2010, 09:41 PM
#202
Fearless DIY Guy
Thread Starter
iTrader: (2)

NOOOOOOO. Not a fan.

Thank-ya, gents.
 Speechless. Awesome skills man.
 These aren't bouts...my creativity is being sucked up at work in a major way as of late, if I had a 'normal' schedule I'd be REALLY tearing things up.
  05-05-2010, 09:55 PM
#204
Congrats on the wedding man...looking buff. lol.
Sounded semi queer, no? Anyway...13 hour workdays...and a workout AND build the LED board...yeah, you must not sleep. Curious to see how the wetsand and polish come out AND would like a good review on what you feel with the RSB. I'm close to ordering the progress adjustable one.
Sounded semi queer, no? Anyway...13 hour workdays...and a workout AND build the LED board...yeah, you must not sleep. Curious to see how the wetsand and polish come out AND would like a good review on what you feel with the RSB. I'm close to ordering the progress adjustable one.
05-06-2010, 08:06 AM
#206
cool cant wait to see the circuit board.. funny how life always takes away time from your car! haha.. if I didnt have to go to work then my car would be soo SICK right now.. lol
I dont know if I missed something, but what exactly is the circuit board gonna do?
I dont know if I missed something, but what exactly is the circuit board gonna do?
05-06-2010, 08:52 AM
#207
Fearless DIY Guy
Thread Starter
iTrader: (2)
Curious to see how the wetsand and polish come out AND would like a good review on what you feel with the RSB. I'm close to ordering the progress adjustable one.
05-06-2010, 08:58 AM
#208
Fearless DIY Guy
Thread Starter
iTrader: (2)
Thanks, man!
I know all to well how that goes!
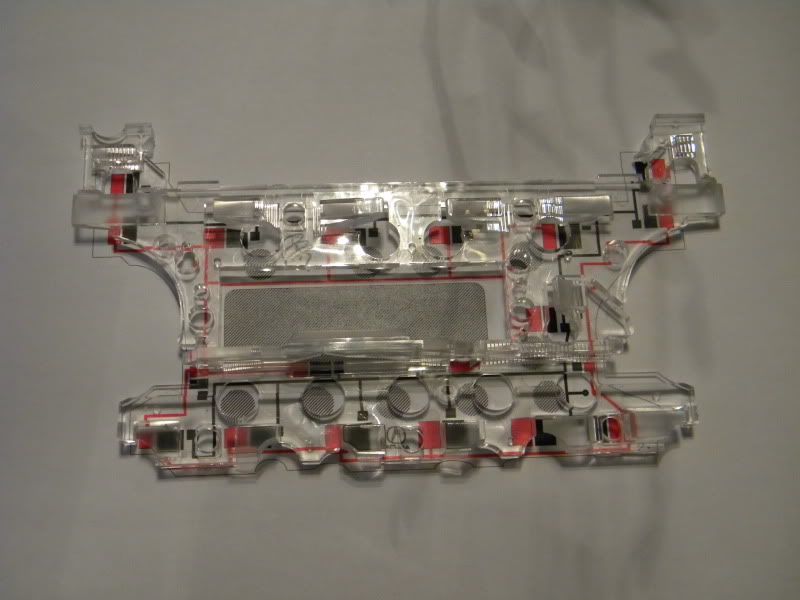
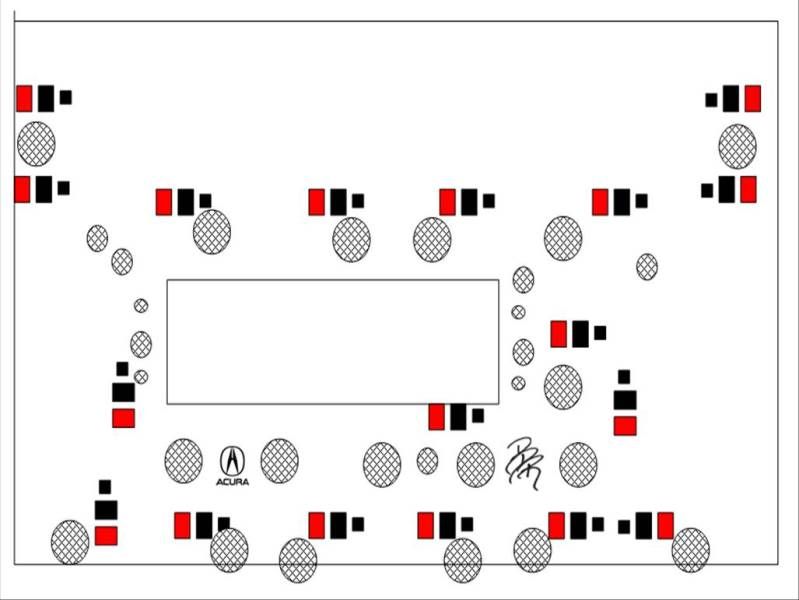
Ok, so, then ONLY remaining area requiring the LED conversion is the radio�and if you�ve noticed one thing about my LED work is that there is not a SINGLE localized �hot spot�. Well, ironically enough, the radio would posses the mother of all hot-spottieness if I were to solder to the OE locations. SO, after reviewing the tolerances AND, almost serendipitously, noticing that each button has it�s own light diffuser in the OE diffuser board�it was as if it were meant to be.
SO, the board will be sandwiched in-between the radio circuit panel and the OE light diffuser�the circuit board will have the LEDs and resistors soldered directly to the board, with one LED loaded behind each button�for PERFECT lighting. By the time it�s done, it�s almost a PnP LED board. Tits.
I dont know if I missed something, but what exactly is the circuit board gonna do?
SO, the board will be sandwiched in-between the radio circuit panel and the OE light diffuser�the circuit board will have the LEDs and resistors soldered directly to the board, with one LED loaded behind each button�for PERFECT lighting. By the time it�s done, it�s almost a PnP LED board. Tits.
05-06-2010, 09:08 AM
#210
I like tits.
And yes...I agree...if you were close...I'd let you use my PC7424 to achieve the glossiness!
J.
You're as methodical with your weight loss as you are with your car and projects and probably work. It's inspiring. I go jogging and gym and mountain bike...but I also eat pizza and ice cream a lot. don't know what kind of cycle I'm on but presumably not a "cut" one. lol.
I know what I need to do...I just need to actually do it.
05-06-2010, 10:26 AM
#212
Three Wheelin'
Ok, so, then ONLY remaining area requiring the LED conversion is the radio�and if you�ve noticed one thing about my LED work is that there is not a SINGLE localized �hot spot�. Well, ironically enough, the radio would posses the mother of all hot-spottieness if I were to solder to the OE locations. SO, after reviewing the tolerances AND, almost serendipitously, noticing that each button has it�s own light diffuser in the OE diffuser board�it was as if it were meant to be.
SO, the board will be sandwiched in-between the radio circuit panel and the OE light diffuser�the circuit board will have the LEDs and resistors soldered directly to the board, with one LED loaded behind each button�for PERFECT lighting. By the time it�s done, it�s almost a PnP LED board. Tits.
SO, the board will be sandwiched in-between the radio circuit panel and the OE light diffuser�the circuit board will have the LEDs and resistors soldered directly to the board, with one LED loaded behind each button�for PERFECT lighting. By the time it�s done, it�s almost a PnP LED board. Tits.
 Wow, thats awesome that you took the time to experiment like that. It's posts like these that keep these boards alive imo. Seriously thanks
  05-06-2010, 12:20 PM
#213
takin care of Business in
iTrader: (5)
Join Date: Jan 2008
Location: Kansas City, MO
Age: 40
Posts: 30,994
Received 4,732 Likes
on
4,064 Posts
subscribed
man you did some crazy nice work to your car....felt bad about people stealing shit from your car.....if you find em....give em an extra black eye !!!
man you did some crazy nice work to your car....felt bad about people stealing shit from your car.....if you find em....give em an extra black eye !!!
05-06-2010, 04:13 PM
#214
Team Owner
iTrader: (2)
Join Date: Jan 2008
Location: Kansas City, MO (Overland Park, KS)
Posts: 36,545
Received 6,470 Likes
on
5,162 Posts
I was just looking at Post #167 again. You should consider the shaved door handle mod for this! It gets rid of the keyhole on the driver's side door. It would really finish off the look for you.
National Acura Meet-June 6th/Kansas City-ONE MONTH AWAY!!!. Click here for details and to sign up!
.
National Acura Meet-June 6th/Kansas City-ONE MONTH AWAY!!!. Click here for details and to sign up!
.
05-06-2010, 04:29 PM
#215
=
Ok, so, then ONLY remaining area requiring the LED conversion is the radio�and if you�ve noticed one thing about my LED work is that there is not a SINGLE localized �hot spot�. Well, ironically enough, the radio would posses the mother of all hot-spottieness if I were to solder to the OE locations. SO, after reviewing the tolerances AND, almost serendipitously, noticing that each button has it�s own light diffuser in the OE diffuser board�it was as if it were meant to be.
SO, the board will be sandwiched in-between the radio circuit panel and the OE light diffuser�the circuit board will have the LEDs and resistors soldered directly to the board, with one LED loaded behind each button�for PERFECT lighting. By the time it�s done, it�s almost a PnP LED board. Tits.
05-06-2010, 09:07 PM
#216
Fearless DIY Guy
Thread Starter
iTrader: (2)
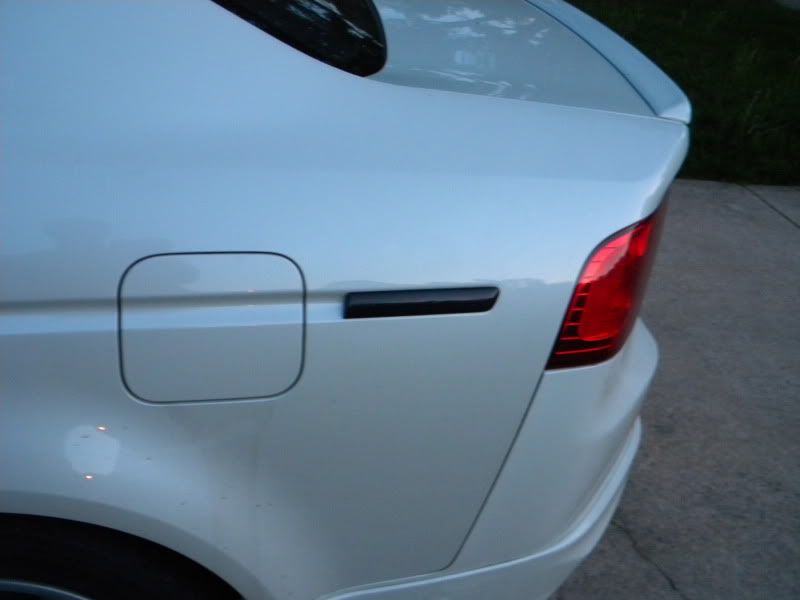
Alright, let's consider this an 'Of Mice & Men' kind of night. So I thought I'd start the evening off simple enough by doing some corrections on the sidemarkers...should be simple, no? 
Well, we start off by going over the mess with an 800-grit wetsand, and the high spots quickly reveal themselves...

But I pressed to hard in one of the corners and the OE red is nigh exposed. MISTAKE #1.

Ok, now time to buff everything out. Only problem is, I have a super-shitty $30 RO from Advance, and while I guess it kinda looks good, I can still see some marks left from the wetsand...
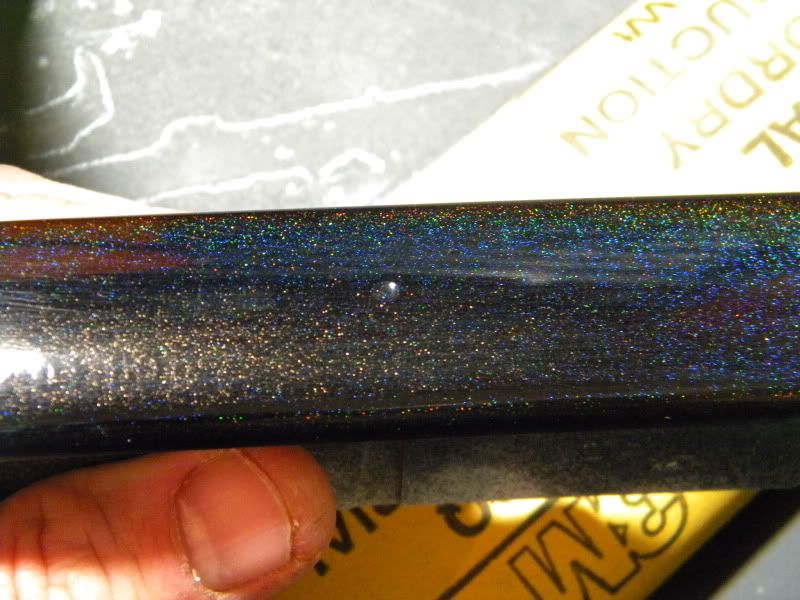
When we compare the two, the difference is OBVIOUS.
A shot at dusk. I guess all in all I am going to have to see how this looks in the AM with the sun beating down on it. You really CANNOT see any flaws unless you're within a foot of the marker, but I am sooooooo fucking anal I don't know if I can live with that. We'll have to wait until the morning to make the final decision. ON TO THE NEXT CHALLENGE...
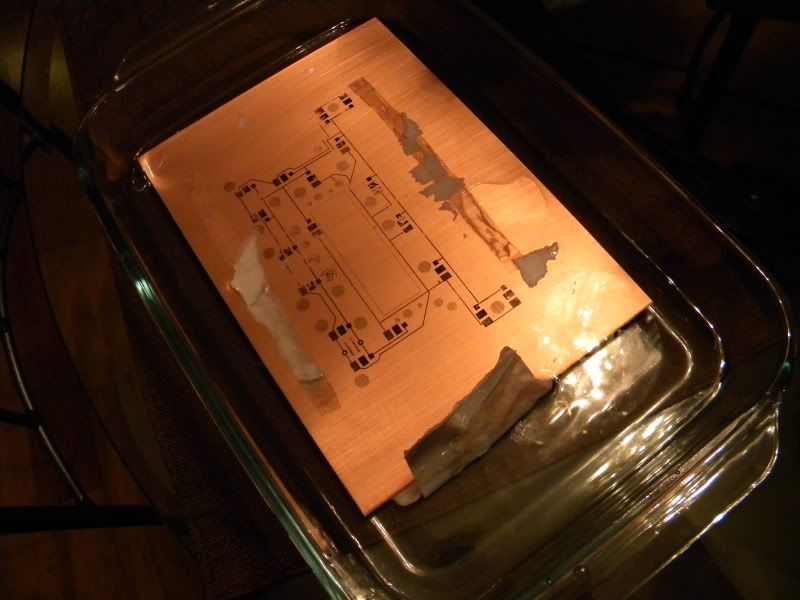
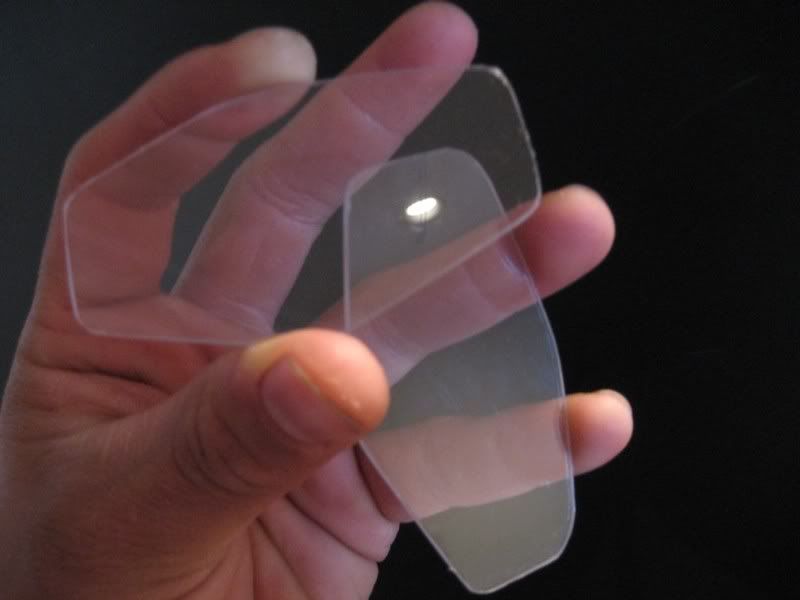
Well, I finally got around to printing V2.0 board!
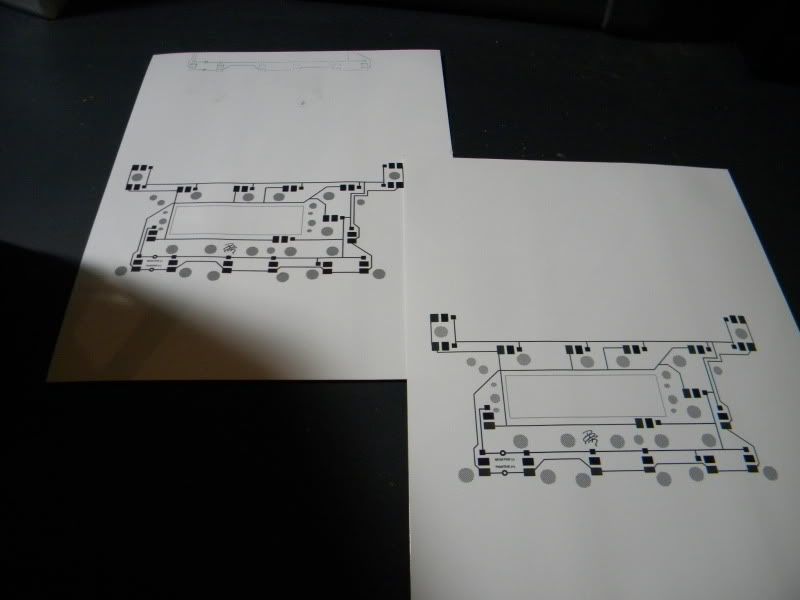
I'll spare the details, but again, looks like we have another challenge to overcome. We'll see if you can figure out just what's wrong.
Tomorrow we revisit the board and do some serious brake work.
Well, we start off by going over the mess with an 800-grit wetsand, and the high spots quickly reveal themselves...
But I pressed to hard in one of the corners and the OE red is nigh exposed. MISTAKE #1.
Ok, now time to buff everything out. Only problem is, I have a super-shitty $30 RO from Advance, and while I guess it kinda looks good, I can still see some marks left from the wetsand...
When we compare the two, the difference is OBVIOUS.
A shot at dusk. I guess all in all I am going to have to see how this looks in the AM with the sun beating down on it. You really CANNOT see any flaws unless you're within a foot of the marker, but I am sooooooo fucking anal I don't know if I can live with that. We'll have to wait until the morning to make the final decision. ON TO THE NEXT CHALLENGE...
Well, I finally got around to printing V2.0 board!
I'll spare the details, but again, looks like we have another challenge to overcome. We'll see if you can figure out just what's wrong.
Tomorrow we revisit the board and do some serious brake work.
05-06-2010, 09:10 PM
#217
Fearless DIY Guy
Thread Starter
iTrader: (2)
SO, while I am by no means impervious to making mistakes, I always like to see what could have been done better. It's as follows:
MISTAKE #1 - Use less pressure when wetsanding, start with a higher grit
MISTAKE #2 - Try buffing for longer periods of time'
MISTAKE #3 - Board prints need be inverted
MISTAKE #4 - Try and find a greater heatsource when transferring ink
MISTAKE #1 - Use less pressure when wetsanding, start with a higher grit
MISTAKE #2 - Try buffing for longer periods of time'
MISTAKE #3 - Board prints need be inverted
MISTAKE #4 - Try and find a greater heatsource when transferring ink
 05-09-2010, 10:22 PM
#220
Fearless DIY Guy
Thread Starter
iTrader: (2)
UPDATE, BRAKE JOB FROM HELL COMPLETE, some painted sections sanded, buffed out...long weekend, more updates tomorrow.
EXTERIOR
A-Spec Front Lip
A-Spec Sideskirts
Type-S Rear Lip
Trunk Lip
Debadged
Painted Rear Panel
Custom Painted Handles
Rear Tint
EXTERIOR LIGHTING
CCFL License Plate Lights
HID Back-up Lights
Tinted Sidemarkers
ICE
Dom's TV-and-Nav-to-Go
Arc Audio 2500-XXK - STOLEN
2 x Alumapro Alchemy RX (DVC SQ) - STOLEN
LED Door lights
OE Conversion of interior lighting (90% complete)
'RL Door Handle LED' Mod
Accessory LED in Door Courtesy Pockets
Boyo VTK350 Backup Camera
Optima Red Top Battery
Infinity 1031t Tweeters
JBL P662S Woofers
INTERIOR
80sqft.Second Skin Audio Damplifier
30sqft. Second Skin Audio Overkill Pro
Ultrasuede Headliner
Real CF Overlay Kit
Custom Two-Tone Steering wheel @ +1/8" Thickness
STOPPING POWAH
Hawk Ceramic Pads
Power Slot Slotted Rotors (Front)
Power Slot Blanks (Rear)
Painted Rear Calipers
SS Brake Lines
AMSOIL Synthetic Brake Fluid (full system flush)
Propah bed-in of brakes
BREATHE EASY
Mid Muffler Delete
Aero 25 Resonator
Type-S Exhaust
Powdercoated Tips
05-10-2010, 07:11 AM
#222
Fearless DIY Guy
Thread Starter
iTrader: (2)
M - Etch Board
T/W/R - Making the CCFL lisc. plate lights BRIGHTER (new HOW-TO!)
F - RSB Install
S - Uber exterior detailing
So, we'll have some upgrades coming this week, I'm taking 2 days off from work + a weekend on the 24th to do an unprecedented interior overhaul...stay tuned...
 05-10-2010, 09:09 AM
#224
Awesome...you got quite the list goin there.
Needless to say my little LED bulbs are crap for my plate, huh? I know Cold Cathode is the bomb...but I'm not sure how much of a mission I want to go on to have a brighter plate.
AND, I was thinking about the reverse HID and the more I think about it...at least here in S.Florida..the more i don't want the option to blind someone behind me. With road rage the way it is these days, not a good idea to do something so aggressive. Even if they are riding your azz...since a lot of times people are clueless that they're being aholes to begin with. Just move out of the way. Sorry, just went off on a tangent cause I've been thinking about it.
Anyway...DM...get yourself something better than that $30 RO buffer...actually, I would say return it and get the porter cable...OR, just go Zaino and it'll look good enough and be protected.
 05-12-2010, 07:22 AM
#230
Awesome...you got quite the list goin there.
Needless to say my little LED bulbs are crap for my plate, huh? I know Cold Cathode is the bomb...but I'm not sure how much of a mission I want to go on to have a brighter plate.
AND, I was thinking about the reverse HID and the more I think about it...at least here in S.Florida..the more i don't want the option to blind someone behind me. With road rage the way it is these days, not a good idea to do something so aggressive. Even if they are riding your azz...since a lot of times people are clueless that they're being aholes to begin with. Just move out of the way. Sorry, just went off on a tangent cause I've been thinking about it.
Anyway...DM...get yourself something better than that $30 RO buffer...actually, I would say return it and get the porter cable...OR, just go Zaino and it'll look good enough and be protected.
Needless to say my little LED bulbs are crap for my plate, huh? I know Cold Cathode is the bomb...but I'm not sure how much of a mission I want to go on to have a brighter plate.
AND, I was thinking about the reverse HID and the more I think about it...at least here in S.Florida..the more i don't want the option to blind someone behind me. With road rage the way it is these days, not a good idea to do something so aggressive. Even if they are riding your azz...since a lot of times people are clueless that they're being aholes to begin with. Just move out of the way. Sorry, just went off on a tangent cause I've been thinking about it.
Anyway...DM...get yourself something better than that $30 RO buffer...actually, I would say return it and get the porter cable...OR, just go Zaino and it'll look good enough and be protected.
As far as Reverse HID, you dont NEED the tailgater switch.. and you are right about the whole road rage thing.. haha.. most people back off because they think I am crazy too cuz I am about to back up into them.. lol .. But there may be that one day that someone loses it.. I have had my fair share of road rage stories.. including one where someones car flipped over..
05-12-2010, 08:33 AM
#231
^^^I've had a few myself. Lol. where my foot ended up making it's way almost thru the guys door. Lol. but I'm older and more mature now. Now I just say WTF, Risky Business style. Let it go.
CC is the way to go, huh? Yeah, I might have to give that a whirl. It's funny, you write off mods when you're skill level is at a certain point because they look too hard...then a year later you're like "wait, WHY was I intimidated by this". lol.
CC is the way to go, huh? Yeah, I might have to give that a whirl. It's funny, you write off mods when you're skill level is at a certain point because they look too hard...then a year later you're like "wait, WHY was I intimidated by this". lol.
05-12-2010, 08:37 PM
#235
Fearless DIY Guy
Thread Starter
iTrader: (2)
A rather staccato update, I'm absolutely exhausted tonight, this week has taken quite a toll on my energy levels. One more week until I can breathe easy at work. 
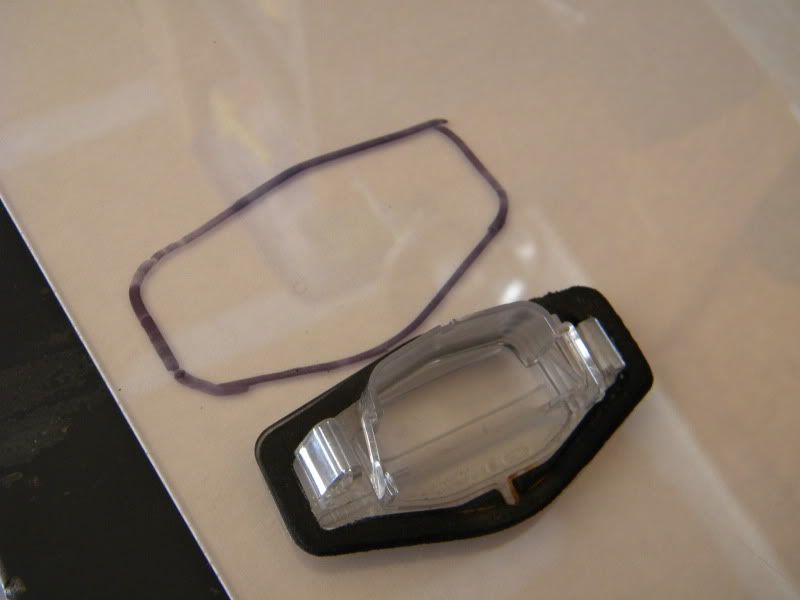
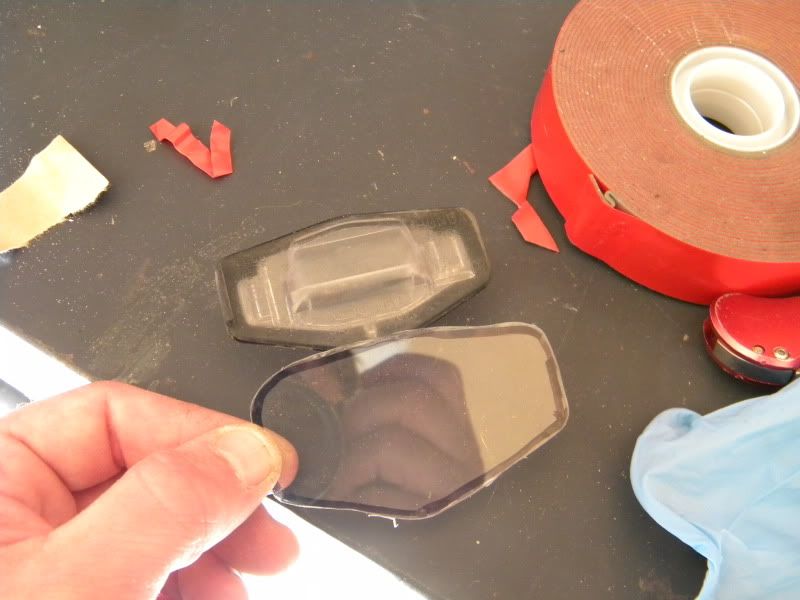
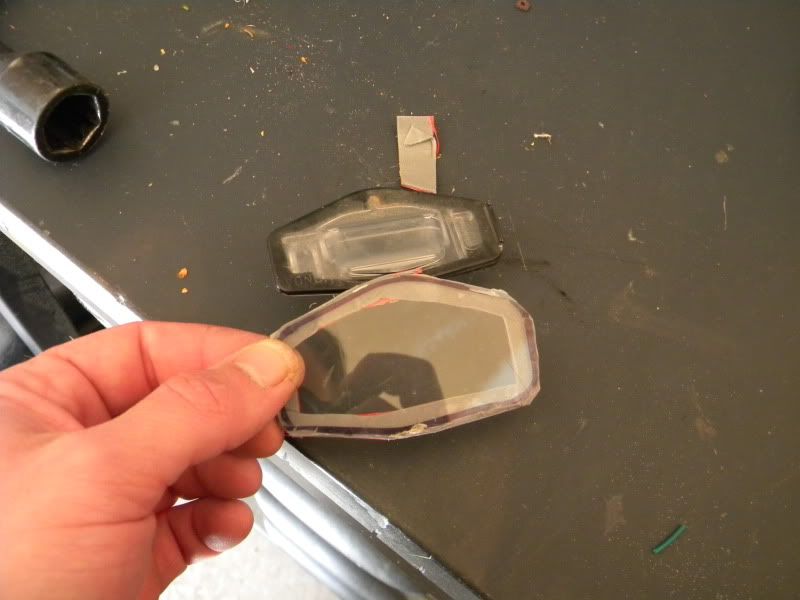
- Make your CCFLs brighter, for about $3, and YES, it's worth it!
- Get cheap peice of clear polycarbonate
- Trace OE cover, cut, clean
- Use 3M 2 sided tape
- Use duct foil tape for reflective shroud
- ZOMG, you've just peed your pants, enjoy
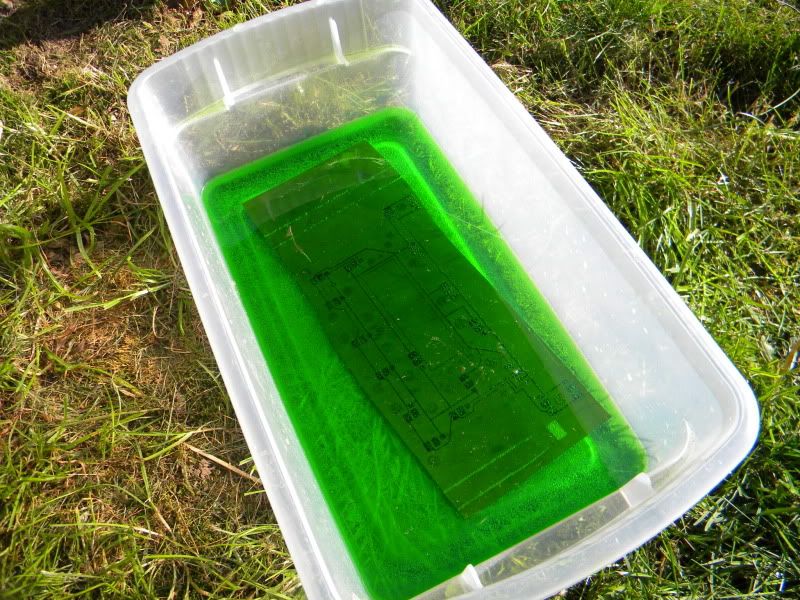
- Chemistry is fun! Insufficient ink transfer on attempt #1, back to the laser printer tomorrow morning

- Make your CCFLs brighter, for about $3, and YES, it's worth it!
- Get cheap peice of clear polycarbonate
- Trace OE cover, cut, clean
- Use 3M 2 sided tape
- Use duct foil tape for reflective shroud
- ZOMG, you've just peed your pants, enjoy
- Chemistry is fun! Insufficient ink transfer on attempt #1, back to the laser printer tomorrow morning
05-12-2010, 09:56 PM
#237
nice, the clear plexi lets the CCFL's shine much brighter.
i did it back in 06 when i had my 04 AM TL. more pics in pimping-tl's DIY thread post #117 pg.3 https://acurazine.com/forums/showthr...e+plate&page=3
I've also done it on my 07 type-s
i did it back in 06 when i had my 04 AM TL. more pics in pimping-tl's DIY thread post #117 pg.3 https://acurazine.com/forums/showthr...e+plate&page=3
I've also done it on my 07 type-s
05-13-2010, 09:53 AM
#238
takin care of Business in
iTrader: (5)
Join Date: Jan 2008
Location: Kansas City, MO
Age: 40
Posts: 30,994
Received 4,732 Likes
on
4,064 Posts
you guys are friggin geniuses !!!!
and death metal i gotta repeat my words....you got skills kid (just a phrase....am younger than you LOL) !!!
and death metal i gotta repeat my words....you got skills kid (just a phrase....am younger than you LOL) !!!
05-14-2010, 11:39 PM
#240
DM, I've forever been baffled by the steps to doing my own spray painting. And you gave me the last piece of the puzzle.
Today, I wetsanded the front grill...and it looked horrible...this was the point where I would freak out and repaint it.
Not today, after what you posted with your sidemarkers...I KNEW to wetsand then compound/polish. Wow...it came out perfectly...it looks like glass.
So, anyway...
THANK YOU.
Today, I wetsanded the front grill...and it looked horrible...this was the point where I would freak out and repaint it.
Not today, after what you posted with your sidemarkers...I KNEW to wetsand then compound/polish. Wow...it came out perfectly...it looks like glass.
So, anyway...
THANK YOU.