04WDPSEDAN > Thread > Timeline

The following users liked this post:
04WDPSeDaN (12-09-2016)
The following users liked this post:
04WDPSeDaN (12-09-2016)
 12-09-2016, 02:18 PM
#483
iWhine S/C 6MT TL
Thread Starter
iTrader: (1)
Back up from the dead.
I've been pretty busy the last few months. Those that follow me on instagram and facebook know that we've been doing a lot of house renovations. It's been difficult between everything to have the time to check up on everyone. I do miss everyone here, I hope everyone is doing well.
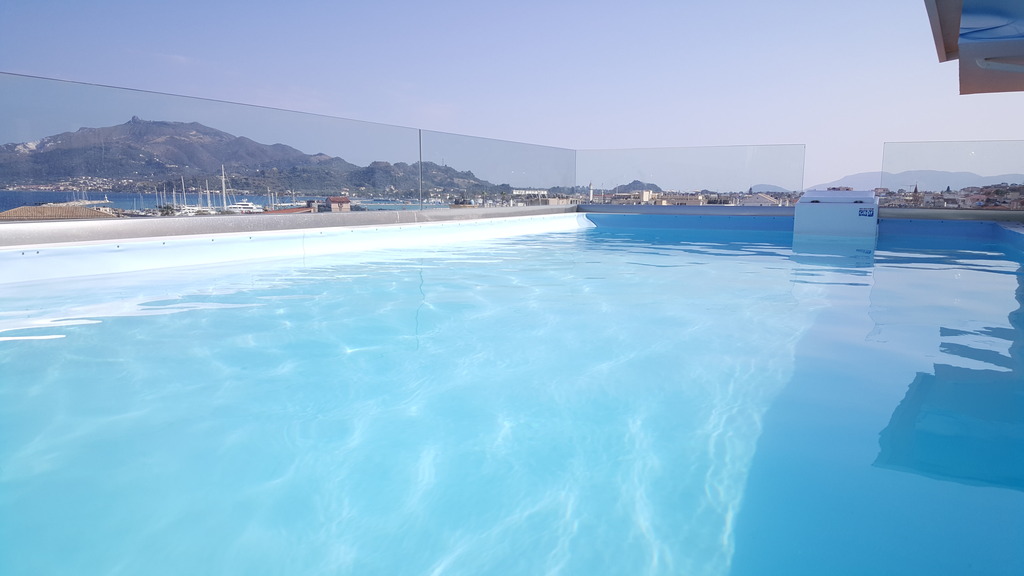
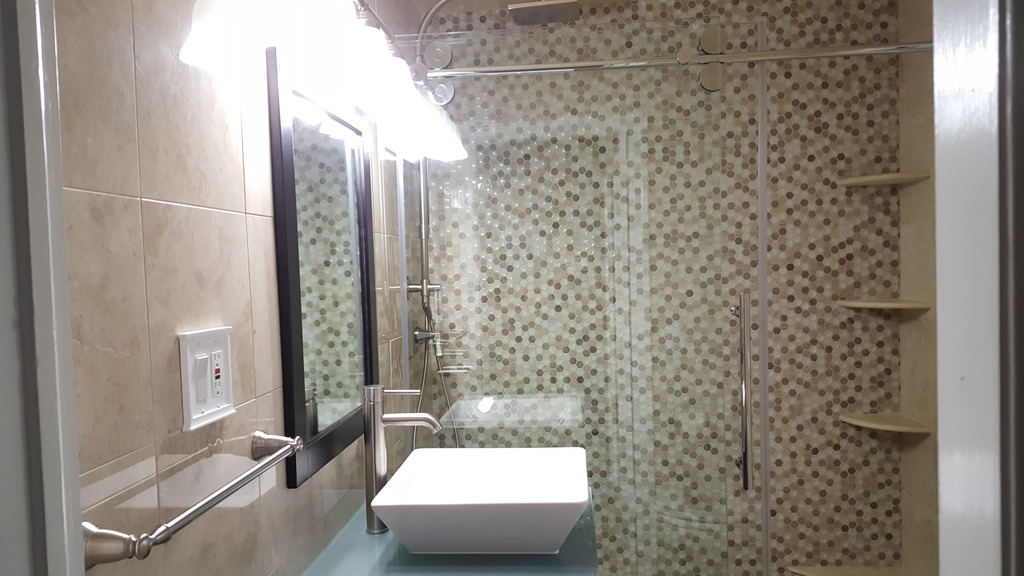
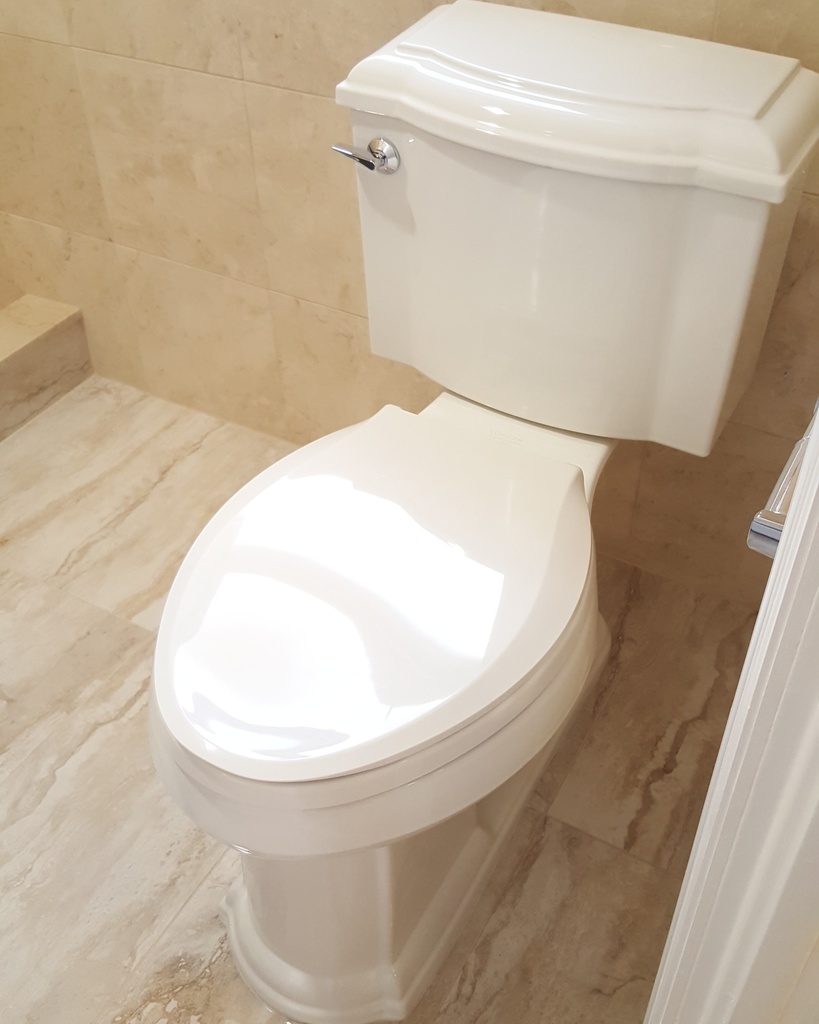
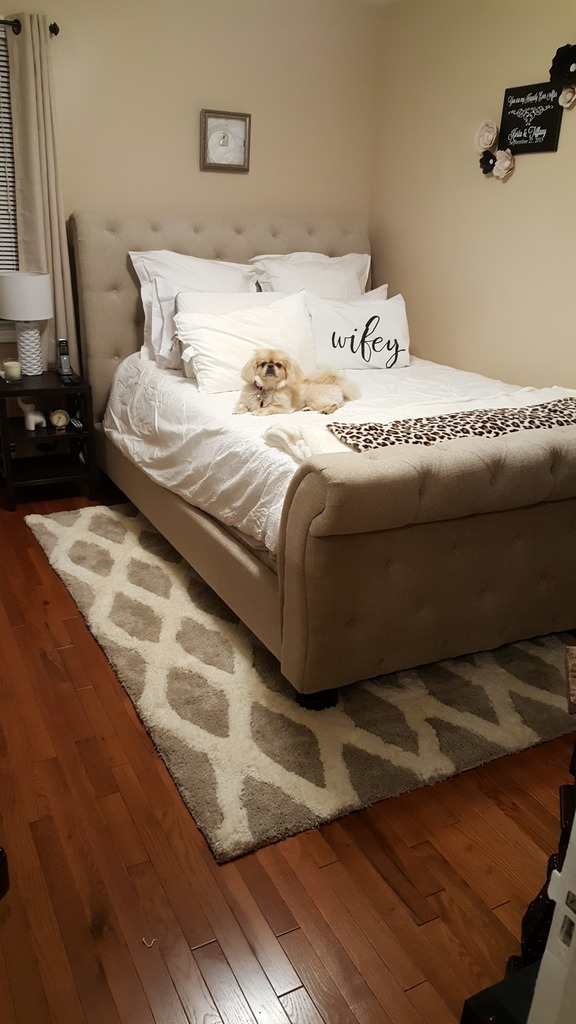
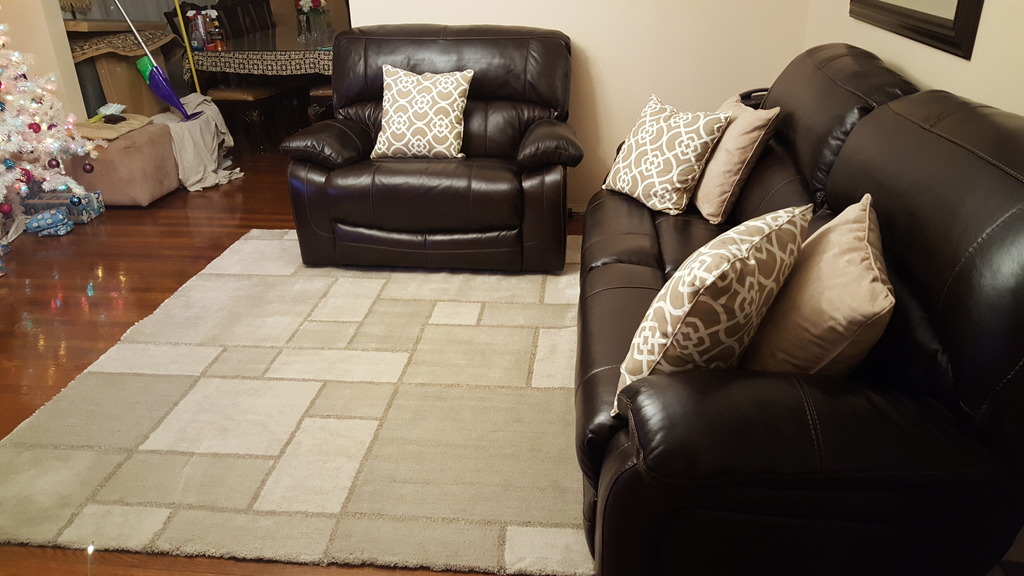
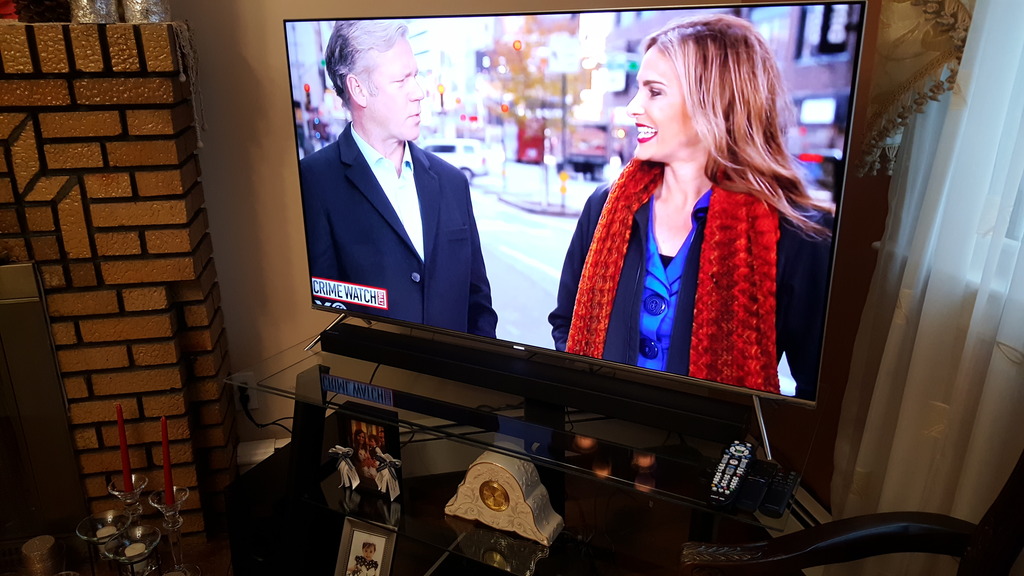
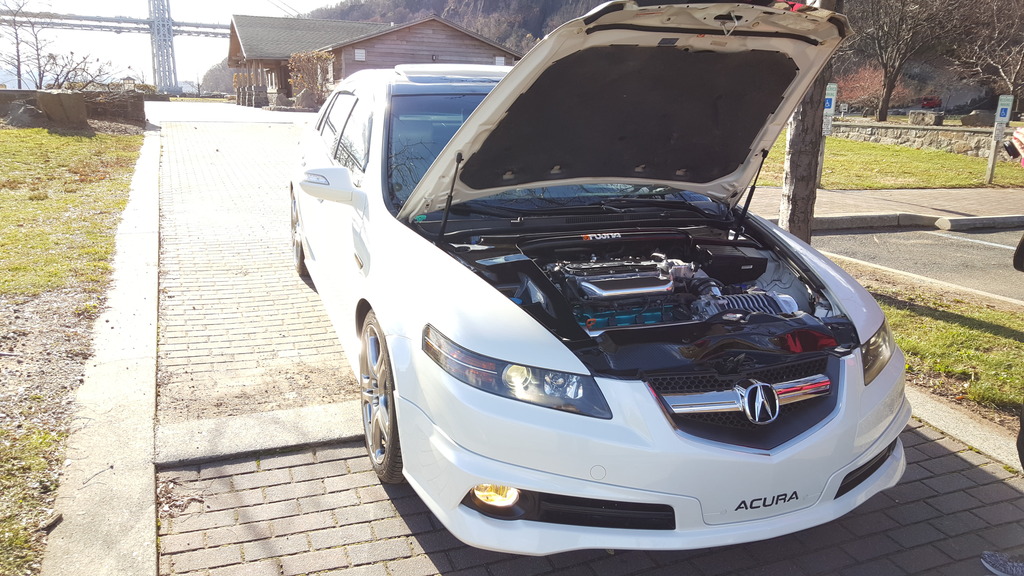
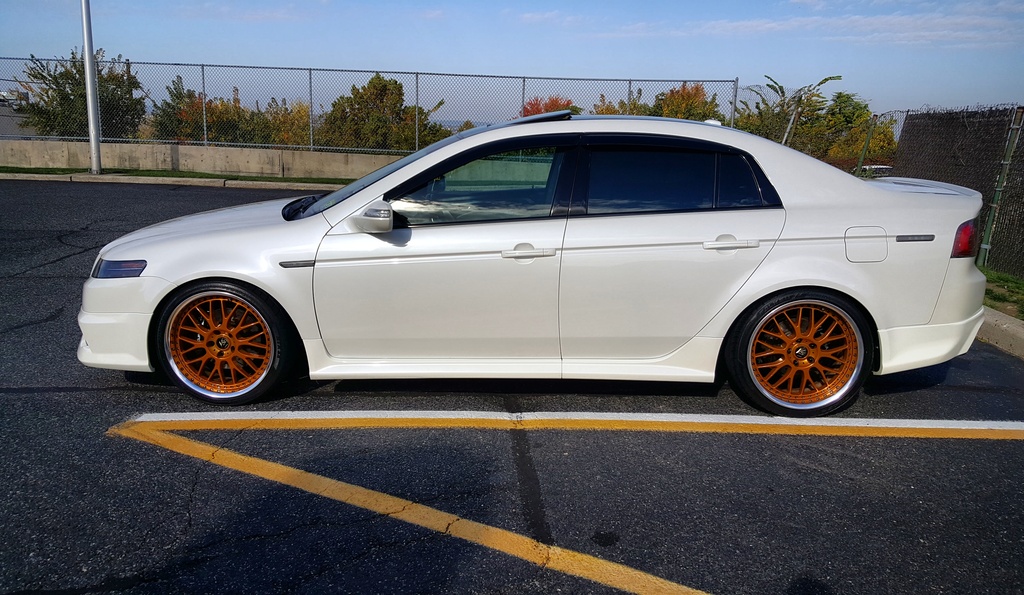
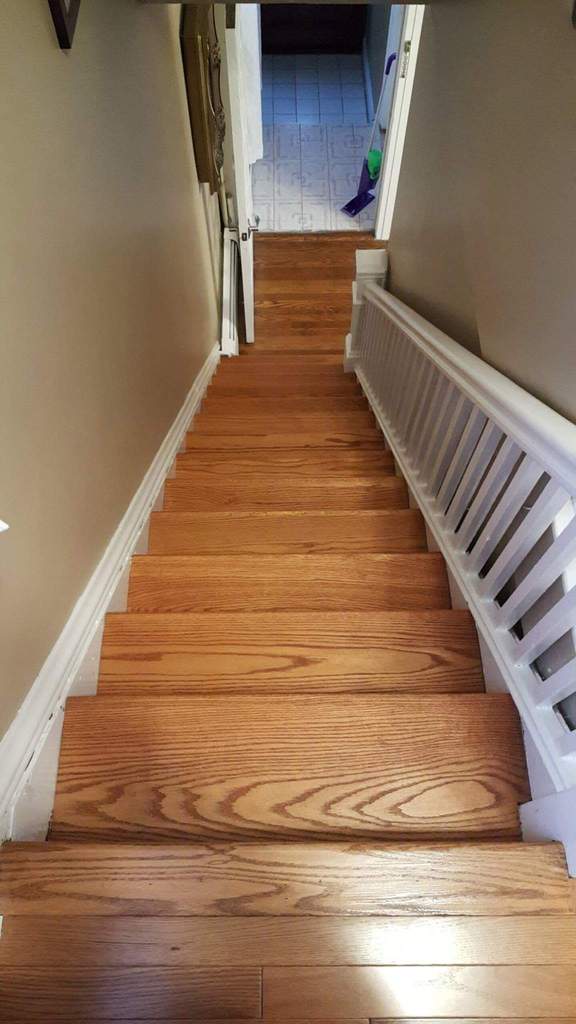
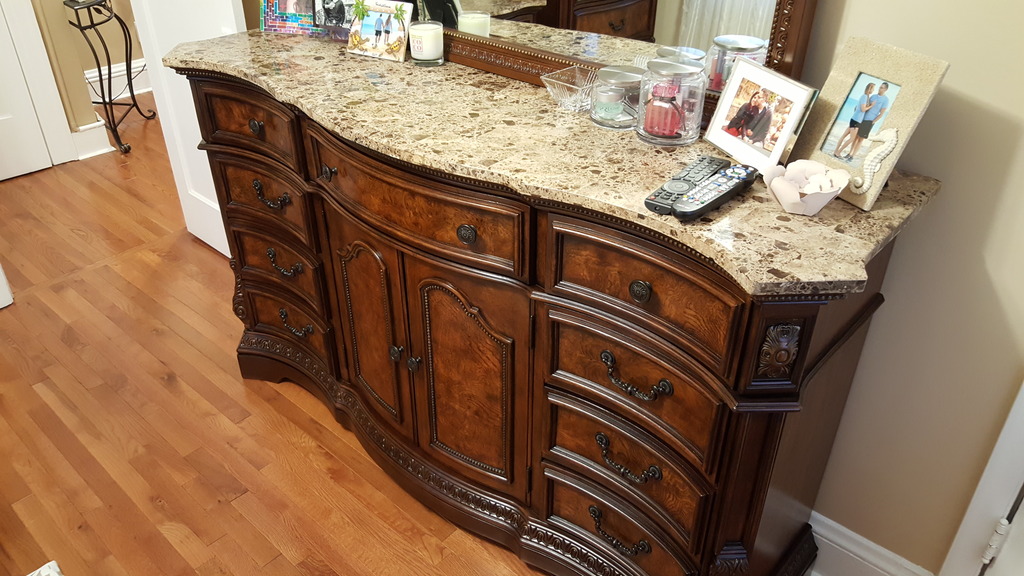
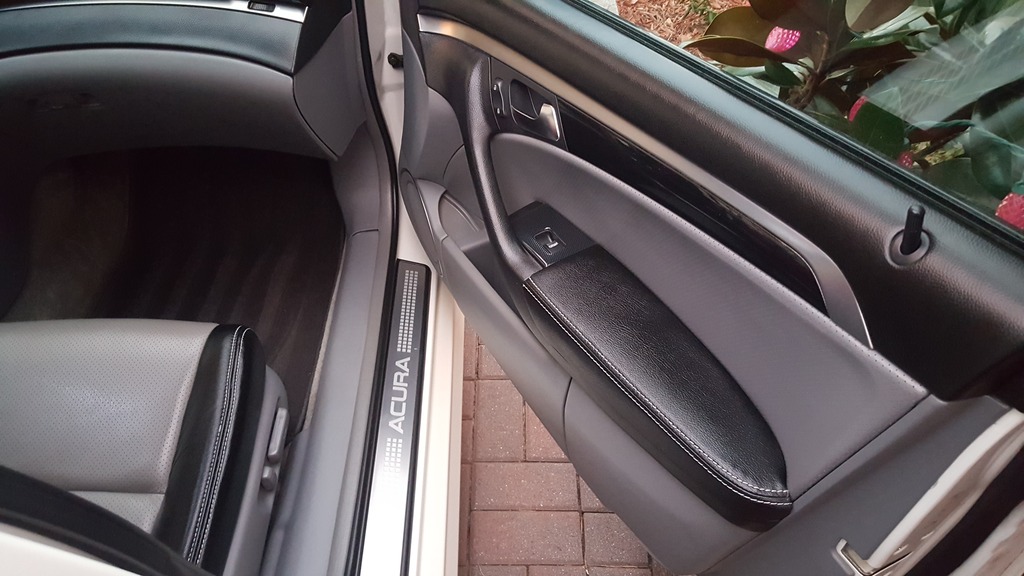
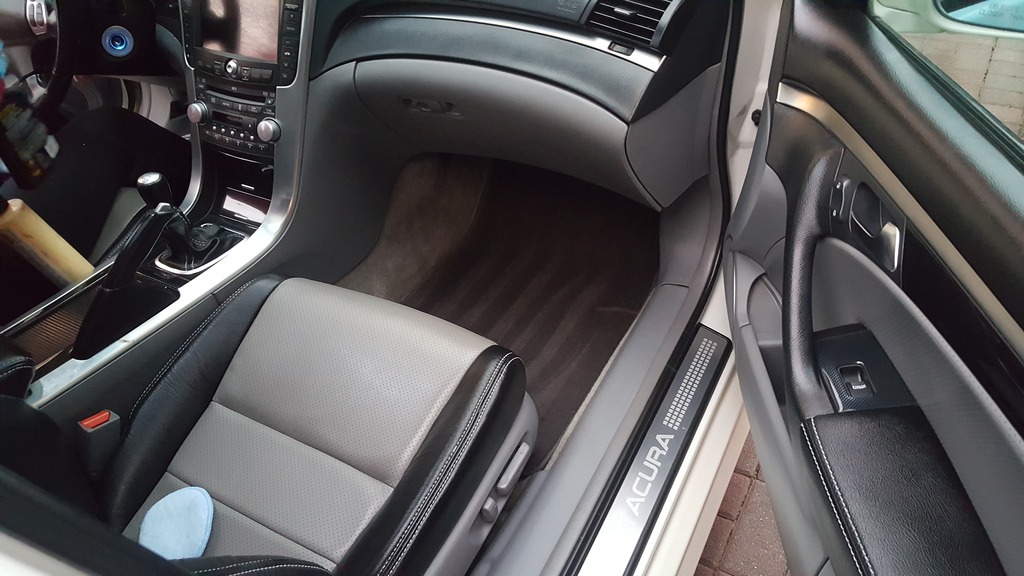
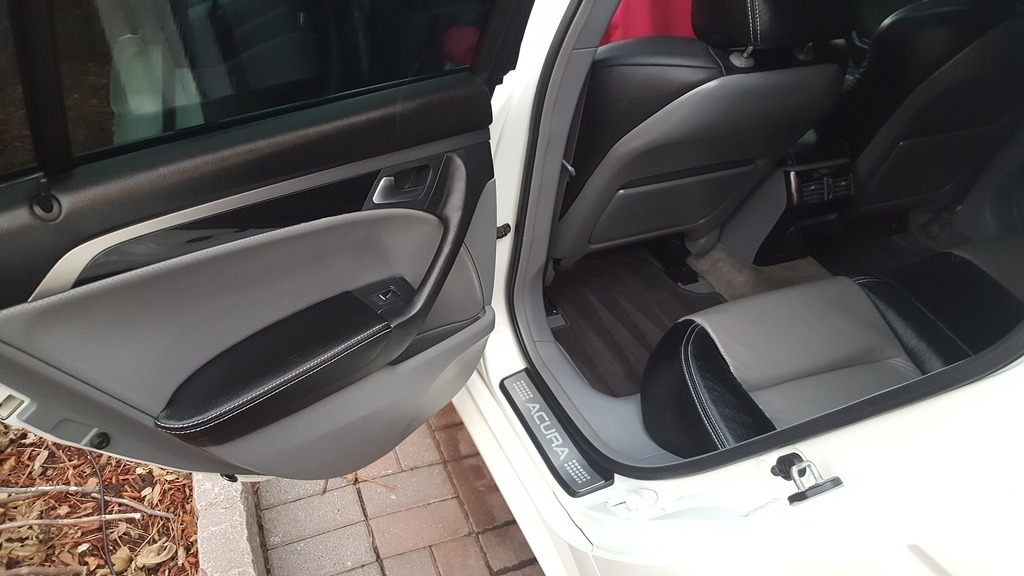
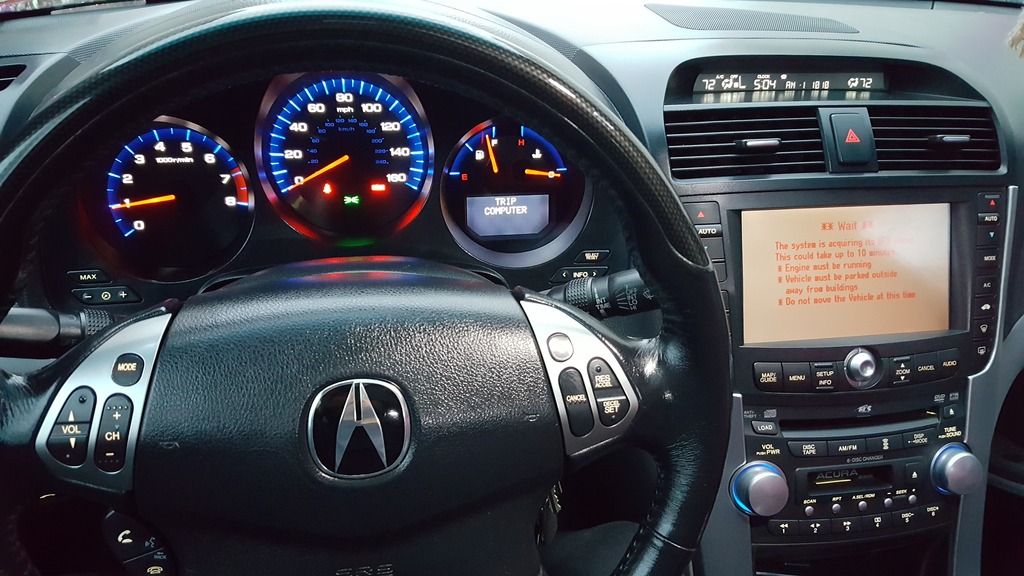
In August, the wife and I went to Greece for a little more than two weeks. Had an amazing time! Our scheduled was jam packed with places to see. It was my wife's 1st time going to Greece, I wanted her to experience as much as possible. We rented a yellow Smart for two, which was pretty bad ass for Greece. Anything bigger would have been a difficult. We celebrated our 1 year wedding anniversary in September. It's been an amazing year together. Also been busy with house renovation work and working in general. We did new hardwood floors in rooms that had carpets. Got new furniture for our room, power reciling sofas in the living room. New Samsung TV's, sound bars ect. Renovated one of the two bathrooms. Still have the other bathroom to finish. I entered my car into a car show contest a week before our anniversary and to my complete surprise, I won 1st place, best in show from 89 to current. The wife ordered me new leather seats from leatherseats.com. 100% full leather kit with the 2 tone and contrast double stitching. This is the Christmas gift (i'm souped over!), will be getting installed over the winter time. It's been pretty eventful over the last few months! I wanted to share some photos of our trip to Greece, the house work and most current photos I took of the TL. The wifey and I did a small photoshoot today. She used her SLR camera, which the pictures came out killer! In no particular order, here is what was keeping us busy.
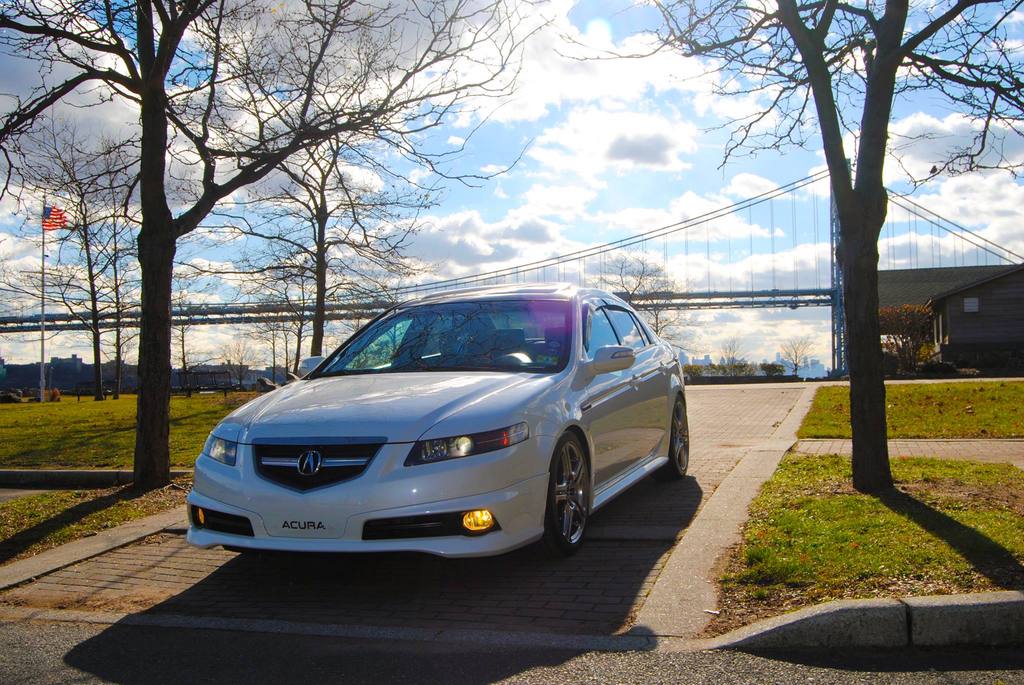
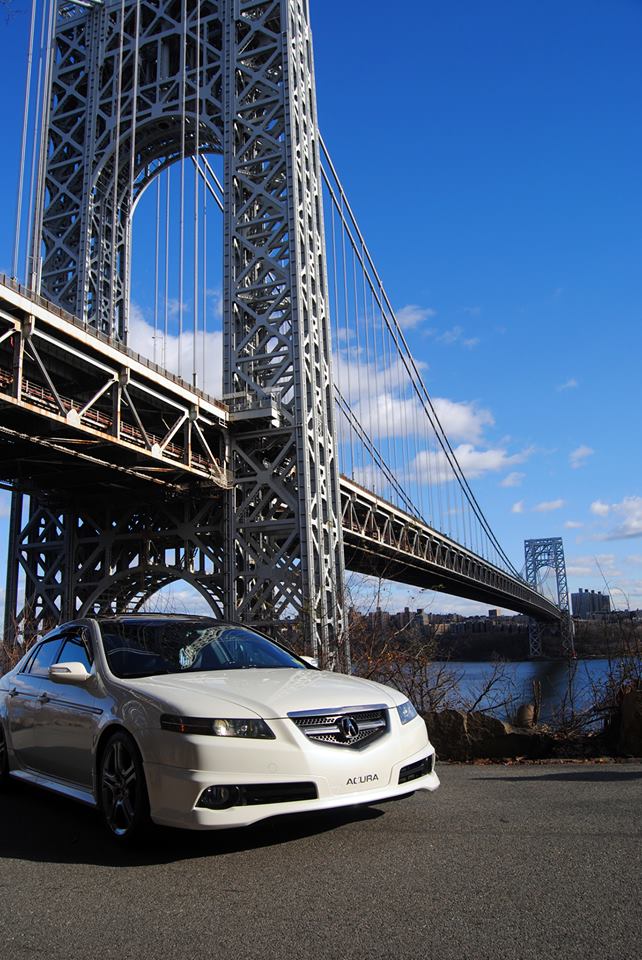
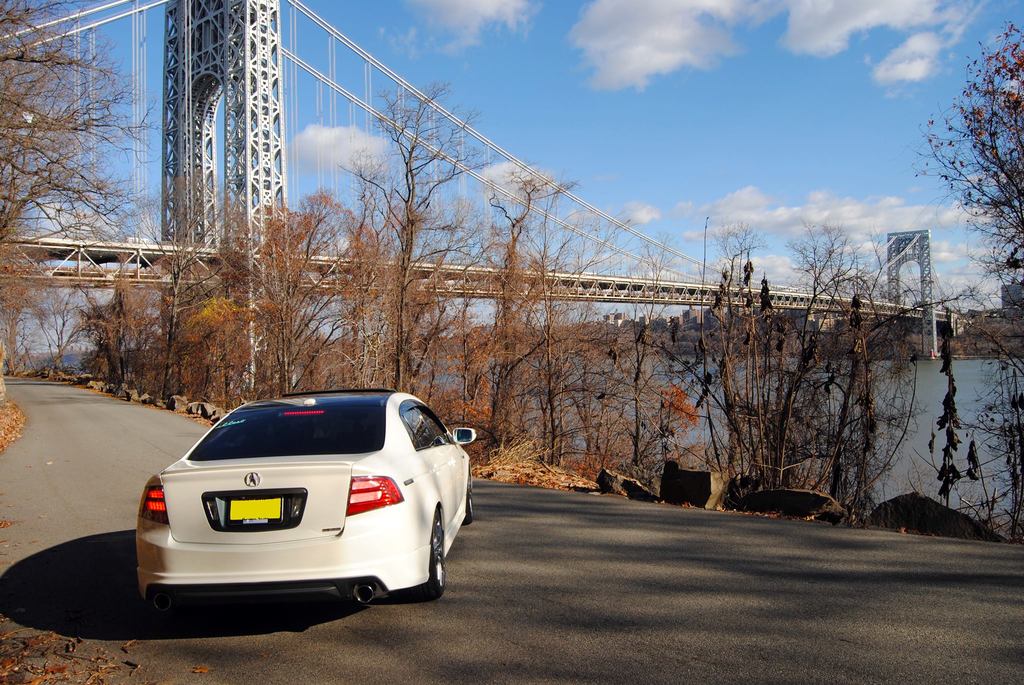
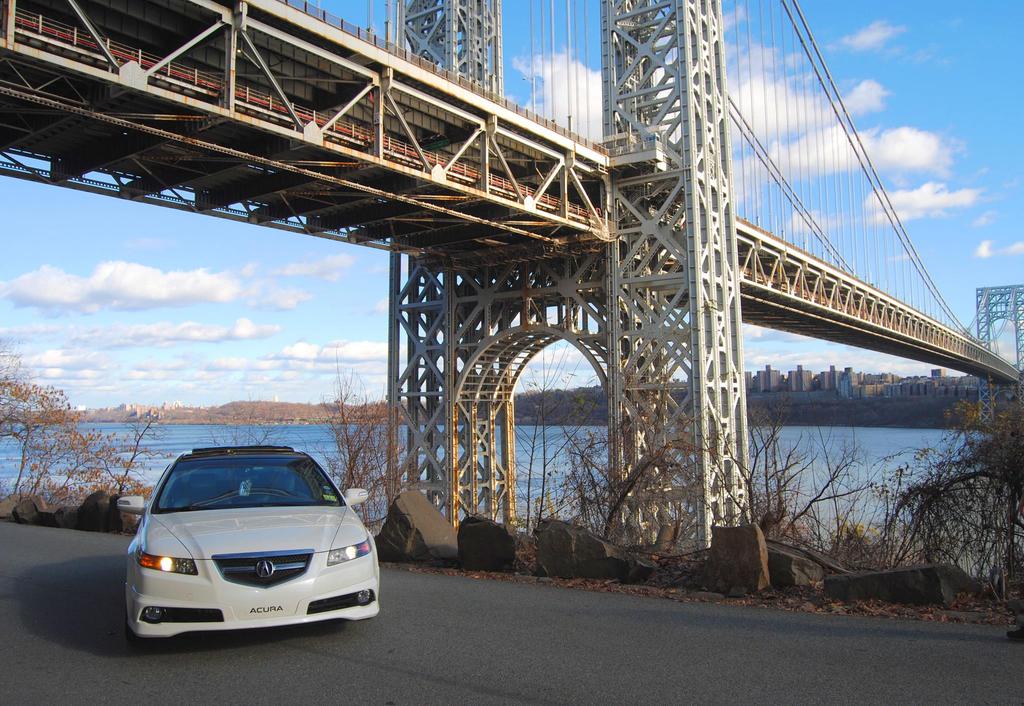
Recent Photos of the Precious TL


Our Trip to the mother land (I uploaded about 600 photos on facebook)


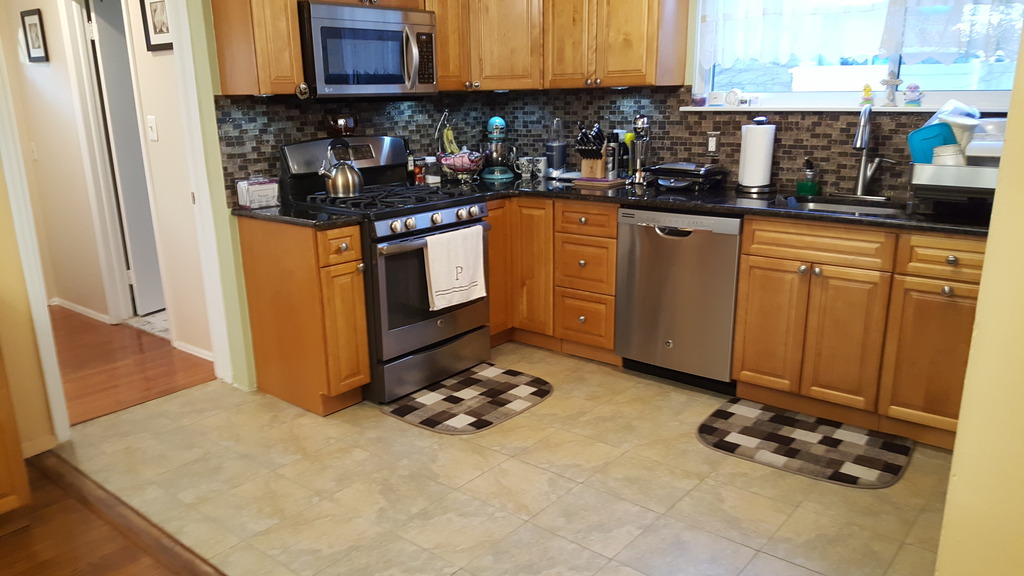
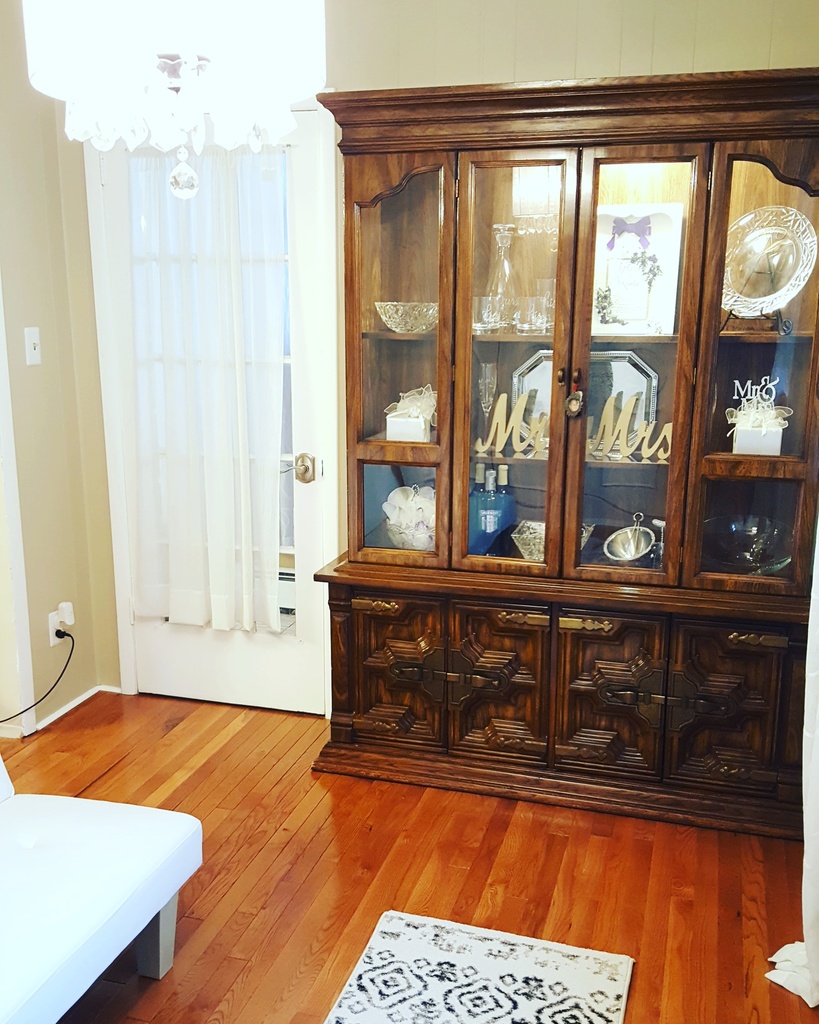
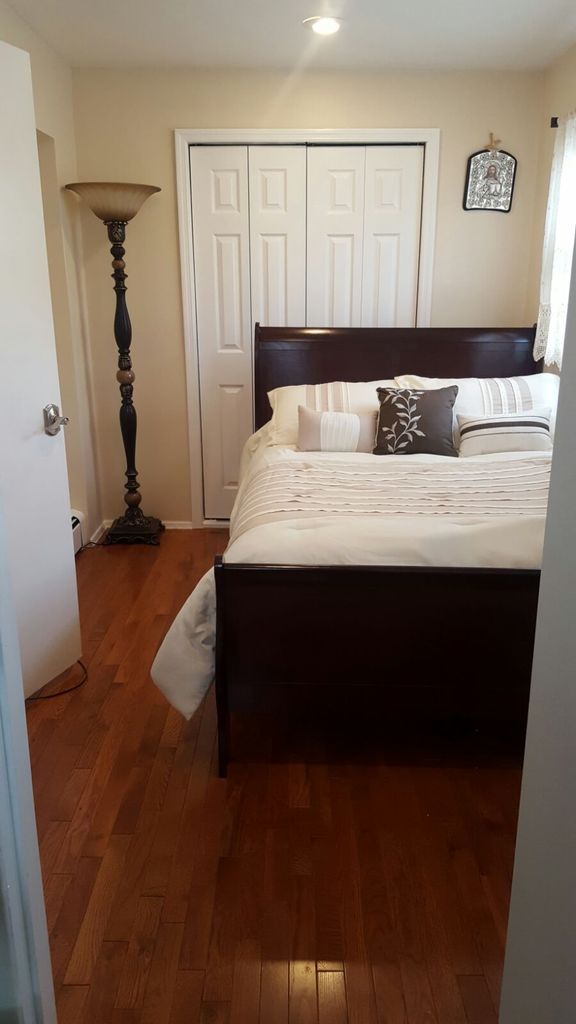
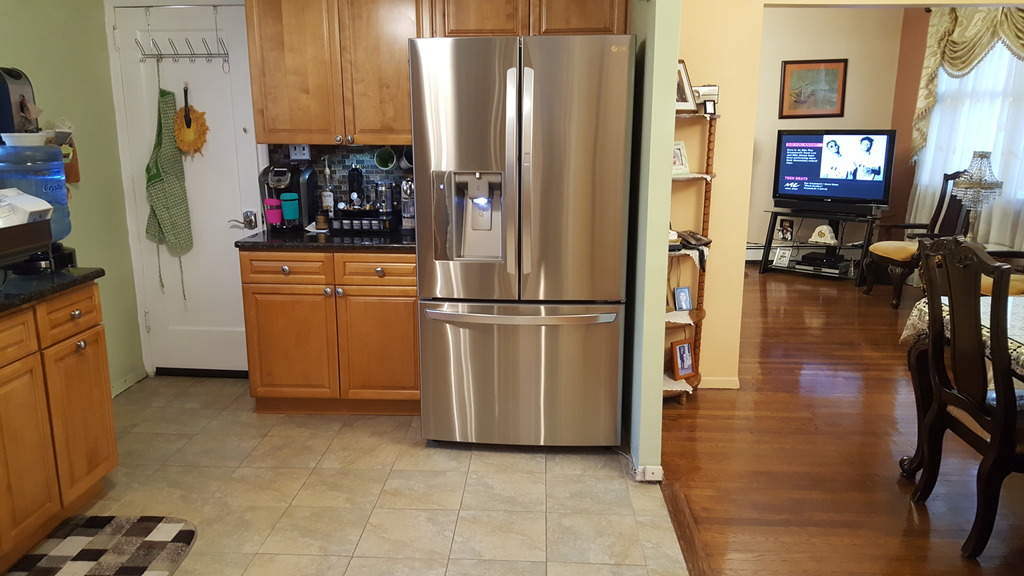
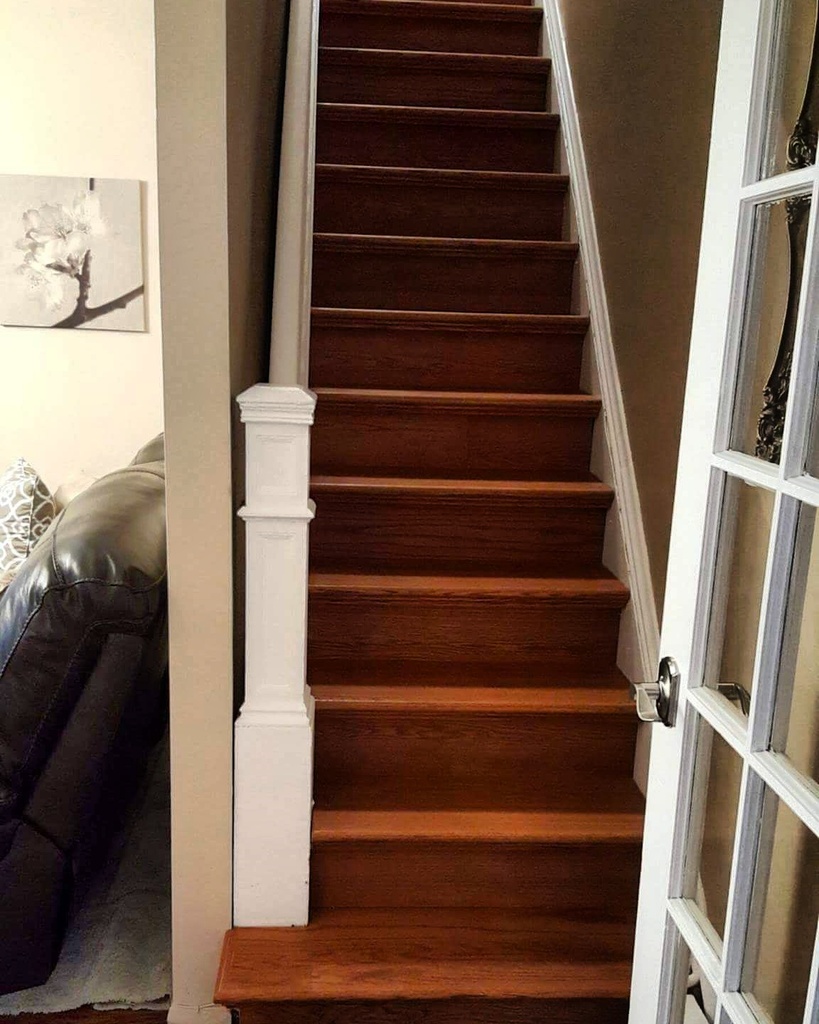
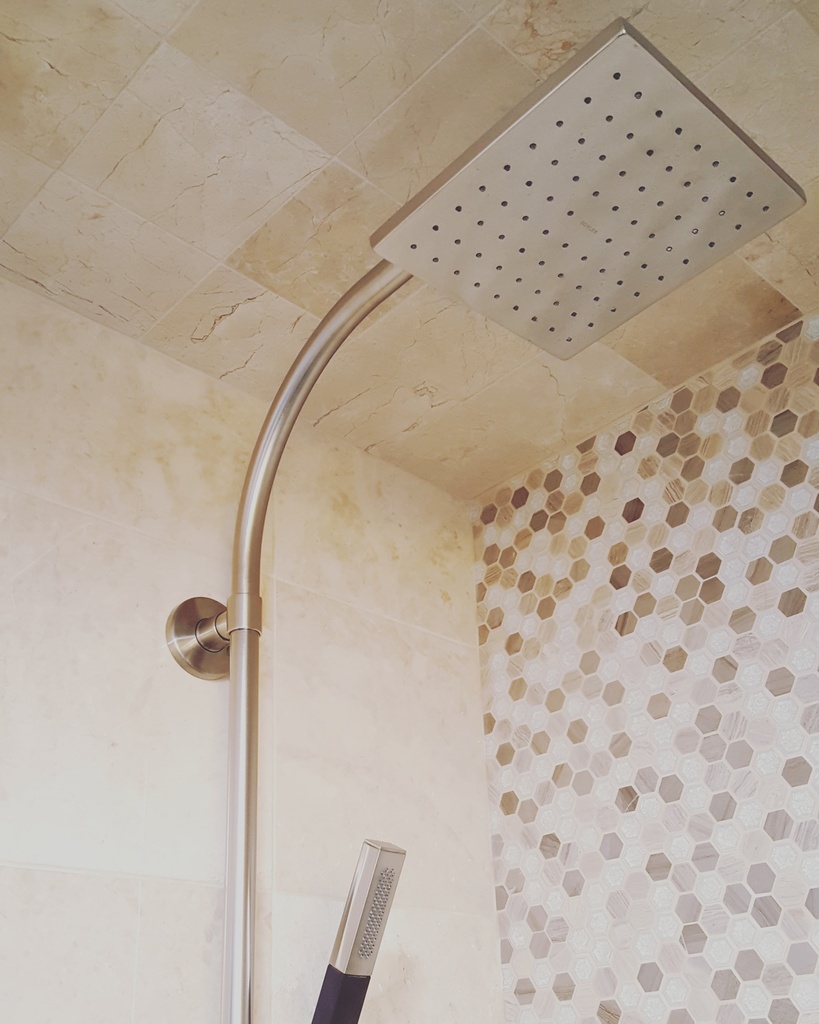
The house renovation work


I've been pretty busy the last few months. Those that follow me on instagram and facebook know that we've been doing a lot of house renovations. It's been difficult between everything to have the time to check up on everyone. I do miss everyone here, I hope everyone is doing well.
In August, the wife and I went to Greece for a little more than two weeks. Had an amazing time! Our scheduled was jam packed with places to see. It was my wife's 1st time going to Greece, I wanted her to experience as much as possible. We rented a yellow Smart for two, which was pretty bad ass for Greece. Anything bigger would have been a difficult. We celebrated our 1 year wedding anniversary in September. It's been an amazing year together. Also been busy with house renovation work and working in general. We did new hardwood floors in rooms that had carpets. Got new furniture for our room, power reciling sofas in the living room. New Samsung TV's, sound bars ect. Renovated one of the two bathrooms. Still have the other bathroom to finish. I entered my car into a car show contest a week before our anniversary and to my complete surprise, I won 1st place, best in show from 89 to current. The wife ordered me new leather seats from leatherseats.com. 100% full leather kit with the 2 tone and contrast double stitching. This is the Christmas gift (i'm souped over!), will be getting installed over the winter time. It's been pretty eventful over the last few months! I wanted to share some photos of our trip to Greece, the house work and most current photos I took of the TL. The wifey and I did a small photoshoot today. She used her SLR camera, which the pictures came out killer! In no particular order, here is what was keeping us busy.
Recent Photos of the Precious TL


Our Trip to the mother land (I uploaded about 600 photos on facebook)


The house renovation work


 12-09-2016, 02:18 PM
#484
iWhine S/C 6MT TL
Thread Starter
iTrader: (1)
Back up from the dead.
I've been pretty busy the last few months. Those that follow me on instagram and facebook know that we've been doing a lot of house renovations. It's been difficult between everything to have the time to check up on everyone. I do miss everyone here, I hope everyone is doing well.
In August, the wife and I went to Greece for a little more than two weeks. Had an amazing time! Our scheduled was jam packed with places to see. It was my wife's 1st time going to Greece, I wanted her to experience as much as possible. We rented a yellow Smart for two, which was pretty bad ass for Greece. Anything bigger would have been a difficult. We celebrated our 1 year wedding anniversary in September. It's been an amazing year together. Also been busy with house renovation work and working in general. We did new hardwood floors in rooms that had carpets. Got new furniture for our room, power reciling sofas in the living room. New Samsung TV's, sound bars ect. Renovated one of the two bathrooms. Still have the other bathroom to finish. I entered my car into a car show contest a week before our anniversary and to my complete surprise, I won 1st place, best in show from 89 to current. The wife ordered me new leather seats from leatherseats.com. 100% full leather kit with the 2 tone and contrast double stitching. This is the Christmas gift (i'm souped over!), will be getting installed over the winter time. It's been pretty eventful over the last few months! I wanted to share some photos of our trip to Greece, the house work and most current photos I took of the TL. The wifey and I did a small photoshoot today. She used her SLR camera, which the pictures came out killer! In no particular order, here is what was keeping us busy.
Recent Photos of the Precious TL


Our Trip to the mother land (I uploaded about 600 photos on facebook)


The house renovation work


I've been pretty busy the last few months. Those that follow me on instagram and facebook know that we've been doing a lot of house renovations. It's been difficult between everything to have the time to check up on everyone. I do miss everyone here, I hope everyone is doing well.
In August, the wife and I went to Greece for a little more than two weeks. Had an amazing time! Our scheduled was jam packed with places to see. It was my wife's 1st time going to Greece, I wanted her to experience as much as possible. We rented a yellow Smart for two, which was pretty bad ass for Greece. Anything bigger would have been a difficult. We celebrated our 1 year wedding anniversary in September. It's been an amazing year together. Also been busy with house renovation work and working in general. We did new hardwood floors in rooms that had carpets. Got new furniture for our room, power reciling sofas in the living room. New Samsung TV's, sound bars ect. Renovated one of the two bathrooms. Still have the other bathroom to finish. I entered my car into a car show contest a week before our anniversary and to my complete surprise, I won 1st place, best in show from 89 to current. The wife ordered me new leather seats from leatherseats.com. 100% full leather kit with the 2 tone and contrast double stitching. This is the Christmas gift (i'm souped over!), will be getting installed over the winter time. It's been pretty eventful over the last few months! I wanted to share some photos of our trip to Greece, the house work and most current photos I took of the TL. The wifey and I did a small photoshoot today. She used her SLR camera, which the pictures came out killer! In no particular order, here is what was keeping us busy.
Recent Photos of the Precious TL
Our Trip to the mother land (I uploaded about 600 photos on facebook)
The house renovation work
The following users liked this post:
04WDPSeDaN (12-13-2016)
12-11-2016, 01:40 PM
#486
Team Owner
iTrader: (2)
Join Date: Jan 2008
Location: Kansas City, MO (Overland Park, KS)
Posts: 36,545
Received 6,470 Likes
on
5,162 Posts
Wow....outstanding.
The following users liked this post:
04WDPSeDaN (12-13-2016)
The following users liked this post:
04WDPSeDaN (12-13-2016)
12-13-2016, 09:31 AM
#488
Senior Moderator

The following 2 users liked this post by thoiboi:
04WDPSeDaN (12-13-2016),
BreezyTL (12-13-2016)
12-13-2016, 12:01 PM
#489
iWhine S/C 6MT TL
Thread Starter
iTrader: (1)
Thank you for the love broski!
Thank you Steven! Hope all is well!
Happy Holidays to you and your family!
Thank you very much! A lot of work around the house lately. The last 2 years, we've been doing quite a bit of work. It seems like a never ending task. My Wife and I miss Greece a lot. Had such an amazing time, and Greece is super beautiful. The people, are a different story.. Thank you for the kind words on the TL. Looks like Thoiboi took care of the Photoshop request. LOL
Hahahaha!! This had me rolling! Seriously, thank you for the laugh! <3
Thank you Steven! Hope all is well!
Happy Holidays to you and your family!
Hahahaha!! This had me rolling! Seriously, thank you for the laugh! <3
The following users liked this post:
Steven Bell (12-14-2016)
12-13-2016, 12:08 PM
#490
Senior Moderator
I was in between meetings at work and figured a shitty chop would fullfill the need just fine 
Sextastic car as always Gus
Sextastic car as always Gus
12-13-2016, 12:16 PM
#492
iWhine S/C 6MT TL
Thread Starter
iTrader: (1)
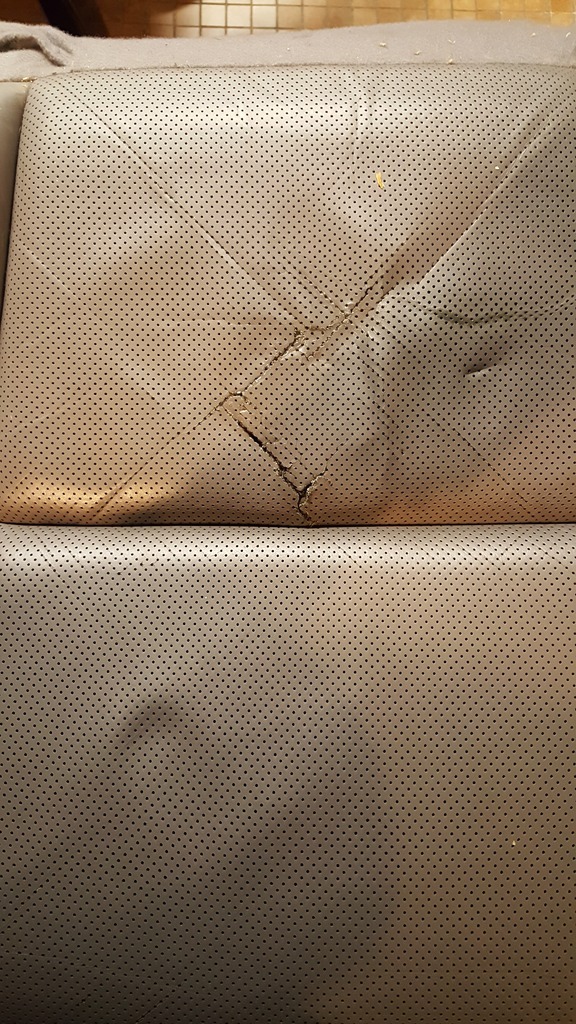
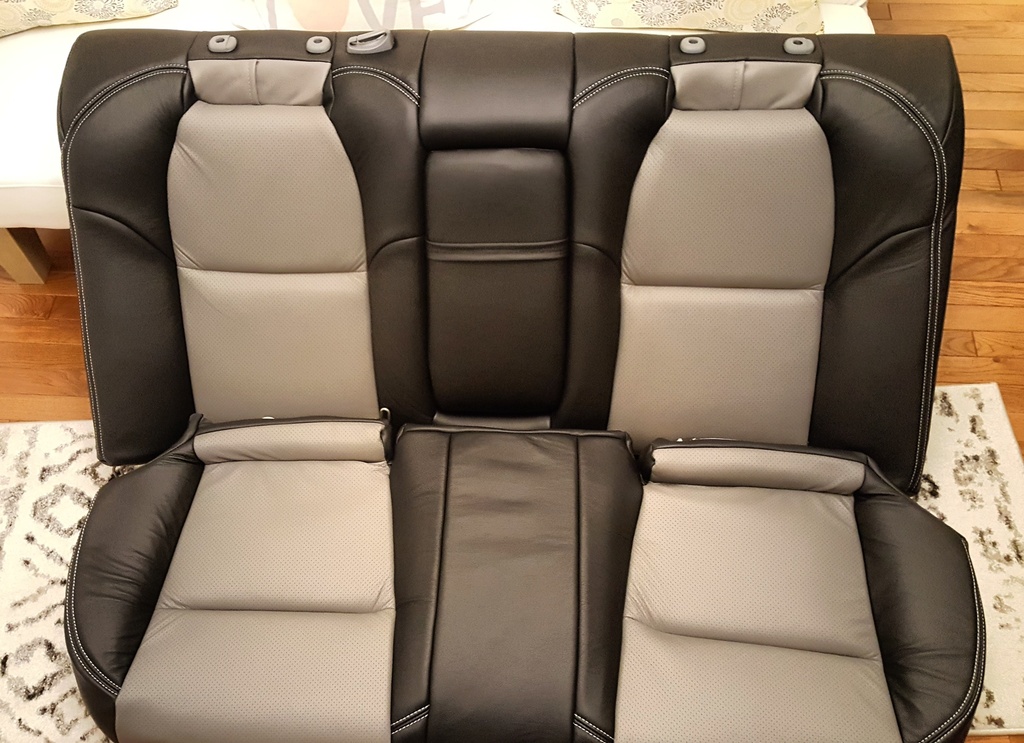
Today my Christmas gift from my beautiful wife arrived. I took the seats out of the box to make sure there wasn't any damages. The box had a large 4 inch rip on the top, so I was a bit worried about the leather being damaged.
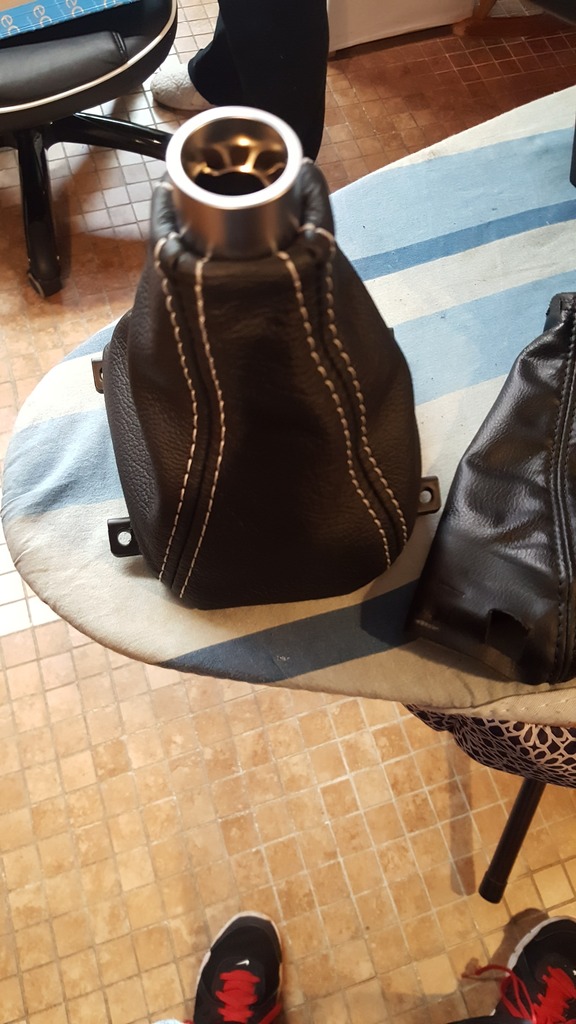
These leather seats were ordered from Leatherseats.com. They are made to fit exactly like the OEM leather covers. I wanted the 100% full leather kit with perforated body, two tone colors (Match the moonlake gray and black) with double contrast dove gray stitching. Included in the kit, 4x head rest covers, 1x center arm rest cover, 1x manual trans shift boot and 4x door panel arm rests. I thought they gave me the e-brake cover as well. I'll call them on that later. I still need to order new front seat heater elements, no point to not replace them while there. Overall, the finish and quality on this kit, is top notch. Anyone thinking about getting skin replacements, check out leatherseats.com!
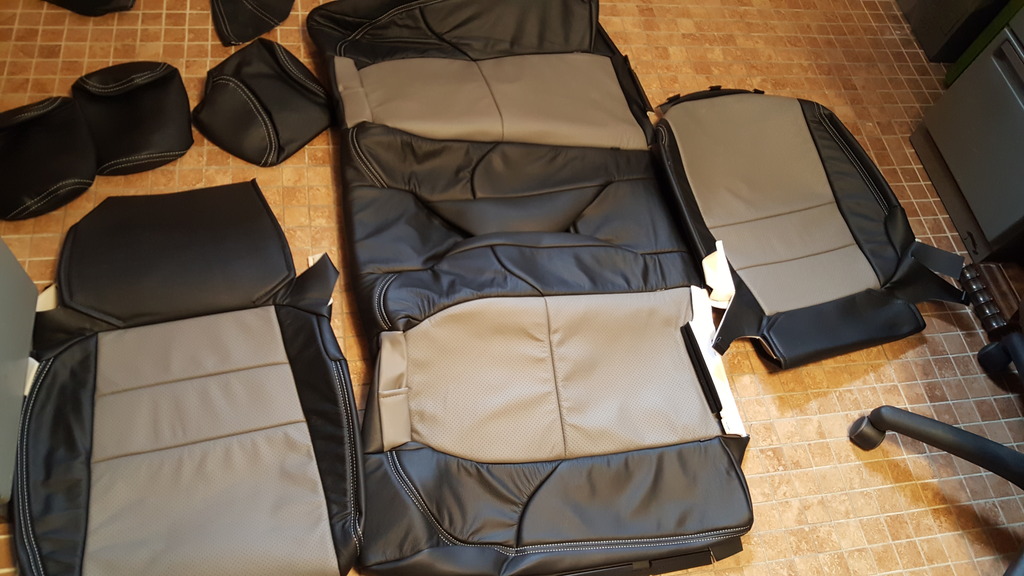
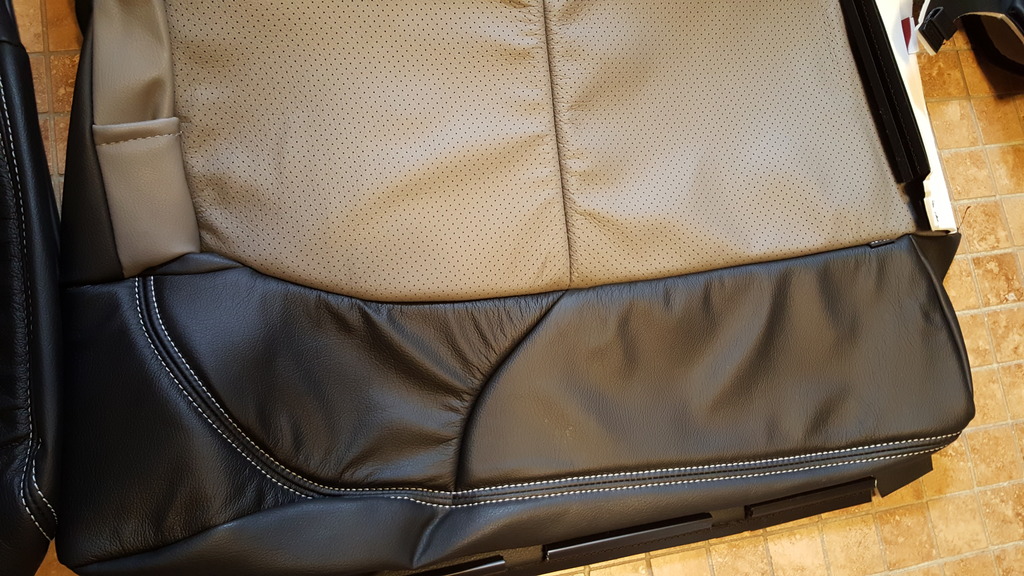
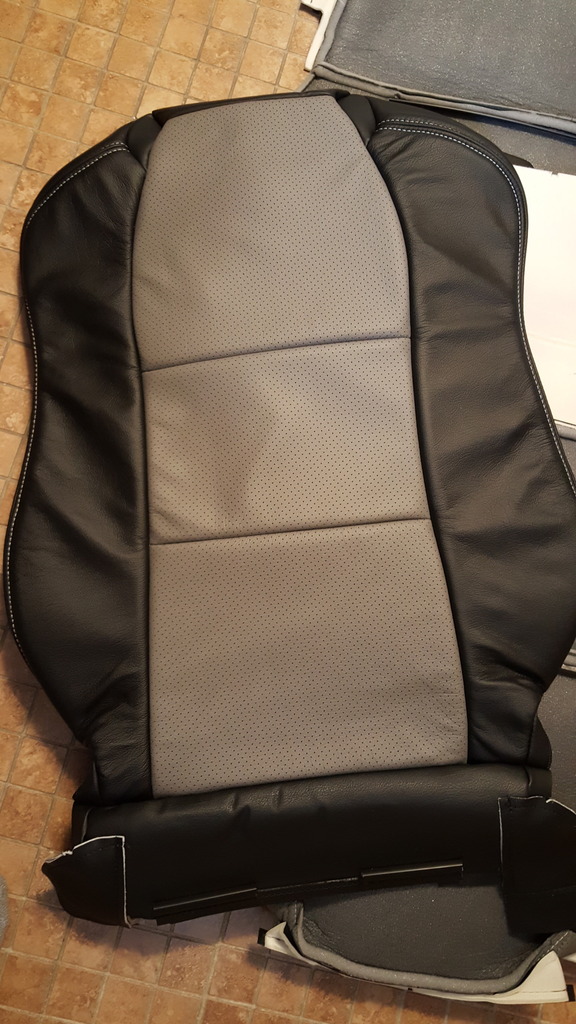
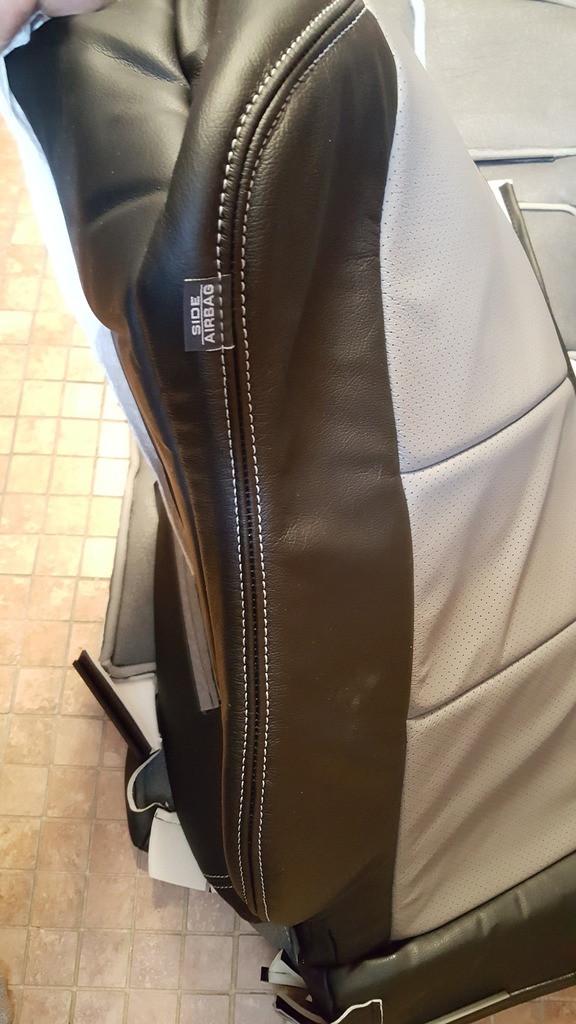
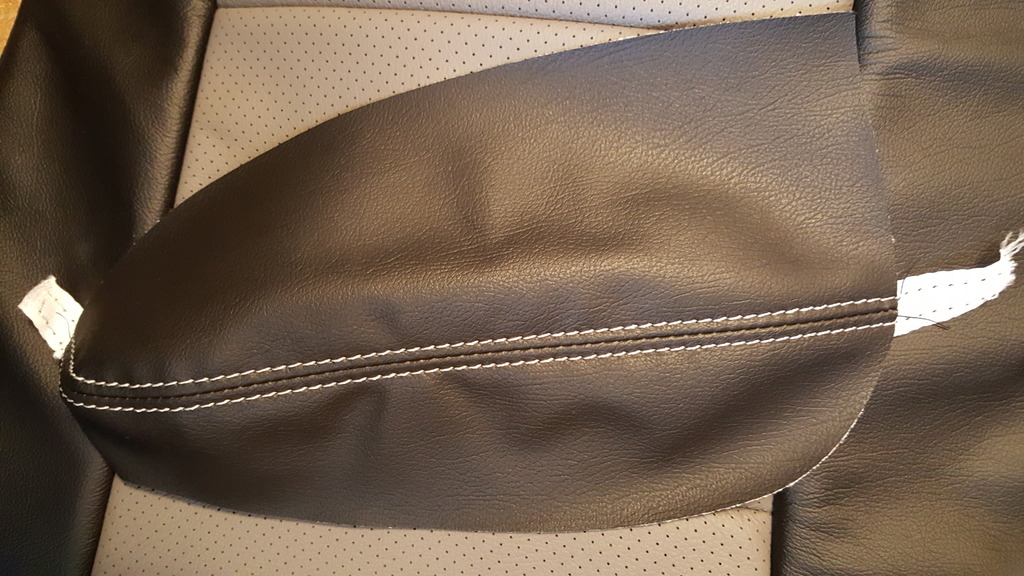
These leather seats were ordered from Leatherseats.com. They are made to fit exactly like the OEM leather covers. I wanted the 100% full leather kit with perforated body, two tone colors (Match the moonlake gray and black) with double contrast dove gray stitching. Included in the kit, 4x head rest covers, 1x center arm rest cover, 1x manual trans shift boot and 4x door panel arm rests. I thought they gave me the e-brake cover as well. I'll call them on that later. I still need to order new front seat heater elements, no point to not replace them while there. Overall, the finish and quality on this kit, is top notch. Anyone thinking about getting skin replacements, check out leatherseats.com!


 12-13-2016, 12:30 PM
#493
Senior Moderator


The following users liked this post:
04WDPSeDaN (12-13-2016)
12-13-2016, 05:02 PM
#495
iWhine S/C 6MT TL
Thread Starter
iTrader: (1)
12-13-2016, 06:36 PM
#497
iWhine S/C 6MT TL
Thread Starter
iTrader: (1)
Hahaha, yes indeed! That shit made me flat line. Thank you, I love my wife to death. We have the same taste and likes. We do everything together. I got lucky to have her in my life.
Nothing wrong with the Endlessrpm covers. I think it's a great alternative to cover up the damaged seats. The only thing I don't like about the kit, is it makes the rest of the interior look incomplete. It's diamond plated on the covers, but the door panels should also have a diamond plated kit at least to match. No idea how well the fit and finish is, but in pictures it looks great. Keep me posted!
Last edited by 04WDPSeDaN; 12-13-2016 at 06:38 PM.
12-13-2016, 11:25 PM
#498
Well I just navigated thru the website and priced what I would like and it only ran me 799.00!! I love the color that's in their now so i basically matched it in single stage as best I could and I was impressed with that price. I mean I'd only have to Save up another 400 clams to get these. Might be an option for me yet....I'll wait to hear the critique on these from you
12-14-2016, 06:32 AM
#499
iWhine S/C 6MT TL
Thread Starter
iTrader: (1)
Well I just navigated thru the website and priced what I would like and it only ran me 799.00!! I love the color that's in their now so i basically matched it in single stage as best I could and I was impressed with that price. I mean I'd only have to Save up another 400 clams to get these. Might be an option for me yet....I'll wait to hear the critique on these from you
The endlessrpm kit is great for what it is, I personally think it's a bit out of place in our interior, without trying to complete the look else where. He does offer additional material (Yard) for an extra cost. The covers seem to take a while to get, which is probably why he has the $110.00 expedite option, but it's still 4 weeks to get. Normal wait time is 11 weeks. The custom kit is a bit more expensive. Still for the cost, it's better than looking at torn seats. Leatherseats.com is made as you order. Took about 2 weeks to make, ship and arrive. They send you a sample kit with colors to exactly match what you have. Moonlake gray is Stone Gray on their website. Tim sent me a sample kit to make sure I match the color 100% . Here are two videos on the TL
12-14-2016, 06:51 PM
#501
Team Owner
iTrader: (2)
Join Date: Jan 2008
Location: Kansas City, MO (Overland Park, KS)
Posts: 36,545
Received 6,470 Likes
on
5,162 Posts
Wow, those covers look awesome.

The following users liked this post:
04WDPSeDaN (12-18-2016)
12-18-2016, 10:08 AM
#503
iWhine S/C 6MT TL
Thread Starter
iTrader: (1)
^^^Thank you buddy! You always show me love! I appreciate all the kind words. Thank you!
I'll start this project soon enough. I'll probably start with the back seats and move forward. Not sure yet if I plan on doing the door arm rests. I would need to get glue and staples to do this task.
I'll start this project soon enough. I'll probably start with the back seats and move forward. Not sure yet if I plan on doing the door arm rests. I would need to get glue and staples to do this task.
Last edited by Steven Bell; 12-20-2016 at 06:57 PM. Reason: No need to re-quote the previous post, especially if you're the next person posting.
12-20-2016, 06:58 PM
#504
Team Owner
iTrader: (2)
Join Date: Jan 2008
Location: Kansas City, MO (Overland Park, KS)
Posts: 36,545
Received 6,470 Likes
on
5,162 Posts
Best of luck on the install.
The following users liked this post:
04WDPSeDaN (12-31-2016)
The following users liked this post:
04WDPSeDaN (12-31-2016)
12-21-2016, 07:30 PM
#506
Moderator
iTrader: (3)
Damn, you have me on that site now  At least I only have to price out 2 covers
Good luck with install!
At least I only have to price out 2 covers Good luck with install!
The following users liked this post:
04WDPSeDaN (12-31-2016)
12-31-2016, 11:47 AM
#507
iWhine S/C 6MT TL
Thread Starter
iTrader: (1)
So...
I did the install and thankfully had some help from my wife. Honestly, it's a bad job to do, just very time consuming. I'm going to be as detailed as possible with my post on my thoughts about this kit and the install itself.
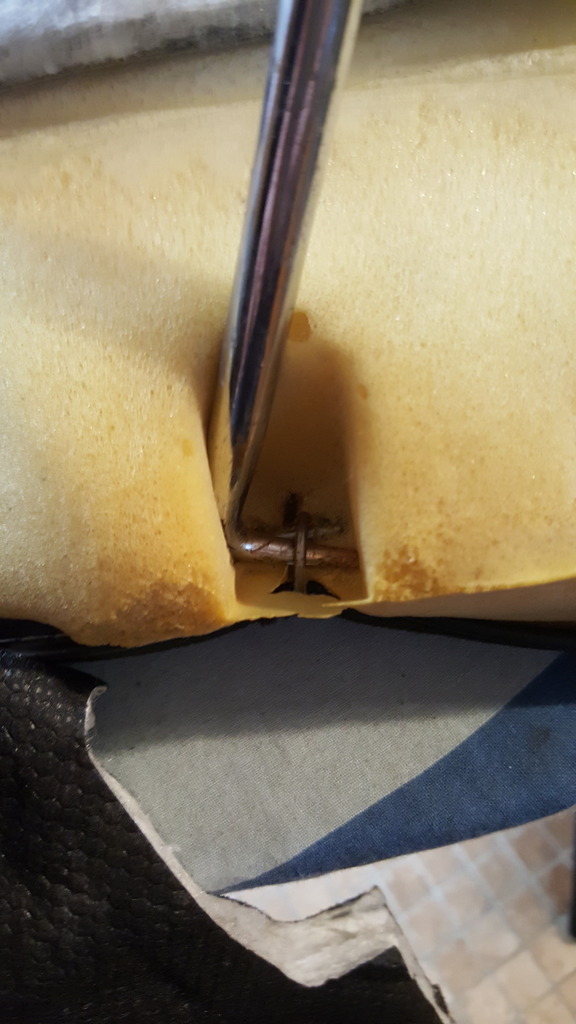
We all know the OEM kit is not 100% real leather. It's mostly vinyl and the lowest grade leather. As you know, leatherseats.com has many options, but the one I want to discuss is the actual percentage of vinyl to leather. This kit is 100% all leather. It's thicker and there's more padding on the kit vs the OEM kit. This has it's benefits as far as comfort and durability. However, it's not EASY install. I did my VERY best to get the leather as tight as possible to the cushions without any wrinkles. The OEM kit already comes with all the holes to install things like the rear cup holder assembly, the holes for the head rest plastic trims and other misc things. Not the best feeling in the world knowing that you must cut into the leather and making sure the cuts are correct, other wise, it would be a big mistake. The OEM kit is installed by using galvanized hog rings. I personally don't like using hog rings for the install, but have used hog rings when I worked at Acura and did warranty work on the seats. I like to use heavy duty zip ties. It gives you a bit more wiggle room and it's easier to work with vs trying to get a hog ring tool to crimp the hog rings in very tight spots.
Removing the old hog rings weren't terrible, however when removing nearly 400 hog rings, your hands take a huge beating. The new kit doesn't come with the metal bars as the OEM kit comes with. These metal bars attach the leather to the cushion with the use of the hog rings. The new covers have a built in plastic bar, which is very strong and durable for the installation. Installing the kit is pretty straight forward. We had a few issues that we resolved a long the way. For example, my TL is a 2004, the front seat bottoms only have one strip vs the 05-08 has double strips for those infamous "Butt print" marks. This kit is not exactly for the 04, so you can't do anything about the 2nd row strip on the bottom cushions. We made it work by pulling the leather tight and strapping it under the seat frame. Used a little 3M spray adhesive for a few spots to assure it was firm to the cushion. The passenger seat, was by far the worse to do. It has the weight sensor on the top half, which is really sensitive to work with. Took me about 3-4 hours to finish the top half of the passenger seat. The straps that go around the side airbags and hook to the frame, was a bit of a pain in the ass to work with. Getting the leather nice and tight on the top half's of the front seats was also a huge pain in the ass. With the help from my wife, we were able to work the leather on. Zip ties came in pretty well when doing the back sides of the top half of the seats. Hog rings would have not pulled the leather tight enough to get out the wrinkles. Besides, you wouldn't have the distance to pull the leather to the bars and crimp them together.
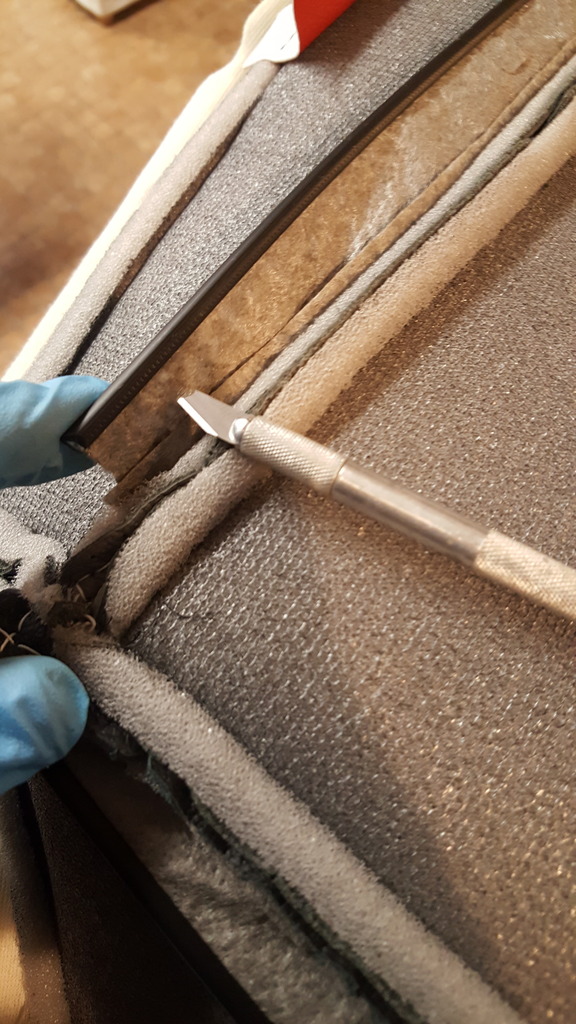
The shiftier boot was another big pain in the ass process. Remove the center console isn't terrible maybe 15-20 mins max. The boot is stapled and wrapped around a plastic trim which is held in with (4x) screws. Removing the old leather boot is simple, pull the staples and cut the zip tie holding the plastic clip trim for the shiftier knob. Installing the new boot isn't bad, but you must follow how the new boot gets installed. Leatherseats.com marked which side would be (FRONT), so installation wasn't bad. Same process is the same except we used hot glue to put the leather boot back to the trim piece and had to use a heavy duty zip tie instead of the smaller one the factory used. The biggest problem we ran into, the new boot is MUCH thicker, so we had to trim a few spots to allow the CF center trim piece to go back into place. We also hot glued a few spots under the CF trim piece to hold it down. Indeed a struggle... The head rests... boy.. when you need tequila shots, this is the part that would have you burn down the car. They are foam injected from factory. You need to cut off the leather and prep the foam for install. I TRIED to use the plastic bag over the cushion while running a vacuum to make the cushion shrink enough to slide the new covers on, but you need a stand to make this work. Even with two people, it was hard. Ended up giving them to an upholstery shop to do them. Took the shop 10 mins to do them and yes, they used the same method to install the new covers.
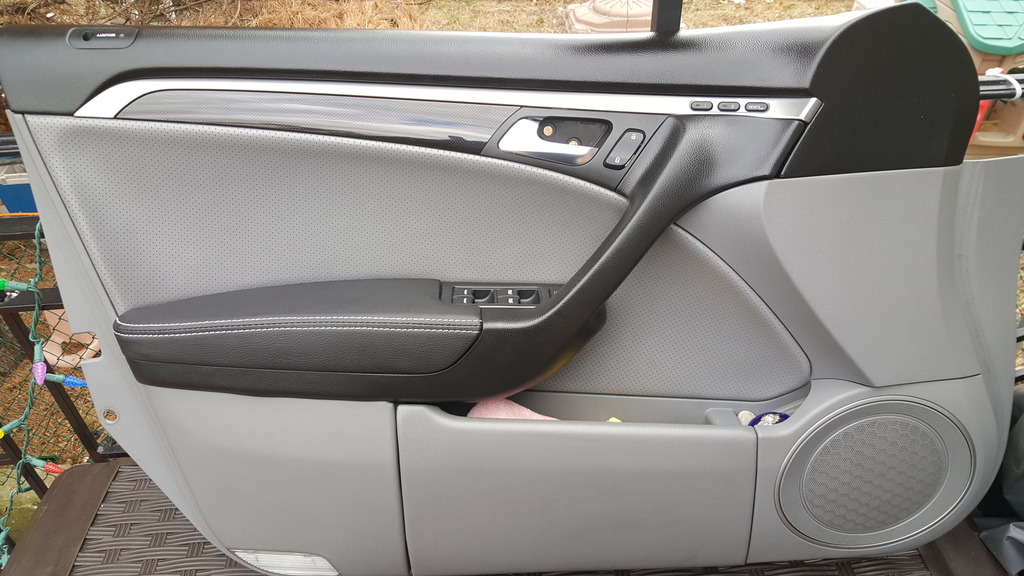
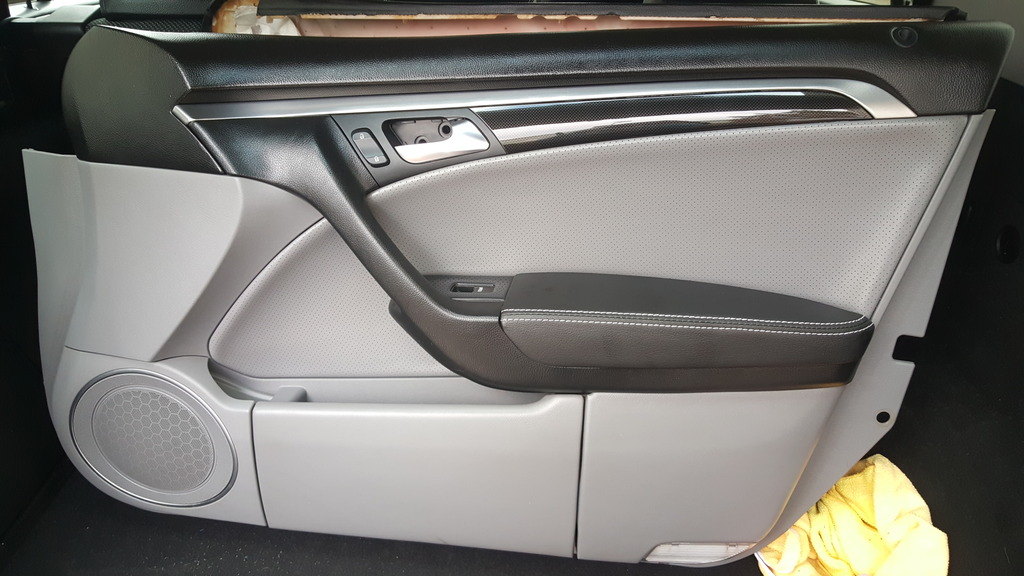
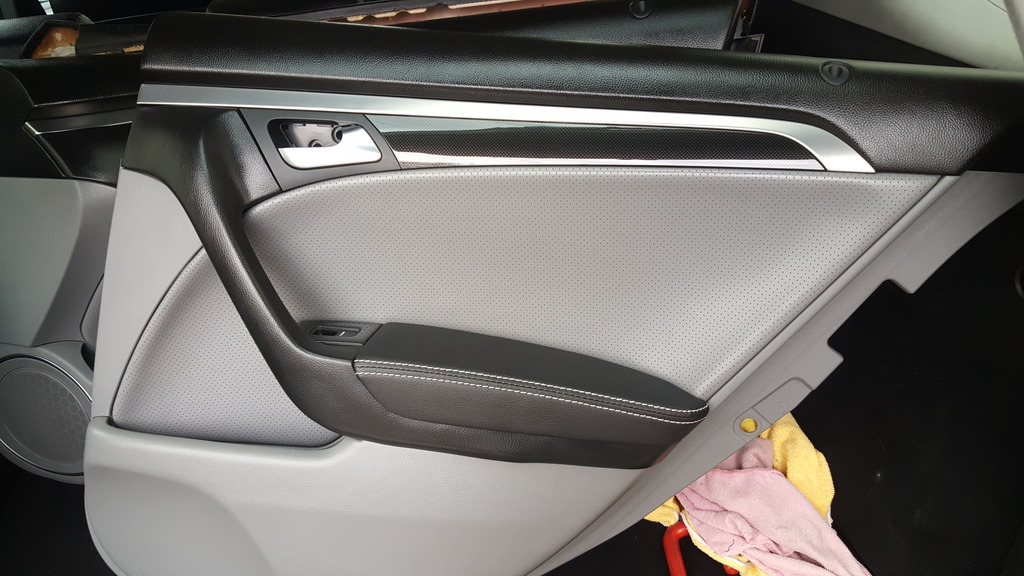
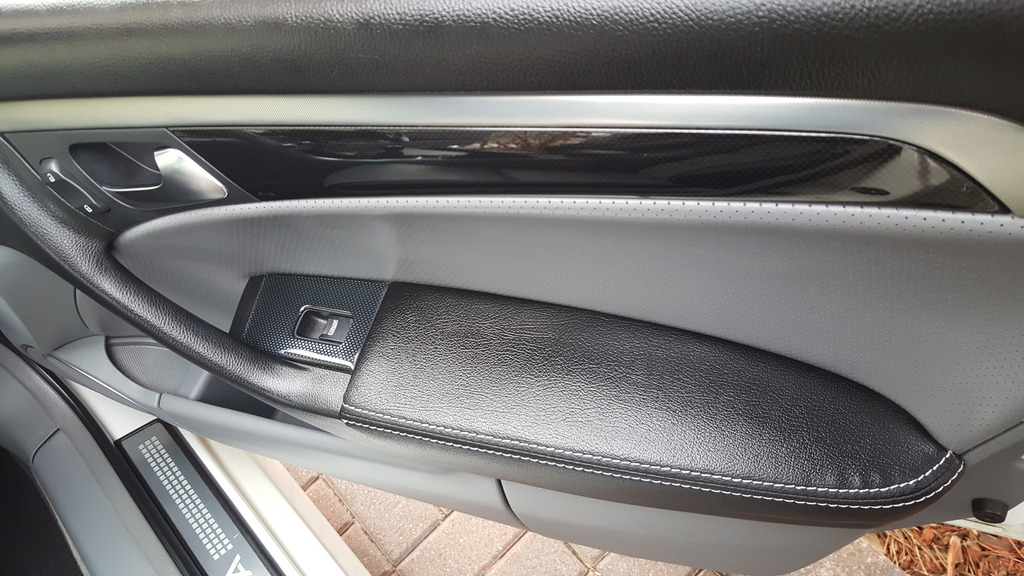
The door panel arm rests are easy as well. Just time consuming to remove each panel and take them out of the door panels to do the job. The leather on the door arm rests, are held in with a few staples. I used 3M adhesive spray and hot glue to the new leather on. Center arm rest, I used new foam and same deal, hot glue with the 3M spray adhesive. The only thing I regret not getting, is the E-Brake leather to match. I can always get that later on.
So, I have take a lot of photos to give everyone an idea of what was involved. If anyone has any questions, please let me know.
Gutting out the car, removing things like the door arm rests, center arm rest, head rests ect.
Started with the bottom cushion

Removal of 60 hog rings, just on the bottom cushion alone.
Started to put them in a jar, thinking to reuse them in a few spots.

The leather off after a hour of pulling hog rings.
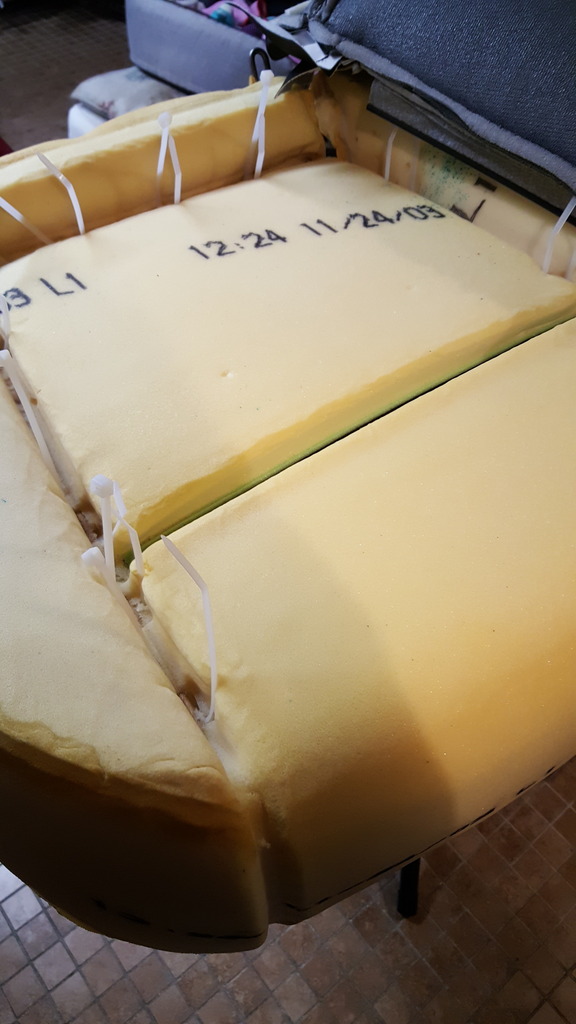
Starting the prep work on the cushion. Look at the production date on the cushion. Pretty awesome to see when it was made.
My zip tie game is on point.
I the exact placement of the holes when I placed the leather on top of the cushion. This was just to show how the plastic bar looks like and where you need to make the holes to pass the hog rings through or in my case the zip ties. This is what holds the leather down to the cushion bars.
After 3 hours of tugging, pulling and all sorts of crap, the bottom cushion is finished!
Started on the top half of the back seat.
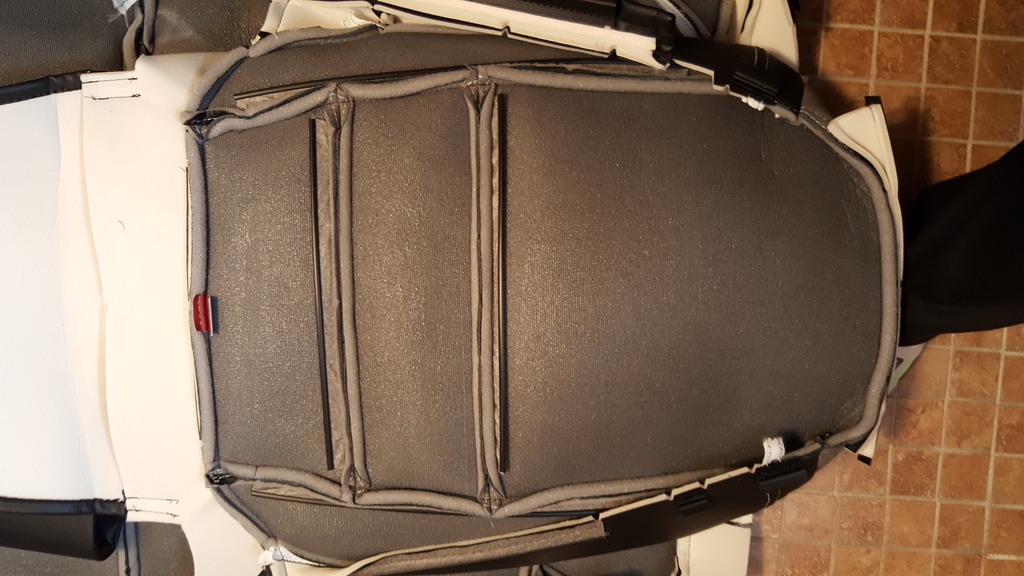
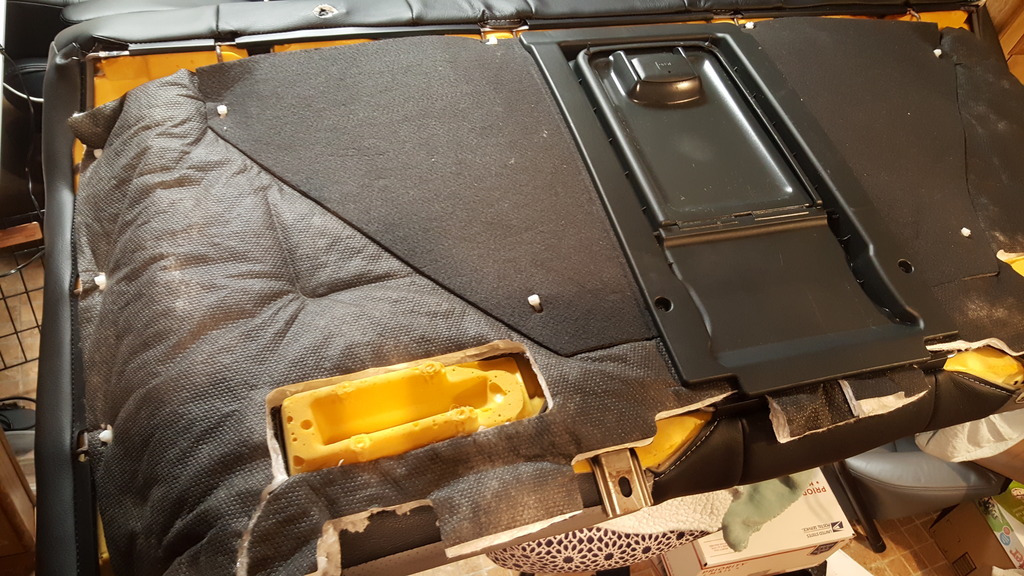
The back top half, was easier to do than the bottom cushion, mainly due to the fact they used a lot less hog rings. The biggest pain in the ass was the removal of the center arm rest. Here i'm removing the head rest inserts.
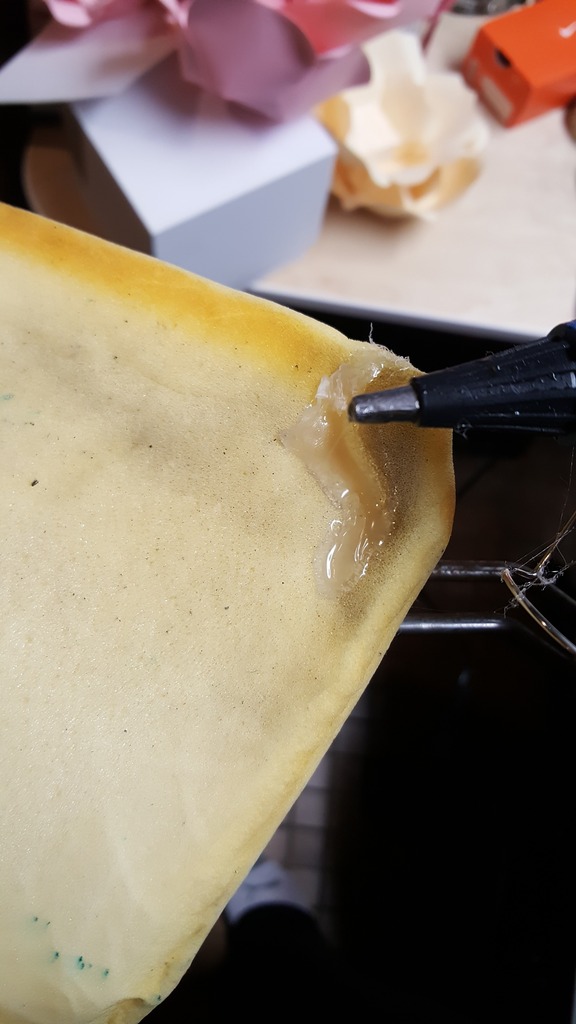
Once the leather was off, I noticed a lot of holes and spots missing foam. I used some hot glue to fill in the spots.
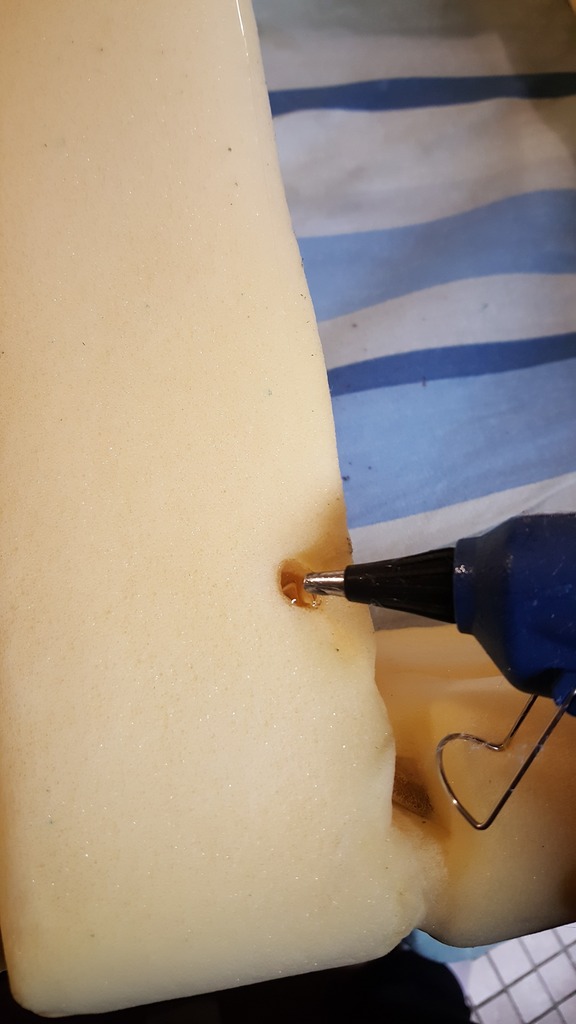
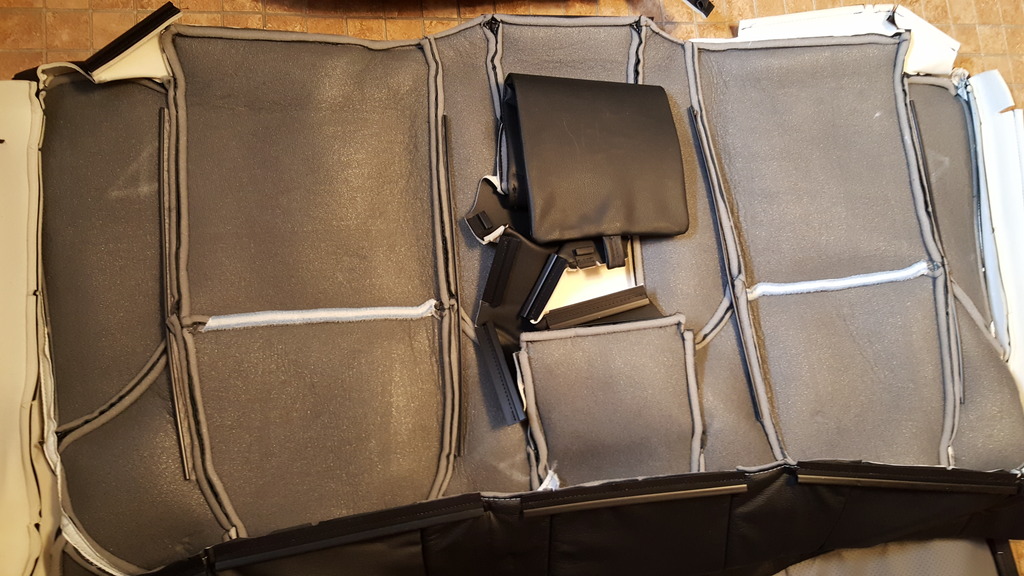
After the wife and I fought to install the leather over the rear arm rest, I noticed there was no opening for the cup holder. I'm pretty sure at this point with my entire hands in pain, I wasn't too happy they didn't bother to make the opening.
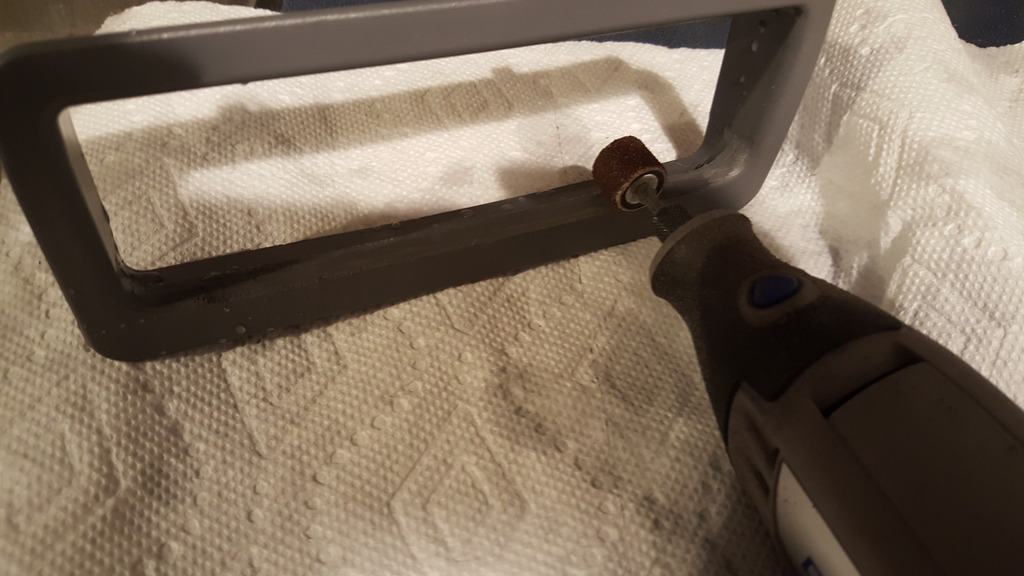
After making the opening and using some hot glue to secure the leather neatly inside the opening, I went to reinstall everything and realized, because the new leather is thicker, the trim cover for the cup holder was being pushed. It wasn't allowing the cup holder to open. I had to pull out the Dremel kit and shave enough of the trim piece to allow the cup holder to open.

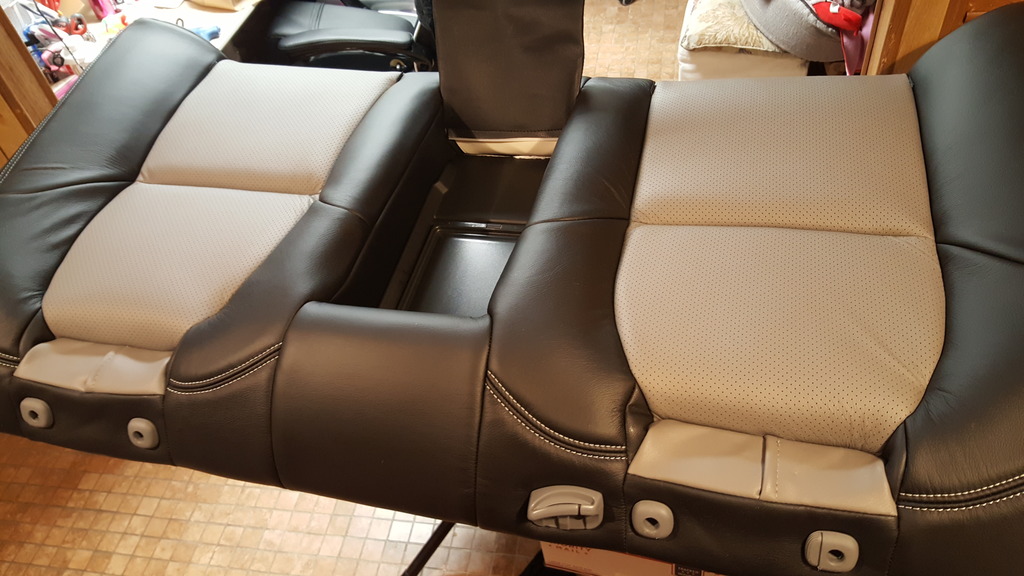
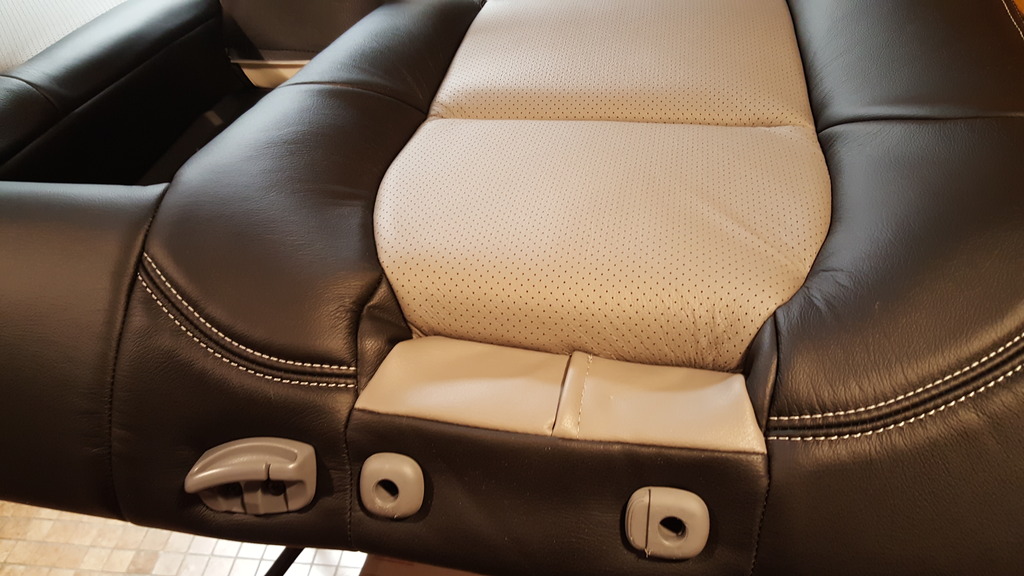
Finishing the entire top half of the back seat. Making all the holes to re-install the center arm rest, head rest inserts and the seat belt holder. Not the easiest thing to try and feel for when the leather is thick. Luckily, we make the holes in the right places.
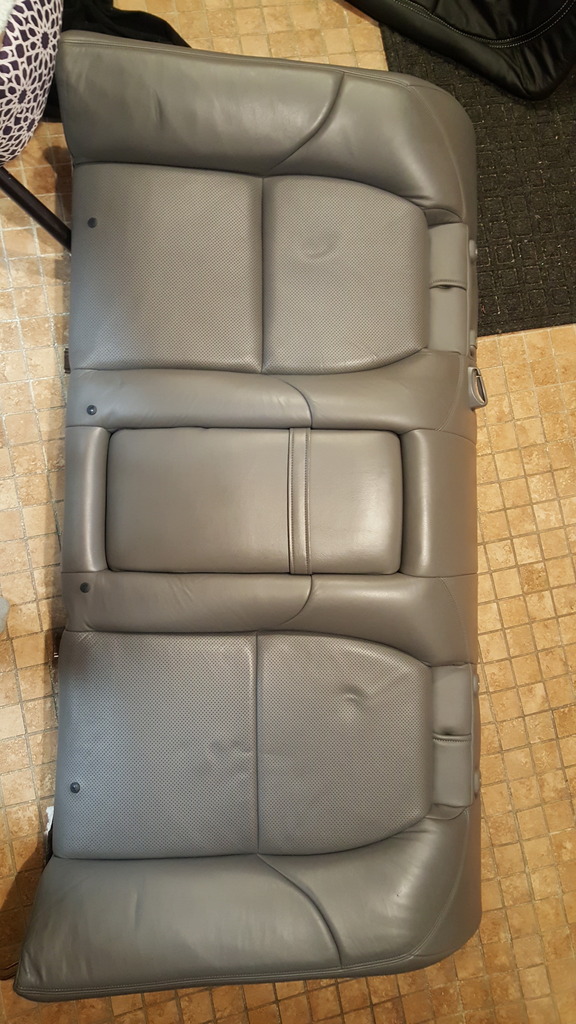
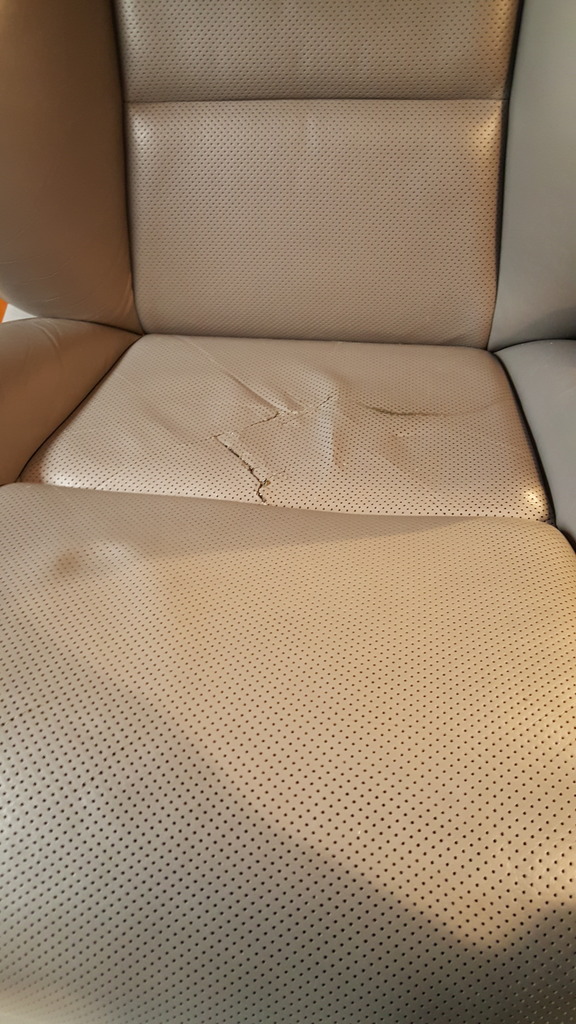
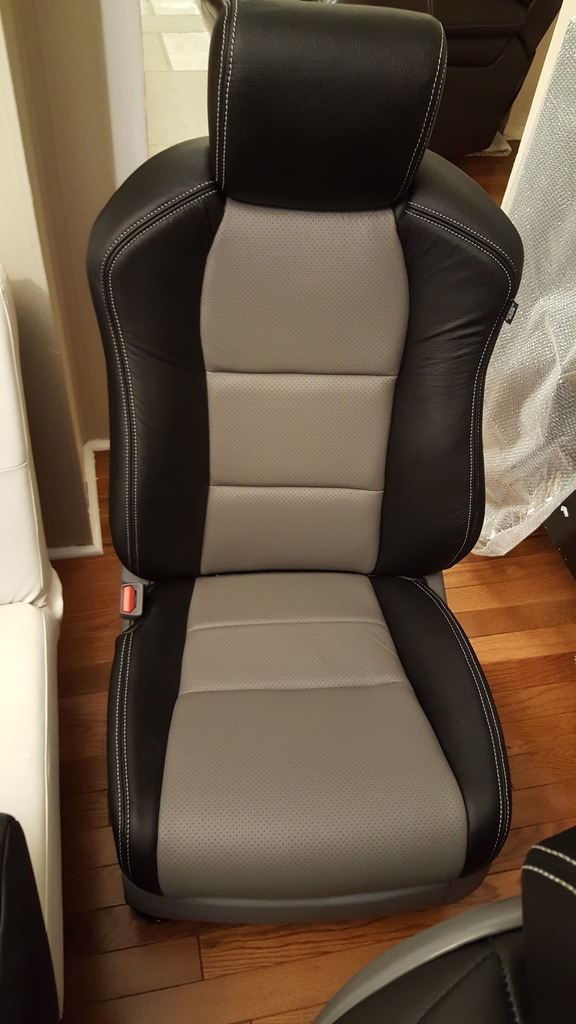
Day 1 down, back seats down. Now off to the front seats. The reason why my wife got me the kit.. Passenger seat bottom was torn.
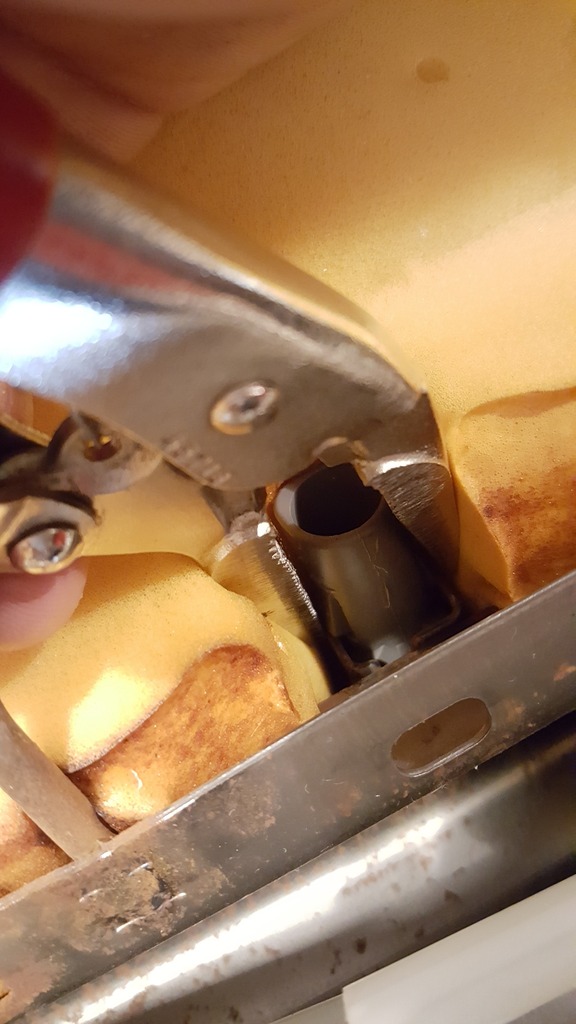
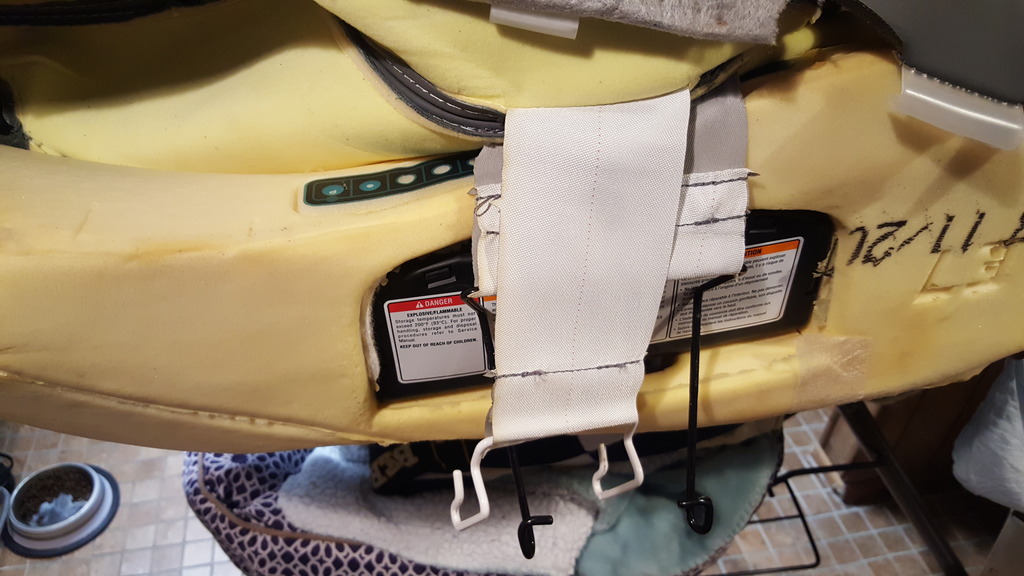
I decided to start with the harder of the two front seats. The passenger seat has the weight sensor on the top half. It is super sensative to deal with. I took this picture as I pulled the straps off the side airbag. You can see part of the weight sensor. The entire back has sensors and wire's.
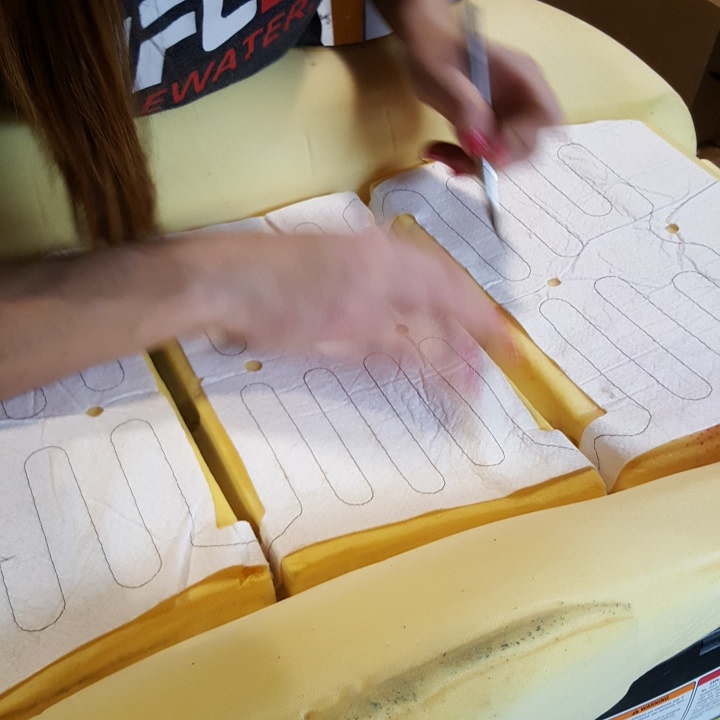
Fast forwarding, I wanted to get the front seats done. At this point my wife jumped in to help me. My hands were shot and bruised from doing the seats. I didn't take pictures of actual install process on the front seats. I did snap a picture of my wife going in with the X-Atco knife, doing the prep work for the installation of the new leather. Also key note here, instead of fighting the weight of the seat, I separated the top half from the bottom half by removing the (2x) 14MM bolts on each side of the seat. Made the job a lot easier.
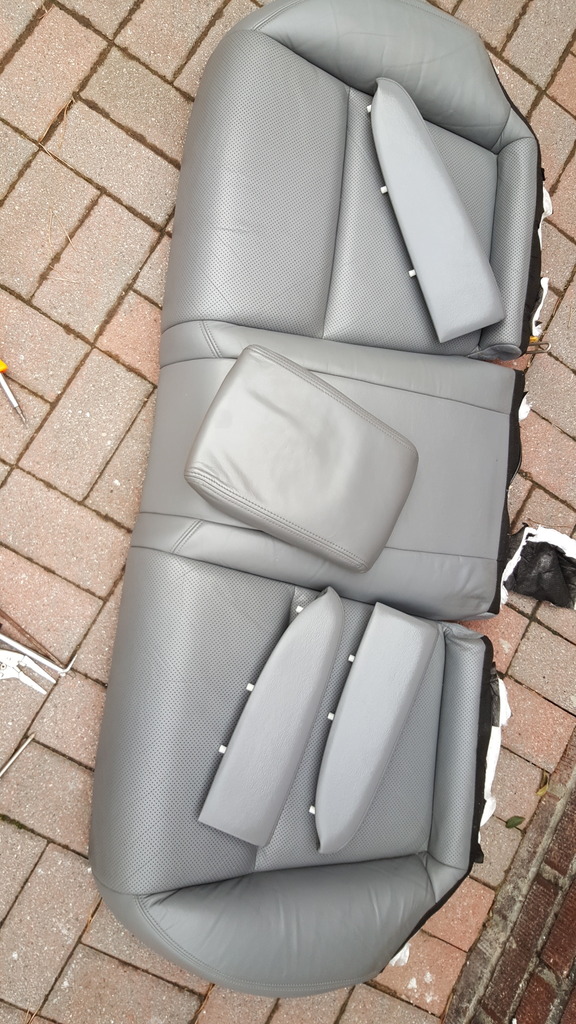
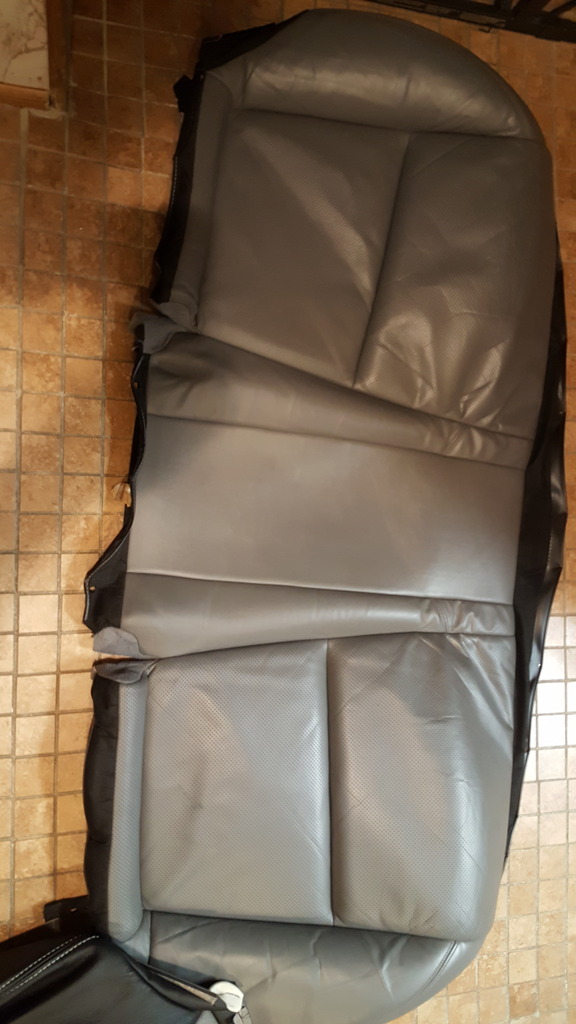
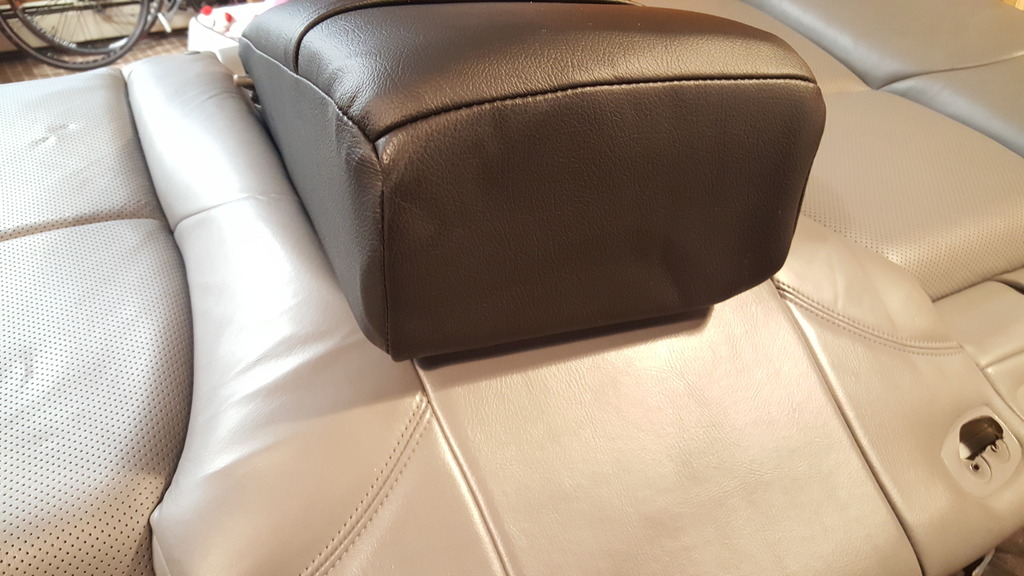
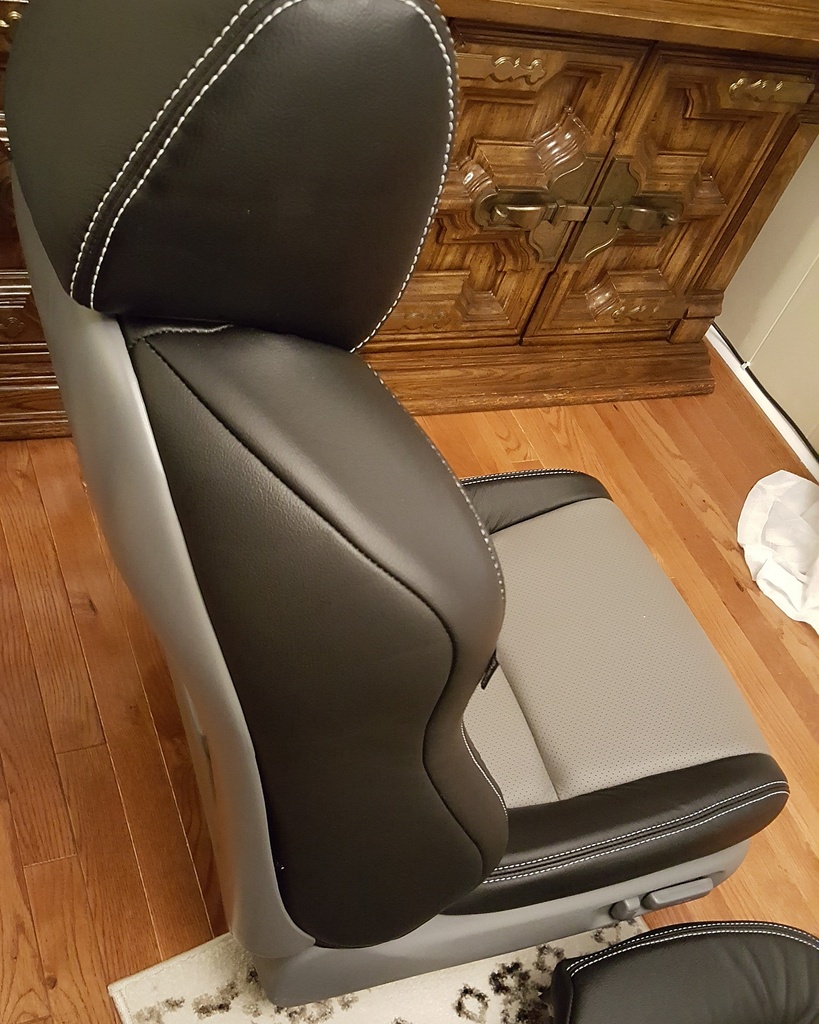
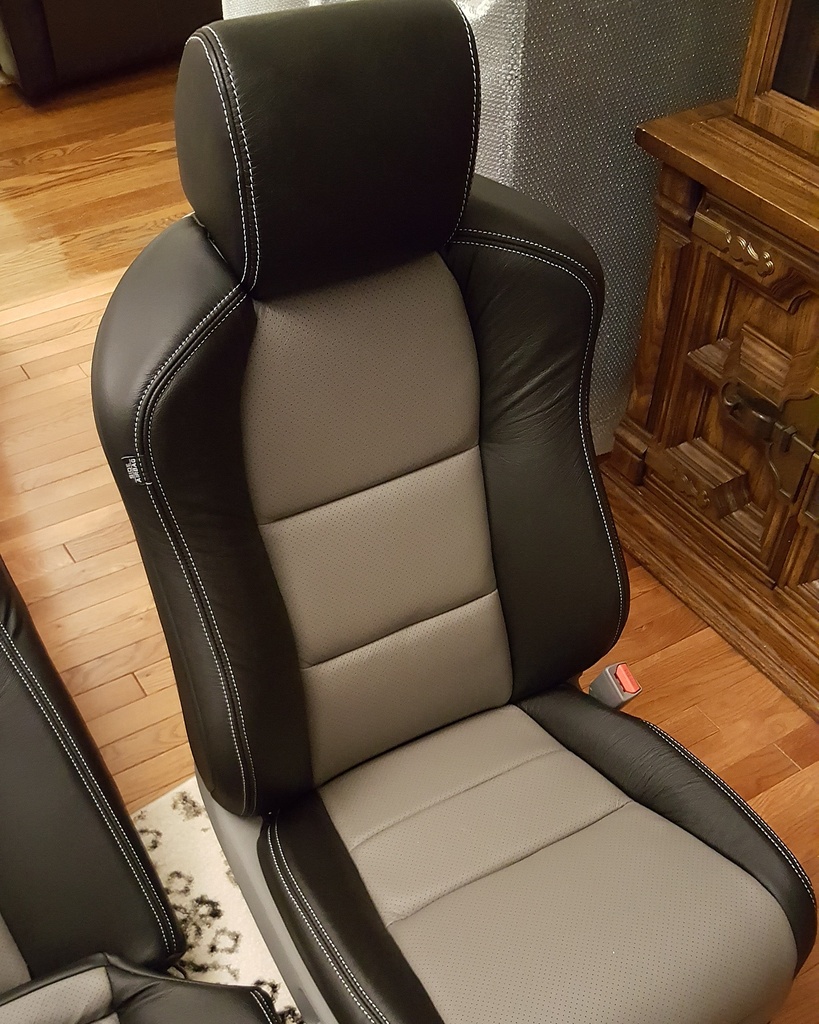
Finally the seats are done, head rests installed and waiting for the final install, back into the vehicle. Snapped a few pictures before heading off to bed.

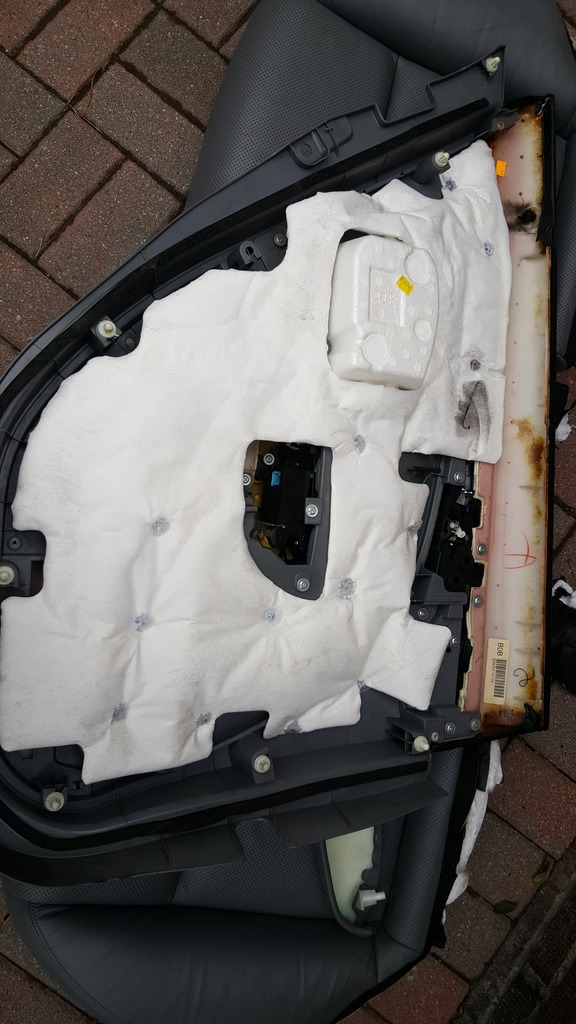
Install day! Finally happy to put my interior back together. Started with the door panels 1st. I assembled the arm rests back on.
Next, I installed the center arm rest and started taking the center console apart, to remove the shiftier. Once finished, I reinstalled everything back before putting the back of the vehicle together.
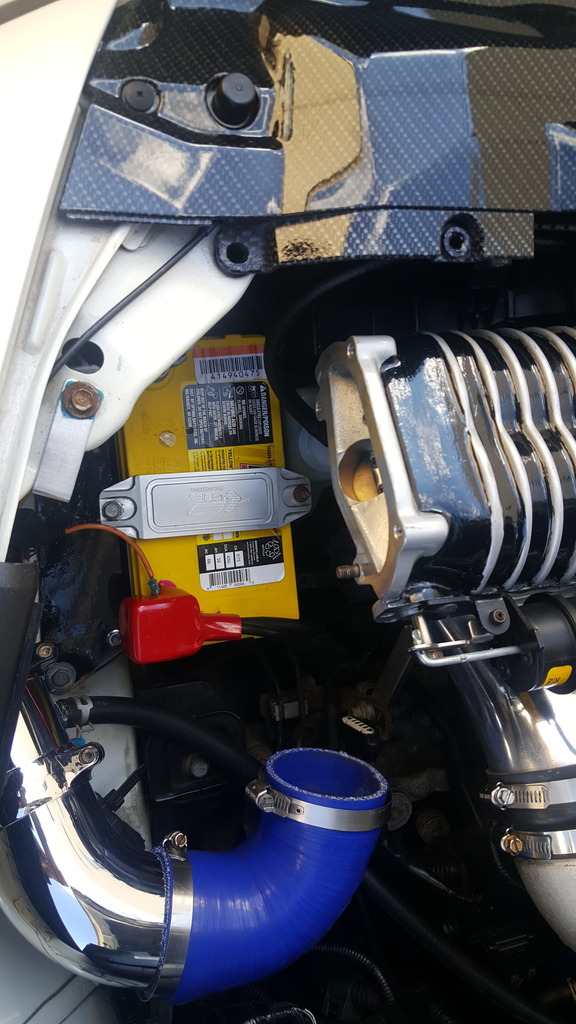
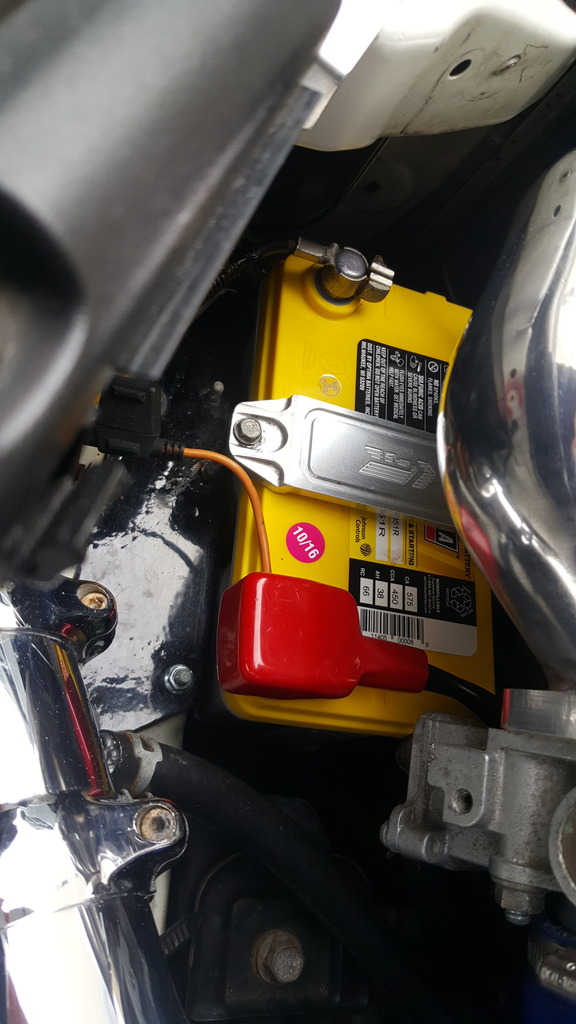
I took the vacuum out and started to clean up the interior, before installing the seats. I cleaned up all the plastic kick panels and the sides of the center console. I went to turn on my interior lights and was surprised they didn't work.. Well, great.. after testing the battery, I had a bad cell. I removed the battery, off to the store to get the replacement. Luckily for me, the Optima yellow top carries 3 year warranty. No cost to me. For those wondering how do you remove the battery from a supercharged TL, well simple;
OUT
IN
At this time, I had asked my wife to help me because it was getting super cold out and flurries were coming down. We hustled out the interior together and as we finished, it started to snow. I snapped a few photos of when It was done.

We rushed to put everything away, got back inside to TL to test everything and make sure there are no issues. The best feeling in the world, car starts, no warning lights no system errors.
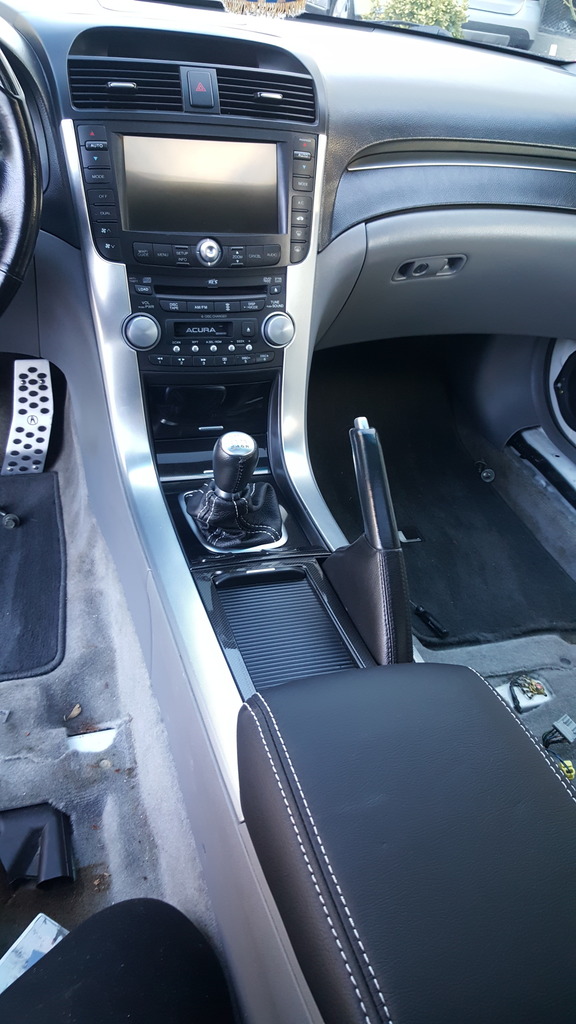
Everything worked! Covered the car and figured it would be better to take better shots the next morning. So today, I took a few more shots of the interior.
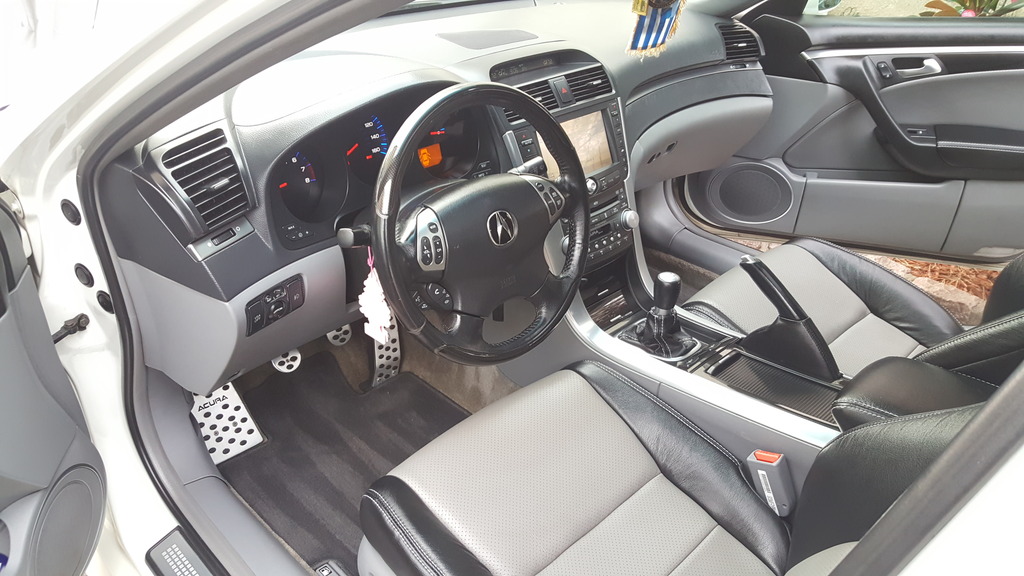

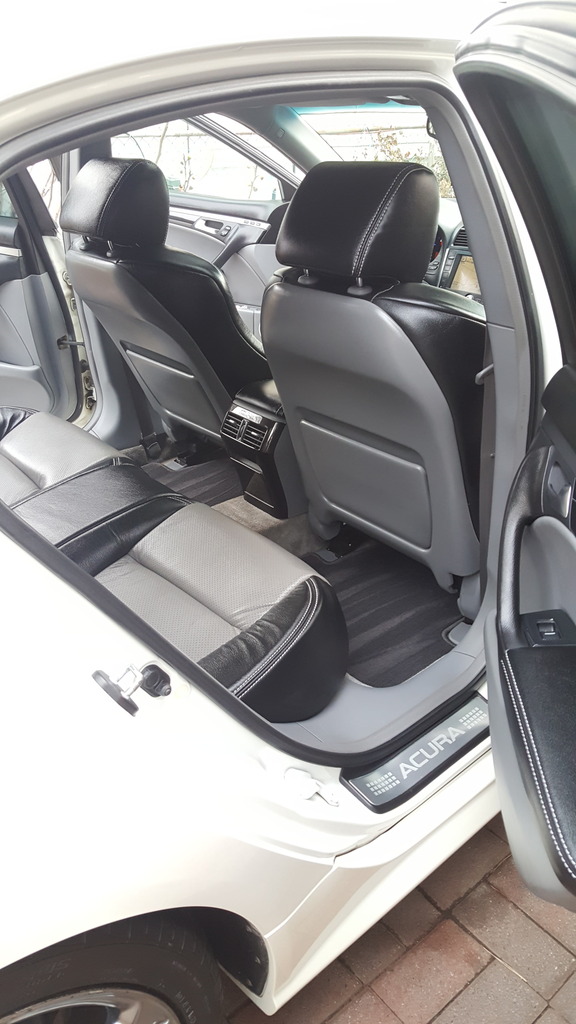

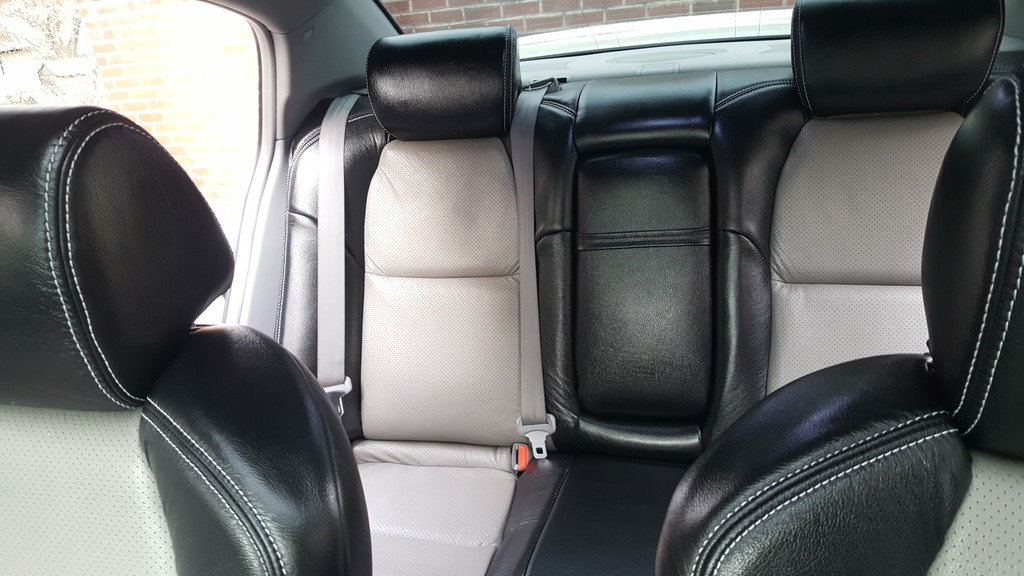

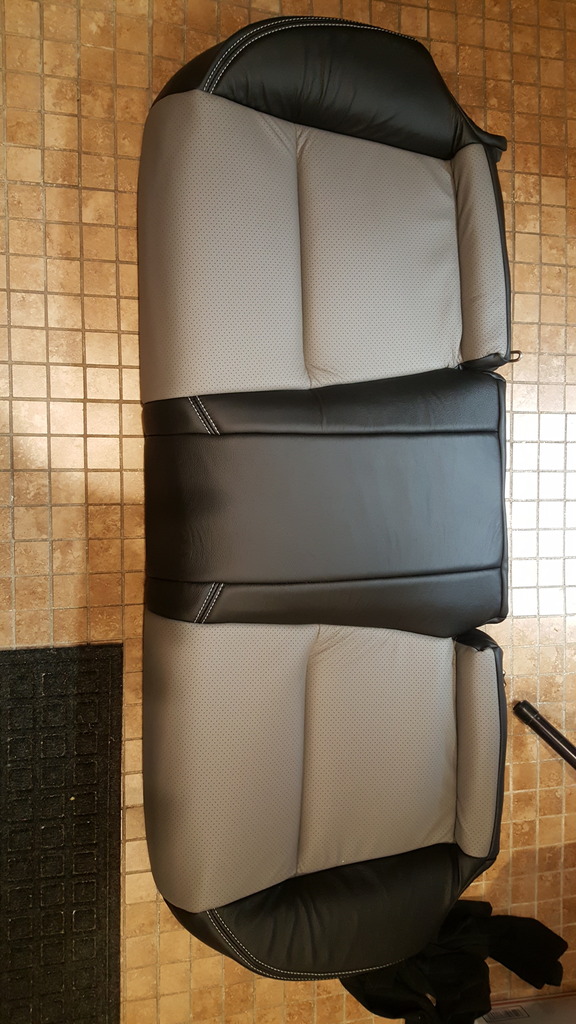
Overall, they came out great. Leatherseats were able to match my interior pretty damn well. The seats feel much better and firm now. The quality is great and happy how it transformed my 2004 interior. Thank you for viewing, and happy New year!
I did the install and thankfully had some help from my wife. Honestly, it's a bad job to do, just very time consuming. I'm going to be as detailed as possible with my post on my thoughts about this kit and the install itself.
We all know the OEM kit is not 100% real leather. It's mostly vinyl and the lowest grade leather. As you know, leatherseats.com has many options, but the one I want to discuss is the actual percentage of vinyl to leather. This kit is 100% all leather. It's thicker and there's more padding on the kit vs the OEM kit. This has it's benefits as far as comfort and durability. However, it's not EASY install. I did my VERY best to get the leather as tight as possible to the cushions without any wrinkles. The OEM kit already comes with all the holes to install things like the rear cup holder assembly, the holes for the head rest plastic trims and other misc things. Not the best feeling in the world knowing that you must cut into the leather and making sure the cuts are correct, other wise, it would be a big mistake. The OEM kit is installed by using galvanized hog rings. I personally don't like using hog rings for the install, but have used hog rings when I worked at Acura and did warranty work on the seats. I like to use heavy duty zip ties. It gives you a bit more wiggle room and it's easier to work with vs trying to get a hog ring tool to crimp the hog rings in very tight spots.
Removing the old hog rings weren't terrible, however when removing nearly 400 hog rings, your hands take a huge beating. The new kit doesn't come with the metal bars as the OEM kit comes with. These metal bars attach the leather to the cushion with the use of the hog rings. The new covers have a built in plastic bar, which is very strong and durable for the installation. Installing the kit is pretty straight forward. We had a few issues that we resolved a long the way. For example, my TL is a 2004, the front seat bottoms only have one strip vs the 05-08 has double strips for those infamous "Butt print" marks. This kit is not exactly for the 04, so you can't do anything about the 2nd row strip on the bottom cushions. We made it work by pulling the leather tight and strapping it under the seat frame. Used a little 3M spray adhesive for a few spots to assure it was firm to the cushion. The passenger seat, was by far the worse to do. It has the weight sensor on the top half, which is really sensitive to work with. Took me about 3-4 hours to finish the top half of the passenger seat. The straps that go around the side airbags and hook to the frame, was a bit of a pain in the ass to work with. Getting the leather nice and tight on the top half's of the front seats was also a huge pain in the ass. With the help from my wife, we were able to work the leather on. Zip ties came in pretty well when doing the back sides of the top half of the seats. Hog rings would have not pulled the leather tight enough to get out the wrinkles. Besides, you wouldn't have the distance to pull the leather to the bars and crimp them together.
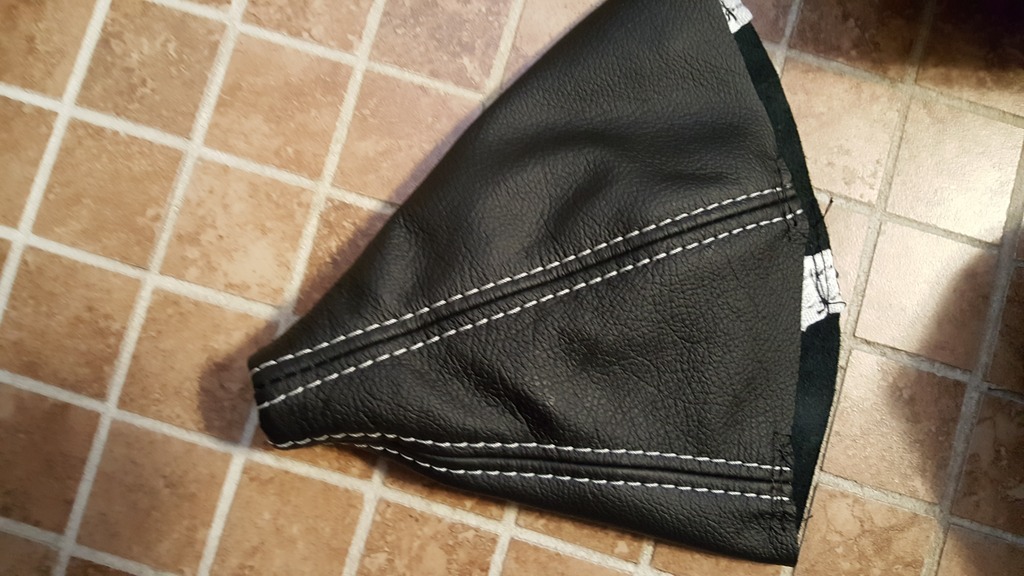
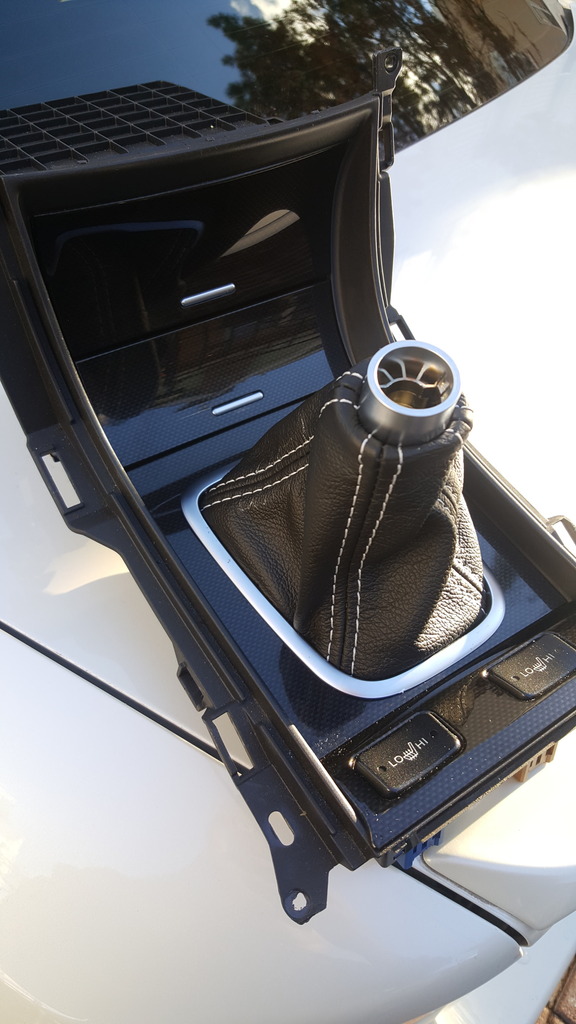
The shiftier boot was another big pain in the ass process. Remove the center console isn't terrible maybe 15-20 mins max. The boot is stapled and wrapped around a plastic trim which is held in with (4x) screws. Removing the old leather boot is simple, pull the staples and cut the zip tie holding the plastic clip trim for the shiftier knob. Installing the new boot isn't bad, but you must follow how the new boot gets installed. Leatherseats.com marked which side would be (FRONT), so installation wasn't bad. Same process is the same except we used hot glue to put the leather boot back to the trim piece and had to use a heavy duty zip tie instead of the smaller one the factory used. The biggest problem we ran into, the new boot is MUCH thicker, so we had to trim a few spots to allow the CF center trim piece to go back into place. We also hot glued a few spots under the CF trim piece to hold it down. Indeed a struggle... The head rests... boy.. when you need tequila shots, this is the part that would have you burn down the car. They are foam injected from factory. You need to cut off the leather and prep the foam for install. I TRIED to use the plastic bag over the cushion while running a vacuum to make the cushion shrink enough to slide the new covers on, but you need a stand to make this work. Even with two people, it was hard. Ended up giving them to an upholstery shop to do them. Took the shop 10 mins to do them and yes, they used the same method to install the new covers.
The door panel arm rests are easy as well. Just time consuming to remove each panel and take them out of the door panels to do the job. The leather on the door arm rests, are held in with a few staples. I used 3M adhesive spray and hot glue to the new leather on. Center arm rest, I used new foam and same deal, hot glue with the 3M spray adhesive. The only thing I regret not getting, is the E-Brake leather to match. I can always get that later on.
So, I have take a lot of photos to give everyone an idea of what was involved. If anyone has any questions, please let me know.
Gutting out the car, removing things like the door arm rests, center arm rest, head rests ect.


Started with the bottom cushion

Removal of 60 hog rings, just on the bottom cushion alone.

Started to put them in a jar, thinking to reuse them in a few spots.

The leather off after a hour of pulling hog rings.

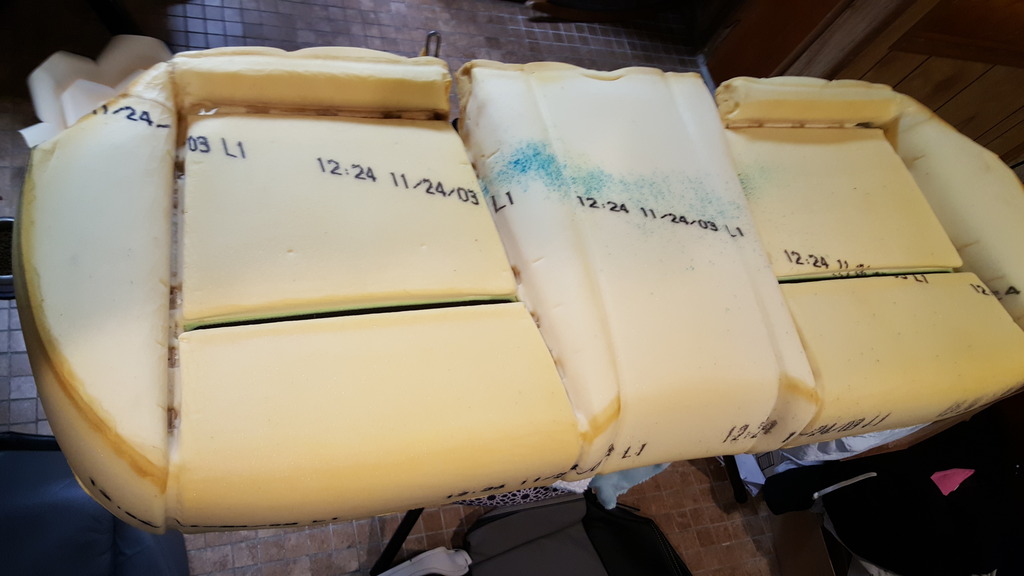
Starting the prep work on the cushion. Look at the production date on the cushion. Pretty awesome to see when it was made.

My zip tie game is on point.

I the exact placement of the holes when I placed the leather on top of the cushion. This was just to show how the plastic bar looks like and where you need to make the holes to pass the hog rings through or in my case the zip ties. This is what holds the leather down to the cushion bars.

After 3 hours of tugging, pulling and all sorts of crap, the bottom cushion is finished!

Started on the top half of the back seat.

The back top half, was easier to do than the bottom cushion, mainly due to the fact they used a lot less hog rings. The biggest pain in the ass was the removal of the center arm rest. Here i'm removing the head rest inserts.

Once the leather was off, I noticed a lot of holes and spots missing foam. I used some hot glue to fill in the spots.


After the wife and I fought to install the leather over the rear arm rest, I noticed there was no opening for the cup holder. I'm pretty sure at this point with my entire hands in pain, I wasn't too happy they didn't bother to make the opening.

After making the opening and using some hot glue to secure the leather neatly inside the opening, I went to reinstall everything and realized, because the new leather is thicker, the trim cover for the cup holder was being pushed. It wasn't allowing the cup holder to open. I had to pull out the Dremel kit and shave enough of the trim piece to allow the cup holder to open.


Finishing the entire top half of the back seat. Making all the holes to re-install the center arm rest, head rest inserts and the seat belt holder. Not the easiest thing to try and feel for when the leather is thick. Luckily, we make the holes in the right places.


Day 1 down, back seats down. Now off to the front seats. The reason why my wife got me the kit.. Passenger seat bottom was torn.


I decided to start with the harder of the two front seats. The passenger seat has the weight sensor on the top half. It is super sensative to deal with. I took this picture as I pulled the straps off the side airbag. You can see part of the weight sensor. The entire back has sensors and wire's.

Fast forwarding, I wanted to get the front seats done. At this point my wife jumped in to help me. My hands were shot and bruised from doing the seats. I didn't take pictures of actual install process on the front seats. I did snap a picture of my wife going in with the X-Atco knife, doing the prep work for the installation of the new leather. Also key note here, instead of fighting the weight of the seat, I separated the top half from the bottom half by removing the (2x) 14MM bolts on each side of the seat. Made the job a lot easier.

Finally the seats are done, head rests installed and waiting for the final install, back into the vehicle. Snapped a few pictures before heading off to bed.


Install day! Finally happy to put my interior back together. Started with the door panels 1st. I assembled the arm rests back on.


Next, I installed the center arm rest and started taking the center console apart, to remove the shiftier. Once finished, I reinstalled everything back before putting the back of the vehicle together.


I took the vacuum out and started to clean up the interior, before installing the seats. I cleaned up all the plastic kick panels and the sides of the center console. I went to turn on my interior lights and was surprised they didn't work.. Well, great.. after testing the battery, I had a bad cell. I removed the battery, off to the store to get the replacement. Luckily for me, the Optima yellow top carries 3 year warranty. No cost to me. For those wondering how do you remove the battery from a supercharged TL, well simple;
OUT

IN

At this time, I had asked my wife to help me because it was getting super cold out and flurries were coming down. We hustled out the interior together and as we finished, it started to snow. I snapped a few photos of when It was done.


We rushed to put everything away, got back inside to TL to test everything and make sure there are no issues. The best feeling in the world, car starts, no warning lights no system errors.


Everything worked! Covered the car and figured it would be better to take better shots the next morning. So today, I took a few more shots of the interior.


Overall, they came out great. Leatherseats were able to match my interior pretty damn well. The seats feel much better and firm now. The quality is great and happy how it transformed my 2004 interior. Thank you for viewing, and happy New year!
Last edited by 04WDPSeDaN; 12-31-2016 at 11:58 AM.
The following 12 users liked this post by 04WDPSeDaN:
*.jpg (01-03-2017),
BreezyTL (01-06-2017),
CLtotheTL32 (12-31-2016),
DMZ (01-13-2017),
EvilVirus (07-31-2018),
and 7 others liked this post.
12-31-2016, 12:39 PM
#508
Moderator
iTrader: (3)
Holy hell what a process, but fantastic work! It looks awesome 
The following users liked this post:
04WDPSeDaN (12-31-2016)
The following users liked this post:
04WDPSeDaN (12-31-2016)
The following users liked this post:
04WDPSeDaN (12-31-2016)
12-31-2016, 01:39 PM
#511
iWhine S/C 6MT TL
Thread Starter
iTrader: (1)
Thank you buddy! Yeah man, I was reading the messages I got about doing it for others, I cringed inside. Very time consuming of a job. Killer on the hands to be honest. Removing the front seats out of the car without hitting any panels is also a huge pain in the ass. I removed all the kick panels and lower B pillar panel to assure they don't get scratched by the seat legs. Now I know why most shops will charge nearly a grand to install the kit.
Thank you man! I was going back and forth on the color options. I'm glad I went with the two tone setup.
Thank you J! I definitely struggled on this. I don't recall anyone enjoying doing seat work at Acura. We all disliked dealing with the removal of the leather, pretty much equally. The entire back seat was my 1st rodeo. Doing the entire interior in 2 days takes a massive toll on your hands. I think there's about 300-400 hog rings for all the seats. I really appreciate that my wife jumped in and helped. She did the drivers top half of the seat and said "F%*K this" "I don't know how you did the other seats.." Like I said, just very time consuming. My wife keeps saying she would have paid someone to do this, however, I knew I could do this myself and I rather not let someone else work on my TL. I gave up on the head rests. Paid a local upholstery shop to do them. Luckily, he cut me a huge break since it was "Slow" season for him. I appreciate the very kind words! My wife will be thrilled she got props.
Last edited by Steven Bell; 01-01-2017 at 05:06 PM. Reason: Merged Posts-use the Multi Quote button (middle icon in the lower right hand corner of each post) to make your responses look like this.

The following users liked this post:
04WDPSeDaN (01-01-2017)
01-01-2017, 05:09 PM
#513
Team Owner
iTrader: (2)
Join Date: Jan 2008
Location: Kansas City, MO (Overland Park, KS)
Posts: 36,545
Received 6,470 Likes
on
5,162 Posts
Wow....well done, young squire.
The following users liked this post:
04WDPSeDaN (01-01-2017)
01-01-2017, 07:58 PM
#514
iWhine S/C 6MT TL
Thread Starter
iTrader: (1)
01-01-2017, 08:07 PM
#515
Senior Moderator
Wow.
That is all.
That is all.
The following users liked this post:
04WDPSeDaN (01-02-2017)
01-02-2017, 06:35 AM
#516
iWhine S/C 6MT TL
Thread Starter
iTrader: (1)
The following users liked this post:
04WDPSeDaN (01-04-2017)
The following users liked this post:
04WDPSeDaN (01-04-2017)
01-04-2017, 09:35 PM
#519
iWhine S/C 6MT TL
Thread Starter
iTrader: (1)
Just kidding, my wife is putting them on next week.
01-05-2017, 07:28 PM
#520
Team Owner
iTrader: (2)
Join Date: Jan 2008
Location: Kansas City, MO (Overland Park, KS)
Posts: 36,545
Received 6,470 Likes
on
5,162 Posts
I'm jealous-my interior doesn't look that good!