XLR8 Engine Torque Damper: '04-'08 TL Manual
 02-22-2010, 10:05 PM
#41
"Let's Do This"
i kinda want one now.....but im going to see how the car feels wit the Xlr8 75a mounts, if i still feel like the engine moves too much then im def buying this. How long is installation time for a mechanic?

 Can't Wait!

 02-28-2010, 11:08 PM
#50
succesful install. It was very easy to put on. I did it from under the car. Just remove the plastic cover and you can swap it out with the stocker in 20-25 minutes. This takes in to account the time needed to adjust the height. Then after the install give yourself another 30min to tune it.
Here is a pic of the stocker next to the new one. (I did not put the bushing like that on the car, so don't worry, and the damper wasn't adjusted yet)

There was one thing that I really noticed about this damper. Let's say you're in 1st or 2nd gear. You accelerate lightly and then let off the go pedal, like you're in traffic. When you take your foot of the accelerator you can experience a bouncy motion. I thought this was a clutch thing. But it must have been the motor bouncing back and forth a bit. After the damper it doesn't happen anymore. I let off the accelerator, feel one bounce and then smooth. Not many bounces. I hope this makes sense.
I can still get the wheels to hop. Not as severe as before though. Before it felt like my doors would rattle off their hinges because the wheels hopped so bad. With the damper it reduced the hopping about 50%. Keep in mind I still have stock mounts. And I am running the damper with the softer bushings. I think I will install the stiffer bushings one of these days.
Also my shifts feel smoother. The bump I would use to feel when shifting was greatly reduced.
This damper is worth the money.
Here are a couple tips.
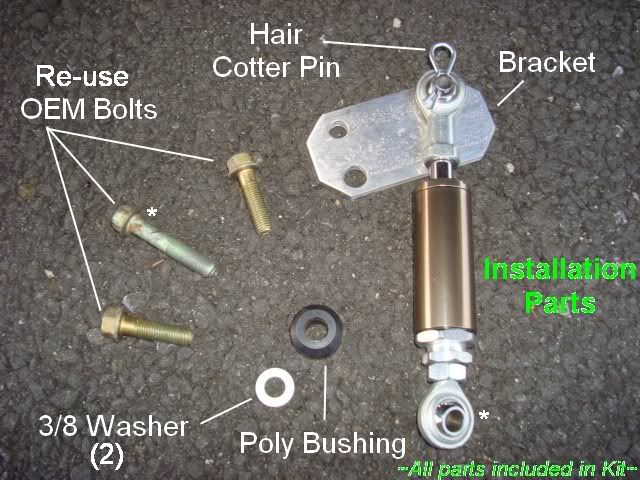
1)The two washers included with the kit need to be used with the two upper stock bolts. If you don't, then the bolts will be too long and bottom out before you can tighten them down on the plate.
2) Use locktite on the threads of upper shaft to keep the endlink form moving around. Tighten it with vicegrips on the shaft, other wise there is no way from keeping it from getting loose.

Here is a pic of the stocker next to the new one. (I did not put the bushing like that on the car, so don't worry, and the damper wasn't adjusted yet)
There was one thing that I really noticed about this damper. Let's say you're in 1st or 2nd gear. You accelerate lightly and then let off the go pedal, like you're in traffic. When you take your foot of the accelerator you can experience a bouncy motion. I thought this was a clutch thing. But it must have been the motor bouncing back and forth a bit. After the damper it doesn't happen anymore. I let off the accelerator, feel one bounce and then smooth. Not many bounces. I hope this makes sense.
I can still get the wheels to hop. Not as severe as before though. Before it felt like my doors would rattle off their hinges because the wheels hopped so bad. With the damper it reduced the hopping about 50%. Keep in mind I still have stock mounts. And I am running the damper with the softer bushings. I think I will install the stiffer bushings one of these days.
Also my shifts feel smoother. The bump I would use to feel when shifting was greatly reduced.
This damper is worth the money.
Here are a couple tips.
1)The two washers included with the kit need to be used with the two upper stock bolts. If you don't, then the bolts will be too long and bottom out before you can tighten them down on the plate.
2) Use locktite on the threads of upper shaft to keep the endlink form moving around. Tighten it with vicegrips on the shaft, other wise there is no way from keeping it from getting loose.
The following 2 users liked this post by NCTL05:
gilla_monster (01-28-2013),
treal512 (03-17-2017)
 03-01-2010, 12:17 PM
#56
Three Wheelin'
03-02-2010, 05:57 PM
#59
I have to add something. Now that I drove in morning and afternoon traffic today I REALLY noticed a big difference in the way the car drove. It is so much smoother shifting. And the car is even more predictable. It has better traffic manners too. This ETD is worth the money. All TL owners should get this cause it makes the car sooo much better to drive. Bravo XLR8!
03-04-2010, 10:45 PM
#60
Oh man, it's threads like these that have made me stay off of AZ for so long. I so want it. When someone has put this on a 5AT with stock motor mounts post up what you feel the difference to be. It's just to bad I'll have to drop an extra $75 to get the mount arm from the 6MT to do the install.
03-05-2010, 08:45 AM
#61
TYPE-S CBP MT
Join Date: Jun 2006
Location: Queens, NY
Posts: 415
Likes: 0
Received 0 Likes
on
0 Posts
03-05-2010, 09:42 AM
#63
TYPE-S CBP MT
Join Date: Jun 2006
Location: Queens, NY
Posts: 415
Likes: 0
Received 0 Likes
on
0 Posts
My fault, in pic 3 it just looks like that is the bushing being used to attach the damper.
 03-05-2010, 10:16 AM
#64
You are correct, that is a bushing in Pic 3. I thought I had mentioned earlier that we included the correct size bolt so that you didn't have to use a spacer (the bushing). The bushings were sent so that you have an alternative bushing for the damper. The bolt is correctly sized so you don't have to use the bushing as a spacer.
03-06-2010, 11:32 AM
#66
Intermediate

Join Date: Dec 2005
Location: Orange County, CA
Age: 39
Posts: 42
Likes: 0
Received 0 Likes
on
0 Posts
I have to add something. Now that I drove in morning and afternoon traffic today I REALLY noticed a big difference in the way the car drove. It is so much smoother shifting. And the car is even more predictable. It has better traffic manners too. This ETD is worth the money. All TL owners should get this cause it makes the car sooo much better to drive. Bravo XLR8!
03-07-2010, 10:41 PM
#68
succesful install. It was very easy to put on. I did it from under the car. Just remove the plastic cover and you can swap it out with the stocker in 20-25 minutes. This takes in to account the time needed to adjust the height. Then after the install give yourself another 30min to tune it.
03-08-2010, 11:24 AM
#70
Also it would affect the performance of the damper too. The harder the setting, the better the traction, better the wheel hop reduction, etc. Basically the results will be more gratifying the harder you set up the damper. You can go ahead and put the hard bushings in and set the damper to full hard to get best results, however you might have some vibration. Depends on your taste. This is hearsay cause I haven't done this yet, but I plan to soon.
 03-12-2010, 07:55 PM
#73
Cruisin'

Join Date: Feb 2010
Age: 40
Posts: 23
Likes: 0
Received 0 Likes
on
0 Posts
planning to take a trip to xlr8 tomorrow to hopefully pick up a damper and whatever other lower-price goodies they talk me in to..then install on monday or tuesday! you guys are open 12-5pm tomorrow, right?
03-13-2010, 02:10 AM
#74
Intermediate
Join Date: Dec 2005
Location: Orange County, CA
Age: 39
Posts: 42
Likes: 0
Received 0 Likes
on
0 Posts
03-14-2010, 11:10 AM
#77
Ok. So after two weeks of driving on the damper I could feel my car start to get sloppy again. So I figured something must have gotten loose. Once off the car I could move piston rod in and out slightly vs. before when I couldn't move it at all. So something was indeed loose. I took the damper apart to check everything. I found that this little guy...

had become loose inside the damper and was causing the slack. I suggest that everyone that gets the damper should open it up and put some loctite on this part and really tighten it. Then re-assemble the damper and you should be good to go. Assembly is easy. Here are some pics of the order that things go in the damper.


After getting this situated and putting the damper back on my car feels tight again and just like it did when I first put the damper on.
And to clarify something. The red bushings are the hard ones, which is what the damper comes shipped installed with. Not the soft ones. I had to call Josh to clarify since he previously told me that the soft ones were what was in the damper to begin with. So to clear up a previous post of mine... There isn't really any cabin vibration with the hardest setting in the hard bushings. At least not that I can make out.
had become loose inside the damper and was causing the slack. I suggest that everyone that gets the damper should open it up and put some loctite on this part and really tighten it. Then re-assemble the damper and you should be good to go. Assembly is easy. Here are some pics of the order that things go in the damper.
After getting this situated and putting the damper back on my car feels tight again and just like it did when I first put the damper on.
And to clarify something. The red bushings are the hard ones, which is what the damper comes shipped installed with. Not the soft ones. I had to call Josh to clarify since he previously told me that the soft ones were what was in the damper to begin with. So to clear up a previous post of mine... There isn't really any cabin vibration with the hardest setting in the hard bushings. At least not that I can make out.
The following users liked this post:
Bun_Bo_Hue (01-12-2013)
03-17-2010, 12:04 PM
#79
Safety Car

First id like to say thank you to Josh, second the damper and motor mount combo is absolutely amazing!!!!! To those of you with a 6MT who dont wanna go nuts on mounts or ur still underwarranty DO NOT sleep on this damper!!
The main reason the OEM mounts ( 99% of the time the rear or side) blow on the car is because the OEM damper is extreme garbage. I have been beating the living shit out of my car since i got done with the install this morning. came back to inspect if anything loosened or broke or shofted out of place..... and nothing, everything is in perfect position. now this car feels the way it was intended to feel right off the assembly line. except for my rack and thats next lol.
The main reason the OEM mounts ( 99% of the time the rear or side) blow on the car is because the OEM damper is extreme garbage. I have been beating the living shit out of my car since i got done with the install this morning. came back to inspect if anything loosened or broke or shofted out of place..... and nothing, everything is in perfect position. now this car feels the way it was intended to feel right off the assembly line. except for my rack and thats next lol.
03-17-2010, 12:07 PM
#80
Safety Car
oh and i took the damper apart last night.....and put blue loctite on every single thread inside and out....reassembled it this morning to the exact distance of the holes to line up. Im using and sticking to the red poly bushing on the damper....they feel great!

